JetFormBuilder is a super powerful form builder, particularly for dynamic content. Then, there’s JetEngine, which is easily one of the most versatile plugins in the WordPress world. It can take the place of a bunch of other plugins, making your setup significantly more efficient. So, what if they work together? Can JetEngine enhance JetFormBuilder’s capabilities even further? Yes!
In this article, I will walk you through the top 10 cool features that JetFormBuilder offers when combined with JetEngine.
💡 But to make this magic happen, please make sure that you have JetFormBuilder (even its free version) and JetEngine installed and activated on your website.
Table of Contents
- Populating Checkbox/Radio/Select Fields Dynamically
- Checkbox and Radio Field Layouts Based on Custom Templates
- Pulling Out Data From Glossaries and Option Pages
- Getting Related Items for the Current Page or User
- Fetching and Updating Remote Data Using REST API
- Updating Fields Based on Other Field’s Values of the Same Form
- Passing Additional Data or Displaying Messages Based on Query Results
- Applying Dynamic Visibility to Form Fields
- Updating Relations and Option Pages Based on Submitted Fields
- User Custom Dashboard for Membership Website
- FAQ
- Takeaway
Populating Checkbox/Radio/Select Fields Dynamically
JetFormBuilder has tools to dynamically populate fields based on website posts, terms, meta fields of the current post, and database fields, even without JetEngine.
When the JetEngine plugin is added, you can also add data from JetEngine’s multi-select fields and, what is even more interesting, from the custom query.
Here are five ideas when the functionality of populating fields dynamically is required:
- Job application form – choose among the vacancies in the chosen category. Hierarchical Select functionality will be more than helpful here as well.
- Event registration form – a user can choose the event to buy a ticket to or submit their application.
- Property inquiry form – a perfect solution for custom property listing websites.
- Guest post submission form – choose a category to submit a post there.
- E-commerce product inquiry form – select a product to inquire about details. Perfect for catalog websites.
Let’s see how such forms can be enhanced with the JetEngine and JetFormBuilder combo.
Getting options from JetEngine’s multi-select field
With JetEngine, you can create custom post types with custom fields that have a multi-select structure (Select/Checkbox/Radio field). Also, using the Meta Boxes functionality, you can add custom fields to default posts and users.
Add Checkbox, Select, or Radio field, choose “Generate Dynamically,” and “Get value list from JetEngine field options,” insert the name of the field, and you will see how values are pulled dynamically from the corresponding meta field.
Getting values list from JetEngine query
If you want to display only particular posts and fields in a multi-select field, you can create a custom query with Query Builder and use it as a source of options.
First, create a query in JetEngine > Query Builder. Let’s say I want to display only posts of the current user so they will be able to view them (great for membership sites). I will choose the post type and, using the “Current User ID” macro, set it to display only the current user’s posts. If you activate the Preview Query toggle, you can see the fetched result with the field names.
Now, I need to insert a query macro in Generate Dynamically > Get values list from JetEngine Query. My macro looks like this:
2|ID|post_titleWhere 2 is the query ID. You can find it in the browser’s address field:
yoursite.com/wp-admin/admin.php?page=jet-engine-query&query_action=edit&id=2;
ID – is the field that provides values;
post_title – is the field that provides labels for Checkbox/Select/Radio fields.
That’s why I’ve mentioned that you can preview the query so you can see the name of the field to insert in this macro. To learn more about generating queries dynamically, read this documentation.
This is what the process looks like:
NOTE
Using this method, you can also dynamically populate single-input fields (e.g., Text, Number, etc.). However, only the first value of the query will be fetched, and you should insert the macro on the Field Updater section on the right panel. Check this link for more details.
Checkbox and Radio Field Layouts Based on Custom Templates
Speaking about Checkbox and Radio form fields, I should mention that you can make them a bit fancier using JetEngine’s functionality for creating custom templates.
Go to JetEngine > Listings/Components and create a new listing for the post type or taxonomy you will use in the form or custom query if you fetch options based on a custom query. Create a listing template using Elementor, Block Editor, Bricks, or Timber/Twig.
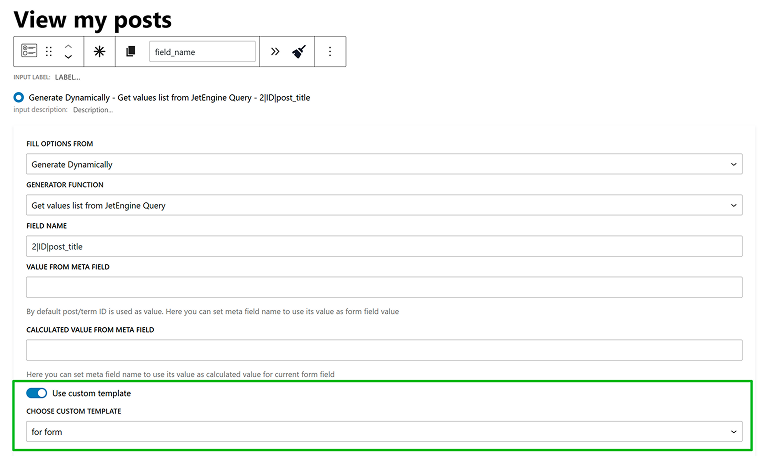
The key is to use images in the Check Mark widget for Checkbox or Radio elements instead of HTML (even though HTML is an option).
After that, go back to the form; in the Fill Options From field, select “Posts,” “Terms,” or “Generate Dynamically” (and then choose parameters for dynamic generation), and activate the “Use custom template” toggle. There, choose the listing template you’ve just created and enjoy the results. If you need more details, check out this video.
Pulling Out Data From Glossaries and Option Pages
With JetEngine, you can create global Option pages and Glossaries.
The first, Option pages, represent sets of meta fields not related to particular posts. They are stored in a dedicated global WordPress database table, so they are available globally. Thus, you can fetch these values from any form, page, or website section.
The second, Glossaries, is a JetEngine-specific post type that provides a set of values for Checkbox/Select/Radio fields that you can reuse in forms or create custom fields – e.g., lists of countries, membership options, etc., so you don’t have to fill them out again and again. Glossaries are also available globally for any form or post.
Let’s start with Option Pages. The values from their meta fields can be used in single-input fields (e.g., Text, Number, etc.). Create a field, and on the right panel, click the “+ Add Dynamic Value” button. There, click on the database icon and choose Option Pages. Choose the option page and the particular field.
As a result, users will get certain fields prefilled, so they can either keep the dynamically generated value or change it.
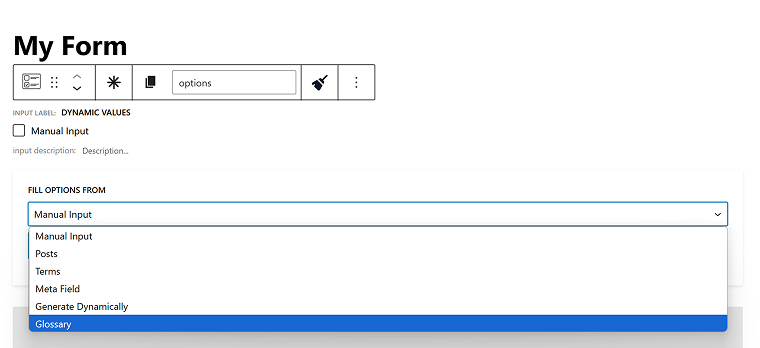
If you want to dynamically populate Checkbox, Select, or Radio fields, use the Glossary option – it’s available as one of the options in the field dropdown.
Getting Related Items for the Current Page or User
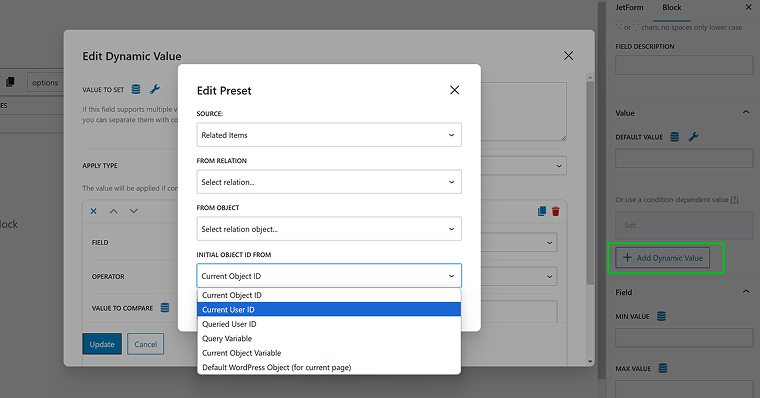
By clicking the “+ Add Dynamic Value” button, you can also choose the Related Items option. It will dynamically populate the field depending on the page where the form is inserted, the current user, or the query variable.
Certainly, you have to have Relations added first in the JetEngine > Relations and then establish connections between these post types, terms, or users.
Fetching and Updating Remote Data Using REST API
JetEngine is a very powerful tool when it comes to dealing with REST API. Using this tool, you can manipulate remote websites or applications. First, activate the REST API module in JetEngine > JetEngine.
Then, follow this comprehensive guide on how to fetch and update content between two remote websites.
Updating Fields Based on Other Field’s Values of the Same Form
Using the Field Updater free add-on and custom queries by JetEngine’s Query Builder, you can update fields based on the other fields’ values.
Getting related items depending on the chosen field
If you want to show options based on the previously chosen fields of the same form, this section is for you.
Let’s say I have a form where a user selects a resort. Based on the selected resort, the related bonus activities should be displayed. For example, if a customer wants to book a mountain resort, the customer should choose between snowboarding and skiing. If they want to book a beach bungalow, snorkeling and diving will be available as bonus options.
First, you should create Properties and Activities custom post types in JetEngine > Post Types. Then, add a relation between them in JetEngine > Relations.
Then, add content to both post types and connect particular Activities to corresponding Properties (available in the post editor, at the bottom of the editor).
Now, install the free add-on I’ve mentioned above, then create a custom query for the Activities post type (as this is what should be displayed, depending on the previous choice of the Properties post type).
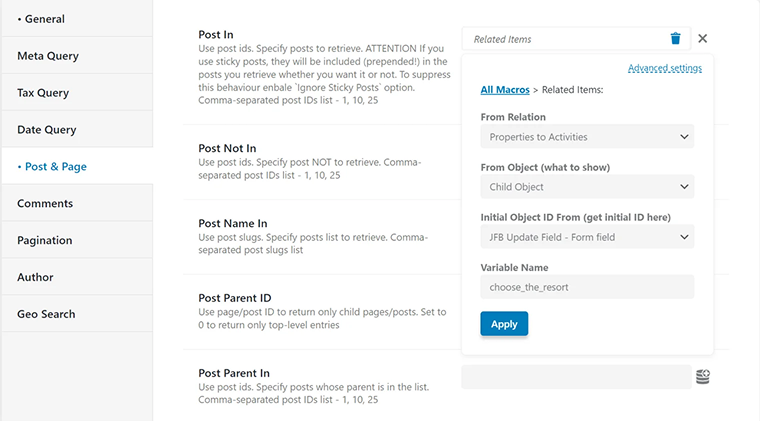
In the Post In section of the Query Builder, choose the Related Items macro by clicking on the database icon. There, choose your relations, Child Object (as it will be displayed). Now, where the magic happens: in the Initial Object Id From field, select the “JFB Update Field – Form field.” In the Variable Name field, copy and paste the field name from your form, based on which the related items will be shown (in my case, it’s a field for choosing a resort).
Save the query, return to the form, and select the Getting values list from JetEngine query method, which I discussed earlier in this article.
One more thing left is to go to the editor’s right panel and open the Field updater section. Activate the toggle and paste the field name in the “Field to Listen” input; in my case, it’s the “choose_the_property” one, which is the same one I used in the query. This means that the form will fetch the value of that field and pull the related items.
💡 Read the detailed guide on how to implement it here.
Getting any data based on previous choice and custom queries
Using the method I’ve discussed in the previous section, you can fetch not only related items but also create a variety of custom queries by using the “JFB Update Field – Form field” option in query settings. You can populate not only Checkbox/Select/Readio fields but also text, number, and repeater fields – please check out this detailed guide.
If you want to create your own custom coupon system, this article is what you are looking for.
Passing Additional Data or Displaying Messages Based on Query Results
What if you use discount codes for eCommerce forms and want to show error messages if the user enters the wrong code?
Or, imagine you want to offer a discount or special bonus if certain conditions are met (e.g., the customer purchases more than three items).
This free add-on is exactly what you need.
💡 Read the detailed article on how to use it.
Applying Dynamic Visibility to Form Fields
JetEngine has a very powerful Dynamic Visibility tool, and it works with JetFormBuilder fields and sections as well. First, activate the module in JetEngine > JetEngine. After that, the eye icon will appear on each field settings panel. You will get a huge number of options there: you can set dynamic visibility based on current or related posts, users, time, date, and queries, and you can fetch these values dynamically as well. And, of course, you can combine the visibility conditions.
‼️ Don’t mix up the Dynamic Visibility functionality by JetEngine with the Conditional Visibility by JetFormBuilder. The first one is about global conditions (e.g., current post, user, query, etc.), while the second one is about values of other fields of the same form.
Updating Relations and Option Pages Based on Submitted Fields
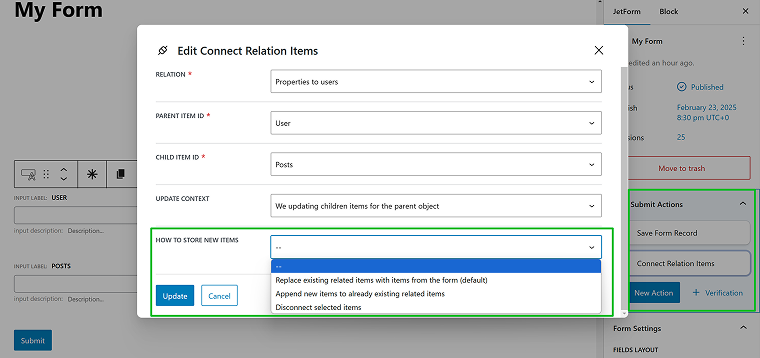
If you have any relation created on the website, a new after-submit action called Connect Relations Items will appear. There, you can connect, disconnect, update, or append relations based on the form field values.
Go to the JetForm tab on the right panel and click the “+ New Action” button. Choose the “Connect Relations Items” action, select a relation, the fields to update, and what will happen based on their values: new items will be connected, existing items will be disconnected, or the relation will be updated.
For example, you can use such functionality to create custom dashboards for multi-vendor marketplaces or membership websites, where users can edit elements using front-end forms.
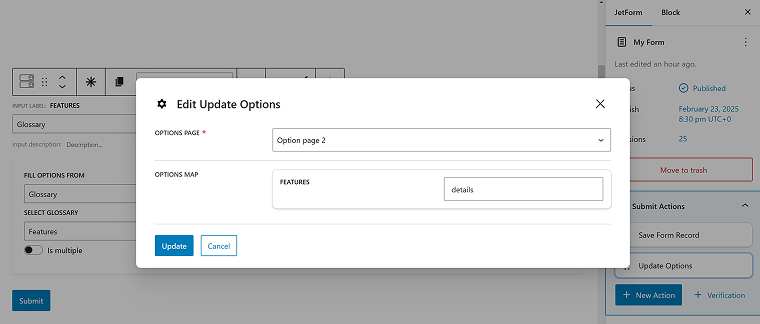
You can update the Option page fields as well, using the Update Options after-submit action. The logic is the same as with updating relations, but here, we have just a few settings: you should choose the Options page and map the fields to be updated with the form field value.
User Custom Dashboard for Membership Website
Membership websites look good when they have custom dashboards. JetEngine has a Profile Builder module for creating advanced and highly customized membership sites and user dashboards. But JetFormBuilder is a must-have tool here. Using all the features this plugin offers alone and the powerful additional functionality it gets when combined with JetEngine, you have the freedom to create even the most advanced custom user dashboards.
💡 Check these articles to learn how to create custom dashboards with JetEngine and JetFormBuilder:
- Profile Builder and Custom Dashboards with JetEngine and JetFormBuilder;
- Creating a User Account Page with various dashboard structures.
You can also read the article about the best membership websites with Crocoblock Profile Builder and try it out using this demo site.
FAQ
JetFormBuilder is great for building dynamic forms, while JetEngine extends its capabilities by pulling data from custom fields, queries, and relations. Together, they allow you to create highly dynamic and interactive forms with advanced automation.
You can populate fields with data from JetEngine’s multi-select fields, custom queries, glossaries, or related items. This ensures that your forms always pull the latest relevant data.
Yes! By integrating REST API requests, you can fetch and update remote data dynamically within your forms, making them even more powerful for advanced applications like membership sites and automated workflows.
Takeaway
JetFormBuilder and JetEngine together unlock powerful dynamic form-building capabilities in WordPress. From populating fields dynamically and fetching remote data to applying conditional visibility and updating related content, this combo makes form automation seamless. Whether you’re building membership dashboards or interactive forms, these tools will simplify your workflow and enhance user experience. Ready to supercharge your forms? Start exploring these features today!

