I guess JetEngine’s real appeal is its flexibility. It provides a broad range of tools that let you shape your projects however you want, based on your creativity.
So, its Profile Builder module for WordPress membership websites really hits the mark, giving you all the tools you need to put together something awesome, almost without limitations.
So, it’s time to explore it.
Table of Contents
- Getting Started with JetEngine’s Profile Builder
- How to Create a User Profile with JetEngine Profile Builder
- FAQ
- Wrapping Up
Getting Started with JetEngine’s Profile Builder
JetEngine offers, except for the core functionality (which is already a lot), 19 modules that you can switch on and off for better performance and 27 free add-ons, which can be found here.
The Profile Builder module is really impressive, especially for advanced WordPress users who love to have all the aces and play them masterfully. Why? Because you have a lot of things, such as Relations, Dynamic Visibility, a unique and powerful Query Builder, Data Stores, REST API tool, and other cool things available in a frame of one plugin. Also, if you are an All-Inclusive Crocoblock subscriber, you can enjoy the whole ecosystem of plugins that reinforce and share data with each other. In this case, if you build a website with membership and user profile functionality as its central feature, you will appreciate the integration with JetPopup or JetAppointment for such websites.
Even if you have only JetEngine and a free JetFormBuilder, there’s a lot you can do by not only adding and updating users but also linking new related items via forms, submitting not only posts and CPTs but also CCTs to store user listings or portfolio content in meta fields without overloading the database. Certainly, you can charge members for their subscriptions and change user roles via forms so they can upgrade their plans.
Anyway, I guess you know the drill and how important it is to have a good ecosystem if your site is not just a simple landing page. So, if you have never heard about or tried JetEngine’s Profile Builder, welcome.
💡 Check Profile Builder in action. For a more advanced demonstration of its functionality, visit the Job Board demo site. Also, check the Car Dealer Marketplace for a bit more simplified functionality.
The good news is these two and the other 12 dynamic templates (premade websites) are available in the All-Inclusive subscription.
How to Create a User Profile with JetEngine Profile Builder
Typical User Profile plugins offer some shortcodes for a user registration form, then for log in/log out, redirection functionality, and probably user roles editor, plus something else. Such plugins are great and easy to use but definitely have limitations.
JetEngine’s Profile Builder offers a logic that is different from that of typical user profile or membership plugins. Also, it doesn’t have a user role editor or restricted content functionality (it has a dynamic visibility module, which is about individual blocks but not full pages or taxonomies). However, there are many free plugins for this.
The rest Crocoblock will do for you. So, let’s dig in and check the steps for setting up an advanced user profile functionality with JetEngine.
I suggest this workflow for creating a user profile with JetEngine.
In the illustrating videos, I will show you examples of user profiles created for two user roles: Company and Employee. That’s why you will see forms created for each of them and the subpages available for different user roles. This will demonstrate how it’s possible to create as many user roles as you want within the Profile Builder interface.
- Adding extra meta fields to Users if needed.
It’s important because the list of default WordPress users’ fields is quite limited; also, in some cases, it’s easier to work with custom fields, such as profession, user picture (instead of Gravatar), contact details, etc. Read this article to learn how to apply meta boxes to users.
⛏️ The tool to use – JetEngine Meta Boxes.
- Creating User Profile page structure.
In this step, create and assign pages for the User’s Account, User’s Public Profile (optional), and All Users Page (optional). To do so, create blank pages and select them from the dropdown in the Profile Builder > Pages tab. Also, choose the Template mode (you will most probably need a Content mode).
⛏️ The tool to use – JetEngine > Profile Builder > Pages tab.

- Creating forms for Users.
Here, we need a Registration form, a Profile Edit form, and any other forms you will need for your project and use in the next step. The logic is the following: anything users edit will be done using forms because the idea here is not to use quite an ugly and limited default WordPress user profile interface. So, instead, we create custom forms so Users will be able to edit the information about them, add posts (if allowed), etc. Based on the submitted information, new/existing meta fields and/or posts will be created or updated. Read this article to learn how to update users via forms.
📌 Note that you can not only update users’ profiles but also submit and update posts (e.g., with users’ listings, portfolios, and other content). JetFormBuilder, even in its free version, has full functionality for doing that.
⛏️ The tool to use – the JetFormBuilder plugin or the JetEngine Forms (Legacy – but it’s used in Profile Builder presets). However, it’s strongly recommended to use JetFormBuilder instead because it is much more powerful and has additional paid add-ons that offer even greater functionality.
- Creating subpages for User Accounts.
Now, it’s time to create subpages which will be components of the layouts for the pages we’ve assigned to the User’s profile structure in step 2. Go to the JetEngine > Profile Builder > Account tab. You will see the “Add Subpage” button and settings for redirection for unauthorized users. Start adding subpages for the user’s account (note that you can make a different set of pages, depending on the user’s role, because you assign the subpage visibility according to the role).
To design your subpages, use the dialog for adding templates right here. You can make them with Elementor (free or paid) or JetEngine’s Listing Template functionality. Set visibility for these subpages in the user’s menu so some can be hidden and accessed only by link. Also, drag and drop subpages in the order you want them to appear on the user’s account page.
📌 These subpages will almost entirely consist of forms because this is the area where the user can edit information about them and/or submit posts.
⛏️ The tool to use – JetEngine > Profile Builder > Account tab.
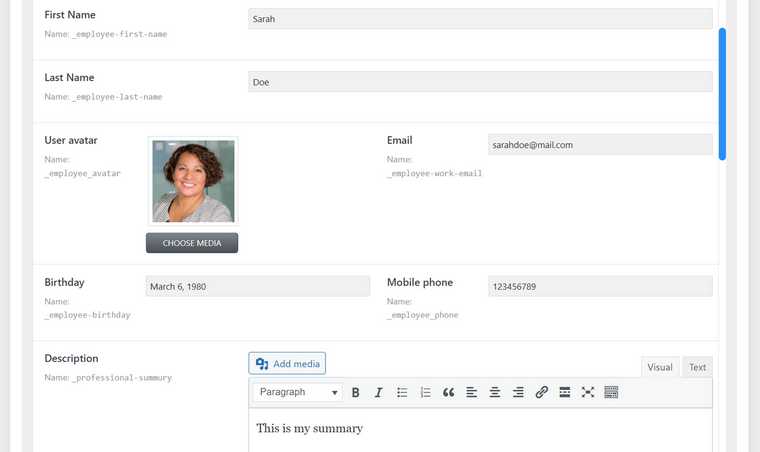
In this video example, I showed the “Personal info template” that is common for both Employee and Company user roles. The irrelevant blocks are hidden with the Dynamic Visibility tool. Alternatively, you can create different templates and assign them to the user roles on the Subpage settings in the User Profile Builder.
Also, I’ve demonstrated that dynamic fields with users’ data are fetched with the help of the Dynamic Field widget, and the forms for editing them open on pop-ups linked to the “Edit” buttons.
- Populating the Users’ Account Page (Members’ area).
Now that we have created all the subpages, it’s time to combine them on the User’s page — the page that the user sees after logging in. Don’t mix it up with the Public User Page.
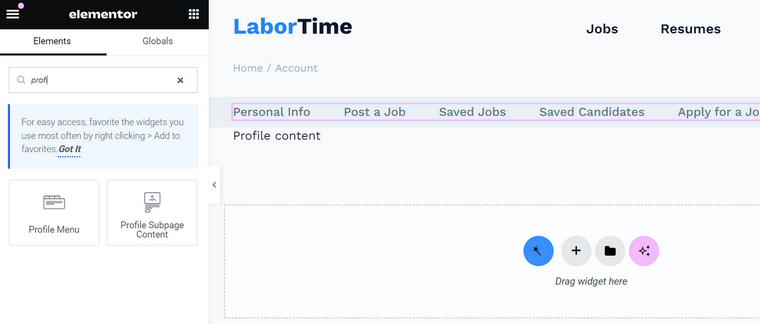
In step 2, we created a blank page for the user’s Account. Now, it’s time to add content there, namely, adding the user’s menu and subpages. The menu will be generated automatically, and the subpage templates we’ve already created in step 4.
There are “Profile Menu” and “Profile Subpage Content” widgets/blocks for adding these elements, which are available for Gutenberg, Elementor, and Bricks. So, place them, add all the necessary styling and headings, and enjoy the result.
⛏️ The tool to use – Gutenberg/Elementor/Bricks editor with JetEngine’s Profile widgets.
- Creating templates for Public User’s Pages (if you choose to have them).
If the users of your website are supposed to have a public profile like this, then it’s time to create it as well.
In step 2, we created a blank page for the user’s Public Profile. Now, it’s time to create a Template or templates for it. Here, we will also add subpages, as in step 4, but they will not consist of forms but instead fetch the dynamic content users already added using the forms.
If you want to display one field, e.g., a user’s email, use the JetEngine Dynamic Field widget. But if you want to show a loop of elements, like here in the Work Experience and Portfolio sections, create a Listing Template first and then fetch it using the Listing Grid widget.
Also, you can assign each subpage to a certain user role; thus, each of them can have a different layout for their public page. Examples: an Employee’s profile and a Company’s profile.
⛏️ The tools to use – Gutenberg/Elementor/Bricks editor with JetEngine’s dynamic content widgets and Listing templates for loops (Listing grids).
Use the same layout and design for the Account page and for the Public User Profile page; just add the “Edit” buttons and place forms for editing in pop-ups. Thus, the user will see exactly what their public profile page looks like right after editing.
This is an illustration of this tip:
📚 Read also:
- Creating a User Account Page with various dashboard structures.
- Membership website with Crocoblock.
- Top membership websites with Croсoblock Profile Builder.
- JetEngine Relationship use cases.
- Connecting relation items using forms.
FAQ
It’s a plugin or a module that adds functionality for registering users from the front-end forms and also provides them with a front-end user profile interface. It’s used for membership websites.
Sure, you can. You will need a User Profile Builder, as the one described above, and some tools for adding and editing user roles. Also, you might need a plugin to restrict content by pages or categories.
Wrapping Up
In this article, I’ve described the capabilities of JetEngine’s Profile Builder module in conjunction with the JetFormBuilder plugin for creating full-fledged user profiles. Using these tools and the guide, you can build membership or directory sites and monetize your WordPress projects.
Thanks to the JetEngine’s powerful functionality and other Crocoblock plugins, there’s a lot of space for your creativity.
