Profile Builder Overview
This tutorial reveals the Profile Builder functionality, with the help of which you can build a WordPress membership site.
Profile Builder is a tool of the JetEngine plugin that permits the creation of personal accounts for users and gives them the possibility to submit any information to the website from the front end.
This overview will describe how to activate the Profile Builder feature and explore the Profile Builder dashboard settings.
Activation and Presets Import Option
Activating Profile Builder
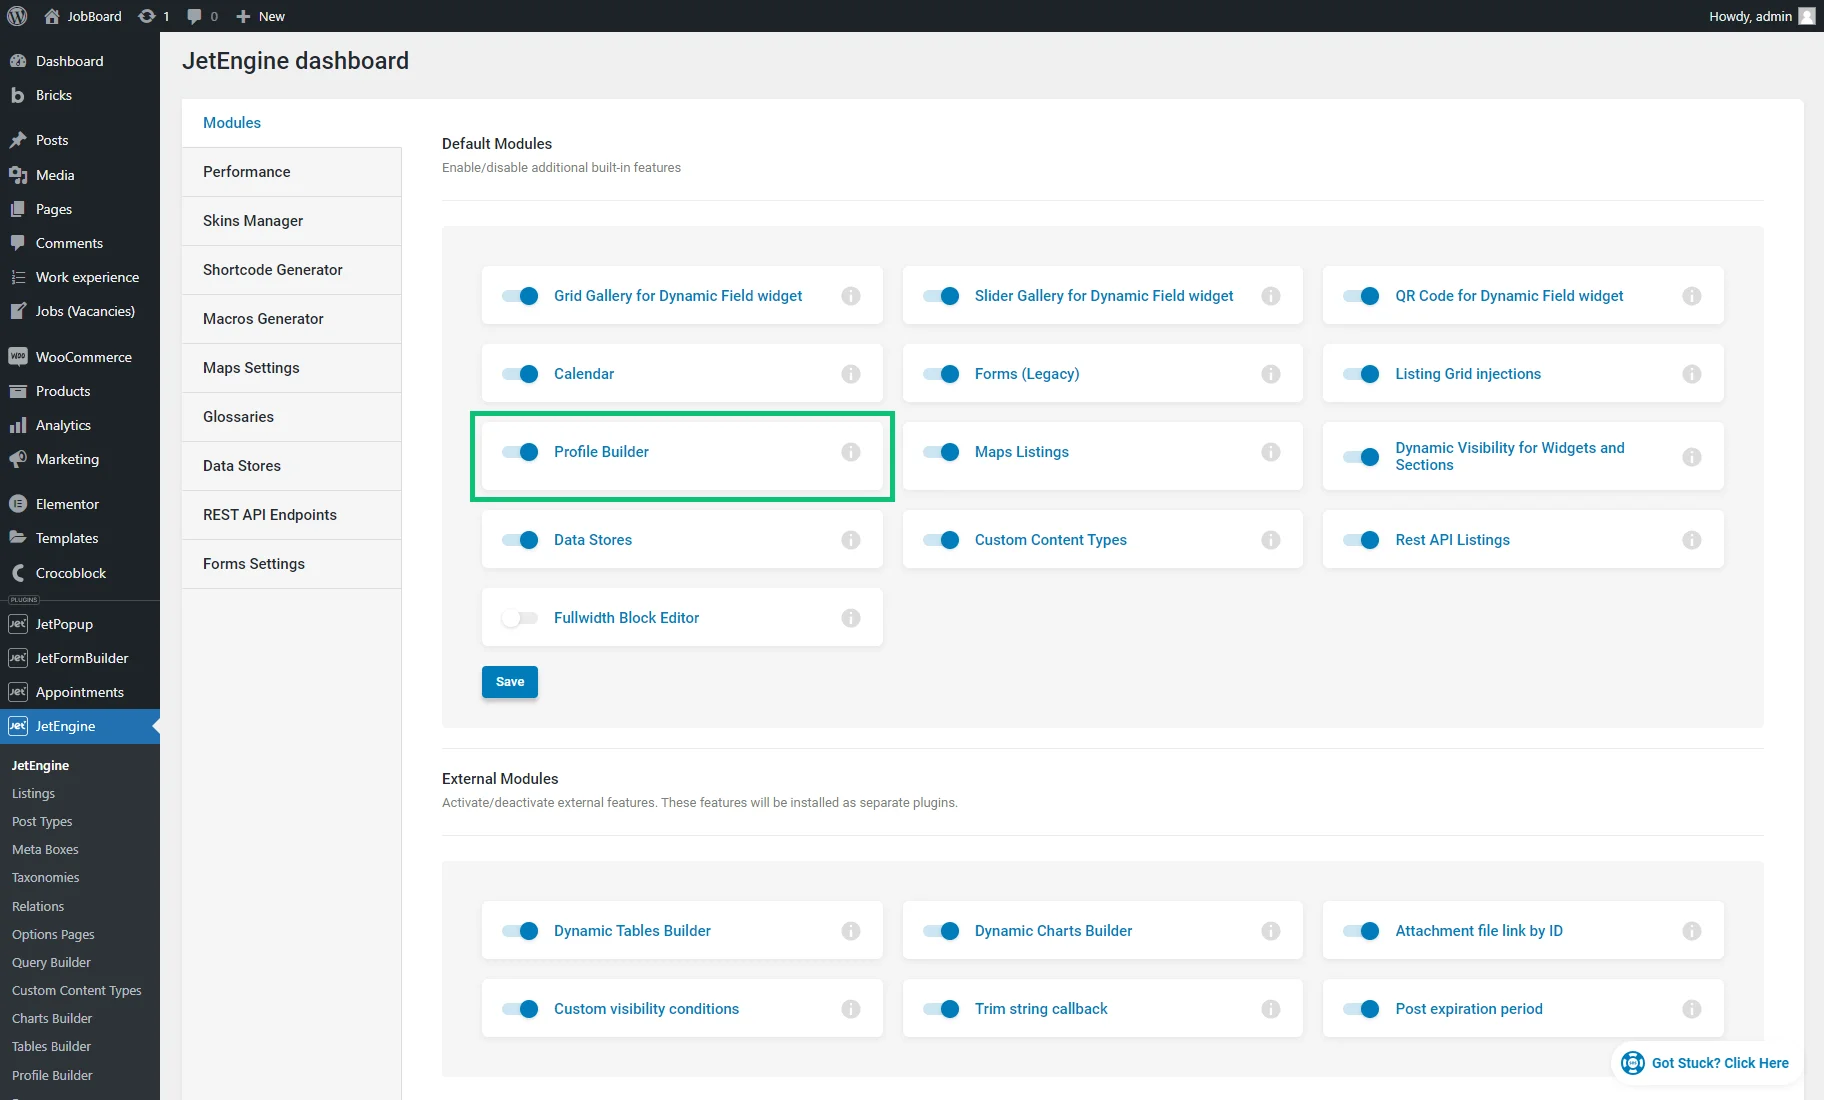
To start working with the Profile Builder feature, enter the WordPress Dashboard, navigate to the JetEngine tab, and click the JetEngine menu item.
The opened JetEngine dashboard window contains Modules available for activation. Turn on the Profile Builder toggle and click the “Save” button.
Exploring the Presets Import option
Once the Profile Builder module is activated, you can set it up to meet your needs. It is possible to import the pre-made configurations and modify them. Get the detailed information from the How to Apply a Preset for User Account Page tutorial.
In the Skins Manager tab within the JetEngine dashboard, unfold the Presets tab.
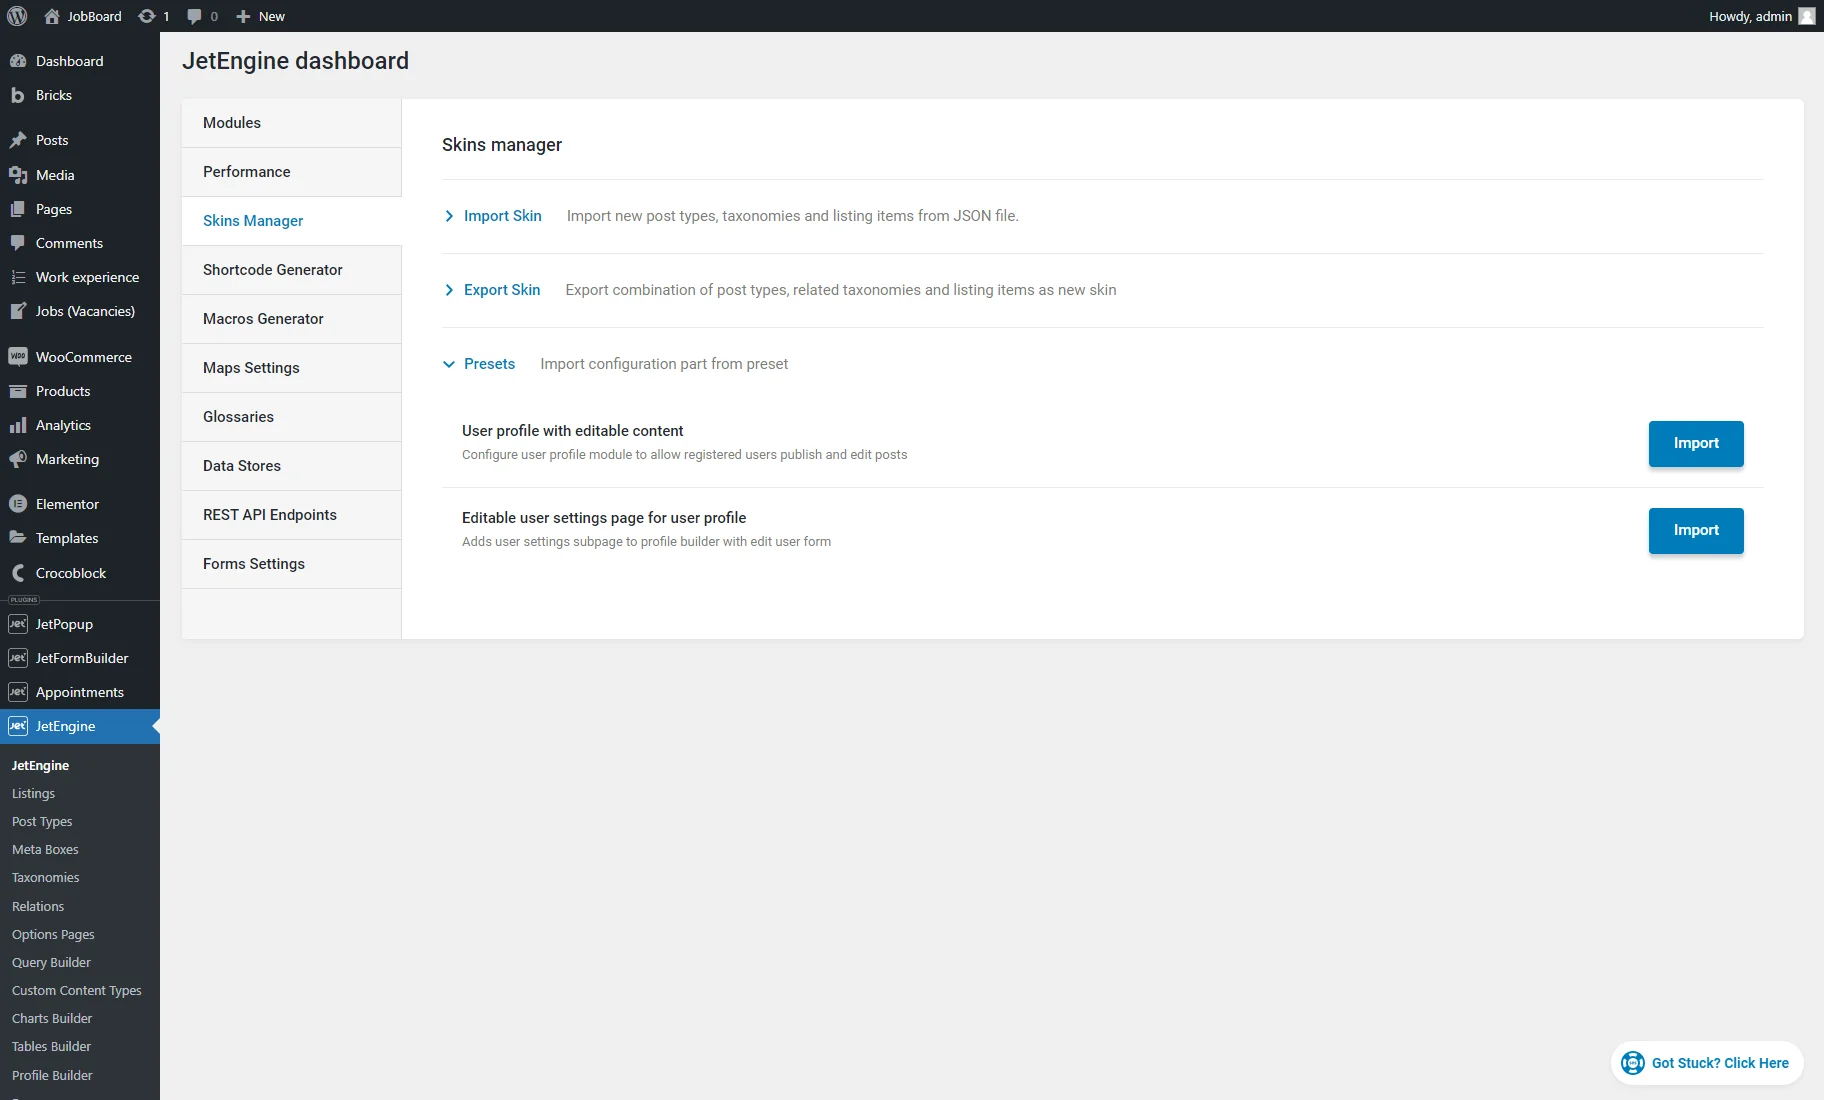
The Presets tab provides two options:
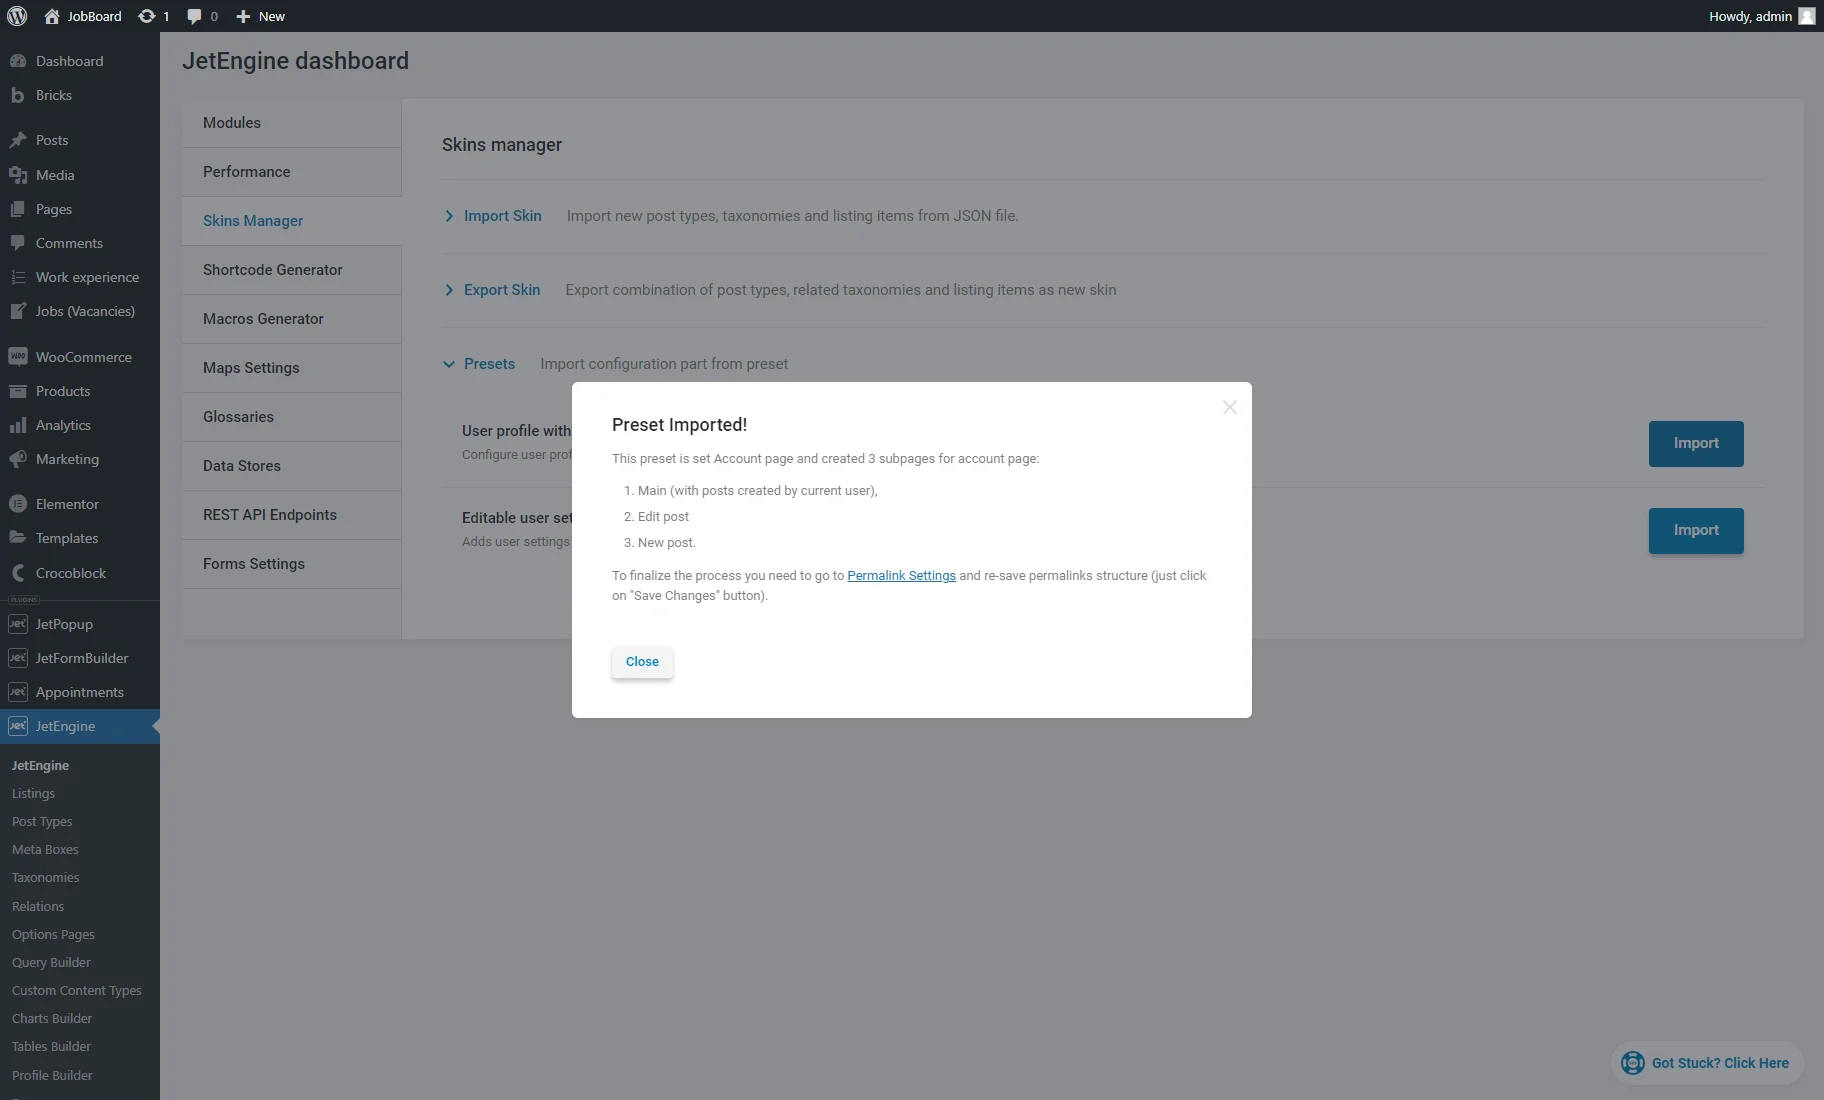
- User profile with editable content – clicking the “Import” button allows importing and configuring the Account page and subpages to your website. After the importing, a pop-up with the imported preset details will appear.
The Account page is located in JetEngine > Profile Builder > Pages. The “User Post,” “Add Post,” and “Edit Post” are Elementor templates in the Templates > Saved Templates tab. They are set as the account subpages in the JetEngine > Profile Builder > Account Page tab.
- Editable user settings page for user profile – this option allows importing the “Edit User” Elementor template, which can be found in the Templates > Saved Templates tab. Also, this template is set as the account subpage in the JetEngine > Profile Builder > Account Page tab.

Permalinks re-save
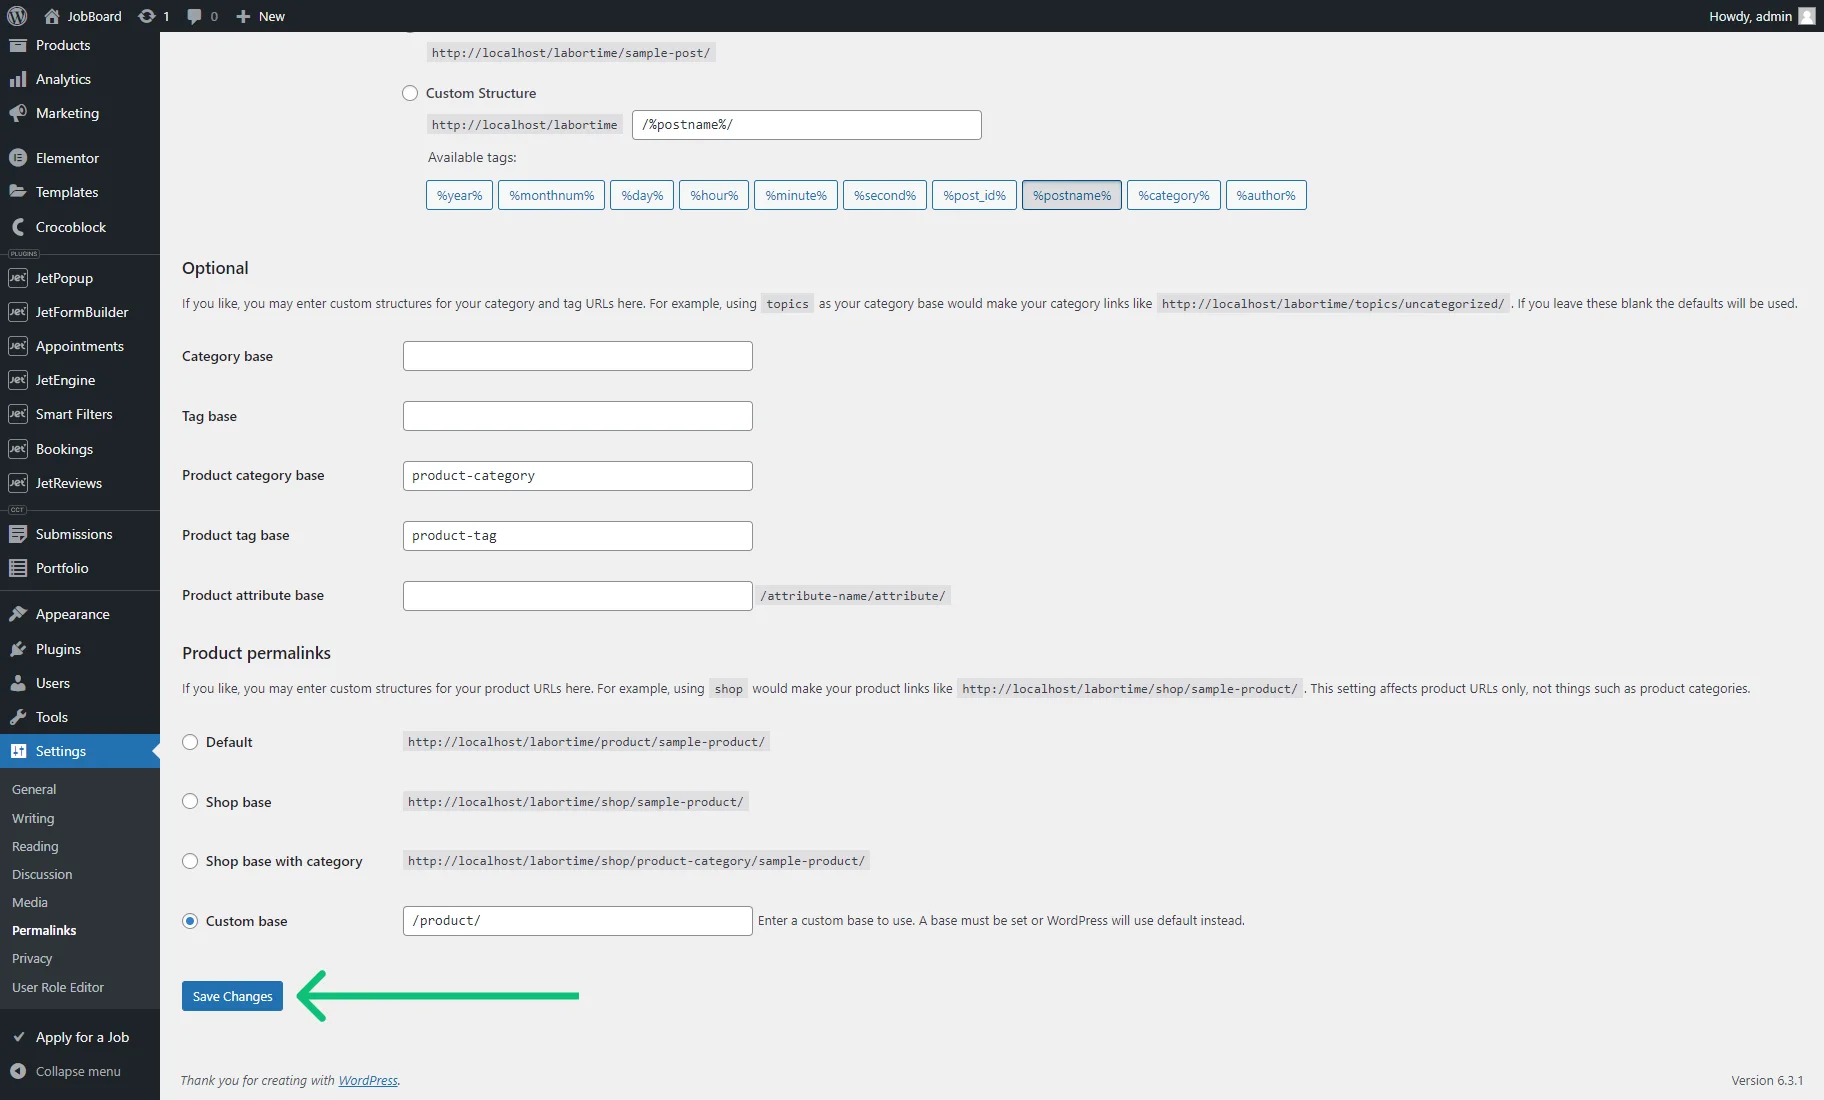
After importing presents, you should re-save the permalink structure.
Navigate to Settings > Permalinks and click the “Save Changes” button at the bottom of the page.
After everything is done, it’s time to observe the Profile Builder dashboard.
Profile Builder Overview
Navigate to the JetEngine > Profile Builder tab.
The dashboard contains three default tabs: Pages, Account Page, and Advanced. The User Page is also available if you’ve added a public page for a single user (as described in the User Page tab overview section).
Pages tab overview
This tab controls which pages your Profile will contain.
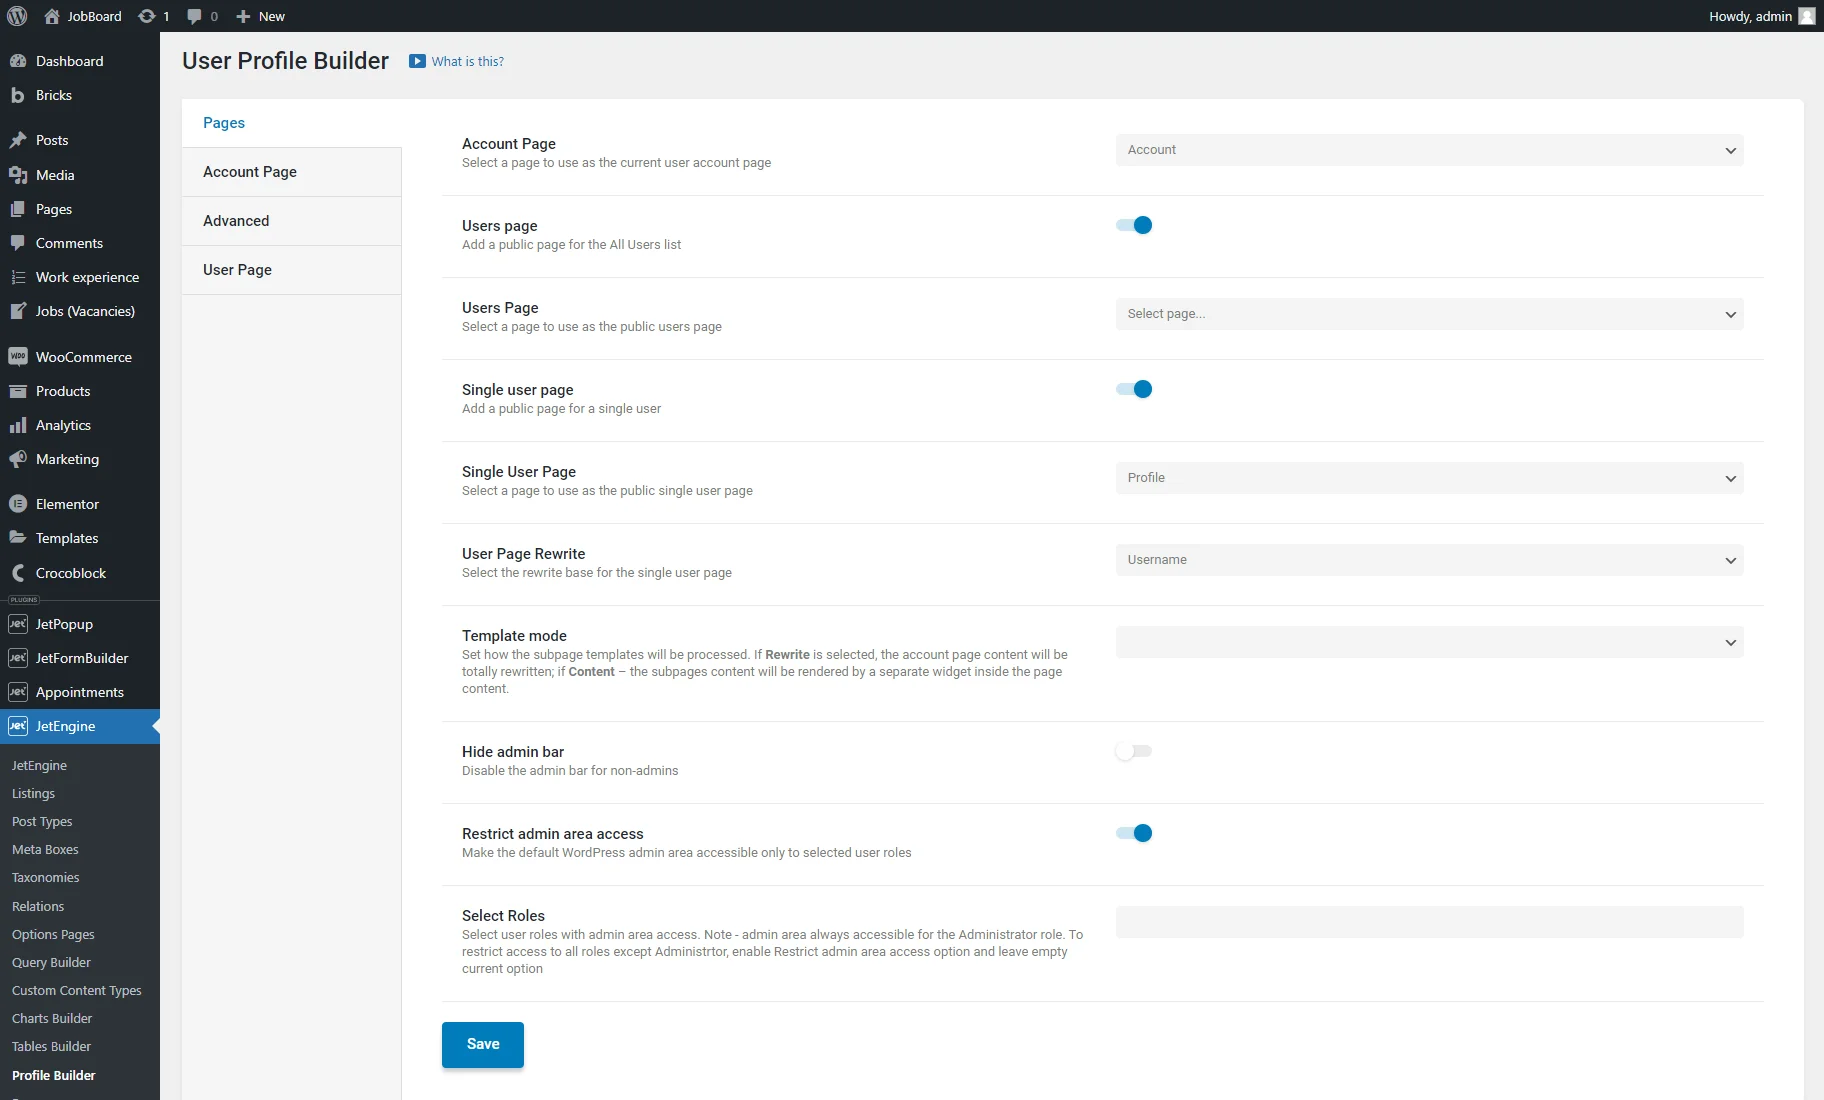
The following settings are provided:
- Account Page – here, you can select the page from the drop-down list to use as your Account page. If you imported the preset, this page would automatically be added to your dashboard;
- Users page – this option is for assigning a public Users page for displaying in the all users list;
- Single user page – you can also add a public page for a single user. Activating this toggle brings out the User Page Rewrite field with options on how to build the permalinks of the user’s public pages:
- Username – basic-URL/username;
- User nicename – basic-URL/user nicename;
- User id – basic-URL/user ID.
- Template mode – here, you can choose whether the templates of the Account’s subpages will be processed via templates or using page content:
- The Content option requires using the Profile Subpage Content widget or block on your Account or User page to display the content. The Profile Menu displays the titles of the subpage templates set for the Account or User page with the Profile Builder in the Account Page and User Page tabs. Content will be displayed dynamically with the Profile Subpage Content widget or block when users click the corresponding menu items;
- The Rewrite option stands for rewriting Account and public User pages based on the template content assigned to them. If the “Content” Template Mode is chosen, you need to add the Profile Menu once on the Account and User pages, but with the “Rewrite” Template Mode, you need to add the Profile Menu to every template. The advantage of the “Rewrite” Template Mode is that you can customize templates differently: you can place the Profile Menu in different places on different templates, and you can decide not to add the Profile Menu to some templates. Also, you don’t need to use the Profile Subpage Content widget or block.
Learn more about template modes from the Creating User Account Page With Different Dashboard Structures tutorial.
- Hide admin bar – enabling this toggle hides the admin bar for non-admin users;
- Restrict admin area access – enabling this toggle allows setting the user roles for accessing the admin dashboard in the Select Role bar. Leaving the Select Roles bar empty restricts access to the admin area for all users except administrators.
Once you set those pages up, don’t forget to click the “Save” button.
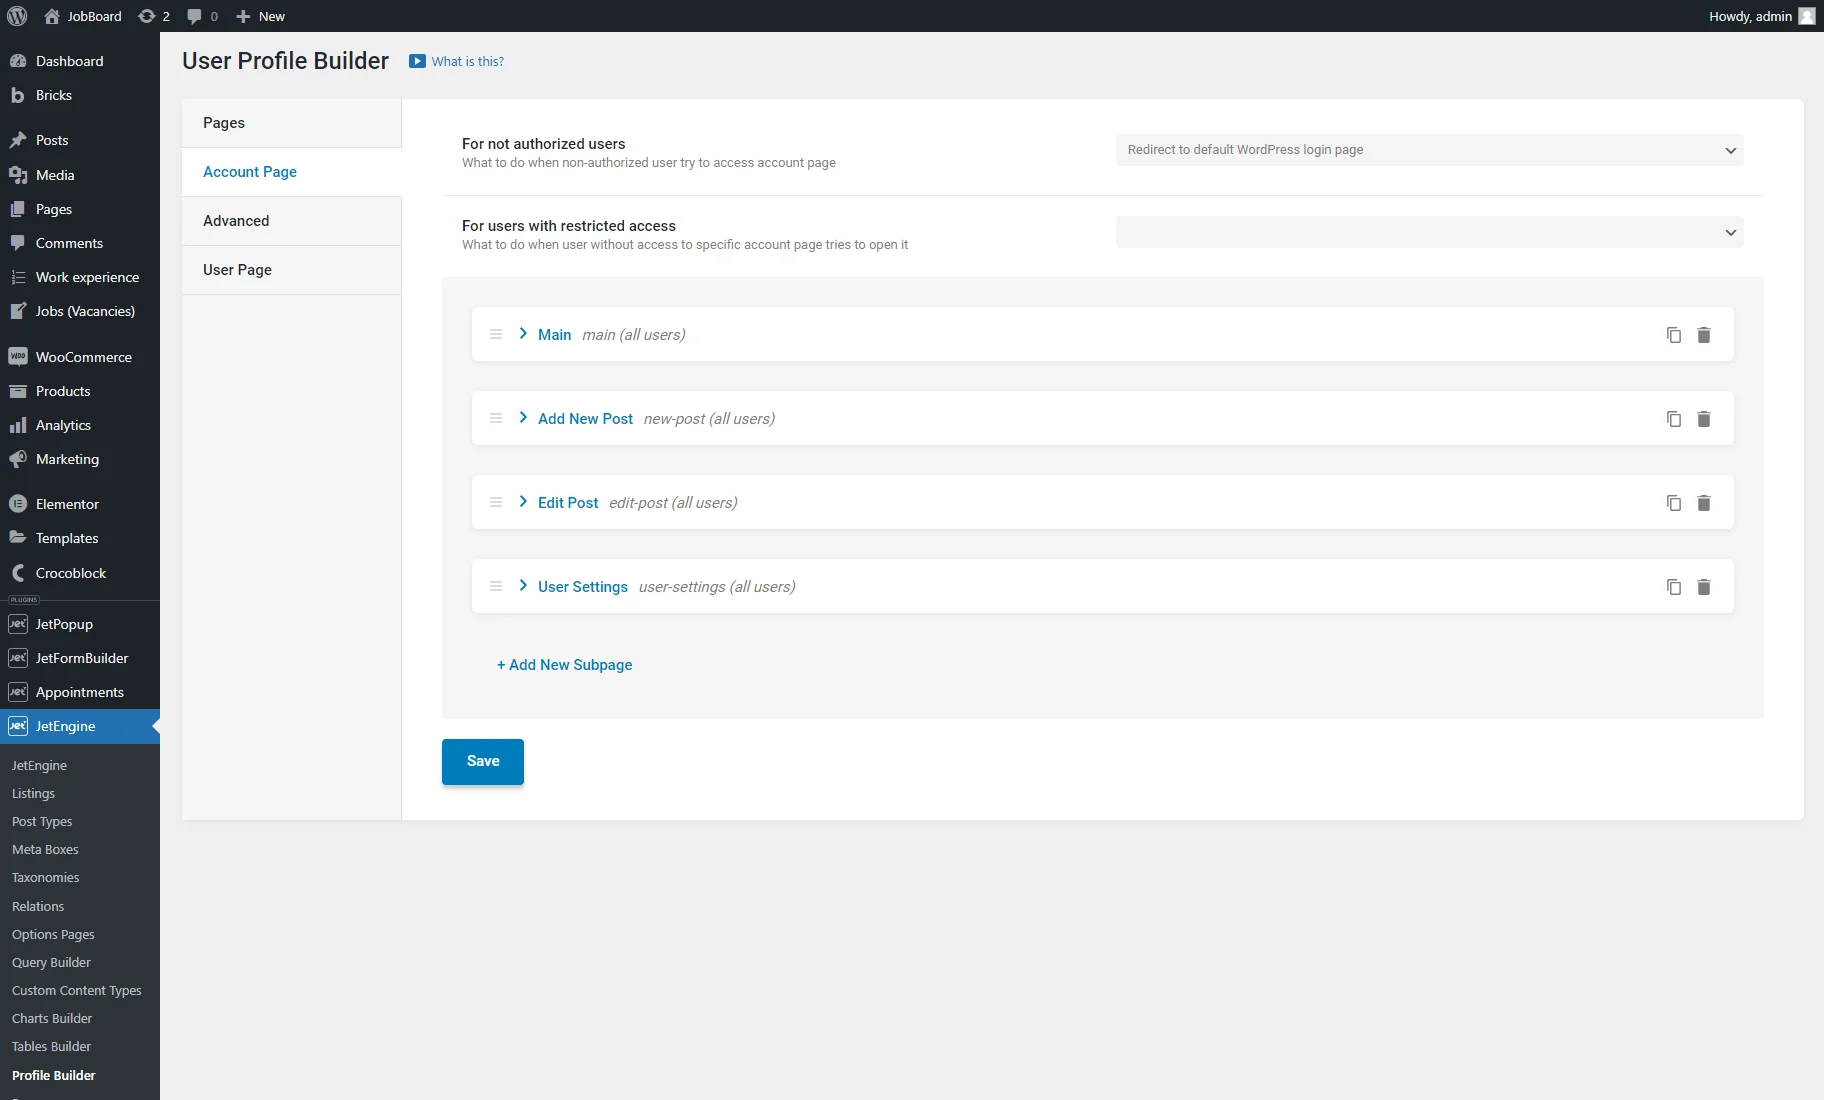
Account Page tab overview
This tab aims to build a structure for your future Account page and adjust its settings. Let’s examine it more closely.
First, you can select what needs to be done when non-authorized users try to access the Account page. There are three options:
- Redirect to default WordPress login page;
- Redirect to page (and set up the Redirect URL);
- Show template (and select Elementor/Listing Item template to show as page content).
Also, you can select what happens with users with restricted access:
- Redirect to page (and set up the Redirect URL);
- Show template (and select Elementor/Listing Item template to show as page content).
Further, there are tabs with the settings for the Account subpages. They can be imported in the JetEngine > JetEngine > Skins Manager > Presets tab (more detailed information can be found in the Exploring Presets import option chapter of this overview), or you can create new ones by clicking the “+ Add New Subpage” button. For the current overview, we imported Main, Add New Post, Edit Post, and User Settings Account subpages. They are fully editable (title, slug, page template selection).
The subpages contain the following settings:
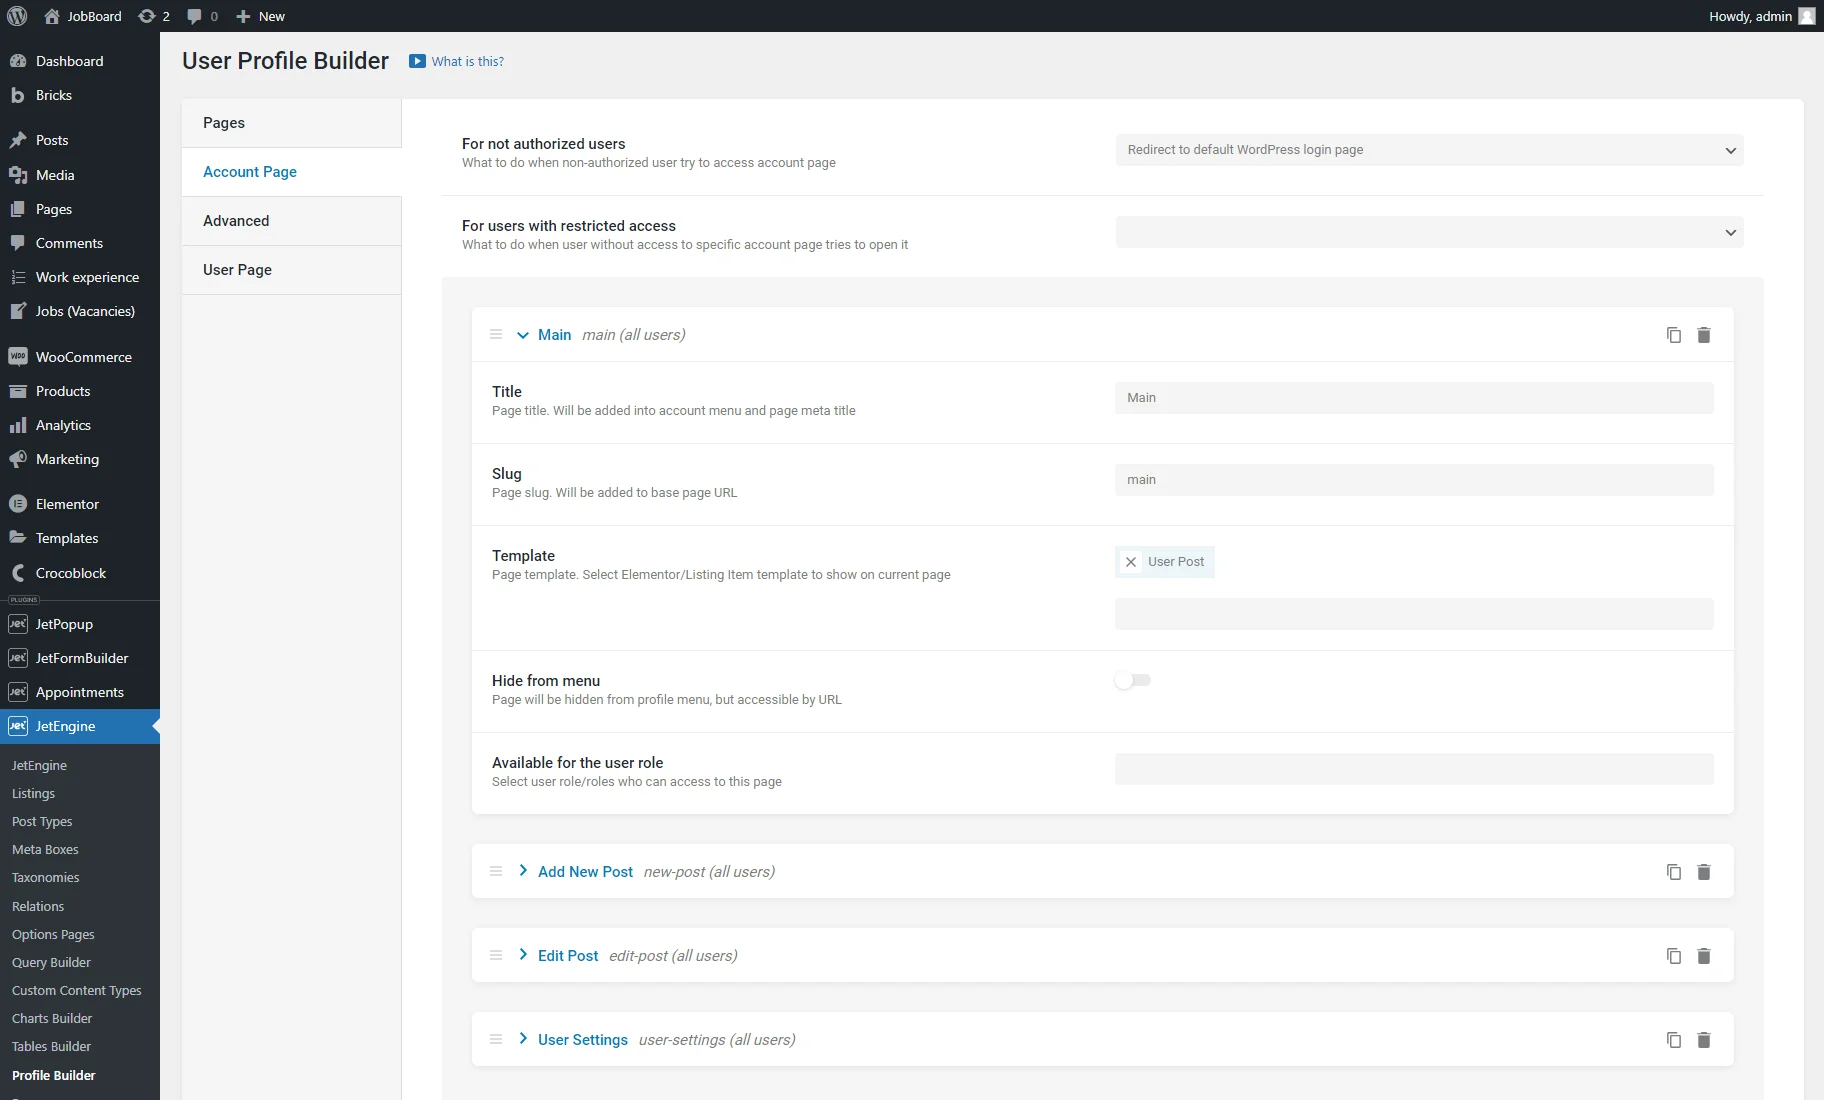
- Title. Set the title to display in the Account Profile Menu and page meta title;
- Slug. Create a unique slug. It will be added to the page URL;
- Template. Select a template created previously with the help of the Elementor Theme Builder or Listing item;
- Hide from menu. If enabled, the subpage will be hidden from the Profile Menu but will be accessible by URL;
- Available for the user role. You can define the user roles that can view and access the page. All the variants are listed in the drop-down menu, and you can select several roles if required.
When you finish customizing subpages, push the “Save” button.
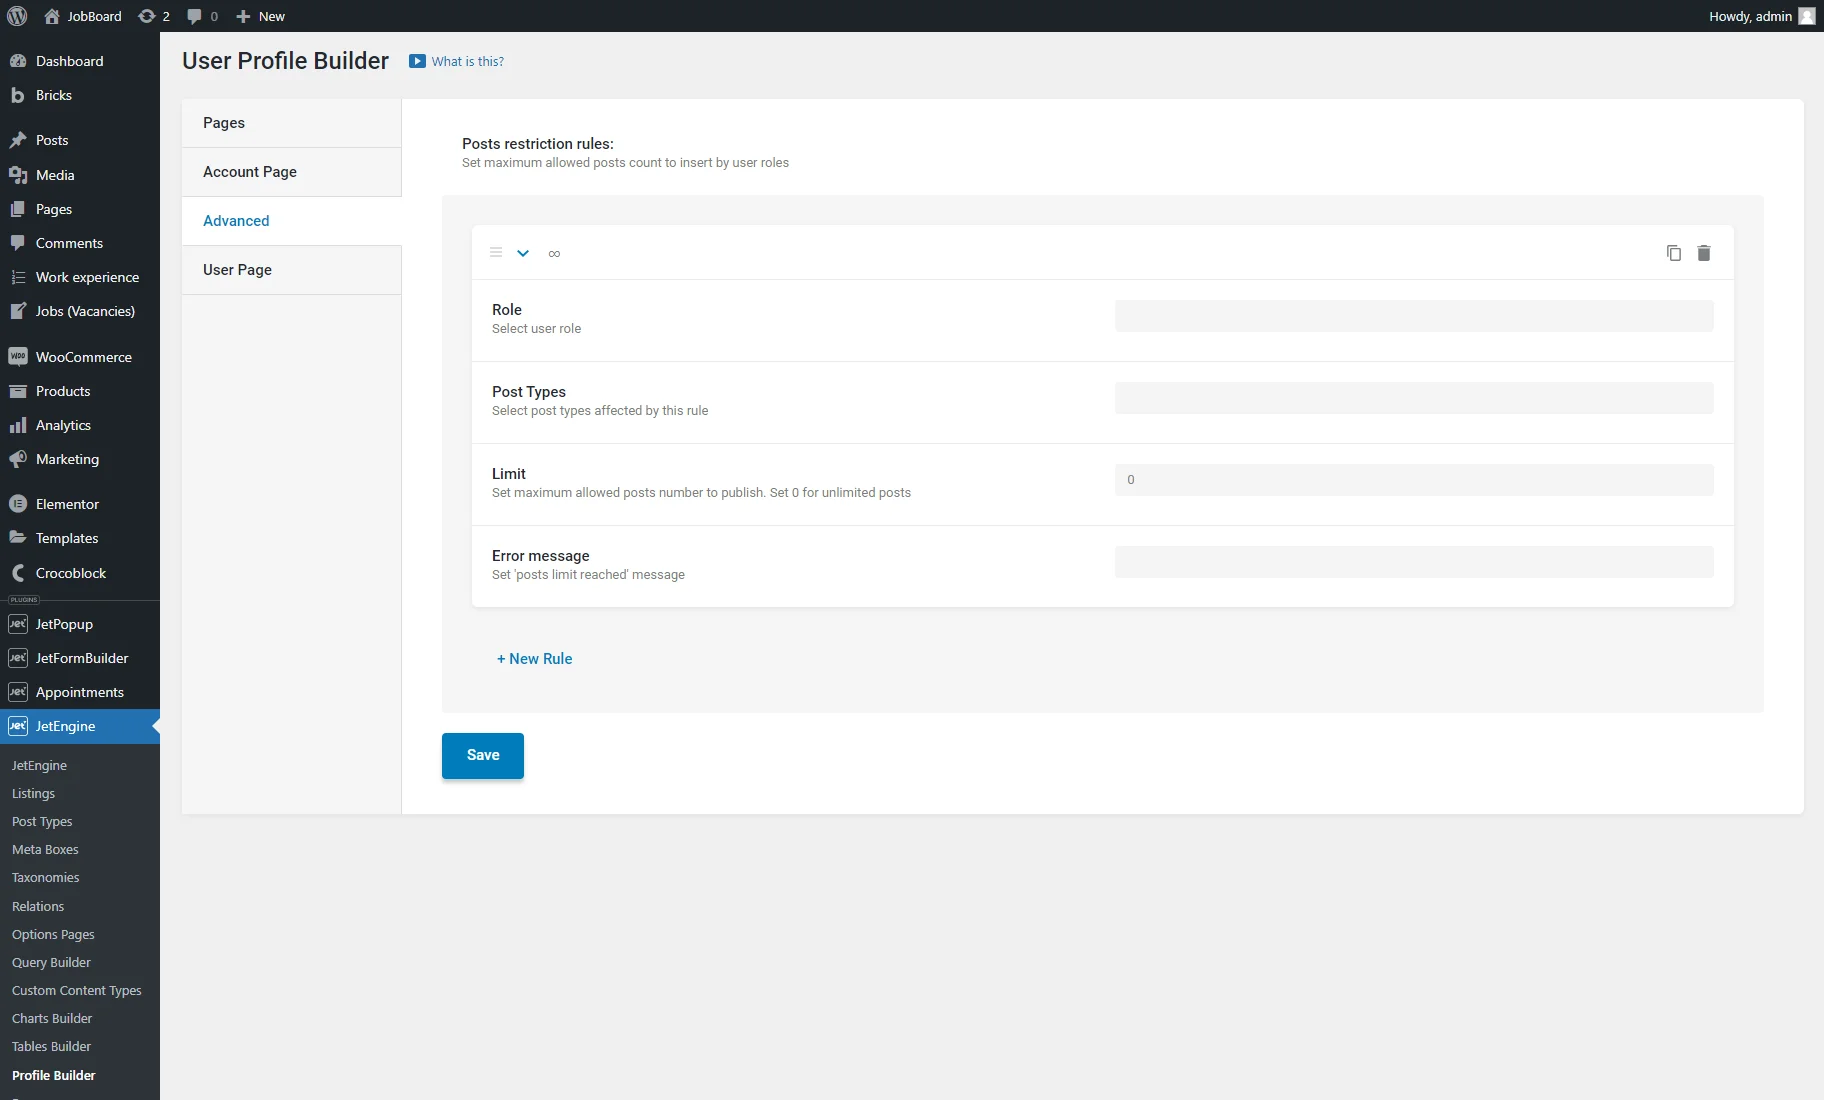
Advanced tab overview
In this tab, you can set the number of posts users can publish. It can vary by role. Click the “New Rule” button to examine the features.
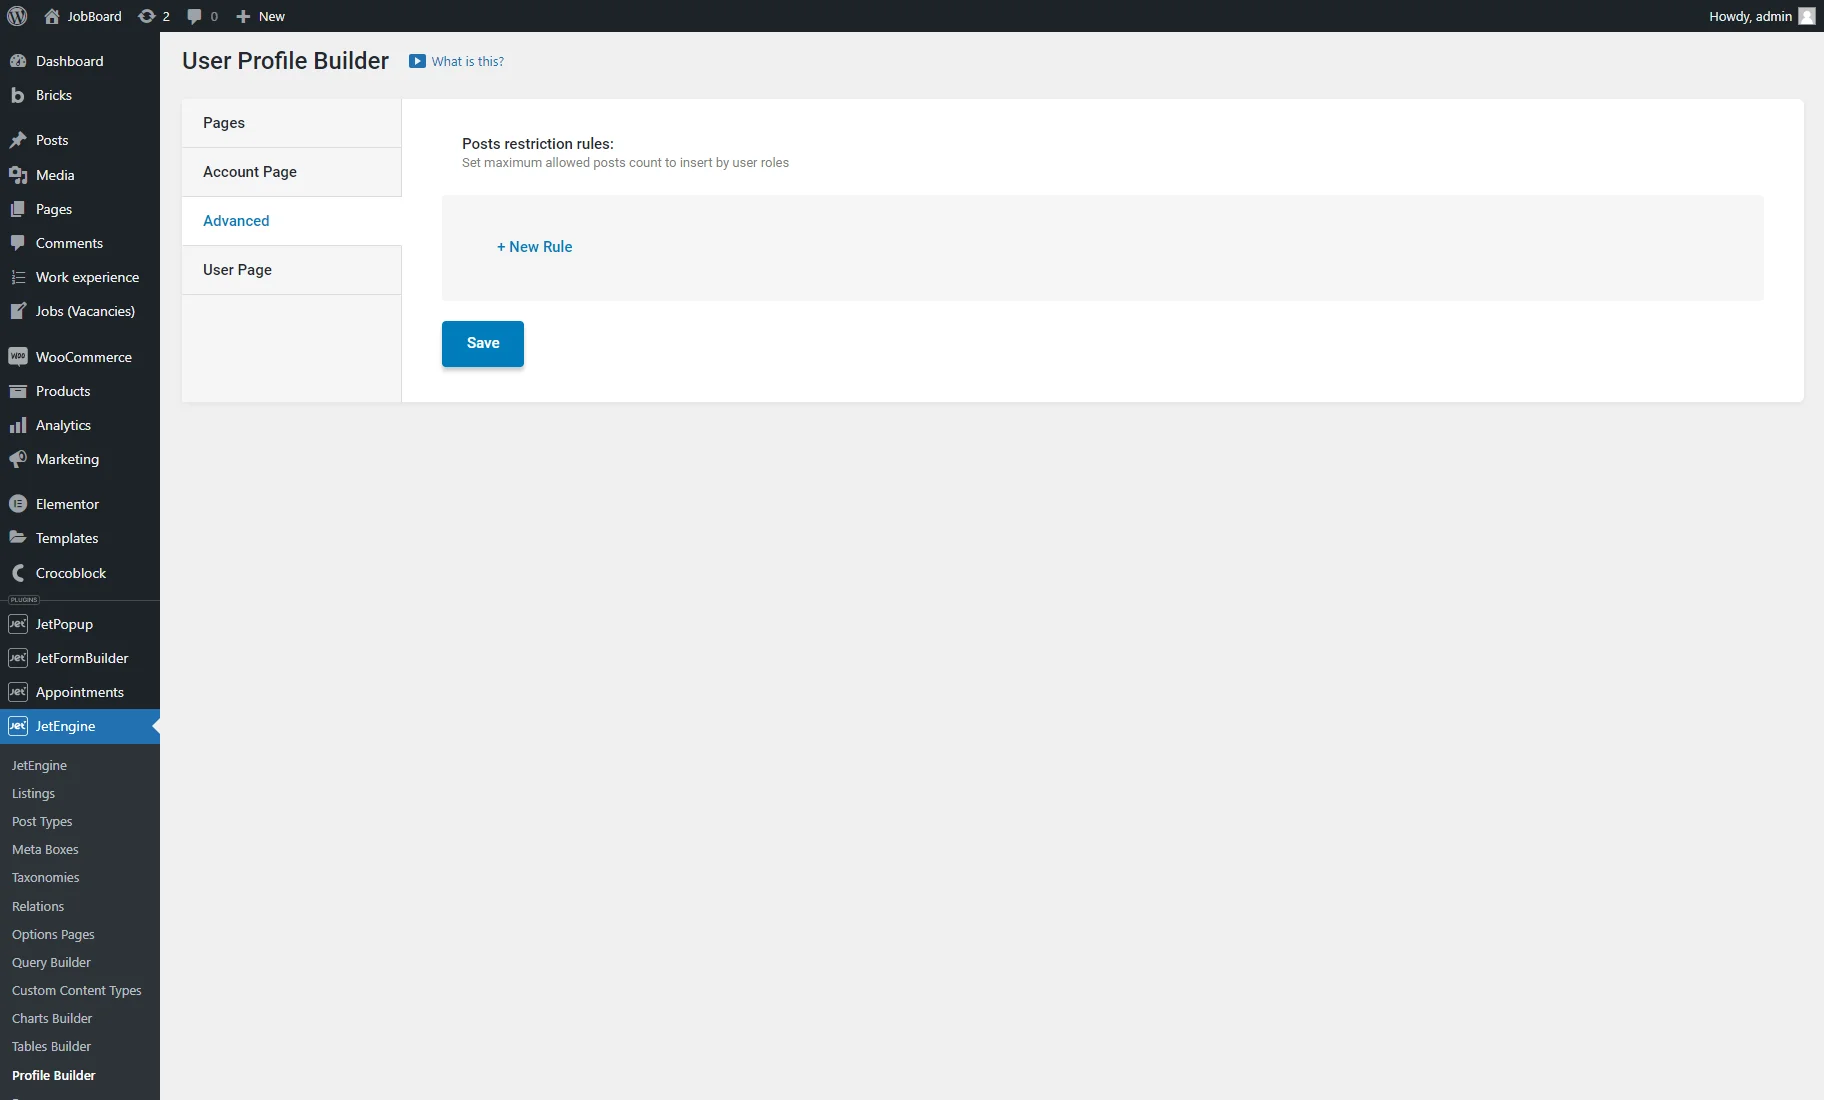
- Role. You can choose the role from the drop-down menu. All the roles you have created will be automatically added to the list;
- Post Types. If you choose a certain post type here, the number you set in the Limit field will define how many posts of such number of such posts of that post type the user can create;
- Limit. Type the maximum number of posts in this bar allowed for the chosen user role. For setting an “unlimited” amount of posts, type “0”;
- Error message. When a user tries to publish more posts than the defined maximum, they will receive a notification. Type the notification text into the text area.
To add more rules, hit the “+ New Rule” button. After setting the restriction rules, click the “Save” button.
User Page tab overview
The User Page tab is available if the Single user page option in the Pages tab is enabled.
This tab aims to build a structure for the Single User (Profile) page and adjust its settings. First, there are such general settings:
- User Page Title. Set the SEO title for the User page. Hit the coin-stack icon to open the list of macros you can use in the title;
- User Page Description. Set the SEO description for the User page. You can use the macros as well;
- User Page Image Field. Set SEO image for the user page. Select the needed user meta field from the drop-down menu to pull the image from.
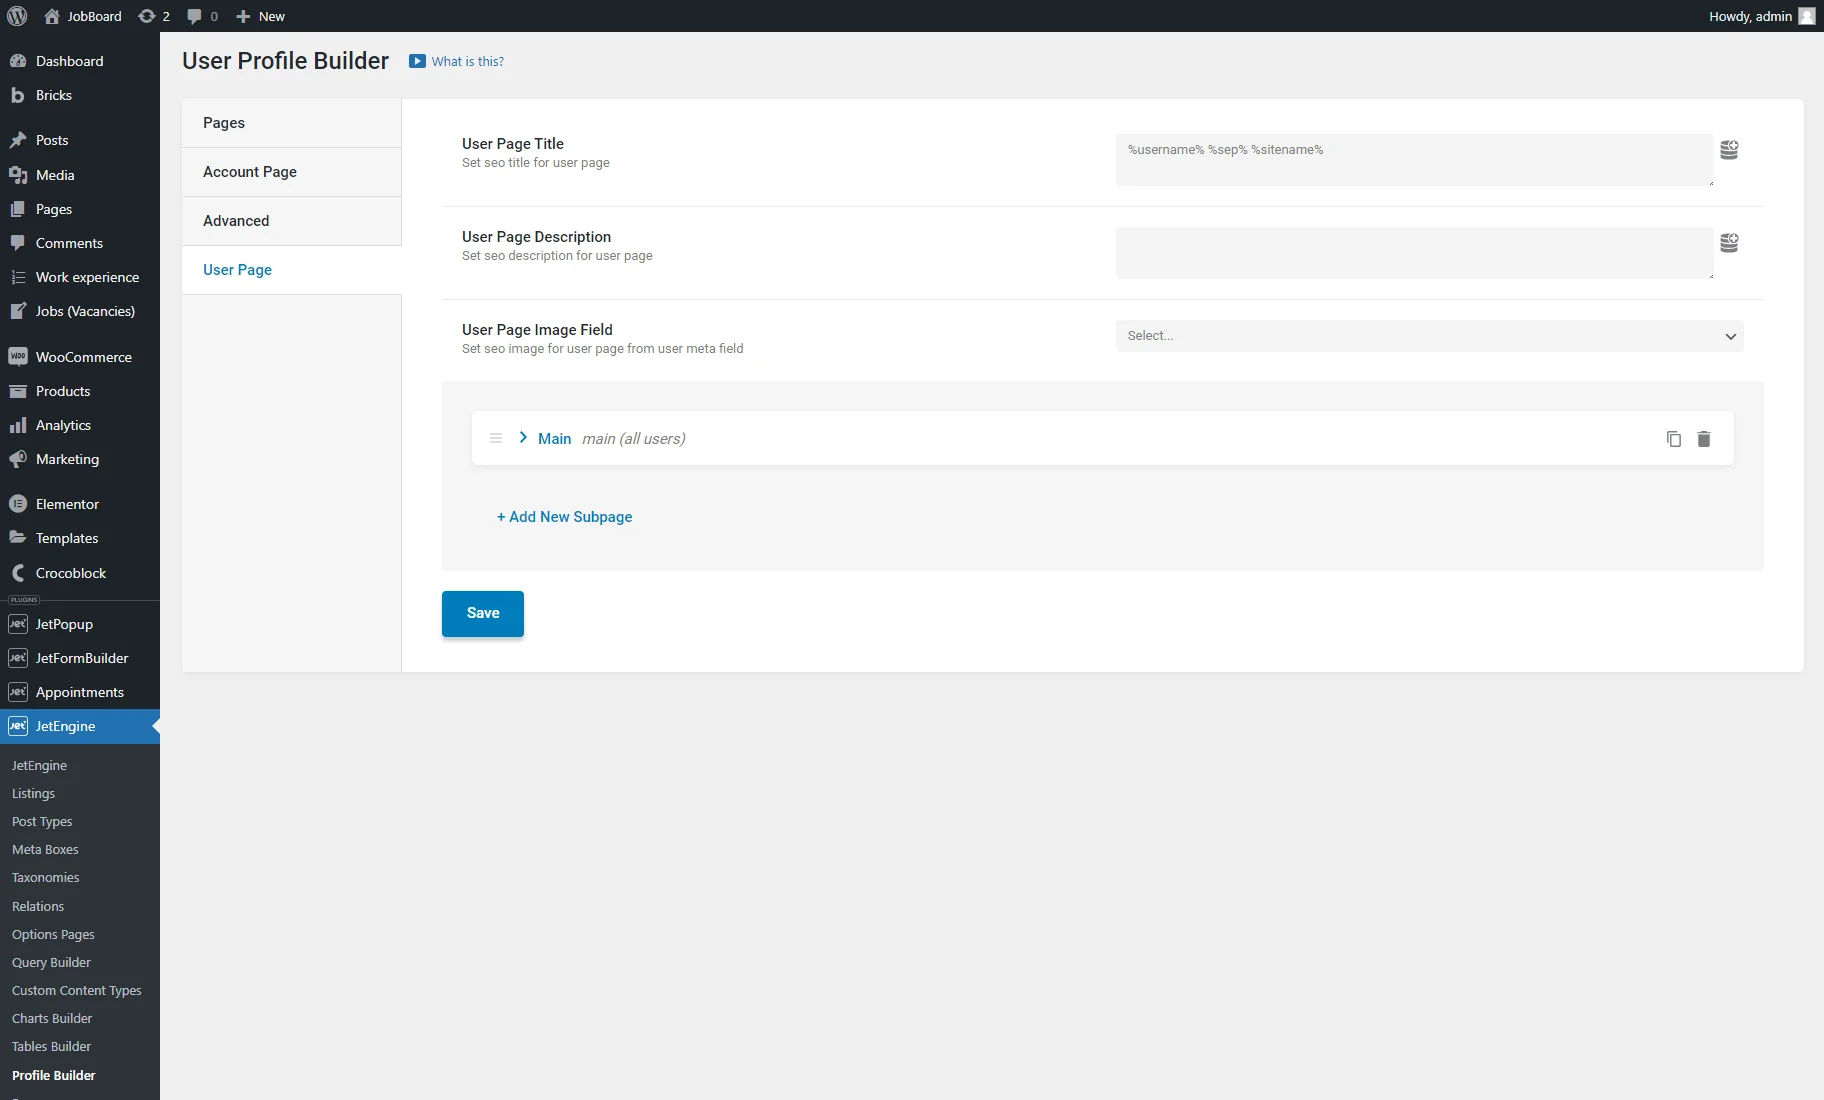
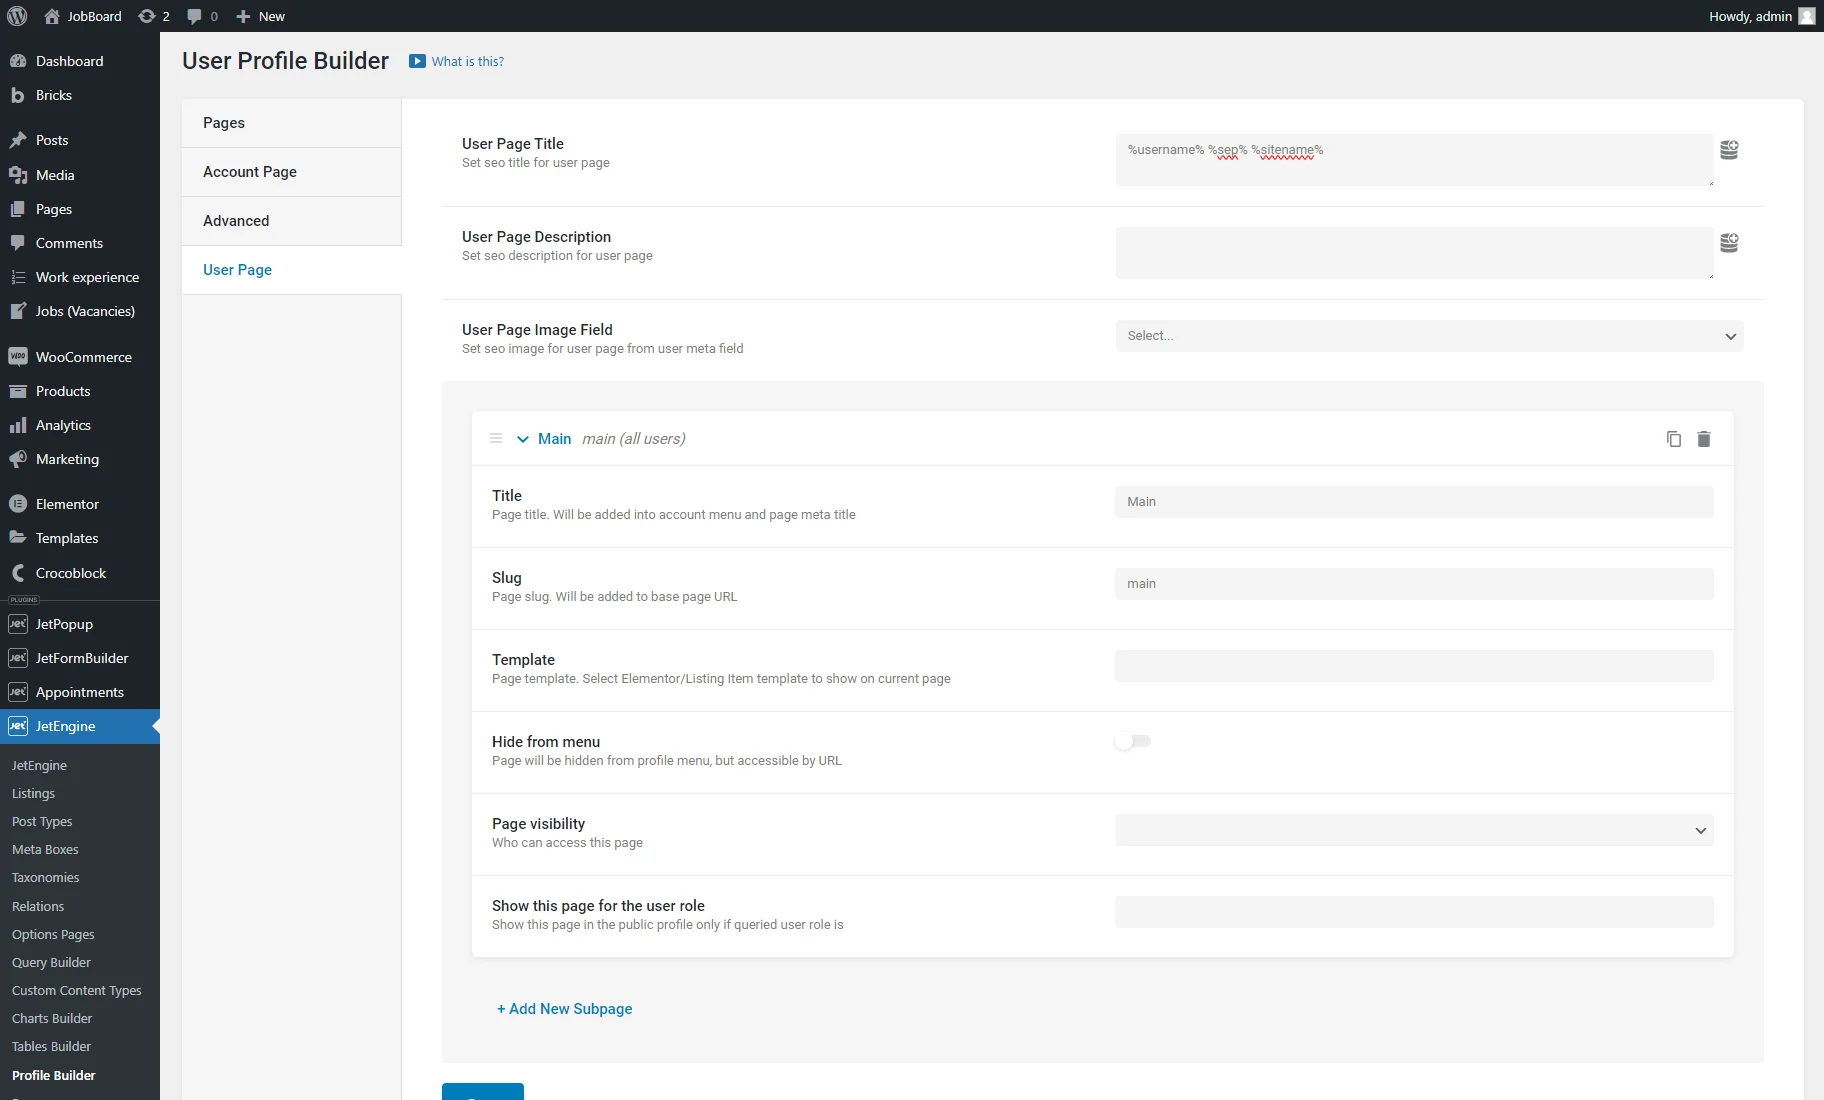
There is one default “Main” subpage here. It doesn’t contain a template yet, but you can create one with the Elementor Theme Builder or Listing item and set it here. Here are the Single User subpage settings:
- Title. Set the title to show in the Single User Profile Menu and page meta title;
- Slug. Create a unique slug for the page URL;
- Template. Select a template created previously with the help of Elementor Theme Builder or Listing item;
- Hide from menu. If enabled, the subpage will be hidden from the Profile Menu but accessible by URL;
- Page visibility. Selecting the “Owner” option makes the subpage content visible only to users logged into their account, while with the “All” option other users can observe it;
- Show this page for the user role. Pick user roles from this drop-down menu that can access this subpage.
Pressing the “+ Add New Subpage” button allows the creation of new subpages.
For example, you can create the “Edit User” subpage by setting the imported “Edit User” Elementor template.
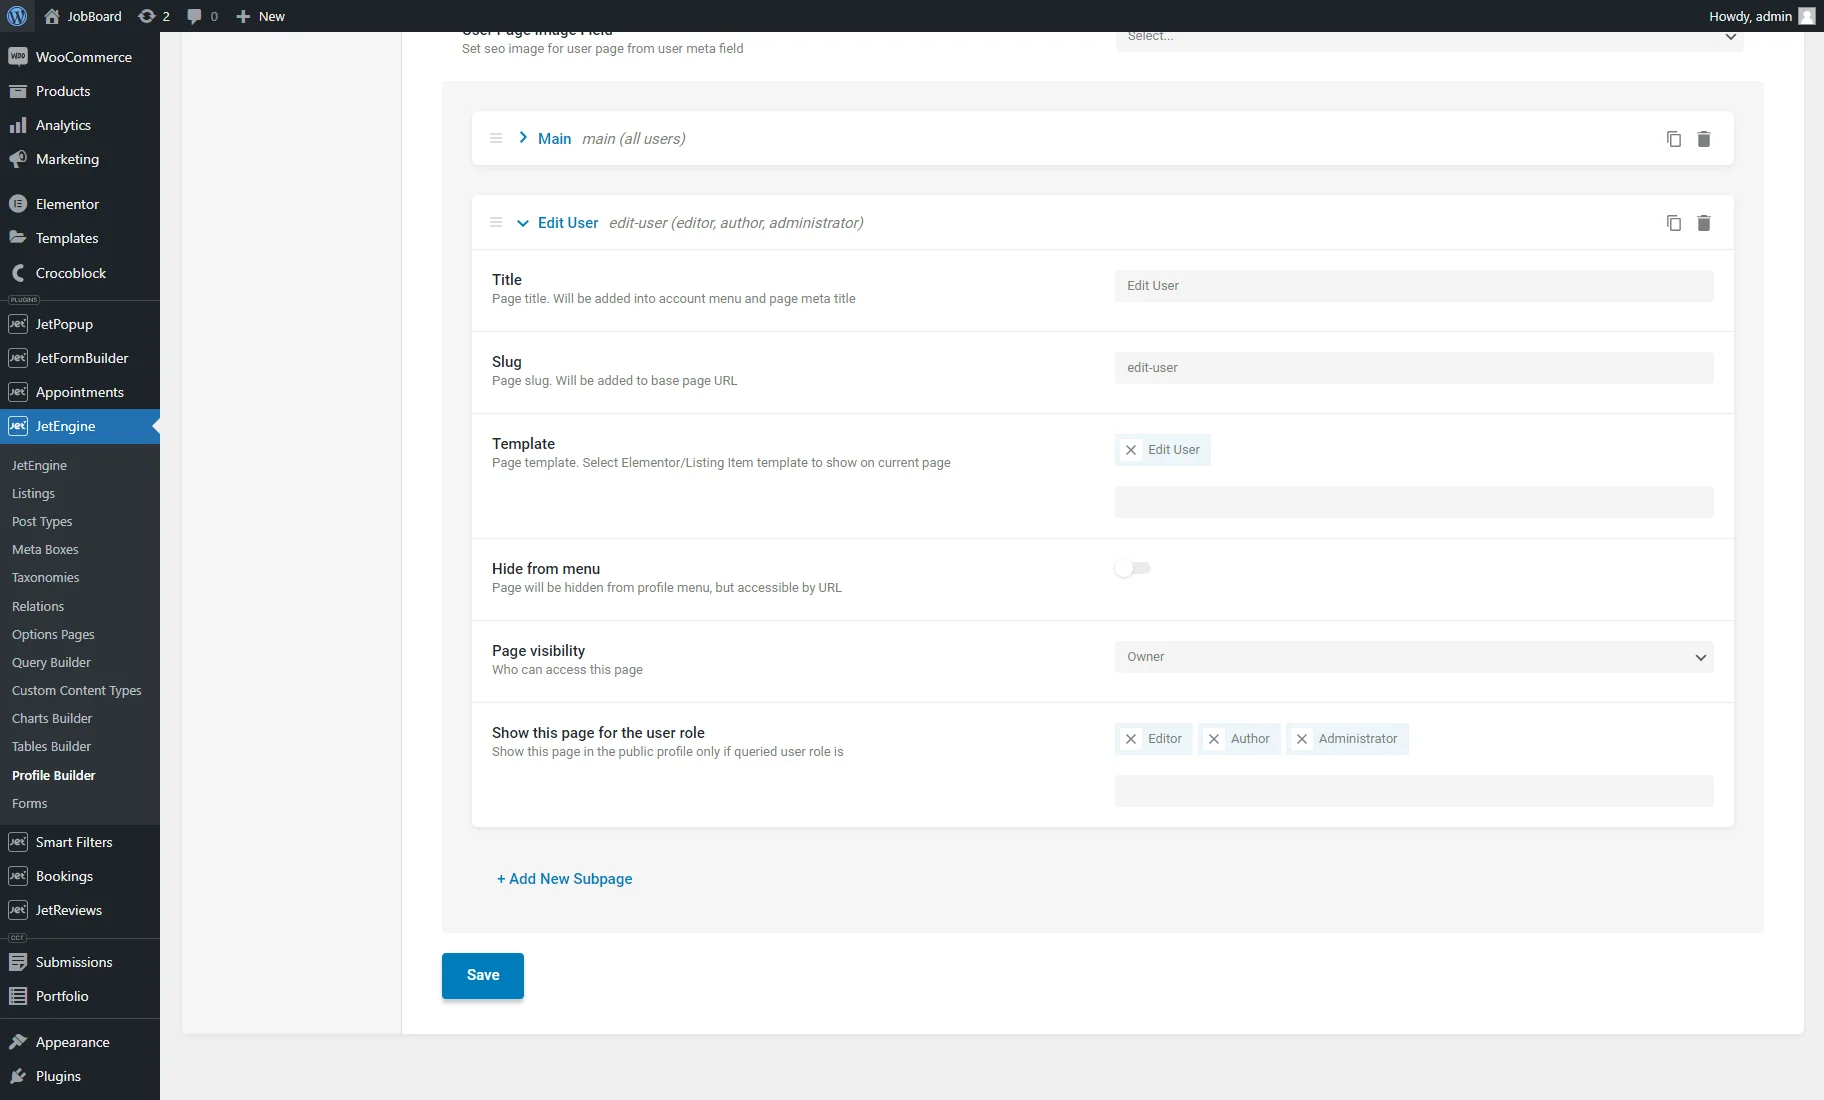
When you finish customizing subpages, push the “Save” button.
That’s all. Now you know more about the JetEngine Profile Builder dashboard settings.