How to Migrate a WordPress Website
Learn how to migrate a WordPress website using three reliable methods: plugins, manual transfer, or hosting provider tools.
Migrating a WordPress website involves moving site files and databases between environments, such as switching hosting providers or moving from a local host to a live server. This process can be completed using automated plugins, manual transfers via FTP and phpMyAdmin, or specialized hosting migration tools.
There might be several reasons why you need to migrate your website. The most common are as follows:
- moving from one hosting provider to another;
- moving from a local environment to a remote hosting provider;
- moving from a hosting provider to a local environment to modify and work on the website’s improvements.
Knowing how to migrate a WordPress site is a must if you are in any way involved in web development.
There are three methods of migrating a website:
- using a plugin;
- manually;
- using a migration service of your hosting provider.
The first two methods are the most versatile and work with any hosting provider. The third option is hassle-free but not universally available—most managed WordPress hosting providers offer it, either included in the plan or as a paid add-on.
You can also migrate a site using the cPanel backup wizard or similar tools. However, considering that your new hosting provider may use a different control panel, this method is not covered here.
Before You Start a Migration
Before proceeding, create a full website backup—both files and database—using your hosting control panel or a plugin to prevent data loss. All hosting providers offer this option, though its location may vary depending on the panel (cPanel, Plesk, or others).
Log in to your hosting admin panel and find where you can create a backup of the current website version and start the backup process. Normally, a “Restore from backup” button is on the same page. So, if something goes wrong with the migration process, you can always restore your website within minutes.
If you will migrate from a local host on your computer, use one of the backup-migration plugins and save the backup on your computer. We’ll cover these plugins later.
Migrating a Website Using a Plugin
This method is simple and convenient, but choosing the right plugin is crucial. For small websites (up to 128–500 MB), there are many free options available. For larger sites, consider buying a premium plugin or performing a manual migration.
There are many migration plugins — let’s review some of the most popular and convenient.
How do migration plugins work?
Migration plugins are, first of all, backup tools. They create backups that can later be restored to transfer your website’s content, settings, and elements. Most plugins allow you to download backups to your computer, while premium versions offer cloud storage. Backup archives are usually stored in the plugin’s folder on your FTP server.
The rest can vary: some ask you to choose what exactly you want to back up, while others back up everything by default.
Backup Migration
Why is the Backup Migration plugin worth attention:
- This plugin offers you to migrate websites up to 2 GB in its free plan.
- It has a user-friendly interface with all necessary settings, without overwhelming beginner WordPress users.
- The plugin offers a “super quick migration option” using the link where your archive is stored.
Price: free / Premium starts from $45/year (2 sites, 5 GB cloud storage).
Tip: Pay attention to the settings and what you are going to exclude from the backup. Summary: This plugin is easy to use, and the free version supports migrating relatively large websites while providing all the essential settings.
WPvivid
Why is the WPvivid plugin worth attention:
- Auto-migration functionality — install the plugin on both sites, connect them using a key, and the migration runs automatically.
- Staging feature — create a staging environment, but automatic push to the live site requires a premium version.
- This plugin offers extensive settings, allowing you to fine-tune every aspect of the migration.
- It doesn’t limit the size of the website you want to back up and migrate.
It allows you to store your backups on cloud services, such as Google Drive, Dropbox, OneDrive, DigitalOcean Spaces, FTP, or SFTP, even with a free plan.
Price: free / Premium starts from $49/year (2 domains).
Summary: The fact that this plugin doesn’t have backup size limitations is a major advantage. Combined with its wide range of options and staging features, it offers a strong and flexible migration solution.
The free version has quite limited functionality for creating scheduled backups, but it works perfectly if you need to migrate your website or create backups manually.
All-in-One WP Migration
Why is the All-in-One WP Migration plugin worth attention:
- User-friendly and straightforward interface.
- You can choose exactly what to export (and migrate) because this plugin offers a big list of choices.
- With premium extensions, you can store backups on various cloud servers.
Price: free / Premium starts from $69/year (unlimited extension).
Tip: this plugin has a limitation on file upload size (when you import your website to a new hosting), and it can’t exceed 512 MB. If you want unlimited, they offer to buy a $69 extension. However, in fact, this limit depends on your hosting provider and the memory limit settings. Summary: This plugin is good for migrating small websites, but some efforts are needed to bypass file size restrictions to deal with large ones.
Migrating a Website Manually
This process consists of five main steps:
- exporting a database;
- exporting files;
- importing files to a new hosting;
- importing the database to a new hosting;
- changing configuration settings of the migrated website.
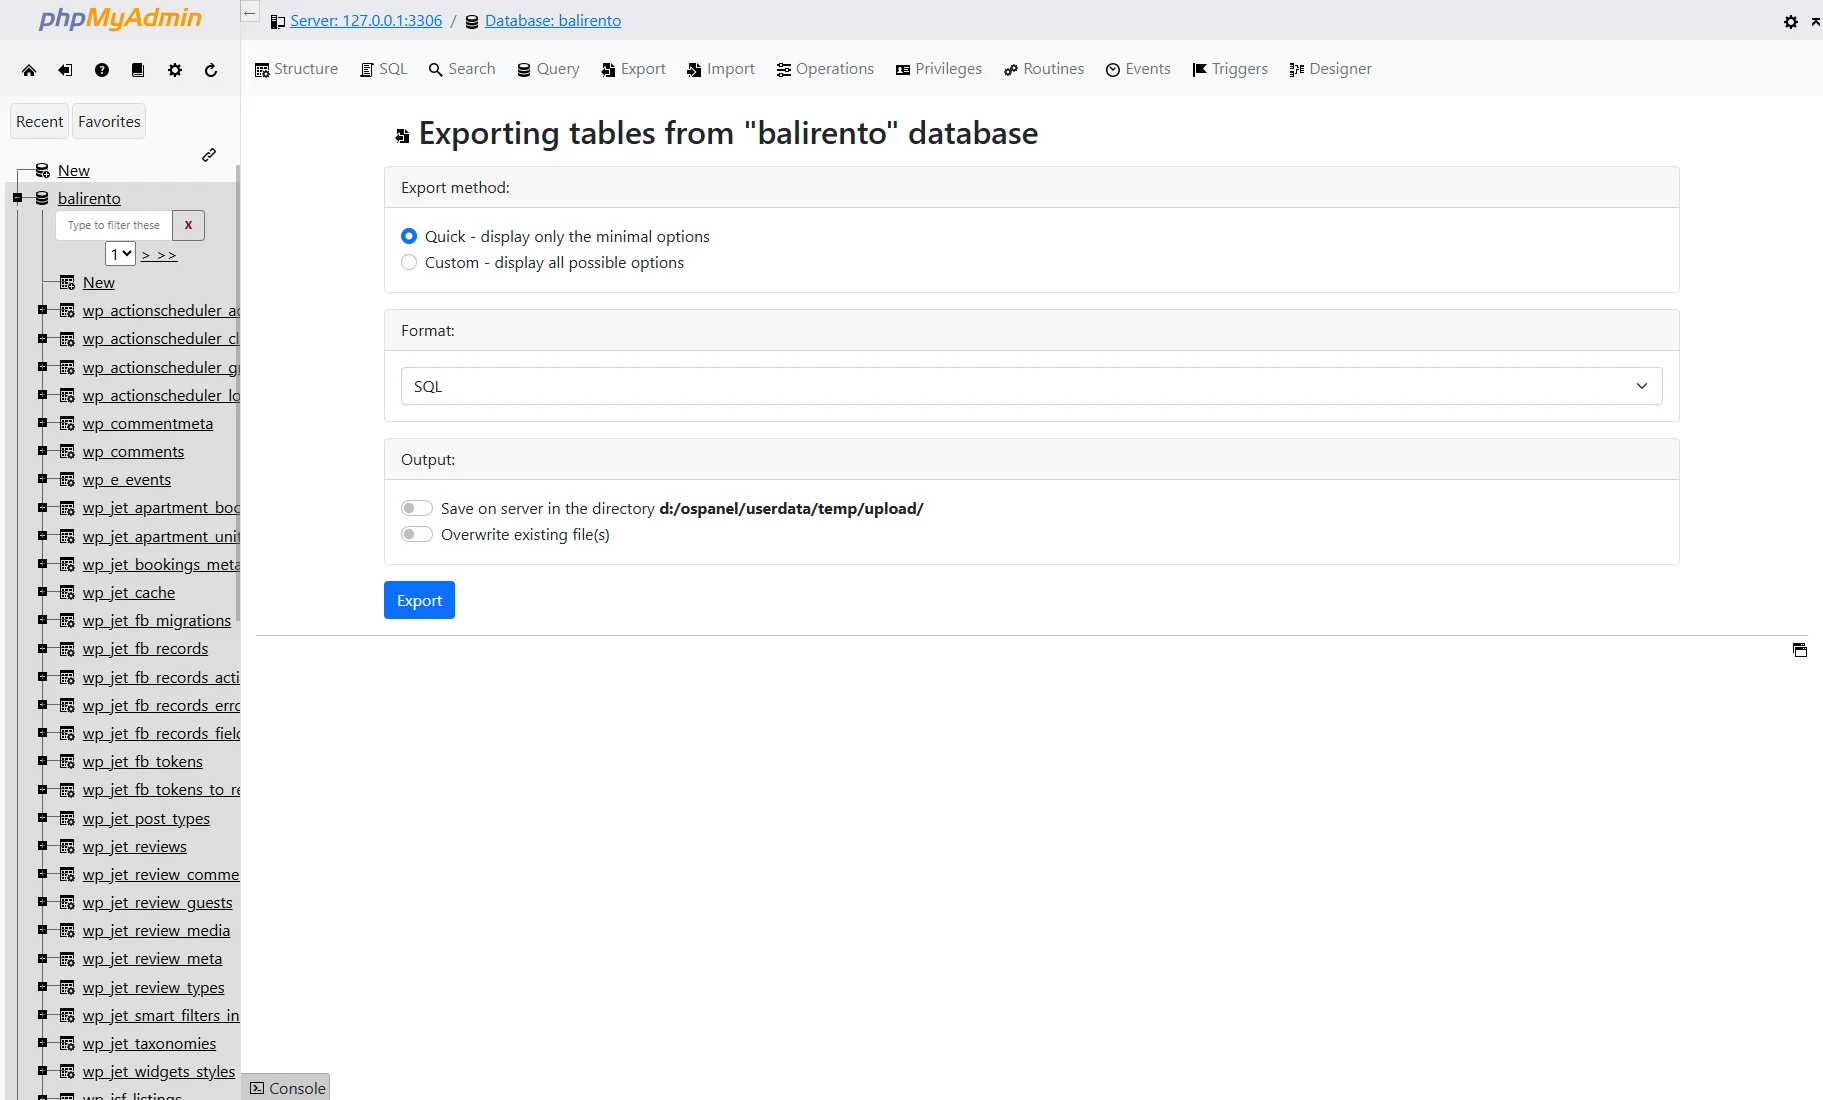
Exporting a database using phpMyAdmin
- Log in to the PhpMyAdmin app. Access is usually provided by your hosting provider along with your login credentials.
- Locate the database used by your website that you want to migrate. If you don’t know its name, you can find it either on the hosting control panel or in the config.php file in the root directory of your WordPress. Find the line:
define( 'DB_NAME', 'Your_database_name' ); where “Your_database_name” will be the name of your database.
- Select this database and press the “Export” tab in the top panel.
- Keep the “Quick – display only the minimal options” Export method and “SQL” Format.
- Press the “Export” button.
- Save the file on your computer and compress it into a ZIP file.
Exporting files
Using an FTP client or the File Manager on your hosting, copy your website files to the local computer. They are usually stored in the www folder for the main domain. For a subdomain, the files are typically stored in a folder with the same name as the subdomain.
Importing files to a new hosting
Upload your website files to the new hosting’s website directory. If you’re using an FTP client, simply transfer the files directly. If you prefer the hosting File Manager, upload the ZIP archive and extract it afterward.
Importing the database to a new hosting
- Create a new database and a new database user with all permissions.
- Import the website database from your computer, using either phpMyAdmin or the hosting provider’s dashboard. If you are asked about encoding, for most cases, utf8_general_ci would be a perfect solution.
- Copy and paste your database name, username, and user’s password into the notepad.
Changing the wp-config.php file
Find the wp-config.php file in the root of your website, open it, and find the following lines:
- define( ‘DB_NAME’, ‘your_database_name’ );
- define( ‘DB_USER’, ‘your_database_user’ );
- define( ‘DB_PASSWORD’, ‘your_database_password’ );
- define( ‘DB_HOST’, ‘localhost’ );
Replace the values with the credentials of the new database you created on your new hosting:
- DB_NAME — your new database name;
- DB_USER — your new database username;
- DB_PASSWORD — your new database password;
- DB_HOST — usually localhost, but may differ depending on your hosting provider.
Save changes.
Open your new website and verify that everything is working correctly.
Using Your Hosting Provider’s Migration Tools
Most hosting providers (especially WordPress managed hostings) offer a Migration Tool to move the website easily. Many of them (Kinsta, Bluehost, WP Engine, GoDaddy) use the MigrateGuru plugin.
You need to install the plugin on your old website and follow the setup instructions, filling in the details about your new hosting account. This is a fast and simple way to migrate a website, and if your hosting offers this option, consider using it.
Crocoblock JetPlugins-Specific Migration Notes
The license is tied to the domain — deactivate it before migration and activate it again after the move.
JetEngine CPT/CCT structures, as well as JetSmartFilters and JetFormBuilder settings, are not transferred by standard migration plugins. Check our dedicated guides for proper data migration.
For JetEngine:
- How to Import and Export Custom Post Types, Terms, and Meta Fields
- How to Import and Export Custom Content Type
- How to Export and Import JetEngine Fields Using WP All Import
- How to Import and Export Data with WP Ultimate CSV Importer Pro
For JetSmartFilters:
For JetBooking:
For JetFormBuilder:
For JetMenu:
For JetPopup:
That’s it. Now you know how to migrate a WordPress website using three reliable methods: plugins, manual transfer, or hosting provider tools.