JetAppointment Settings Overview
After the JetAppointment installation, a new submenu appears in the dashboard. This overview reveals all the features available for you in that menu.
After the JetAppointment installation, a new submenu will appear on the dashboard. This overview reveals all the plugin’s features.
After completing all the steps of the JetAppointment plugin setup wizard, one can access the Appointments submenu. This guide covers what is behind those features and when they’ll come in handy.
Firstly, let’s follow the WordPress Dashboard > Crocoblock > JetPlugins Settings > JetAppointments path.
General Settings
This tab allows for the configuration of services and providers, management of WooCommerce integration, and control of service capacity for smooth appointment handling.

- Services post type — a feature that allows changing the post types with which the JetAppointment plugin works. It can be used to alter the post type initially set during the setup wizard;
- Provider post type — a feature that allows changing the providers’ custom type; if needed, another one can be chosen from the drop-down menu;
- Service Slot Duplicating Across Providers — a feature that is disabled by default. When set to “Disabled”, all providers of the same service share the same slots. In this case, booking a slot with “Provider A” makes the same time slot unavailable for “Provider B,” ensuring that no double bookings occur for a particular time. When set to “Enabled,” each provider of the same service has separate appointment slots. This means that booking a time slot for “Provider A” does not affect the availability of the same time slot for “Provider B,” allowing multiple providers to take bookings independently;
- WooCommerce Integration — a feature that is deactivated by default. When activated, it allows the user to pay for the service right after finishing the appointment form with the help of the WooCommerce service. This topic is fully uncovered in the WooCommerce integration tutorial:
- Two-way WC orders synch — when enabled, this feature ensures that the WooCommerce order status is updated when the appointment status changes. By default, changing an appointment status does not affect the related order status;
- Manage Capacity — a feature that is deactivated by default. When activated, it allows setting the maximum number of slots available for booking:
- Show Capacity Counter — a feature that is deactivated by default. When this switcher is enabled, it displays the service capacity count in appointment slots;
- User Can Manage Booked Capacity — a feature that is deactivated by default. When this switcher is enabled, users can adjust the number of booked items for a selected slot.
Working Hours
This tab allows one to set booking schedules, define time formats and buffer times, and enable multi-booking options for appointments.
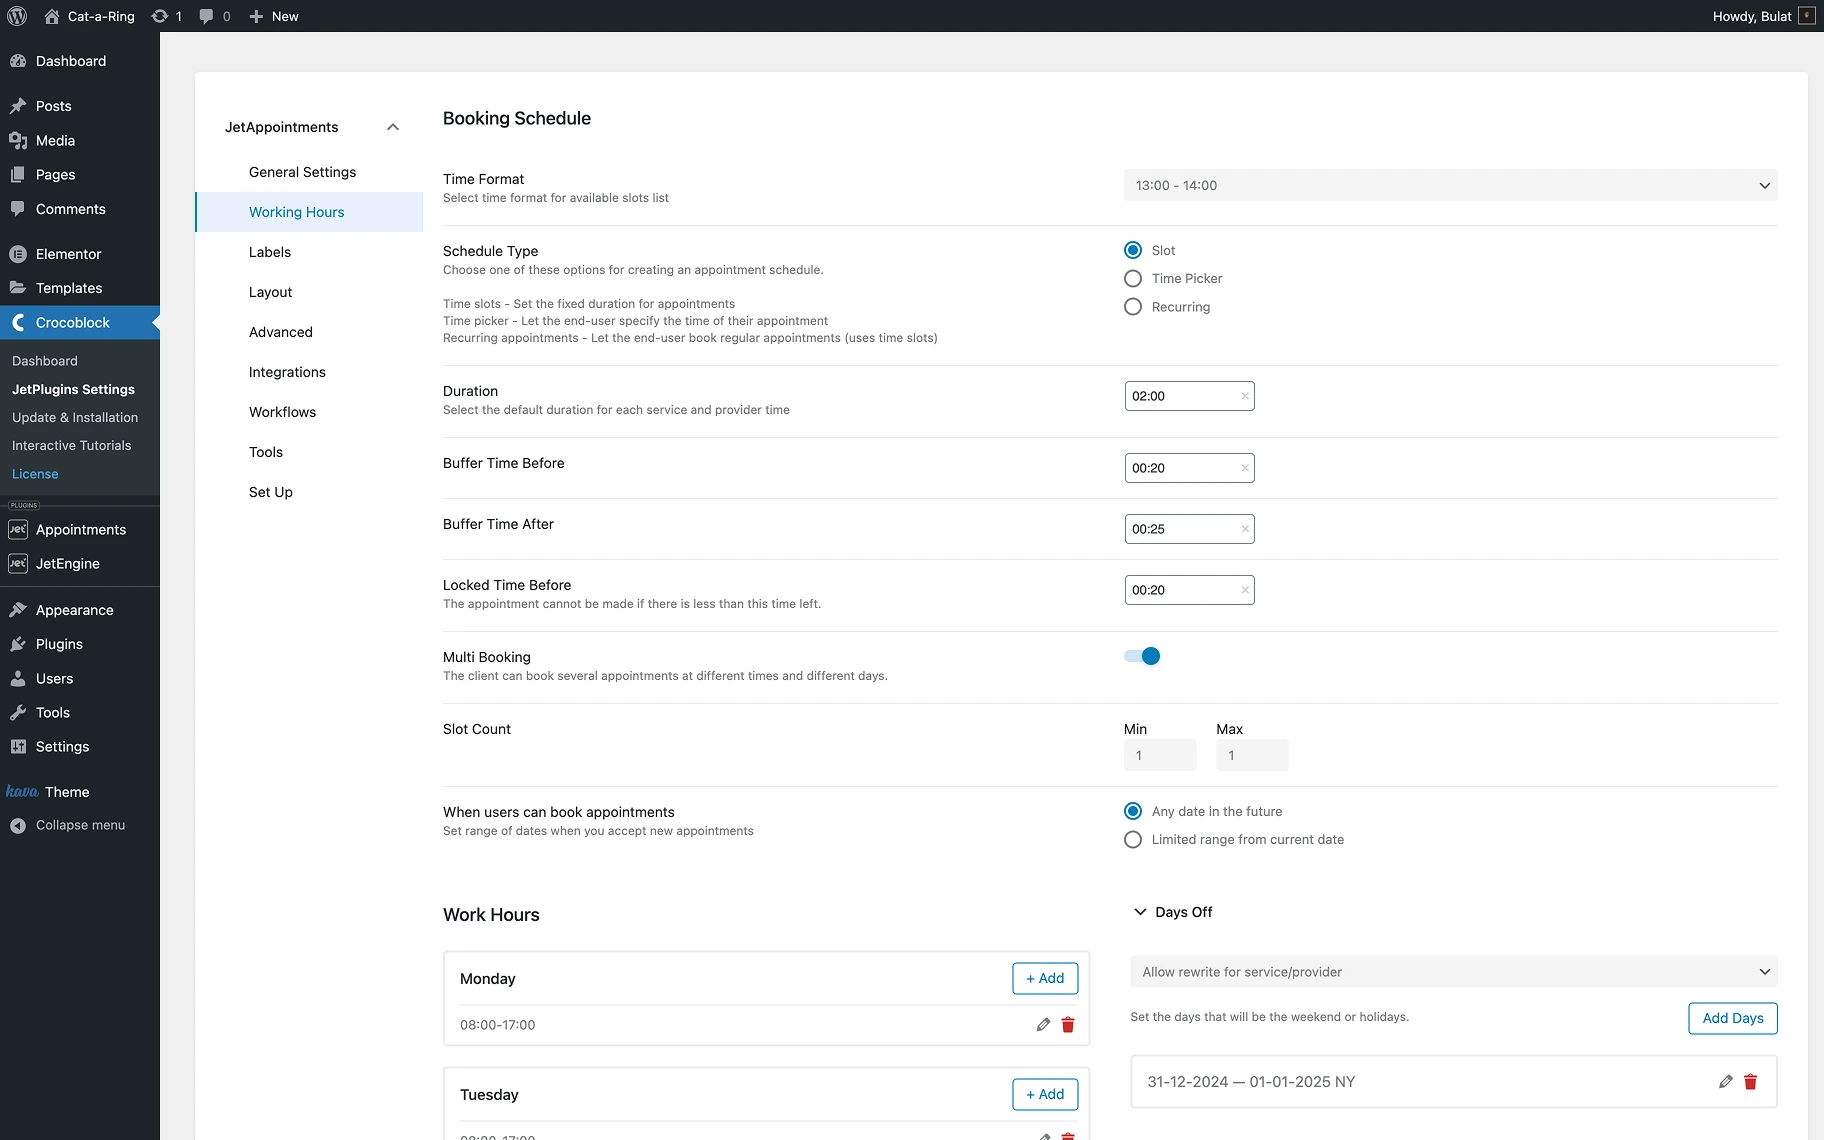
- Time Format — a feature that defines the time format displayed in the appointment form;
- Schedule Type — a feature that alters the appointment schedule behavior. Set the “Slot” option to fix the appointment durations or select “Time Picker” and “Recurring” types;
- Duration — a feature that defines the default duration of the services;
- Buffer Time Before/Buffer Time After — a feature that sets a short break that one can add before or after the slot;
- Locked Time Before — a feature that defines when the appointment is no longer available if less than this time is left before the appointment. For example, if set to “00:15”, a 5:00 p.m. appointment cannot be booked after 4:45 p.m.;
- Multi Booking — a feature that is deactivated by default. This switcher should be activated to allow the client to book several appointments at different times and days:
- Slot Count — a feature that sets the minimum and maximum number of slots available for booking by one person;
- When users can book appointments — a feature that allows adjusting the dates when booking new appointments is allowed: any date or limited range.

- Work Hours — a feature that sets the company’s work hours for every day of the week. If there are days when the company doesn’t work, just don’t set any work hours;
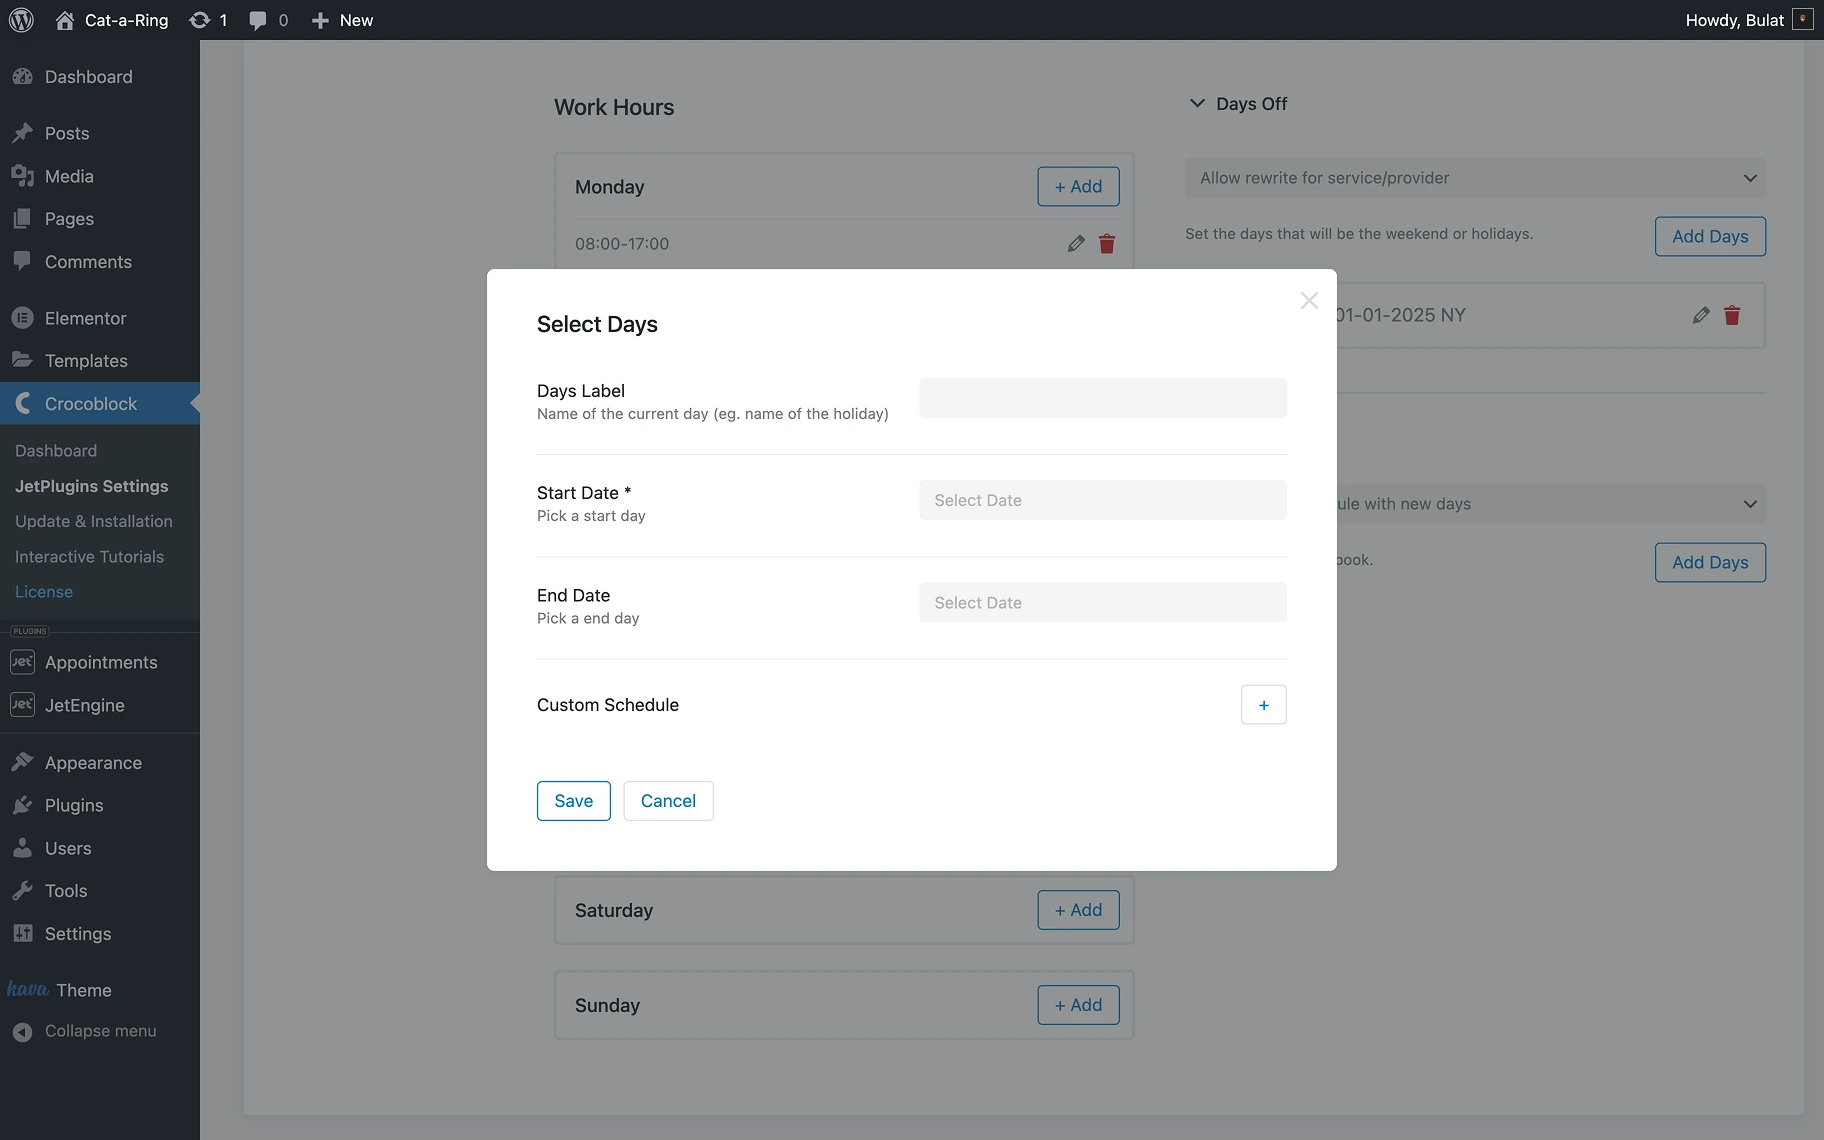
- Days Off — this feature allows one to specify non-working days, such as weekends or holidays. The “Allow rewrite for service/provider” option enables custom days off for specific services or providers. The “Force global days off” option applies the same days off across all services and providers. To configure this, the “Add days” button should be clicked;
- Working Days — this feature allows one to define the available days for bookings; two options are available. The “Override all schedule with new days” option replaces the entire schedule with the selected working days. The “Override only days added below” option modifies only the specified days without affecting the existing schedule. To configure this, the “Add days” button should be clicked.
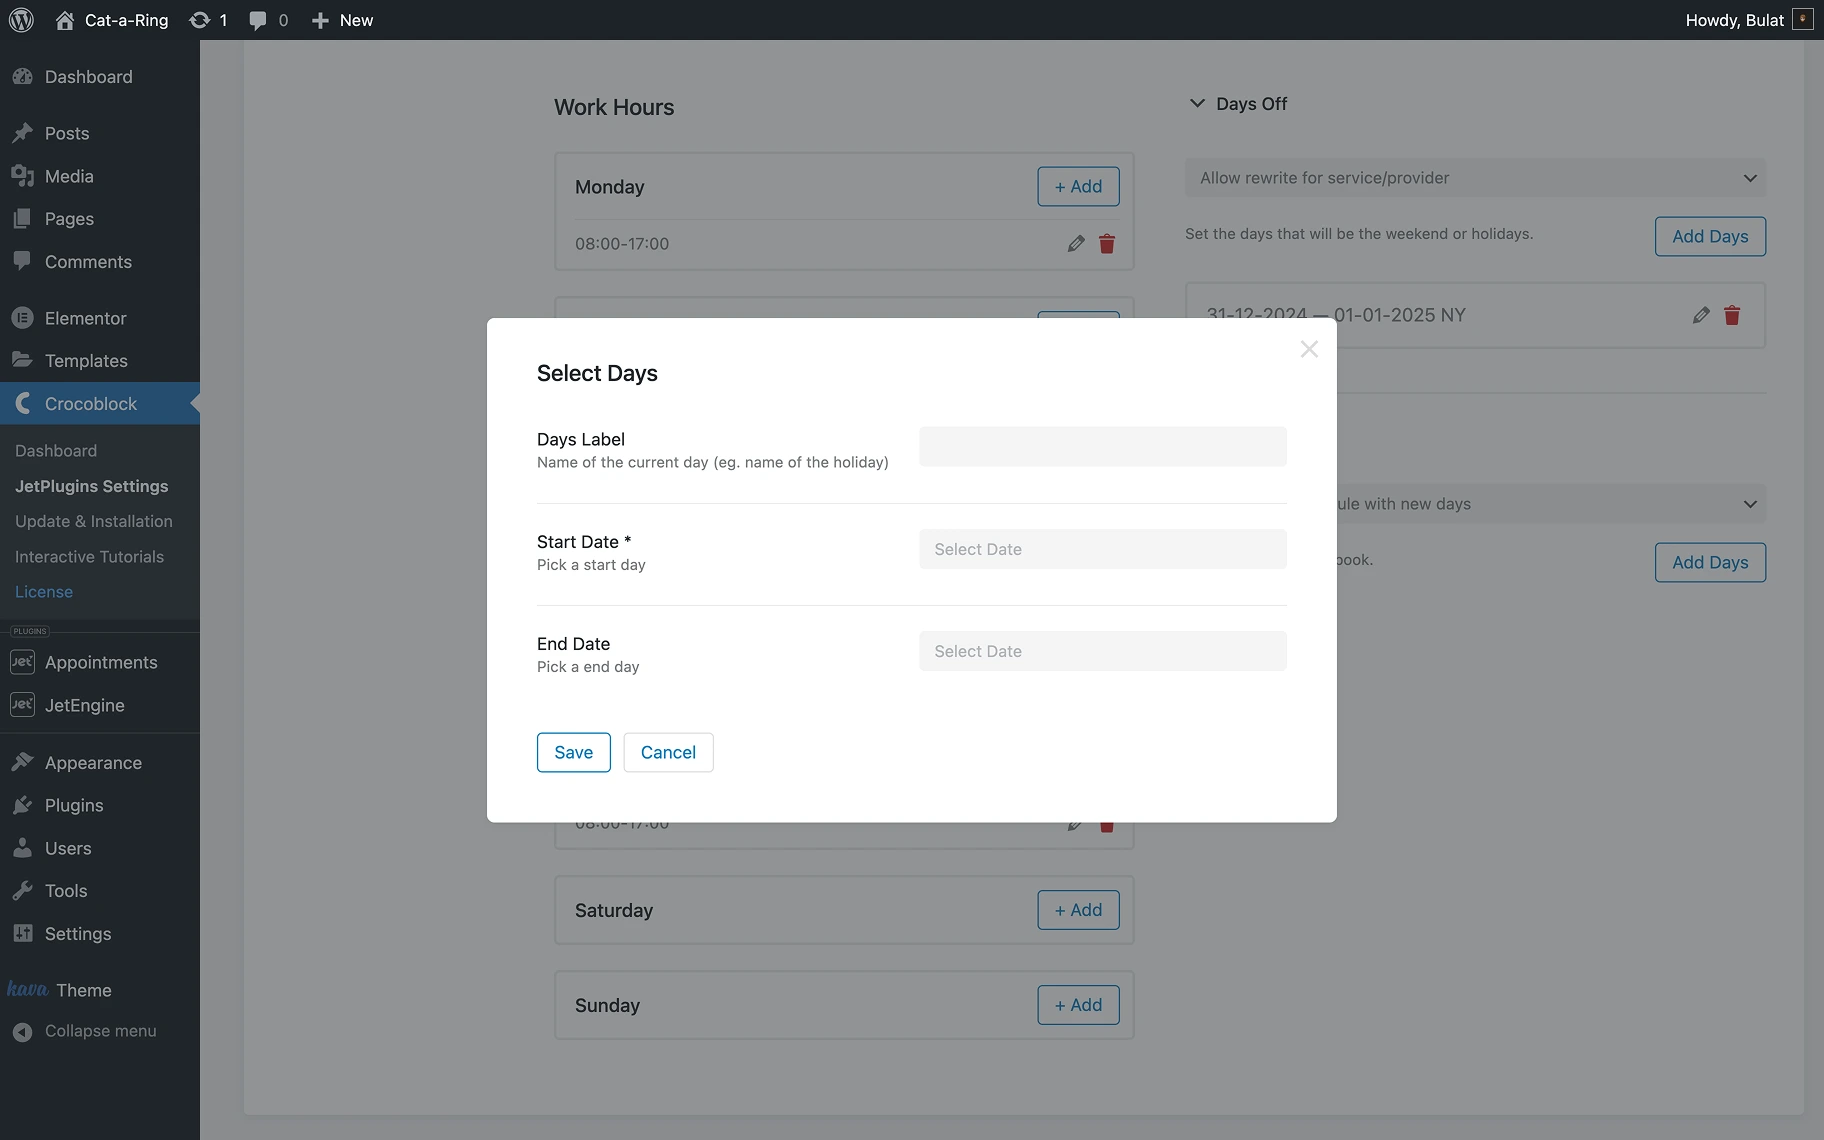
The same settings are available in the pop-up when configuring working days. In addition, one can set a Custom Schedule if needed. One should specify the Days Label, Start Date, and End Date to disable appointments for particular days.
The “Save” button updates the settings. One can also read more about setting prices for appointments per hour and minute.
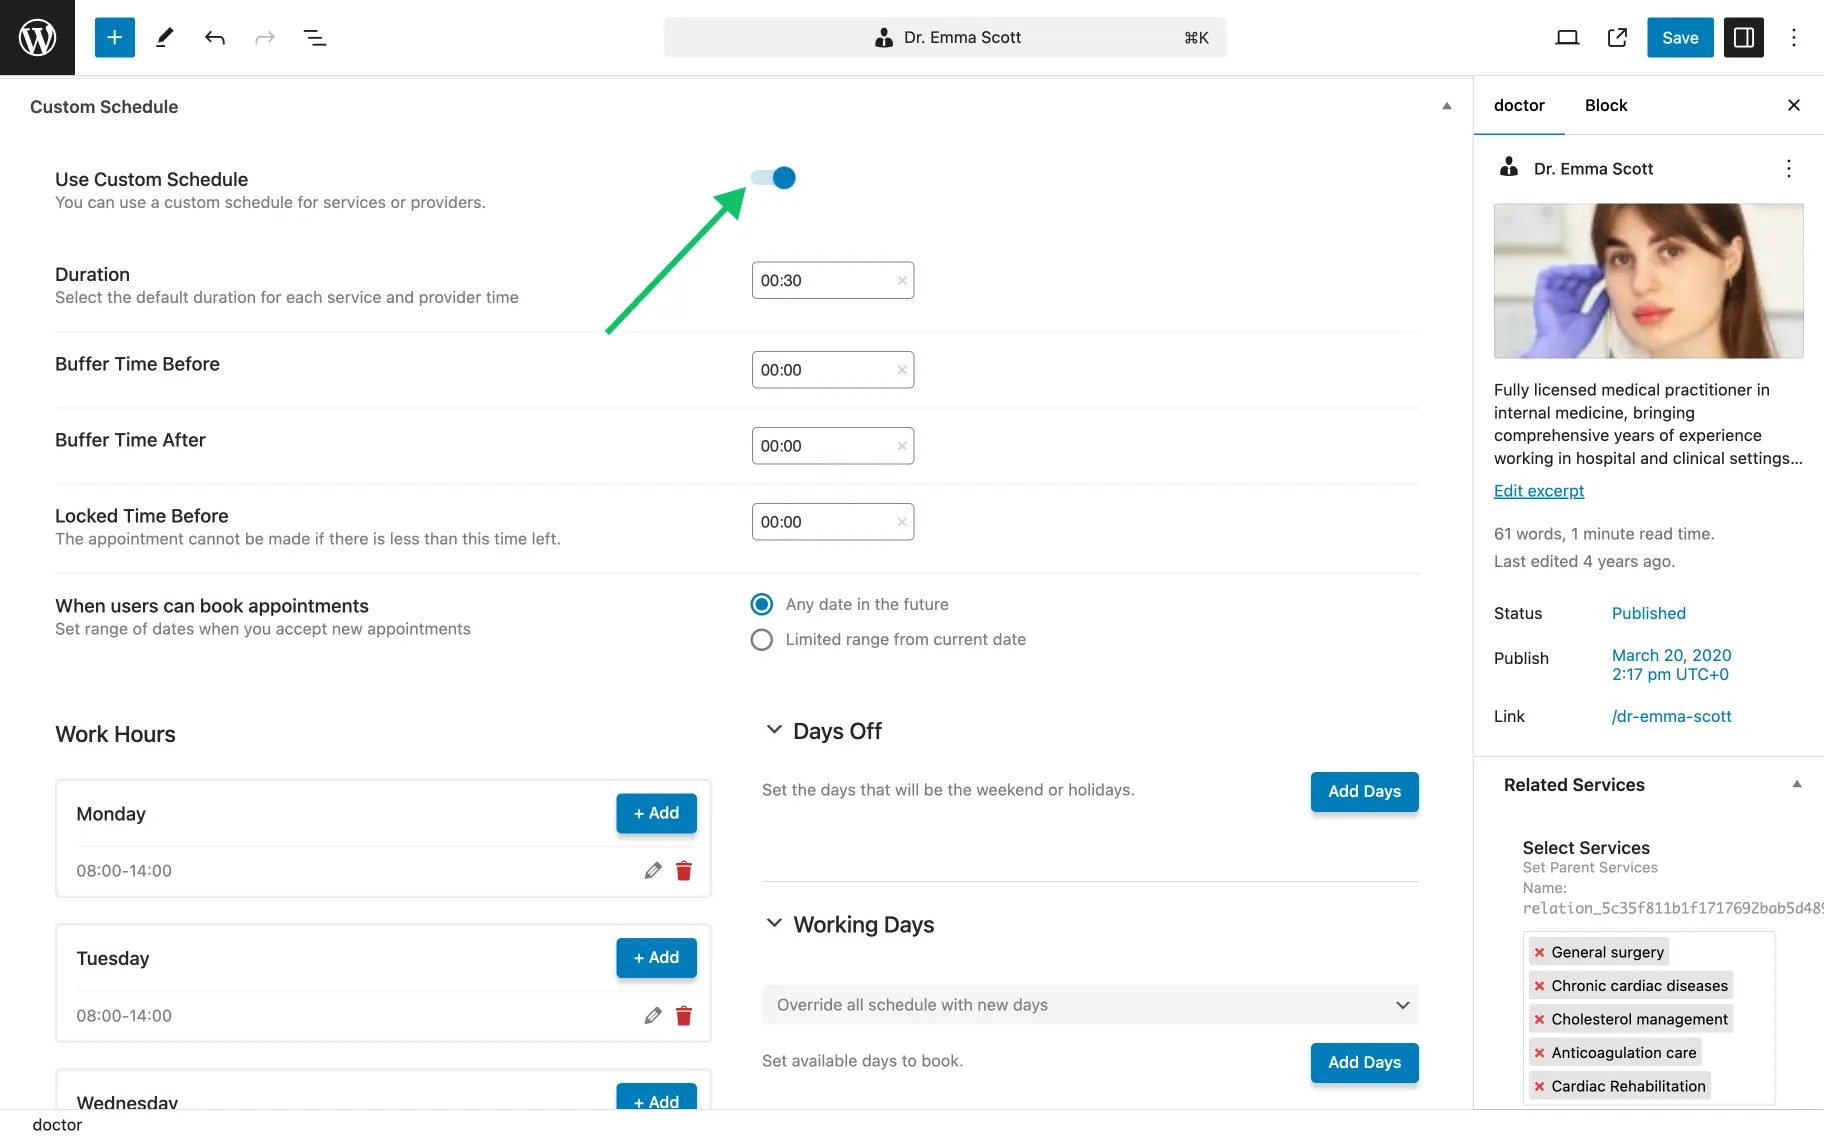
Working hours hierarchy
Three types of work hours can be set: general work hours, work hours of services, and work hours of providers. They overlap each other in the following order:
Work hours of providers — Work hours of services — General work hours
This means that the provider’s individual schedule will be a higher priority than the service and general work hours. When a schedule is set for a specific service, it will be displayed instead of the general work hours. If a provider’s schedule is defined, it will take precedence over the service schedule.
An individual schedule can be enabled by turning on the Use Custom Schedule toggle in the Custom Schedule section of a service or provider custom post.
Labels
The Labels tab contains the Use custom labels toggle. It should be turned on to customize the labels of weekdays and months in the form’s calendar.
Once enabled, the default labels for weekdays and months will be displayed.

The labels that define default error messages and field names related to appointment scheduling are also included. These include notifications for unavailable time slots, appointment details, and recurring booking counts.
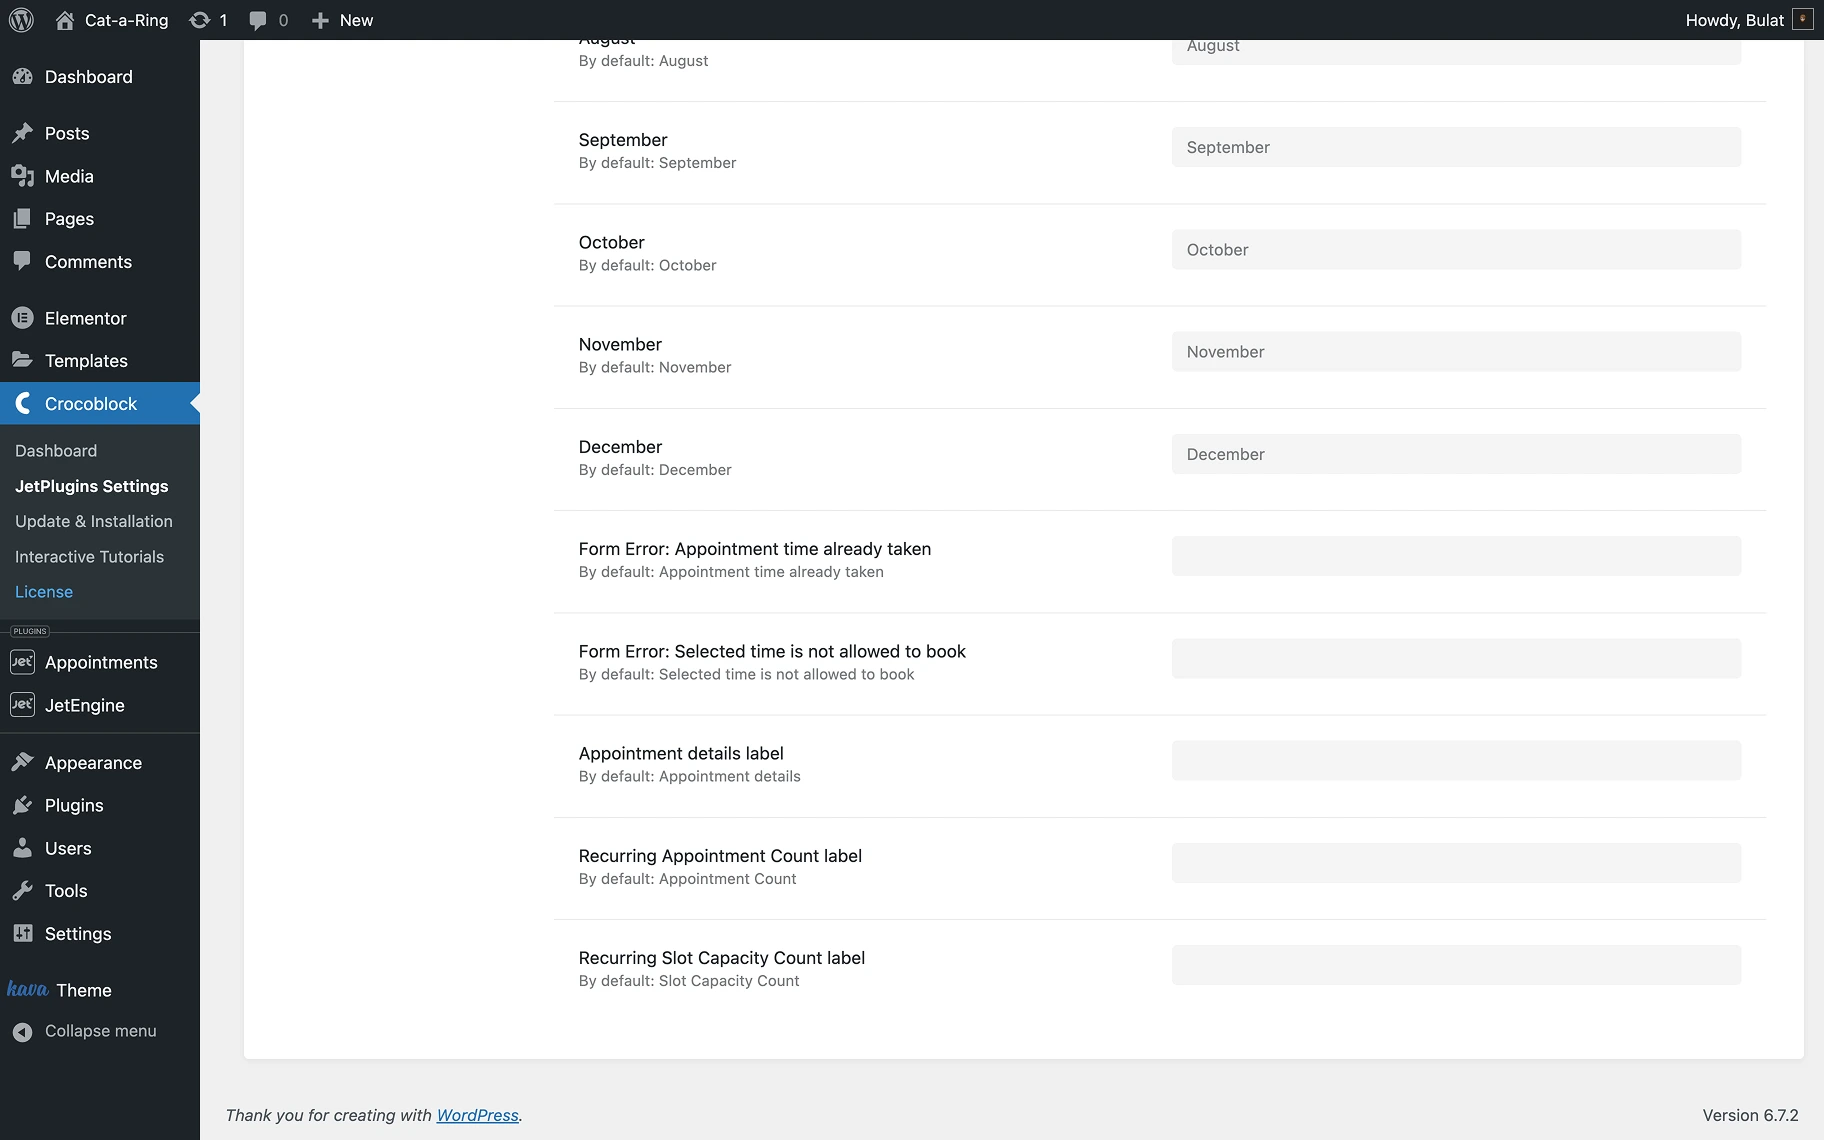
These labels can be left “as is,” or the preferred ones to the right of the actual weekdays can be typed.
Layout
This tab allows for the adjustment of the calendar layout, enables auto-scroll to appointment details, and displays a timezone picker for user-friendly bookings.
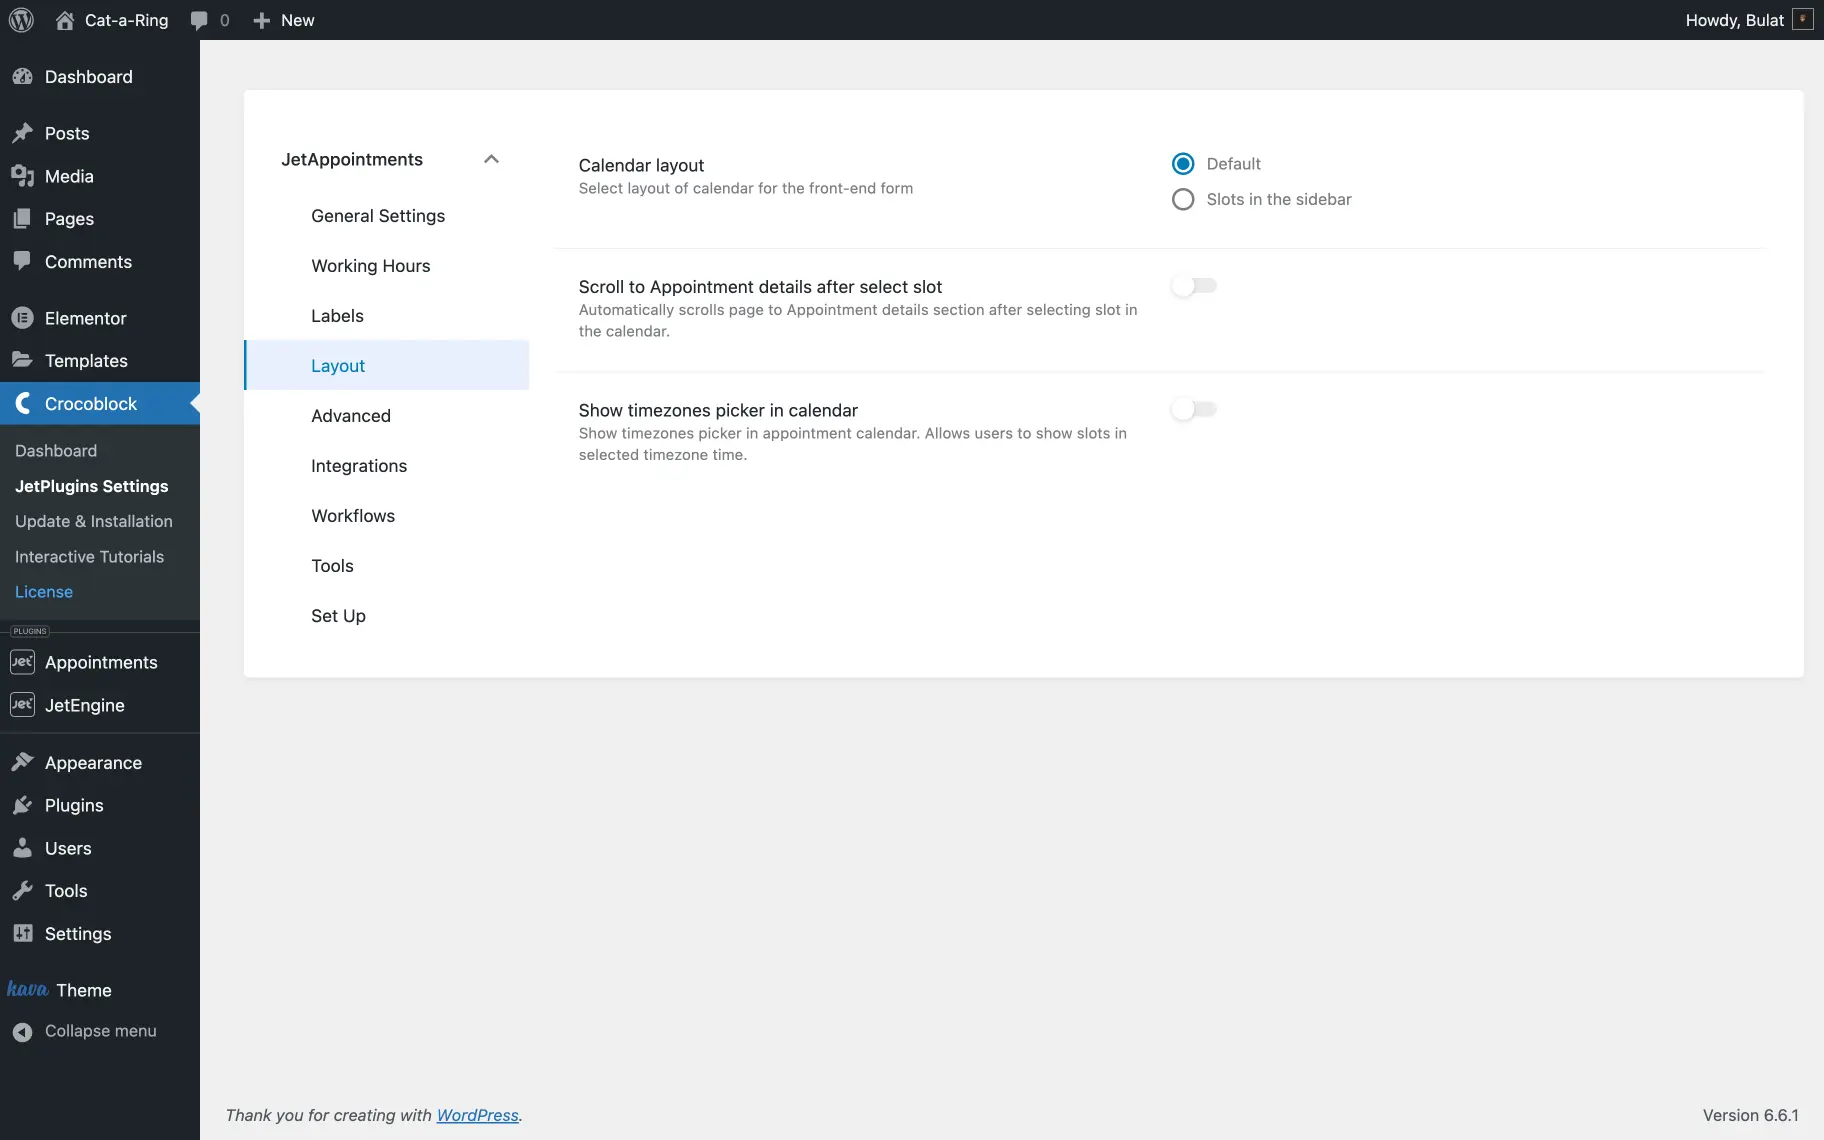
- Calendar layout — this feature allows one to choose between the “Default” calendar view or displaying appointments via “Slots in the sidebar”;
- Scroll to Appointment details after select slot — a feature that is deactivated by default. It should be activated to automatically scroll the page to the appointment details section after the date and time are selected;
- Show timezones picker in calendar — a feature that is deactivated by default. It should be activated to enable the display of the time zone picker next to the appointment calendar. With this feature, the page shows available slots only in the selected timezone.
Advanced
This tab allows managing appointment availability, handling ‘on-hold’ slots, and automatically switching appointment statuses to prevent conflicts.
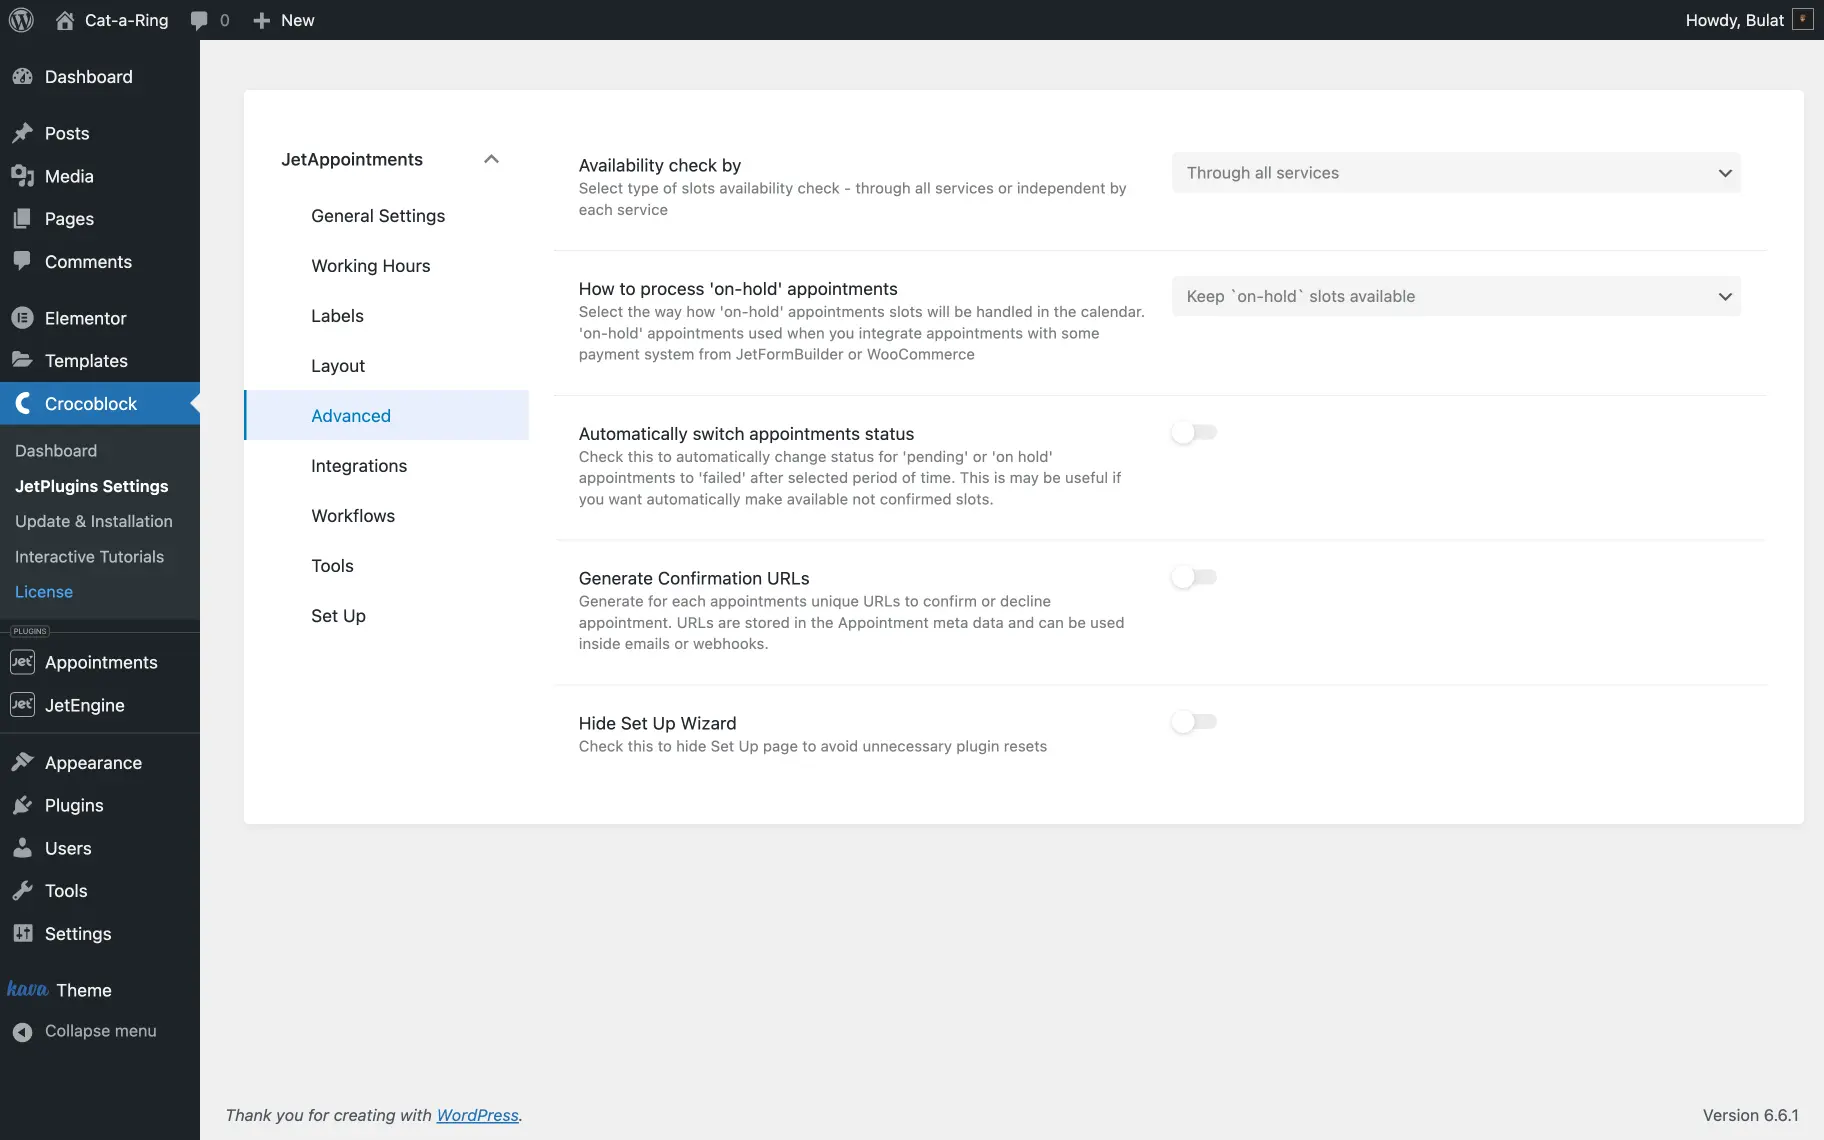
- Availability check by — this feature allows selecting how appointment availability is managed across services; two options are available. The “Through all services” option allows visitors to book a time slot for one service; the same slot becomes unavailable for other services provided by the specialist. The “By each service” option keeps availability separate for each service, allowing a specialist to have multiple bookings at the same time for different services;
- How to process ‘on-hold’ appointments — this feature allows one to choose whether to exclude “on hold” dates from the calendar or leave them for users to pick (so the slot is reserved for the client who pays for the service first);

- Automatically switch appointments status — a feature that is deactivated by default. When activated, this feature switches the appointment status to “Failed/Cancelled” after a certain amount of time if it hasn’t been confirmed;
- Switch interval — a field that is used to set the time interval between the appointment booking and its cancellation;
- Switch from — a field that provides the option to select from three available appointment statuses: “On hold,” “Pending payment,” or “Processing”;
- Switch to — a field that determines the status that will change to “Failed” or “Cancelled” after the specified time interval.
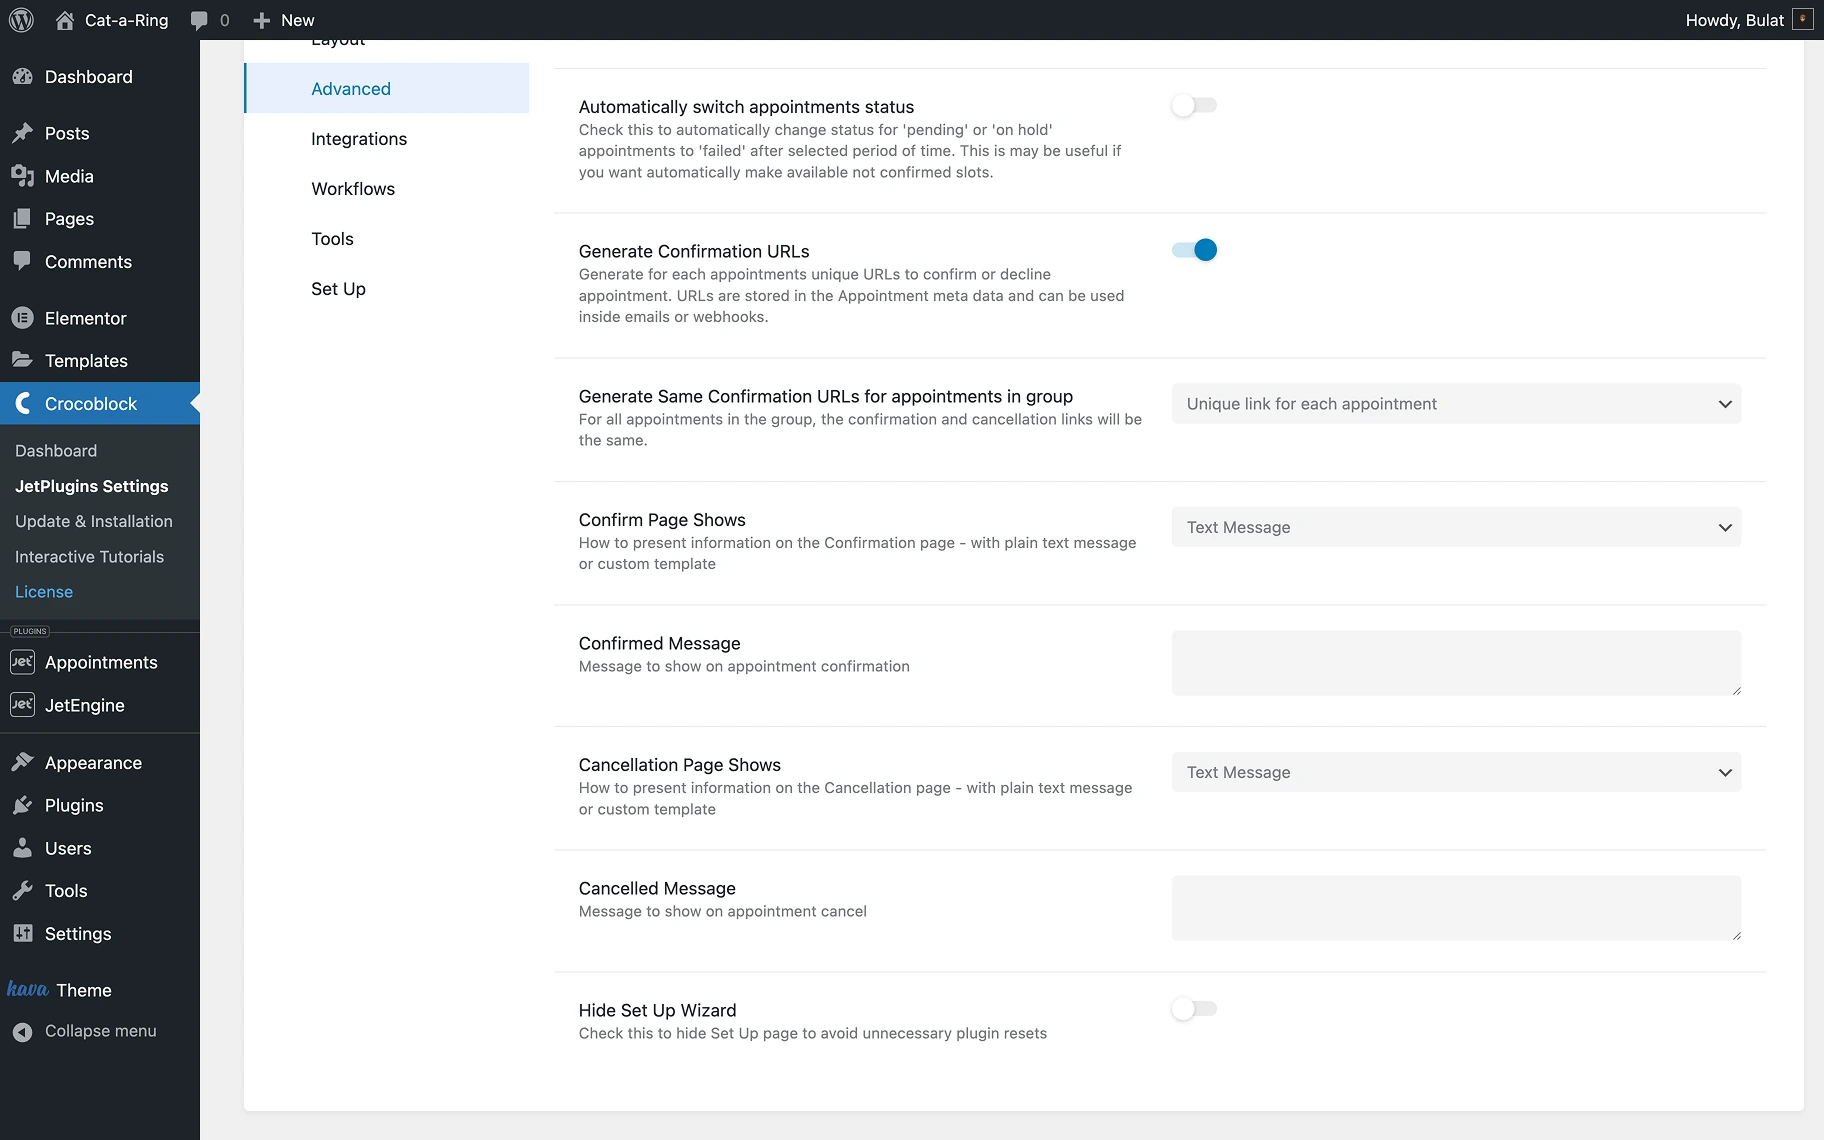
- Generate Confirmation URLs — a feature that is deactivated by default. One should activate this switcher to generate unique URLs for every appointment. This feature should be used to confirm or cancel appointments via emails, and all the data will be stored in the particular appointment metadata;
- Generate Same Confirmation URLs for appointments in group — a feature that generates a single confirmation URL for all appointments in a group. This means that confirming or canceling through the link will apply to all bookings in the group at once. The feature has the following options:
- “Unique link for each appointment” — in this default option, each booking receives a unique confirmation URL. Confirming or canceling an appointment affects only the specific booking associated with the link;
- “One link for group” — in this option, all bookings in the group share a single confirmation URL. Confirming or canceling via the link applies to all appointments in the group;
- Confirm Page Shows/Cancellation Page Shows — these features allow selecting how information is presented on the confirmation or cancellation page, either with a “Text Message” or a “Custom Template”;
- Confirmed Message/Cancelled Message — when these fields are filled with text, the message will be shown to the user once the appointment is confirmed or canceled;
- Hide Set Up Wizard — a feature that is deactivated by default. One should activate the switcher to hide the setup option in the plugin menu to prevent appointment resets.
Integrations
This tab allows connecting appointments with Zoom. After activating the toggle, Zoom account details (Account ID, Client ID, Client Secret) fields will appear. After authenticating the app, Zoom meetings can be attached to appointments.
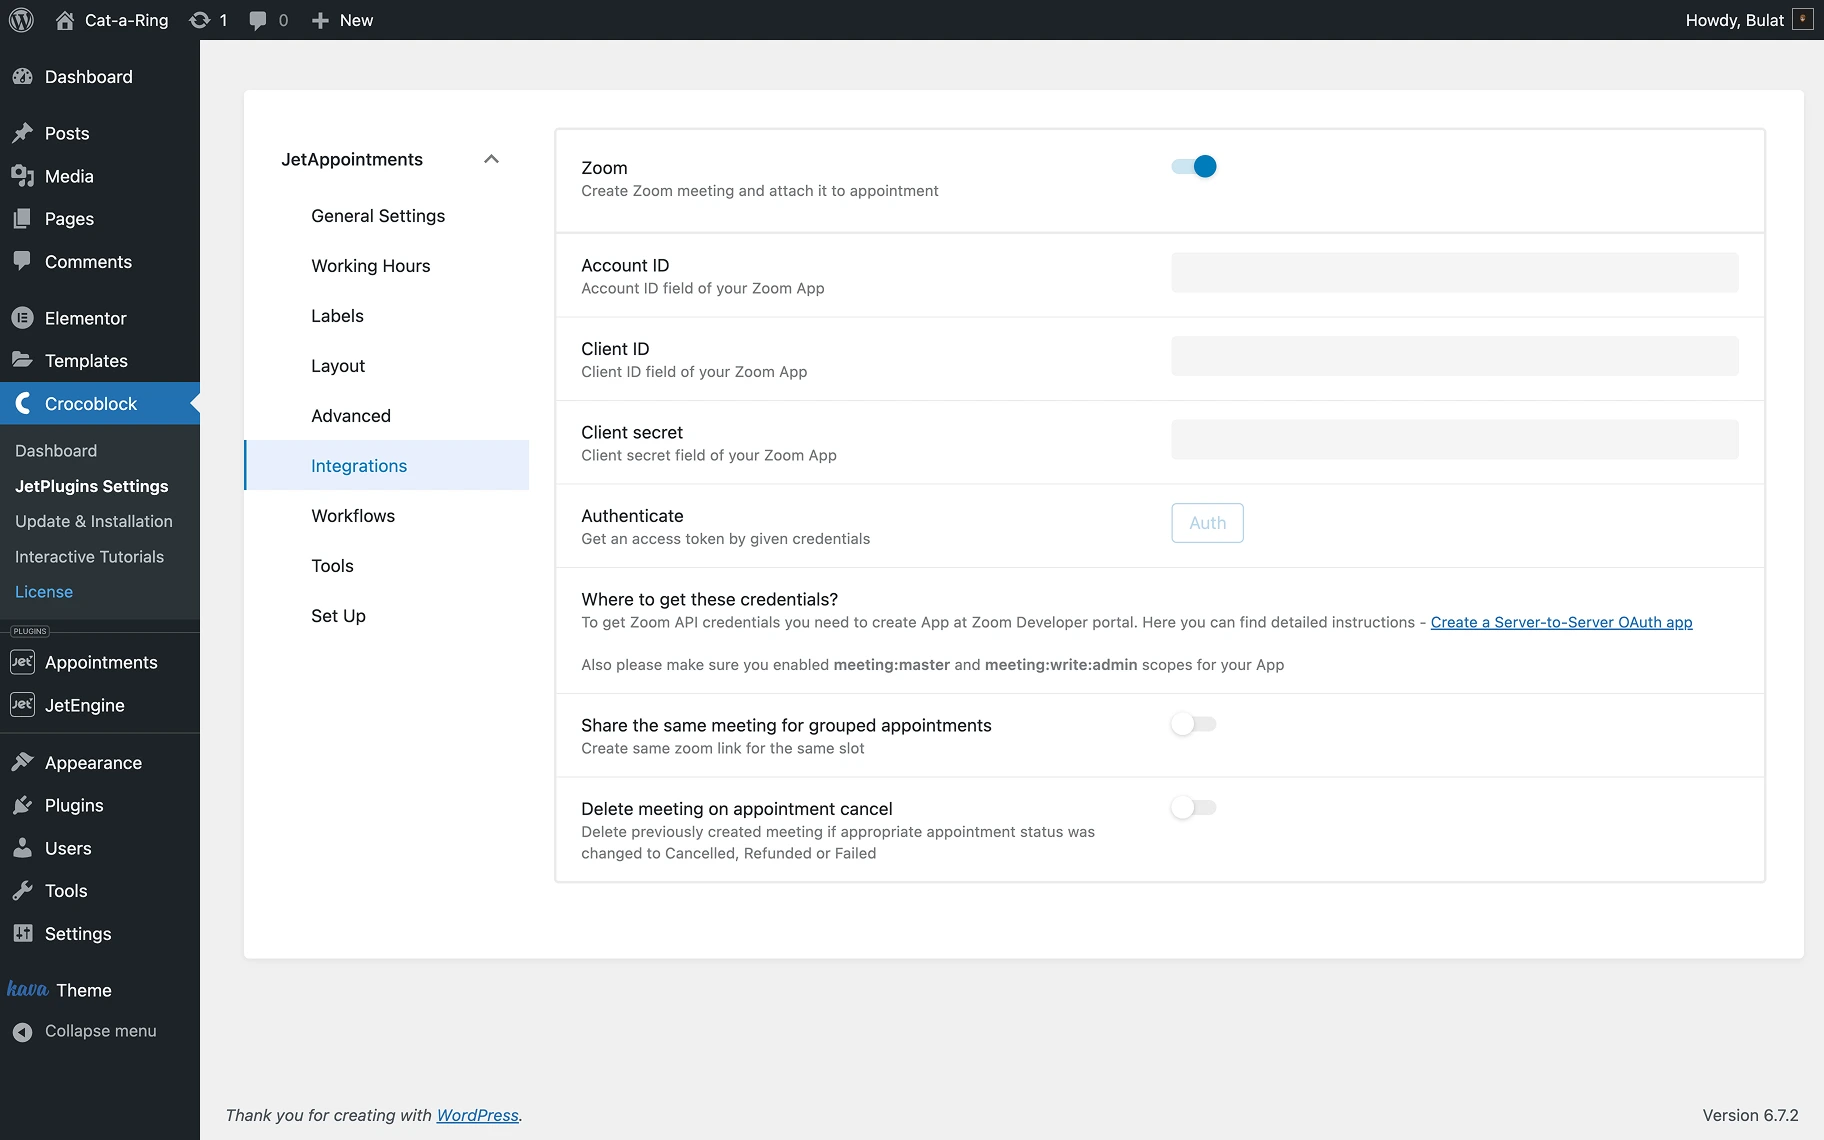
- Account ID — the Account ID field of the Zoom application;
- Client ID — the Client ID field of the Zoom application;
- Client secret — the Client Secret field of the Zoom application;
- Authenticate — a button that should be clicked to get an access token using the provided credentials;
- Share the same meeting for grouped appointments — when this switcher is on, all appointments booked for the same time slot will use the same Zoom link;
- Delete meeting on appointment cancel — when this switcher is on, the previously created meeting is deleted if the corresponding appointment status is changed to “Cancelled,” “Refunded,” or “Failed.”
For more information on finding API credentials, refer to the detailed instructions by clicking the “Create a Server-to-Server OAuth app” link in the Where you can get these credentials section.
Workflows
This tab allows enabling or disabling the current workflow and adding new workflow items.
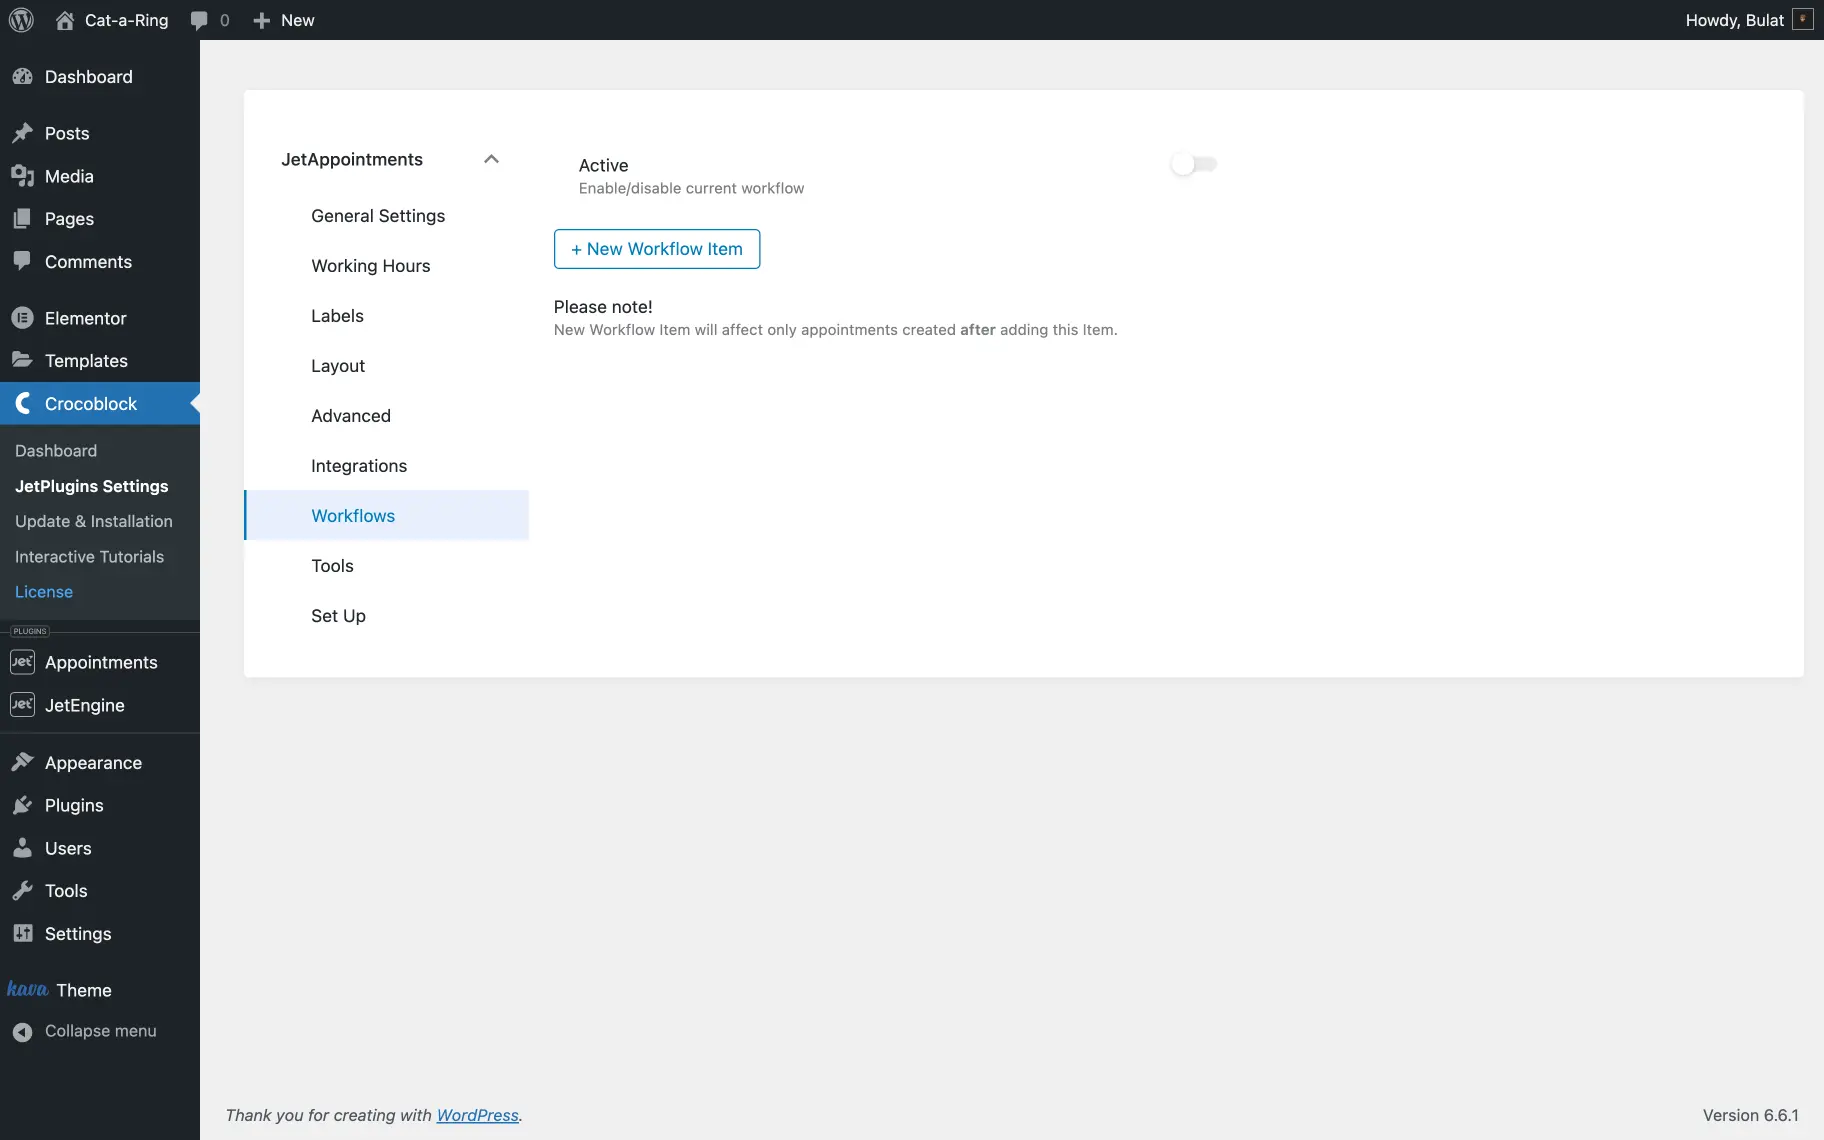
- Active — this feature is deactivated by default. When the toggle is activated, it allows for enabling/disabling the workflow. It can be done on every step of the workflow customization.
For instance, you can set a workflow to confirm the appointments via the link, both usual appointments and Zoom ones.
Tools
Here, one can clear the cache from the database tables. For example, when there are no slots available and another slot needs to be added for this day. However, it won’t be displayed on the front end. In this case, one needs to clear the cache, and the slot will appear for the users to see.
Besides that, one can change the database table here — add new columns by pressing the “New DB Column” button or delete unnecessary ones.
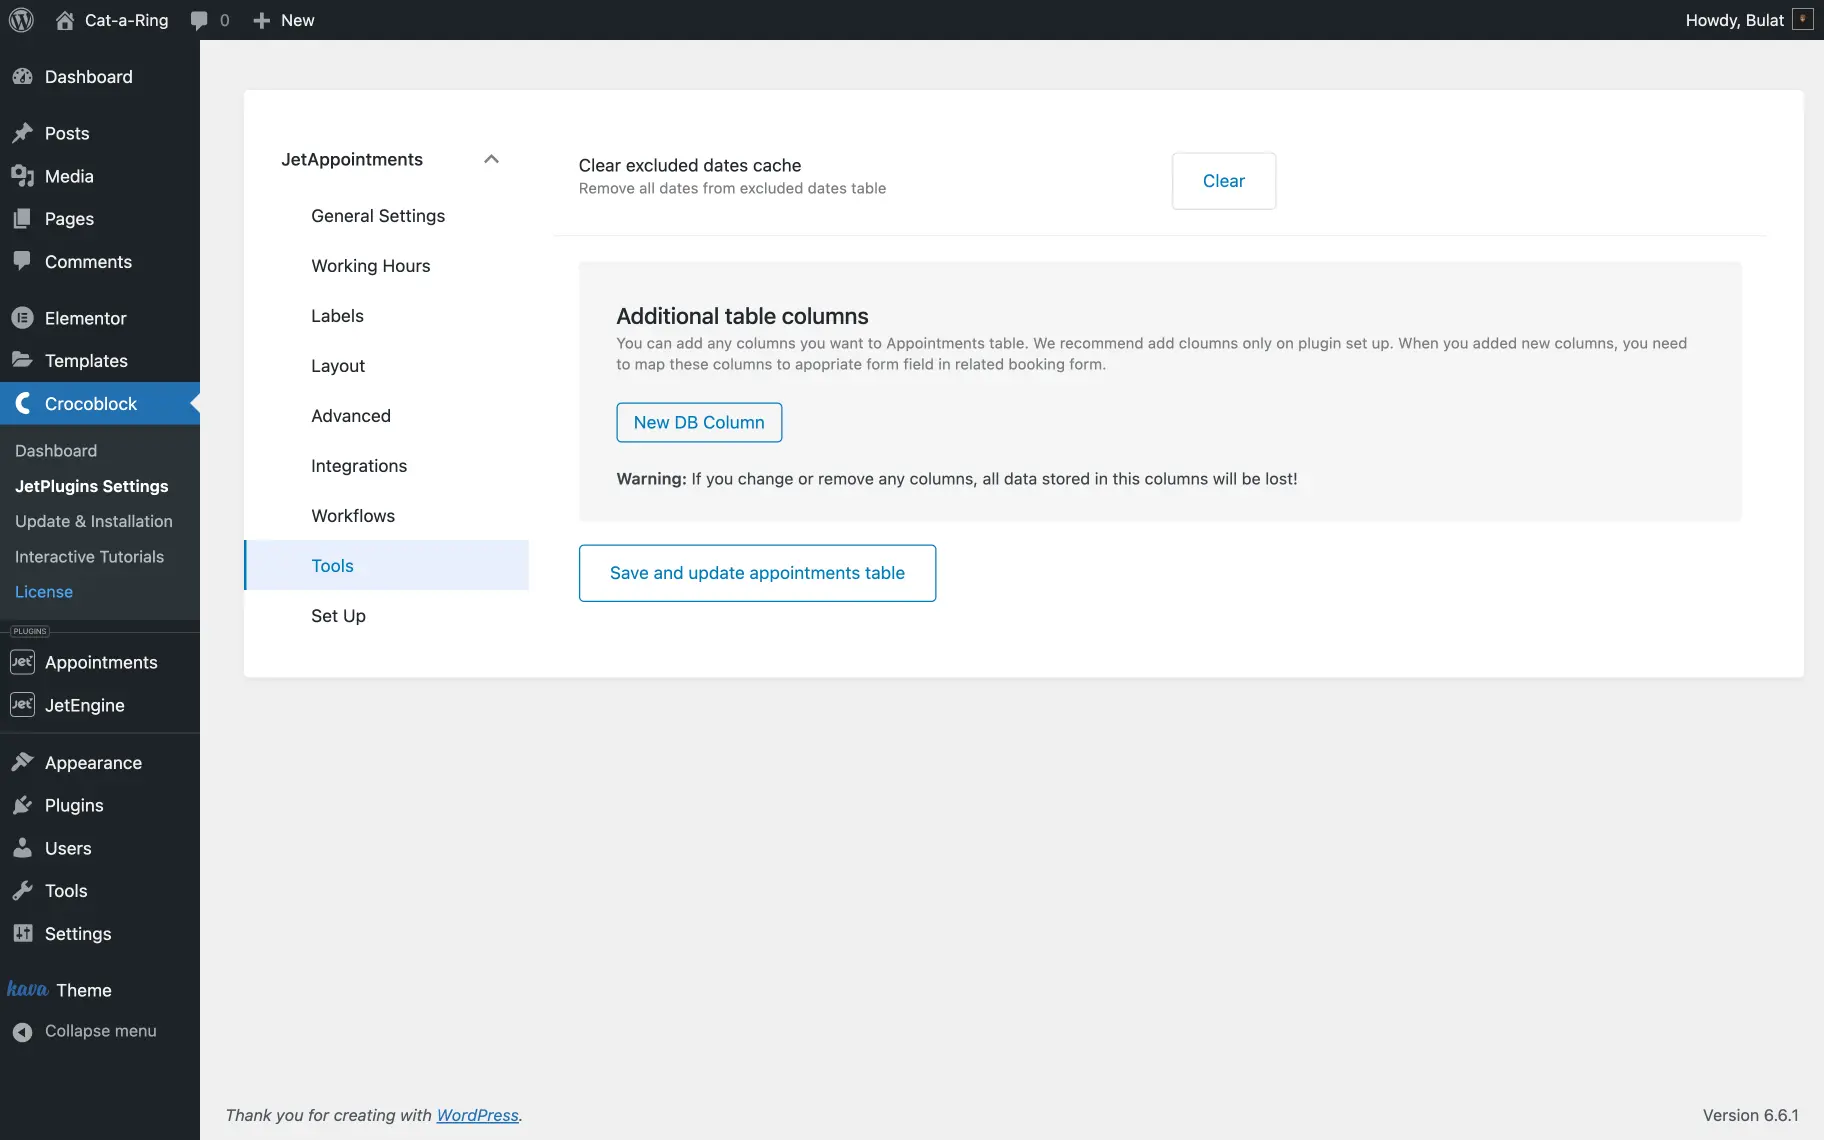
Two table columns are set by default. To delete them, the garbage bin-shaped icon should be hit.
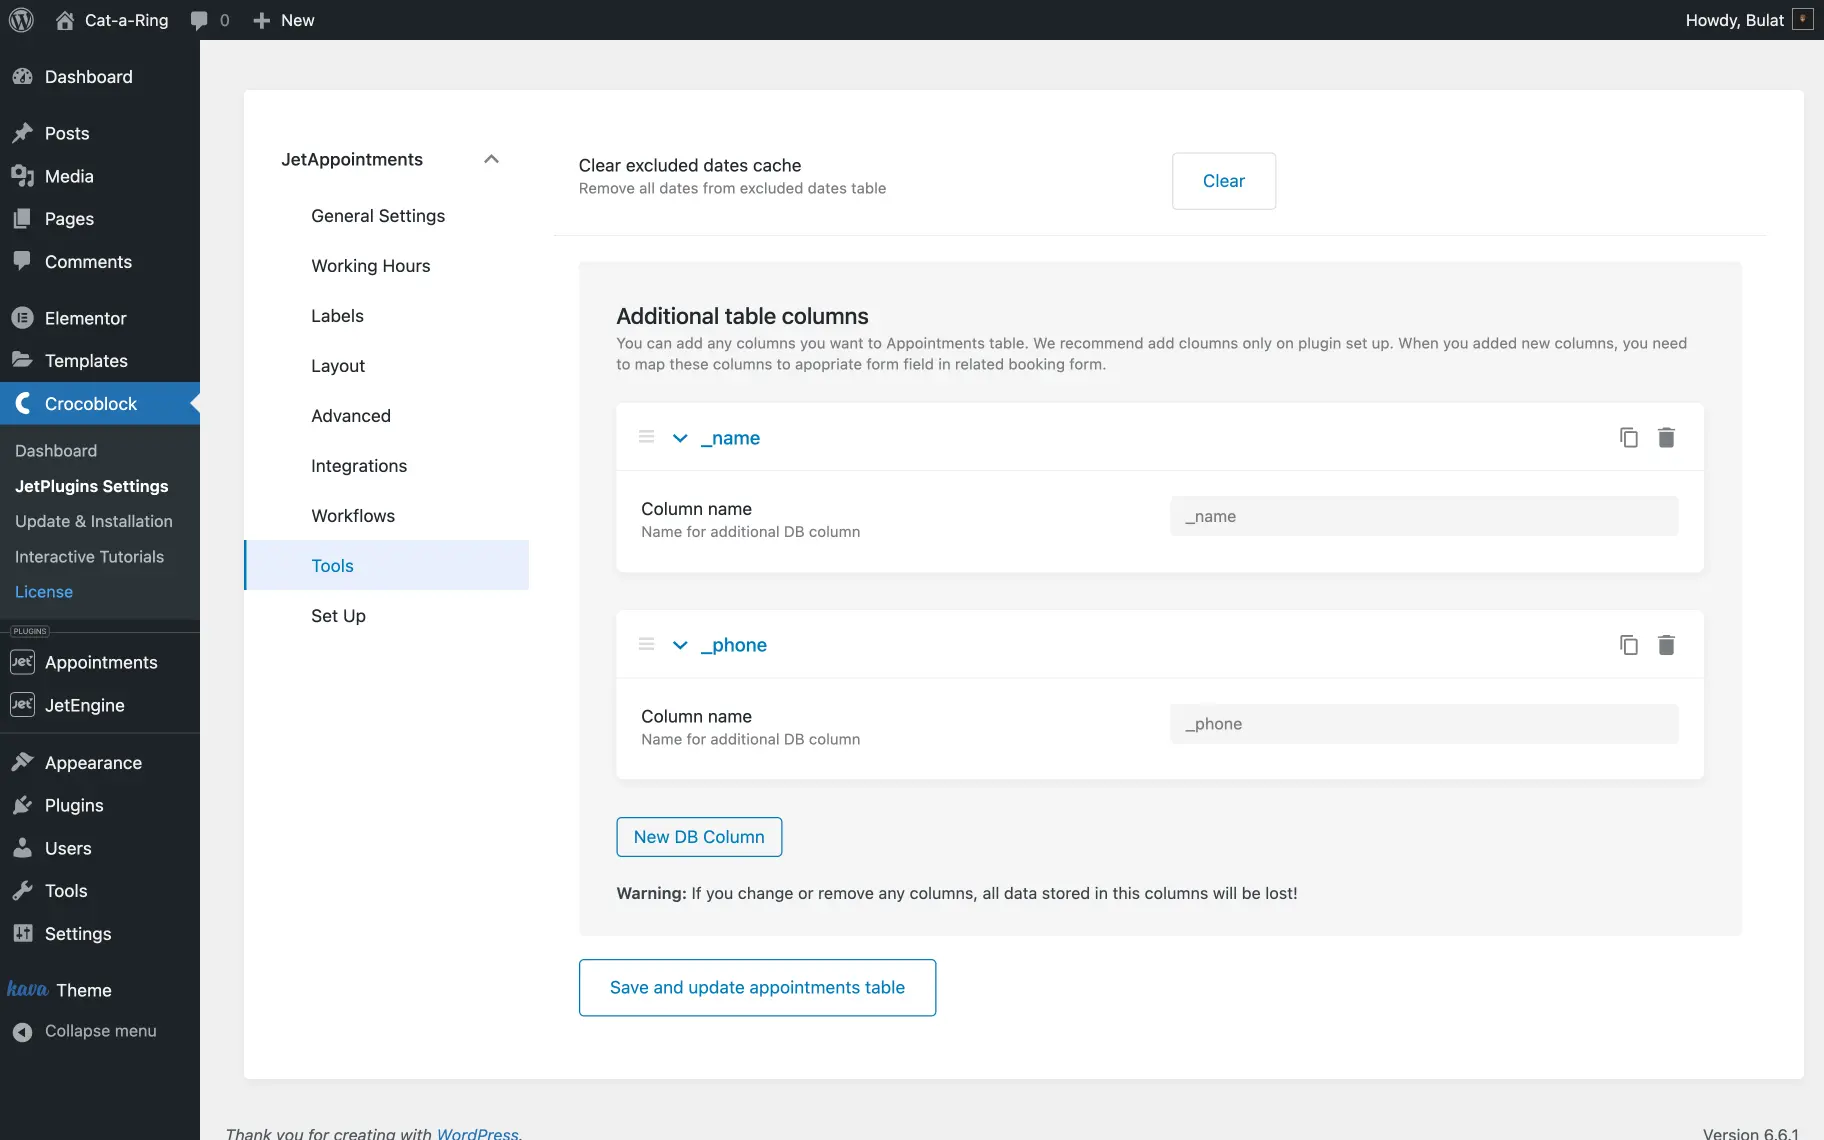
The “Save and update appointments table” button should be clicked to save the custom database columns that were previously created.
That’s it for the settings. All the details about the features available in the JetAppointment Settings dashboard for WordPress websites have been described.