JetSmartFilters Listing Overview
In this overview, we will cover the JetSmartFilters’ Listings functionality and available features for WordPress websites.
JetSmartFilters introduces the Listing functionality, which allows displaying the collection of items on the needed page and applying filters to it.
During the Listing building, one can set up the query (which elements will be shown) and the layout (how the elements will be displayed).
Each Listing has an Item assigned to it, which is a template for a single post with the blocks inside. The available blocks allow for displaying titles, images, links, and more. The Item will be automatically repeated for every element in the Listing.
Listing Creation
The listings directory can be found by proceeding to the WordPress Dashboard > Smart Filters > Listing Builder dashboard.
Here, one can observe the list of the created listings (if there are any) or build new ones.
To switch between the listings and items creation directories, the “All Listings” and “All Items” buttons are presented.

One can search among the available listings and items using the search bar and click the “gear” icon to access the Appearance and Property settings for the displayed list.
To build a new listing, the “Add New Listing” button should be pressed.
Alternatively, if the “All Items” button is clicked and the items building directory is opened, the “AddNew Item” should be clicked to build a new item.

When the “Add New Listing” button is clicked, one will observe three tabs: Query, Layout, and Item. By default, the Query tab is opened.
Here, one can select what content to display in the listing.
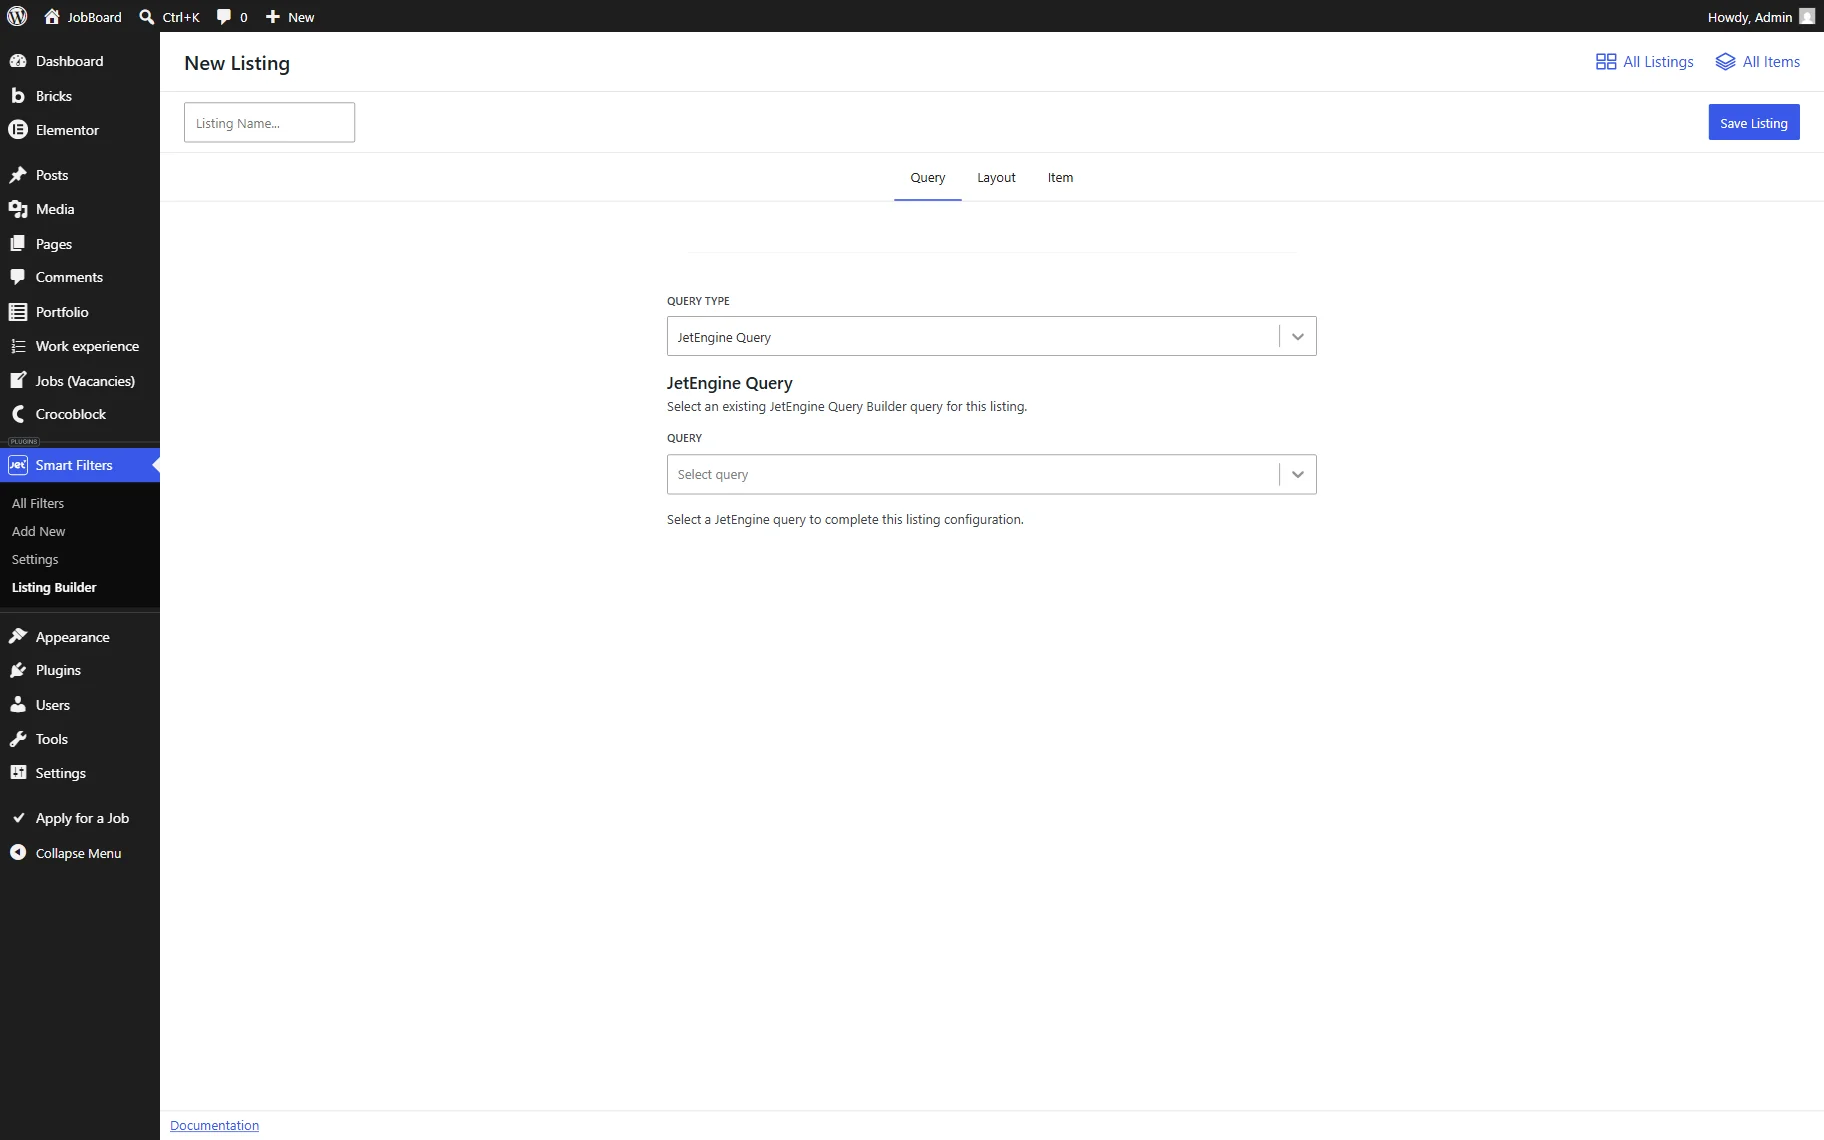
At the top of the Query tab, the QUERY TYPE field is available. It defines which data source will be used for the listing: “Posts” or “JetEngine Query Builder.”
The “Posts” option displays posts based on the settings configured directly in the Listing Builder, and “JetEngine Query Builder” uses a query previously created in JetEngine Query Builder.
When the “Posts” option is selected, the following query settings are available.
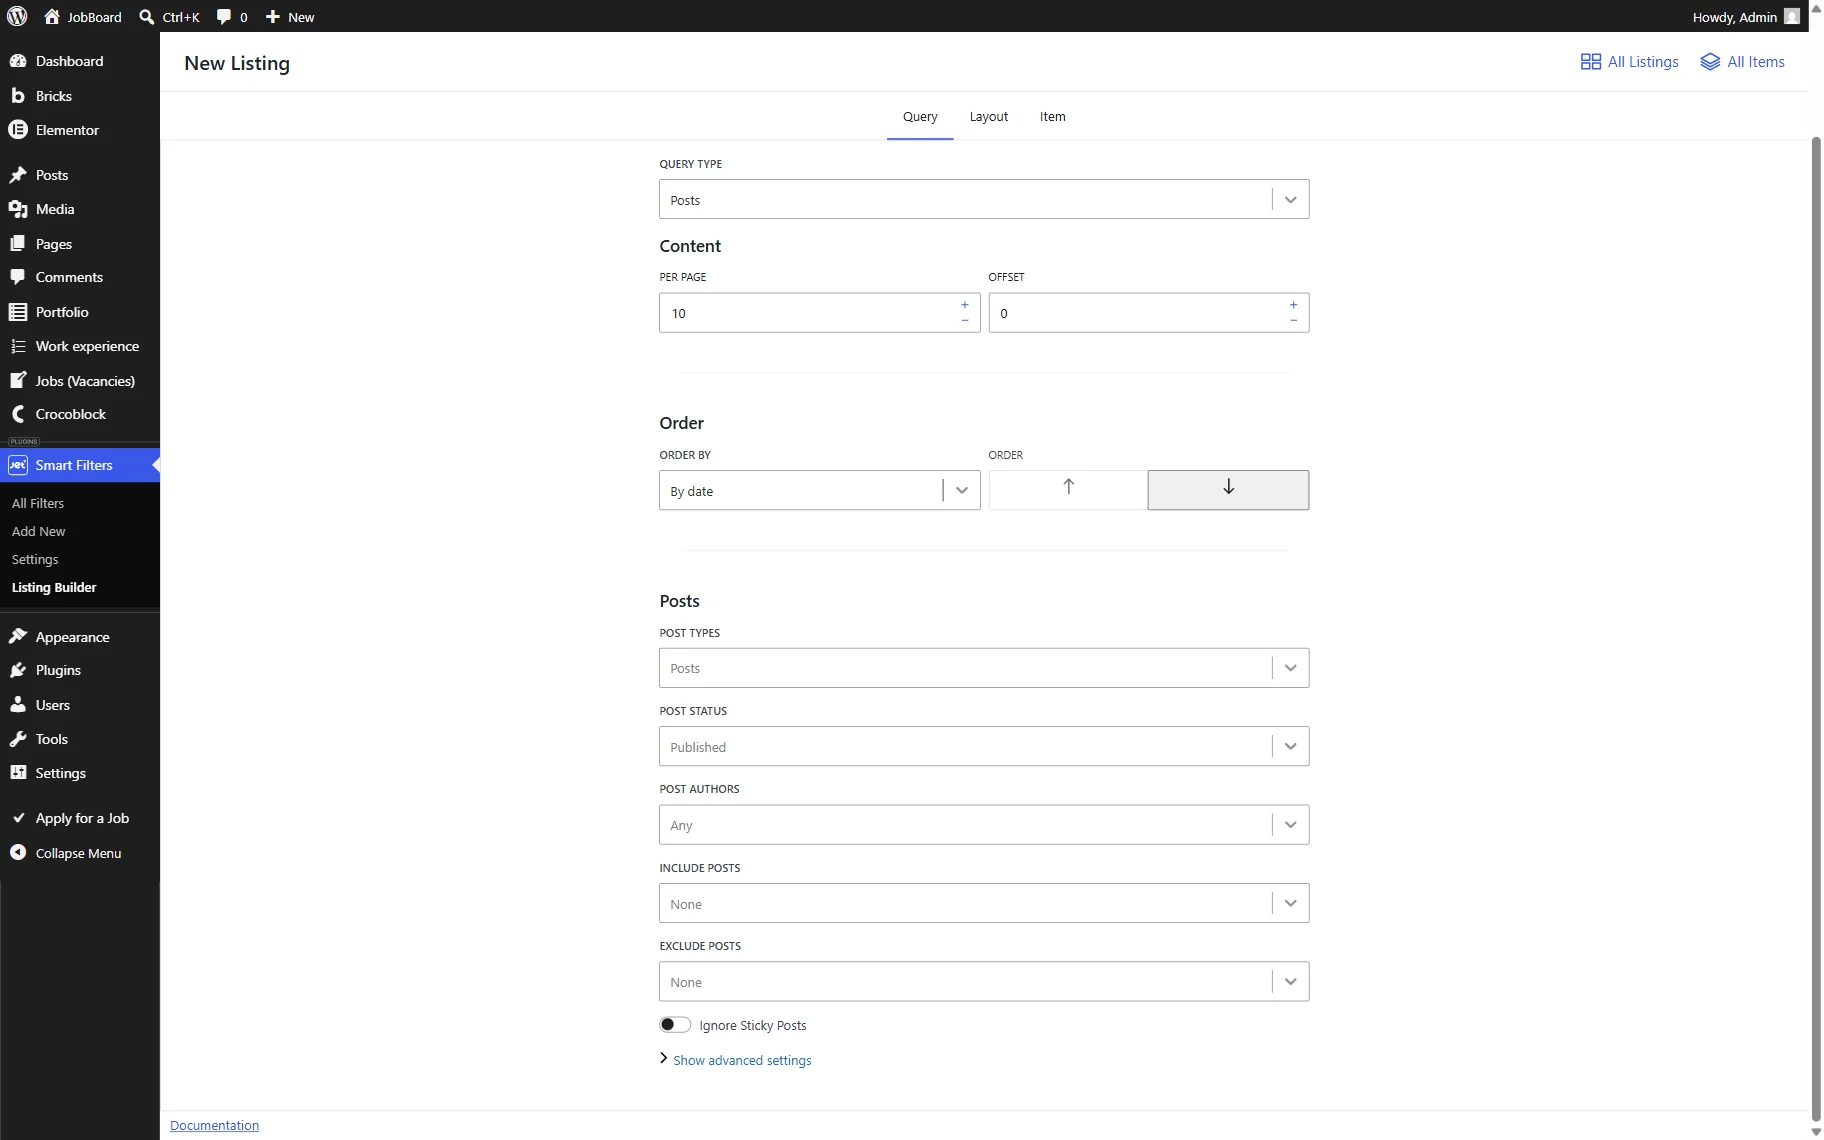
Here, first, the Content settings are presented:
- PER PAGE — the number of posts to show per page;
- OFFSET — the number of posts to skip at the beginning of the listing. For example, if you enter “2”, the first two items will not be displayed in the listing, and it will start from the third item.
Next, the Order settings are displayed:
- ORDER BY — a field that defines the criterion used for sorting items. For example, date, post ID, author, etc.;
- ORDER — a field that sets the sorting direction (the one selected in the ORDER BY field). The order can be set to ascending or descending.
The next section is called Posts and includes the following settings fields:
- POST TYPES — the post type that will be used as a source for the listing items. Here, several options can be selected;
- POST STATUS — the status of the posts that will be displayed in the listing. Here, several options can be selected;
- POST AUTHORS — the authors whose posts will be displayed in the listing. Here, several options can be selected;
- INCLUDE POSTS — a field where the names of the posts that should be included in the listing should be selected;
- EXCLUDE POSTS — a field where the names of the posts that should be excluded from the listing should be selected;
- Ignore Sticky Posts — a toggle that is disabled by default, and sticky posts are displayed at the top of the items list. When this toggle is enabled, the sticky posts functionality becomes inactive, and the posts will remain in their places.
Except for the main settings, one can also access the advanced ones by clicking the “Show advanced settings” button.
Once done, two more sections are presented: Taxonomies and Custom Fields. With the help of these settings, the content associated with certain taxonomies and custom fields can be displayed in the listing.
If the “Add Clauses” button is clicked in the Taxonomies section, the following query parameters can be set:

- TAXONOMY — a taxonomy to get the posts from. For example, “Categories,” “Tags,” or custom taxonomies;
- FIELD — a criterion by which the terms can be selected in the following TERMS field: “Term ID,” “Name,” “Slug,” or “Term taxonomy ID”;
- TERMS — the taxonomy terms used for the query;
- COMPARE OPERATOR — an operator that defines how the query should compare the post’s terms with the ones specified in the TERMS field;
- Child Terms — a toggle that is deactivated by default. When activated, it includes the children for hierarchical taxonomies.
Pressing the “Add Clause” button allows one to add an additional clause with the “AND” condition, while pressing the “Add Clauses” button again enables one to add a clause with the “OR” condition.
At the same time, if the “Add Clauses” button is clicked in the Custom Fields section, the following fields are presented:

- FIELD KEY — the key (name) of the meta field that needs to be queried;
- FIELD TYPE — a type of the meta field used for query: “Char,” “Numeric,” “Date,” etc.;
- COMPARE WITH — a comparison operator for matching the field value;
- FIELD VALUE — the value that will be used for the comparison against the custom field.
Clicking the “Add Clause” button allows adding an additional clause with the “AND” condition, and clicking the “Add Clauses” button again adds a clause with the “OR” condition.
When the “JetEngine Query Builder” option is selected in the QUERY TYPE field, the interface displays the QUERY field where one can choose a previously created JetEngine query.
In this case, all query logic is managed inside JetEngine Query Builder, while Listing Builder is responsible only for displaying the returned items.
The following settings tab, called Layout, includes one section, called Sizing.
The three tabs are already presented by default: for three, two, and one-column layouts. They can be deleted if needed, or the settings inside can be adjusted as preferred:

- MAX WIDTH — the maximum width of the listing container;
- COLUMNS — a number of columns in the listing;
- SPACING — the gap between the items in the listing.
To add a new layout, the “Add New” button should be clicked.
In the following Item column, the item with the blocks inside can be assigned to the listing.
So, in the corresponding Item dropdown list, one can select the previously built item or click the “Create new item” button to build the new item from scratch.

If the “Create new item” button is clicked, the item creation page will be opened.
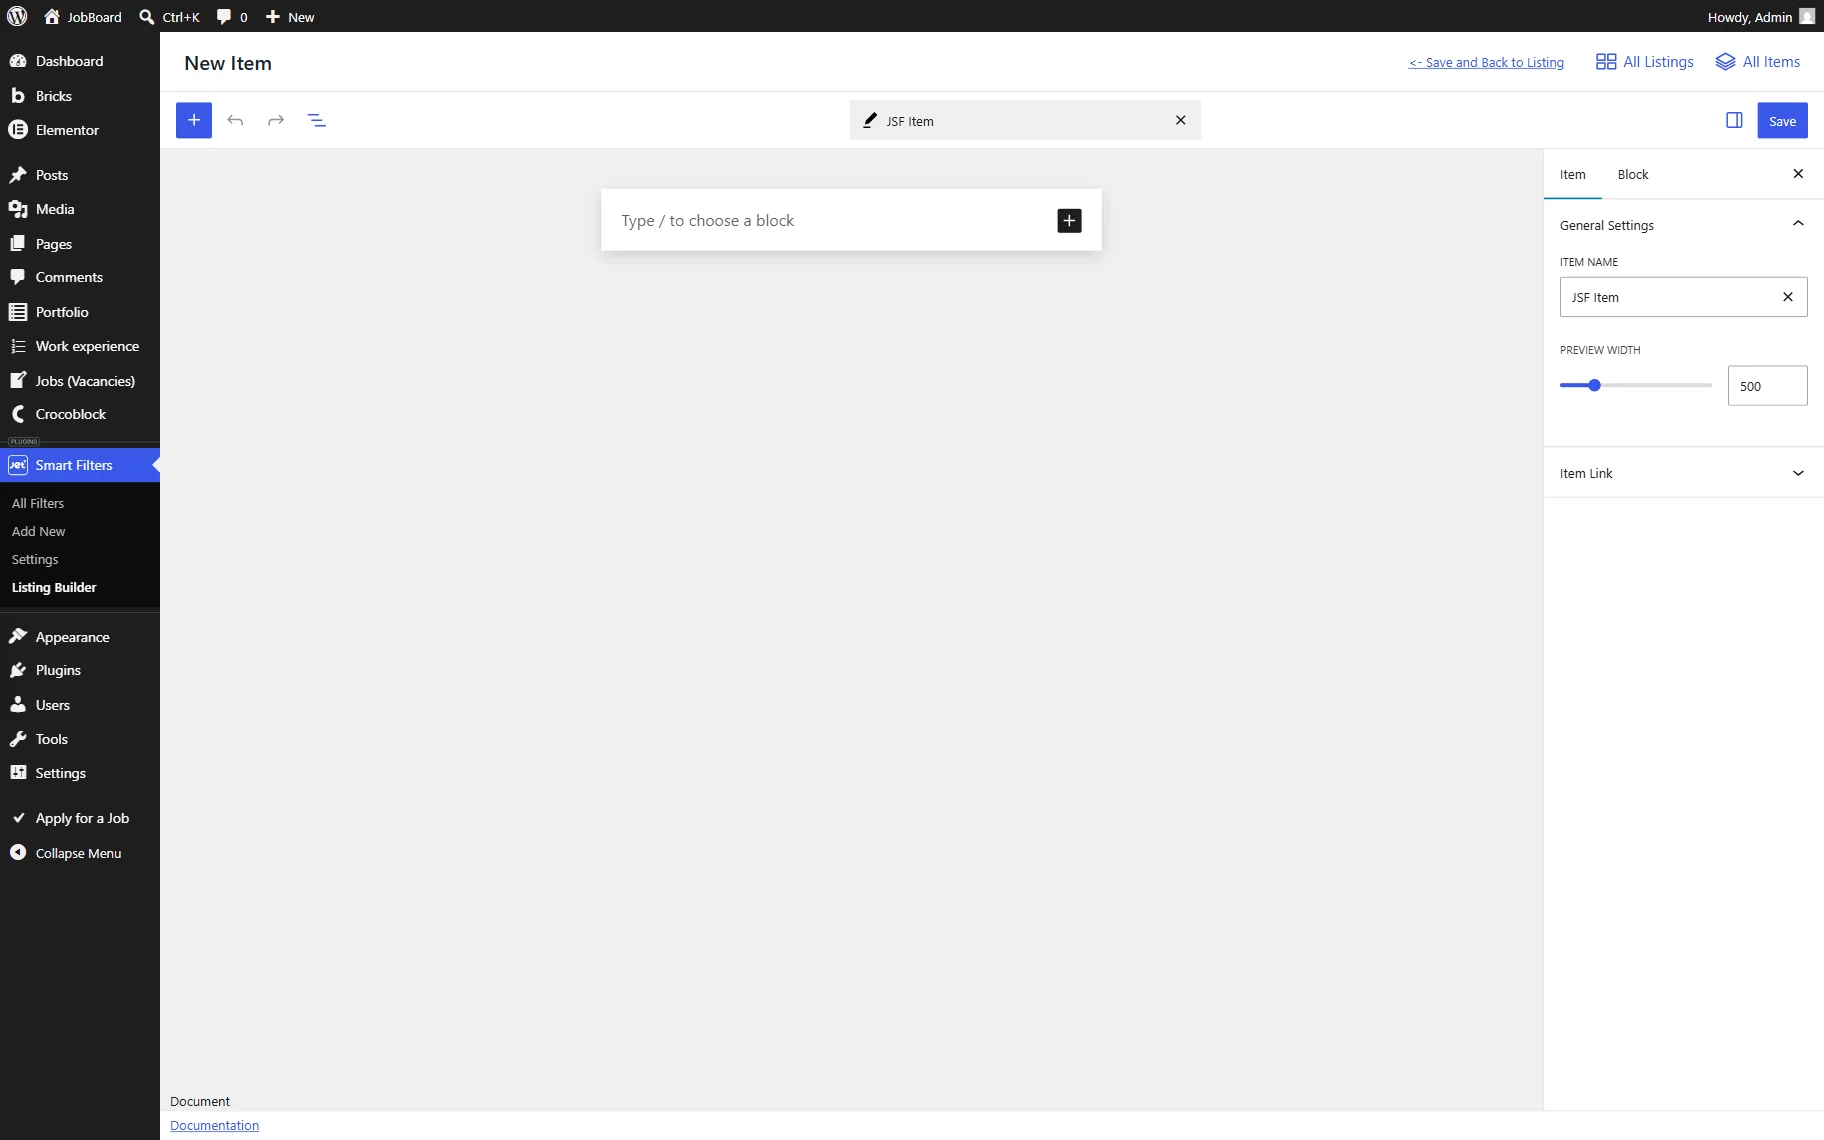
Initially, one can see the Item settings block on the side. Here, two tabs are presented: General Settings and Item Link.
In the General Settings tab, one can enter the ITEM NAME and set the PREVIEW WIDTH of the item.
In the Item Link tab, one can activate the Item Link toggle. It allows turning the entire listing into a clickable element.
Once enabled, additional settings become available:
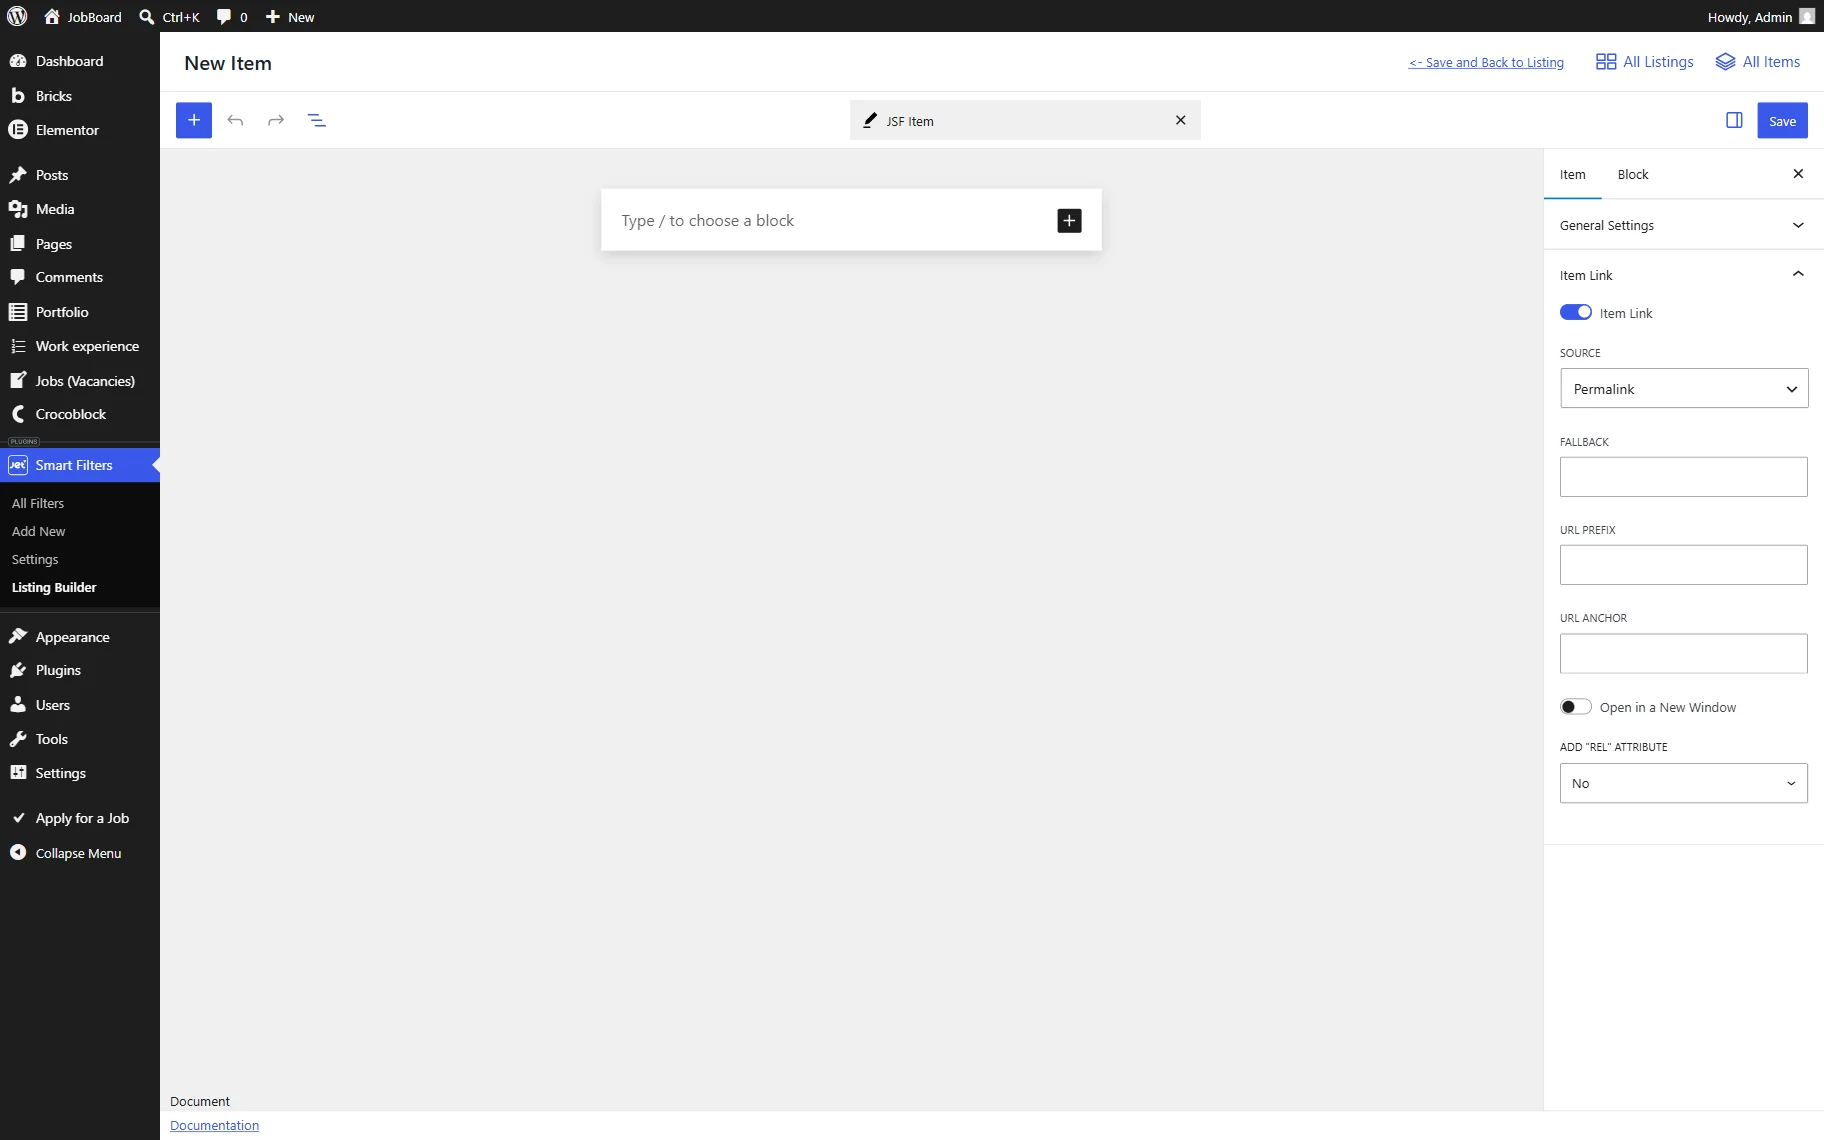
- SOURCE — defines where the link URL should be taken from. The available options are:
- Permalink — uses the permalink of the current item;
- Attachment URL — uses the URL of the related attachment;
- URL From Meta Field — retrieves the URL from the selected meta field;
- URL From Options — retrieves the URL from the specified options field.
- FALLBACK — a fallback URL used when the selected data source does not return a value;
- URL PREFIX — a prefix added before the URL value;
- URL ANCHOR — an anchor appended to the generated URL;
- Open in a New Window — a toggle that, when activated, opens the link in a new browser window;
- ADD “REL” ATTRIBUTE — a dropdown field that allows adding an attribute to the generated link.
Also, make sure that the item name is added. Next, one can add content inside the item by clicking the “plus” button or typing the block’s name in the editor area, starting with the “/” character.

Item Blocks
Now, we will briefly look through the main listing blocks that can be added to the item.
The Listing Field block displays any text data. More information about this block can be found in the Listing Field Block Overview.

The Listing Image block helps to display the dynamic images. More information about this block can be found in the Listing Image Block Overview.

The Listing Link block can be used to add text links to the item. More information about this block can be found in the Listing Link Block Overview.

The Listing Terms block renders the posts’ terms and can be used for the listing with the posts correspondingly. More information about this block can be found in the Listing Terms Block Overview.

Once the item is created, it can be saved with the “Save” button.
Then, the newly built item can be assigned to the listing in the Item dropdown of the listing editor, and when done, the listing can be saved by clicking the “Save Listing” button.

Building a Filter and Adding the Listing to the Page
After the listing is built, one can create filter(s) and assign them to the built listing with the help of the JSF Listing block/widget/element. More information about it can be found in the How to Create Filters with JSF Listing tutorial.

When adding the JSF Listing to the Block Editor, it can be placed inside the block in order to customize the block’s layout.

FAQ
JetSmartFilters Listing Builder is a native listing solution built directly into JetSmartFilters. JetEngine Listing Grid is a separate listing system provided by JetEngine. The choice depends on the project requirements and preferred workflow. For a detailed comparison, check the JetEngine Listing Grid vs. JetSmartFilters Listing Builder: Which One to Use? guide.
Currently, listings can be built using standard “Posts” queries or queries created with JetEngine Query Builder.
Yes. The configuration of each Query Type is stored separately, so switching between them does not override the existing settings.
Open the Item Link tab, enable the Item Link toggle, and configure the available settings: link source, fallback, prefix, and others.
Yes. Filters can be connected to the listings that use JetEngine Query Builder as their source, provided that the query returns compatible data.
In many cases, yes. Since the listing and filtering logic are handled with the same system, fewer integrations are required, which may reduce overhead.
That’s all about the JetSmartFilters’ Listing functionality available for WordPress websites.