How to Set Automatic Price Calculator
This tutorial provides all the details on how to set prices for every apartment you offer and define the price rates depending on the number of days a user wants to book. Besides, this guide will teach you to display the total price automatically in the booking form and WooCommerce order.
Before you start, check the tutorial requirements:
- Elementor (Free version), Block editor (Gutenberg), or Bricks
- JetBooking plugin installed and activated
- JetFormBuilder plugin installed and activated with a Single Page Booking Form built
Use Case with JetFormBuilder
Adjust booking price and pricing rates
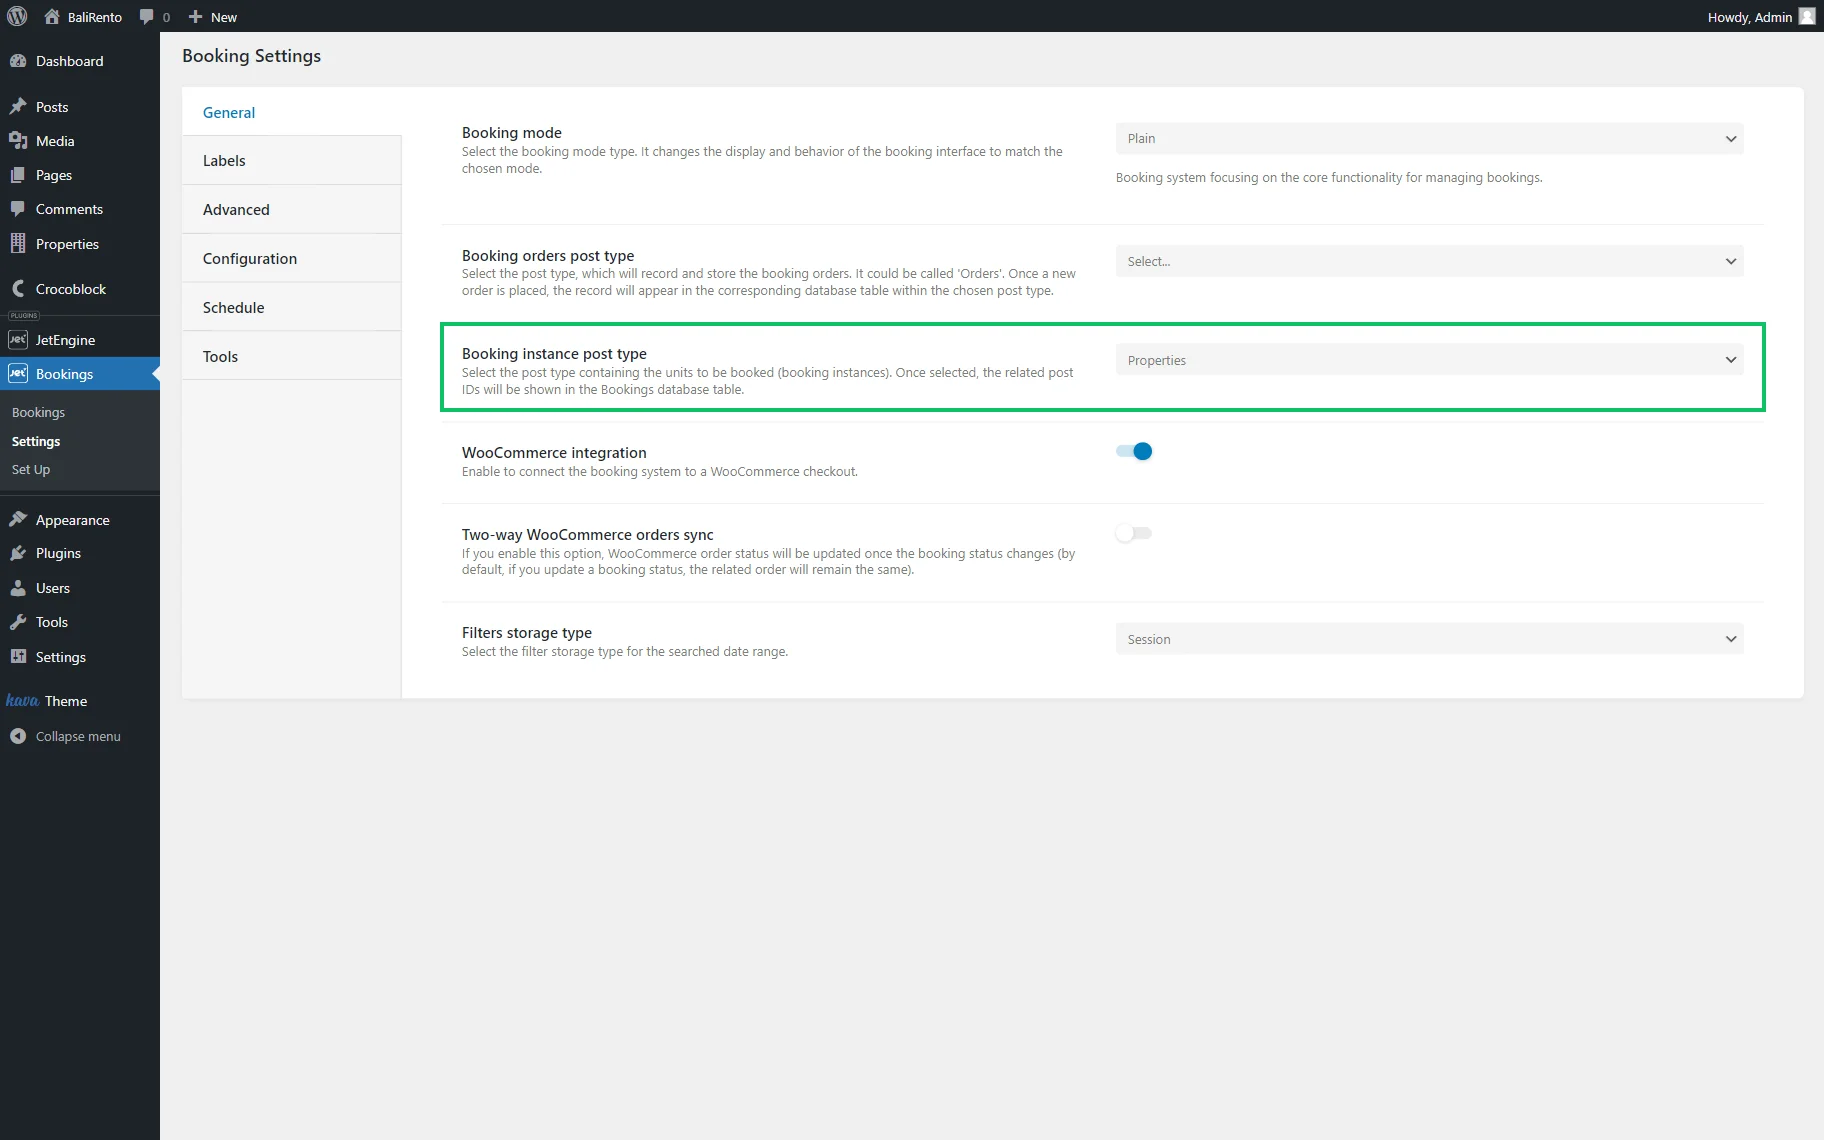
Open the General tab in the WordPress Dashboard > Bookings > Settings directory. Here, you can see the post type applied as a Booking instance post type.
The fields for editing the booking settings are added to this post type, so we edit its posts accordingly.
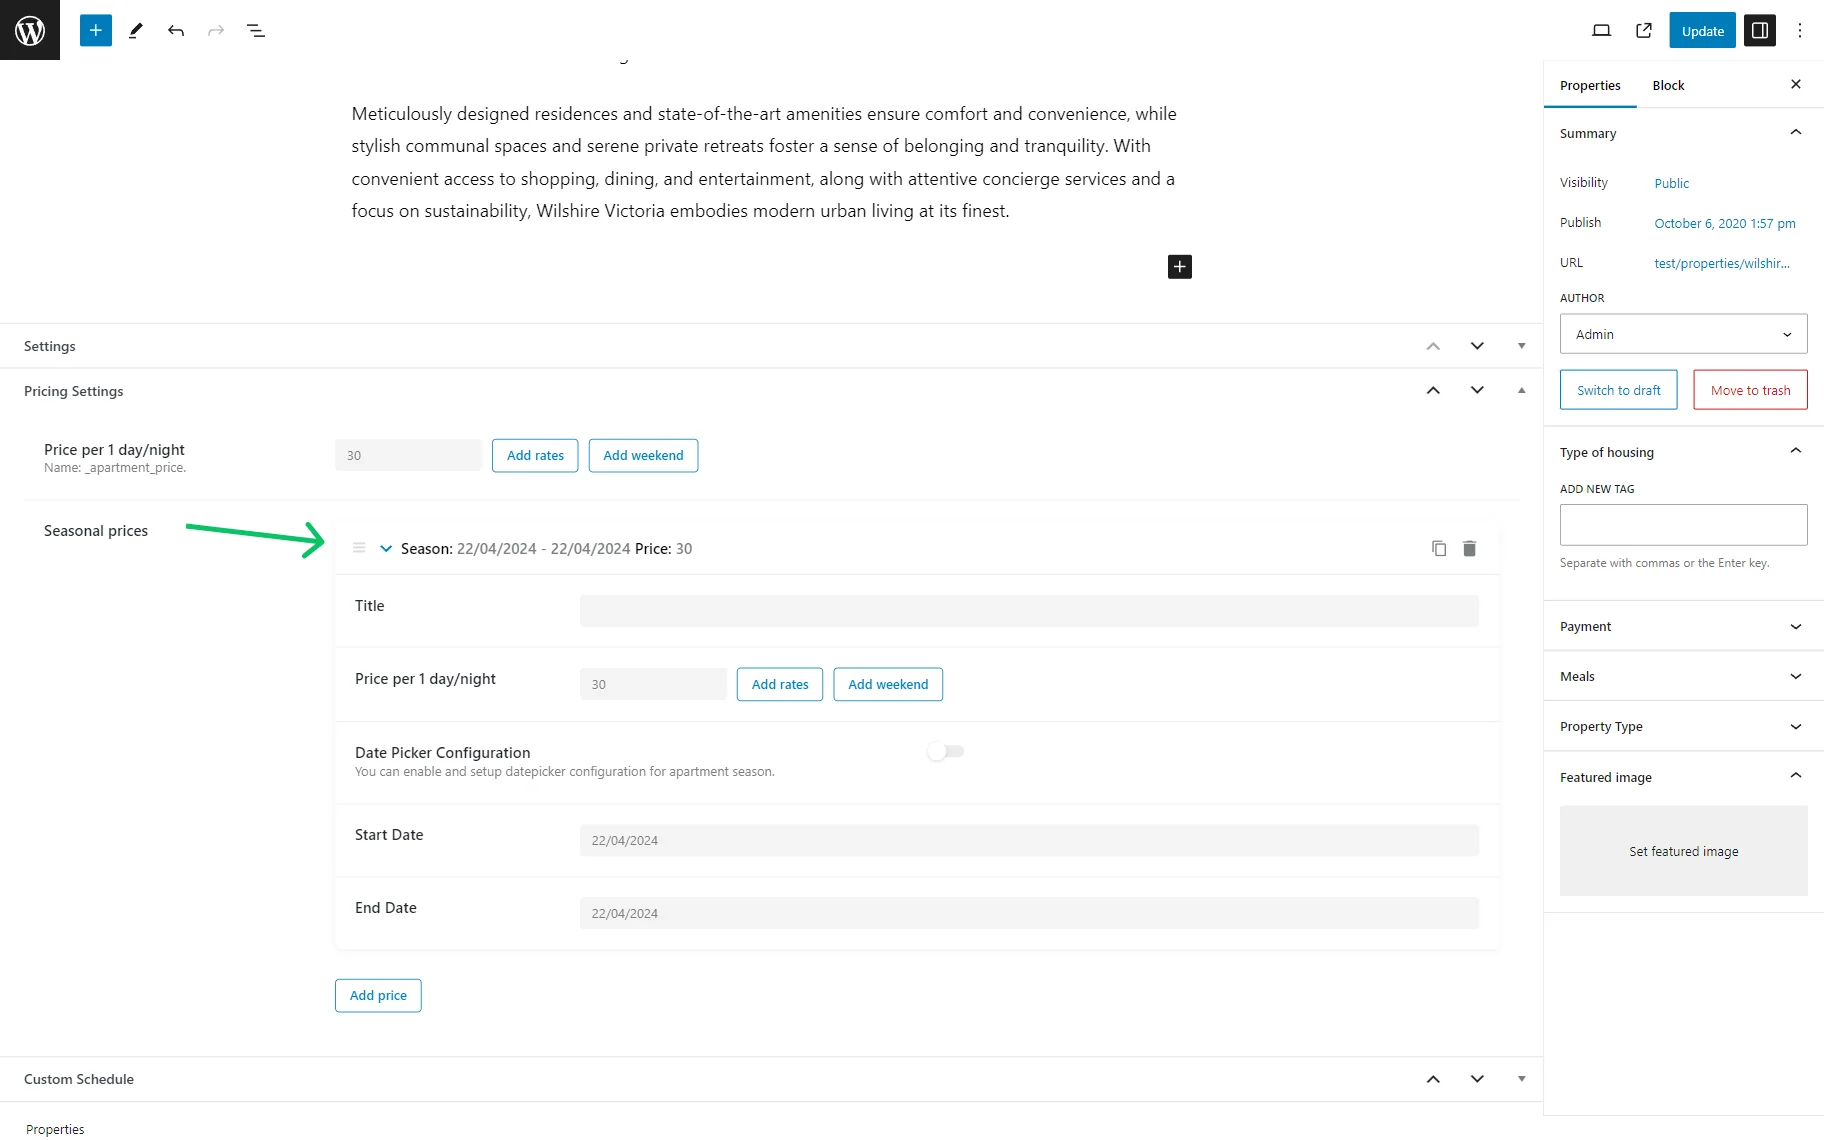
On the post editing page, there is a Pricing Settings block, in which the Price per 1 day/night is added. This price can be displayed later on the Single Page.
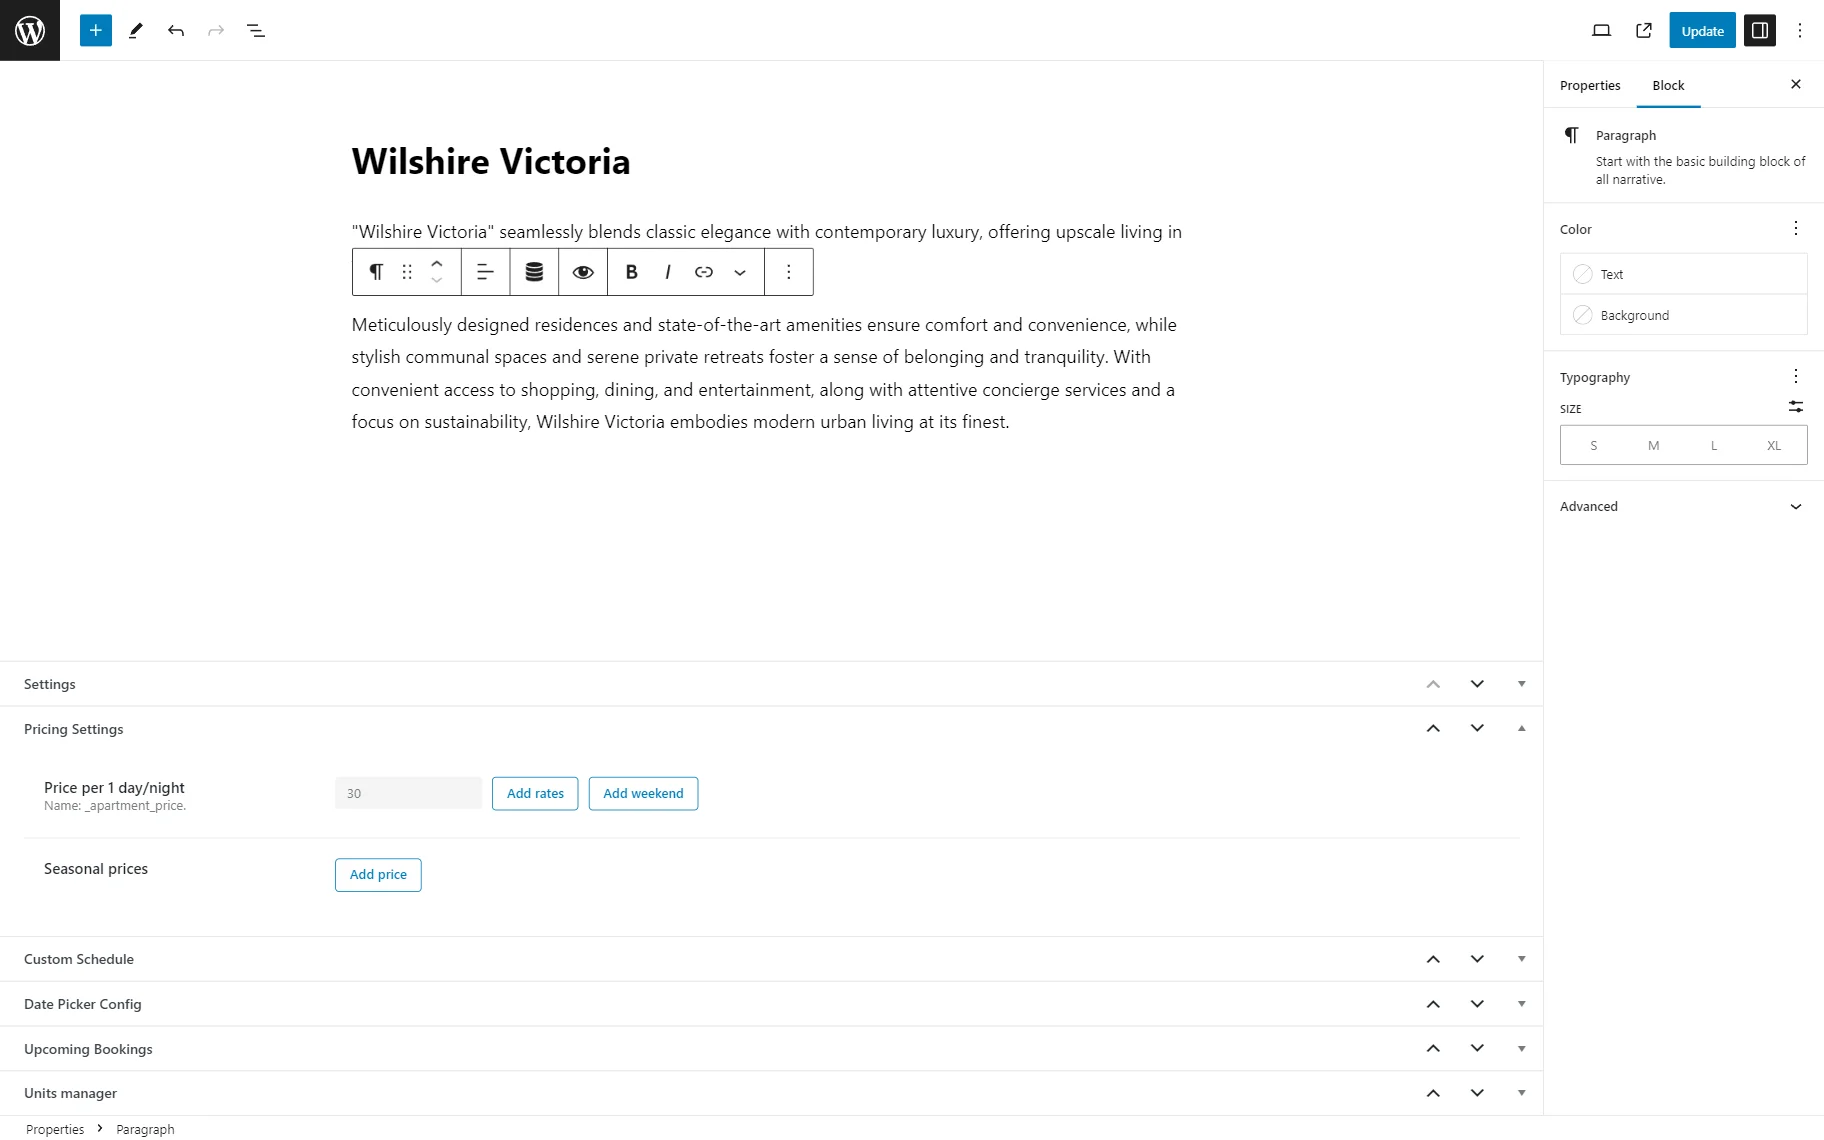
Besides adding the static price for one day or night, you can also create flexible price rates.
It means you can set a different price for a longer-term stay. For example, if a visitor rents the accommodation for three or more days, the price per day will be $ 21 instead of $ 30.
Click the “Add rates” button to call the rates settings.
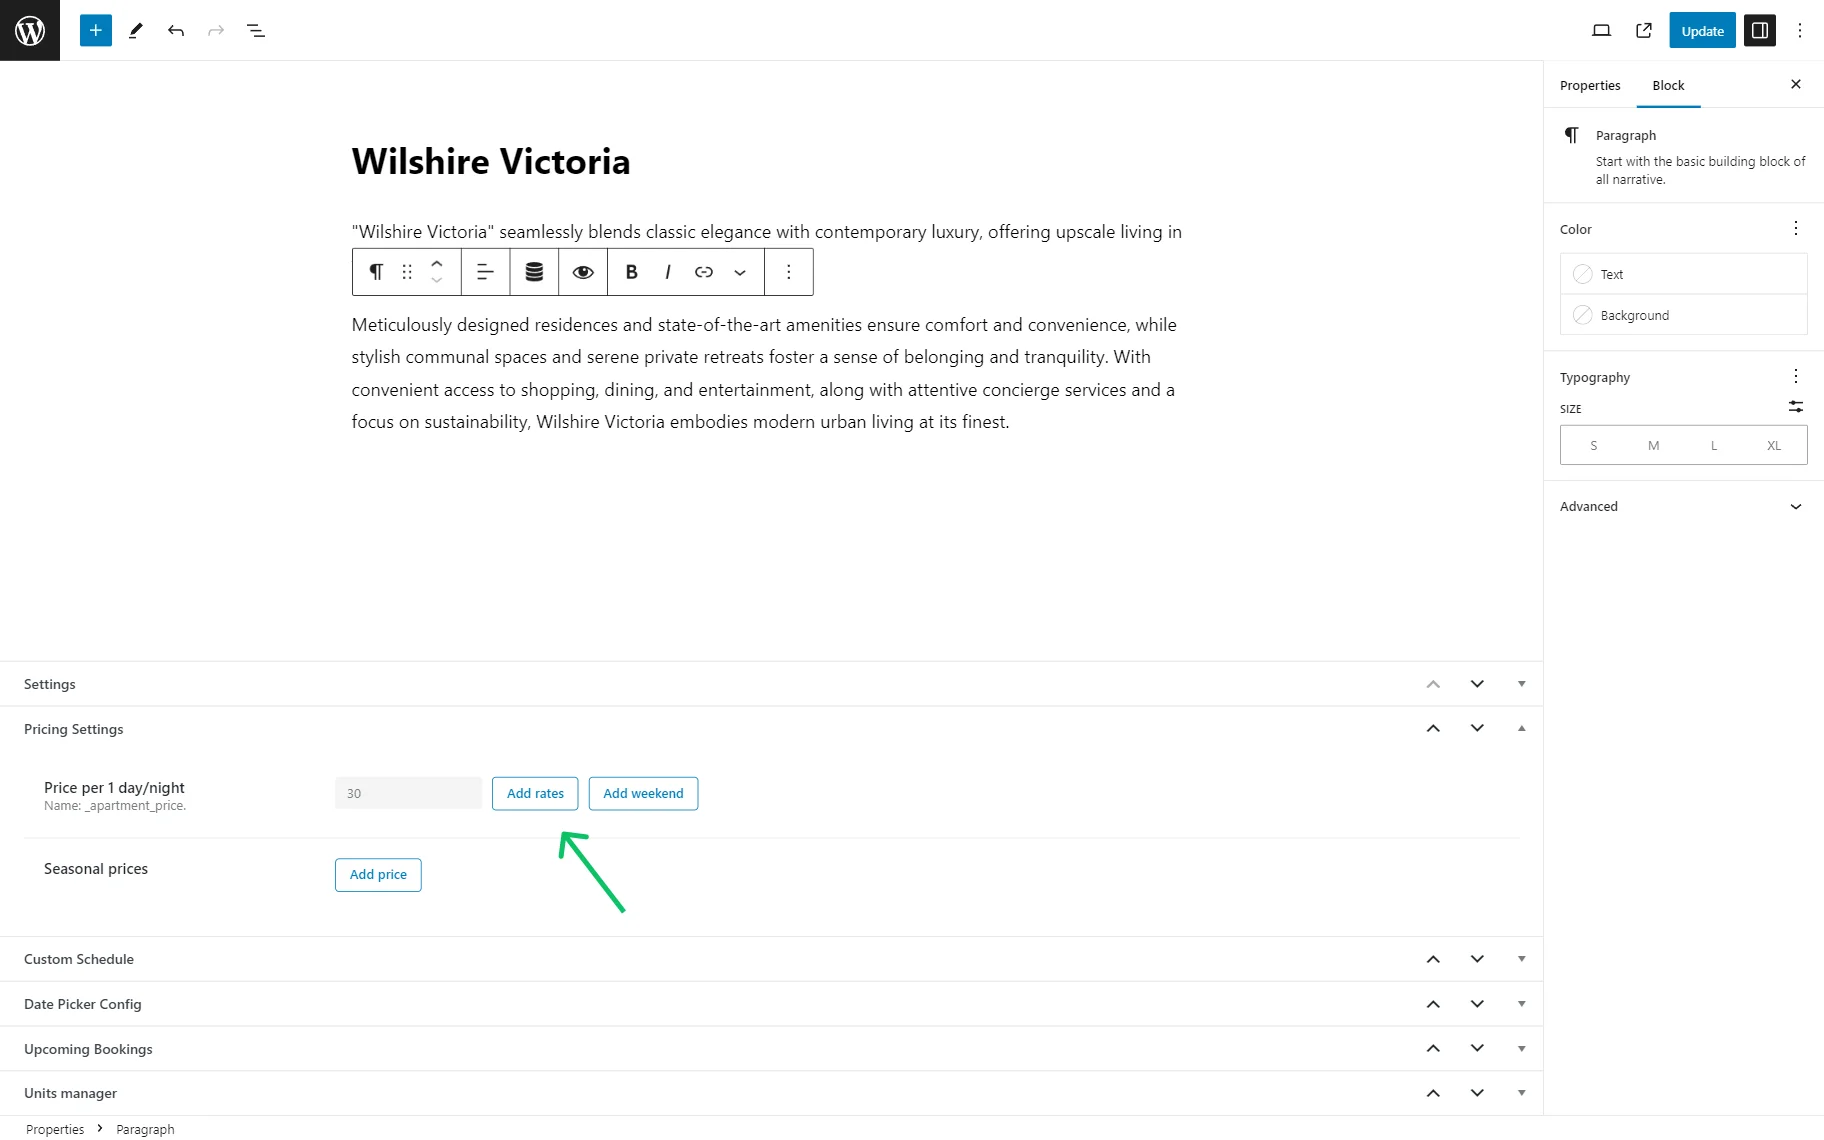
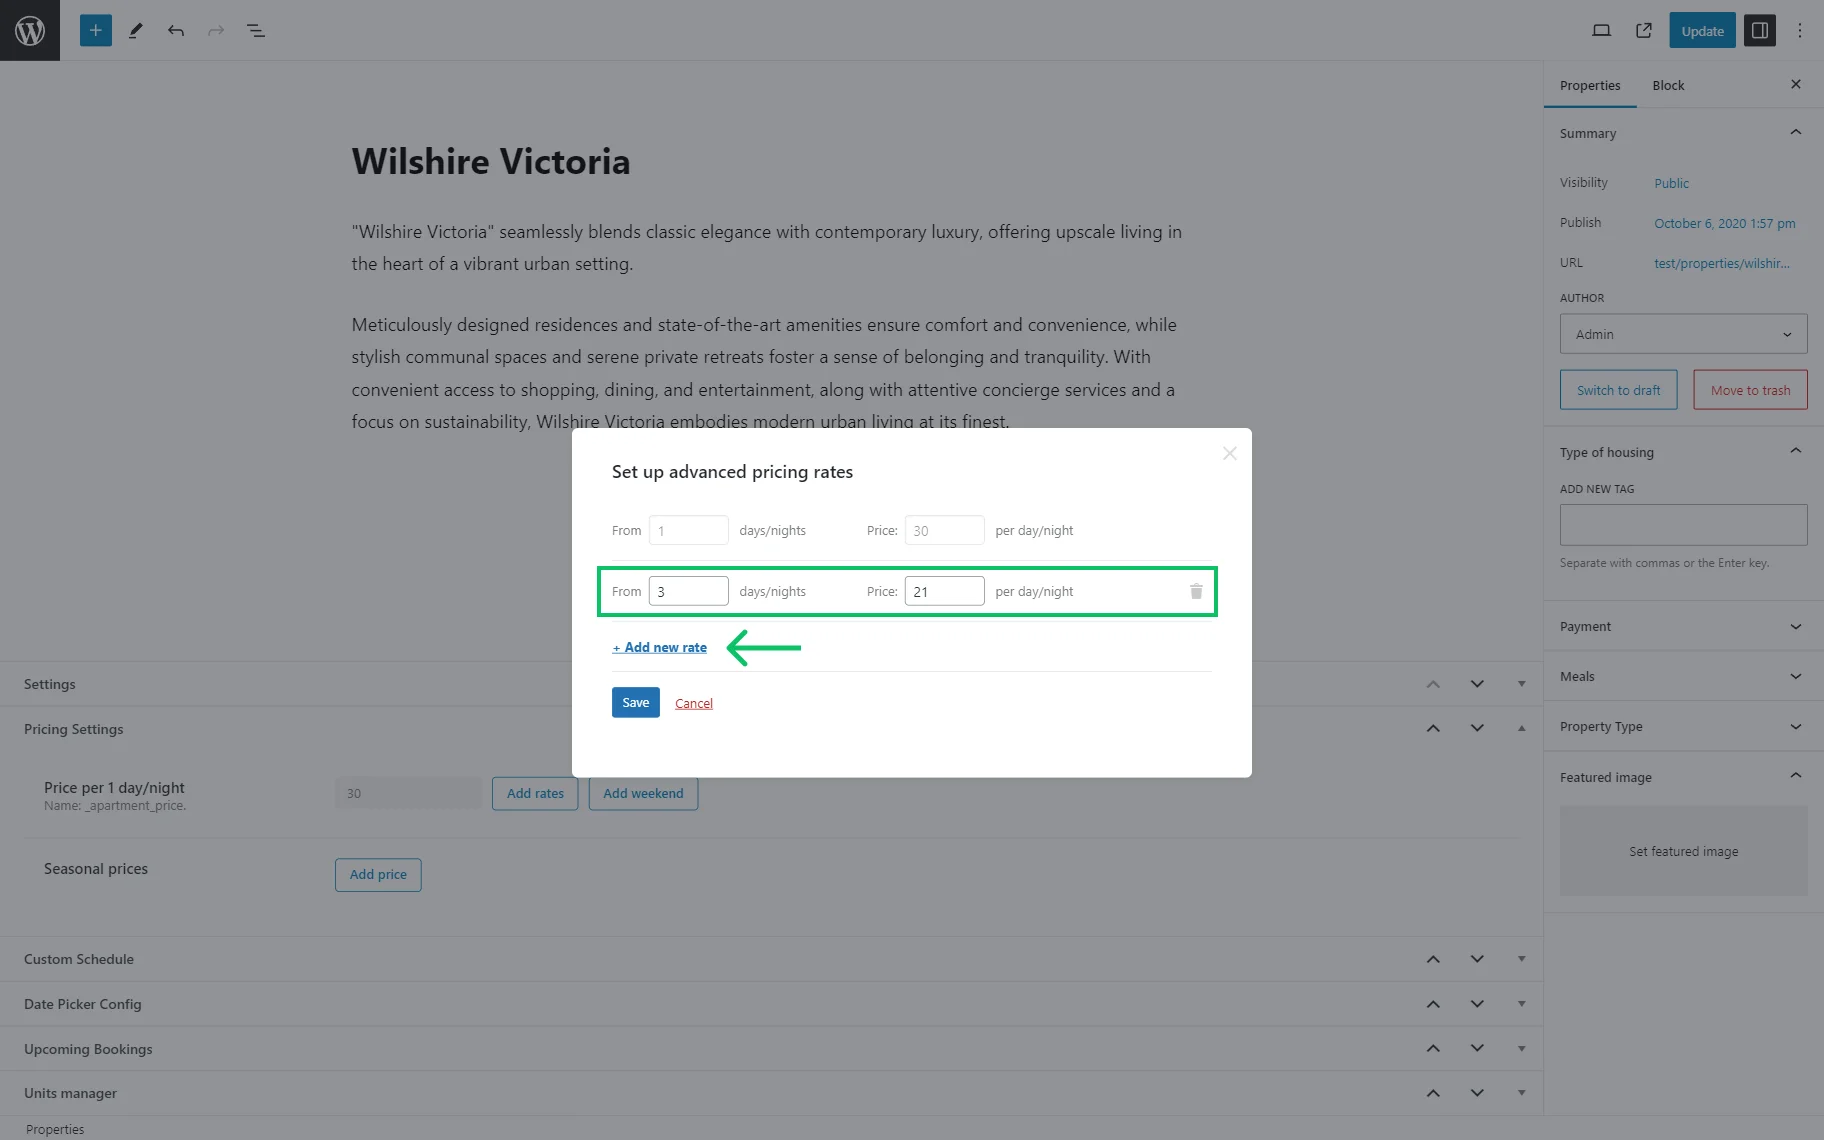
Press “Add new rate” to specify the new rates.
In our example, we added a new rate for bookings that last three days, priced at $21.
Add as many rates as you want. When you are done, hit the “Save” button.
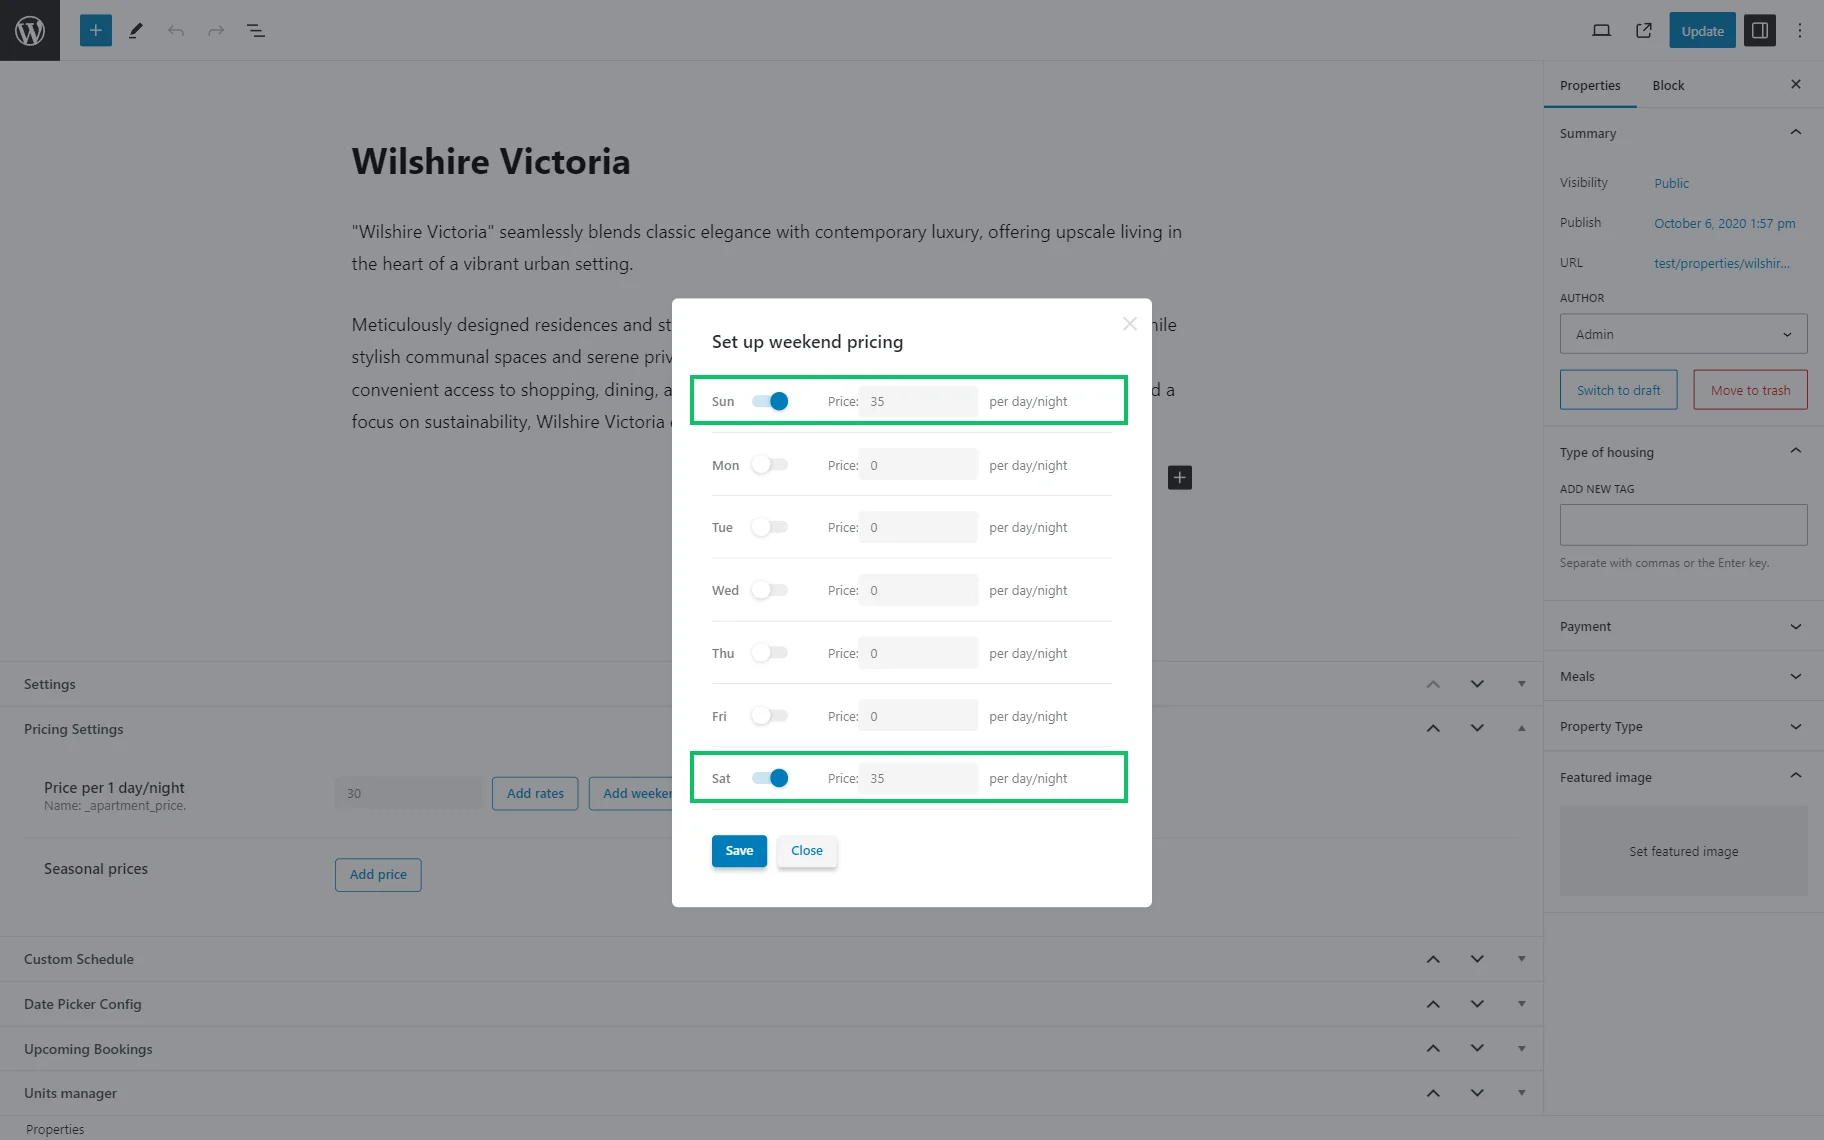
You can optionally add special prices on specific days of the week by hitting the “Add weekend” button.
You can also add special prices for specific date periods using the Seasonal prices settings.
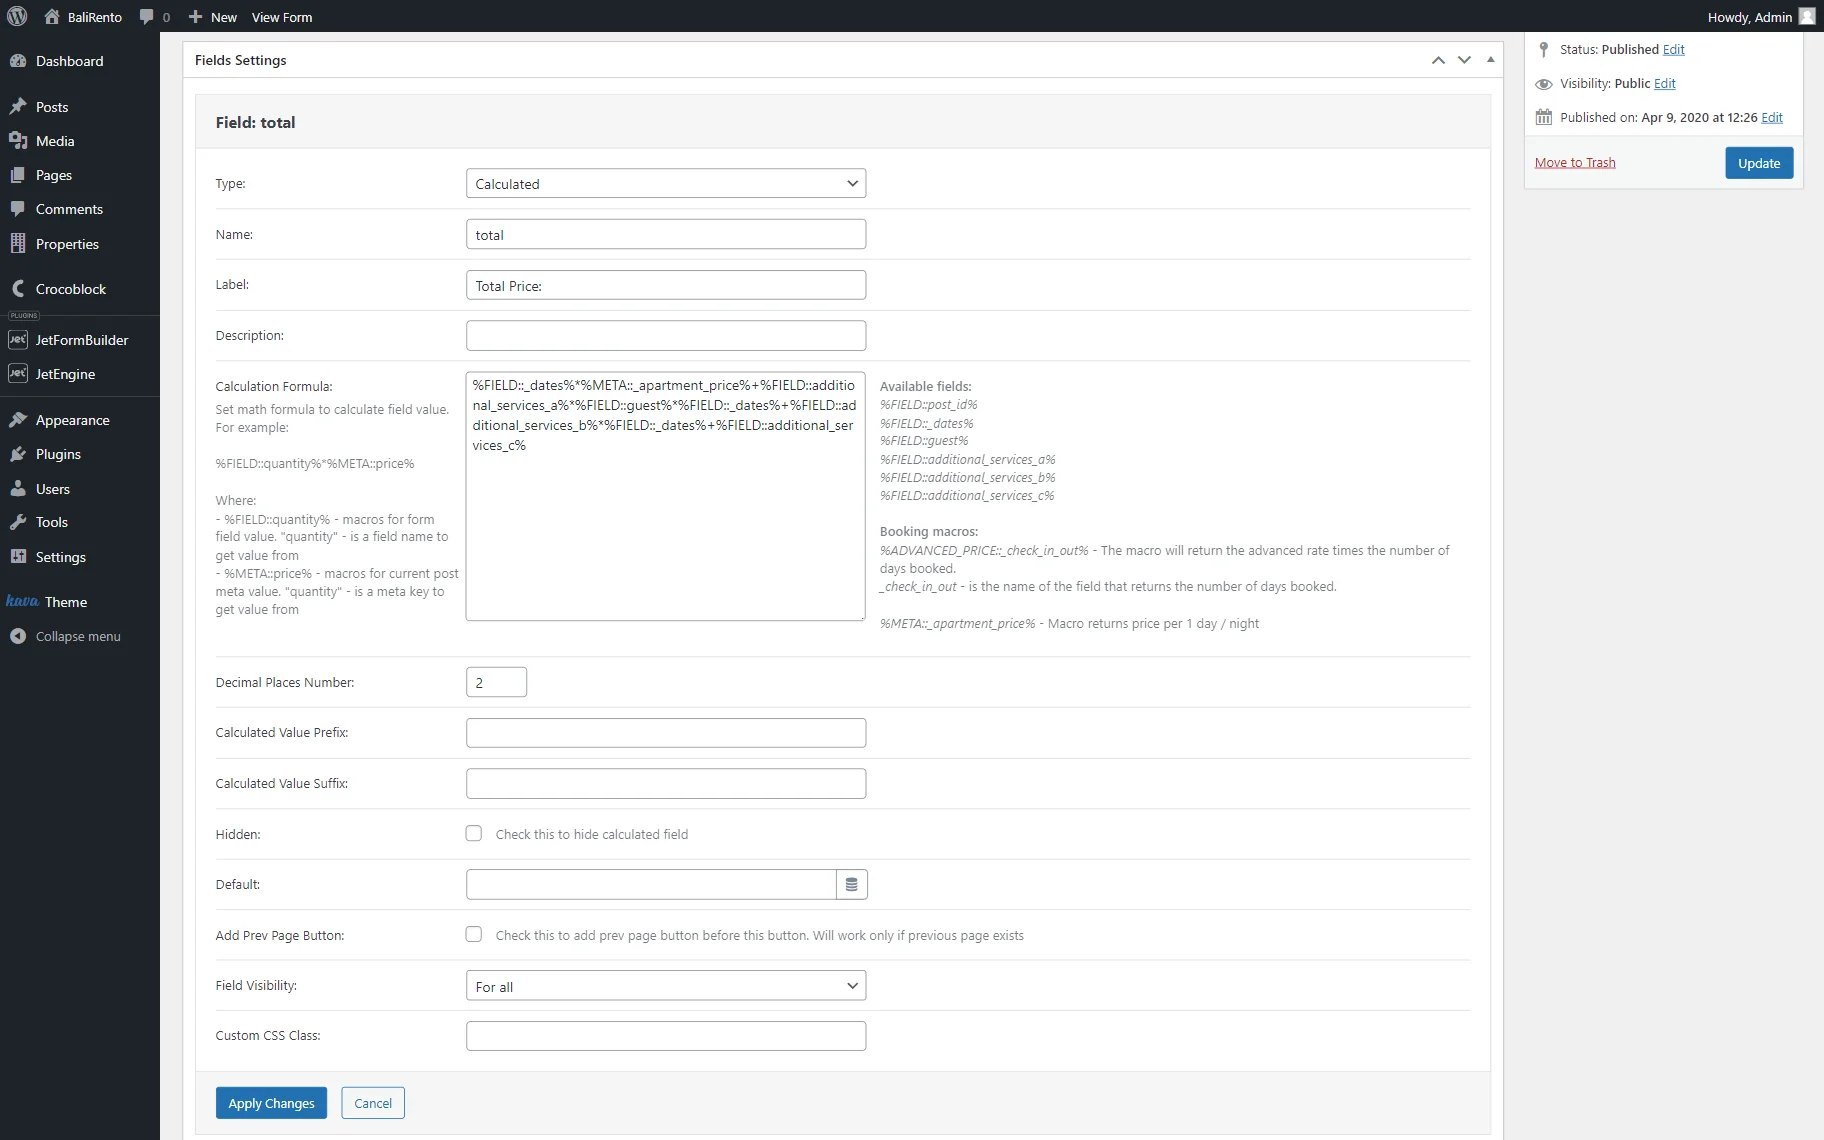
Add a total price field to the booking form
Check how the pricing can be displayed in the booking form.
Go to WordPress Dashboard > JetFormBuilder > Forms and open the Single Page Booking Form for editing.
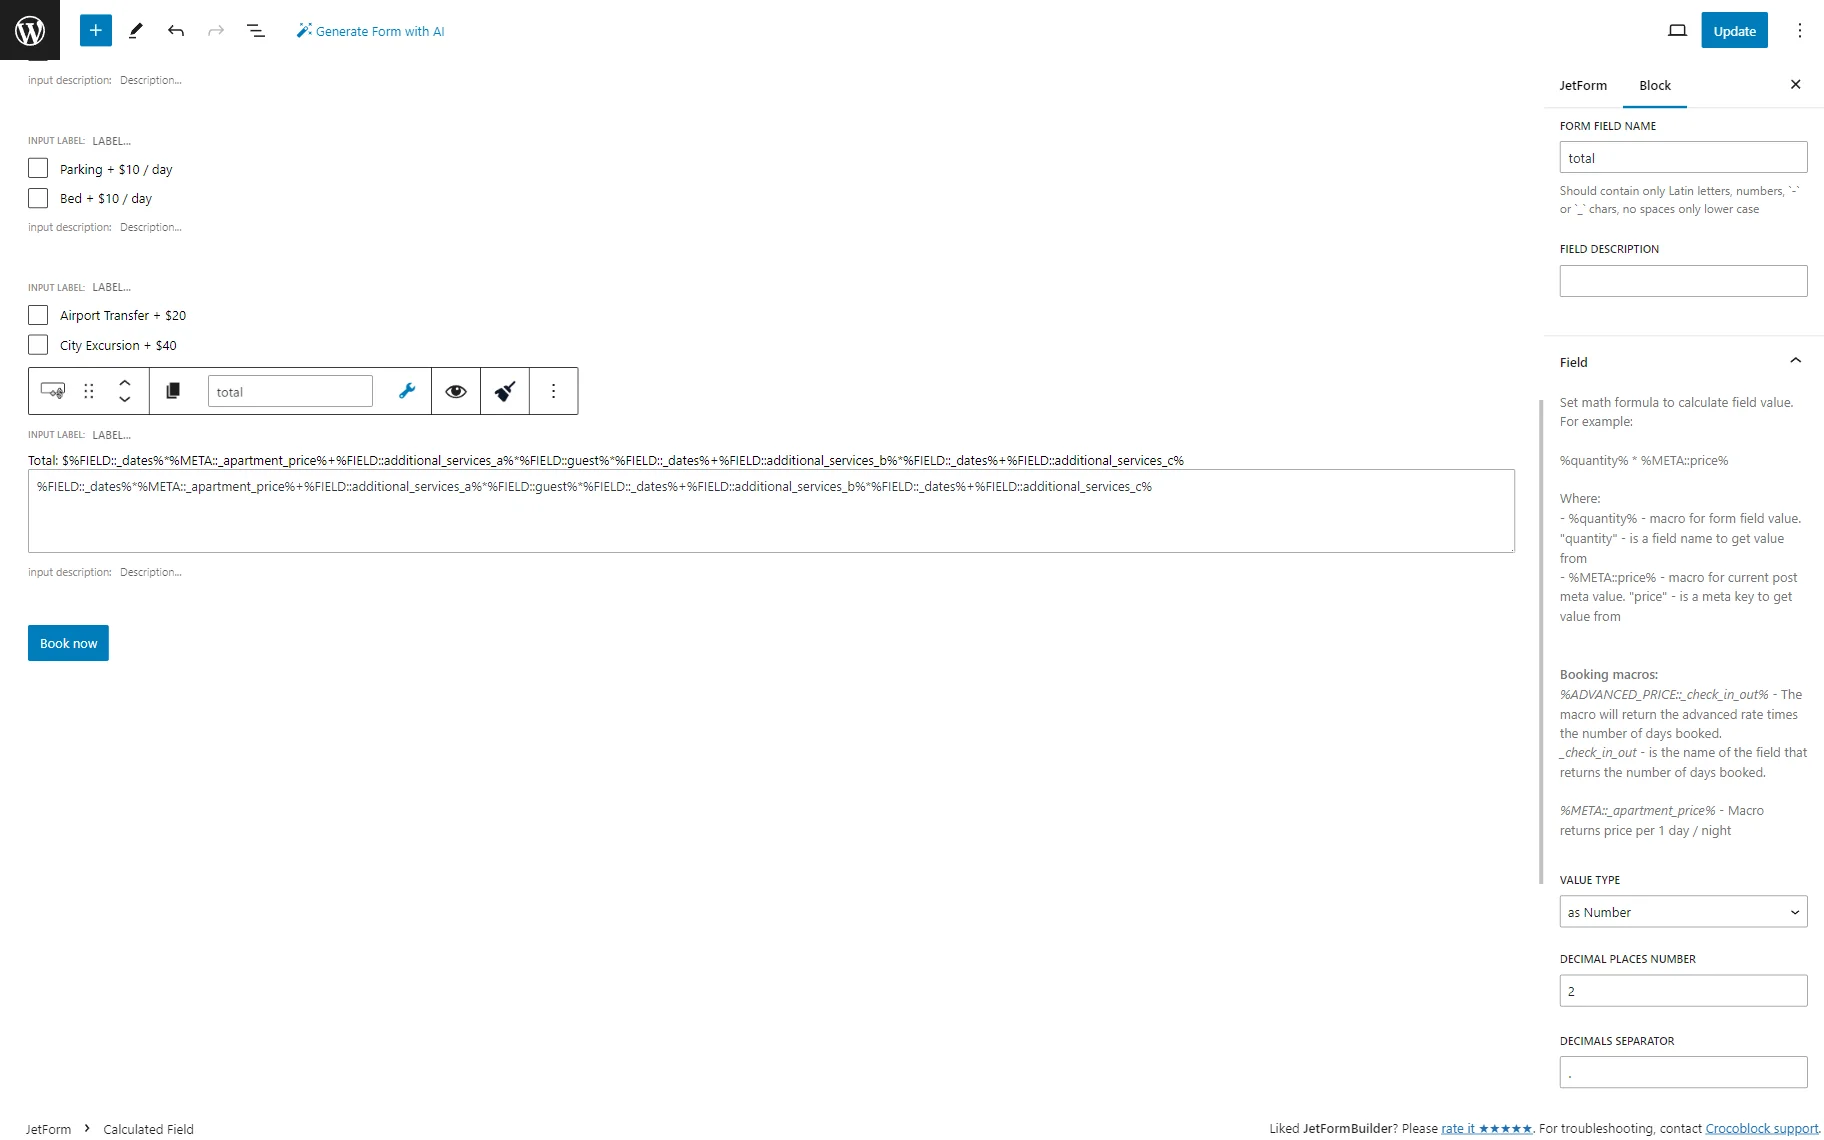
Add a Calculated Field to the form and check the block settings. There, you can find the macros that can be used in the Calculated Field.
For instance, the inserted formula into the Calculated Field in the described case is:
%FIELD::_dates%*%META::_apartment_price%+%FIELD::additional_services_a%*%FIELD::guest%*%FIELD::_dates%+%FIELD::additional_services_b%*%FIELD::_dates%+%FIELD::additional_services_c%With this formula, the total amount will be based on the selected dates, additional services, and the number of guests.
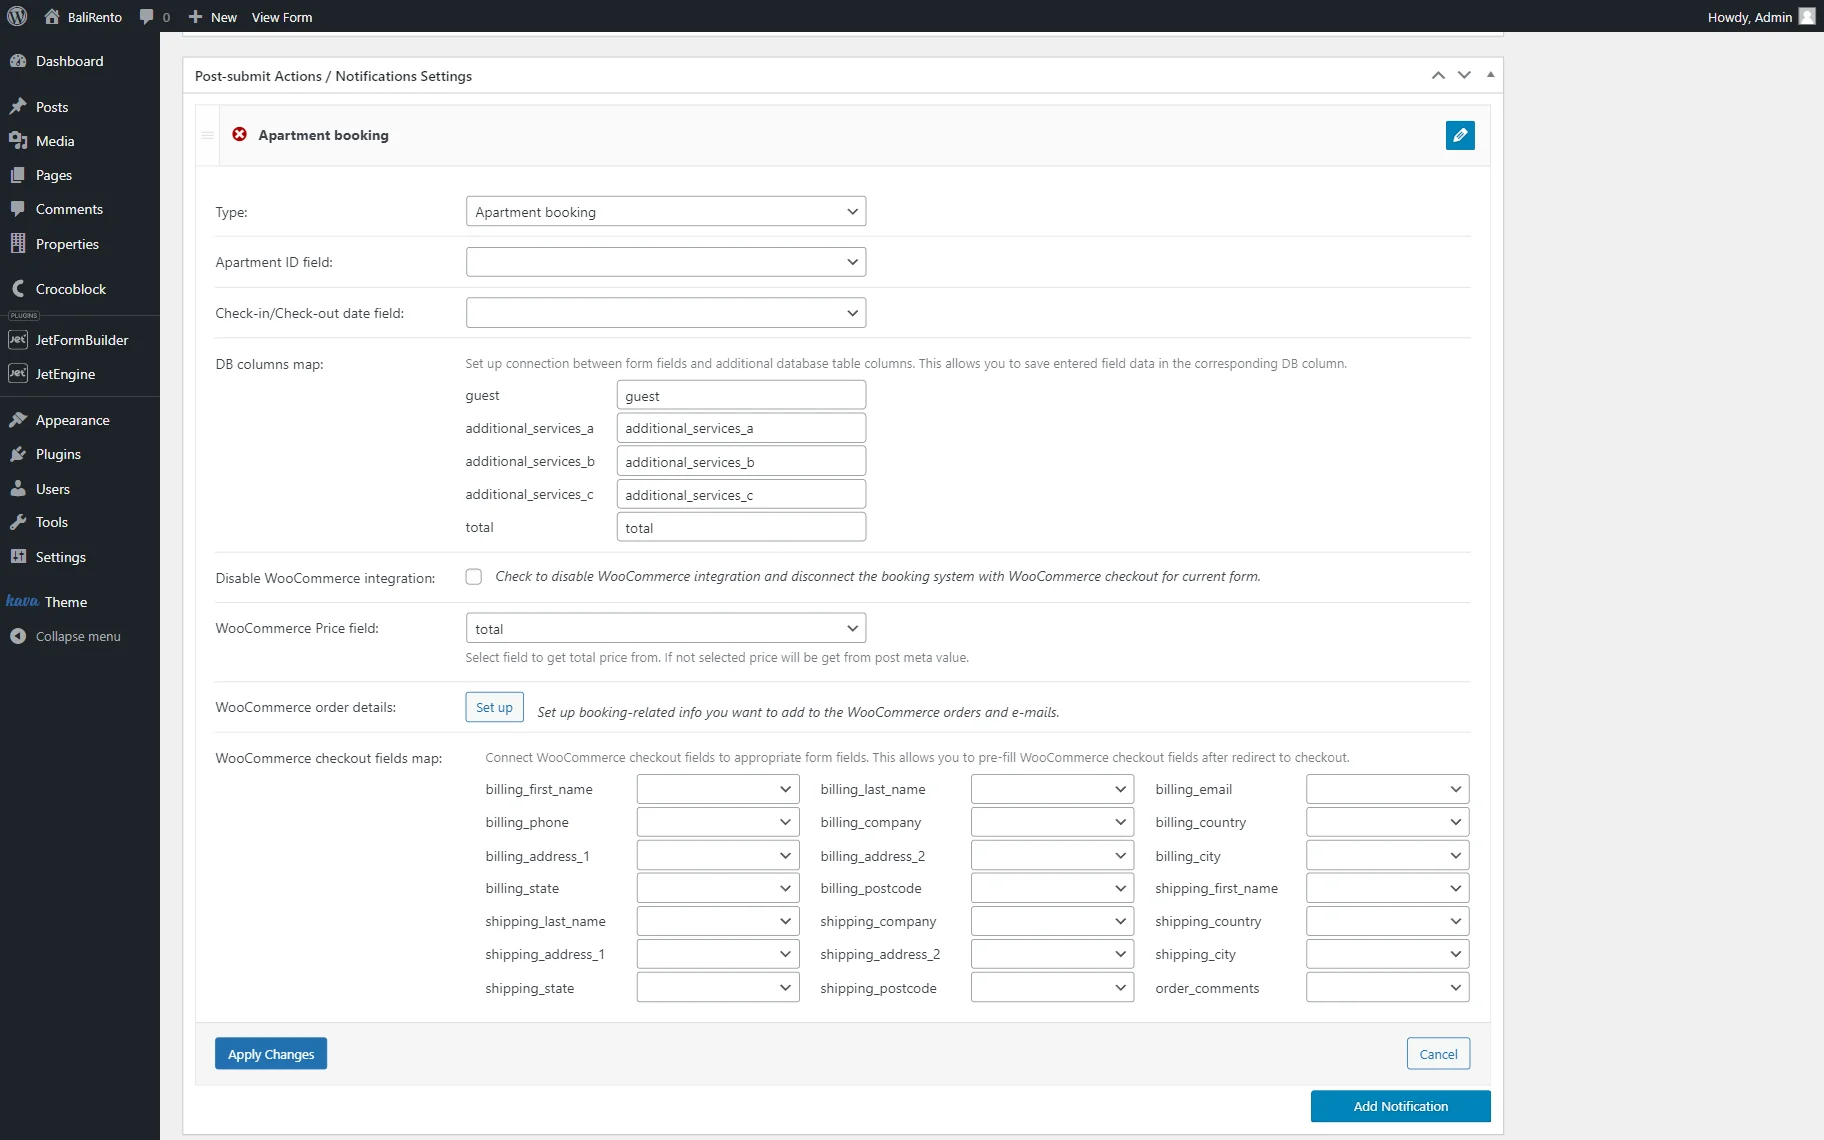
Add the total price to the WooCommerce order
In the same booking form built with the JetFormBuilder plugin, we can use the Calculated Field to fill in the price used on the WooCommerce checkout and order. To do so, open the Post Submit Actions tab and add the “Apartment Booking” action.
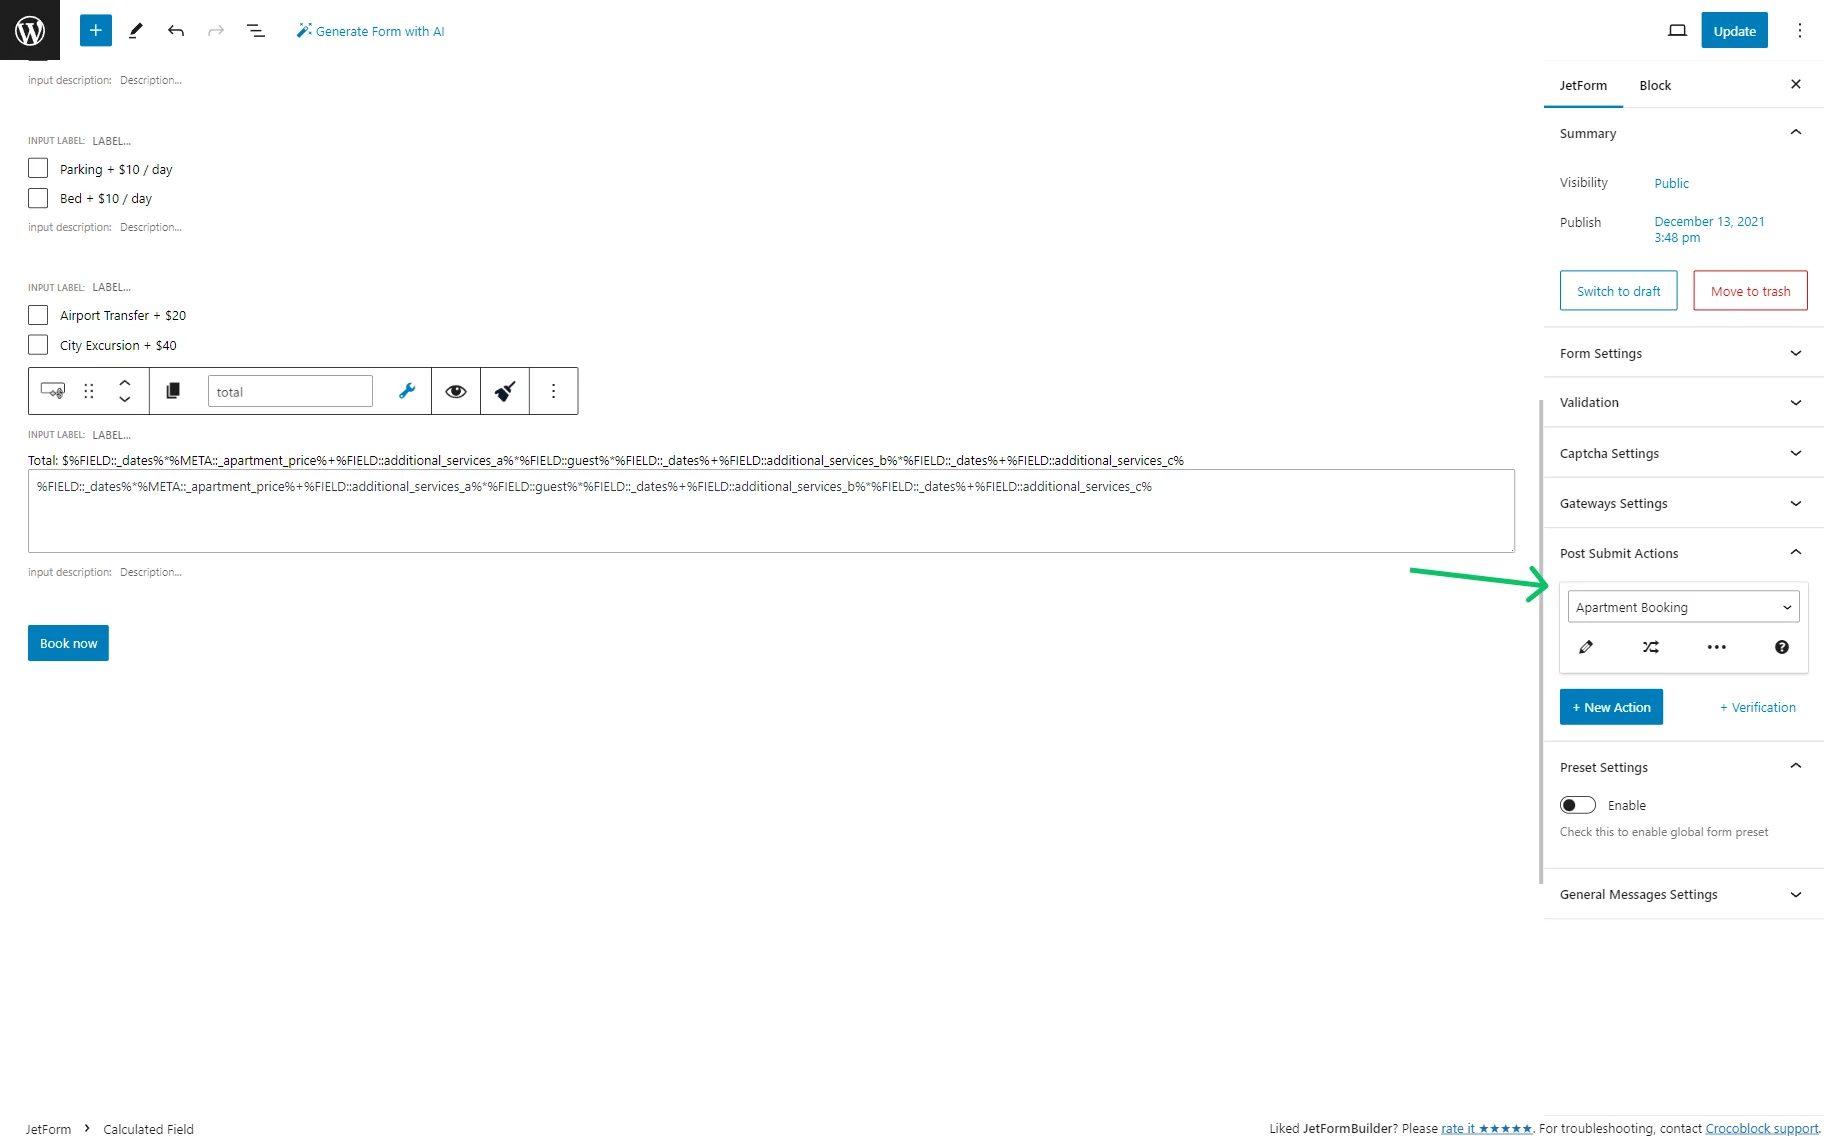
In addition to mapping the APARTMENT ID FIELD and CHECK-IN/CHECK-OUT DATE FIELD, we should select the Calculated Field, which contains the advanced price formula as a WOOCOMMERCE PRICE FIELD.
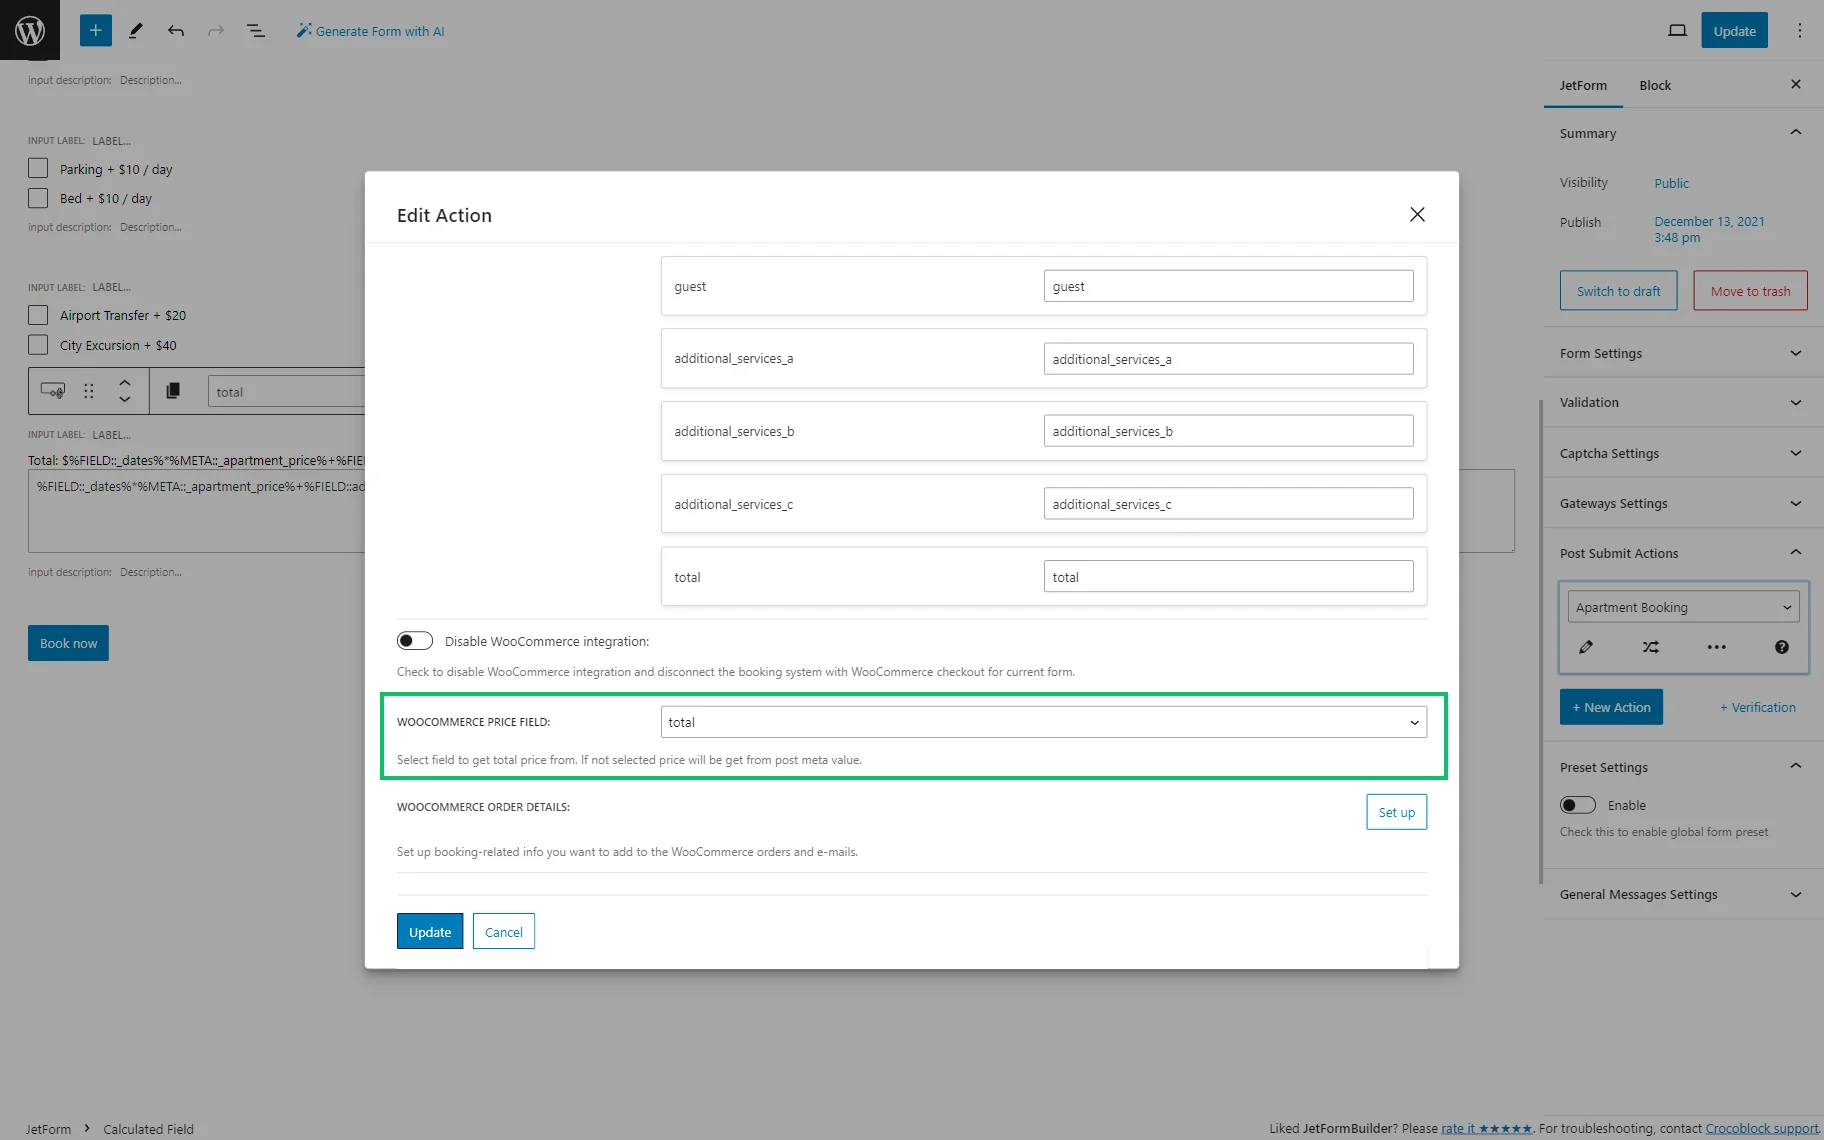
Hit “Update” to save the form.
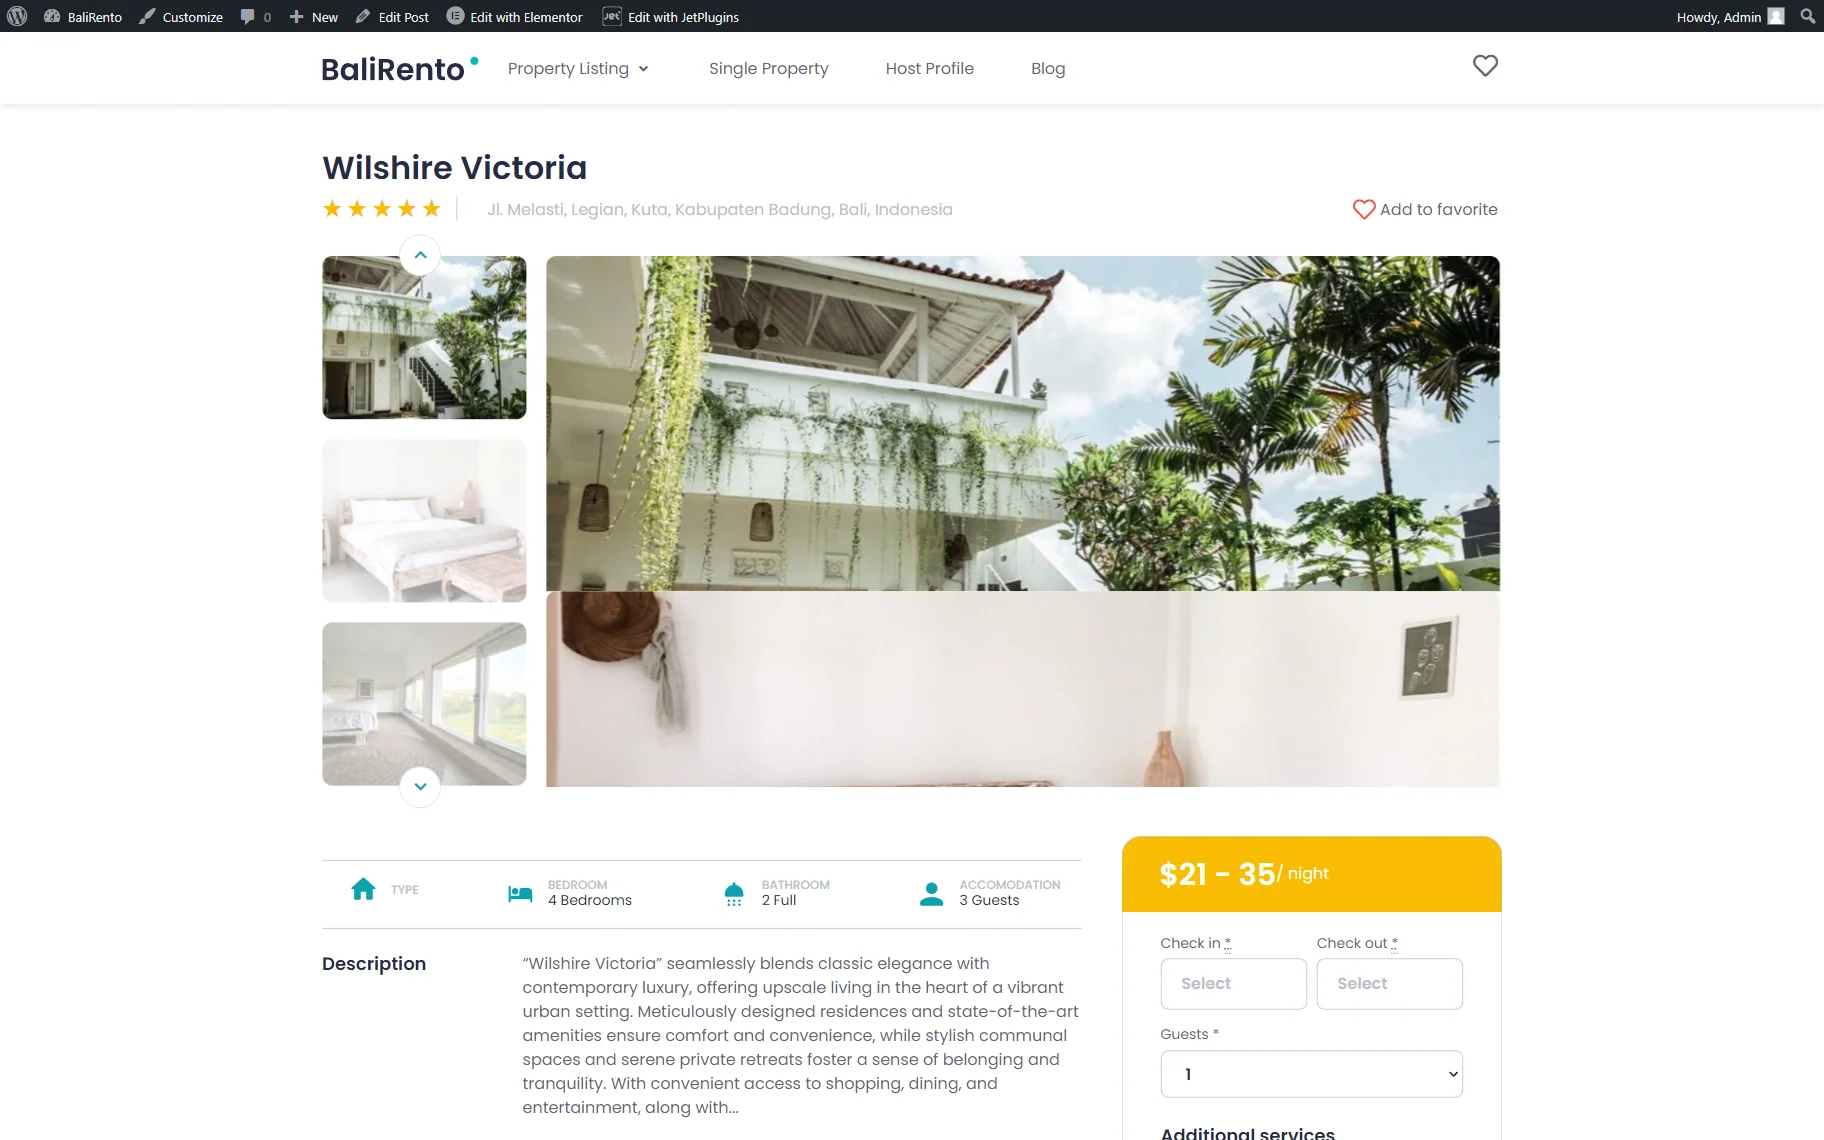
Show pricing rate on the single page
Check how this pricing can be displayed on a Single Page (it can be edited in Elementor, Gutenberg, or Bricks).
You can add a widget/block/element that will display the dynamic price. It can be a Headline or Text Editor widget.
Click on the “Dynamic Tag” icon, and select the “JetBooking: Price per day/night” option.
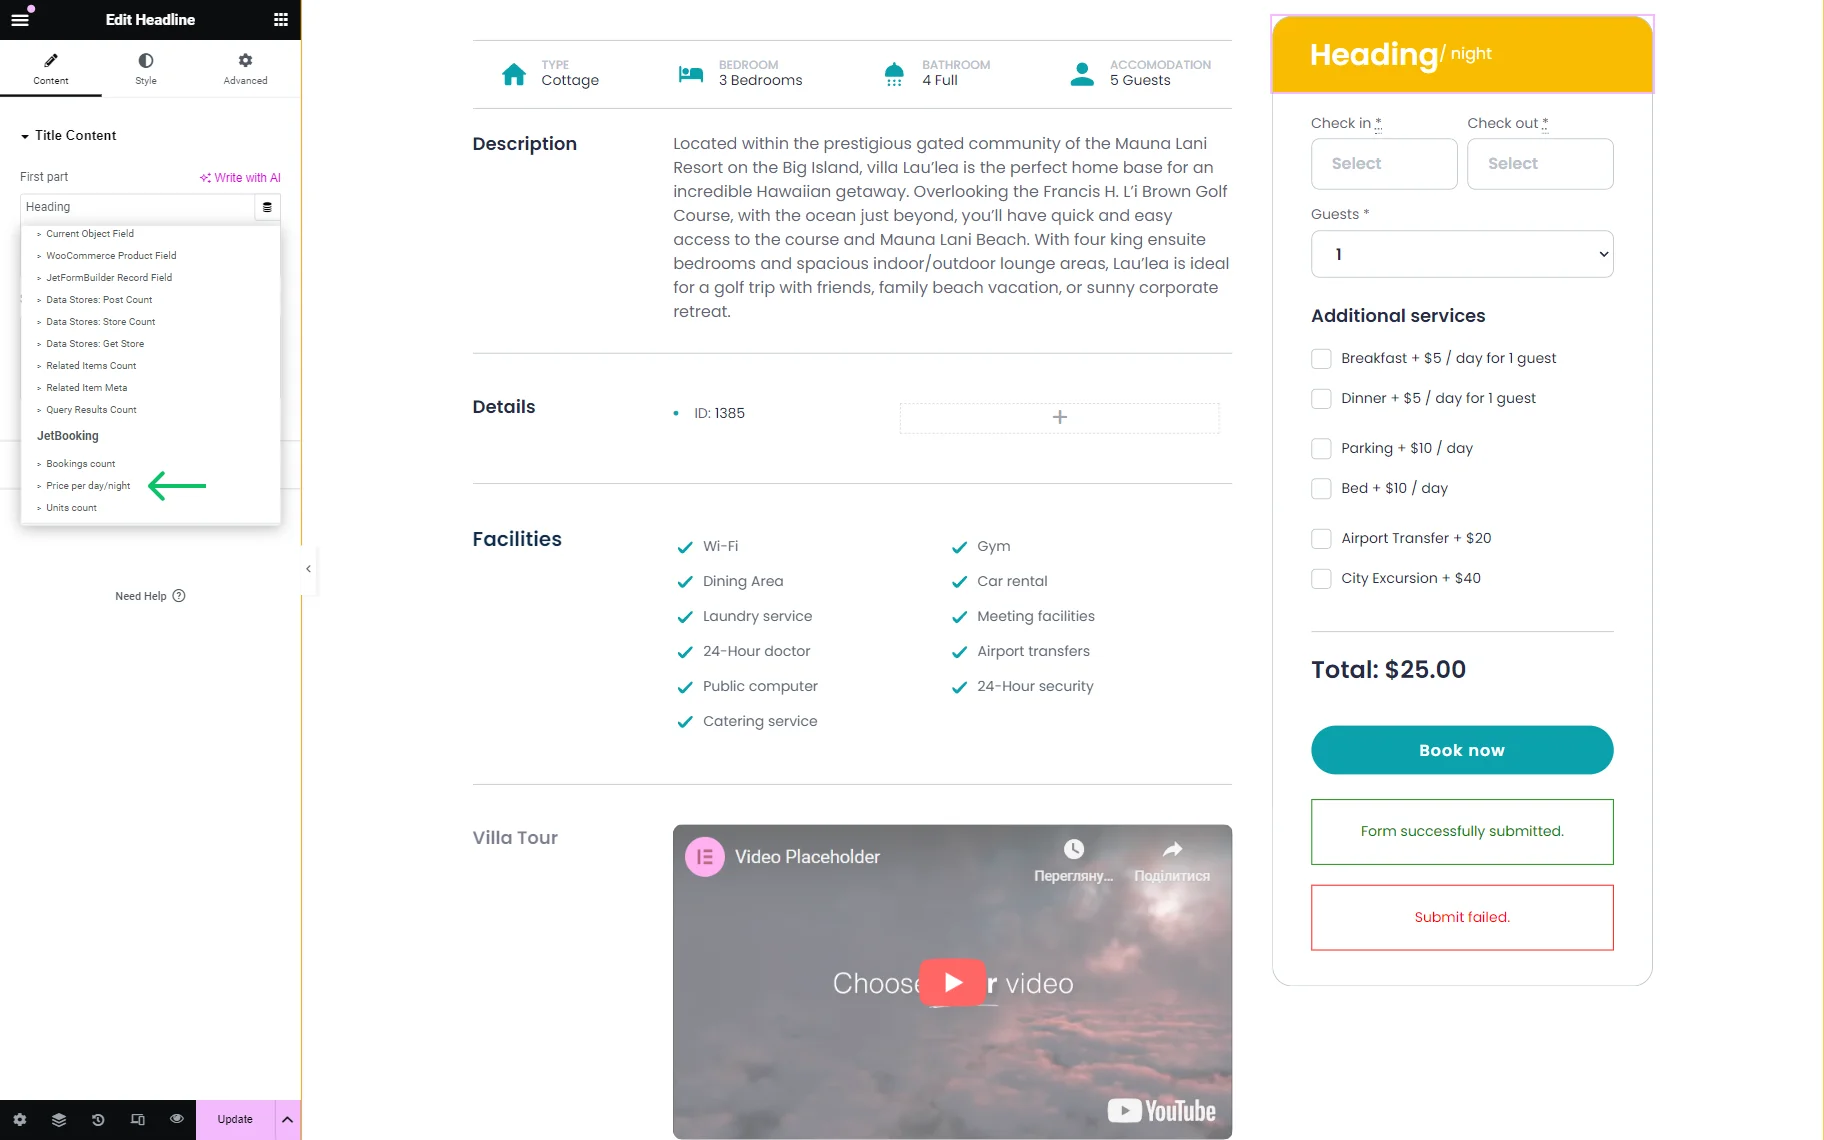
In the “JetBooking: Price per day/night” option, we picked the “Prices range” to be displayed (Show price field).
Also, we enabled the Change Dynamically toggle to change the price according to the dates selected in the booking form on the Single Page.
You can also edit the Currency sign and its position to fit your needs.
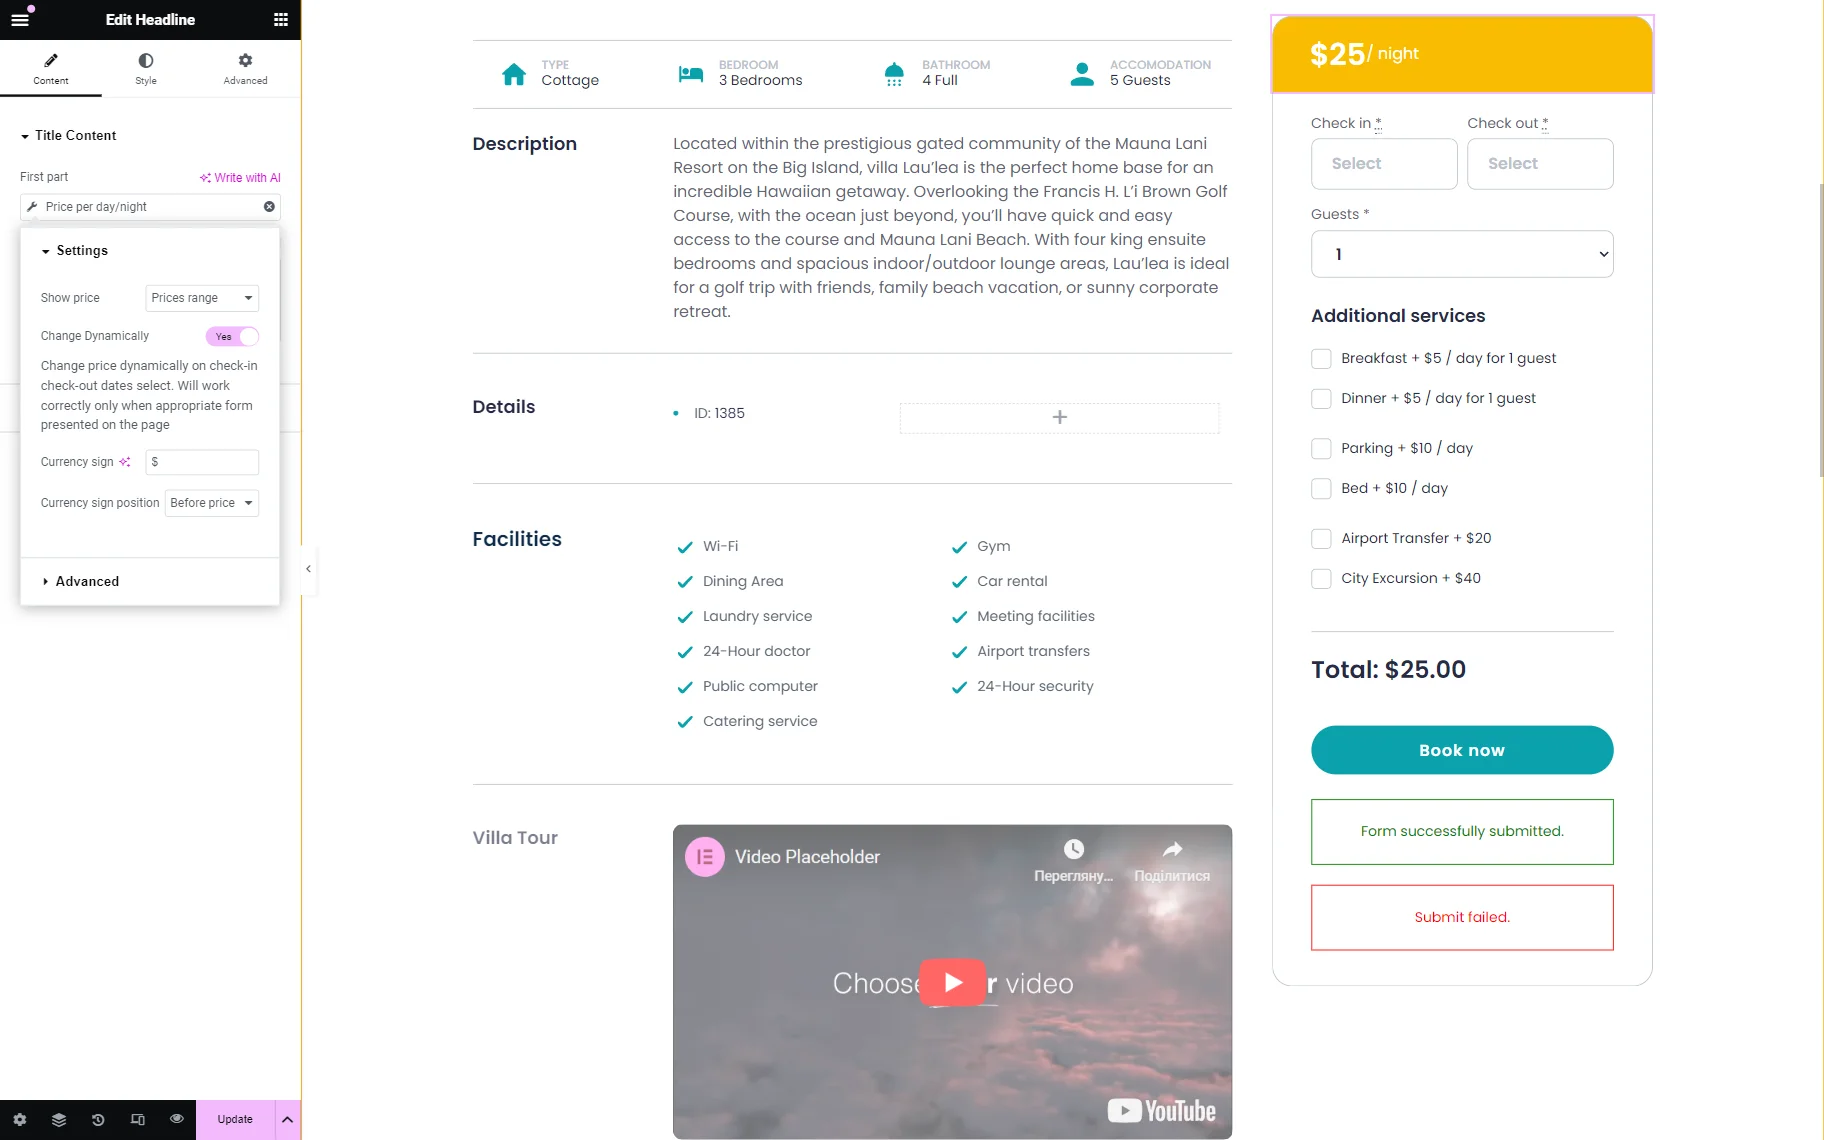
Also, set the Second part that will be added to the price, if desired.
Once the changes are made, press the “Publish/Update” button.
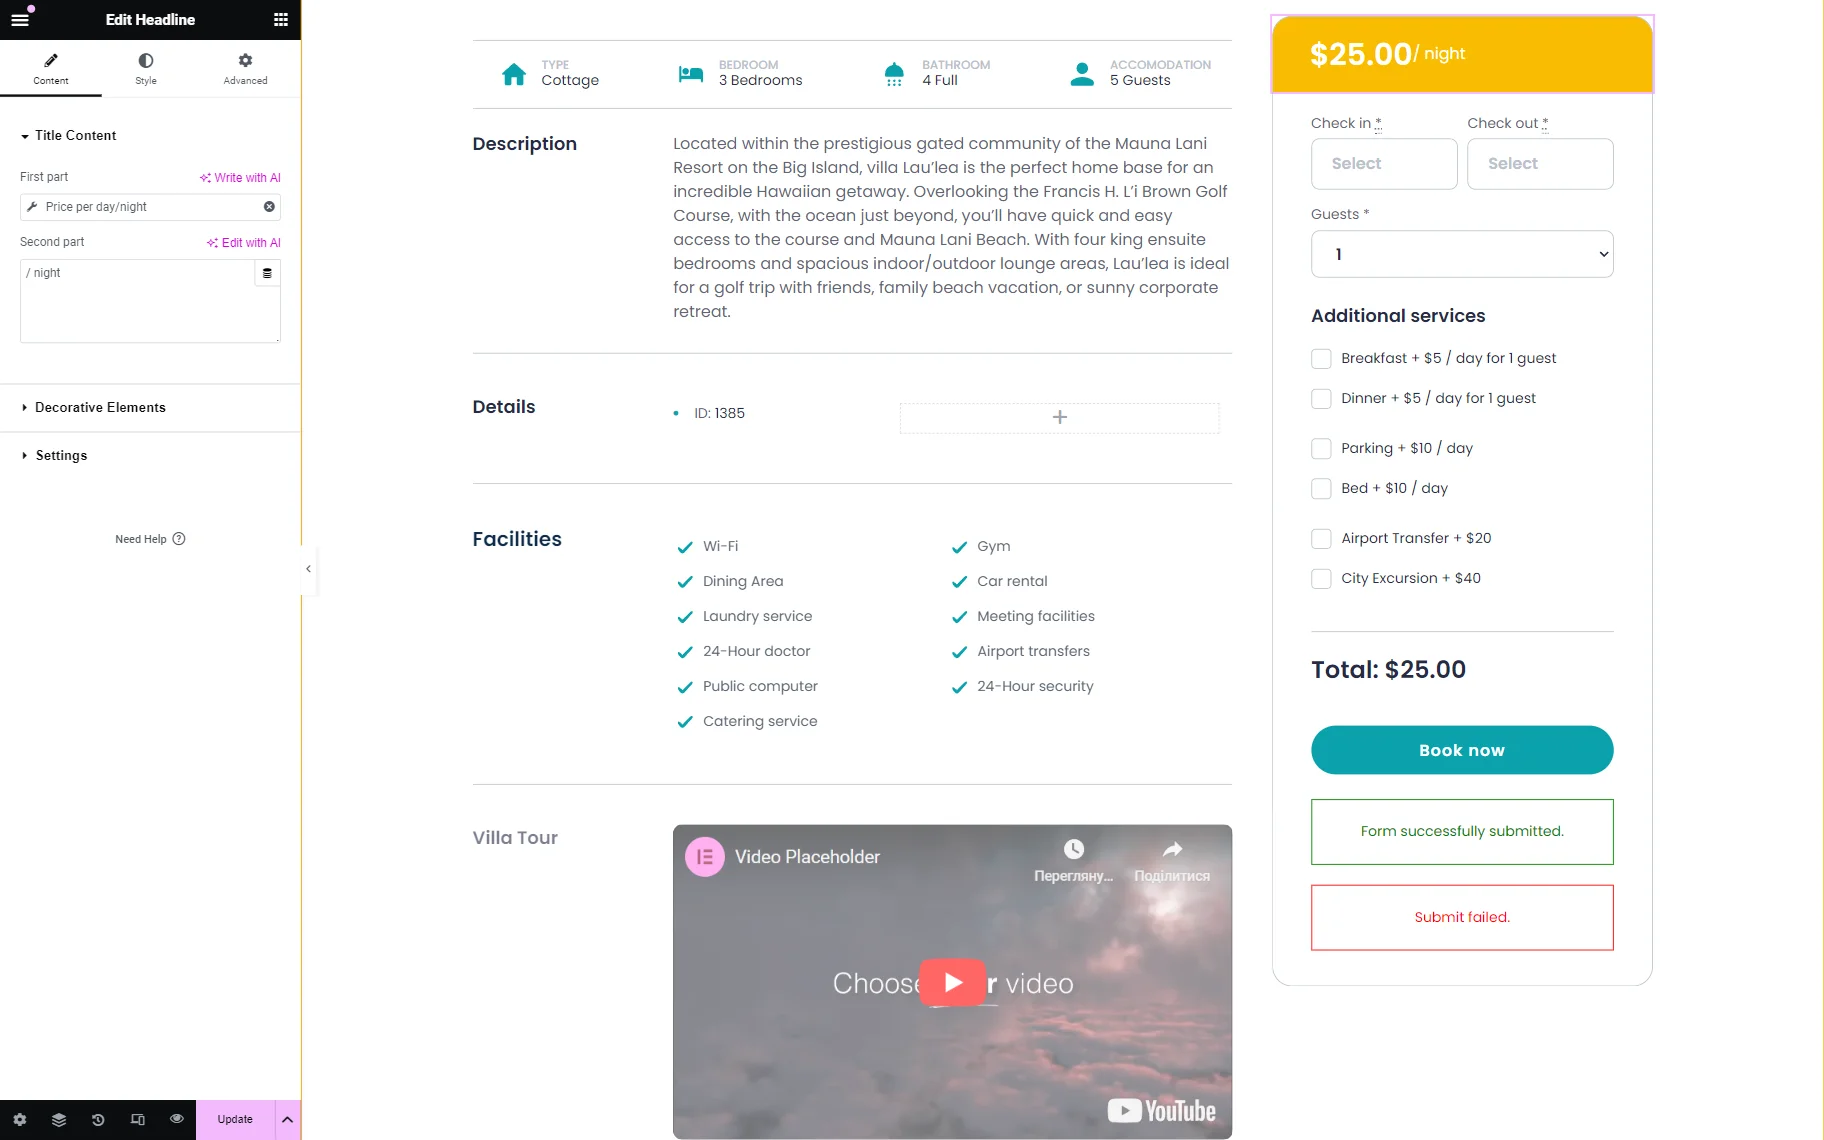
Check how the price is displayed on the front end.
Now the price range shows “$21-35” according to the Pricing Settings of the product.
Use Case with JetEngine (Legacy)
Add a total price field
Go to WordPress Dashboard > JetEngine > Forms and open the booking form you created.
Click “Add Field” and proceed to edit it. Choose the “Calculated” Type and type in the Name and Label.
In the Calculation Formula text area, we put the following formula:
%FIELD::_dates%*%META::_apartment_price%+%FIELD::additional_services_a%*%FIELD::guest%*%FIELD::_dates%+%FIELD::additional_services_b%*%FIELD::_dates%+%FIELD::additional_services_c%With this formula, the total amount will be based on the selected dates, additional services, and the number of guests.
After other settings are adjusted, hit the “Apply Changes” button.
Additional options
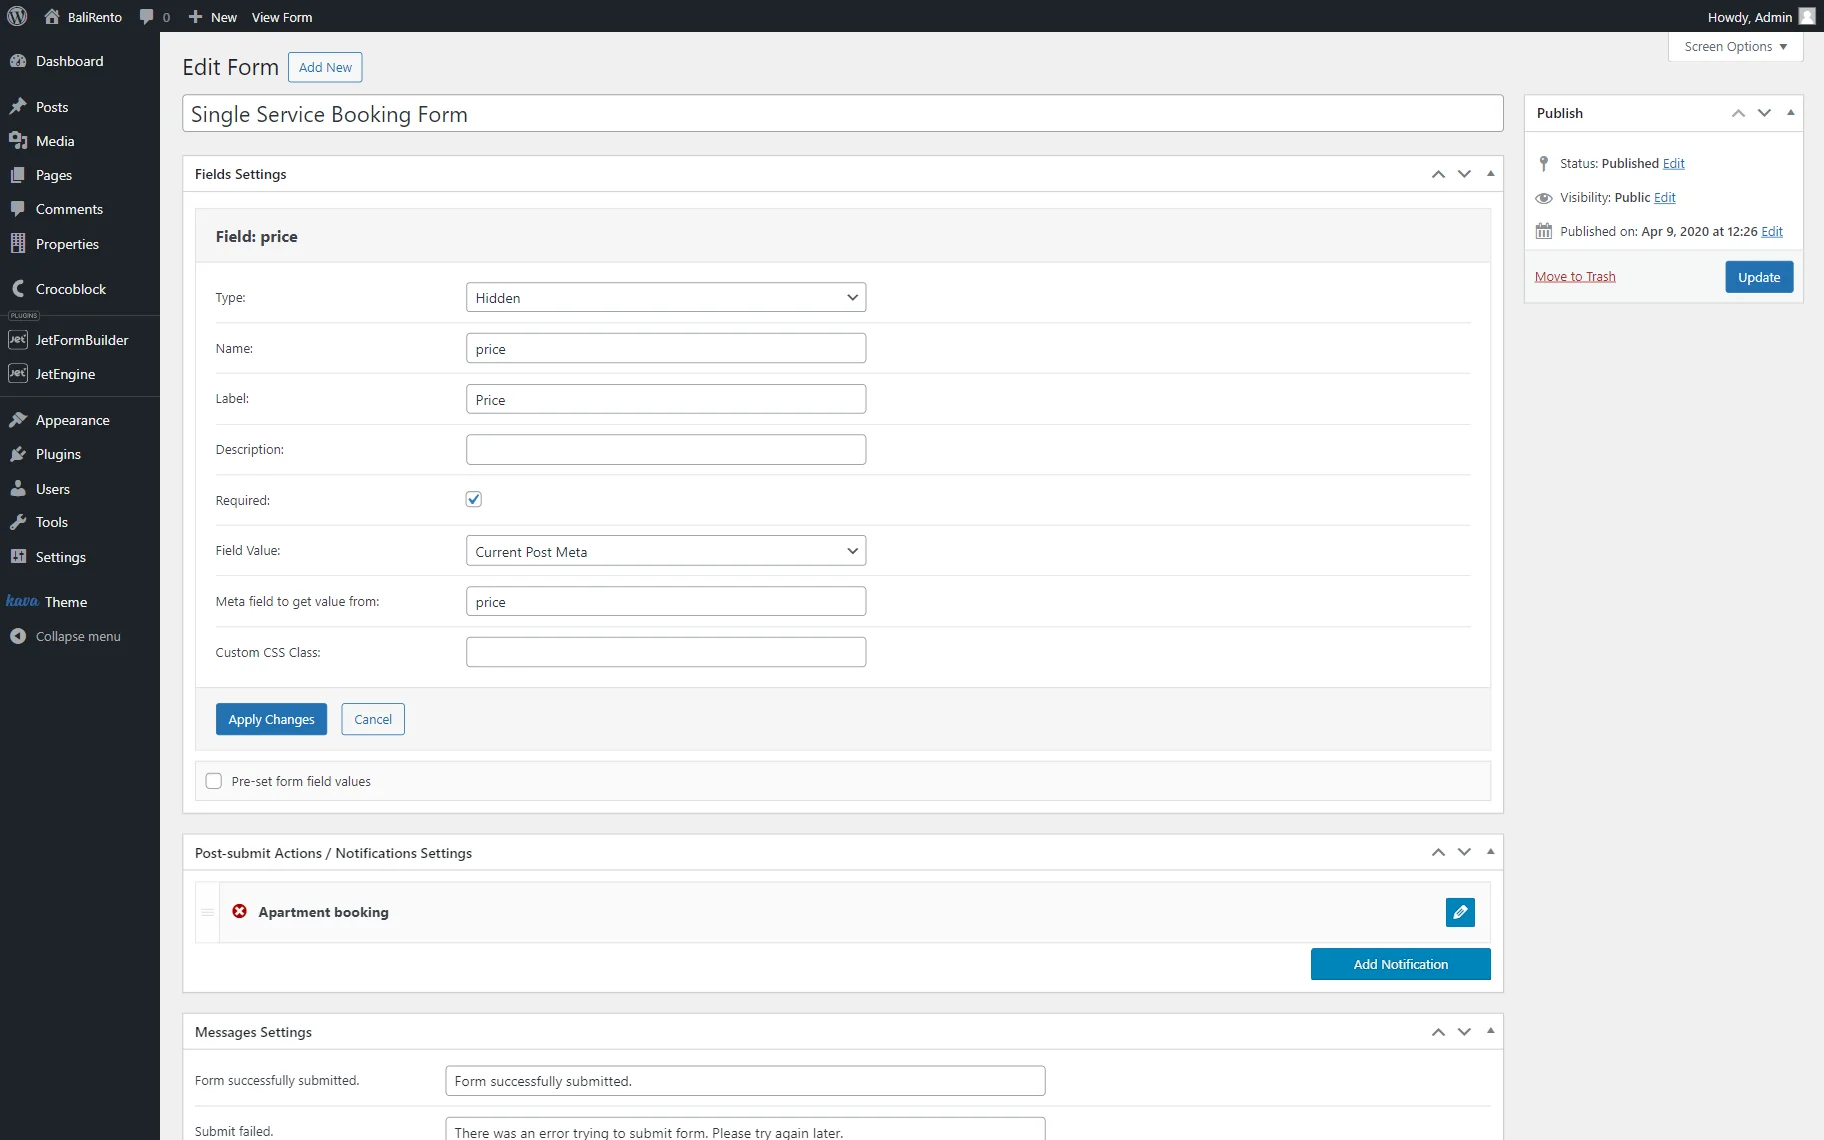
If you have a separate meta field for pricing and want to use it in the total price formula, you need to perform a few additional steps.
Go to the Post Type or Meta Box where you created the Price meta field, open it, and copy the ID of the field (the text you put into the Name bar).
Proceed to the form, hit the “Add Field” button, and start editing it. You don’t want the user to see it in the form, so choose the “Hidden” Type.
Type in the Name and Label, then choose the “Current Post Meta” option in the Field Value drop-down menu. Paste the copied ID into the Meta field to get value from bar and click the “Apply Changes” button.
After that, go to the “Calculated” field and change the Calculation Formula to:
%FIELD::_dates%*%FIELD::price%Here, the %FIELD::_dates% macro will return the number of days the user selects, and the %FIELD::price% macro will use the value of the “Hidden” field you just created.
According to the formula, the number of days/nights selected by the user will be multiplied by the price you set in the corresponding meta field. If you need more information on the topic, go through our Hidden and Calculated Fields guide.
Add the total price to WooCommerce order
Go to WordPress Dashboard > JetEngine > Forms and open the booking form you created.
Scroll to the Post-submit Actions / Notification Settings and open the Apartment Booking. There is a WooCommerce Price field option there. Clicking on it will show a drop-down menu with all the created form fields. Choose the field you would like to use for the total price shown in the checkout form and order.
If you leave that field empty, WooCommerce will use the value of the Price per 1 day/night meta field of your Custom Post Type.
That’s all; now you can set the prices and simplify your work sufficiently with an automatic calculation of the total price by using JetBooking, JetFormBuilder, and JetEngine plugins.