Let’s say you are an independent freelancer or represent an agency that works on projects in different industries and offers various services, from marketing strategy to video production. It’s important to create a proper portfolio website, isn’t it?
For the best possible outcome, it’s vital to create a solid dynamic structure for the site to be scalable and extendable for future projects, services, and industries and, at the same time, not overloaded with unnecessary details.
In this guide, we will create a marketing agency website with a dynamic portfolio with filters. Gear up, and let’s get to work!
Table of Contents
- The Scope
- Step 1. Adding Portfolio Custom Post Type (CPT) With Custom Fields
- Step 2. Creating a Dynamic Template for Portfolio CPT
- Step 3. Creating the Main Portfolio Page with Filters
- Step 4. Adding Filters to Portfolio
- Wrapping Up
Starting from JetEngine 3.6.0, the AI Website Structure Builder feature is available. It’s very helpful for building portfolio websites in particular.
The Scope
There are three main objectives:
- Create individual pages for each portfolio item with the common template for all of the items.
- Create a main Portfolio page with all the portfolio items showcased.
- Make the items on the Portfolio page filterable by:
- Year of completion;
- Industry (Engineering & Construction, Telecom, Healthcare, Food, Agriculture, Retail, Culture & Entertainment, Hospitality, Energy, Other);
- Service type (Marketing Strategy and Support, Brand Identity Design, Video Production, PR).
Plugins used for this project:
Crocoblock suite (we recommend the All-Inclusive subscription, but you can purchase each plugin separately depending on your needs and the project).
Recommended additional plugins:
- Elementor (Free or Pro, it doesn’t matter)
- JetElements add-on for Elementor
📌 Note that Crocoblock works equally efficiently with Block Editor (Gutenberg) and Bricks as with Elementor.
Step 1. Adding Portfolio Custom Post Type (CPT) With Custom Fields
Why make a Dynamic Portfolio page and use CPT?
Creating separate Custom Post Types (CPTs) for each portfolio item is the best solution if you want to provide more details about these portfolio projects instead of just showing them on the main Portfolio page as a collection of static blocks.
There are many advantages of the dynamic approach to Portfolio, and here are just some of them:
- You can display the portfolio items on many pages, and you don’t have to modify each of them every time you add a new project or modify an existing one.
- Each portfolio item can be connected to the corresponding Service or other CPTs to create a solid and interconnected website structure.
- Portfolio item pages have the same template, so you don’t have to manually format or code them each time you add an item.
🔖 Some theory:
WordPress Custom Post Types Explained
What is a Custom Post Type Template?
Before creating the post type and custom meta fields, it’s important to look at the wireframe to determine which fields we need.
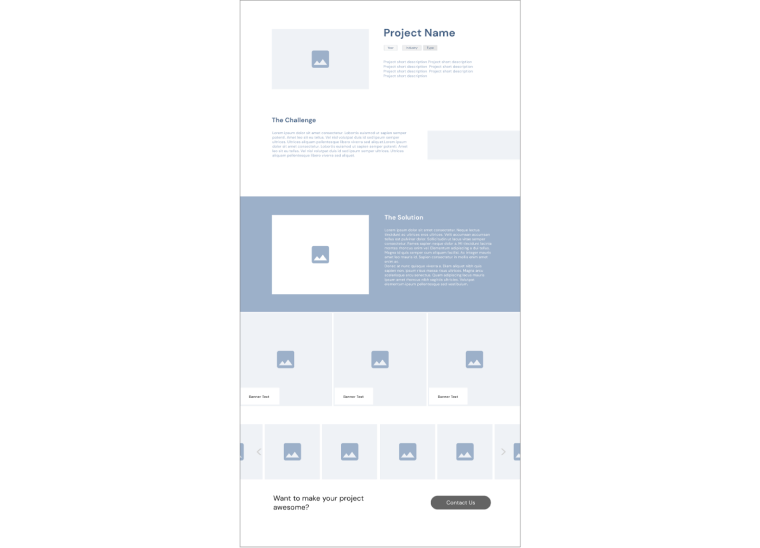
According to the wireframe, the Portfolio CPT will have the following custom fields:
- Three WYSIWYG fields:
- Project description;
- Challenge;
- Solution.
- Three Text fields:
- Banner 1;
- Banner 2;
- Banner 3.
- Two Select fields (where Glossary functionality will be used to reuse the select lists):
- Type of Service;
- Industry of the client.
- Five Media fields:
- Hero image;
- Solution image;
- Banner 1;
- Banner 2;
- Banner 3.
- One Gallery field (for the project’s gallery);
- One Number field (for the Year of completion).
Note that we didn’t use Repeater fields for the banner fields (images and texts) because, according to the wireframe, there must be no more than three banner blocks.
Preparing Glossaries
Glossary is a feature of the JetEngine plugin that saves plenty of time and makes work efficient. Using it, you can compose a glossary-like field sequence and source the options for Select, Radio, and Checkbox meta fields, forms, and filters.
🔖 Some theory:
JetEngine Glossary Feature
JetEngine Glossary Documentation
For this project, we will create two glossaries:
- Industries;
- Service Type.
💡 Using them, we can fetch Select options from the corresponding Glossary and reuse them for Services CPT (or any other, as well as in the forms) in the future without manually entering the Select field values repeatedly.
Go to JetEngine > Glossaries > New Glossary. Name it, and add fields for the future “Select” list, one option per field:
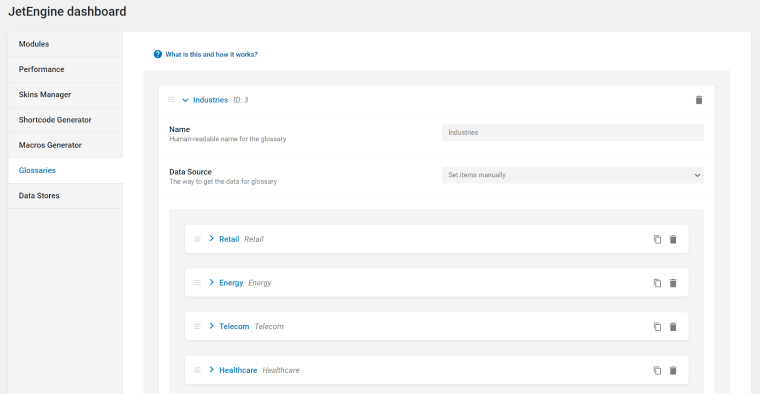
This is the whole process:
Now, we are ready to create the Portfolio CPT and add its custom fields.
Adding Portfolio CPT with custom fields
Go to JetEngine > Custom Post Types > Add New.
Name the custom post type and assign the icon you want in the Advanced settings section.
And now, it’s time to add custom fields.
💡 Custom fields are the key feature of any custom post type. The advantage is that you can fetch them separately in the front end and place them whenever you need, unlike the traditional Content block on the page or post, which can be shown only as one piece.
This is what the process of adding the Portfolio CPT with custom fields looks like:
There are a few things to pay attention to when working with custom fields using JetEngine:
- Select the right field type (e.g., Text, Textarea, Number, Media, etc.).
- For the convenience of the dashboard, you can set up the Field Width – which only affects the field display on the back end. For example, to set up the width of the field, go to JetEngine > Post Type > [Corresponding post type] > [Corresponding meta field] > Field width, and set the width of every meta field to occupy.

- Organize the order of the fields by simply dragging them – this is the order in which the fields will be displayed in the editor of the CPT.
Using custom fields vs. taxonomies. What to choose?
With JetEngine, both custom fields and taxonomies can be used to organize CPTs on the page (using the Query Builder sorting option) or display specific fields on the CPT pages.

However, taxonomies and custom fields have different purposes. While custom fields belong to the particular CPTs, taxonomies organize them in groups, can have an archive page, and (which is very important) can have a hierarchical structure.
Admin columns and quick edit
Having some Admin Columns for CPTs to see essential information about the post in the Dashboard and have certain fields available for quick editing is very convenient and saves a lot of time.
JetEngine has an easy-to-use toolkit for setting Admin Columns and Quick Edit features.
- To make a certain meta field available for quick editing, just activate the “Quick Edit” toggle in the meta field settings in JetEngine > Post Types > [Post type] > [Meta field].
- To add certain fields as Admin Columns, scroll down to JetEngine > Post Types > [Post type] > Admin Columns > Add New. Name the column and insert the meta key (name) of the field, the value of which will be shown.
If it’s an array (checkbox, radio, or multi-select), you will need to use a callback. In the Type section, choose “Custom Callback” from the list. Click on the “Select from existing callbacks” list and choose the one for checkboxes. Insert the meta key in the dialog box.
To display images in the Admin Column, you should use callbacks as well.
There is much more to choose from, so enjoy this powerful JetEngine tool to make your Dashboard look organized and convenient.
Step 2. Creating a Dynamic Template for Portfolio CPT
This is how to create custom templates with Crocoblock’s JetThemeCore plugin. However, if you have Elementor Pro and prefer its Theme Builder, you can repeat the same process there.
🔖 Some theory:
What is a Custom Post Type template?
What is a Dynamic tag, and where can you find it?
Creating a template
To display the content from the custom fields on the page properly – according to the prototype – we need to create a template for the Portfolio CPT.
But first, don’t forget to add content to all the meta fields of the Portfolio CPT (at least for one post) so you can properly see what the template looks like.
- Go to Crocoblock > Theme Builder > Create New. Set the conditions so the template will be applied to the Portfolio CPT (Include > Singular > CPT Single > Portfolio).
💡 Remember that you can add more refined conditions later if necessary. For example, you can create a template for a certain device type, post ID, etc.
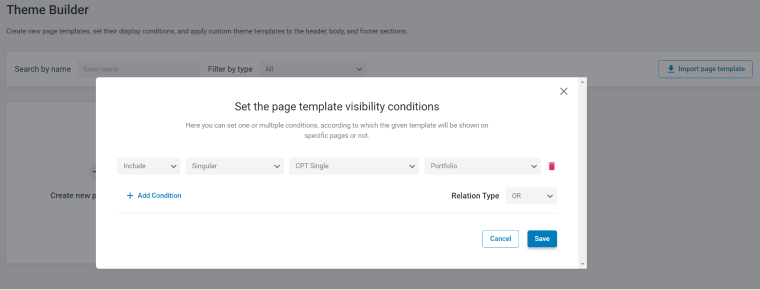
- Click “Add Content” and create the content section template. Choose the editor you will use (Elementor, in our case), and you can edit the template.
- To preview the edit results, you need to click “Preview post.” Click the gear icon in the bottom left corner (for Elementor), Preview > Portfolio post type > the post you will use [mine is called Sohag]. Update the post and refresh the page (without refresh, the preview might not work).
- Now, start creating your page, just as you always do it. But here is one difference – dynamic values. There are several ways to fetch them:
- Dynamic Field widget – can fetch almost everything, any post object or field;
- Dynamic Image – for images;
- many widgets that support Dynamic tags can be used.
How do I know it supports Dynamic tags?
The widgets that support dynamic tags can be recognized by the database icon placed in the corner. Click on it and choose the field from which the data is to be fetched. Dynamic tag is a perfect solution when you use them with Icon Lists, Toggle, Tabs, and other widgets with a bit of complicated structure.

For example, instead of styling the Dynamic field, the Button widget (without a link) was used to display Type, Industry, and Year; it’s faster and more convenient.
This is an overview of the template and the fields that were used. The most tricky part here is the Carousel section, and we will break it down into details in the next section.
Creating a Slider or Carousel from the Gallery field
JetEngine has a very powerful feature called Filter field output that allows for the modification of the way the content from a dynamic field is displayed.
What is the Filter field output feature?
Filter field output is a handy functionality for Dynamic Widget/Block in JetEngine. Using it, you can change the format of the data that is fetched from the database the way you need. When you activate the Filter field output toggle, there will be a list of Callbacks, which is sort of a directive for JavaScript to handle the requests the way you want the fields to be formatted.

For example, you can fetch the Media field, where images are stored by their IDs. If you choose “Get Image by ID,” you will get images displayed, not their IDs.
There are more than 30 callbacks to choose from.
🔖 Some theory:
To display Gallery as a Carousel, you need to activate it in Dashboard > JetEngine > JetEngine > Slider Gallery for Dynamic Field Widget. Also, you can activate the Grid Gallery for the Dynamic Field widget.
After that, you will see the new callback that turns a list of the image IDs into a beautiful gallery that you can customize.
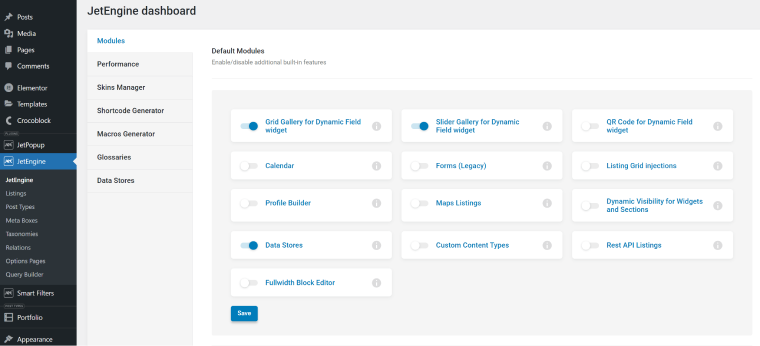
To display the Gallery field type with an array of photos, add a Dynamic Field widget, choose “Meta Data” as the Source, and set the Meta Field value to “Gallery” (in my case, but you can have another name for your Gallery type meta field).
Now, you will see the IDs of the images.
To display them as a carousel or slider, activate the Filter field output toggle, and the Callback list will appear. Choose “Images Gallery Slider” there and set the number of slides you want to show. Now, you can style your slider.
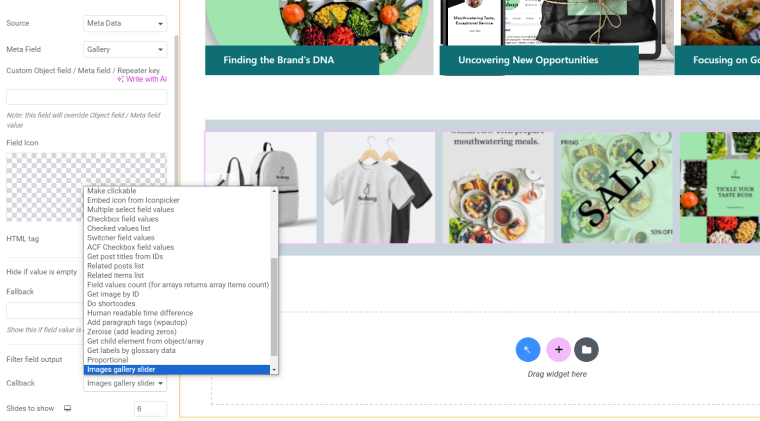
If you want to display images as a Gallery Grid, choose it instead from the list and make sure this module is activated in JetEngine > JetEngine.
A pro tip for further improvement: setting up colors dynamically
You can dynamically set different colors for key elements of each portfolio item. For example, to match the Project Name and the Solution block background with the client’s brand color. It can be done dynamically in three simple steps:
- adding a Colorpicker custom field to the post type you want to use this functionality;
- setting up the color for each Portfolio item while editing the post;
- getting Color/Background properties using dynamic tags instead of selecting them manually.
Here are these steps in detail:
- Go to JetEngine > Post Types > Portfolio and add one more custom field. Name it “Color” and set the field type to Colorpicker. If you want to adjust the color transparency, activate the Alpha mode toggle.
- Go to the post you use to preview your template and select the color you want in the Color field.
Go to the template assigned to the Portfolio post type, choose the element you want to change color dynamically, click on the color picker, and then on the dynamic tag icon in the corner. Choose JetEngine > Custom field > [the field that is responsible for your color]. That’s it!
Step 3. Creating the Main Portfolio Page with Filters
This is a wireframe for the main Portfolio page:
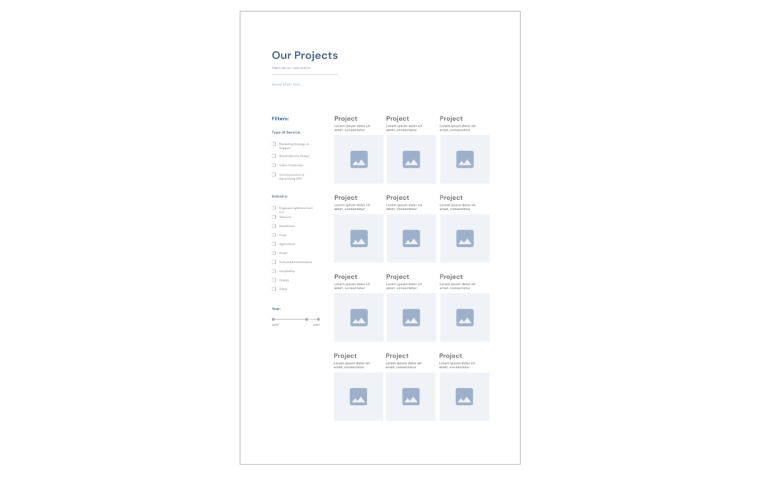
There are two main elements on the page: the grid of items and filters.
Filters will be created with the JetSmartFilters plugin, but first, we need to build a grid of dynamic elements. Each element consists of three blocks:
- heading;
- project description;
- project’s hero image.
This constituent element that will be looped further and serve as a building brick of the grid is called Listing.
🔖 Some theory:
Listing Template Overview
How to Create a Listing Template for a Post
Creating a JetEngine Listing template to display portfolio items on other pages
First, you build a Listing template and then fetch it whenever you need it as a grid, slider, carousel, etc.
Go to JetEngine > Add New. Choose the Listing Source (in our case, “Posts”), Post type (“Portfolio”), Editor (“Elementor”), and name the listing. That’s it; now, you can modify the listing in the chosen editor and add all the elements with the help of Dynamic Field, Dynamic Image, and other widgets with dynamic tags, just like we did while editing the template.
But first, click on the gear icon and set up a better preview width.
Note! It will not be the real width of your listing, but it will give you a better idea of how the item will look in the grid.
Also, you can make the whole item clickable and set up the link that opens upon clicking. There are a lot of things available, even pop-ups.
This is how it looks:
💡 Pay attention that in this video, the Trim String Callback is used. It’s a little add-on that can be activated in JetEngine > JetEngine, and it lets you set up the text length and trim all excessive. It’s really helpful when some text blocks are not equal for different items, but you want them to look neat in the grid.
Another callback used here is Multiple select field values (alternatively, the Checkbox field values can be used). The reason for this is that the “Type” meta field has the “Multiple Select” activated. That’s why there’s an array, not a single value, in the database. So, to display it properly, a callback is needed. But in such cases, JetEngine will show you the error message and instruct you what to do, like this:

Simply follow these instructions.
Creating a portfolio grid
Now, it’s time to display all the elements in a grid on the Portfolio page.
Add the Listing Grid widget where you want your grid to be displayed, and you will see the grid of the previously designed listing items.
You can set the number of columns and posts, Masonry grid, or Equal column height, as well as Lazy load, Infinite scroll, or Load more. Additionally, you can add some styling to the whole block.
Remember that you can also display posts as a Slider or Carousel. There are more modules, such as Map, Table, etc.; these modules should be activated in Dashboard > JetEngine > JetEngine beforehand.
💡 Remember that you can reuse Listing templates as many times as you need. For example, on the Portfolio page, you display it as a grid with filters, but on the Home page, the same Listings can be shown as a carousel section.
A pro tip for further improvement: displaying items in custom order
🔖 Some theory:
Query Builder Feature Overview
Query Builder Documentation
Post Query made with Query Builder
By default, listing items are displayed in the same order they have been added to the website. But it’s not always the best sorting option. You can display them using one of the meta fields as a sorting value.
You can add an additional meta field for sorting, where the order will be set manually. But in this project, let’s use the Year of Completion field to display the most recent projects at the top.
To do so, go to JetEngine > Query Builder > Add New:
- Name your query, select the Query type (we will deal with “Post query”), and the Post type – “Portfolio.”
- Now, let’s get to the Order & Order By settings. In the “Order by” list, you can find a lot of options for sorting. Choose the “Order by numeric meta value” (as the Year field is a numeric type).
- Copy from the Post type (JetEngine > Post Types > Portfolio) and paste the meta value meta key (or Name. But not Label!) of the meta field that will be used for sorting to the Meta key field. In our case, it’s the “year of completion.”
- And now, set the order.
- Save the query.
Now, go to the page where you’ve added the Listing Grid. Reload the page.
- Open the Custom Query section and activate the toggle.
- Choose the query you’ve just created – and the sorting will happen.
Step 4. Adding Filters to Portfolio
It’s time to add filters to the Portfolio so the clients can sort the items by Industry, Year, and Type of Service, like this:
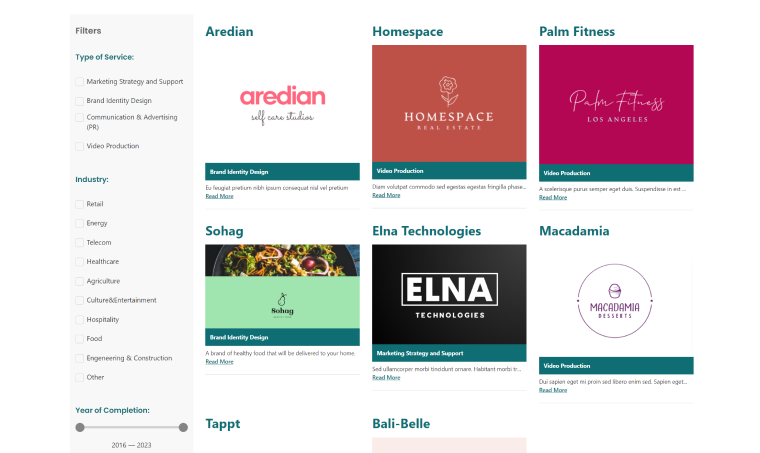
Setting up JetSmartFilters
1. Setting up a filter for Type of Service
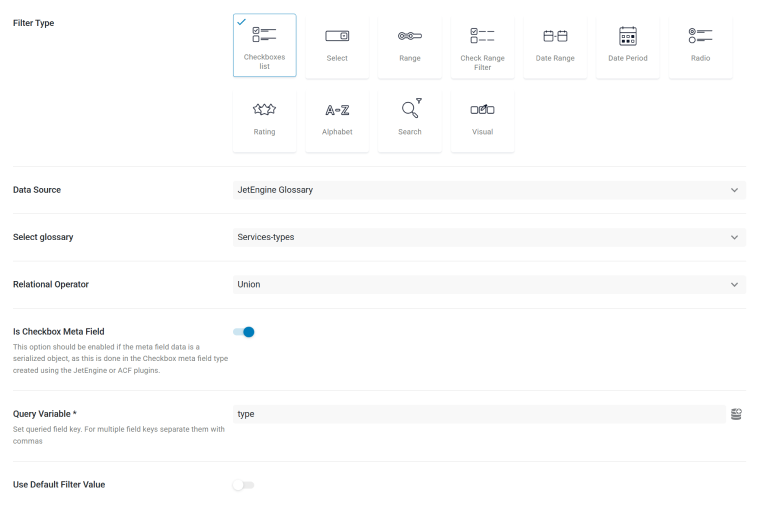
Go to JetSmartFilters > Add New. Name the filter “Services” and select a Checkboxes list filter type.
After selecting the filter type, the corresponding additional fields will appear:
- The first one will be Data Source. Select the “JetEngine Glossaries” data source.
- Select the “Services” glossary.
- Activate the Is Checkbox Meta Field (Jet Engine) toggle.
- Insert the name of the corresponding meta field in the Query Variable field, which is the field to which the sorting will be applied. To get the name correctly, go to JetEngine > Post Types > Portfolio CPT, copy the ID/Name of the field, and then insert it into the Query Variable field.
- Fill out the Filter Labels fields (the labels are to be displayed as filter names on the front end, and they can also be hidden).
This is what the settings for the Type of Service filter look like:
2. Setting up a filter for Industry
Filtering by Industry of the project is also a Checkboxes list filter type with the data taken from the corresponding JetEngine glossary. That’s why just repeat the steps from the previous section, but don’t forget to insert the right field name (“industry”) into the Query Variable field.
3. Setting up a filter for the Year
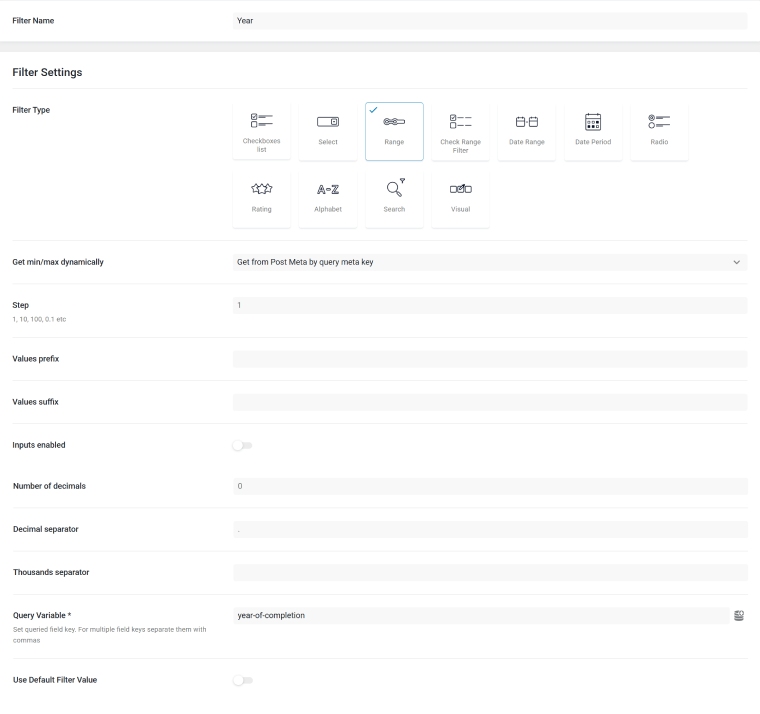
Go to JetSmartFilters > Add New. Name the filter “Year” and select a Range filter type.
After selecting the filter type, the corresponding additional fields will appear.
- In the Get min/max dynamically field, select the “Get from Post Meta by query meta key” value.
- You can set the step value and other parameters if needed.
- Insert the name of the corresponding meta field in the Query Variable field, which is the field to which the sorting will be applied. To get the name correctly, go to JetEngine > Post Types > Portfolio CPT, copy the ID/Name of the field, and then insert it into the Query Variable field.
- Fill out the Filter Labels fields (the labels will be displayed as filter names on the front end and can also be hidden).
This is what the settings for the Year filter look like:
Displaying filters on the front end
🔖 Some theory:
JetSmartFilters Overview
Filter Settings Overview
How to Set AJAX Request Type
Indexer Feature Overview
How to Filter Glossary Items
To make filters work on the front end (Portfolio main page), you should add the filter widget to the page. To do this, open the page in the Elementor editor (or reload the page after setting up filters on the back end).
To add the filters for Service and Industry, select the Checkboxes Filter widget.
- In the Select filter field, select the name of the filter (Service / Industry).
- In This filter for the field, select “JetEngine” (because the CPT and fields were created with JetEngine).
- In Query ID, it’s recommended to add the ID of the container that has the items to be filtered. It will help avoid the mashup if you add more containers with filterable items to the page.
To do this, click on the container with the filterable items, go to the Advanced tab, and assign the ID in the CSS ID field. Then, copy and paste it to the Query ID field of the filters widget.
This is what the whole process of setting up and displaying filters looks like:
Wrapping Up
In this guide, we went through the process of adding a dynamic portfolio with advanced filtering to the website. Each portfolio item has its dedicated page layout, which is controlled globally from the portfolio template.
Because of its dynamic structure, it’s expandable even if your website becomes much bigger and complex.

