Dynamic Tags Overview
This guide is about what a dynamic tag is, how to display dynamic content with its help, and which features the Dynamic Settings section can offer.
Dynamic Tags Usage
To access the “Dynamic Tag” functionality, one should proceed to the page editor.
Dynamic Tag type
For example, dynamic tags can be applied to the basic Image Elementor widget. When it is dropped onto the page, the settings menu is opened.
The “Dynamic Tags” button is located in the bottom right corner of the Choose Image field. After it’s clicked, it opens the list of all tag types that can be used with this widget.
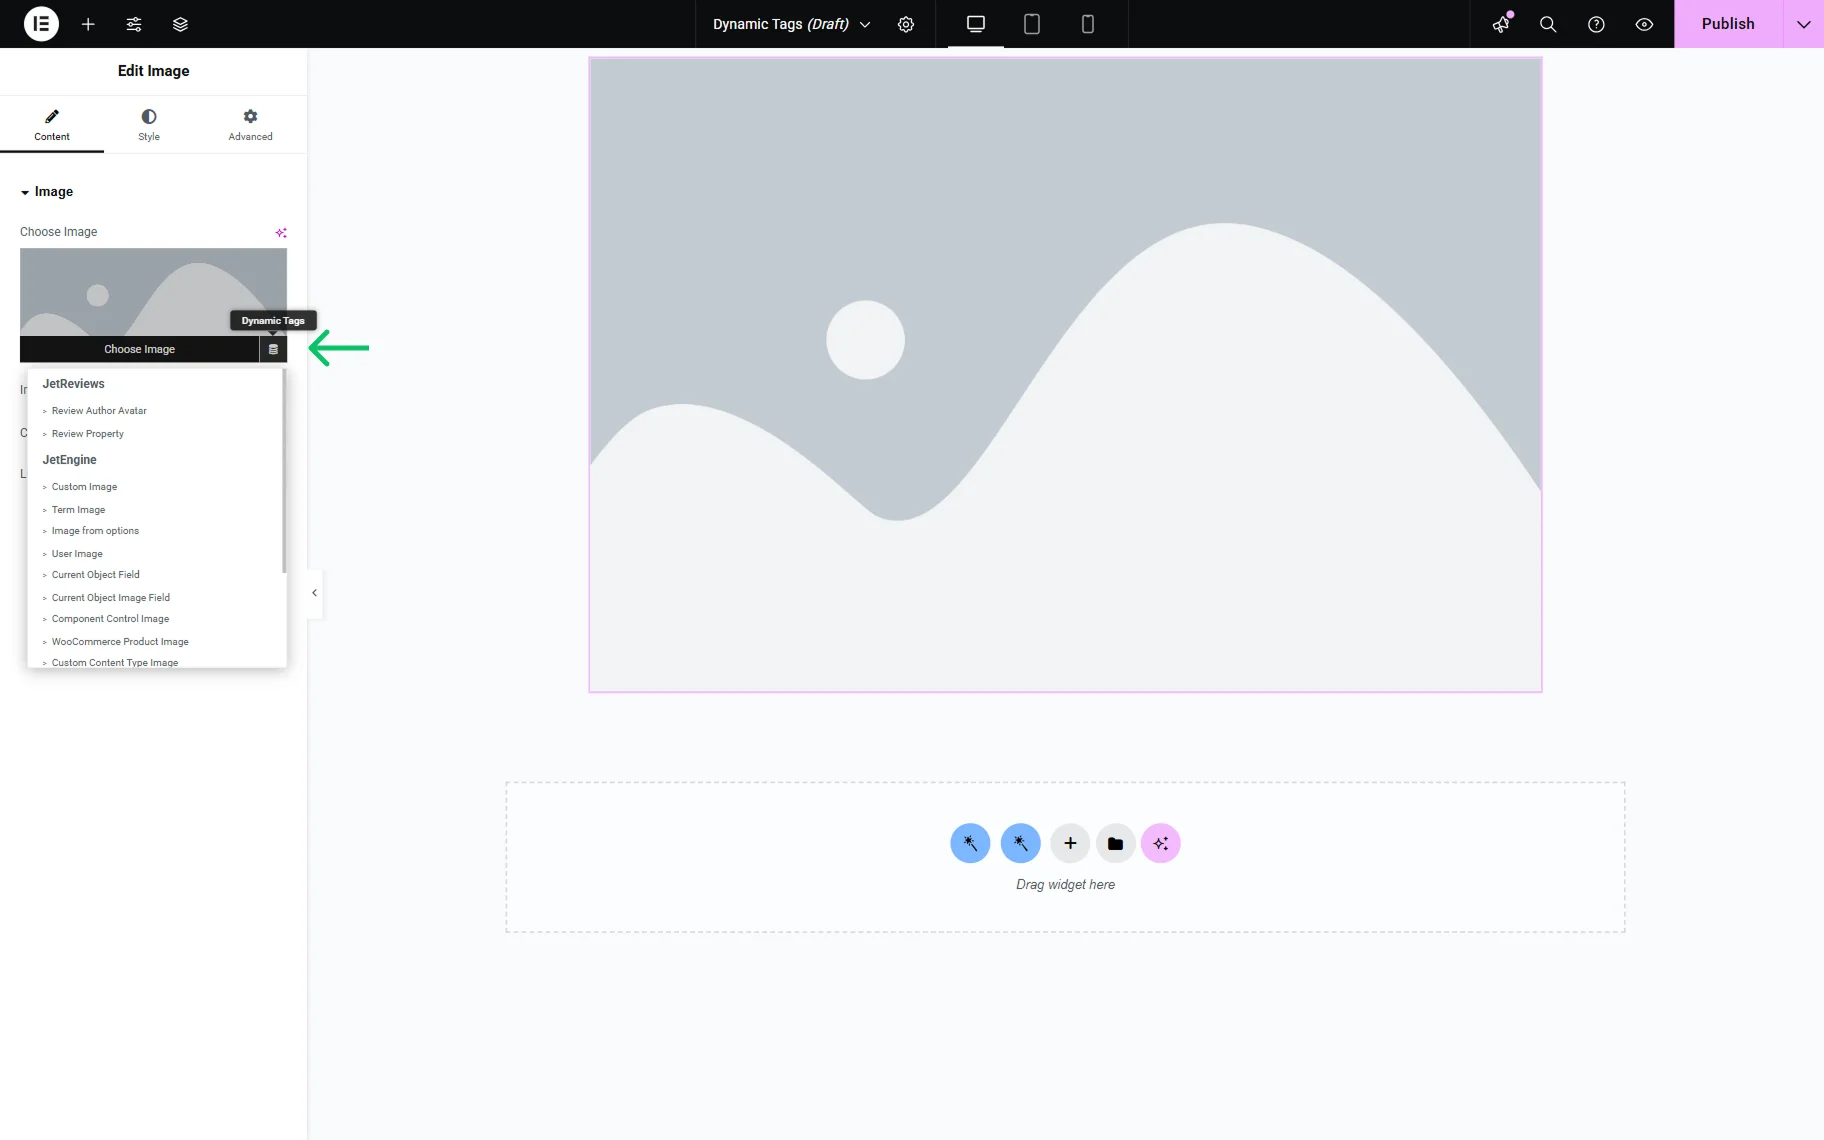
Source
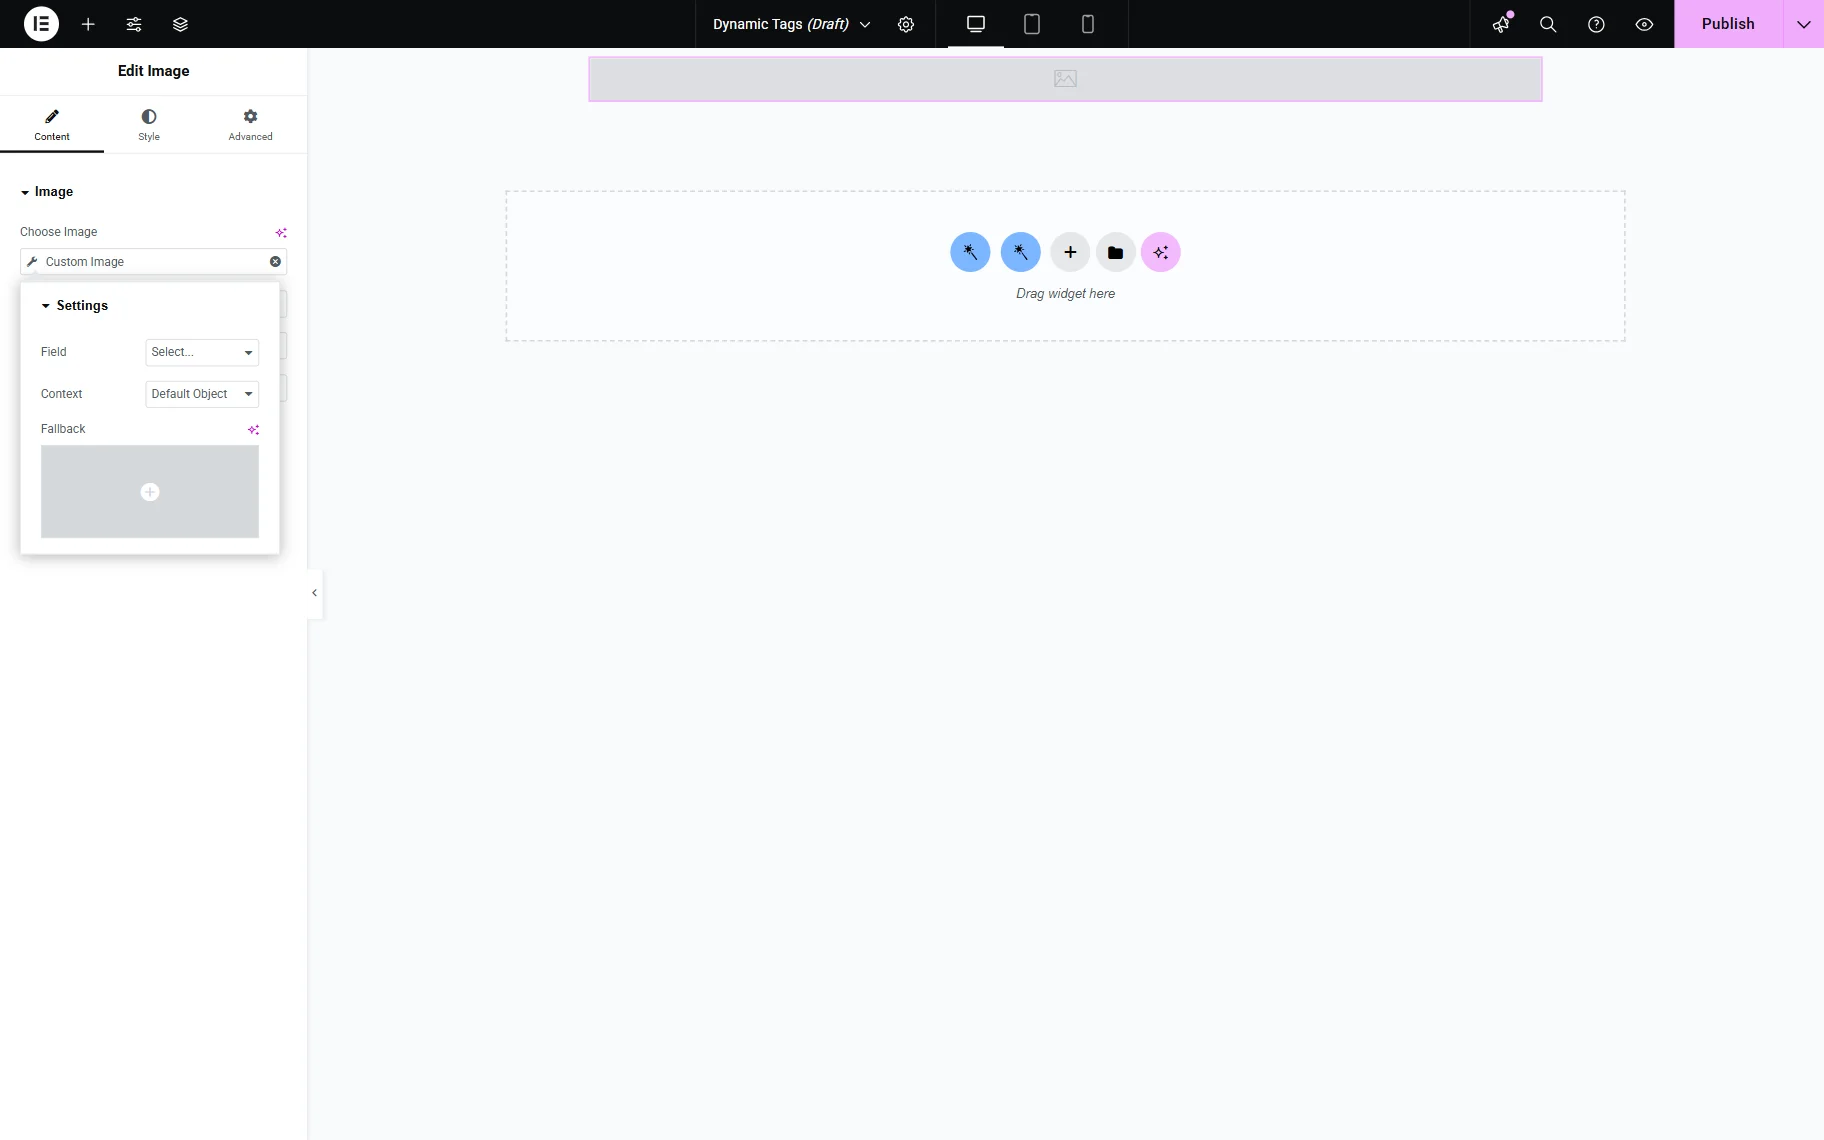
After the Dynamic Tag is selected, the meta field from which to pull the data should be specified; it can be done with the help of the Field drop-down list. Although this tutorial uses the Image widget as an example, the steps are the same for all Dynamic Tags fields.
In the Field bar, there is a list of all meta fields of the demanded type with the data that has a suitable format.
Some tags have a Context drop-down list, like User Image or User Field. It defines the user more specifically:
- Current User (global) — the user for whom the page was created;
- Current User (for current scope) — the user currently proceeding. For example, a listing of users shows the posts written by each user after clicking on them. In this case, if the “Current User (for current scope)” option is selected, it will display the meta field value of the user just clicked on, not the logged-in user;
- Queried User — the currently logged-in user or the user mentioned in the URL (the ID of the user is in the URL);
- Current Post Author — the meta field value of the user who is the author of the currently opened post;
- Current CCT Author — the data in the meta field of the user who is the author of the currently opened Custom Content Type item. It can be used in the CCT Listing Template to show the information about the CCT item author;
- Related Items From… — the data for the created relation. To learn more, navigate to the Relations Dynamic Output tutorial.
Besides that, it contains additional features like the Fallback (data that will be shown if something is wrong with the main info).
Then, the necessary meta field should be selected, and the additional settings should be defined. After that, the Image widget will pull the content dynamically from the chosen source.
Dynamic Tags List
Here is a list of all the dynamic tags that can appear for widgets with different plugins and modules activated.
JetEngine tags for Image widget
These tags will appear for the Image widget by default if you have the JetEngine plugin installed and activated.
- Custom Image — image from the meta fields added to the Custom Post Type;
- Term Image — picture from the meta field created for the Custom Taxonomy;
- Image from options — image from the meta field chosen to use like an Options Page;
- User Image — photo from the meta field added to the User Profile.
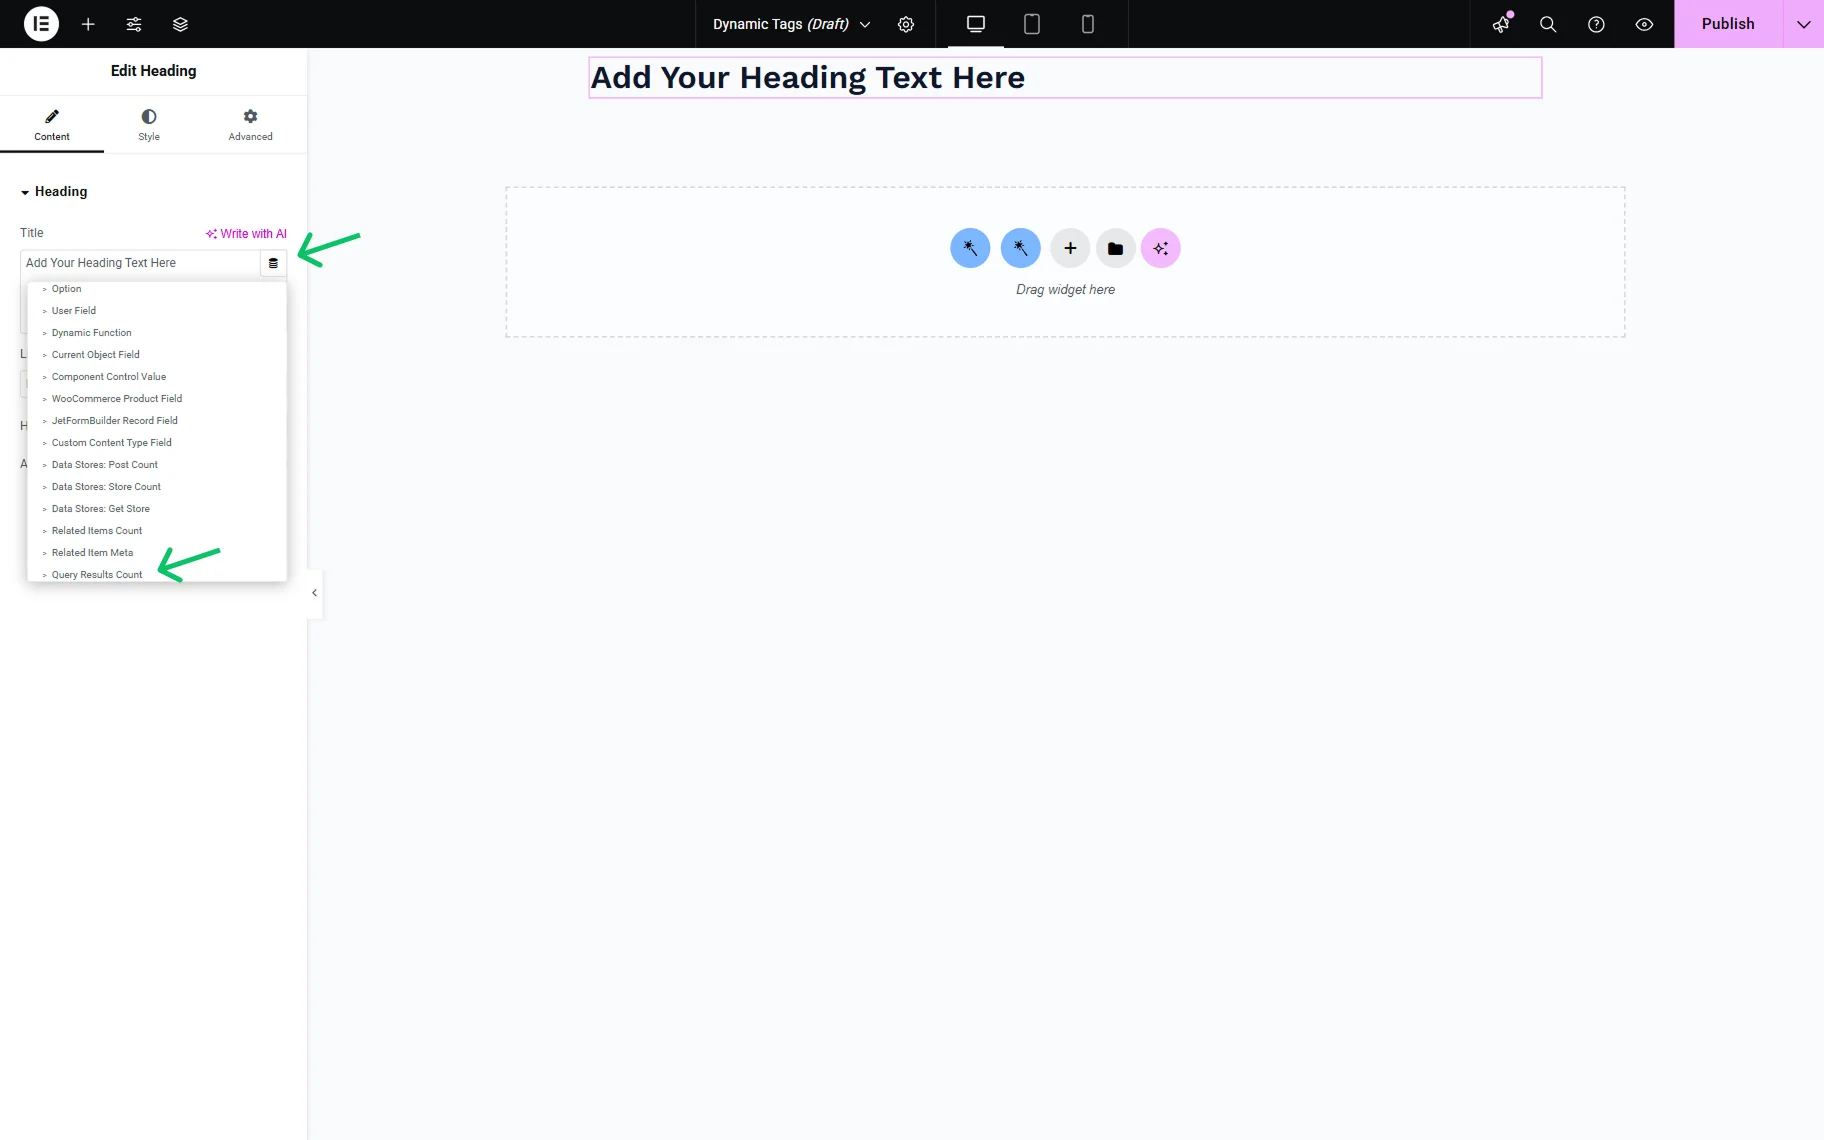
JetEngine tags for fields
This list of tags is shown for widgets that display text information or links (like Text Editor, Button, or Heading):
- Custom Field — data from one of the meta fields added to the Custom Post Type;
- Term Field — a value of the meta field created for the Custom Taxonomy;
- Option — data put into a particular Options Page;
- User Field — data from the meta field added to the User Profile;
- Current Object Field — data from the SQL query;
- Query Results Count — number of query results created with Query Builder.
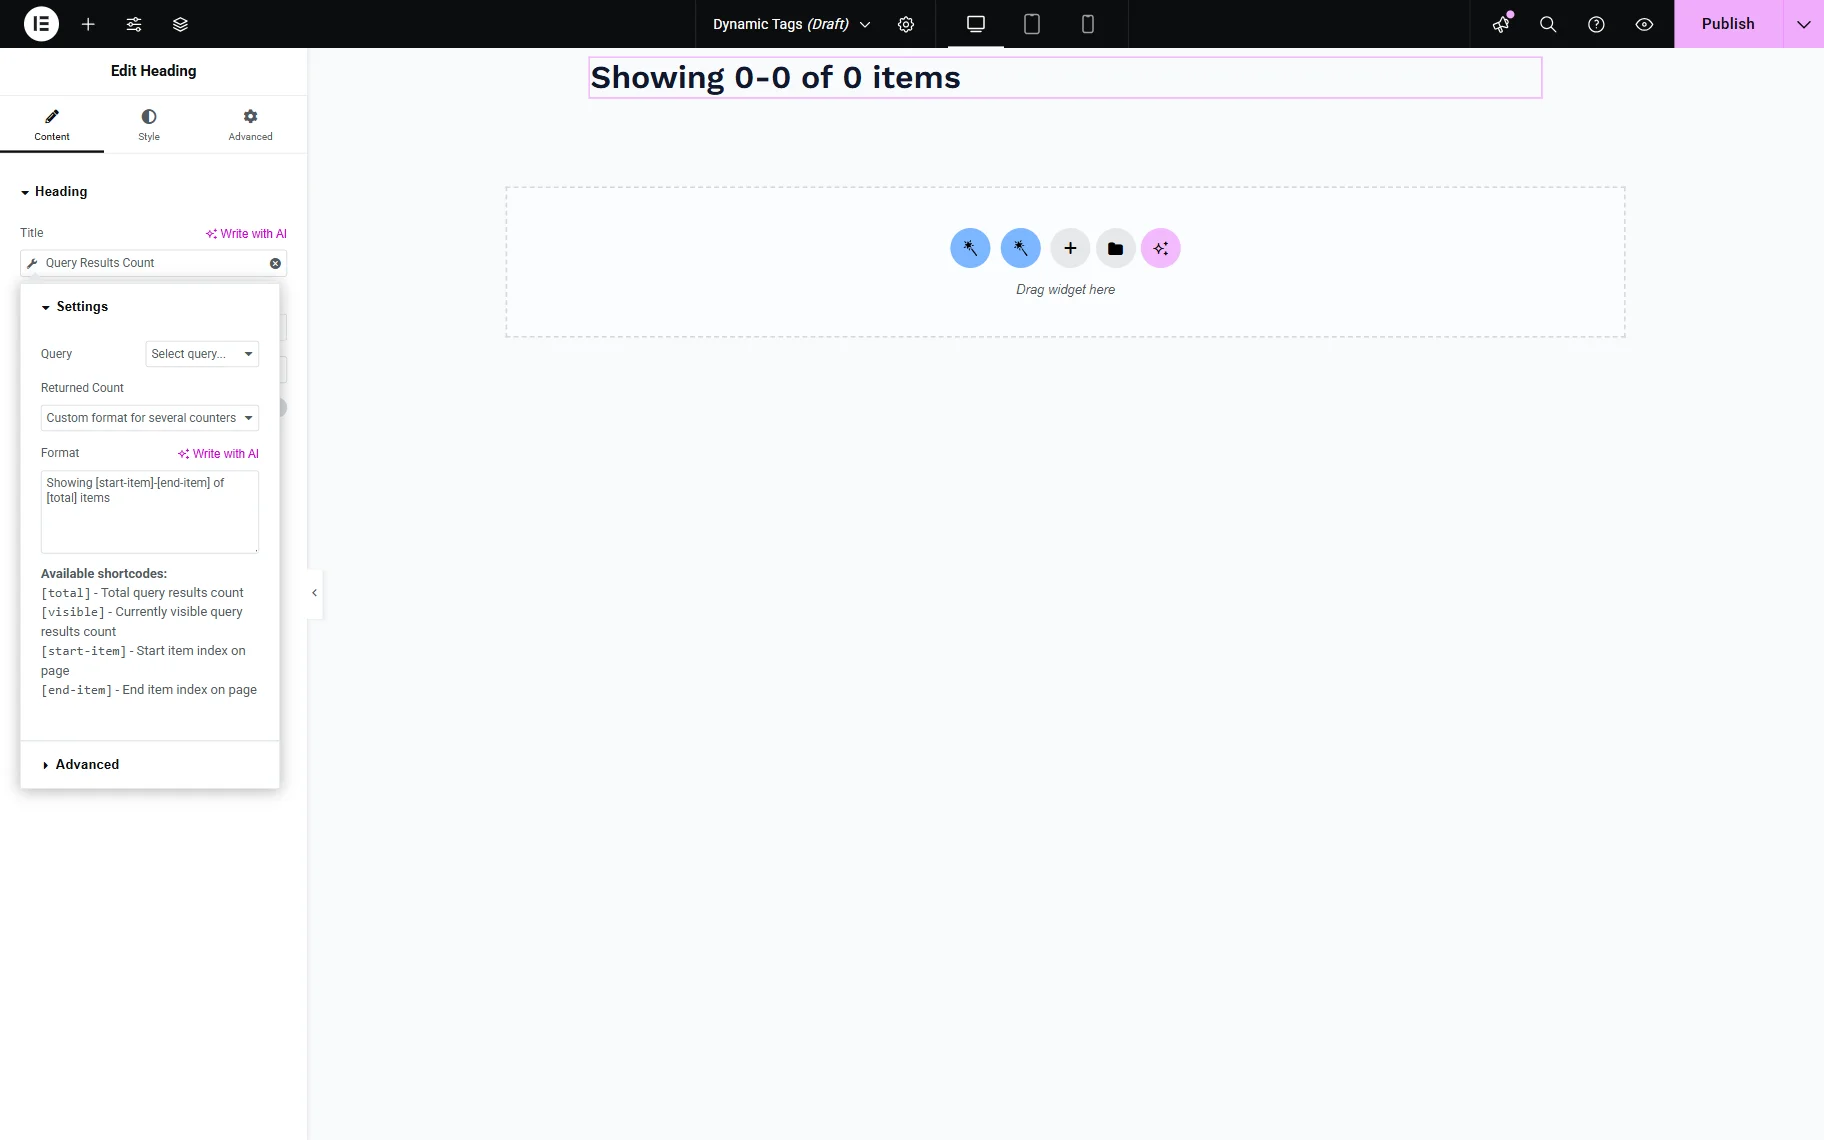
Query results count dynamic tag
The Query Results Count dynamic tag shows the total number of query results and the number of currently visible query results on the page. It works with queries created via Query Builder.
In the Settings tab, such features can be spotted:

- Query — query with pagination that is applied to the widget under;
- Returned Count:
- Total query results count — number of total query results of all pagination pages;
- Currently visible query results count (per page) — number of results on the current page;
- Custom format for several counters — counter which can be customized in the following Format field with the help of available macros.
In the Advanced tab, there are the following fields:
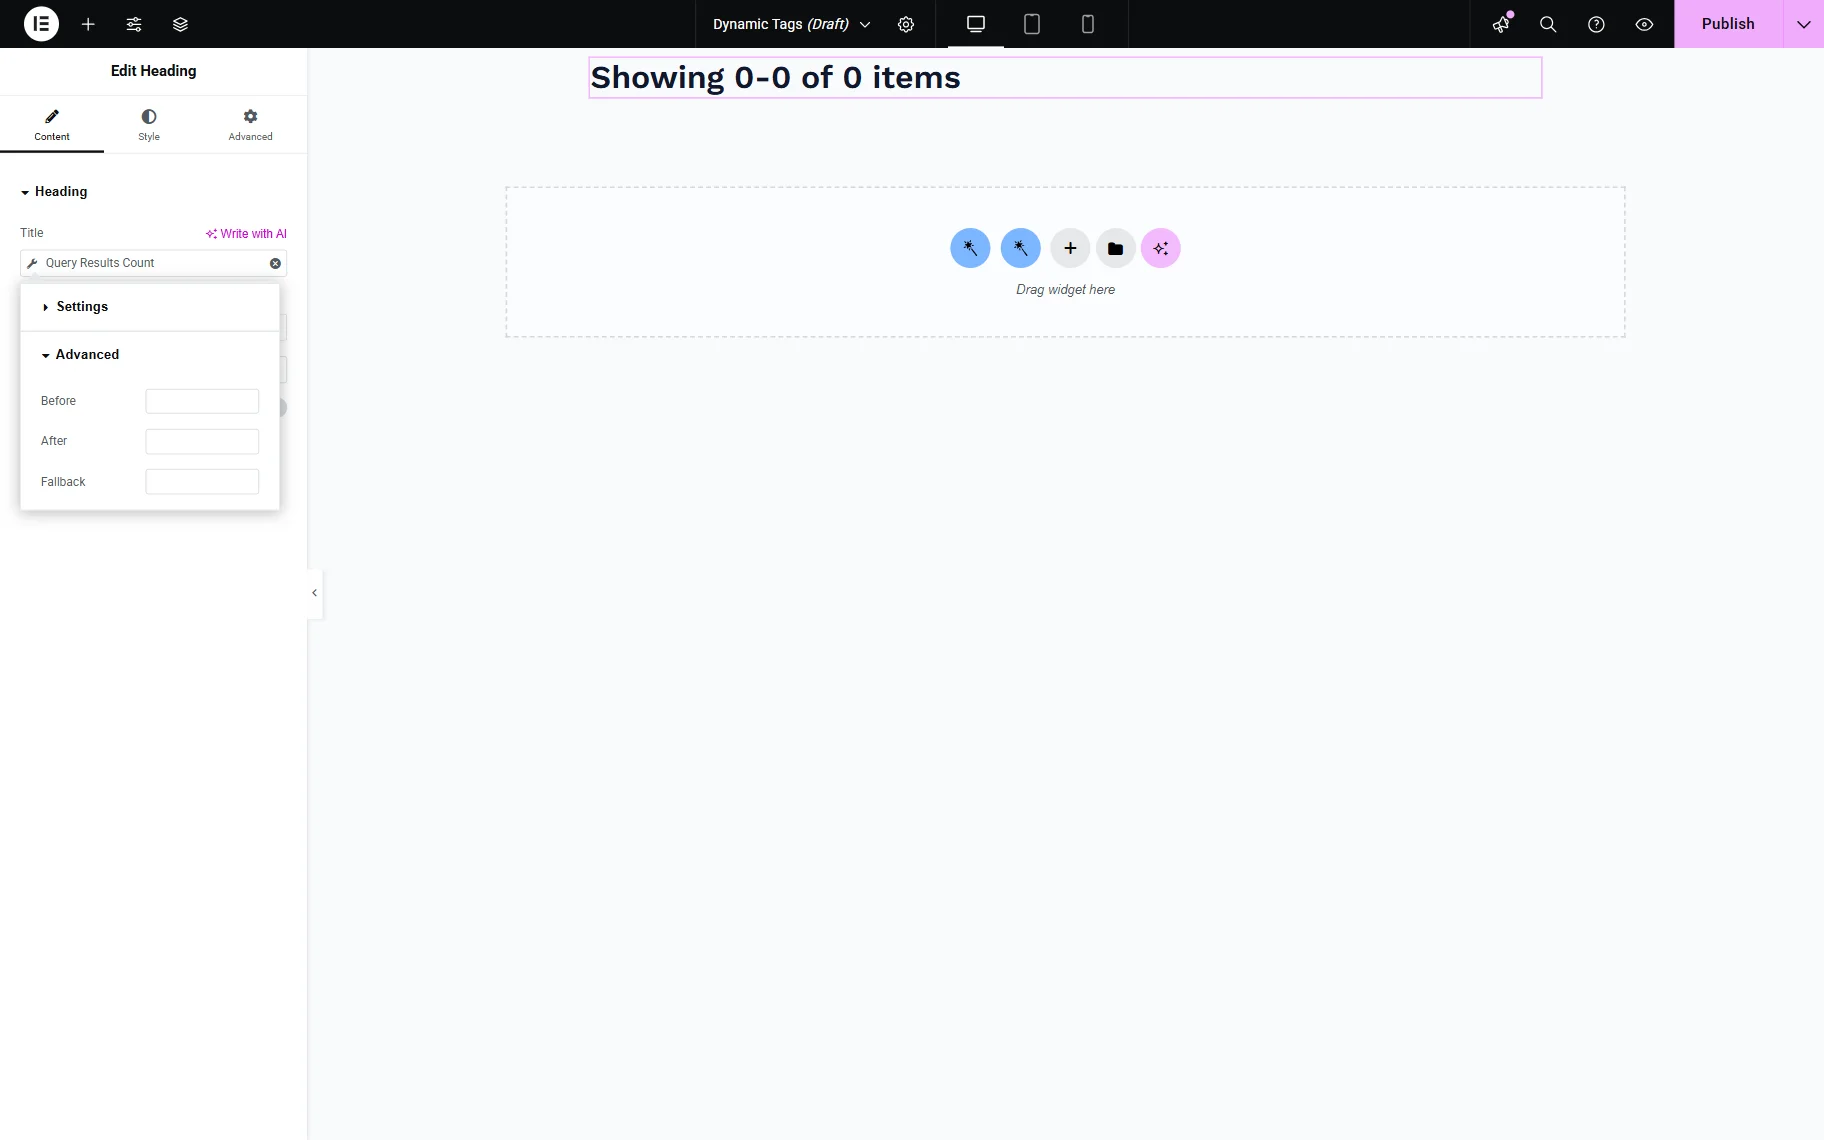
- Before and After — text before and after the number. In those two fields, one can use indents to separate the number from the text;
- Fallback — text that will be shown if data fails to be displayed.
We have a dedicated tutorial about applying the Query Results Count dynamic tag and using it with Dynamic Visibility.
Query Calculations dynamic tag
The Query Calculations dynamic tag calculates specific values based on the Query Builder’s query result.
It is suitable for cases where calculations need to be performed on small data volumes (200–400 items in the query results) or when using the Dynamic Function tag is not possible, such as with REST API queries.
This feature can be used in widgets like Rating or various types of progress bars. It can also serve as a dynamic argument for other queries. For example, to display products with a price greater or smaller than the average price on the site.
The following settings can be adjusted:
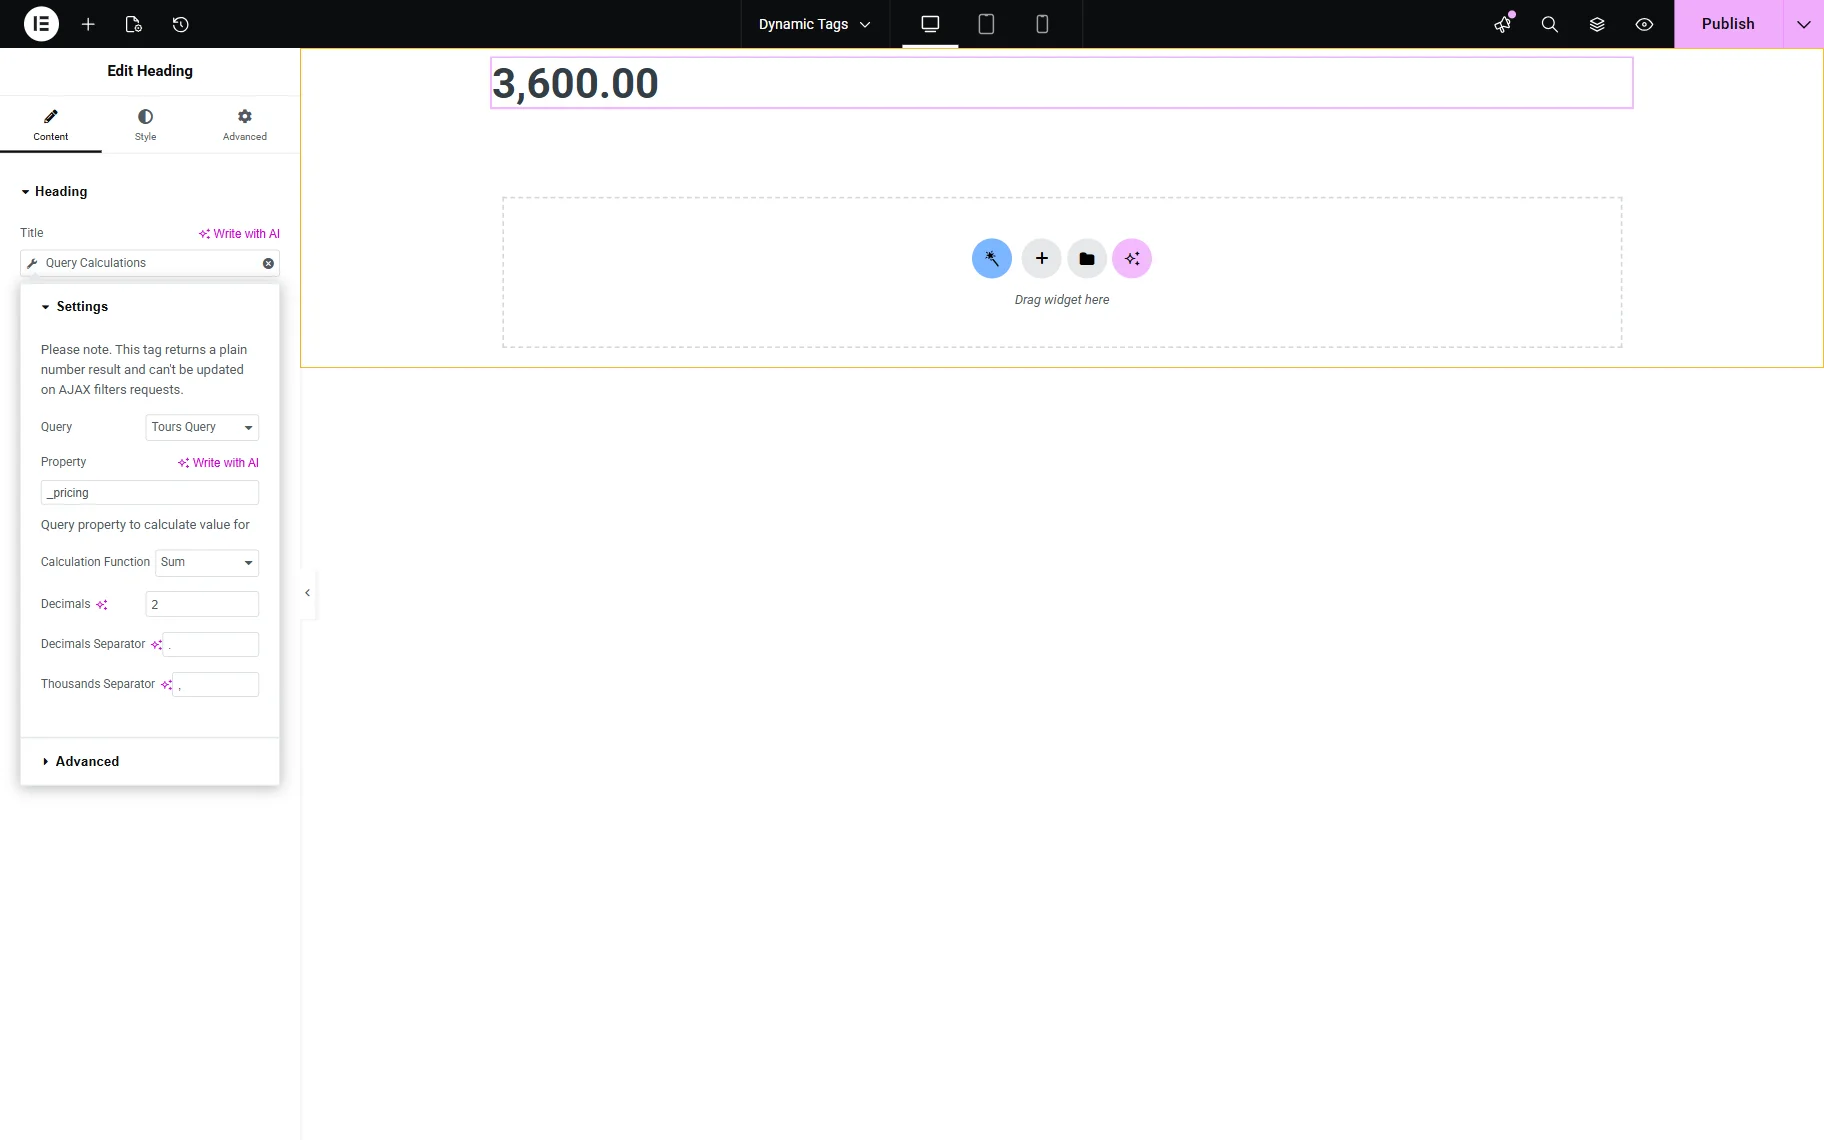
- Query — a dropdown field that allows selecting a query to work with;
- Property — a field for specifying the property to be the source of the calculations. For “Posts Query” Query Type, this field supports post meta fields;
- Calculation Function — a function that will be used for calculations:
- Sum — calculates the total of all numeric values returned by the selected property in the query;
- Average — returns the arithmetic mean of all values;
- Minimum — returns the smallest numeric value from the query results;
- Maximum — returns the largest numeric value from the query results;
- First — returns the numeric value of the first item in the query results;
- Last — returns the numeric value of the last item in the query results;
- Standard Deviation (how dispersed a dataset is around its mean) — shows how spread out the values are around the mean. A higher standard deviation indicates greater variability in the data;
- Variance (the average of the squared differences from the Mean) — calculates the average of the squared differences from the mean, representing the overall dispersion of values;
- Median (the middle value in a list of numbers) — returns the middle value in the ordered list of numbers;
- Mode (the most frequently occurring value in a dataset) — returns the value that appears more frequently in the dataset.
- Decimals — a field indicating the number of decimals shown after the decimal point in the calculation result;
- Decimals Separator — a field that defines the character used to separate the integer part from the decimal part of the number (e.g., “.” or “,”);
- Thousands Separator — a field that defines the character to group thousands in large numbers (e.g., “.” or “,”).
Current object field dynamic tag
The “Current Object Field” dynamic tag can be used for such cases:
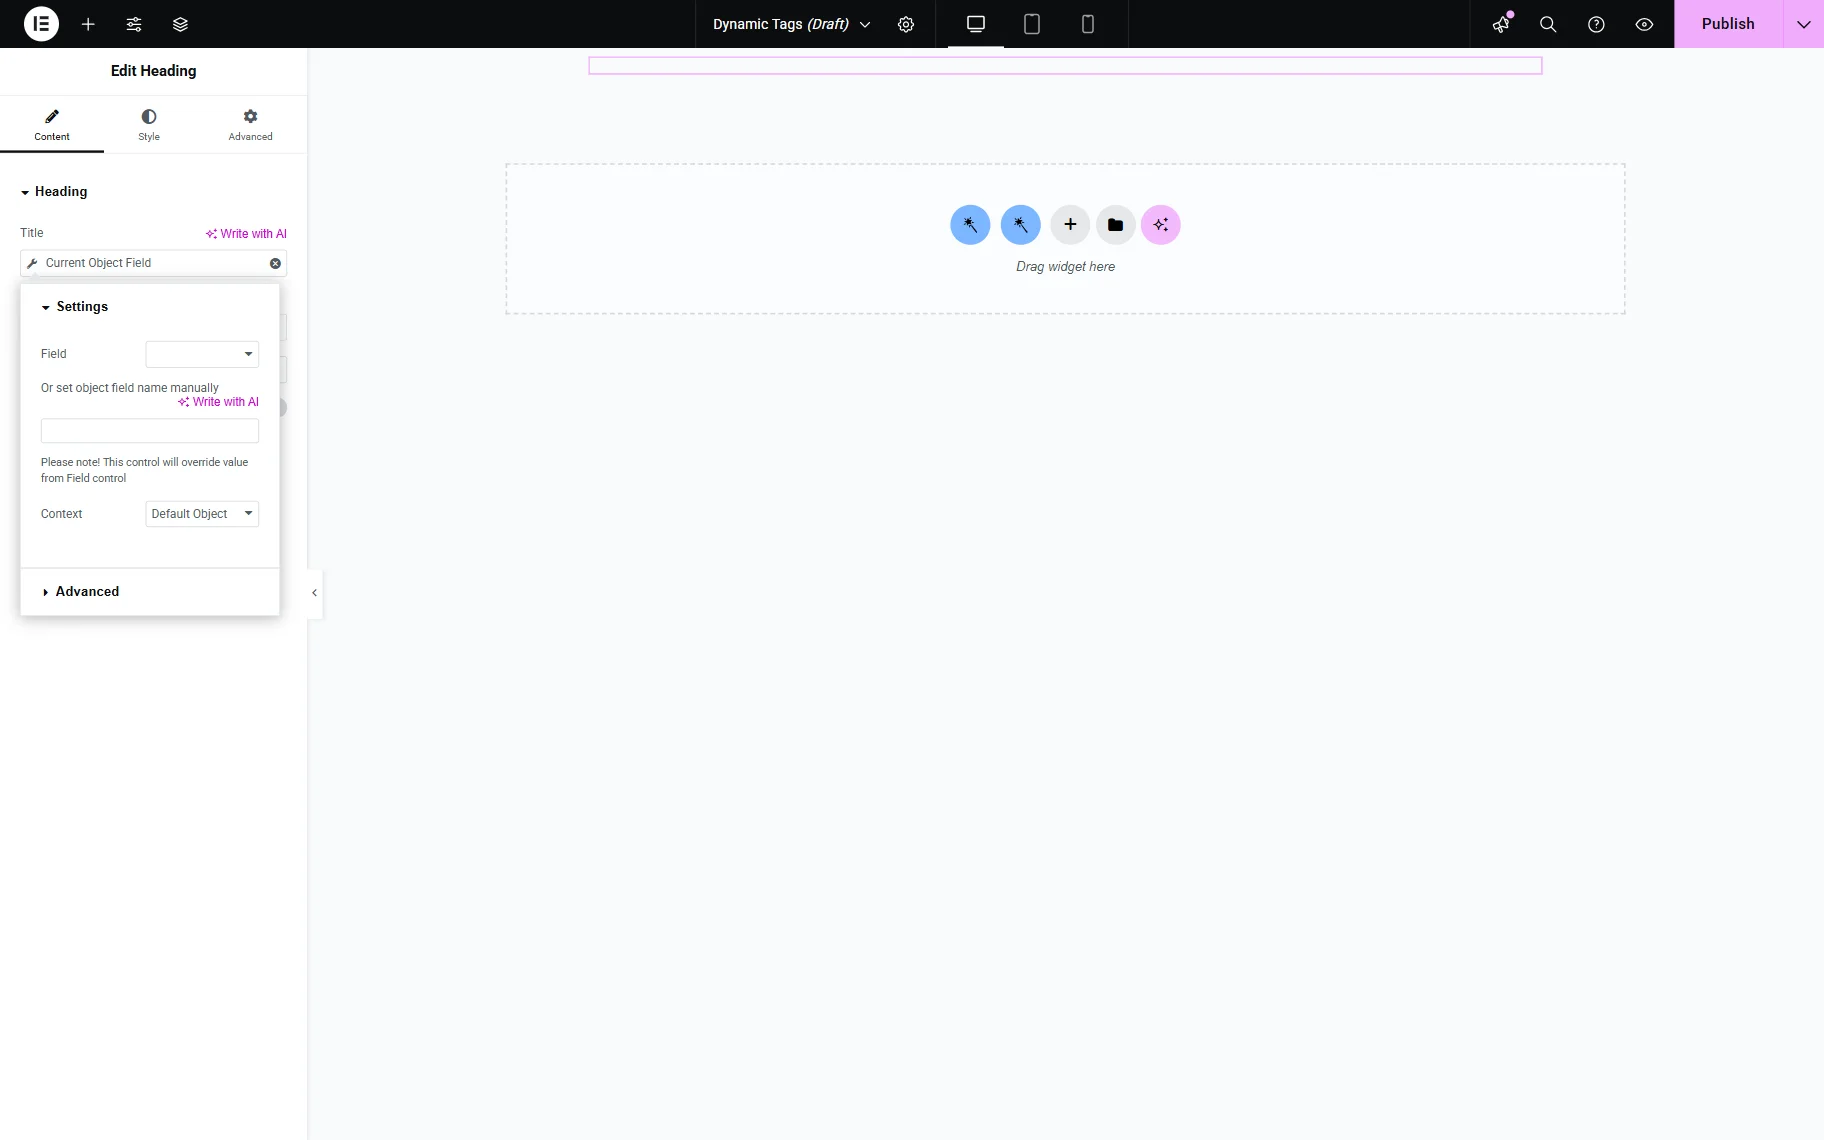
- to display a post, user, term, and comment meta;
- to collect the data from the SQL query;
- to use specific data called in Query Builder depending on clause conditions;
- to display the object’s called data on the front end or use it in the Dynamic Visibility Conditions to hide or show an element according to the object’s data;
- to use two or more tables from the database, e.g., USERMETA and MEMBERSHIP tables. One should use the Query Builder and apply the Current Object Field dynamic tag to output the results.
JetEngine tags appearing after module activation
The following tags will appear in the list when the corresponding module is activated by navigating to WordPress Dashboard > JetEngine > JetEngine Dashboard > Modules.
REST API module
After activating this module, the “REST API Image” and “REST API Field” dynamic tags will appear in the tags list. Those tags display the information from the meta fields on another website yet received via REST API functionality. In the case of images, only the image’s ID can be displayed this way so far.
Custom content type module
Adds the “Custom Content Type Image” and “Custom Content Type Field” tags to the list. When chosen, these dynamic tags display the value of the meta field created for the Custom Content Type.
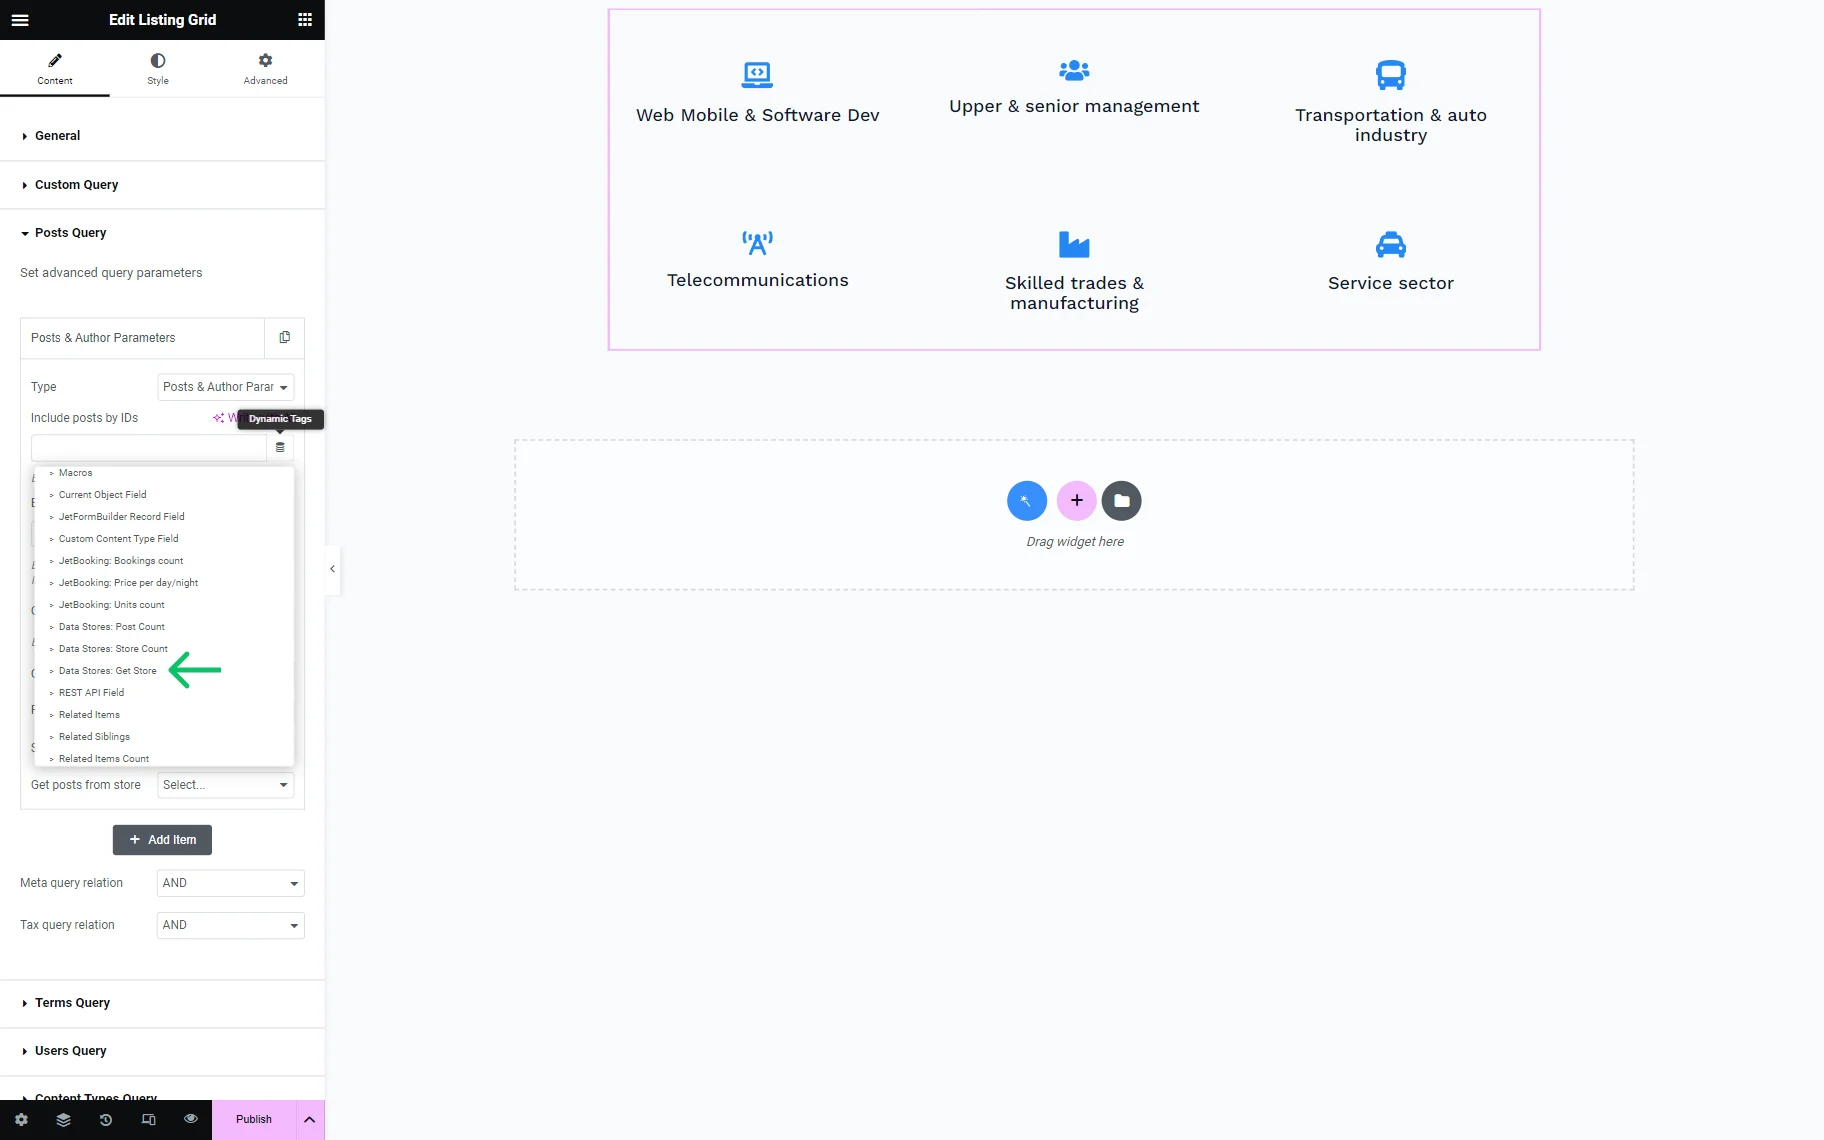
Data stores
After enabling this module, the “Data Stores: Post Count” and “Data Stores: Store Count tags” appear in the list. They allow adding a counter of likes and a counter of items in the store.
Also, a “Data Stores: Get Store” tag will appear. It can be found in the Query settings section of widgets that display posts (Listing Grid, for example). It allows the widget to show items from the store and thus include or exclude them from the list. For instance, it can be used to show the items the user added to the favorites in the general grid.
Profile builder
When the Profile Builder module is active, it adds a “Profile Page URL” tag available only in features that are supposed to add a URL (for example, a link to the Heading). This tag creates a link to one of the profile pages.
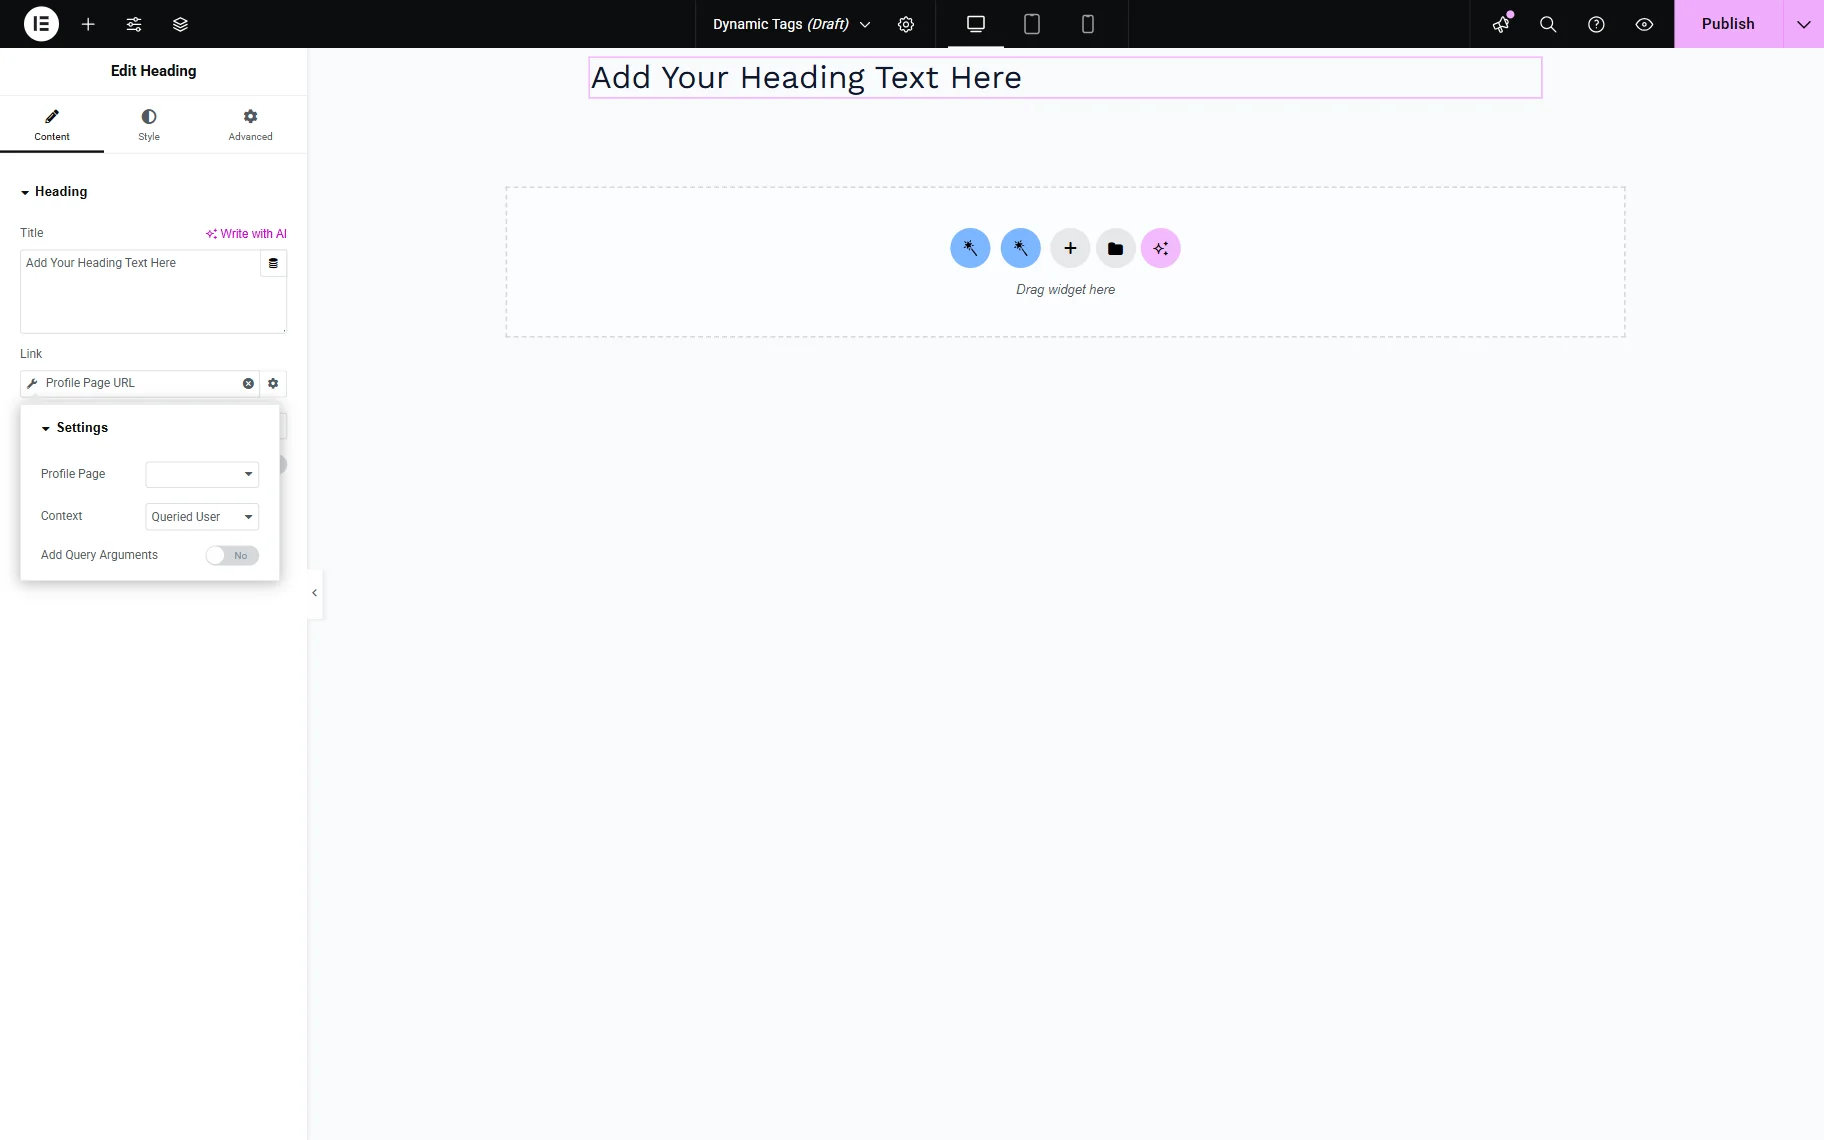
- Profile Page — pages created in Profile Builder;
- Context — here, the page can be specified:
- Queried User — page of the logged-in user or user mentioned in the URL;
- Current Post Author — profile page of the author of the post;
- Current CCT Item author — profile page of the current CCT item author;
- Add Query Argument — when this toggle is enabled, a URL of the profile page can be built.
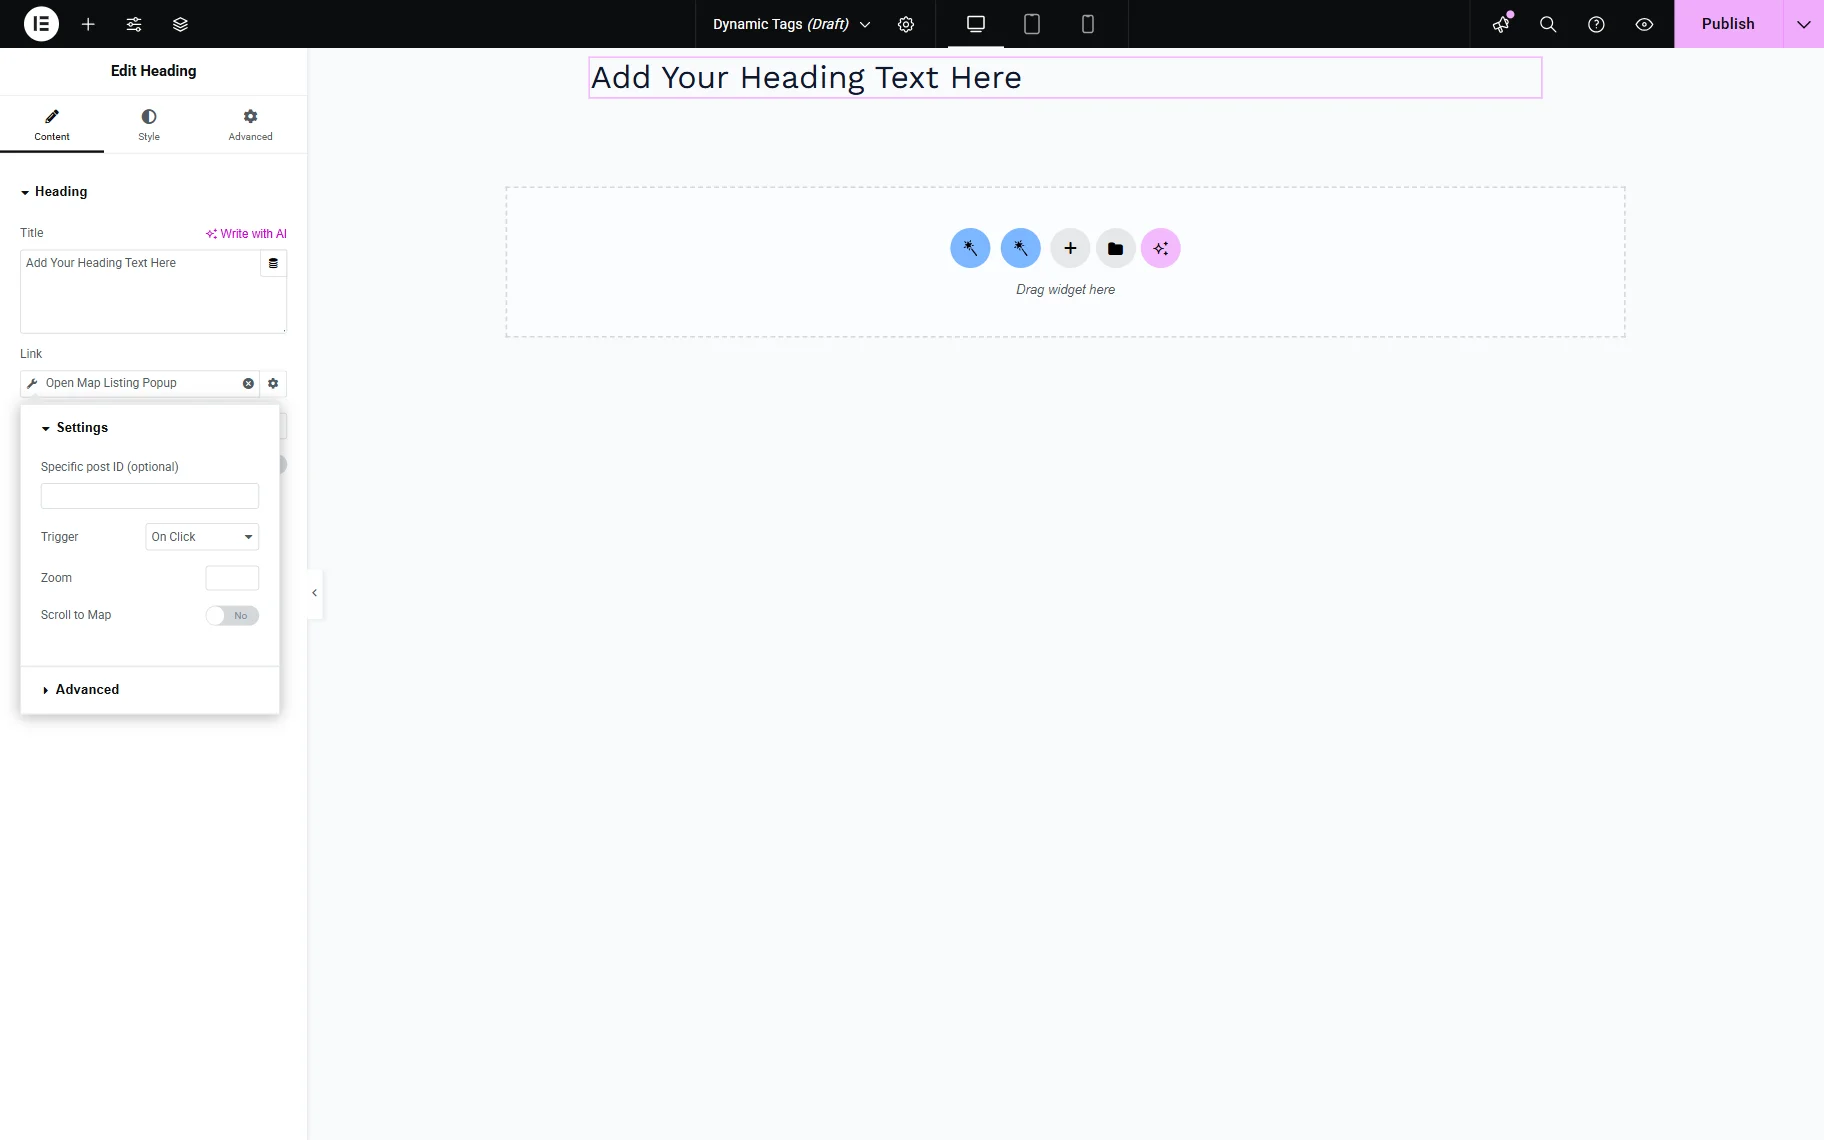
Map listing
After the Map Listing module activation, the “Open Map Listing Popup” tag also appears. This tag is available for features that add a URL to the page (like the Link feature of the Heading widget); it opens a Map Listing pop-up.
In the Specific post ID bar, one can put the ID of the post in the Map Listing to open. Here, the Trigger can also be set – whether the pop-up will appear when the user hovers over the link or clicks on it.
The Zoom field can be filled in with the value that will zoom the needed item on the map according to the completed number.
The Scroll to map toggle should be activated in order to scroll to the map automatically once the pop-up is opened.
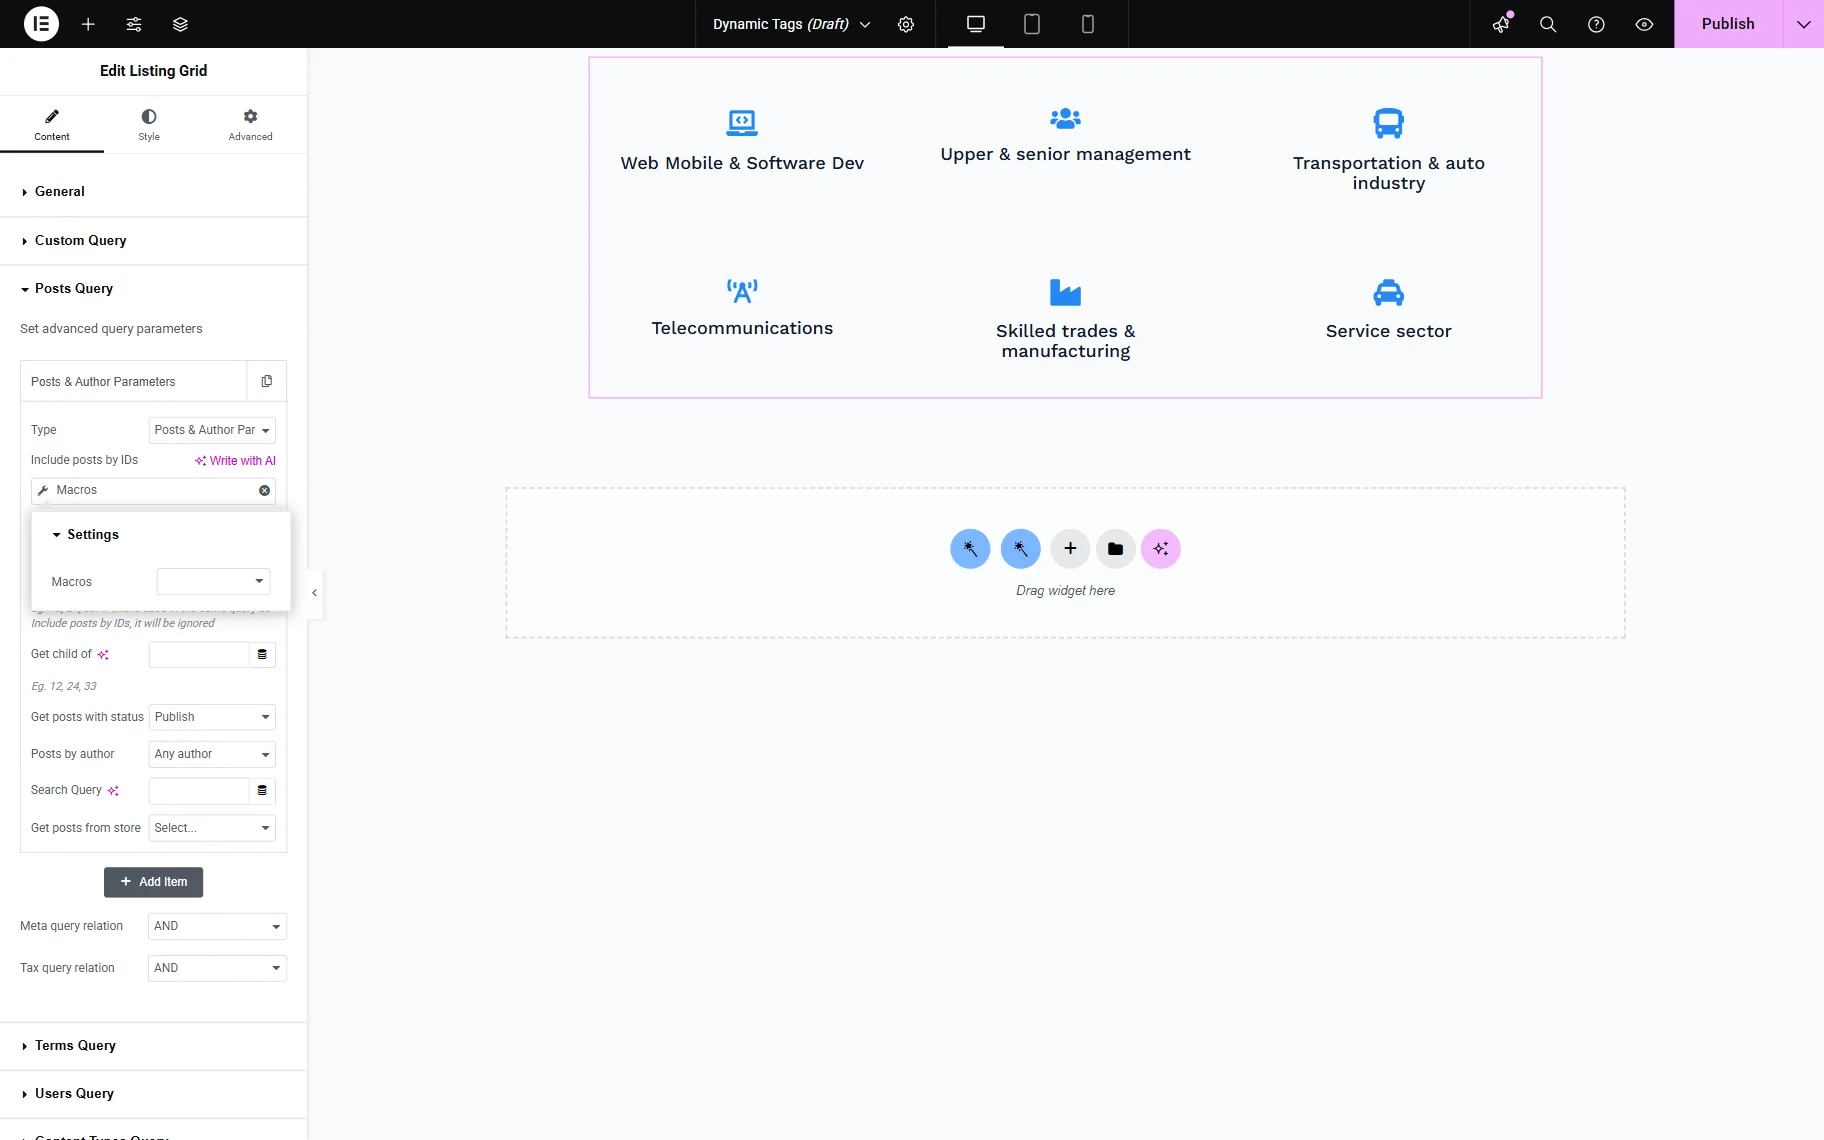
Macros
This tag is available right after JetEngine plugin activation. However, it can be used only in JetEngine widgets like Listing Grid or Dynamic Link and features that allow dynamic tags usage (for example, in the Posts Query settings section).
This tag allows the use of macro codes. These can be typed in the field manually or selected in the Macros list.
Dynamic function tag
It appears in the tags list after the JetEngine plugin activation. This tag has a few more complex settings, so it will be described in a separate paragraph.
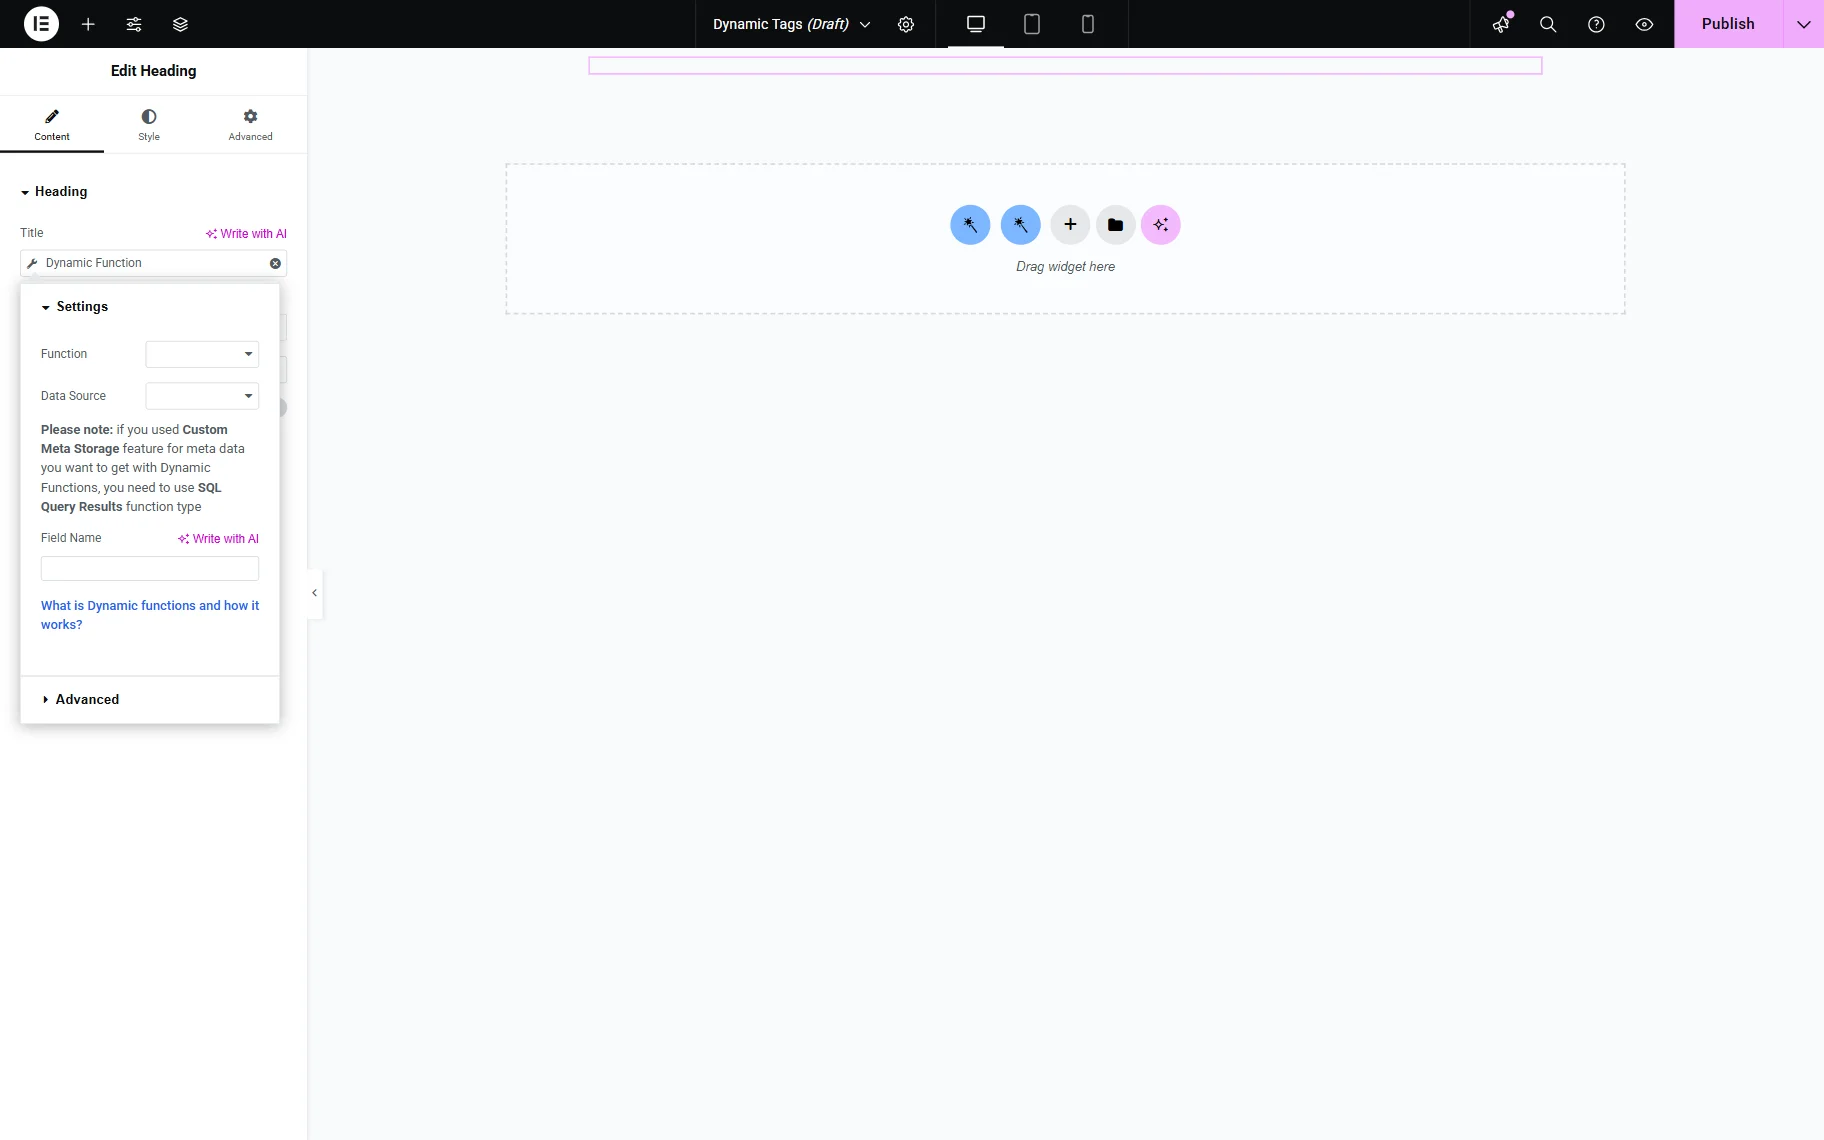
This tag performs calculations with the field values. The Function defines the type of calculation:
- Function — calculations to be performed with the field’s value:
- Summed value — counts the sum of values;
- Average value — counts the average value of the ones placed in the field;
- Count — counts the number of posts/terms/users having the mentioned field filled with data;
- Maximum/Minimum value — checks the values in the field and displays the maximal/minimal one.
- Data Source — field to choose where to take the data from — Post, Term, or User meta fields. If you have selected the Post Meta option, you will be additionally asked to specify the Data Context:
- All posts — data will be taken from all posts;
- Posts from current term — term in the Taxonomy drop-down to be selected so the data will be taken only from the posts of that taxonomy;
- Posts by current user — the values will be taken from the posts of the current user;
- Posts by queried user — the user in the Set user ID/login/email bar, so the values of that user’s post will be calculated;
- Field Name — the name of the field. The values of that field will be used in calculations;
- Decimal Point — available for all functions except the “Count.” It defines the appearance of the decimal point;
- Thousands separator — available for all functions except the “Count.” It defines the appearance of the thousands separator;
- Decimals Count — available for all functions except the “Count.” It defines how many numbers after the decimal will appear.
JetAppointment tag
The “JetAppointments Booking: add booking to Google calendar” tag appears after activating the JetAppointment plugin. It allows creating a link to add appointments to the Google calendar. The usage of this tag is described in the tutorial that reveals how to add the appointment to the Google calendar.
JetBooking tags
The JetBooking plugin adds such dynamic tags to the list that can be used on the Single Instance page or in the Listing template with booking instances:

- Accommodation Status — returns the current state of the reservation. The Settings tab in the pop-up contains the Available Label, Pending Label, and Reserved Label options that can be customized;

- Booking Price — dynamically display the booking price based on the selected date range (if a user filters dates or uses the booking form), seasonal, and weekend pricing. The Settings tab in the pop-up includes such options:
- Period Start and Period End — fields where the date can be entered in `Y-m-d` Universal time format (e.g., “1996-04-09”) or dynamic tags can be used;
- Currency — field where the currency sign can be set (e.g., “$”);
- Currency Position — a dropdown that contains two options: “Before” and “After”;

- Bookings count — displays the total number of bookings made within a specific date period for a particular instance. The Period Start and Period End can be specified in the Universal time format: ‘Y-m-d H:i:s’ or ‘Y-m-d’. Example: ‘1996-04-09 00:00:00’ or ‘1996-04-09’.

- Price per day/night — shows the price per day/night of the instance. The Settings tab in the pop-up includes such options:
- Show Price — in this drop-down, such options can be set:
- Default — shows the price set in the Price per 1 day/night field of the Pricing Settings tab on the instance editing page;
- Min Price or Max Price — shows the minimum/maximum price set for an instance, taking into account default, seasonal, and weekend prices;
- Prices Range — displays the span between the minimum and maximum price.
- Change Dynamically — if activated, this option will change the price dynamically for the check-in and check-out dates. It will work correctly only when the appropriate booking form is presented on the page;
- Currency — field where the currency sign can be set (e.g., “$”);
- Currency Position — a dropdown that contains two options: “Before” and “After”;
- Show Price — in this drop-down, such options can be set:

- Units count — returns the number of units available for booking (for example, to show that two rooms are still available to book). More details about the units feature are described in the How to Manage Units tutorial. This dynamic tag doesn’t have additional settings.

The use cases of the JetBooking dynamic tags can be found in such tutorials:
- How to Apply JetSmartFilters to Your Booking Website;
- How to Set Automatic Price Calculator;
- Applying Price Filter Based on Seasonal and Weekend Rates.
JetReviews tags
The JetReviews plugin adds such dynamic tags to the list:
- Average Rating — displays the average rating of the post or user;
- Reviews Info — shows the reviews count;
- Review Average Rating — retrieves the average rating from user-submitted reviews within JetReviews;
- Review Property — retrieves specific data from user-submitted review and displays different review-related details dynamically, such as “Review ID,” “Author,” “Date,” “Rating,” “Likes,” “Dislikes,” etc.
Some details can be found in the How to Display the Average Rating and Reviews Count tutorial.
JetSmartFilters tag
The JetSmartFilters plugin adds a “URL with filtered value” option in the Dynamic Tags list. Discover how to use it in the following tutorial.
WooCommerce tags
The WooCommerce Product Image and WooCommerce Product Field dynamic tags allow pulling data for the JetEngine listings creation.
More details can be found in the How to Build WooCommerce Products Listings with the Dynamic Tag and How to Add Sale and Best Seller Badges to WooCommerce Products tutorials.
That’s all about Dynamic Tags and their settings available with the JetEngine plugin for WordPress websites.