Suppose your business relies significantly on online services. In that case, scheduling appointments with sales representatives, consultants, customer support, and various departments is a crucial aspect of the workflow, not to mention the cases when the company operates primarily through appointments, e.g., salons, spas, healthcare providers, legal consultancies, etc.
There is a choice of SaaS services that manage online scheduling, but the price often heavily depends on the number of users, appointments, and various factors, not to mention the restrictions they always have. Why not create your own appointment booking system on the website to suit you perfectly?
In this article, using an example of the Crocoblock Schedule Zoom Call page, I will show you how to set up appointment booking functionality on your website using just three plugins and have no limitations on the number of service providers (consultants) and teams (departments).
💡 To learn why the Crocoblock team moved to JetAppointment from Calendly and all the advantages and features, read this article.
Plugins to Use
JetAppointment
As the name suggests, JetAppointment is the central plugin for implementing appointment booking functionality, and it offers a list of additional useful features, such as:
- WooCommerce integration and setting up price per time units;
- recurring appointments;
- multiple services and providers to choose from;
- integration with Zoom and any other service with a webhook and automation services (e.g., Zapier, Make, or WP Webhooks).
JetFormBuilder
I’ll put it simply: if you want any of Crocoblock plugins to get data or get manipulated from the front end, JetFormBuilder is there for you because it has all the required integrations and tools. It’s a free plugin available on the WordPress plugin directory, with paid add-ons that you can purchase here. If you are a happy client with the All-Inclusive Crocoblock subscription, the premium add-ons will be free – just click a dedicated banner on your user account. Also, to get an idea of what it can offer you, read the plugin’s documentation, especially the Advanced section.
JetEngine (not required but strongly recommended)
JetEngine makes any website and any other Crocoblock product even more powerful, flexible, and awesome. Talking about the appointment booking functionality, it will be useful to create CPTs for the services, listing templates for teams and service providers, as well as display user’s appointments on the front end. Other than that, JetEngine is responsible for creating relations, additional meta fields, glossaries, etc.
Setting Up Appointment Booking Functionality on the WordPress Site
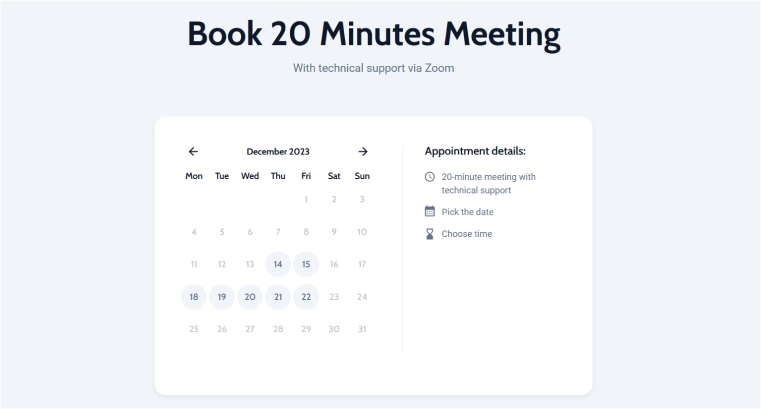
Before starting to set up the functionality, let’s outline the scope of work. The goal is to create a page for booking a 20-minute Zoom call with customer support. The client can pick the date and time from the available slots and then put their name, email address, and some other details for the support specialist. They immediately get a confirmation email with the Zoom meeting link and the link for the appointment cancellation. One day before the video call, they get a reminder email.
Setting up the JetAppointment plugin
There will be two parts: setting up the JetAppointment plugin and a JetFormBuilder form.
Creating Service and Provider pages
Before setting up the plugin, it’s important to know that it operates two entities: service and provider. For example, if it’s a nail salon, the services would be manicure and pedicure. The service providers are the nail stylists working in this salon so that the client can choose the procedure and the specialist. This demo shows it well.
That’s why first, create a page/post/CPT to be the Service that clients will book.
In our case, we have only one service on the dedicated mini-site of the multisite, and that’s why we didn’t create a Service post type. But if you have several services and want them to put descriptions, pictures, and catchy designs for each of them, like this one. The same goes for the Service Provider pages, like on this demo page.
Using the JetAppointment Wizard
The easiest way to set up appointment functionality is by using Wizard in Dashboard > JetAppointment > Set Up.
For more advanced settings, adding workflows, and fine-tuning the details, use Dashboard > JetAppointment > Settings. For example, it’s great to add a time zone selector.
📚 It’s a very intuitive process, but you can check this guide on how to set it up.
In the video below, I’ve shown the walk-through of the Wizard. As you can see, it automatically creates forms that can be edited and used on the front end.
📚 You might be wondering why two forms were created. Read about the difference between Static and Single Service forms in this article.
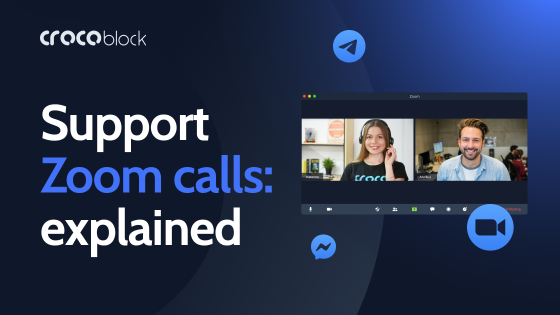
Integrating Zoom and notifications
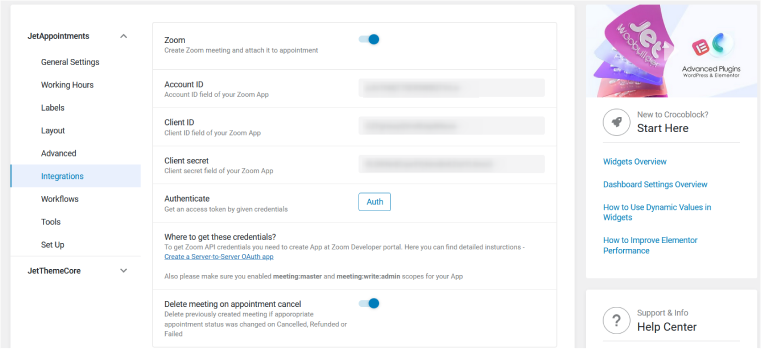
Now, the appointment booking functionality works, and clients can book their time slots for Zoom calls. However, we want such meetings to be automatically scheduled in the customer support Zoom account. It’s not a problem because JetAppointment has the built-in Zoom integration. All you have to do is go to Dashboard > JetAppointment > Settings > Integrations and insert API keys from your Zoom account. There’s also a very useful toggle “Delete meeting on appointment cancel” to be activated in our case.
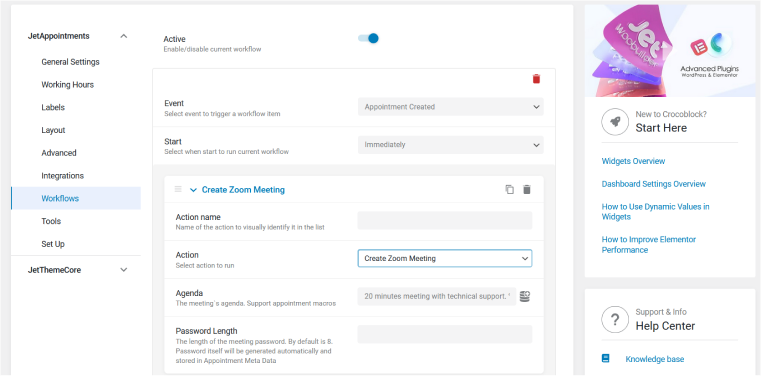
After that, go to Dashboard > JetAppointment > Settings > Workflow, add the “Create Zoom Meeting” action, and set the timing for it – immediately or after a certain time. Name the agenda (how the meeting will be displayed in Zoom), and enjoy the automation.
Setting up notifications and links for clients and the Support Team
The final step is to set up notifications for clients so they can get a confirmation about the appointment, then a reminder, and also have all the information about the Zoom call, as well as a link to cancel it if their plans change.
Go to Dashboard > JetAppointment > Settings > Workflow and click “Add New Workflow Item,” set the trigger (when the appointment is created or when the status changes), and set the timing (immediately or after a certain time). Now, add Action Items – sending an email, calling a webhook, or creating a Zoom meeting (but first connect the Zoom API).
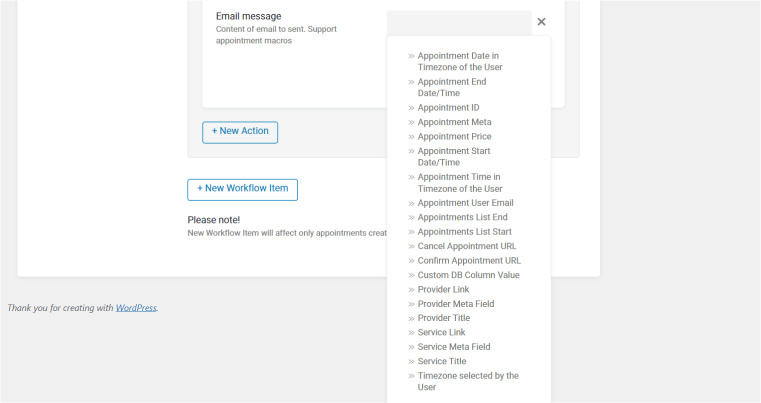
If you choose to send the email, the email body can be edited right here, and to insert dynamic data and links, use the icon with a database. As you can see, there are a lot to choose from:
A similar email is being sent to the Support Team.
📚 Read this article for more details about setting up a workflow.
NOTE
New Workflow Item will affect only appointments created after adding this Item.
Setting up the appointment booking form
The Wizard creates forms for you, but we had some tweaks to add to them. To be precise, we will use the Single Service Booking Form because it doesn’t have a “Select Service” option (it’s a compulsory one for the Static Page Booking Form). We don’t need it, because it’s only one service in our case.
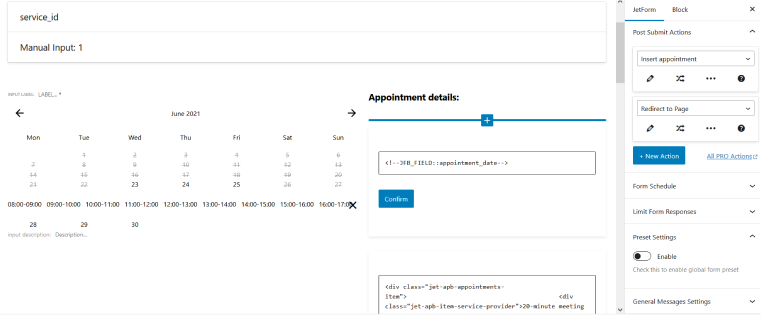
That’s why we should edit the hidden field called “service_id” (on the very top). By default, it has the “Current Post ID” value because this form is supposed to be used only on the service page. But we will use it on the main page; that’s why changing “Current Post ID” to the actual ID of the Service page we’ve created at the very beginning is essential. Choose “Manual input” and insert it.
NOTE
To find the ID of any post/page/CPT on your website, hover on the post on the dashboard and look at the URL on the bottom of the page, it will have the “id=” argument. Or install one of the plugins that display it, for example, Display IDs.
The right column of the booking page shows the information about the chosen date and time dynamically. The key here is using a macro:
<!–JFB_FIELD::field_name–>
Just insert a field name you want to display dynamically. Use the HTML block to insert macros.
📚 Read more about using JetFormBuilder macros in this article. Advanced users can check out this small add-on that adds attributes to macros.
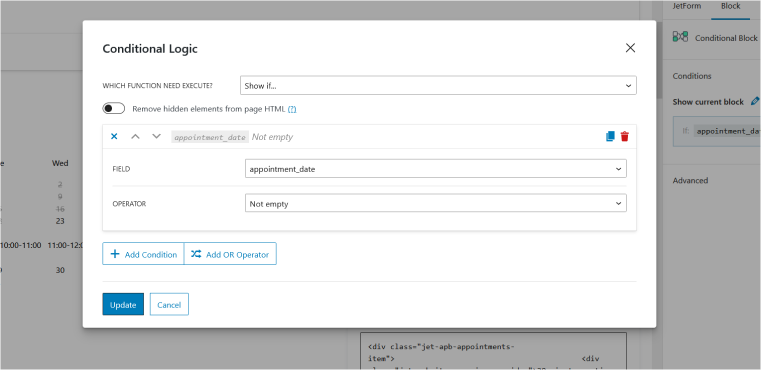
The date and time are displayed after the user has selected it, but if not, they will see the instructions about choosing the date and time. It’s been done using the Conditional field wrapper. So, the instruction is shown when the “appointment_date” field is empty, and the macro shows field values – when it’s not empty.
We’ve used a multi-step form here, so there’s also a “Confirm” button in the conditional section that is shown when the user has chosen the date. But this button actually leads to the next step of the form.
Also, you can use one of the JetFormBuilder premium add-ons to limit form responses, save form progress, or autofill – they will work great with this functionality.
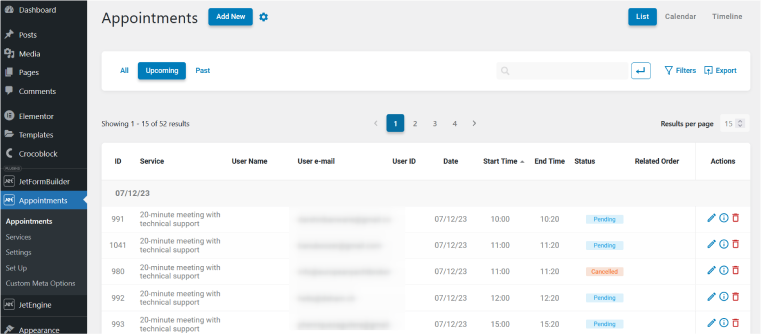
This is what the appointments look like on the website’s dashboard. They can be filtered, exported, and displayed as a calendar or a timeline.
Additional tips & tricks
Double-checking the client’s time zone
To ensure that the client has chosen the right time zone, we double-check it. So, in the email body that is sent to the Support Team, we add the local date and time of the user (which was detected when they booked the appointment) using macros in JetAppointment > Settings > Workflows > Actions:
%user_local_date% and %user_local_time% (they are available in the list of all dynamic macros; just click on the database icon).
Sending links to Zoom Meetings to the Support Team
Clients sometimes lose their links to the Zoom appointments they’ve booked and message us to the chat or open a ticket to find it. However, support agents responsible for Zoom calls are not the same people who reply to the chat/ticket messages. To streamline this process without giving all the support specialists access to the video call dashboard, we send links to the meeting to the team’s inbox so any member of the Support Team can easily find them.
Sending the data from additional fields
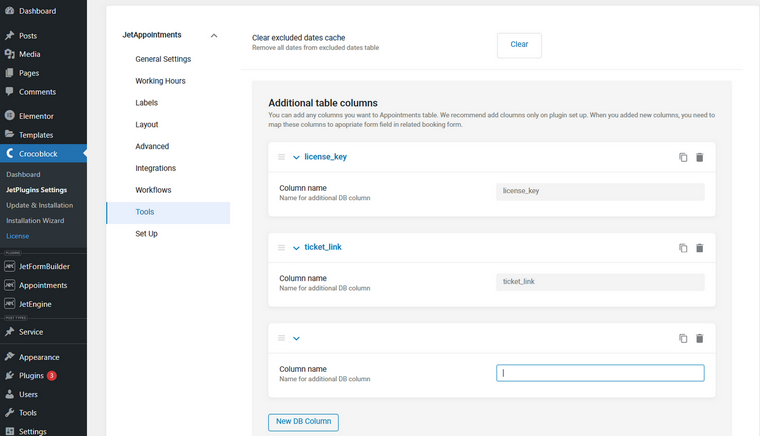
If you add additional fields on the booking form (except email, name, etc.) and want this data to be saved on the Appointment calendar, you should add these fields as additional database columns in JetAppointment > Settings > Tools, and then use these names as field names.
📚 For more ideas about expanding the plugin’s functionality and integrating it with other tools, read the documentation.
FAQ
You can see the comparison of the features and prices on this page.
It’s a website functionality that allows users to book time slots on particular dates for various activities. To do so, they don’t have to log in; instead, everything can be done from the front end.
Yes, JetBooking offers functionality for booking and renting out properties or equipment on particular dates, while JetAppointment is all about time slots, services, and providers.
Takeaway
In this article, I’ve shown how to set up a scheduling appointment functionality on your WordPress website using the example of Crocoblock’s Schedule Zoom Call page. This solution is easy to make, flexible, and scalable. You can create simple appointment booking functionality, add multiple services, teams, and specialists to choose from, set prices per time unit, and charge your clients. As usual, Crocoblock offers a robust set of tools to bring your ideas to life without any limitations.