JetFormBuilder is a robust WordPress form plugin that enables users to create dynamic forms. However, like any advanced tool, it can face various technical issues that may cause frustration for both site admins and visitors. Problems such as security token conflicts with caching plugins, file upload limits, and validation errors can seriously affect your website’s performance and user experience.
Understanding these common errors and their underlying causes is crucial for keeping your WordPress site’s forms running smoothly. Whether you’re facing nonce validation failures, CAPTCHA setup issues, or file type recognition problems, each error usually has specific triggers and proven solutions. This comprehensive guide covers the most frequently reported JetFormBuilder errors and offers step-by-step troubleshooting methods tested and verified by the WordPress community.
The solutions provided here range from simple setup adjustments to more advanced coding techniques, ensuring users of all skill levels can effectively fix their form issues. By following these detailed steps, you’ll quickly identify problems and apply the right fixes to get your forms working properly again.
‘nonce_failed’ error on JetFormBuilder with LiteSpeed Cache plugin
The ‘nonce_failed’ error in JetFormBuilder when using LiteSpeed Cache happens because security tokens expire while cached forms keep using outdated validation data. Here are two effective ways to fix this issue.
Configure caching settings specifically for your forms to avoid token conflicts. Open your form Settings, and go to JetForm > Validation section, where you can disable “enable form safety” to bypass nonce validation completely.
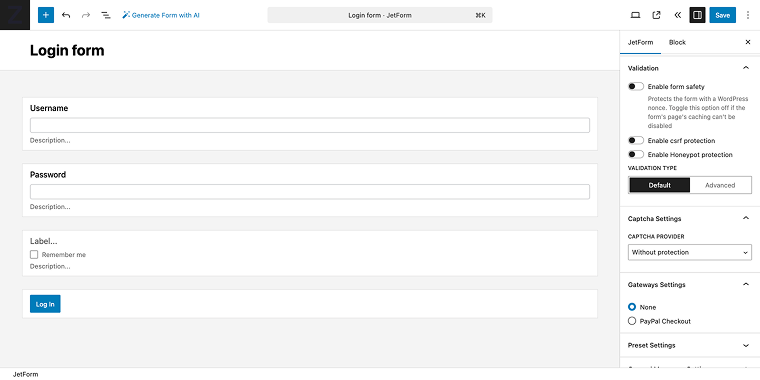
Additionally, check for LiteSpeed-specific options at the bottom right of the form editor settings (JetForm > LiteSpeed) and enable the cache exclusion settings to prevent forms from being cached.

This targeted approach preserves site performance while addressing the security token issue for individual forms.
Alternative solution
Implement a comprehensive caching strategy that targets the root cause of expired nonces. Fully clear your site’s cache and temporarily disable caching plugins to confirm the solution works.
For long-term resolution, configure your caching system to exclude form pages or set cache duration to under 12 hours, since WordPress nonces expire after this period. You can also extend token validity by adding a custom filter to your functions.php file that adjusts the CSRF token datetime limit, effectively giving tokens more time before expiration while maintaining security standards.
add_filter(
           'jet-form-builder/security/csrf-token/datetime-limit',
           /** @var \DateTimeImmutable $datetime */
           function ( $datetime ) {
               return $datetime->modify( '-8 hours' );
           }
       );
Images submitted by guests can’t be found in the Media Library
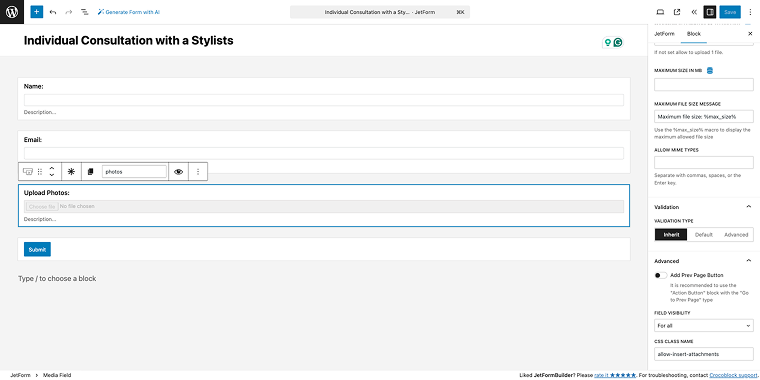
By default, WordPress restricts file uploads to logged-in users as a security measure. However, JetFormBuilder can be set up to let guest users upload images to your Media Library through a three-step process that requires careful configuration and security considerations.
First, set up your Media Field by adding a specific custom CSS class to the CLASS CSS NAME field that allows attachment insertion. Use ‘allow-insert-attachments’ as the base class.
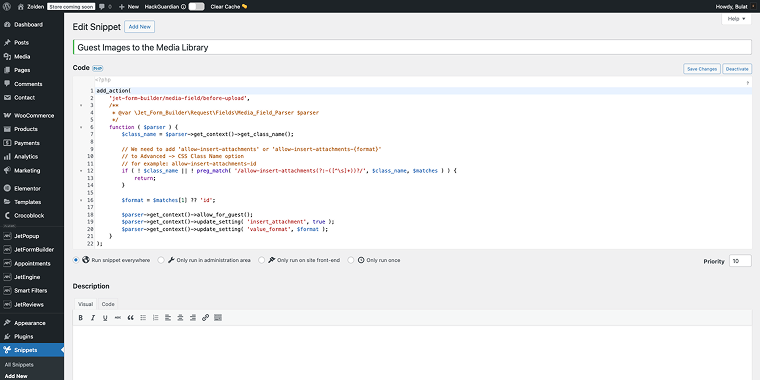
Next, add the copy and custom code from the GitHub repository to the Code Snippets plugin or your theme’s functions.php file. This code, specifically designed for JetFormBuilder version 3.0.4 and later, creates the necessary permissions and handling mechanisms for guest uploads. The implementation bridges the gap between WordPress security restrictions and your form’s functionality requirements.
Finally, return to the form and, in the Media Field settings, locate the USER ACCESS field and select the value “Any user (incl. Guest).”

Now, the form can save images submitted by guests to the Media Library.
While this solution allows guest uploads, it is essential to acknowledge that bypassing WordPress’s default upload restrictions can pose security risks. Consider adding extra validation, file type restrictions, and regular checks of uploaded content to maintain the site’s security.
Guests can’t update posts
Guest users are unable to update posts due to WordPress’s built-in security restrictions. Only specific user roles, such as administrators and editors, are permitted to modify existing posts. This limitation is a core part of WordPress’s user permission system and cannot be bypassed through standard form actions. You can find more information on this topic here.
Alternative solution using custom hooks
Since the standard Insert/Update Post action won’t work for guest users, you’ll need to implement a custom hook solution. This approach allows you to create specific post update functionality while maintaining WordPress security standards.
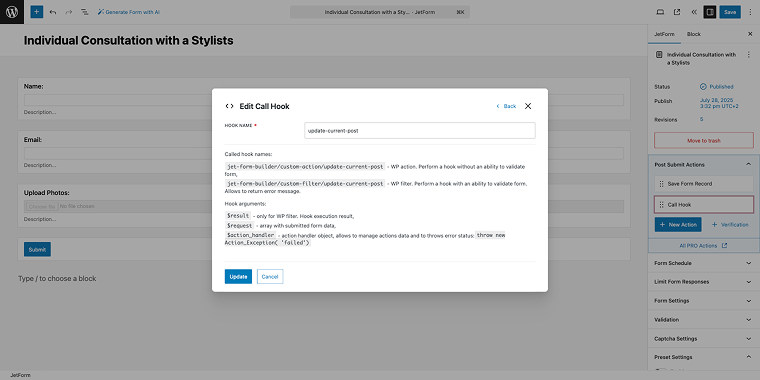
Replace the Insert/Update Post action with a Call Hook action in your form. This method uses custom PHP code to handle post updates when the form is submitted.
For example, here is the hook, where “update-current-post” is the HOOK NAME, and you can insert your own based on the tips below the form’s field.
Add the following code to your active theme’s functions.php file (exclude the opening <?php tag if it already exists):
use Jet_Form_Builder\Exceptions\Action_Exception;
add_action( 'jet-form-builder/custom-action/update-current-post', function ( $request, $handler ) {
	$post_id = $request['post_id'];
	$rooms_new_number = $request['_form_field_1'];
	update_post_meta( $post_id, "_rooms", $rooms_new_number );
}, 10, 2 );
Please note that this code was originally written for a hotel website to update the number of available rooms for a specific post when a booking form is submitted. It listens to a custom JetFormBuilder action and updates a post meta field (_rooms) based on the submitted form data. Depending on the website type and form purpose, the code should be adjusted accordingly.
Let’s say you have a car rental site. You could use this to store the number of rental days, the selected car model, or the pickup location. Adjust the meta key accordingly (_rental_days, _car_model) and point the $request to the correct form field.
So basically, two values need to be updated:
- the name of the form field you’re retrieving data from the FORM FIELD NAME (_form_field_1);
- and the name of the meta field you want to store data in (_rooms in the original code).
This solution requires custom PHP development and should be implemented carefully. Always test on a staging site first, and consider the security implications of allowing guest users to modify post data. You may want to add additional validation to the form.
For detailed developer documentation and advanced hook implementations, refer to the JetFormBuilder GitHub documentation.
Captcha validation failed
The “Captcha validation failed” error usually happens when reCAPTCHA is turned on in your form but isn’t correctly set up with the required API keys and configurations.
To resolve this issue, you have two options: either complete the reCAPTCHA setup by following the detailed reCAPTCHA guide, which walks you through obtaining Google reCAPTCHA keys and setting them up correctly, or simply remove the reCAPTCHA field from your form if anti-spam protection isn’t needed.
The error stops form submission because the system cannot validate the CAPTCHA without correct API credentials; therefore, fixing the configuration is crucial for the form to work.
reCAPTCHA error in JetFormBuilder
When encountering reCAPTCHA validation issues in JetFormBuilder, follow this step-by-step troubleshooting checklist to identify and resolve the problem.
Adjust Score Threshold
Check your reCAPTCHA threshold score settings in JetFormBuilder, which controls how strictly the system assesses user interactions. The score ranges from 0 (considered a bot) to 1 (confirmed as human), with the default at 0.5.
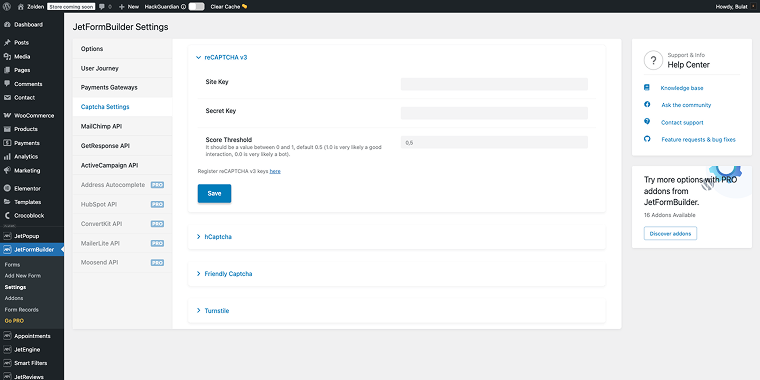
If legitimate users are being blocked, consider lowering this threshold to be more permissive, or raise it if you’re facing spam issues. This balance is important because requests below your threshold will automatically prevent the form from submitting.
Validate API Keys
Make sure your reCAPTCHA API keys are correctly set up and valid. Keys that are invalid, expired, or mismatched will cause validation to fail, regardless of the user’s actions. Verify you’re using the right site key and secret key pair from your Google reCAPTCHA admin console, and confirm they match the domain where your forms are hosted.
Invalid Resource error
This issue most often happens when using caching plugins like WP Super Cache or security plugins like Wordfence. The solution is to exclude pages with your forms from the cache to prevent nonce tokens from expiring. For detailed steps on how to set cache exclusions and fix nonce failures, see this in-depth guide on solving nonce failure errors in WordPress.
Alternative troubleshooting
If your site doesn’t use the mentioned plugins, begin by clearing all website caches and temporarily disabling third-party plugins to identify the issue. This helps determine whether the problem is caused by plugin conflicts or other caching mechanisms that might interfere with form security tokens.
The key is to make sure that form pages generate new nonce tokens for each visitor instead of serving cached versions that have already expired.
Incorrect file type error / File not found in request error
These errors often happen when you try to import forms into JetFormBuilder, usually because your WordPress setup doesn’t recognize the application/json MIME type needed for form import files. The fix is to enable support for the JSON MIME type.
Install the WP Add Mime Types plugin to expand your site’s file type recognition. After activation, go to your WordPress Dashboard > Settings > Mime Type Settings to access the MIME type configuration panel.
Check if “application/json” is in your current MIME types list.

If this type is missing, you need to add it manually by entering the MIME type information “json = application/json” in the Add Values field. This addition allows WordPress to accurately recognize and process JSON files used for form imports.
Invalid token error
The “Invalid token error” usually occurs when CSRF protection is enabled in your form settings and your website’s caching system interferes with the security tokens. To verify if it’s enabled, go to the JetForm tab, scroll down to the Validation section, and disable the Enable csrf protection switch.

You can also exclude the specific pages containing your forms from your caching system. This ensures that each visitor receives a fresh, valid security token when the form loads, preventing the “Invalid token error” from occurring during form submission.
Cannot download PRO add-ons with Crocoblock subscription
If you can’t access JetFormBuilder PRO add-ons despite having an active Crocoblock subscription, this is a common issue with specific resolution steps.
Please refer to our detailed guide on how to download JetFormBuilder PRO add-ons for free with a Crocoblock subscription for complete instructions on accessing your included PRO features.
PCLZIP_ERR_BAD_FORMAT
This error usually happens during plugin updates and relates to problems with license verification or file corruption.
For detailed troubleshooting steps and solutions, please consult our guide on fixing Crocoblock plugin update and license errors.
FAQ
The “nonce failed” error happens because WordPress security tokens (nonces) expire after 12 hours, but cached forms continue to serve outdated validation data. To fix this, try disabling caching for pages with forms, lowering the cache time to less than 12 hours, or turning off “Enable form safety” in your form’s validation settings. If you’re using LiteSpeed Cache, enable cache exclusion settings specifically for your forms in the form editor.
By default, WordPress limits file uploads to logged-in users for security reasons. However, you can allow guest uploads by adding the CSS class ‘allow-insert-attachments’ to your Media Field, using custom code from Crocoblock’s GitHub repository, and setting the USER ACCESS field to “Any user (incl. Guest).” Keep in mind that this bypasses WordPress security restrictions, so add extra validation and file type restrictions to keep your site safe.
ReCAPTCHA validation failures typically occur due to incorrect API key configuration or inappropriate score threshold settings. First, make sure that your site key and secret key from the Google reCAPTCHA admin console are correctly entered and match your domain. Then, review your threshold score in JetFormBuilder settings – if legitimate users are being blocked, lower the threshold from the default 0.5 to make it more permissive. If anti-spam protection isn’t necessary, you can simply remove the reCAPTCHA field from your form.
Conclusion
Remember that while these solutions resolve the most common JetFormBuilder errors, complex sites with multiple plugins and custom setups may require additional troubleshooting. When applying the recommended fixes, always thoroughly test them in a staging environment first, and consider the security implications of any changes made to file upload permissions or validation settings.
For ongoing support and advanced customization, the JetFormBuilder community and Crocoblock’s documentation offer valuable resources for keeping your forms running at their best on your WordPress site.


