Appointment forms are essential in the service industry. If you’re running a clinic, a salon, or offering consulting sessions, you know how important it is to let people book time with you easily – and to set it all up efficiently, without hassle. That’s where appointment forms come in.
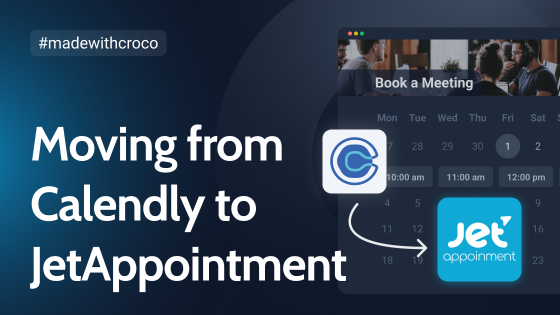
In this article, I’ll walk through how to create flexible, functional ones using JetFormBuilder and JetAppointment plugins, step by step.
Appointment Form vs. Booking Form: What’s the Difference?
But let’s start with the fundamental question. Users are often confused about which tool to use when they choose between the JetAppointment and JetBooking plugins. Both use JetFormBuilder for form creation, but they handle the process differently. So, what’s the difference between appointments and bookings under the hood?
Although the terms are often used interchangeably, appointment forms and booking forms serve different purposes:
Appointment forms
Typically used in service-based businesses where a client books a specific time slot with a person or team, often for a short session (e.g., a haircut, medical consultation, or coaching call).
Key features:
- fixed duration per session (fixed time slots);
- often involves selecting a staff member or location;
- real-time availability is crucial;
- less focus on service variety, more on scheduling accuracy.
Think about visiting a hairdresser, you choose the time among available time slots, the staff member, and a location, if there is more than one.
Precise timing is the central thing when it comes to appointment forms.
Booking form
More common in event-based or product-based scenarios, like renting an apartment, daily car rental, or booking travel.
Key features:
- may involve multi-day or multi-item selection;
- often includes payments, terms, and optional extras;
- can support group or multi-person bookings;
- less tied to personal schedules or individual staff.
Think about renting a holiday apartment – you don’t really choose who will be the staff member or a host, and the check-in/checkout time can be quite flexible. Also, it can include extra services for an additional fixed price, e.g., airport pickup.
So while both instruments are for managing reservations, appointment forms are about time-slot precision, while booking forms are about resource or service allocation.
What’s the Appointment Form and How to Make It Effective?
An appointment form is more than just a way for users to pick a date and time; it’s a user experience tool that bridges the gap between your services and your client’s needs. At its core, it should do two things well:
- streamline the booking process for the user;
- and simplify scheduling and management for you.
That’s why it’s not only about forms but about a handy dashboard to manage bookings, tools for integrations with external services, as well as an efficient and secure way to store the data and personal details of your customers.
The anatomy of an effective appointment form
To make an appointment form truly effective, you need to go beyond the basics. A well-designed form should combine clean interface design with functional depth. Here’s what that means:
- Clarity and simplicity. Users should instantly understand what to do. That starts with clear labels, intuitive field groupings, and avoiding clutter. Use progressive disclosure where needed; don’t overwhelm the user with all options at once.
- Calendar UI that makes sense. The calendar component is the heart of any appointment form. It should show available dates and time slots in real time, ideally synced with your schedule automatically.
- Mobile-first, always. Many users will book services from their phones. That means fields need to be mobile and touch-friendly, layouts must be responsive, and input methods (like time pickers) should be optimized for mobile UX.
- Minimize steps, but guide clearly. A single long form might be overwhelming, but too many steps can feel tiresome as well. Strike a balance by using a multi-step form only when it improves clarity, like separating service selection, customer details, and confirmation. Use progress indicators and friendly descriptions to guide users through the process.
- Smart field logic. Conditional logic allows the form to adapt to user input. For example, if a user selects a specific service, show only the relevant staff, duration, and available slots.
- Confirmation and follow-up. And, finally, remember that a great appointment form doesn’t end at submission. Provide instant confirmation, and ideally, trigger automated follow-ups (emails, reminders, or integrations with your calendar system).
Functionality that matters
From a functionality standpoint, the best appointment forms integrate tightly with your back-end system. Using the JetFormBuilder and JetAppointment combo, you can:
- log appointments;
- use macros and dynamic values to pre-fill user data;
- connect with calendars or CRM systems using add-ons or third-party integrators;
- control availability with custom logic (e.g., block weekends, limit daily bookings);
- set up recurring appointments;
- add payments if needed, either using JetFormBuilder’s payment integrations or by connecting it with WooCommerce checkout.
Setting Up the Appointment Form by Crocoblock’s JetAppointment and JetFormBuilder
Crocoblock is an ecosystem for those who build not just landing pages, but highly dynamic websites. In short, dynamic websites are not just collections of static pages with text and images – they display content that changes based on page type, user interaction, or other query parameters.
So, setting up an appointment form is all about these steps:
- outline your business processes and goals very clearly, and map them;
- install and activate JetAppointment and JetFormBuilder plugins;
- follow the JetAppointment Wizard;
- adjust details;
- enjoy the flexibility and features.
Whether you’re a beginner or a seasoned WordPress developer, here are a few quick tips:
- Bundle smart, as the most budget-friendly approach is to get a full Crocoblock subscription. But if you don’t need the whole suite, a combination of JetAppointment and JetFormBuilder, plus JetEngine for creating custom post types, might be all you need.
- Keep it structured, and, before jumping in, spend a bit of time mapping out services, providers, working hours, and form steps. This will save you a lot of rework later.
Step 1. Creating Services and Providers CPTs
JetAppointment operates two CPTs: Services and Providers. The advantage of this approach is that you can create full-fledged templates for both, and appointment booking forms will be fully functional on both, which is very handy. This structure also makes it easier to scale your setup – for example, if you later decide to add more services, team members, or even locations, your system can grow without needing a full rebuild.
Let’s say we create an appointment system for a barbershop, you might have Services like Haircut, Coloring, and Styling, and Providers like Anna, John, and Maria – each with their own working hours, availability, and assigned services. This separation helps you manage everything more clearly and customize the booking experience per staff member or service.
So, using JetEngine, create two CPTs: for Services and Providers.
Then, add custom fields required there: in my example for a barbershop, I have these meta fields to give information about each service.
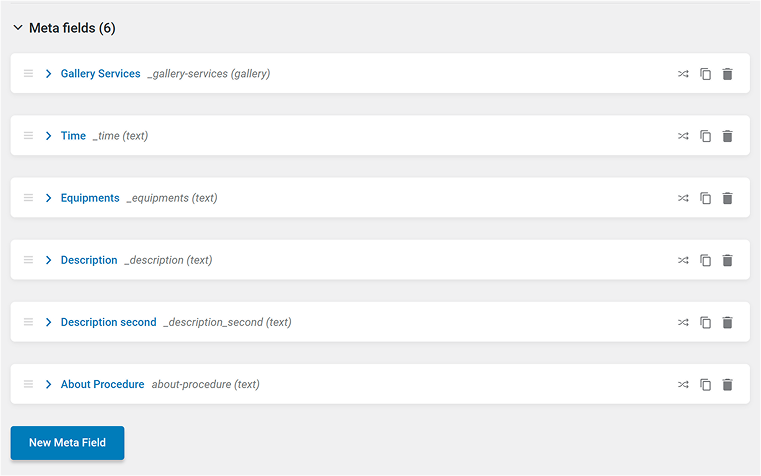
And do the same for a Teams CPT, adding fields to give information about each specialist. You can name this CPT however you want, e.g., “staff,” “specialist,” etc.
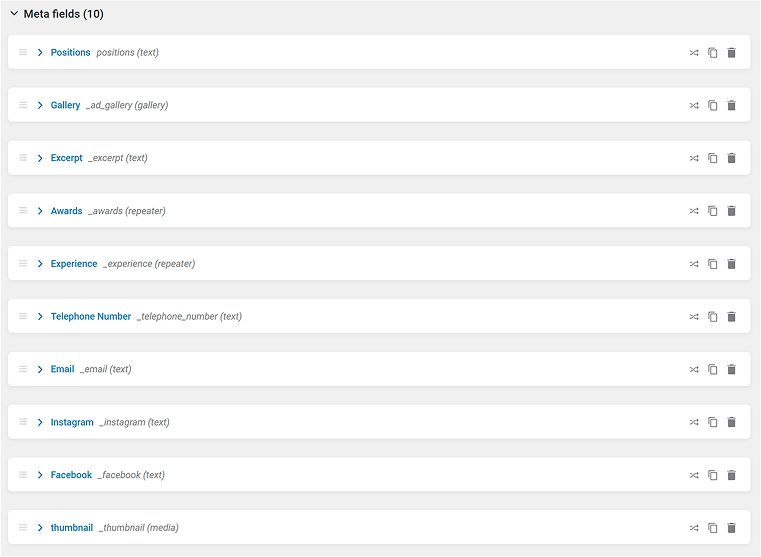
After adding all the fields, go to your newly created Services and Providers (Teams) and add the content – describe services and add information about the specialists.
Later, we will get back to creating front-end templates for them.
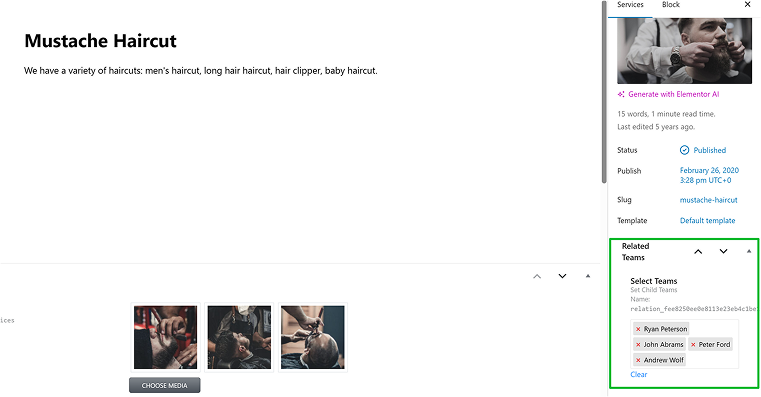
Step 2. Connecting Services and Providers
JetAppointment automatically creates relations between Services and Providers. But it can’t “know” which Service each Provider offers. That’s why you should open each Provider and connect the corresponding Service (or vice versa).
Step 3. Setting up JetAppointment
Now, go to JetAppointment > Set Up, and you will see a Wizard for setting up JetAppointment quite intuitively. Select post types for Services and Providers.
On the next steps, you can set up time slots and format, a global schedule (you can set up a custom schedule for each Provider as well), set up buffer time, and choose whether you want to enable a multi-booking functionality (to book several appointments using one form).
You can choose whether you want to charge customers online, and, if yes, you can either select payment integrations for JetFormBuilder or prefer to do it using WooCommerce functionality. If you choose the latter, a sample WooCommerce product will be created – don’t delete it. Set up payment methods and the checkout process in WooCommerce.
And, the final step of the Wizard is creating booking forms – it will create them for you, just make sure you have JetFormBuilder installed. It can create two types of forms – a Single Service Booking Form (without Service select field) and a Sample Page Booking Form (with a Service select field).
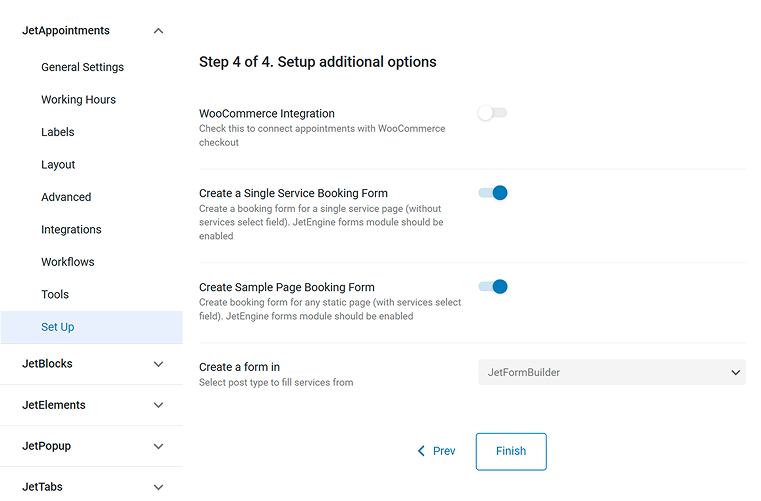
Congrats! Now you have your JetAppointment set up and two forms created. Now, you can go to Settings to fine-tune things.
One of the most important settings here is under the Workflows tab. There, you can set various automation scenarios: sending confirmation emails, changing appointment status, or calling a webhook. It has macros for every field or object to insert dynamically, but also, there are links for cancellation and confirmation of the appointment.
You have many more cool features under other Settings tabs, such as switching on and off a confirmation link functionality, adding appointments to calendars, or using automation anywhere else.
Also, you can integrate Zoom, so they would be scheduled there automatically. Read the full guide here.
📺 For the full walkthrough, watch this video, but pay attention that here, the legacy JetEngine forms were used. Use JetFormBuilder instead; it’s free.
Step 4. Displaying and styling appointment forms on the front end
This is the final step – as we’ve created everything on the back end, now, it’s time to beautifully display it on the front end.
Remember that JetAppoitnement has seamless integration with Elementor, Block Editor, and Bricks. That’s why you have a choice – which tool to use for creating templates for Services and Providers, be it Elementor Pro, Bricks, or JetThemeCore.
The great news is that there are widgets for styling JetFormBuilder forms visually if you are using Elementor or Bricks. So, don’t worry about how your form looks when you create it (using Gutenberg) – you can style every little detail visually right on the page.
You might be wondering if it is possible to add more forms, let’s say, for Providers’ pages. Or modify the existing one created with the Wizard? Absolutely! There are two special blocks: Appointment Providers and Appointment Date to use.
But if you want to create it for Providers’ pages, use the great power of JetFormBuilder and how it can fetch data from anywhere on the website dynamically.
Add a Radio field, and in the Fill options from, choose Posts, then select Services. That’s it!
You will get a list of all the services as a Radio list.
However, if you want to be fancy and display services with images or just in cool layouts, it’s absolutely possible. Just use JetEngine’s Listing templates as a template for your Radio buttons; follow this guide for all the details.
The most crucial thing when creating your custom appointment form is to add the Insert Appointment post-submit action in the JetForm tab and map the fields with the corresponding fields at the Appointments table.
And you can definitely combine this post-submit action with other form actions.

Displaying Appointments on the Front End
All appointments will be saved in your website’s dashboard in the Appointments section.
It has List, Calendar, and Timeline views for your convenience, with filters and an export tool.
❗ If your appointments don’t display properly, check your caching plugin – switch it off, and if it helped, add JetAppointment scripts to exceptions.
However, you might want to display all appointments on one page for those team members who don’t have access to the website admin area.
To implement it, you will need another Crocoblock plugin, JetEngine. Create a JetEngine listing template in JetEngine > Listings/Components > Add new. Choose User Appointments in the Listing source dropdown, and create a template with all the fields you need – you can display them dynamically using JetEngine’s dynamic widgets/blocks. Also, a great idea here would be to use the Dynamic Calendar.
Don’t forget to make this page password protected and add the noindex directive using your SEO plugin, so the data will not be available to everyone on the Internet.
Watch this video to see a full guide on creating such a page.
If you want to display appointments as a table, use JetEngine’s Dynamic Tables module. This video has the full instructions.
Displaying page sections depending on the appointment status
If you want to display or hide certain sections on the appointment page, depending on whether it’s booked or not, you can do it using the JetEngine’s Dynamic Visibility feature. Follow this tutorial for a step-by-step guide.
FAQ
Yes, absolutely. Use the Appointment Date block for the calendar and the Insert Appointment post-submit action in the form settings.
Appointment forms are for scheduling specific time slots with service providers (like doctors or stylists), while booking forms often deal with resources or events (like room rentals or tours) that don’t require individual staff selection.
Yes, JetFormBuilder handles the form structure and field logic, while JetAppointment manages the time slots, availability, and scheduling logic.
Yes, by integrating payment gateways with JetFormBuilder or using its WooCommerce integration, you can accept payments during the booking process.
You can create a “Providers” custom post type with individual availability settings and assign each staff member to specific services using JetEngine and JetAppointment.
Yes. When built with responsive tools like JetFormBuilder, your appointment forms will be fully usable on mobile devices, which is essential.
Final Takeaway
Creating a reliable, user-friendly appointment form in WordPress doesn’t have to be complicated. By combining JetFormBuilder’s flexible form-building tools with JetAppointment’s scheduling engine, you get a system that’s powerful, scalable, and tailored to your services.
