Relationships are everything, and WordPress is no exception.

They’re absolutely essential for building complex, dynamic websites. And with JetEngine, you can create relationships of almost any complexity without touching code or manually messing with the database.
Even if you’ve never worked with relations before and have no idea where to start or what they actually are, this article will give you a clear, easy-to-follow picture.
- I’ll briefly explain what WordPress relations are and when they make sense to use.
- Then I’ll walk you through a couple of step-by-step examples and real-world use cases you can apply to your own site.
- And will mention some best practices.
Interested? Let’s get down to business!
What Relations Mean in WordPress
In simple terms, Relations are a way to connect different WordPress entities – posts, taxonomy terms, and users. In the case of JetEngine, you can also connect Custom Content Types.
And here, I have two things to pay your attention to:
- Custom relations aren’t available in WordPress by default. The database can handle them, but WordPress doesn’t provide a built-in way to create or manage them. So, the plugin for dynamic content is required.
- You might say, “Well, but I can connect posts with taxonomy terms (e.g., categories) out-of-the-box, so what’s the point?” And you are absolutely right – you can assign as many categories as you want to any post. And yes, using custom relations to connect posts and terms is not a very common practice; however, it can also be useful – it adds sort of another layer in addition to posts having their taxonomy terms.
The most common use case for the Relations functionality is building connections between different post types or between terms. Or posts (CPTs)/terms with users.
And again, a user can be connected to a post natively, but only if they are that post’s author. But what if I have a clinic website and a custom post type for each unit (e.g., general neurology) and want to connect several doctors to it? Then I should use the relation between the Unit CPT and Users (if doctors are users).
Or what if I want to connect the whole department (a term for my Unit CPT) and the doctors working there? Then, connect the term with users.
Types of Relations
I’ve already scratched the surface of this topic in the previous section, but let’s have a bit of a deeper dive.
By entity types
There can be relations between Posts (any post type, including Pages), Taxonomy terms, Users, and Custom Content Types (JetEngine-specific entity).
By multiplicity
- One-to-one;
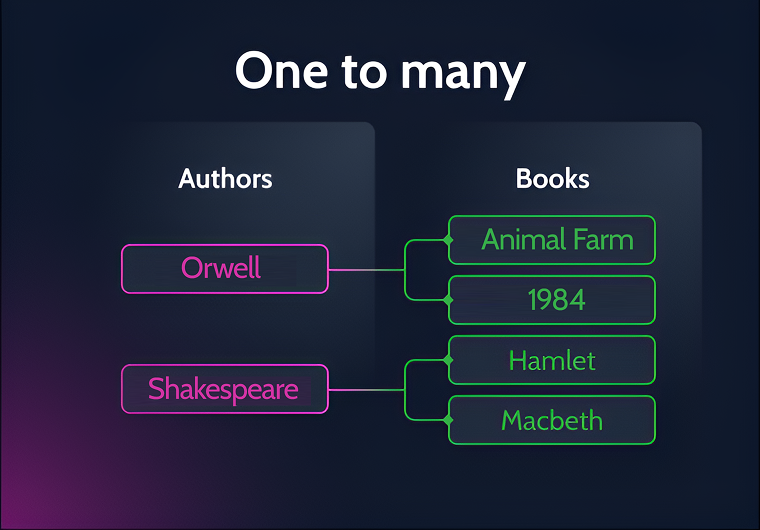
- One-to-many;
- Many-to-many.
Also, any relation must have a Parent and a Child.
It doesn’t mean a Parent has more rights than a Child – it’s just required to build the data structure under the hood and identify each item.
Also, this role model is critical in a one-to-many situation: one of the participants should serve as the starting point.
Examples:
- One-to-one.
Patient (User) and Medical Record (CPT). A Patient can have only one Medical Record, and vice versa. - One-to-many.
Author (CPT) and Book (CPT). An Author can have many books, but a Book can have only one author.
- Many-to-many.
Student (User) and Course (CPT). A Student can attend many Courses, and a Course can have many Students.
💡If you want to read a more technical, in-depth explanation of relations and how they work under the hood, check this article.
Working With WordPress Relations: From Setup to Front-End Output
This is the fast walkthrough on using WordPress Relations.
Setting up the Relation using JetEngine
🟢 First, install the JetEngine plugin.
You can create relations between default posts and pages. But in most of the real-world cases, they are created between custom post types, taxonomies, etc.
So, first, you should create them. For example, in JetEngine > Post Types, I will add:
- Article CPT
- and Course CPT
Also, add all the custom fields these CPTs should have.
🟢 Then, add some posts within these CPTs.
🟢 Now, we can create a relation in JetEngine > Relations.
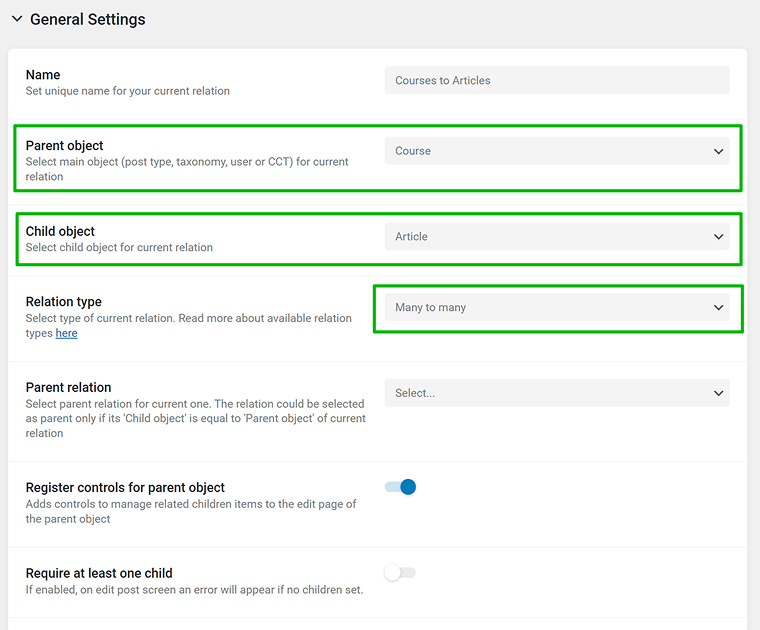
There are many toggles to add flexibility to the interface in the future steps.
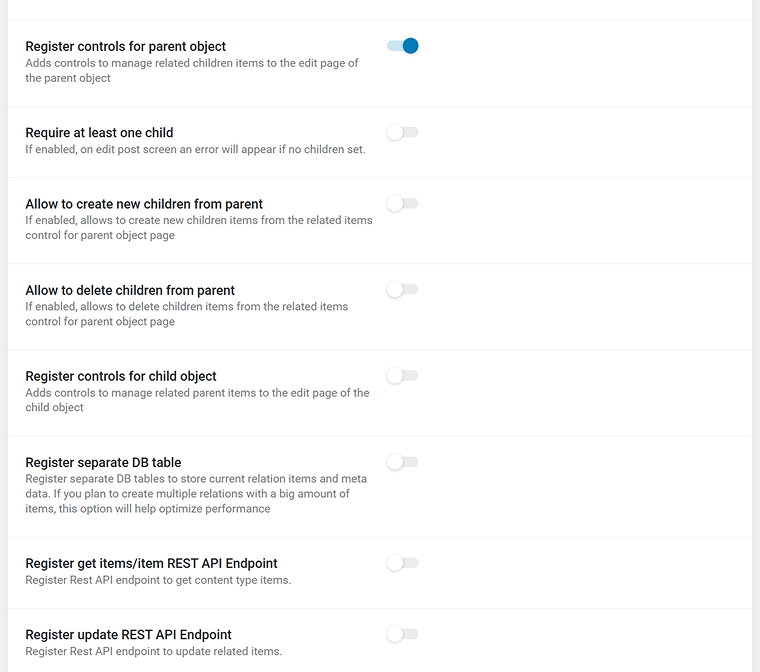
For example, you should always keep at least one of these toggles active:
- Register controls for parent object or
- Register controls for child object
to be able to create relations between particular posts.
You can have both of them on. Also, you can create and delete parent objects when editing child ones and vice versa.
There’s an option to register REST API endpoints to create such relations remotely.
One more important feature of JetEngine’s Relations tool is that you can add a custom field to a relation (not to the parent of the child). This means you can create this meta field only when you create a relation. For example, enter a date of establishing the relation between two items, a responsible specialist, a contract number, and so on. These fields will be displayed on the front end.
But JetEngine offers flexibility even here, and you can create a separate DB table to store these meta fields for even better performance.
🟢 Connect particular posts using controls (for Parents or Children, or both):
Add as many connections as you need.
Now, you can use these relations to work with data and display it on the front end.
Displaying related data on the front end
Now that we have our text Courses and Articles relation ready and the corresponding posts connected, we can display one element depending on the other, just as when you display posts within a certain category or by a certain author.
There are a few ways to fetch elements this way, but the only thing you should do in most cases is to create a Relations Query. It fetches all available items from a specific relation and makes all related objects and fields available for display on the front end.
NOTE
The dedicated Relations query type was introduced only at the end of 2025. So, in guides and documentation made before that, you will find more complicated recipes for fetching related data. The good news is that now you can just use the Relations query.
To create such a query, go to JetEngine > Query Builder > Add New and create a new query of the Relations type.
Choose your relation, and then choose what you want to display: children based on the parent, or parents based on the child.
In the Preview, insert the URL of the parent if you chose the “Get Children Items for Fixed Parent” or a URL of the child if you chose the “Get Parent Items for Fixed Child” option, to see if the query returns some results.
After that, there are plenty of ways to display related items. Let me demonstrate some of them in the next section.
Using Relations in WordPress: Popular Examples and Use Cases
There are almost unlimited use cases for the Relations feature; your imagination is the limit.
I will give you some examples to start with.
Displaying articles related to this course
A very classic example is simply displaying CPTs related to the current CPT in the sidebar or below the main article. For example, you have a page that describes a certain service (the Course CPT, in my case) and you want to display articles related to it (the Article CPT, in my case).
🔵 Let’s prepare how related articles will look and create a Listing template for them in JetEngine > Listings/Components. Just design them for Articles; no relations are involved at this point. Read here how to do it.
🔵 Now, let’s create a template for the Course CPT with related articles at the bottom of it.
Use JetThemeCore, Elementor Pro, or Bricks’ Theme builders, and add all the fields you want to have on the template: e.g., title, content, various meta fields.
To see a preview, click the Page Settings button at the top of the page, select a post for a preview, save it, and refresh the page.
Add the Listing Grid widget wherever you want to see the related posts and select the Listing Template you’ve just created as a Source. You will see all the articles appear, but we need only the related articles here. That’s why, open the Custom Query tab and select the query (Relations query type) we’ve created earlier.
This query “filters” only related posts here.
Related articles from the same category (classic related posts)
In the previous example, I’ve displayed related posts of another CPT. But what if I want to display the very classic related posts situation – posts of the same post type, that are somehow related to the current one? These posts can be united by the same category or tag.
To implement this, we don’t need to create a custom relation or anything special. If you have posts and categories/tags they belong to, it’s enough.
We just need to create one more query in JetEngine > Query Builder.
The Query: choose Posts Query as a query type, then your post. In the Tax Query tab, choose a Current Term macro and the particular term (Category). That’s it!
But to make it look good, if you add the Related Posts section to the post template, it’s better to exclude the current post so it doesn’t repeat. To implement it, open the Post&Page tab of the Query Builder and, in the Post Not In, select the Current ID from the list of macros.
Finally, choose this query in the Custom Query section to use a basic listing template in the editor.
Related articles from the same custom relation and post type (siblings)
Let’s level it up and almost mix the two previous examples.
This is our case now: I have Articles and Courses connected by a relation. But in contrast to the example I’ve already used, where I displayed related Articles on the dedicated Course page, now, I want to display them on the Article page, too.
For example, the following articles:
- Article 1
- Article 2
- Article 3
- Article 4
are all connected to Course 1 and are shown on the Course’s page template.
What I want now is this: when viewing a single Article, display the other Articles that belong to the same relation (that is, the same Course).
In other words, each Article’s single page should show its “siblings” – the other Articles connected to the same Course.
The Query: In the Post&Page tab, choose the Related Siblings macro and your relation, choose what you want to display (parent or child), and the Context (Current ID for most of the cases).
Again, use this query in the Custom Query tab and enjoy the result.
Advanced content selection and sorting
The Query Builder tool has many other controls and tabs, so you can combine them. For example, exclude or include specific posts, authors, terms, or those that have certain meta field values.
Also, dynamically, you can choose the context (e.g., “Current Author”) and filter by dates and other criteria. Basically, you have all the options available on WordPress for a very precise selection.
Sorting is also available in the General tab – so your related items will look exactly as you want them.
Creative Use Cases for Custom WordPress Relations
In the previous section, I gave some basic use cases for using Relation, but the pattern is always the same, and the result is determined by the query.
📌📌 Here you can find many other very common and useful examples of using the WordPress Relations feature.
📌 This is how to display related items as a timeline and show the meta fields for the relations.
FAQ
WordPress relationships are structured connections between posts, custom post types, taxonomy terms, or users. They allow you to model real-world data instead of relying only on categories or authors.
Categories work for classification; relations work for structured data modeling or extended classification.
Use JetEngine’s Listing templates and Query Builder as described in this article.
Yes, using the JetFormBuilder form plugin. If there’s a relation created on the website, the “Connect Related Items” post-submit action will appear in the list of actions automatically. All you need to do is to map the posts that should be connected on form submit.
Final Thoughts
Using JetEngine’s Relations feature and then adding a layer of Query Builder to fetch exactly what you want, you can display any kind of related posts, WooCommerce products, users, terms, and so on.
The important thing to understand is that a relation is only a data connection. It doesn’t define where or how anything is displayed. That logic lives entirely in the query.
Once the relation exists, you can pull children, parents, or siblings, depending on the current page context.
Overall, it’s an extremely powerful tool for structuring data on websites of any complexity, and JetEngine gives you the complete toolset to create, query, and display them on the front end.