In the bustling realm of website development, efficiency is paramount. This is where automation comes in. With the powerful combination of JetPlugins and Make, you can streamline your workflow and unlock a new level of efficiency. Through a series of compelling automation cases, this article delves into the transformative potential of collaboration between JetPlugins and Make, illustrating how it revolutionizes the WordPress experience for developers and designers alike.
JetPlugins, a suite of premium WordPress plugins from Crocoblock, empowers you to create dynamic and feature-rich websites. Make, a cloud-based automation platform, takes things a step further by allowing you to automate various tasks within these plugins. Together, they become a game-changer for any WordPress user seeking to optimize their website management experience.
JetPlugins and Make: A Brief Overview
JetPlugins is a collection of premium plugins developed by Crocoblock that are specifically designed to enhance the functionality of WordPress websites. They work particularly well with the popular Elementor page builder but can also be used independently. These plugins offer a wide range of features, but their core strength lies in creating dynamic content and functionalities without requiring any coding knowledge. With JetPlugins, you can build custom post types, manage taxonomies, create forms, and design dynamic page layouts – all through a user-friendly interface.
Make is a cloud-based automation platform designed to streamline workflows by connecting different applications and services. Imagine it as a digital glue that lets you automate tasks between various tools you use. Make provides a user-friendly interface with drag-and-drop functionality, allowing you to build “scenarios” (automations) without needing to write code. This makes it accessible to users of all technical backgrounds. By connecting Make with JetPlugins, you can automate tasks within your WordPress website, saving you time and effort.
Advantages of WordPress Automation with JetPlugins and Make
Managing a WordPress website often involves repetitive tasks like content scheduling, user management, and data manipulation. These tasks can quickly eat away at your precious time and hinder your productivity. This is where the powerful duo of JetPlugins and Make comes in, offering a wealth of advantages for automating your WordPress workflow.
Here’s how JetPlugins and Make can enhance your website management:
- Increased efficiency: automating repetitive tasks frees you up to focus on more strategic initiatives. Imagine automatically creating user accounts based on specific criteria or updating data across different plugins – all happening seamlessly in the background.
- Reduced errors: manual tasks are prone to human error. By automating them with Make, you ensure consistency and accuracy in your data and website operations.
- Enhanced scalability: as your website grows, manual tasks become even more cumbersome. JetPlugins and Make allow you to easily scale your automation workflows, ensuring your website runs smoothly even with increased traffic or content volume.
- Streamlined workflows: you can connect JetPlugins with other services you use, creating automated workflows that span beyond your WordPress website.
Overall, JetPlugins and Make provide a compelling combination for WordPress users seeking to optimize their website management. By leveraging automation, you can save time, minimize errors, and ultimately build a more efficient and user-friendly website.
4 Examples of JetPlugins and Make Utilization
Now that we’ve explored the advantages of using JetPlugins and Make together, let’s delve into some concrete examples. We’ll showcase four practical use cases demonstrating how this powerful combination can automate various tasks on your WordPress website, saving you time and effort.
Use case 1: How to send data from JetFormBuilder to a Google Form?
First, log in or create an account on the Make platform. Then locate the Scenarios tab on the dashboard and click on “Create a new scenario” in the top right corner.
Next, hit the plus button and select the Webhooks module from the tool list. Then, choose the Custom Webhooks trigger.
After choosing the Webhooks module, click on “Add” and then proceed to “Save” in order to assign a name to the Webhook.
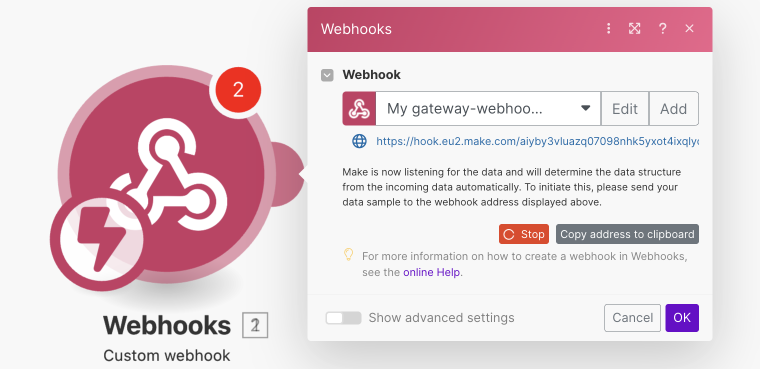
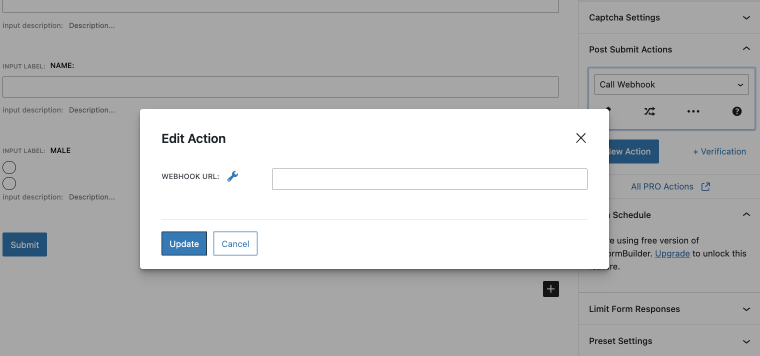
When you get a generated link, copy it. Then, while keeping the Make window open, navigate to your WordPress site. In the WordPress Dashboard, go to JetFormBuilder > Forms, find the desired form, and change the default “Send Email” Post Type Action to “Call a Webhook.” Click on “Edit” and paste the URL into the designated field. Finally, update the Post Submit Actions and the WordPress form by clicking on the respective buttons.
Submit the form on the front-end page. When you see the “Successfully determined” message in the Webhook, click “OK.”
In Make, add a Google Forms action to your scenario. Select “Create a Form” and fill in the fields. For the Title section, put ‘title’; for the Document Title, put ‘document_title’ and ‘description’ for the Description.
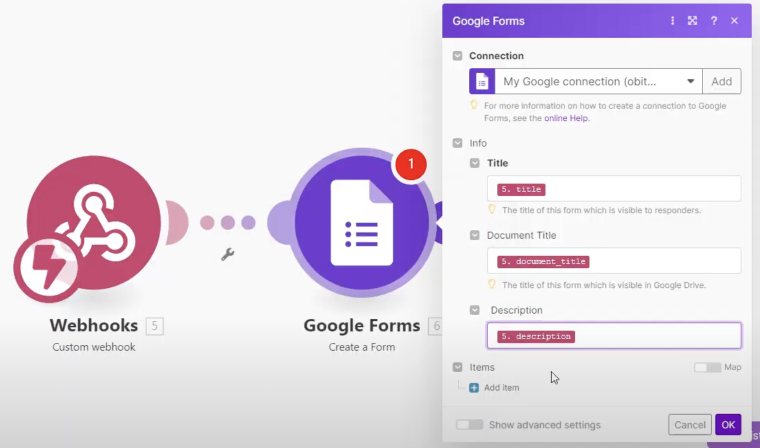
Press the “Add item” button, select ‘question_title’ as a Title and ‘question_description’ as a Description, and click OK.
After configuring your Make scenario, save it and perform a test to verify the accuracy of data mapping.
When someone submits a form on your website, you will receive it in your Google Forms.
Use case 2: How to send an SMS reminder 24 hours before the appointment?
For this use case, make sure you install and activate JetFormBuilder and JetAppointment plugins.
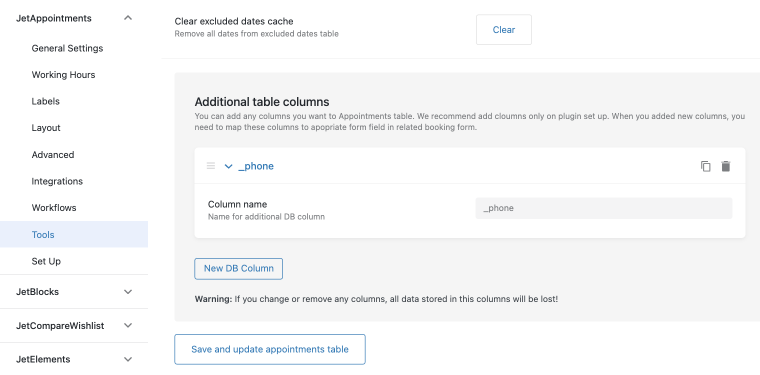
Step 1. You need to add a database column for the phone number field in JetAppointment settings. Go to WordPress Dashboard > Crocoblock > JetPlugins Settings > JetAppointments > Tools. Create the column, fill in the details, and click “Save and update appointments table.”
Step 2. Then, in the JetFormBuilder booking form, include a field for entering a phone number. Add a Text Field block to the form, provide a Field Name, and select the Field Type as “Tel.”
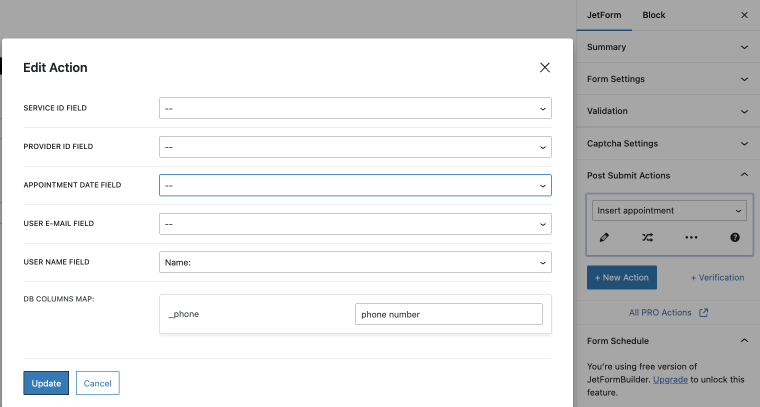
Once you’ve added the field, connect it to insert its value into the previously created database column.
Navigate to the JetForm settings and scroll to Post Submit Actions. Select “Insert appointment” and access its settings by clicking the pencil icon. Add the form field name in the DB Columns Map field. Click “Update” and save the form.
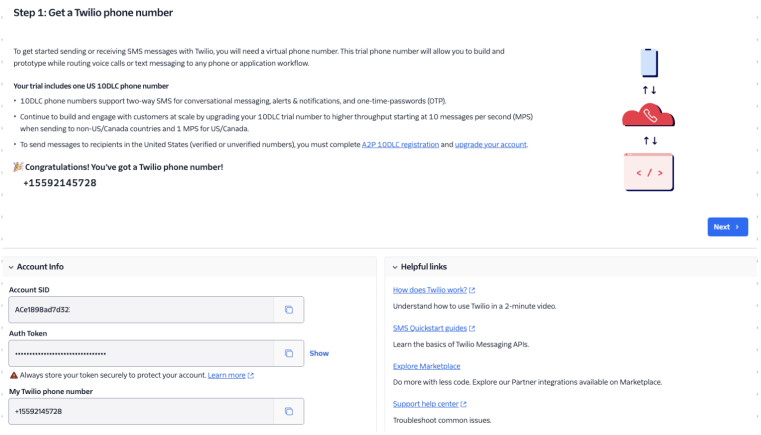
Step 3. Now, it’s time to create an account on Twilio to proceed with integration. Once registered, obtain a phone number by clicking “Get phone number.” After you get your number, you’ll find the Account Info tab below containing your Account SID and Auth Token, which is essential for integrating with Make.
Step 4. At this point, we can create a Webhook in Make. The steps are the same as those described in Case 1: Make dashboard > Scenarios > Create a New Scenario > add Webhooks > Custom webhook > Create a webhook > Copy address to the clipboard.
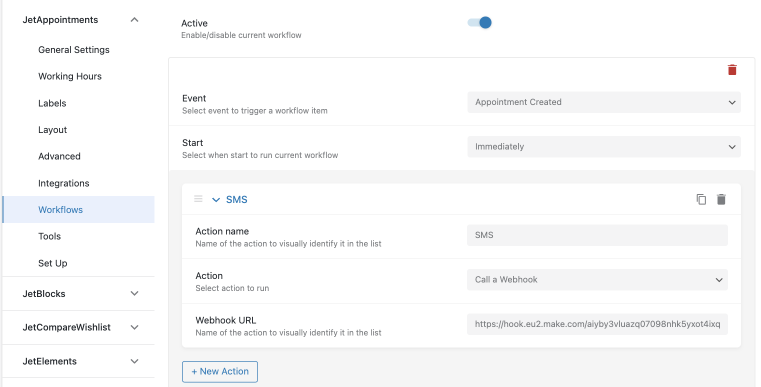
Now, paste the copied webhook into the Appointment Workflow, which you can find in WordPress Dashboard > JetAppointments > Settings > Workflows. Set “Appointment Created” as the Event and “Immediately” as the Start. Click “New Action,” name it, choose “Call a Webhook” Action, and paste the webhook URL.
Afterward, submit the form on the front end to add the appointment fields to the webhook. Upon form submission, expect a green message in Make confirming the parsing of appointment data.
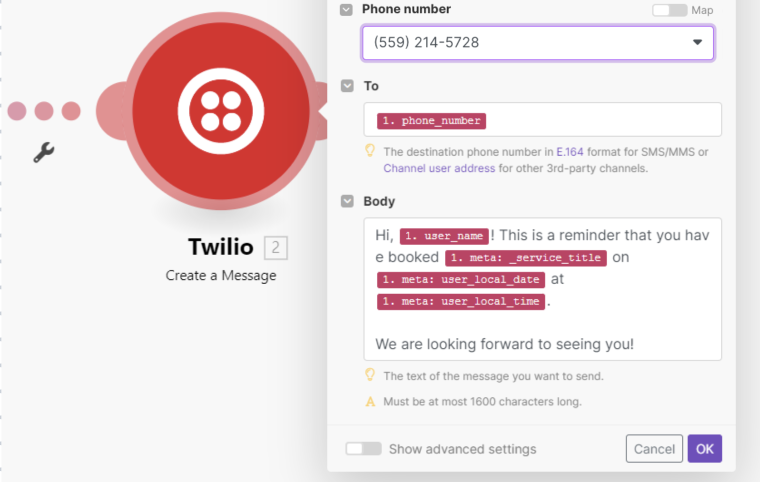
Once fields are parsed, add another Twilio module and select “Create a Message.” Customize the “Send a message from” field by choosing the previously generated Twilio phone number.
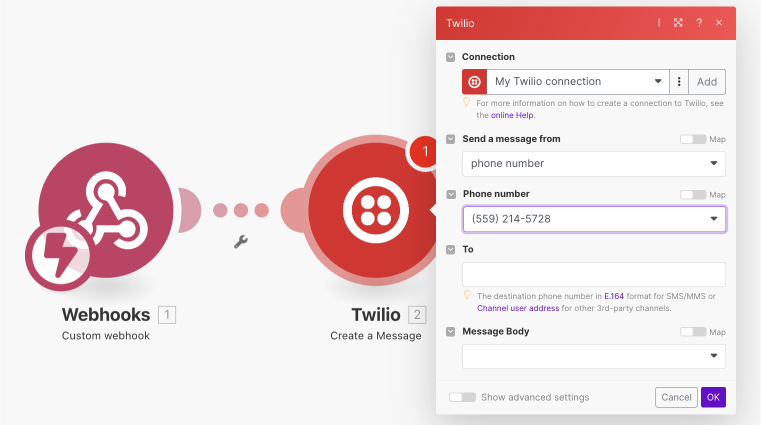
Step 5. For the “To” field, add a ‘phone_number’ field to send an SMS to the user-entered phone number. Similarly, ensure the SMS body contains data on appointment details. Utilize the previously parsed fields from a form submission: ‘user_name,’ ‘_service_title,’ ‘user_local_date,’ and ‘user_local_time.’ Additional fields can be included if necessary.
After finalizing the message body, activate the scenario schedule by toggling the Scheduling option. Click the “Schedule setting” icon to choose the desired scheduling option. Once activated, save the scenario using the corresponding icon.
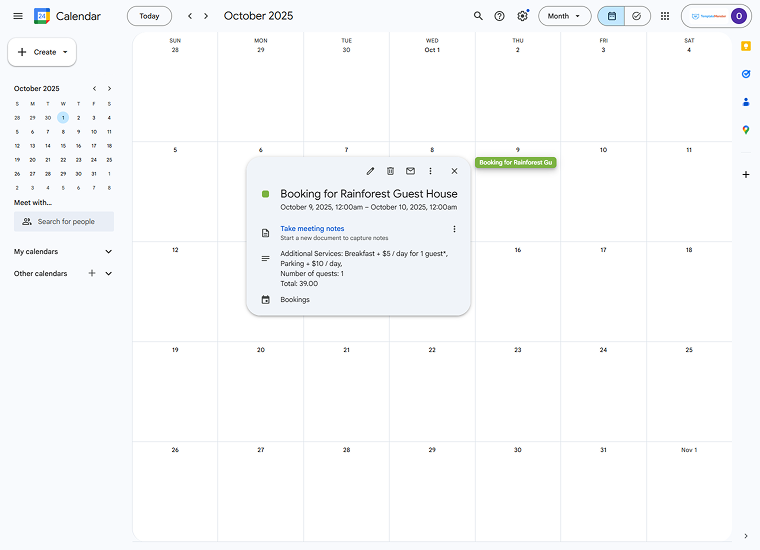
Use case 3: How to add multiple appointments to Google Calendar and Gmail?
Add a new module to the Webhook by clicking “Flow Control” in the Tools panel and dragging the Iterator module.
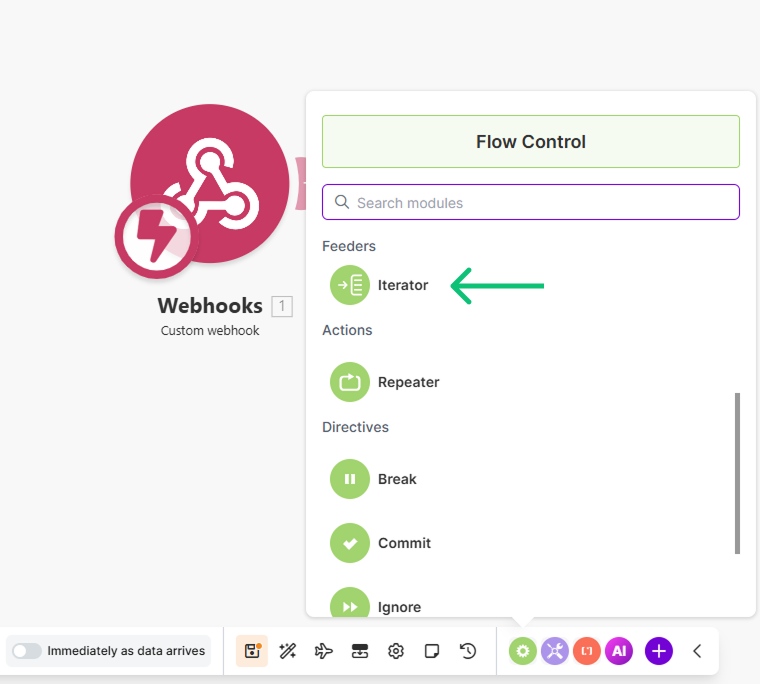
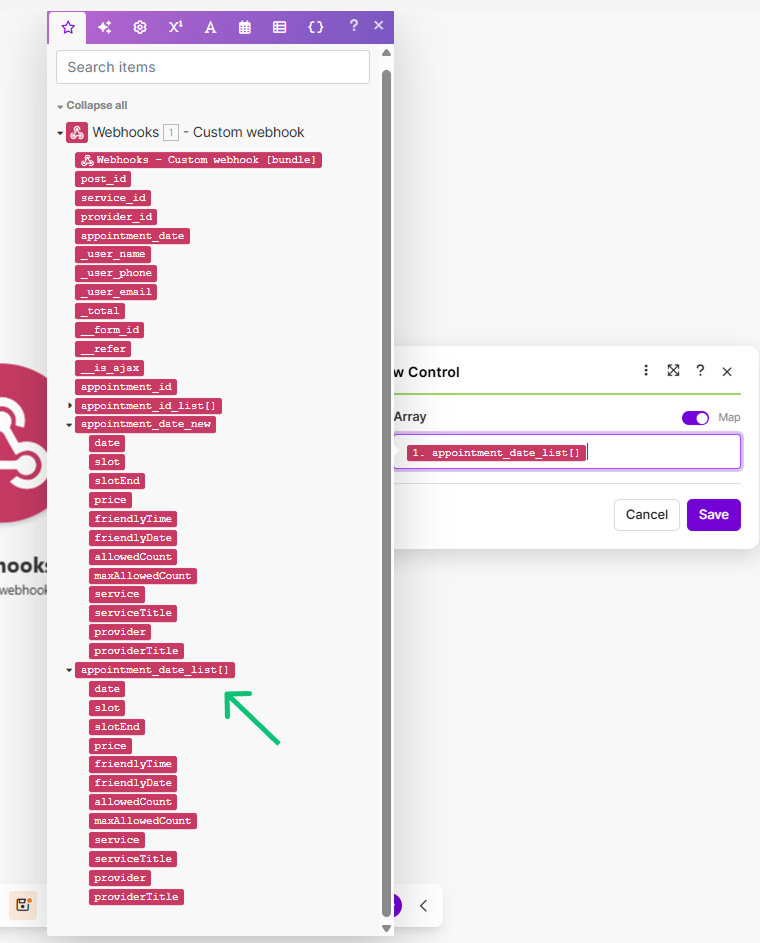
Click on the Iterator and select the “appointment_date_list” in the dropdown menu. Ensure the item name matches the appointment date field in your form. Then, click the “Save” button.
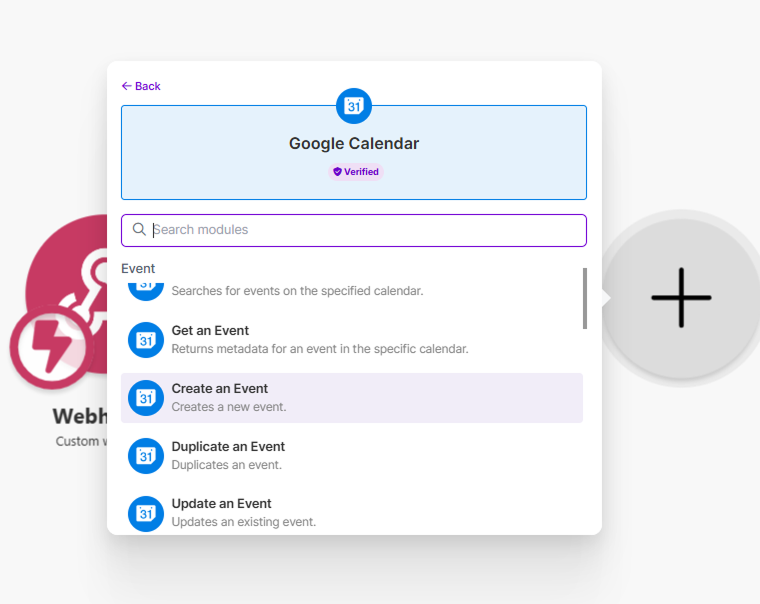
Click the “Add another module” button, then add “Google Calendar.” Select the “Create an Event” action.
Click the “Add” button near the Connection bar and connect Make to the Google account.
In the Create an Event dropdown, select the “In Detail” option.
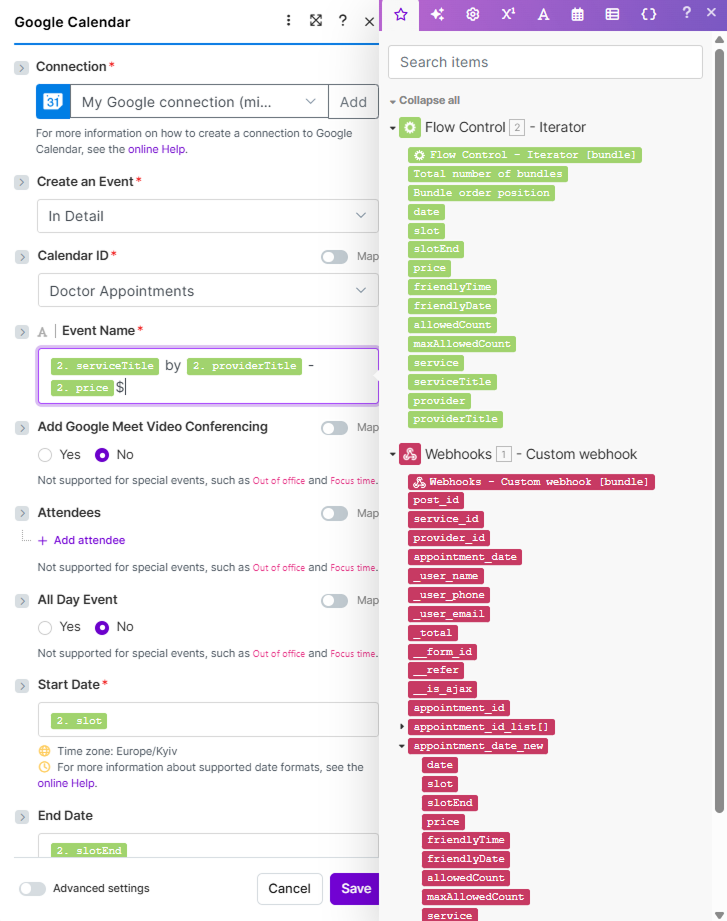
In the Calendar ID dropdown, pick the required calendar from your Google Calendar account (“Doctor Appointments” in this example).
As the Event Name, choose as many items from the “Flow Control – Iterator” section from the pop-up as you want, like service and provider titles, price, user name and surname, user email, and so on. They will be shown in the Google Calendar slots as additional information about appointments. Note that you need to separate items with spaces, and you can add plain text to customise the slot. The item names are assimilated with the field names from the form that is connected with the Webhook.
Drag and drop the “slot” item to the Start Date field and the “slotEnd” item to the End Date field. The “slot” and “slotEnd” items work for appointments with the time frames, but if you need to book an event only by days (not by hours), you need to drag and drop the “date” item.
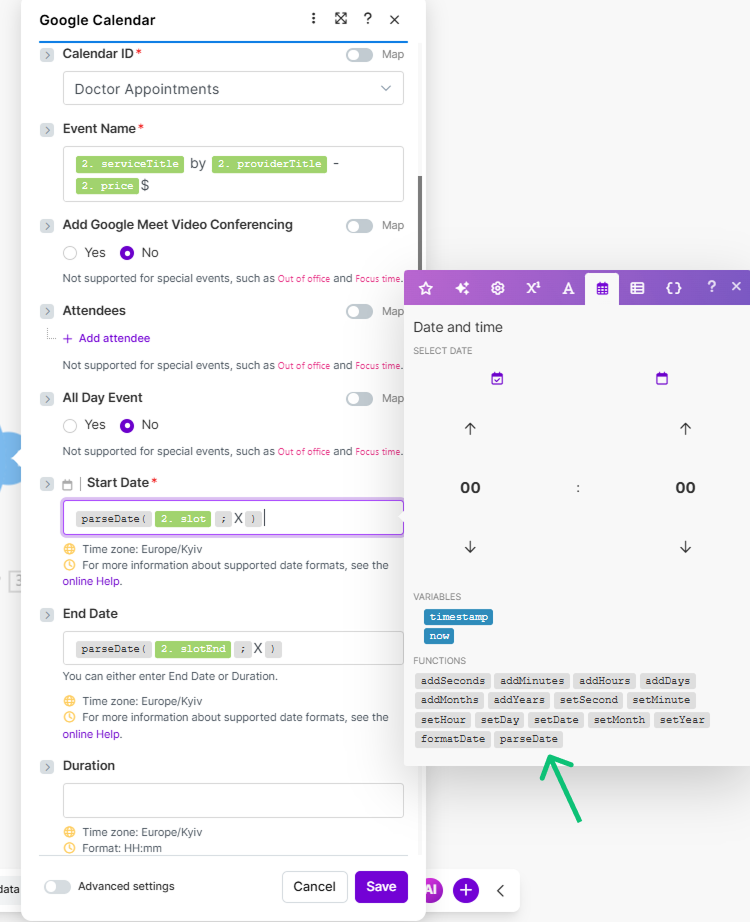
Since the date and time are saved in the timestamp, they need to be parsed. Click on the “Date and time” icon in the pop-up and drag and drop the “parseDate” function to the Start Date and End Date fields.
Prescribe the dates in such a way: “parseDate ( slot ; X )” and “parseDate ( slotEnd ; X )”.
Remember to press the “Save” button when you’re done. To execute the scenario, you can set up the schedule. Once completed, save by clicking the “Save” icon at the bottom of the page.
To receive appointment information via email, set the “Send Email” post-submit action in the JetFormBuilder form or add a Gmail module.
Press the “Add another module” button and add the Text aggregator tool. In its settings, select “Iterator” as the Source Module. In the Text field, add the “Summary” item from the Google Calendar module. You can also add the <br> tag after the item to list appointment details rather than put them on one line.

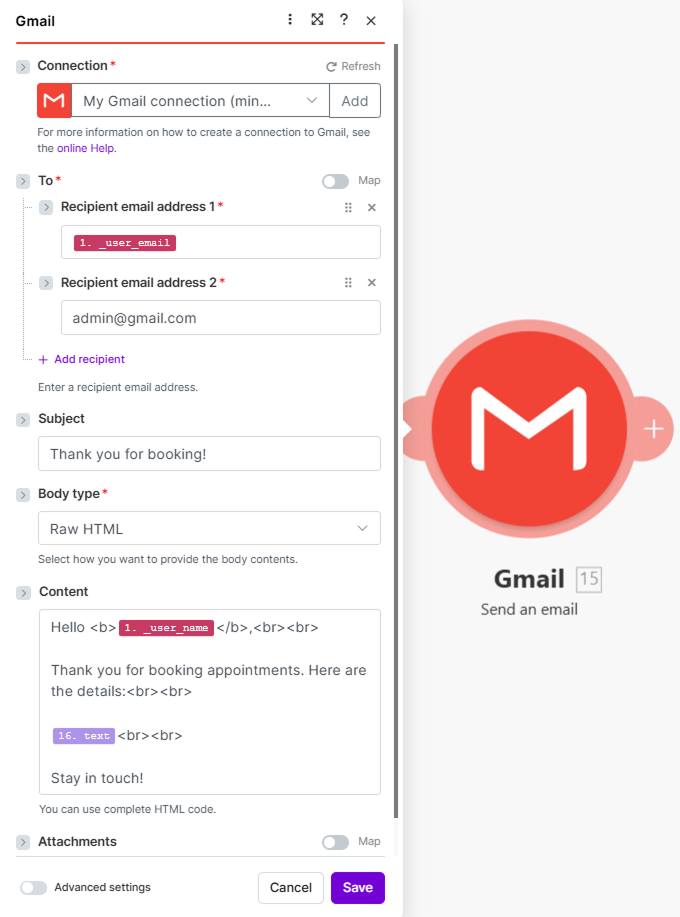
Then, push the “Add another module” button again, select “Gmail” and “Send an email” action.
Click the “Add” button near the Connection bar to connect Make to the Gmail account.
In the To field, press the “+ Add recepient” button to add the Recipient email address. In the first field, insert the “user_email” item that is connected to the form field where the user enters their email address, and in the second field, you can enter the admin email if needed.
Customize the Subject as desired.
In the Body type dropdown, select the “Raw HTML” option.
In the Content field, adjust the email body using plain text, HTML tags, and items. The “text” item from the Text aggregator will show multiple appointment details.
Push the “Save” button and run the scenario.
For more detailed step-by-step instructions, refer to the How to Add Multiple Appointments to Google Calendar and Gmail tutorial.
Use case 4: How to connect the JetBooking plugin and Google Calendar?
Step 1. In Make, set the Webhook module connected to the JetFormBuilder form, place the Google Calendar module, and pick the “Create an Event” option. Click the “Add” button near the Connection bar to connect Make to your Gmail account, or select an existing connection from the dropdown.
Step 2. In the Calendar ID, select the calendar to which you want your bookings published. For the Event Name, set the post title form field, for the Start Date — check-in date, and for the End Date — check-out date field.
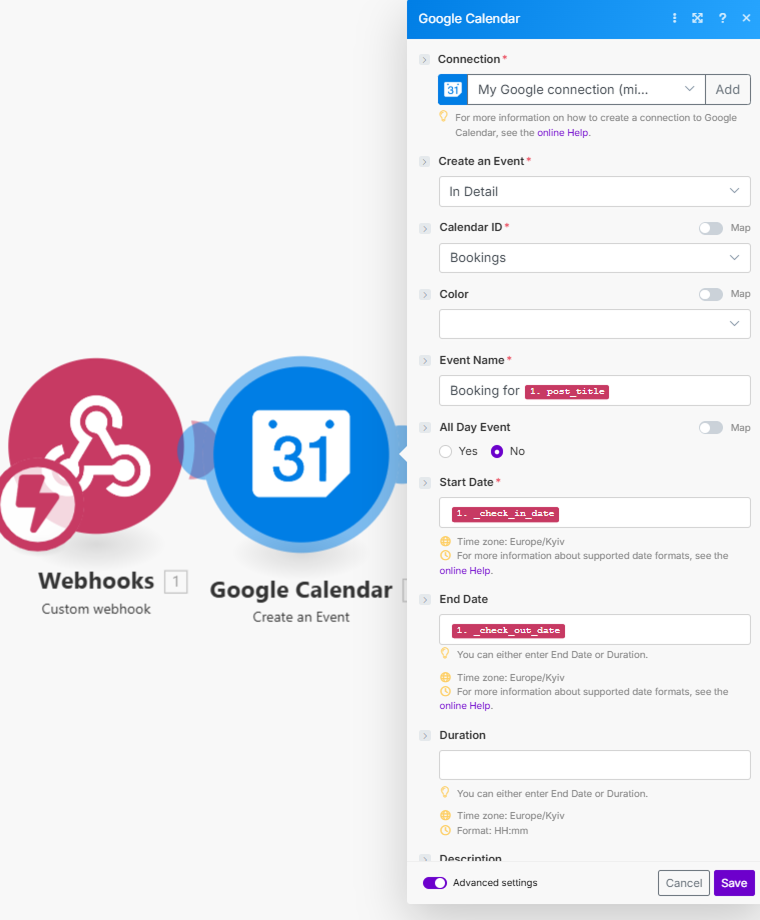
Step 3. Press the “Save” button at the end of the pop-up and save the scenario. Then, go to the Scenarios tab and switch the toggle on. Now, check the Google Calendar service. Bookings will appear in the schedule after users book the apartments.
For more detailed step-by-step instructions, refer to the How to Add Bookings to Google Calendar and Gmail via Make tutorial.
FAQ
No, both JetPlugins and Make offer user-friendly interfaces with drag-and-drop functionality for building automations.
Make allows you to connect JetFormBuilder with other services, automatically sending form data to email lists or other destinations.
No, Make is a cloud-based platform accessed through a web browser.
Takeaway
As you’ve seen, JetPlugins and Make combined offer a robust automation toolkit for your WordPress website. By leveraging these tools, you can streamline repetitive tasks, minimize errors, and free up valuable time to focus on more strategic initiatives. Whether you’re managing content, users, forms, or other website functionalities, this powerful duo enables you to work smarter, not harder.
Remember, these are just a few examples to spark your creativity. With a bit of exploration, you can unlock a vast array of automation possibilities tailored to your specific website needs. So, embrace the power of JetPlugins and Make, and watch your WordPress workflow soar to new heights of efficiency!


