Selling tickets on WordPress gives you full control over your management, eliminating third-party fees and allowing you to customize the experience for your customers. With JetPlugins, you can create a seamless ticketing system that includes custom registration forms, automated PDF ticket generation, and secure QR code access – all within your WordPress site. In this guide, we’ll walk you through the setup process step by step.
Why Sell Tickets Through WordPress?
Selling tickets through WordPress offers unmatched flexibility and control. By handling ticket sales directly on your site, you eliminate middleman fees and gain the ability to fully customize the ticketing experience to match your event’s needs. You can set up custom forms, tailor the checkout process, and manage everything from pricing to attendee tracking – all from one platform.
With a range of plugins available, you can integrate payment gateways, automate email confirmations, and easily offer discounts or promotions. Plus, WordPress allows you to combine ticket sales with your existing content.
3 Plugins for Creating a Ticketing System on WordPress
In this article, I’ll walk you through how to create a complete ticketing system on your WordPress site using Crocoblock’s powerful JetPlugins. We’ll be using JetFormBuilder to design and manage your custom forms, the JetFormBuilder PDF Addon to generate downloadable tickets, and JetEngine to create QR codes for event access.
Here’s a quick overview of each tool we’ll use:
JetFormBuilder
JetFormBuilder is a versatile form builder plugin for WordPress that allows you to create complex forms with ease. It supports a wide range of fields and functionalities, making it perfect for creating event registration forms. JetFormBuilder gives you full control over collecting attendee details and customizing form elements.
JetFormBuilder PDF addon
This PDF addon extends JetFormBuilder’s functionality by allowing you to generate PDF documents from form submissions. For a ticketing system, this means that once an attendee completes the registration form, they can instantly download a customized PDF ticket, complete with event details, a unique code, or other relevant information.
JetEngine
JetEngine is a powerful plugin for creating custom post types, taxonomies, and dynamic content on WordPress. When building a ticketing system, JetEngine’s ability to generate dynamic QR codes is priceless. You can create QR codes for each ticket and display them.
These plugins, combined, offer a flexible, user-friendly solution for managing ticket sales, creating downloadable tickets, and adding a layer of security with QR codes – all within your WordPress site. Stay tuned as we dive deeper into each step of the process.
Creating a Ticket Purchase Form
As mentioned earlier, I’ll be using JetFormBuilder to create our form. It’s an excellent tool for form creation – easy to use and available for free on WordPress.org. With most essential features included at no cost, it’s a great choice for anyone looking to build functional forms quickly. Now, let’s explore the different options for creating our form and integrating the payment system into it!
How to build a ticket sales form with JetFormBuilder
AI-generated form
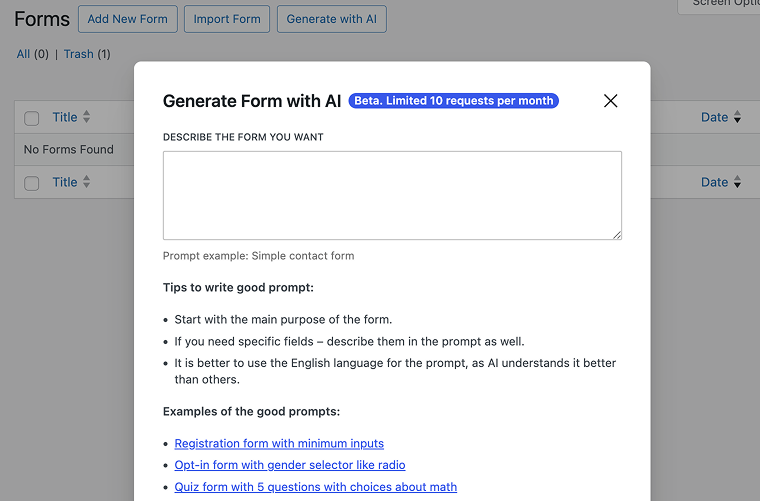
JetFormBuilder provides an AI-powered option to generate forms quickly. You can simply input a prompt with the details you want in the form, such as the fields for name and surname, phone number, and the number of tickets. This method is fast and helps create a basic ticket sales form in seconds. Once the form is generated, you can easily customize the fields to meet your specific needs.
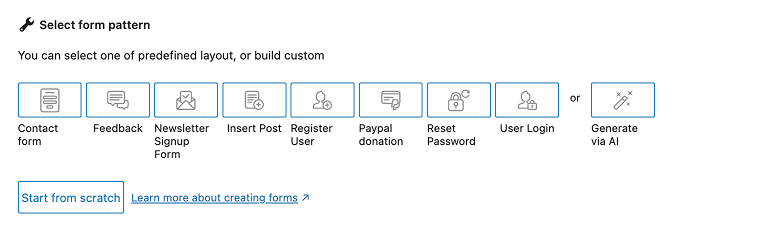
Pre-built form templates
JetFormBuilder also offers a variety of pre-designed form templates that you can use as a starting point. These templates are specifically designed for different purposes. Once you’ve selected a template, you can customize it by adding or removing fields, adjusting styling, and integrating additional features such as payment gateways or confirmation emails.
Custom form
If the pre-built options don’t meet your exact requirements, JetFormBuilder allows you to create a custom form. With the intuitive drag-and-drop builder, you can add fields such as name, contact details, and payment options. You can also implement advanced features like conditional logic, allowing the form to show or hide fields based on previous selections.
To make your ticket more secure, add a Hidden field (select a random string and configure it as needed) and a Calculated field (which you need later for your discount). These fields are essential for creating a unique identifier for each ticket, ensuring authenticity and preventing unauthorized copies.
NOTE
In the Calculated field, don’t forget to use single quotes to ensure the code works correctly. And check it as Hidden in the Block tab.
How to insert a payment method for ticket sales
Go to your WordPress Dashboard and navigate to JetFormBuilder > Settings. Navigate to the Payments Gateways section and enable both Enable Gateways and Enable Test Mode toggles to set up your payment system.
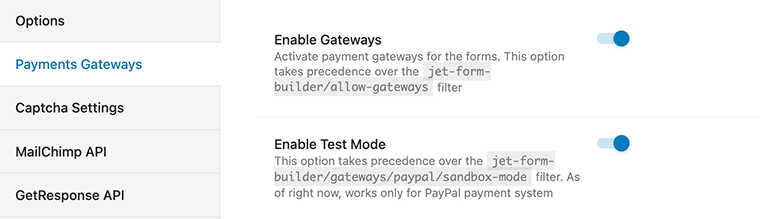
In the Payments Gateways section, you’ll see all available payment options. By default, PayPal is enabled, but if you have the Stripe Payments addon installed and activated, you can use Stripe as well. Expand the desired gateway and enter your Client ID and Secret Key. To get your PayPal Client ID and Secret Key, log in to the PayPal Developer website or create an account. Navigate to App & Credentials > REST API apps, where a Default Application is already generated. To create a new API key, click “Create App,” fill in the required details, and submit. Once created, go to the API Credentials tab, find your app, and copy the Client ID and Secret Key. For more details, check the How to Configure Payment Gateways guide.
For a form to work correctly in a live environment, set up the appropriate API credentials (the “Live” or “Sandbox” mode; the instructions are in the Get Started with PayPal Developer tutorial) and indicate a proper currency code (the list of codes can be found on the Country Currency Codes page).
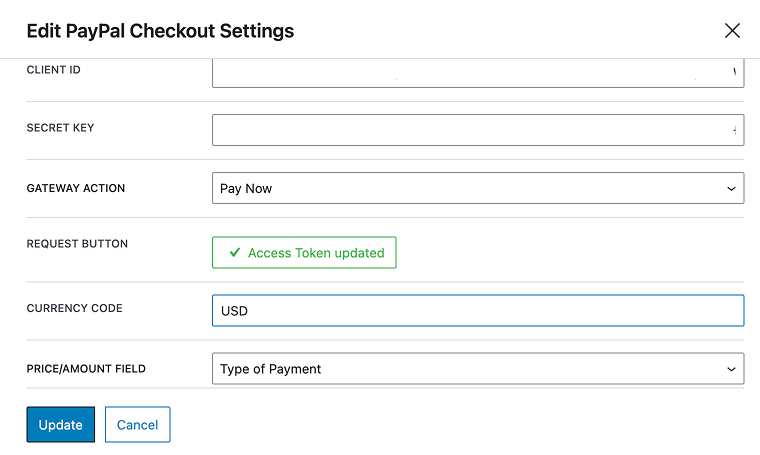
Next, go to JetFormBuilder > Gateways Settings, choose your preferred payment method (I chose “PayPal”), and click “Edit.” Enter your Client ID and Secret Key, then click “Sync Access Token.” Once synchronization is complete, the button text will update to “Access Token Updated.”Finally, set the Currency Code (in my case, USD) and select the Type of Payment field. You can also customize the message customers will receive after a successful or failed payment.
NOTE
If you want users to be registered after submitting a form, you need to set up post-submit actions after configuring the payment gateway. Check out this guide to learn how.
How to Generate a PDF Ticket After Purchase
Portable Document Format, or commonly known as PDF, is a file format developed by Adobe that maintains a document’s layout, fonts, and images across devices and operating systems. Unlike editable formats, PDFs ensure consistency in appearance. They are widely used for official documents, contracts, and forms due to their security features, such as password protection and digital signatures. PDFs can also include interactive elements like hyperlinks and multimedia.
Steps to generate a PDF
To convert a form submission into a PDF, you can use the JetFormBuilder PDF Attachment Addon. This addon automatically generates a PDF version of the submission and lets you create dynamic PDF templates. So let’s start:
- Install and activate JetFormBuilder and the PDF Attachment Addon.
- Navigate to the Post Submit Actions tab, click “+ New Action,” and select “Generate PDF” from the list.
- Choose an existing PDF template or create a new one.
You can customize the template by adding field labels and names and using the %field_name% macro within Paragraph, Heading, Custom HTML, Table, and Image blocks. Media files and tables can also be included. Once your template is configured, click “Update.”
After you customize your PDF, click on the “Attach to the Send Email” action so the customer receives the file after submitting the form. Then, configure all the necessary details for sending the email. To send emails after form submission, make sure you have the JetFormBuilder Send Email action.
That’s it – your PDF is ready in just a few steps!
How to Create a QR Code With JetEngine
In my case, I decided to generate a QR code for a 10% discount if the buyer purchases more than two tickets at once. After submitting the form, they will receive a unique QR code that can be used for their next purchase.
PRO TIP: Create a Custom Content Type to organize purchased tickets. This will serve as a database storing all ticket purchase details. Also, don’t forget to set up the “Edit Insert/Update Post” action in Post Submit Actions to ensure purchases are recorded automatically.
There are two ways to set this up:
- Create a simple page where you can insert a QR code directly.
- Use a Custom Post Type (CPT) for a more structured approach.
Let’s go with the more advanced option and set it up using a CPT.
To create a CPT, go to JetEngine > Post Types > Add New and create a new post type. Add a meta field (in my case, I named it “discount_10%”). Once the CPT is created, enter a unique code in the meta field.
To display the CPT, go to Crocoblock > Theme Builder > Create New Page Template. Select your CPT and choose the builder you prefer.
Set up as you need your template and include the QR code: use the Dynamic Field widget, set the Source to “Meta Data.” Select the discounts meta field (from the CPT). The QR code should appear automatically.

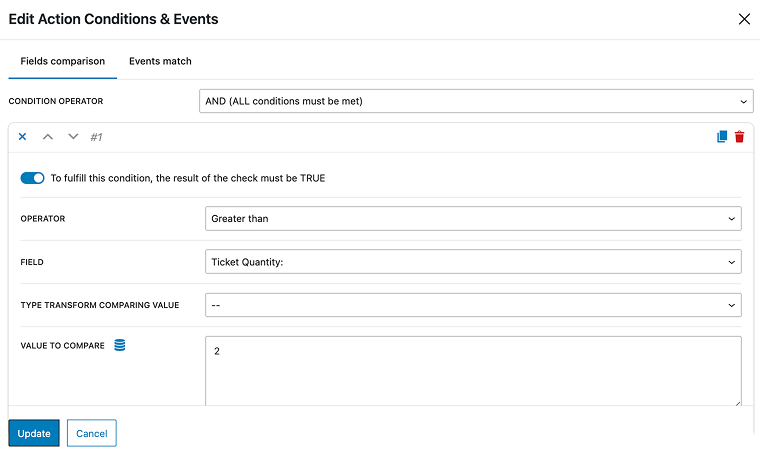
To show the QR code after a successful purchase, modify the Post Submit Action in your form. Go to Post Submit Actions and select “Redirect to Page.” Click “Add New Condition” and set the following:
- Condition Operator: AND
- Operator: Greater Than
Field: Ticket Quantities - Value to Compare: Enter the minimum quantity (I chose “2”).
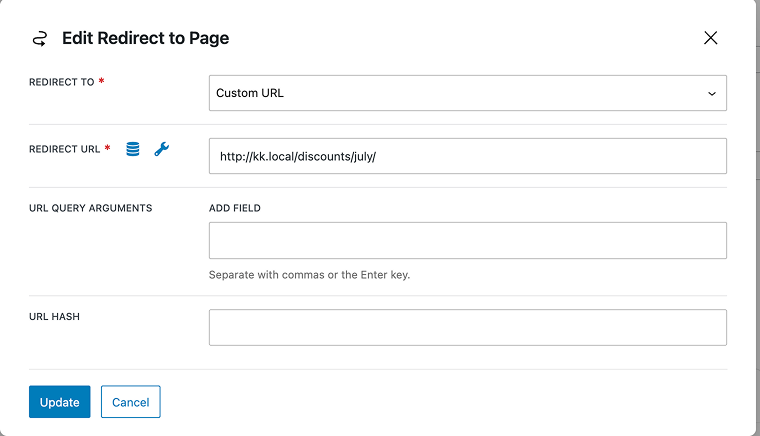
In the Redirect to field, choose “Custom URL” and enter the link to your CPT page.
If you created a page, then in the Redirect to field choose “Static page,” and select the needed page.
And that’s it! Your system is now set up to generate and display QR codes based on ticket purchases.
FAQ
Yes! JetFormBuilder has a free version with essential features, but you may need add-ons for advanced functionality like PDF generation.
Absolutely! JetFormBuilder supports PayPal and Stripe integrations, allowing you to collect payments securely.
Yes, it’s possible. The QR code essentially returns the information stored in the metadata or elsewhere. You can leverage dynamic visibility to display exclusive content for VIPs.
Yes! JetFormBuilder and JetEngine work seamlessly on mobile devices, making it easy for attendees to purchase tickets and check in.
Wrapping Up
By turning your WordPress site into a full-fledged ticketing platform, you can create a seamless experience for your customers while maintaining complete control over your event. With JetPlugins, you’re not just slapping a checkout form onto your site; you’re building a dynamic system that handles registrations, generates professional-looking tickets, and even secures your event with QR codes.
The real advantage? No third-party commissions, no restrictive ticketing platforms – just a solution tailored to your exact needs. Whether you’re hosting a local workshop, a large-scale conference, or an exclusive online event, this setup ensures that every step, from purchase to check-in, is smooth and efficient. Plus, with JetFormBuilder’s automation and JetEngine’s dynamic capabilities, you can scale your ticketing system without extra hassle.
Now that you know the process, the only thing left is to bring your event to life. Set up your ticketing system and give your attendees a frictionless way to secure their spot!


