Most WordPress developers probably know about the community of this CMS and the events that take place pretty often. There’s an official WordPress.org event page with a list of these events, the information about them, and the location, so people can find what’s going on in their region.
I’ve recreated it using Crocoblock plugins and will give you a step-by-step guide on how to do it in this article. Check the live demo here.
Table of Contents
- The Scope of Work
- Crocoblock Tools Used
- Adding Events
- Creating Queries in Query Builder
- Creating Listing Templates
- Setting Up Filters
- Сomposing the Events Page
- FAQ
- The Bottom Line
The Scope of Work
The event page of WordPress events for 2024 has the following components:
- Interactive map with pop-ups that display the information about events and a link to the event’s page.
- A list of events.
- Filters for this list (search field and sorting by month, format, and type).
- A dynamic counter for the events.
- A dynamic counter of the countries in which these events will take place.
There is also a number of participants displayed on the original page, but I will skip it for now. They could also be displayed dynamically, but it requires more advanced logic.
Also, I will recreate only some European events for obvious reasons, not to add over 1,000 of them to the demo site.
If you want to display only future events or create two lists with past and future ones, use this tutorial.
Here is a step-by-step work plan:
- creating a CCT and adding events;
- creating custom queries in Query Builder;
- creating Listing Templates based on these queries;
- setting up filters;
- composing the Events Page and fetching data dynamically.
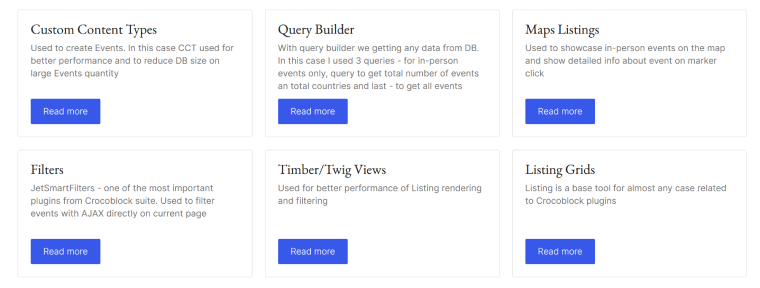
Crocoblock Tools Used
- Custom Content Types. This is a Crocoblock-specific entity, and they are used for better performance and reducing the Database size in case there is a large number of records. We will store individual events using them. It’s also the most convenient way because the events have individual pages on third-party resources.
- Query Builder. A powerful tool to get any data from the Database. I’ve used it to get all the events, the total number of countries and events, and to display in-person events only. In total, there are three queries.
We need a separate query for in-person (not online) events, as only this type should be displayed on the map. - Map Listing. It showcases the in-person events on the map and on-click pop-ups that display brief info with a link to the event.
By the way, if you need a geolocation filter so the users find something close to their location, we’ve released a functionality for it; read the detailed tutorial here.
- JetSmartFilters. They filter events with AJAX right on the page.
- Timber/Twig Views. I’ve created listing templates using Twig. This way, the best performance can be achieved.
- Listing Grid. It’s a widget/block for looping JetEngine Listing templates.
- A Dropbar widget from JetElements is used to create a smooth filter display. However, it’s pretty optional, and only if you use Elementor to compose the event page.
In total, two Crocoblock plugins were used to implement this functionality: JetEngine and JetSmartFilters. The additional plugin is JetElements, which is used to display filters in a dropbar.
💡 I will demonstrate settings using Elementor, but all of these work equally well in Gutenberg and Bricks.
Adding Events
First, let’s create a CCT for events. CCT is a Crocoblock-specific entity similar to CPT but doesn’t have a dedicated single page (but can be linked to any of the post types to have it and inherit its template) and stores the whole post in one database row, which is great for performance. You have full control over its REST API settings and admin columns as well.
It can have meta fields, relations, etc, just like CPTs.
Another advantage of using CCT in our case is that a dedicated JetFormBuilder form can be created in one click, so you can easily populate the CCT records via the front end – which is exactly what we need for events when users submit them.
Also, the WordPress community events on the original site have a meeting agenda on meetup.com or other third-party resources, so we definitely don’t need single pages in this case.
📚 Check the guided use case of collecting events from different websites using the REST API tool by JetEngine here.
Creating CCT for events
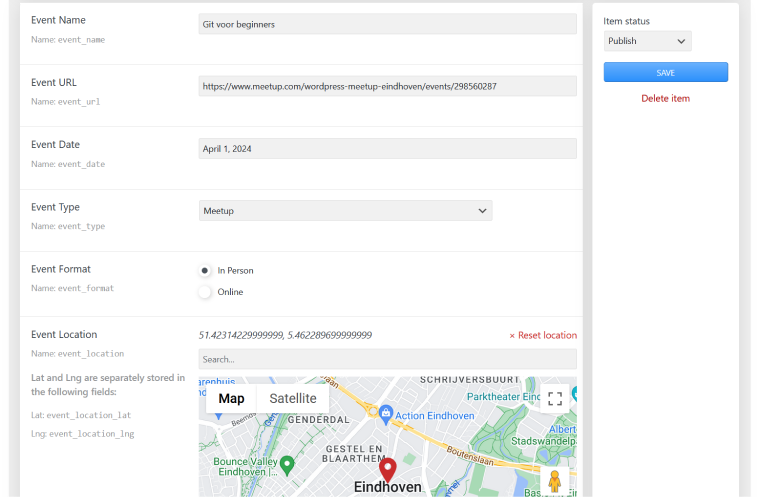
First, activate Custom Content Types and Map Listings modules in JetEngine > JetEngine. The Custom Content Type option will appear in the JetEngine section of the Dashboard. Click “Add New” and create a CCT called “Events.”
I’ve added eight meta fields to it:
- Event URL (text);
- Event Date (date);
- Event Type (select type, with Meetup, WordCamp, and Other options);
- Event Format (radio type, with In-Person and Online options);
- Event Location (map);
- Event Country (select from Glossary);
- Event City (text).
I’ve also selected the fields I wanted to see in the admin columns.
After that, the Event CCT will appear in the Dashboard menu, and it’s time to add the events. Don’t forget to add a map provider (e.g., Google Maps) with their API key in JetEngine > Maps Settings.
Creating Queries in Query Builder
Custom queries are required to fetch the exact content we want in the order we want. The query results can be cached as well.
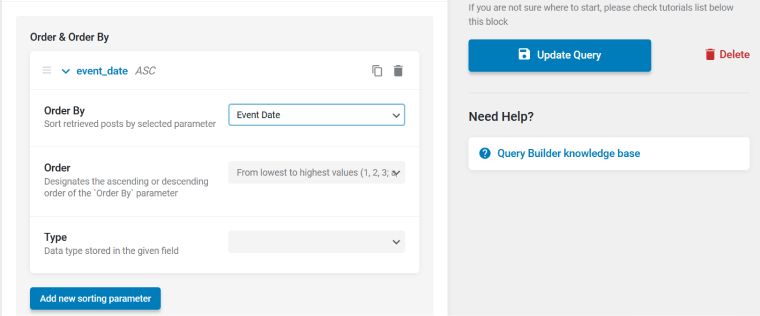
All Events query
To display all events in chronological order, I create the All Events query with query type “Custom Content Type,” “events-list” ID (it’s required to deal with filters on the Main Page), and “from lowest to highest” order.
In-Person Events query
As only in-person events will be displayed on the map, let’s create a query to display only this type. It will have the same settings as the previous query (but it doesn’t require an ID) to sort by date, plus it selects the “Event Format” field value equal to “in-person.”

Total Number of Countries query
To count the number of countries where the events will take place, I will use Query Builder with a query type “SQL/AI query.” Switch the Advanced/AI query toggle.
The command is the following:
SELECT count(*) AS total_events, count(DISTINCT event_country ) AS total_countries FROM {prefix}jet_cct_event;If you want to modify the query but are not so familiar with SQL commands, use the AI tool and check our article about popular queries.
Creating Listing Templates
Listing templates are the templates for the loop, which are based on selected queries. There can be various types of listing sources and display posts, users, terms, relations, Options Pages data, Query Builder data, Repeater fields, Custom Content Type items, and REST API endpoint items.
In this case, I will use a Query Builder as a source with the queries created above and the Timber/Twig view to design them to ensure the best possible performance.
📚 To use it, activate the Timber/Twig view in the JetEngine > JetEngine > Performance tab and follow this guide for detailed instructions on creating it.
For this project, I will need two listing templates:
- List Event – to display the list of all events;
- Map Event – to display events on the map.
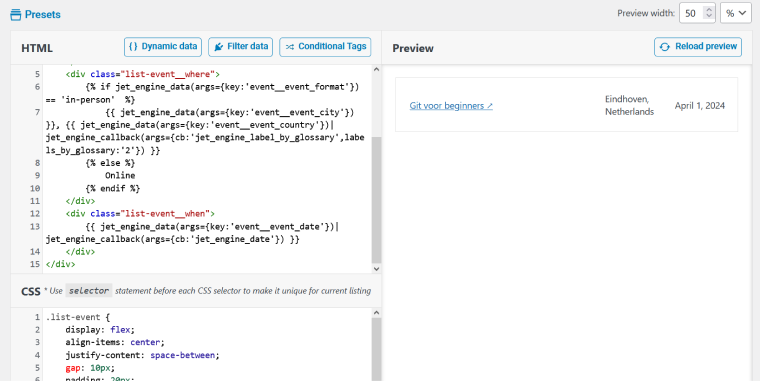
The List Event listing is for displaying all the events (online and in-person). Choose the All Events query as a source.
This is the code I’ve used:
HTML/Twig:
*(remember, you can generate Twig tags dynamically using buttons on the top)
<div class="list-event">
	<div class="list-event__name">
		<a href="{{ jet_engine_data(args={key:'event__event_url'}) }}" target="_blank">{{ jet_engine_data(args={key:'event__event_name'}) }} ↗</a>
	</div>
	<div class="list-event__where">
		{% if jet_engine_data(args={key:'event__event_format'}) == 'in-person'  %}
			{{ jet_engine_data(args={key:'event__event_city'}) }}, {{ jet_engine_data(args={key:'event__event_country'})|jet_engine_callback(args={cb:'jet_engine_label_by_glossary',labels_by_glossary:'2'}) }}
		{% else %}
			Online
		{% endif %}
	</div>
	<div class="list-event__when">
		{{ jet_engine_data(args={key:'event__event_date'})|jet_engine_callback(args={cb:'jet_engine_date'}) }}
	</div>
</div>
CSS:
.list-event {
	display: flex;
	align-items: center;
	justify-content: space-between;
	gap: 10px;
	padding: 20px;
	border: 1px solid #d9d9d9;
	margin-top: -1px;
}

.list-event__name {
	flex: 0 0 60%;
}
.list-event__where,
.list-event__when {
	flex: 0 0 20%;
	color: var(--e-global-color-text);
}

@media (max-width:768px) {
	.list-event {
		flex-wrap: wrap;
		font-size: 14px;
	}
	.list-event__name {
		flex: 0 0 100%;
	}
	.list-event__where,
	.list-event__when {
		flex: 0 0 auto;
	}
}
As you can see, I’ve used global style variables here, such as color: var(–e-global-color-text); in our case, it’s Elementor’s variables, but the same approach can be used with other tools. It’s recommended to maintain the style compatibility without editing the code.
As a result, we will get the following view:
The the Map Event listing, I use the In Person query as a source.
The design is pretty similar:
HTML/Twig:
*(remember, you can generate Twig tags dynamically using buttons on the top)
<div class="map-event">
	<div class="map-event__title">
		{{ jet_engine_data(args={key:'event__event_name'}) }}
	</div>
	<div class="map-event__link">
		<a href="{{ jet_engine_data(args={key:'event__event_url'}) }}" target="_blank">Open event site ↗</a>
	</div>
	<div class="map-event__meta">
		<div class="map-event__meta-row">
			{{ jet_engine_data(args={key:'event__event_country'})|jet_engine_callback(args={cb:'jet_engine_label_by_glossary',labels_by_glossary:'2'}) }}
		</div>
		<div class="map-event__meta-row">
{{ jet_engine_data(args={key:'event__event_date'})|jet_engine_callback(args={cb:'jet_engine_date'}) }}
		</div>
	</div>
</div>
CSS:
.map-event {
	background:#fff;
	padding: 20px;
	font-family: var(--e-global-typography-text-font-family);
	font-size: 13px;
	color: var(--e-global-color-text);
	border-radius: 3px;
	box-shadow: 0 3px 5px rgba(0,0,0,.1);
}

.map-event__title {
	font-weight: 500;
	font-size: 16px;
	padding: 0 0 10px;
	color: var(--e-global-color-secondary);
}

.map-event__meta {
	padding: 10px 0 0 0;
}
This is the output preview:
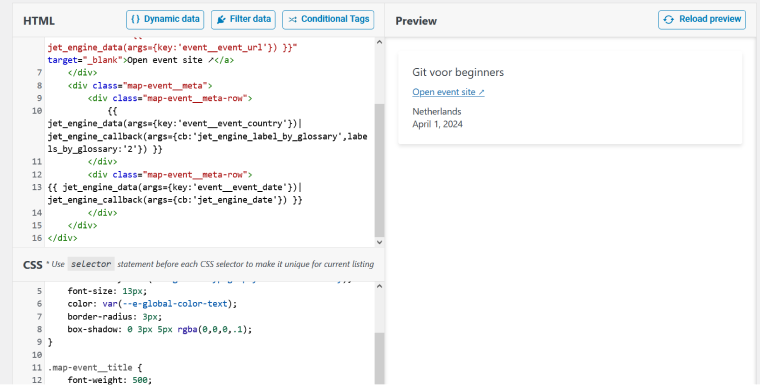
Setting Up Filters
I guess there’s no need to explain why filters are essential here.
I will create four filters:
- Search (by event name) – search;
- Format (In–person or Online) – radio;
- Type (Meetup, WordCamp, or Other) – radio;
- Date (select month) – date period.
Search filter settings (search type)
The settings for this filter are pretty straightforward: select the Search By Custom Field and type the Query Variable “event_name” (the name of the field for your event).
Format filter settings (radio type)
- Data Source – Manual Input.
Add options with “in–person” and “online” values (they must be the same as the option of the “event-format” meta fields of your CCT); - Type the “event_format” query variable;
- The comparison operator should be “equals” (=);
Type filter settings (radio type)
The settings are the same as for the previous one, but the options must be for the “event_type” meta field and the “event_type” query variable.
Date filter settings (date period type)
- Filter by – Meta date;
- Period type – Month;
- Datepicker button text – Month;
- Start/End Date Period Enabled – toggle activated;
- Query Variable – event_date.
Сomposing the Events Page
I will demonstrate settings using Elementor, but it works equally well in Gutenberg and Bricks.
First, let’s place the interactive map on the page. Add the Map Listing widget with the Map Event listing selected “event_location” meta key in the Address meta field input in General settings and your preferred style settings for the map (height, center, etc.). I’ve used this custom map style to look like the one on WordPress.org:
[
    {
        "featureType": "administrative",
        "elementType": "labels.text.fill",
        "stylers": [
            {
                "color": "#444444"
            }
        ]
    },
    {
        "featureType": "landscape",
        "elementType": "all",
        "stylers": [
            {
                "color": "#f2f2f2"
            }
        ]
    },
    {
        "featureType": "poi",
        "elementType": "all",
        "stylers": [
            {
                "visibility": "off"
            }
        ]
    },
    {
        "featureType": "road",
        "elementType": "all",
        "stylers": [
            {
                "saturation": -100
            },
            {
                "lightness": 45
            }
        ]
    },
    {
        "featureType": "road.highway",
        "elementType": "all",
        "stylers": [
            {
                "visibility": "simplified"
            }
        ]
    },
    {
        "featureType": "road.arterial",
        "elementType": "labels.icon",
        "stylers": [
            {
                "visibility": "off"
            }
        ]
    },
    {
        "featureType": "transit",
        "elementType": "all",
        "stylers": [
            {
                "visibility": "off"
            }
        ]
    },
    {
        "featureType": "water",
        "elementType": "all",
        "stylers": [
            {
                "color": "#c8d1fc"
            },
            {
                "visibility": "on"
            }
        ]
    }
]
Marker tab
I chose the WordPress icon.
Popup tab
This is the pop-up to display the info about the event, designed in the Map Event listing.
The size is 320x45px, with a pop-up preloader activated and a pin, it opens on click.
Here is the result:

To add the dynamic counts of events and countries, I used a Heading widget and a dynamic tag. Choose “Dynamic function” from the JetEngine section of the list and the “SQL query results” function. Choose the “total_events” query column to display the number of events and the “total_countries” to display countries.
In the Advanced tab of the same window, add the text that comes after the dynamic data: events this year/countries.
Now, let’s display the list of all events with filters.
For the Seach filter, add the Seach Filter widget and select your filter; choose AJAX on typing, with a minimum of 3 letters, and the “events-list” query ID.
To display Radio filters (Format and Type), I’ve used a Dropbar widget to show the radio fields as a smooth dropdown (for Gutenberg or Bricks, use other solutions or just add the radio filters as they are). Choose the Button type – Text, and type the name of the filter. In the Content Type tab, choose Template.
Create Section templates using Elementor (for Format and Type filters). Add the Radio filter to that section with the “events-list” query ID and AJAX apply type. You should create two templates like this for Format and Type filters. For the first one, choose the “Format” in the Select filter input, and for the second, choose the “Type” one. Add styling, go back to the main page, and choose these templates for the corresponding Dropbar widgets.
For the Date filter, add the Date Period filter widget. Select the “Date” filter, choose the AJAX apply type with Apply on Value change, and specify the “events-list” query ID.
Finally, to clear all the filters, add the Remove filters widget with AJAX apply type and “events-list” query ID.
Don’t forget to style everything.
The final step is adding the list of all events. Add the Listing Grid widget, choose the Event list listing template, “Published” status, select “1 column” and Lazy Load. If you want to use Infinite Scroll or Load More, they are available right here in settings. In case you want to add pagination, check this guide.
Enjoy the result!
FAQ
There are a lot of applications for CCT; however, it will be the best choice if you want to place a large number of records with a lot of meta fields and keep your database as compact as possible. Check this diagram to get an idea.
Event plugins are tools for displaying various events. They provide functionality to make these events easy to find and filterable and even display them as an event calendar.
Sure! You can display JetEngine CPT and CCT as a calendar, dynamically submit new events via forms, and filter them.
The Bottom Line
In this article, I demonstrate how you can recreate the main event page of the WordPress community with just a couple of Crocoblock plugins. There’s also a lot of space for additional development if you want to create a more complex event directory or combine it with membership functionality.
