Not every website needs a comment section – in fact, for many, it’s just unnecessary clutter. However, for a huge number of sites, comments are essential and work as social proof. And in those cases, the default WordPress comment system often just doesn’t cut it.
In this article, we’ll look at the key situations where customizing your comment form really matters, and most importantly, how to actually make those changes and fix the built-in limitations.
What Are WordPress Comments (Under the Hood)?
Before we begin, it’s essential to understand what comments are in a nutshell – this is crucial for effectively dealing with them.
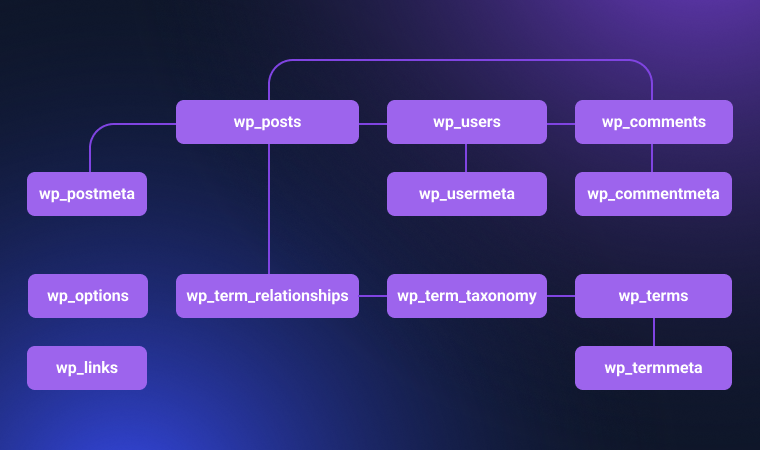
WordPress comments are not post types — unlike post, page, or any custom post type (CPT) you register. Instead, they are a separate data entity, stored in their own database table called wp_comments. Each comment is tied to a post or page through the comment_post_ID field.
It’s user-submitted content pieces that are linked to these posts (which means default posts, pages, or CPT).
There’s also wp_commentmeta, a meta table to store custom fields or extra data per comment.
Top Cases When Comment Form Customization and Functionality Is Necessary
I will go through the top challenges of WordPress comment functionality, starting with the most basic and then moving on to the more complex ones. Also, I will give solutions for each of these cases. Let’s get started.
Comment support for CPT
🔒 Default post types (posts and pages) support comments by default. But for custom post types, this functionality should be activated.
🔑 If you use plugins like JetEngine for creating custom post types, go to the Advanced Settings section and locate the Supports field (on the bottom) while creating or editing the post type, and select “Comments”:

If you use ACF, you can activate it in the Advanced tab as well.
If your CPTs were created using code, add this code to the functions.php file and replace the your_cpt_slug part with your actual CPT slug:
function modify_cpt_to_support_comments( $args, $post_type ) {

    if ( 'your_cpt_slug' === $post_type ) {

        $args['supports'][] = 'comments';

    }

    return $args;

}

add_filter( 'register_post_type_args', 'modify_cpt_to_support_comments', 10, 2 );
Spam in comments
🔒 Spam in comments is the #1 reason why so many websites deactivate them. It’s, without exaggeration, a nightmare for any website owner or maintenance professional. You don’t even have to make any SEO optimization for your website – create it, make it live, and in a week or so, you will see tons of bot-generated comments, even if you have zero to no content there.
But, if you are a properly working living website, you are opening a can of worms that doesn’t close.
Here, you have two solutions:
🔑 Close comments or close them for particular post types.
I like the Disable Comments plugin to do the job. Using it, you can choose particular post types to disable them.
🔑 Use anti-spam solutions – the Akismet plugin is a tool primarily designed to protect comment forms, but it can be pricey. As an alternative, you can use the Advanced Google reCAPTCHA plugin to incorporate this type of protection into native comment forms.
Page reload required after submitting a comment
🔒 By default, when a comment is submitted, the page reloads. It feels outdated nowadays.
🔑 If you just want to add AJAX so the page will not reload, the Ajaxify Comments plugin would help. But if you want to add more functionality, proceed to the next sections and consider creating custom comment functionality.
No social login
🔒 There are two options for who can leave comments on a WordPress website: either registered users or anyone, and this setup can be changed in Settings > Discussion. If you leave it open for everyone, there’s a huge chance for spam or advertising comments. On the other hand, if you let only registered users comment, it will reduce the activity, as it’s an extra effort and step, which quite often stops users from proceeding to a comment, according to Insiteful, around 70% of them would stop and leave a website if there are any obstacles to a smooth process of filling out any form, including a comment one. And, according to a Cornell University study, a considerable number of high-quality contributors are deterred by the registration process.
So, unless the comment section is strictly for your registered customers, consider using social login functionality.
🔑 Social login is a good solution here: you still don’t allow anonymous comments, but don’t deter users with the registration process. It’s a good concept, but the only issue is that WordPress comment forms don’t have this functionality by default.
There are two solutions here:
- a plugin like wpDiscuz, which is good, but the bundle of add-ons is quite pricy;
- a custom comment form with social login – I will explain how to create it in the section below.
No custom fields in comments
🔒 Default comments are just a couple of fields: title (sometimes), comment text, plus you can display the meta: username and publication date. But what if you need more? For example, to rate something, to add extra information about the user, and so on?
🔑 You can add custom fields programmatically or using the Meta Box extension. Alternatively, use a custom comment system.
No user role-based logic
🔒 In the default comment form, you can’t show different fields and features based on whether someone is logged in or based on user role.
🔑 To create conditional visibility and role-based logic in comments, you will need to create a custom comment system.
No discussion interface and comment analytics
🔒 You can’t see which comments are the most popular and helpful in the default interface.
🔑 Use the JetReviews plugin, which allows you to create custom comment logic, create reviews, upvote comments, and have a visual analytics dashboard. You have control over the user roles as well.
Custom Comment System by Crocoblock in 5 Steps
The good news is that you can build a totally custom commenting functionality to have full control over every detail – not just add custom fields and control visibility, but have a completely custom workflow – e.g., send emails, add users to mailing lists, trigger different events, register or redirect users, create posts, and so on.
You will need three Crocoblock plugins to implement it:
- JetFormBuilder – for forms and after-submit actions;
- JetEngine – for storing and querying comments;
- JetThemeCore – to modify templates and insert comment forms there.
Step 1: CCT and form
First, create a CCT – the JetEngine-specific Custom Content Type and add all the fields you want to have in a comment.
Activate the CCT module in JetEngine > JetEngine, then go to JetEngine > Custom Content Types and add it. By the way, a dedicated database table will be created as well, so it will not bloat other tables.
Let’s say, I want to have such comment fields:
- Name;
- Email – for notifications or moderation, can be hidden;
- Role (Select/Radio): “Customer,” “Developer,” “Student,” to add context to their comment;
- Comment purpose: “Question,” “Feedback,” “Follow-up,” “Report an Issue”;
- Comment text.
So, add a news Comment CCT and the fields in JetEngine > Custom Content Types. Don’t forget to specify which fields will be visible in the admin dashboard to identify the comments – check them in the Admin Columns section (e.g., Name, Email).
Save the CCT, and you will see the “Create New Form” button on the right (make sure the JetFormBuilder plugin is activated). Click it, and the form with all the fields you’ve added to the CCT is automatically created for you.
Also, the Edit Insert/Update Custom Content Type Item post-submit action is added, and the form fields are mapped to the corresponding fields of the CCT.
Now, if you submit this form, a CCT record will be created. You can add more post-submit actions, for example, to send an email to the user or the administrator.
Step 2: Template to display comments
Now, add a sample comment directly from the admin dashboard – so when we create a listing template, we can see how the fields will look.
Go to JetEngine > Listing/Components and create a new one with the Custom Content Type as a source.
You can make it using Elementor, Block Editor, Bricks, or Twig.
Step 3: Relating comments to posts
We need this step to connect the posts where the comments will appear with the comment form. You can use any custom post type, if needed. In my case, it’s Tours.
Go to JetEngine > Relations and add a new one. The Tour (post type) should be a Parent object, and the Comments CCT – a Child object. Relation type – “One to many.”

Now, it’s time to create a functionality so that the comment submitted on the particular page would automatically get related to this post.
Go back to the form and add two adjustments:
- Add a hidden field, name it Post ID, and make sure it fetches the Post ID (from the list).
- Add a new post-submit action called Connect Related Items.
- In its settings, make the Parent Item ID equal to the Post ID hidden field you’ve just created.
- The Child Item ID will be inserted_cct_yourpostname (added automatically).
- In the Update Context field, choose the “We updating children items for the parent object.”
- In the How to store new items field, choose “Append new items to already existing related items.”
- Save the form.
This is the process illustrated:
Step 4: Querying comments based on relation
We’ve done most of the job – the comment form exists and not only publishes comments ass CCTs but also automatically creates relations between the comment and the post it was created on.
Now, what we need to do is display these related comments. If we just place the listing template created in Step 2, it will display all the existing comments on the website. But we only need those related to the particular post.
It’s quite easy to do thanks to the Query Builder, a unique tool by JetEngine.
Go to JetEngine > Query Builder, add a new query with a Custom Content Type as a source, choose your CCT for the comments, and then click “Add Query.”
Use these settings:
- Field – Item ID;
- Compare – In the list;
- Value:
Click on the Database icon and choose the Related Items macro. There:
- From relation – choose the relation name you’ve created in Step 3;
- From Object – Child Object;
- Initial Object ID From – Current Object ID.
Save the query.
This is the process visually:
Step 5: Adding custom comments to the page template
We have everything ready, so let’s put it together.
Open your custom template for your post – in my case, it’s a Tour CPT, and I use JetThemeCore to create a custom template for it.
Add Listing Grid widget and choose the listing template you’ve created in Step 2. Now, the super important action: open the Custom Query section and select the Query Builder query you’ve just created.
This makes the whole point here – it filters only comments related to this particular post.
Don’t worry – it will show you no results in the editor, because you are editing a template, so it obviously does not have related items; you will see them on a real post.
Do all the styling and adjustments. You can add the comment count using the Dynamic Tag and choosing the Related Items Count value from the list.
And, of course, add the form using the JetForm widget for Elementor, Bricks, or a block for the Block Editor. The first two options allow you to style every detail of the form visually, so there’s no need to do it while creating the form.
This is the process:
Congratulations! Your custom commenting system is ready.
If you want even more details about creating custom comment forms, check this guide.
Additional features
You may be wondering – what about the social login I mentioned earlier in this article?
I have great news for you: you can add social login (using any of the social login plugins) to the form.
The beauty of the JetFormBuilder and what many don’t appreciate in the beginning – the fact that it uses a native block editor. But, in fact, it gives a lot of advantages. Read this article to learn about them.
💡 JetFormBuilder is super powerful when it comes to dynamic fields and fetching data dynamically from anywhere on the website. You can definitely use this feature to create an advanced comment system. Read this article to learn about these features.
💡 And finally, JetFormBuilder goes into overdrive when combined with JetEngine. Read about the 10 most interesting features here.
JetReviews Plugin Features

JetReviews is a Crocoblock plugin for reviews and comments. Here are the key features:
- Flexible review types:
- Custom rating fields. You can create different fields to rate various features. For example, “Cleaniness,” “Service,” etc.
- User comment fields – Title and Comment, and you can deactivate both if you don’t need them.
- The media field can be activated to upload photos.
- Users can like or dislike others’ comments and leave replies.
- You can use reCAPTCHA v3 form verification.
- Full control over user roles that are allowed to leave comments and reviews for each review type. Also, you can set up which user role (or Guest user) should have their reviews approved.
- You can check the content of reviews and comments for disallowed words.
- Flexible system of notifications: you can choose whether to send a notification to the administrator and the post author via email.
- Review moderation. You decide whether new reviews are displayed immediately or require admin approval. Spammy stuff? You can block it or require a login to review.
- Analytics dashboard with a graph and list of comments, with tabs for particular review types and other filters.

You can activate the Post Metadata toggle to synchronize reviews with the post metadata.
- You can choose a Structured Data type, e.g, “Service,” “Organization”, “Event,” etc., for better SEO optimization.
- A visual Reviews Listing widget/block for Elementor and Block Editor to customize fields, labels, and its design.
To add a JetReviews block to a page, you will need to modify a template of this post type using JetThemeCore or Elementor Pro. Also, you can display user ratings and comments on the front-end user profile with the help of JetEngine – it’s useful for membership websites.
📌 If you just need a simple commenting system, without rating, add this CSS in the Appearance > Customize > Additional CSS:
.jet-reviews-advanced__new-review-form .jet-reviews-slider-input, .jet-reviews-advanced__new-review-form .jet-reviews-slider-input, .jet-reviews-field__rating, .jet-reviews-advanced__new-review-form .jet-reviews-stars-input, .jet-reviews-field__rating   {
display:none;
}
It will hide both the rating form and the submitted comment. But on the Analytics dashboard, it will be considered the highest rating (JetReviews assigns the highest rating if no other rating is chosen).
Another useful CSS snippet is for hiding a reCAPTCHA badge, which appears on the bottom right corner of the website after activating it:
.grecaptcha-badge {
visibility: hidden;
}
FAQ
Many users skip commenting if the form feels too long, confusing, or requires too much personal information. A clean, simple design with fewer fields encourages engagement.
Avoid captchas unless truly needed. Instead, use automatic spam filtering tools (like Akismet), limit links, and turn off the website/URL field to keep the form simple and safe.
Yes, it helps prevent spam and encourages accountability, but avoid asking for anything beyond name and email – it creates friction and discourages users.
Final Word
The default WordPress comment functionality is quite normal but not very user-friendly. If you really want to involve users in commenting, you definitely need to improve it. So, in this article, I discussed the main pain points and how they can be fixed. Also, I created a detailed guide on building a custom comment system with just three Crocoblock plugins. And, finally, talked about a simpler but efficient solution – JetReviews.
I hope it was helpful!

