This is the second article in the series about using a JetEngine listing as a filter for another listing. This significantly expands the scope of filter application, adds flexibility, and allows you to bring complex ideas to life.
This guide isn’t just about highlighting a single feature or a use case. Instead, it’s about showing you how to weave together various Crocoblock tools to tackle a big project. We’re going to break down a seemingly huge task into smaller, more manageable chunks. By doing this, not only do we make the project more approachable, but we also get a chance to explore the inner workings of Crocoblock plugins. You’ll learn how to adapt and manipulate these tools to fit the needs of your project. So, let’s dive in and see how we can make these tools work for us.
Table of Contents
- The Scope of Work
- Adding Initial Data
- Setting Up Listings as Filters for Another Listing
- Putting It All Together on the Front End
- FAQ
- Bottom Line
The Scope of Work
In the previous article, I described a much simpler yet very practical use case. However, in this article, I will describe how to recreate a more complicated one with three listings, two of which work like filters.
This is what we will get as a result:
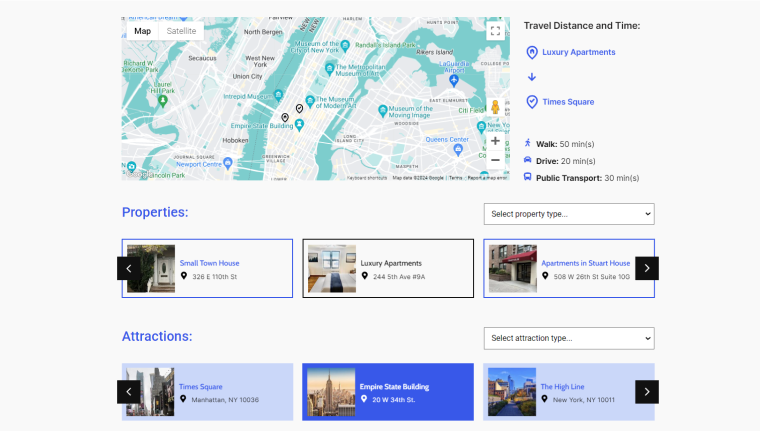
There are Properties and Attractions listings (two carousels on the bottom) and the Map listing to show the distance between these two on the map and how long it takes to reach one place from another by walk, car, or public transport.
Also, there are two additional Select filters for Property types (Townhouses and Apartments) and Attraction types (Buildings and Neighbourhoods).
This is how it works in the front end:
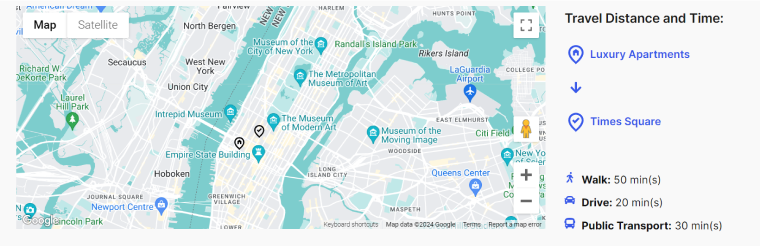
- The user clicks on an item in the Property listing (e.g., Luxury Apartment) and on an item in the Attractions listing (e.g., Times Square), and these two points appear in the “Travel Distance and Time” section in front of the corresponding icons (in blue color).
- The user sees a calculated amount of time it takes to get from one point to another.
- The user can filter Properties and Attractions by categories using the dropdown filter.
💡 Check the demo page here. The plugins to be used: JetEngine and JetSmartFilters.
⛏️The add-on for using listings as filters can be downloaded from GitHub.
NOTE
As of now, this functionality is available only for Elementor. However, in the future, it will be added as JetEngine’s add-on that supports Block Editor and Bricks.
Adding Initial Data
- First, let’s create two CPTs: Properties and Attractions. Each has two custom fields: Address (text field) and Coordinates (text field).
- Then, add one taxonomy to each CPT called Property Types and Attraction Type, respectively. For Properties, there will be categories called “Townhouses” and “Apartments,” and for Attractions – “Buildings” and “Neighbourhoods.”
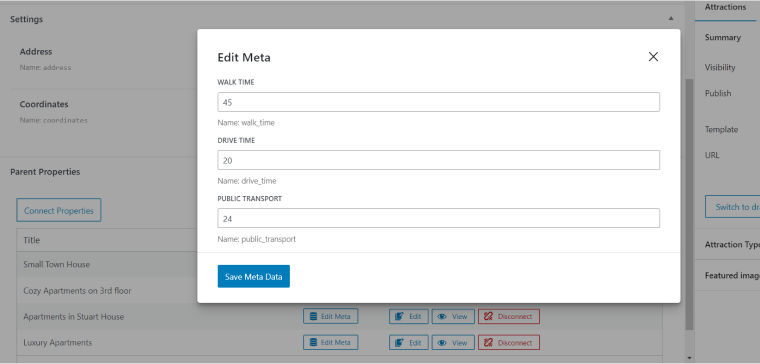
- Now, add relations between Properties and Attractions CPTs; use the “many-to-many” type. Add meta fields to this relation, called “Walk Time,” “Driving Time,” and “Public Transport.” They can be used to indicate the time it takes to get from any property to any attraction.
- Don’t forget to activate “Register controls for parent object” and “Register controls for child object” toggles.
And now, remember to fill out these meta fields. They will be available in the editing interface of both Attractions and Properties.
Displaying basic listings and filters on the front end
Before moving on to the complex tasks of our project, let’s finalize the simple ones and display Properties and Attractions with their simple filters on the front end.
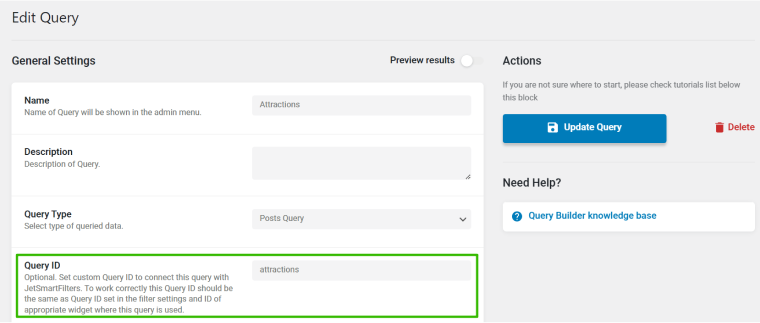
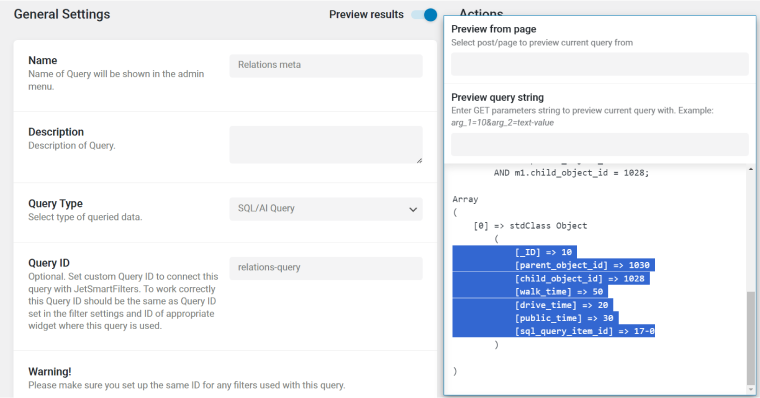
- Go to JetEngine > Query Builder, and create custom queries for future Properties and Attractions. Name the custom queries “Properties” and “Attractions” respectively.
❗ It’s extremely important to add query IDs for both queries. Otherwise, the filters will not be applied.
- Go to JetEngine > Listings, and design listings with corresponding “Query builder” sources for Properties and Attractions CPTs.
- Go to JetSmartFilters > Add New and add a Select filter for Properties CPT with the data source “Taxonomies” with the “Property Type” taxonomy. Repeat the same for the Attractions CPT and the “Attraction Type” taxonomy.
- Now, display Properties and Attractions listings on the front end using the Listing Grid widget. In CSS ID, assign the same IDs you’ve added for the Query (step 1) to the containers.
- Add JetSmartFilters “Select” filter widgets for Properties and Attractions. Select the corresponding filters as a source and JetEngine as a provider. Also, add the Query IDs of the listings to be filtered.
Now, you can see the two listings and their filters. For now, you can close this page, and let’s move on to the more complicated part of the project to make these listings work as filters and display the travel distance and time between two points on the map and the travel time.
Setting Up Listings as Filters for Another Listing
Fetching data for Travel Distance and Time block
Which Crocoblock tool should I use to create the “Travel Distance and Time” block? This block displays filtered dynamic content, and JetEngine has a tool for fetching such things: Listing. Yes, in this case, it will consist of just one item and look like an ordinary page section; however, it will be a listing under the hood.
How to fetch data for this block
Again, which Crocoblock tool shall be used to fetch and filter data for this listing? JetEngine has a universal tool for this: Query Builder and its SQL query type.
⛏️ Use this gist with the SQL query I used.
It may look scary at first glance, but let’s look at this query in parts, and it will become clear that there is nothing overly complicated there.
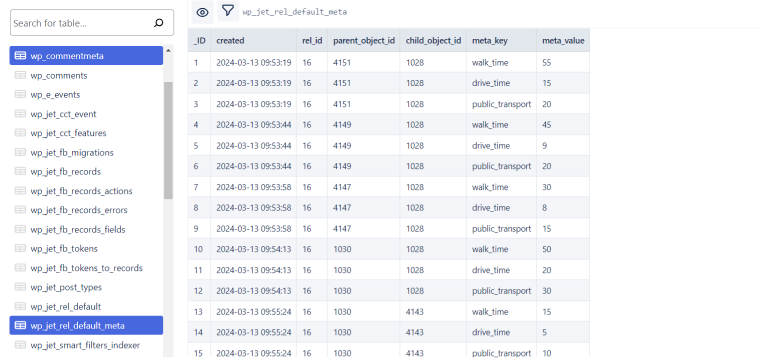
First, let’s see what we need to fetch in the query. We need the relevant Properties ID and Attractions IDs, as well as meta field values from their relation. This data is stored in the {prefix}_jet_rel_default_meta database (or in the {prefix}_jet_rel_{relation_ID}_meta if you chose the “Register separate DB table” option in the relation settings).
Second, we need to collect values of different meta fields for each pair of Properties ID + Attractions ID. SQL has a JOIN clause for such purposes (there are different variations, and I will use INNER JOIN).
So, let’s analyze the SQL query, taking into account this information, and explain it in simple English.
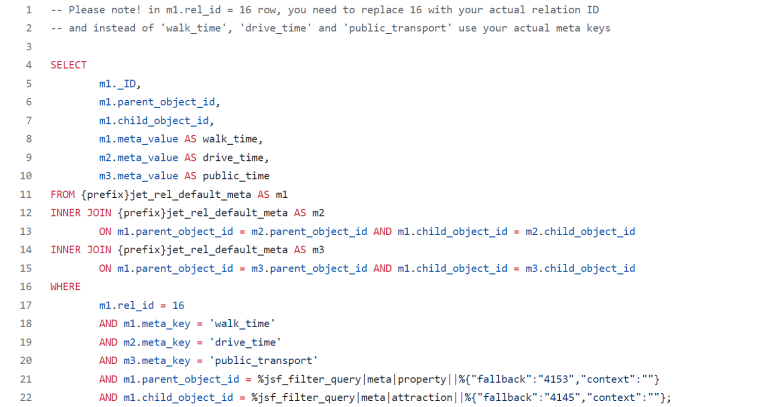
In short, this query retrieves specific meta values (‘walk_time’, ‘drive_time’, ‘public_transport’) related to a particular rel_id (16) and parent_object_id and child_object_id values.
Let’s break it down into three blocks. In the first block, I specify what should be selected; in the second one, I specify where to take this data from; in the third, I specify conditions for selecting specific rows from the database table.
Let’s start from the second block to make it more clear:
- First block (lines 1-7):
The SELECT statement specifies the columns to be retrieved in the result set. It selects the _ID, parent_object_id, and child_object_id columns, as well as the meta_value column, named walk_time from m1 table, drive_time from m2, and public_time from m3.
What are m1, m2, and m3? They are aliases for DB tables, and we could use a similar query to retrieve data from three different tables. But we have all our data stored in one table – {prefix}_jet_rel_default_meta. However, it’s not a problem, and in lines 8, 9, and 11, I assigned these three aliases to the same table in order to perform three runs through the database to get walk, drive, and public time values. - Second block (lines 8-12):
I took data from the {prefix}_jet_rel_default_meta table (aliased as m1 in line 8) and added the data from the same table (m2) to it.
INNER JOIN is used here. It means that we combine two DB tables that have matching values in both of them, and specify the column that should match.
For example:
ON m1.parent_object_id = m2.parent_object_id AND m1.child_object_id = m2.child_object_id
means that in both m1 and m2 tables the parent_object_id must match AND in both m1 and m2 tables child_object_id must match.
To join a third table, I have to perform the INNER JOIN again, which is why we have the m3 alias.
We have only one table – {prefix}_jet_rel_default_meta – where we take all the values from but treat it as three different ones by using aliases.
As a result, we have the walk_time, drive_time, and public_time values retrieved for unique combinations of the Properties ID + Attractions ID pairs. - Third block (lines 13-19):
As I don’t need all the information retrieved by the commands above, only records from the Properties–Attractions relation (as more relations may exist on the website), it is specified in line 14: m1.rel_id = 16.
You can find your ID in JetEngine > Relations > {your relation}; it will be shown in the URL arguments:
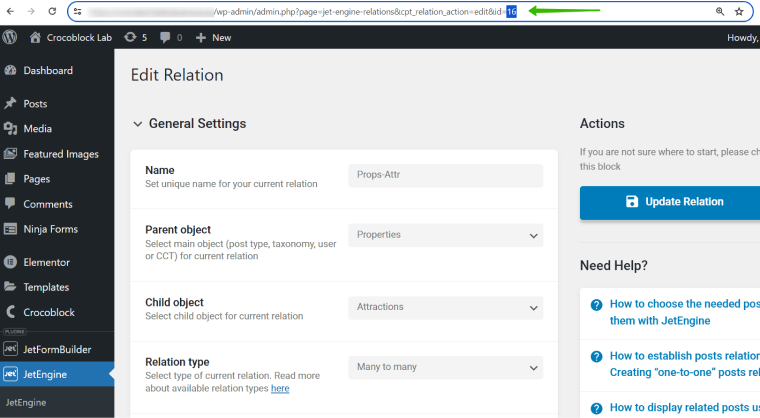
The m1 prefix means that it’s a condition for a table with m1 alias. Moreover, from this table, we only need rows with the value of meta field walk_time (using m1.meta_key = ‘walk_time’), a drive_time from m2 (using m2.meta_key = ‘drive_time’), and a public_time from m3 (using m3.meta_key = ‘public_transport’).
If we stop here, in line 17, we’ll get a set of travel time data for all the Properties + Attractions pairs:
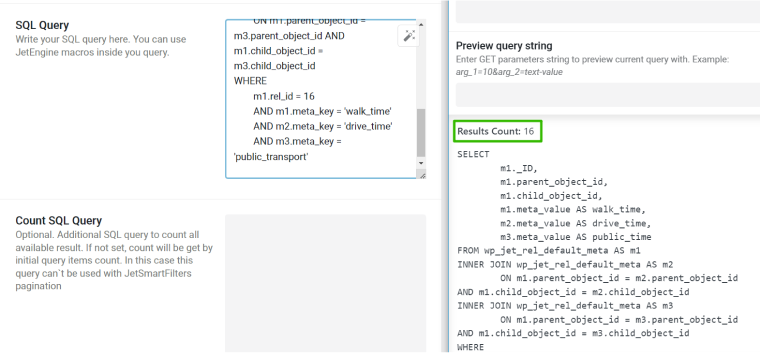
But we don’t need it. Instead, we want the information for the particular Property + Attraction pair selected in filters. To implement it, I’ve added the particular conditions for parent_object_id and child_object_id.
To pass values from the current filter request to these conditions, I used a special macro, which I describe in the next section. Also, this part of the condition guarantees that we will always get 1 result (or 0) since there can only be one parent_object_id and child_object_id pair in a given relation.
How to pass selected Property and Attraction from filter to query?
Now, when the query is ready, the next step is to connect it with filters, as we will have two listings (Properties and Attractions) work as filters for the “Travel distance and time” listing.
But first, let’s discuss the filtration logic under the hood. It works like this: any filter that works on the front end sends a request to the back, which contains filter values selected by the user.
Next, the filter plugin converts them to a standard form and passes them to the query for processing. Each query processes a standardized filter request and passes the selected values to the corresponding query parameters. In the case of SQL query, this logic does not work out of the box since there are no “parameters” in the SQL query, only a string with an SQL query.
This is where JetEngine macros come in handy. A macro is a dynamic line element; during processing, it will be replaced with the corresponding value according to the settings.
In our case, we need this particular macro – JetSmartFilters Query (%jsf_filter_query||||%) – described here. It returns the value of the selected query variable for the current filter request.
In our case, we need to receive two query variables from the filter request – for property and attraction. To make it work, first create filters. The filter type does not matter much in this case since we will further use the properties and attractions listings as UIs for these filters (I described it in more detail in this article). But to comply with the logic, it is advisable to select the type of filter that corresponds to the behavior at the front, in this case, Select or Radio. As a listing source, select “Manual,” but without any options because we will use listing items as options.
However, it’s important to set query variables for both filters:
For now, these filters can be set aside; we will use them in the final section of this guide.
Macros
Now, let’s configure the macros to transfer the query variables of the created filters to the SQL query. The JetEngine > JetEngine > Macros Generator tab will be helpful for this.
We will create two macros: one for Attractions and one for Properties, with the relevant query variables. I will create the one for Attractions on the screenshot below.
Take into account one thing specific for filters: if we specify a simple query variable for the filter, as in the video above, it goes as a meta field to the meta query because, for default filters, any custom query variable is a meta field. Therefore, when setting up a macro, we need to specify the appropriate variable type (Meta field):
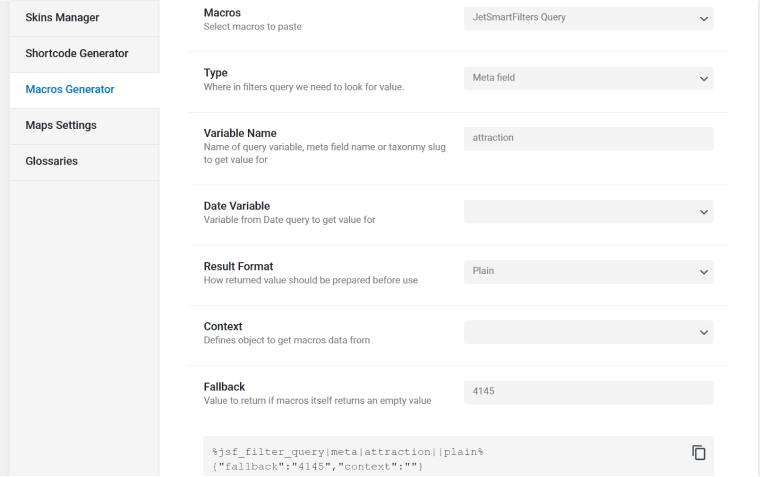
Another important point here is that before the filters work for the first time, we need to show something to the user so as not to destroy the integrity of the interface. That’s why for property and attraction, add fallback – the ID of any post (from Attractions CPT) that the macro returns before the filters work for the first time (4145 in my example on the screenshot above). Now, pastу this code to the SQL query instead of my macro on line 18 of the gist code.
Repeat all the actions for the Property CPT.
Retrieving coordinates for Property and Attraction on the map
For our project, it’s also important to show selected properties and attractions on a map so that users can navigate easily. To implement this, the Crocoblock suite offers two tools: Advanced Map widget by JetElements (a simple one) and JetEngine Map Listing (more complicated). In theory, this case can be implemented using Map Listings, but the initial purpose of this functionality is somewhat different: to display a dynamic set of markers on the map and, when you click on each marker, load detailed information about the object in a format that the user configures.
For our project, we always need only two markers – property and attraction. We will also fetch the object titles. The Advanced Map widget, in combination with dynamic tags, can solve this task quite easily.
As we store coordinates in the Coordinates meta fields (created in the beginning), it’s enough to retrieve these coordinates and the post title for the text marker on the map inside the listing with SQL query. Well, this is where this problem arises – as you know, we can only get the IDs of the corresponding posts in the query results, but not their meta values.
It seems like the solution should be somewhere close, as we have a post ID and a meta field to retrieve data. And it is, but you will need to add a little custom code.
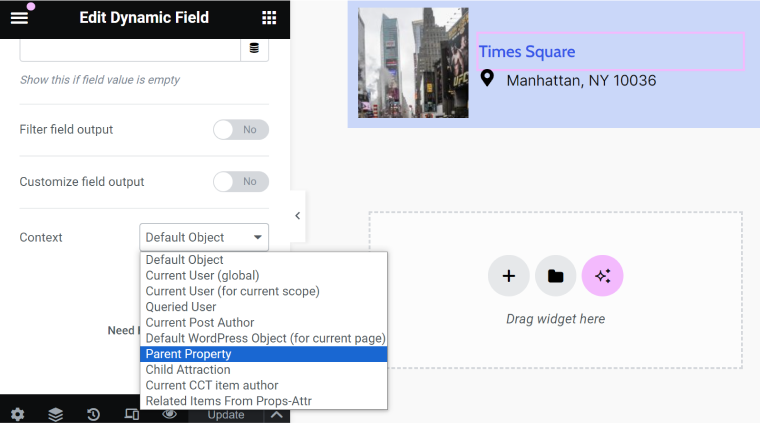
In this code, I used a cool feature by Crocoblock, which I consider very important but, unfortunately, is not very widely covered in the documentation yet, so it is not used as often as it could be. This feature is the context.
For most dynamic data, we can additionally specify the context from which to obtain this data:
What does this concept mean? When we receive some data, it is mostly obtained from some object, be it post, user, term, taxonomy, etc.
By default, JetEngine tries to determine which object to get data from, depending on where you use some kind of dynamic widget or tag. This could be the current listing item, the object of the current post, the global queried object of WordPress core, etc.
The context option allows you to manually specify another object to receive data, regardless of what JetEngine itself has defined.
So, for example, on the post page, we can display data about the post author, using the same widgets as for the post itself but changing the object to Current Post Author.
The same logic and approach should be applied in our case; the difference is that instead of the object, we use Properties or Attractions posts.
⛏️ This is the code to be used: gist with custom code.
Here is a short explanation of this code:
- The first function is used to register the custom contexts to retrieve data from the current Property and Attraction.
- The second and third functions separately process each of the selected contexts and return the corresponding object.
- To reduce the number of additional operations in the dashboard and simplify data access, I did a trick with the coordinates in line 41. I get the coordinates right with the post object and write them to the post_status property of the fetched post (it can be any other property that is not used). This is done in order to immediately access these coordinates through the dynamic Current Object Field tag.
Setting up the map on the front end
Let’s make a listing with a map and all the data. Go to JetEngine > Listings > Add new. Select Query Builder as a listing source and the query with SQL and macros we’ve been creating. For the map, use the Advanced Map widget by JetElements. We need to put two pins there, one for Properties and one for Attractions.
To display a pin of the Property, use:
- Address type – Coordinates;
- for the Pin Address Coordinates, use Dynamic Tag (the database icon) > Current Object Field > Post status (field) with a “Parent Property” context;
- for the Pin Address and Pin Description, use Dynamic Tag (the database icon) > Current Object Field > Title (field) with a “Parent Property” context;
For the second pin (to display Attraction on the map), use the same, but instead of the “Parent Property” context, choose the “Child Attraction” one.
Setting up dynamic fields for Travel Distance and Time block
The fields with Attraction and Property titles are displayed using the same logic as the items on the map.
To show walk, drive, and public transport travel time, use the Dynamic Field widget with corresponding object fields used from the query (in my case, this query is called “Relation meta”):
Putting It All Together on the Front End
Finally, let’s place the created Travel Distance and Time listing on the page, adding it to the listings we’ve added there in the beginning. Also, at this stage, let’s set up these listings to work as filters for the Travel Distance section.
The most important thing here is to remember to specify the right query IDs and Providers while setting the Listing as a Filter tab.
The query ID you specify in the CSS ID field must be the same as indicated in the Query Builder query, which is a source for this listing.
In my example, the query with the SQL has query ID “relations-query.” This query is a source for the listing with map and travel time information. When I put this listing on the front end, I assign “relations-query” as a CSS ID to the block.
Then, when setting up the Listing as a Filter tab for Properties and Attractions listings, I specify this ID as the query ID for the filter, so it will filter values in this object.
Let me show it:
A more detailed overview of setting up this add-on can be found in the Listing as Filter article.
FAQ
An SQL query is a command used to retrieve, insert, update, or delete data from a database. It allows users to interact with the database by specifying the operations they want to perform on the data. SQL queries are written using the Structured Query Language (SQL), a standard language for managing relational databases.
In WordPress, macros are small pieces of code or shortcuts that can be used to automate tasks or add functionality to your website. They are often used to simplify complex operations or to create dynamic content.
You can use the JetSmartFilters plugin and its Listing as a Filter add-on, demonstrated in this article.
Bottom Line
Using the Crocoblock suite and some creativity, you can definitely implement even the most complex tasks and build projects of any complexity.
In this guide, I showed how to use two JetEngine listings as filters for another listing and fetch the data from the meta fields belonging to the relation that connects these listings. Also, I demonstrated how to create pretty complex SQL queries for Query Builder with macros and make great use of the Context feature.
Hope it will be useful for your projects.


