How to Filter Posts by Author and Nicename
Learn how to enable additional sources for filtering, e.g., filter CPT posts by author (user ID), comments count, dates, and meta values, and filter some CPT posts using the JetSmartFilters Author & post type filter free add-on.
Before you start, check the tutorial requirements:
- Elementor (Free version), Block editor (Gutenberg), or Bricks
- JetEngine plugin installed and activated with the Custom Post Type (CPT) posts built.
If you have not done it yet, read the tutorial.
- JetSmartFilters plugin installed and activated
- Author & post type filter add-on for JetSmartFilters installed and activated.
Create a Filter for Authors (User ID)
Configure the filter settings
Head to the WordPress Dashboard > JetSmartFilters > Add New page to create a new filter. Next, enter a title to the filter in the Filter Name field and fill in the Filter Label and Active Filter Label fields (we insert the “Filter by Author” text in this case).
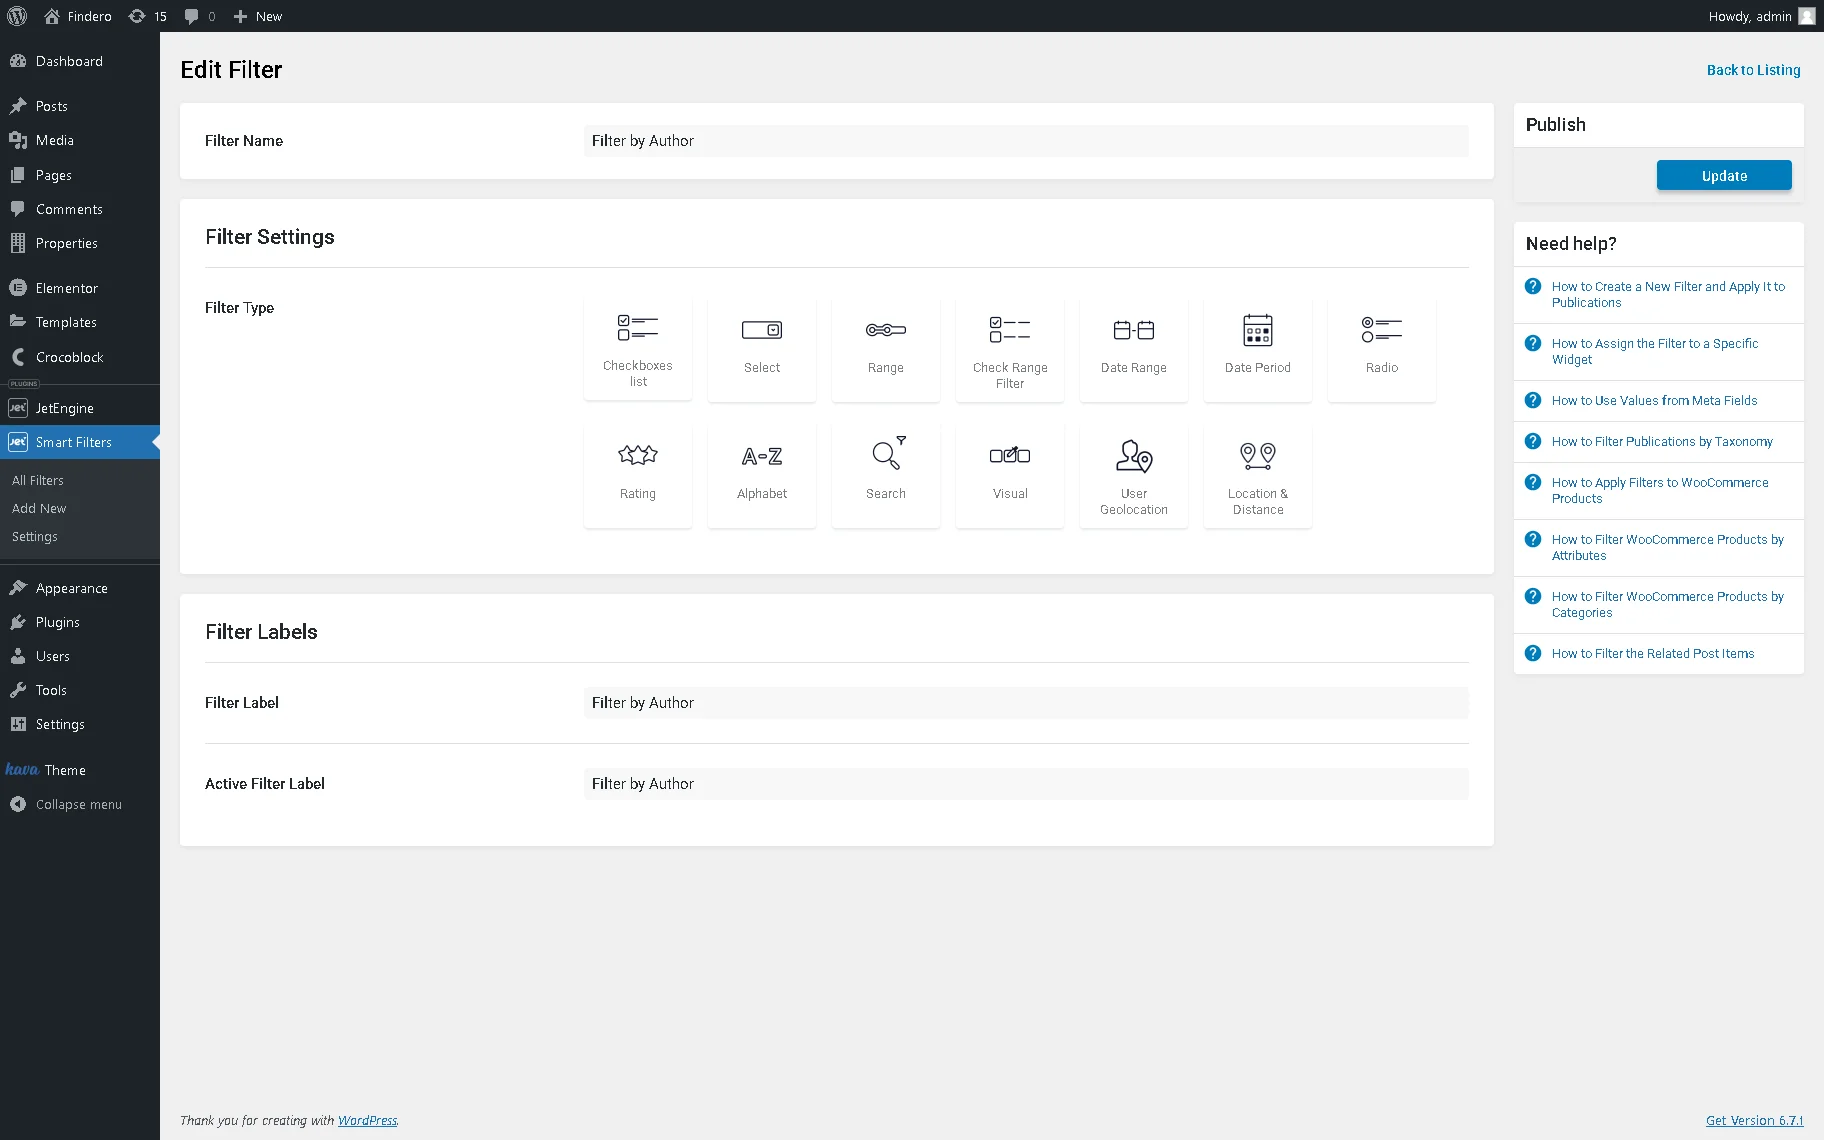
Then, move to the Filter Settings section and define the Filter Type by pressing the corresponding buttons. In this tutorial, we pick the “Checkboxes list” type, but you can use any desired option.
Read the Filter Creation Settings Overview to learn how to create different types of filters and manage their settings.
After that, scroll this page, select the “Manual Input” option as the Data Source, and click on the “+ Add New” button.

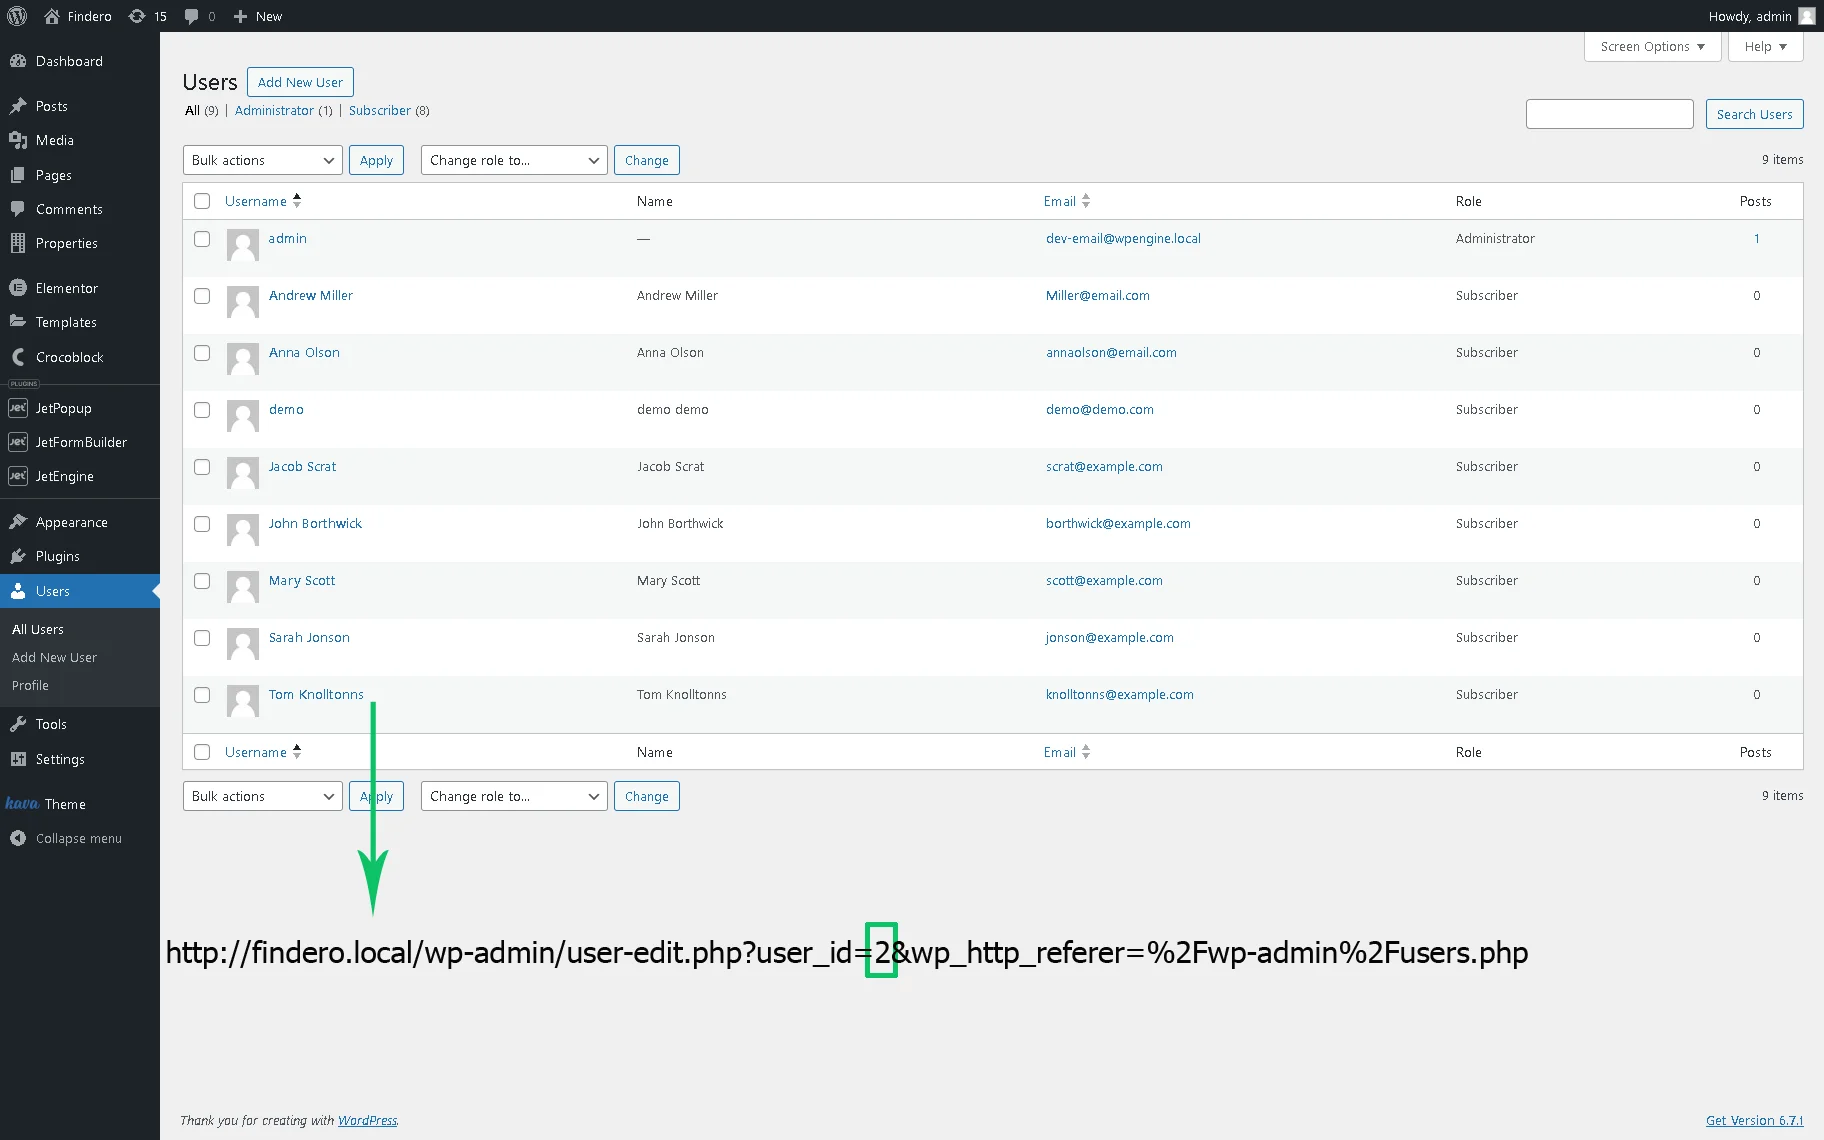
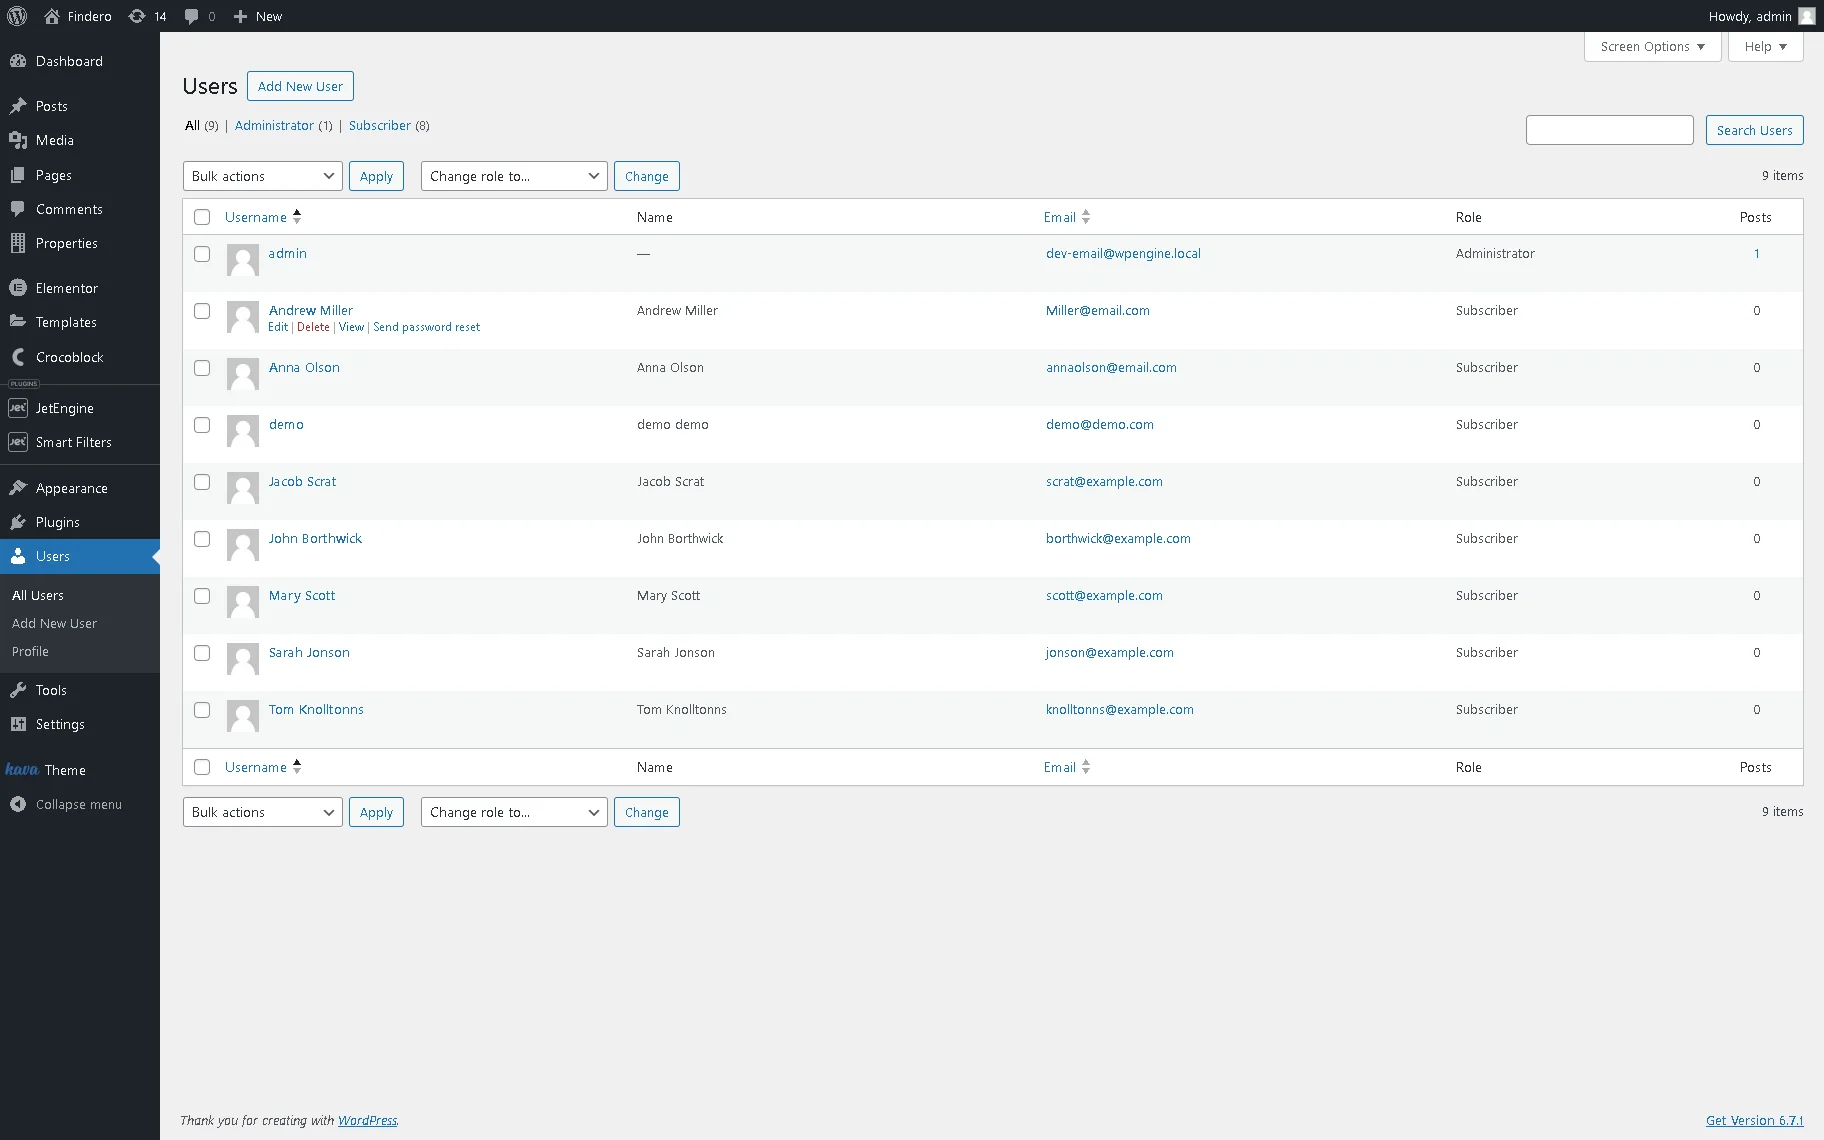
The Value field represents the user ID, which can be found in the WordPress Dashboard > Users > All Users directory. Hover over the user name to see their ID.
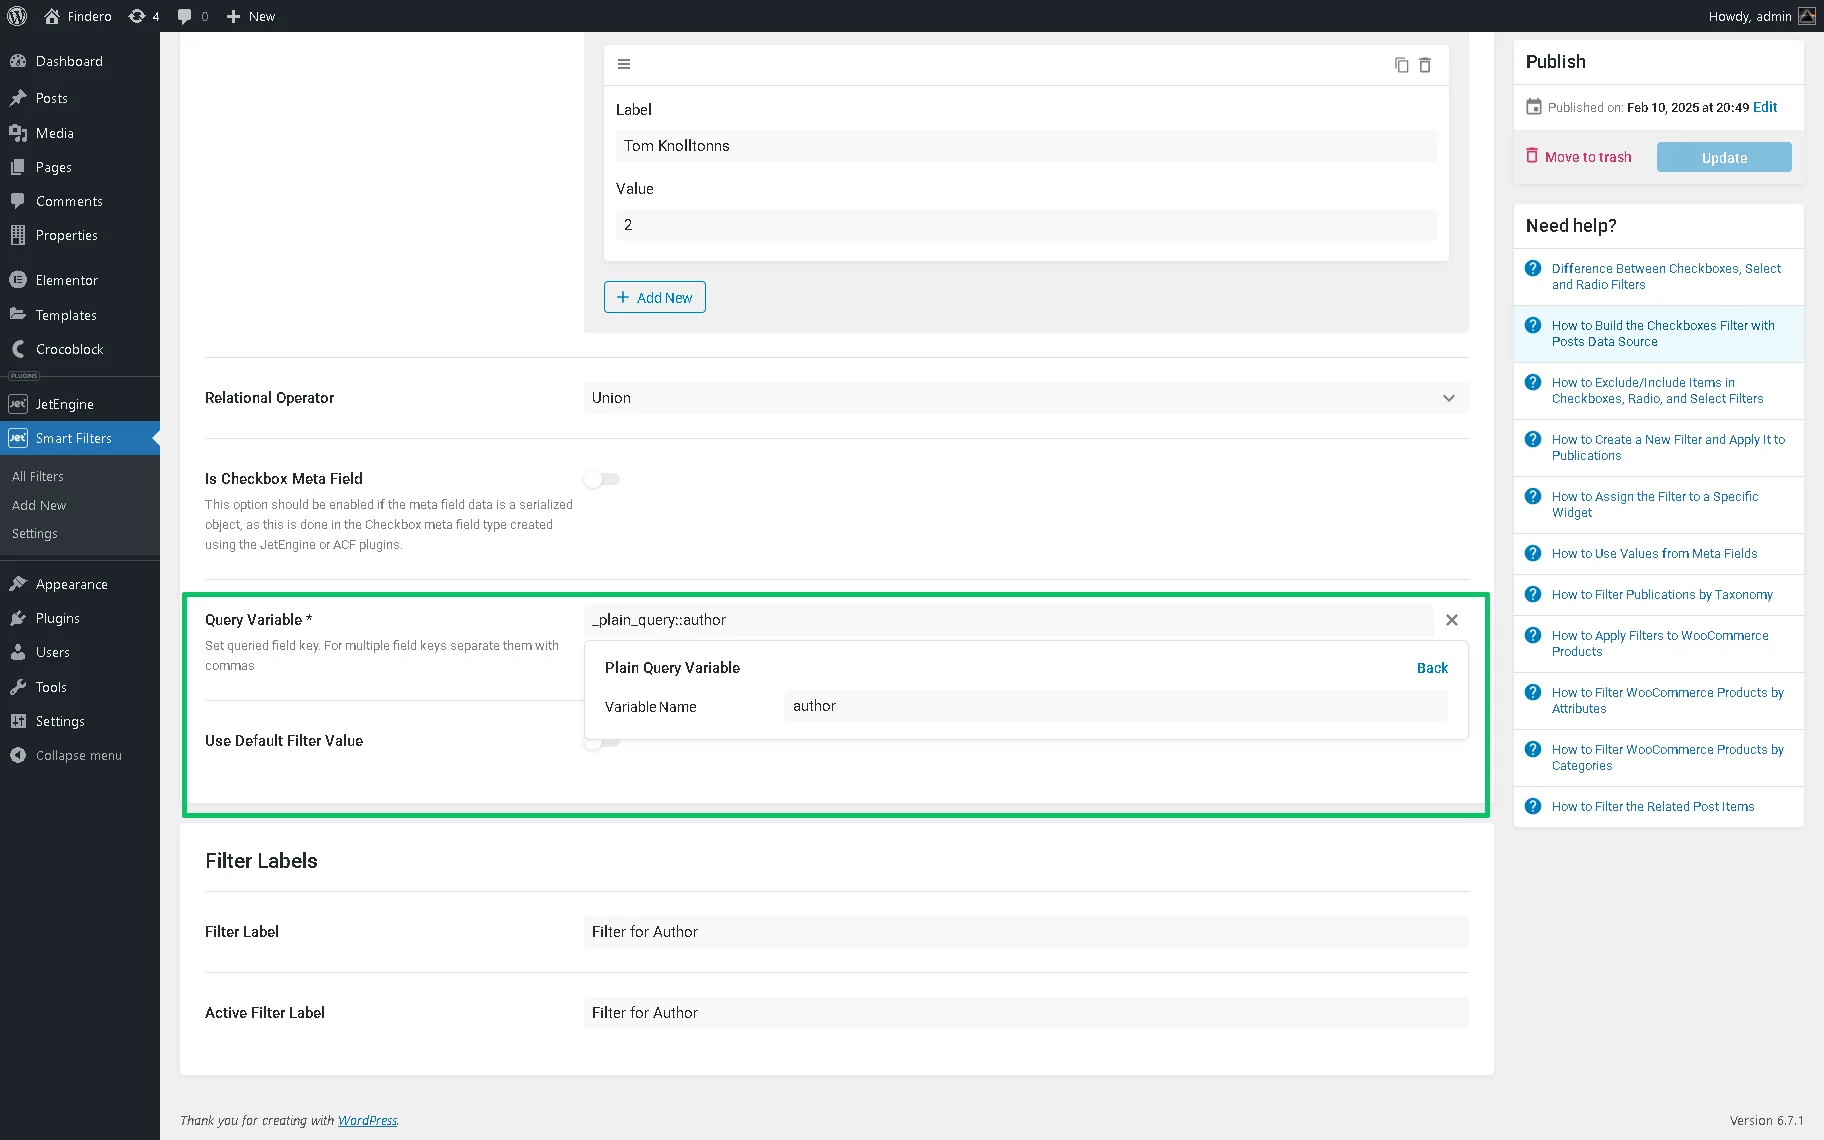
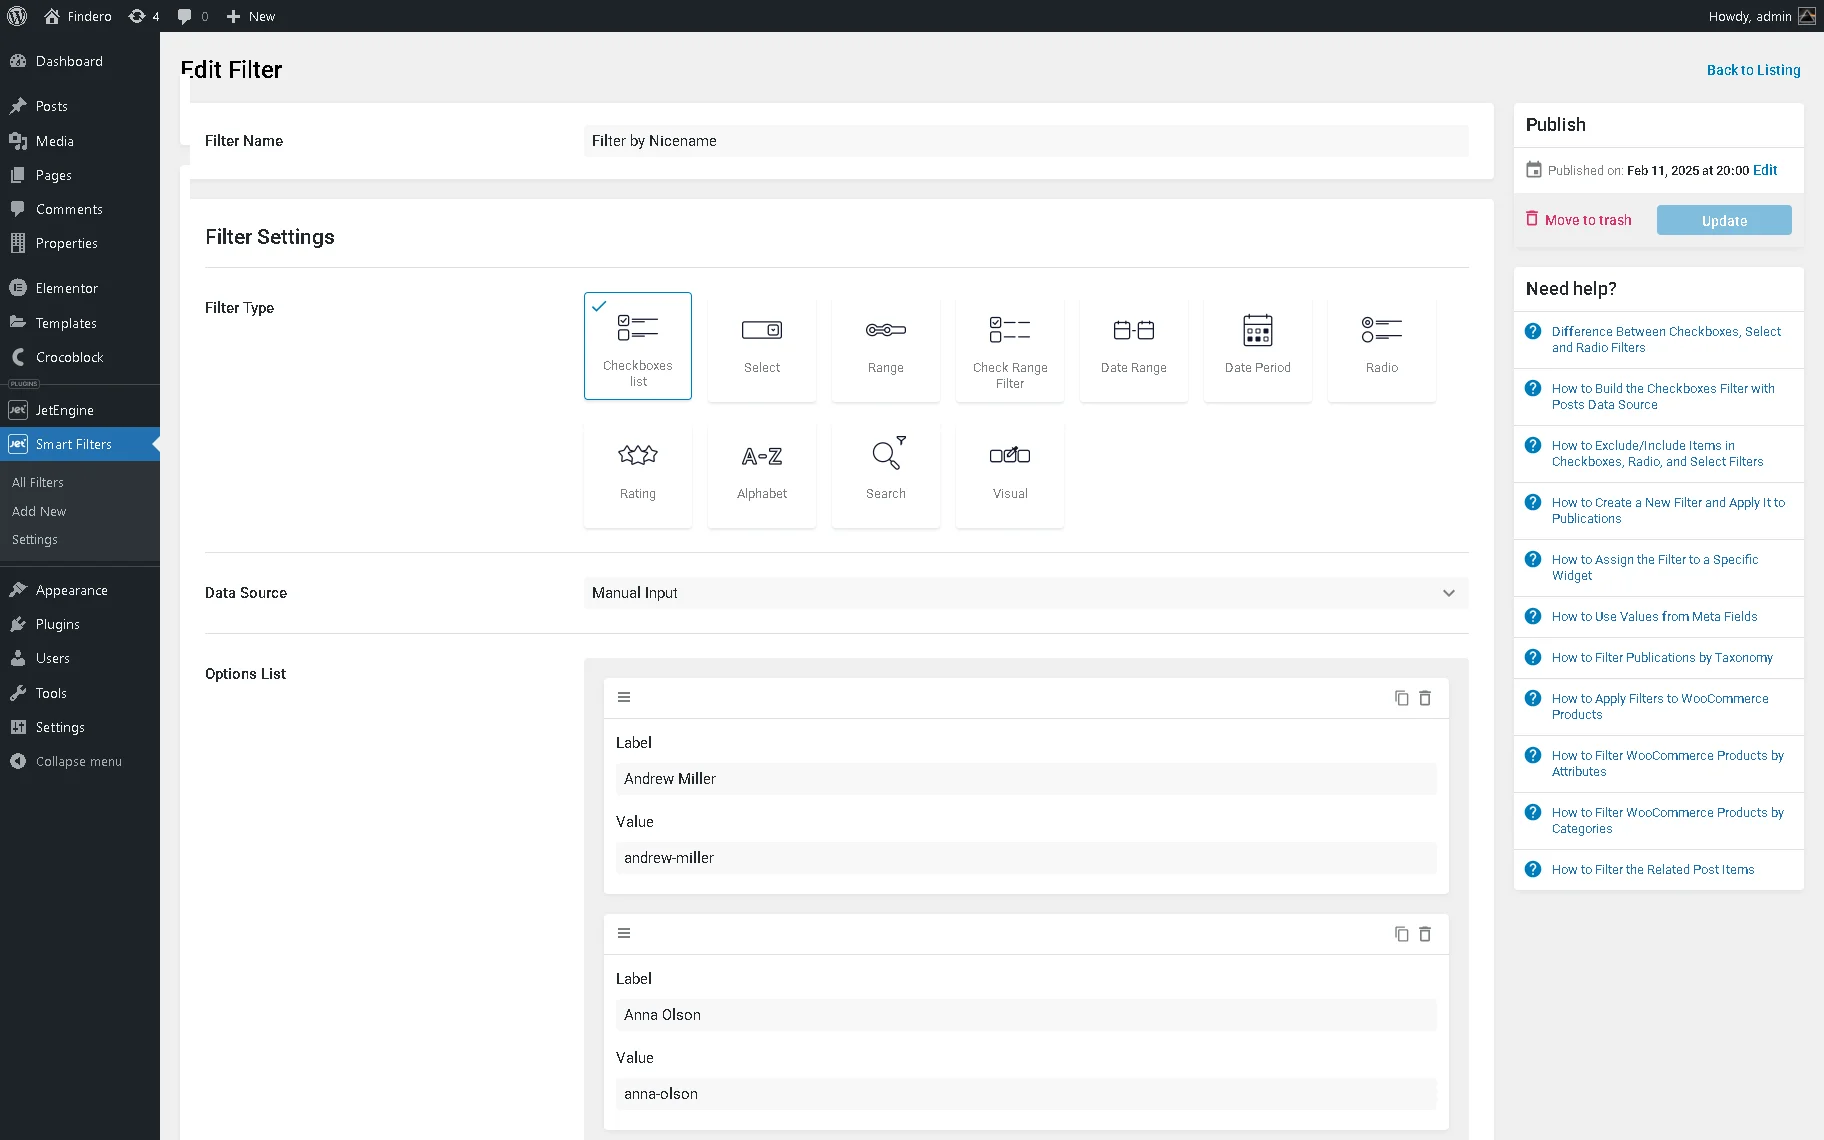
Return to the filter editor and fill in the needed ID. There is also a Label field where you can type the label to be displayed as an option. In this case, we add seven users and type their names in the Label fields and IDs in the Value fields.
Read the Checkboxes Filter Overview to learn how to use the Checkboxes Filter and configure its settings.
You can enable the Is Checkbox Meta Field option to filter data from the Checkbox meta field type.
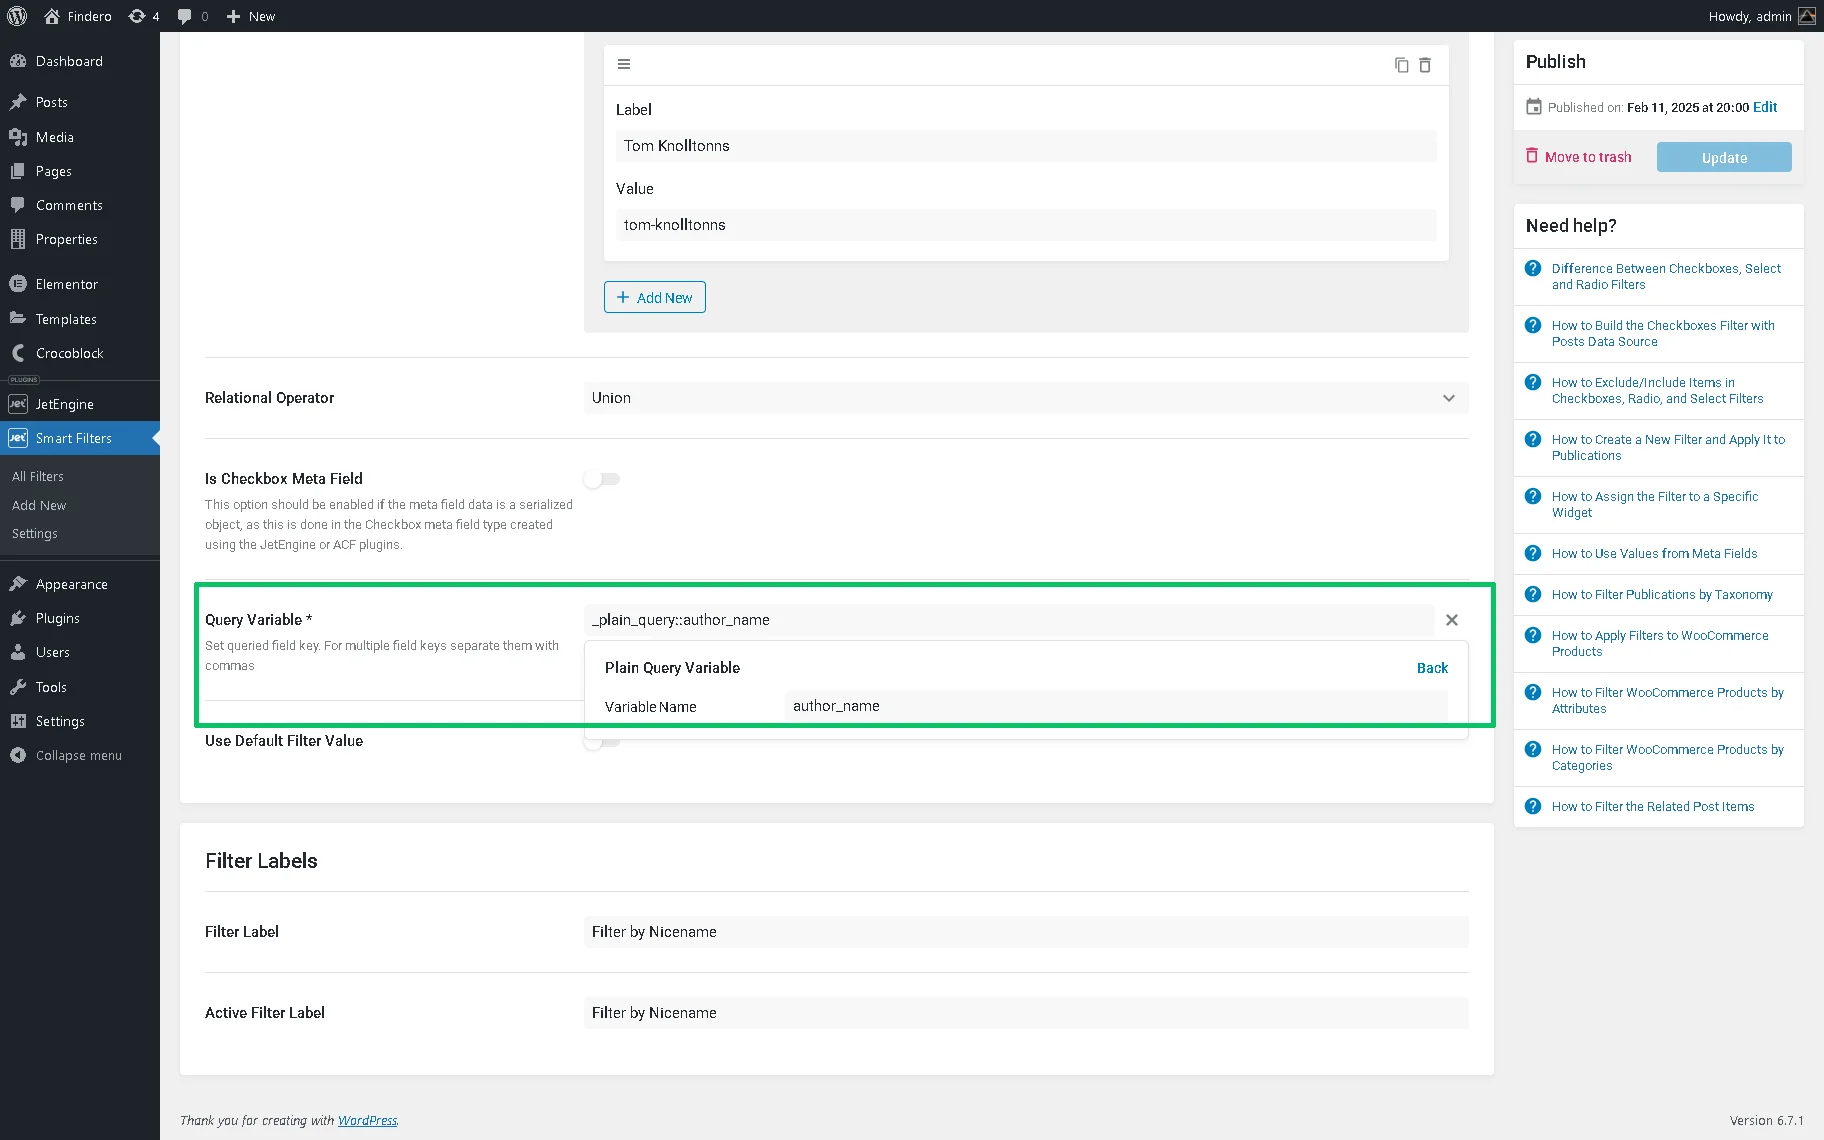
Head to the Query Variable field. Press the “dynamic tag” icon and select the “Plain Query Variable” option in the newly-appeared drop-down list. Then, put the “author” value in the Variable Name field. After that, the “_plain_query::author” will appear in the Query Variable field.
You can also set the predefined filter value if needed. Read the How to Set a Default Value for Filter tutorial to learn how to select metadata and taxonomies without using query strings and display the results as the initial state in the filter widgets/ blocks/elements.
Finally, move to the top of the Edit Filter page and click on the “Publish/Update” button.
Add the filter to the page
Proceed to the page where you want to place the filter; it can be edited either with Elementor, Block Editor, or the Bricks theme. In this case, we use Elementor.
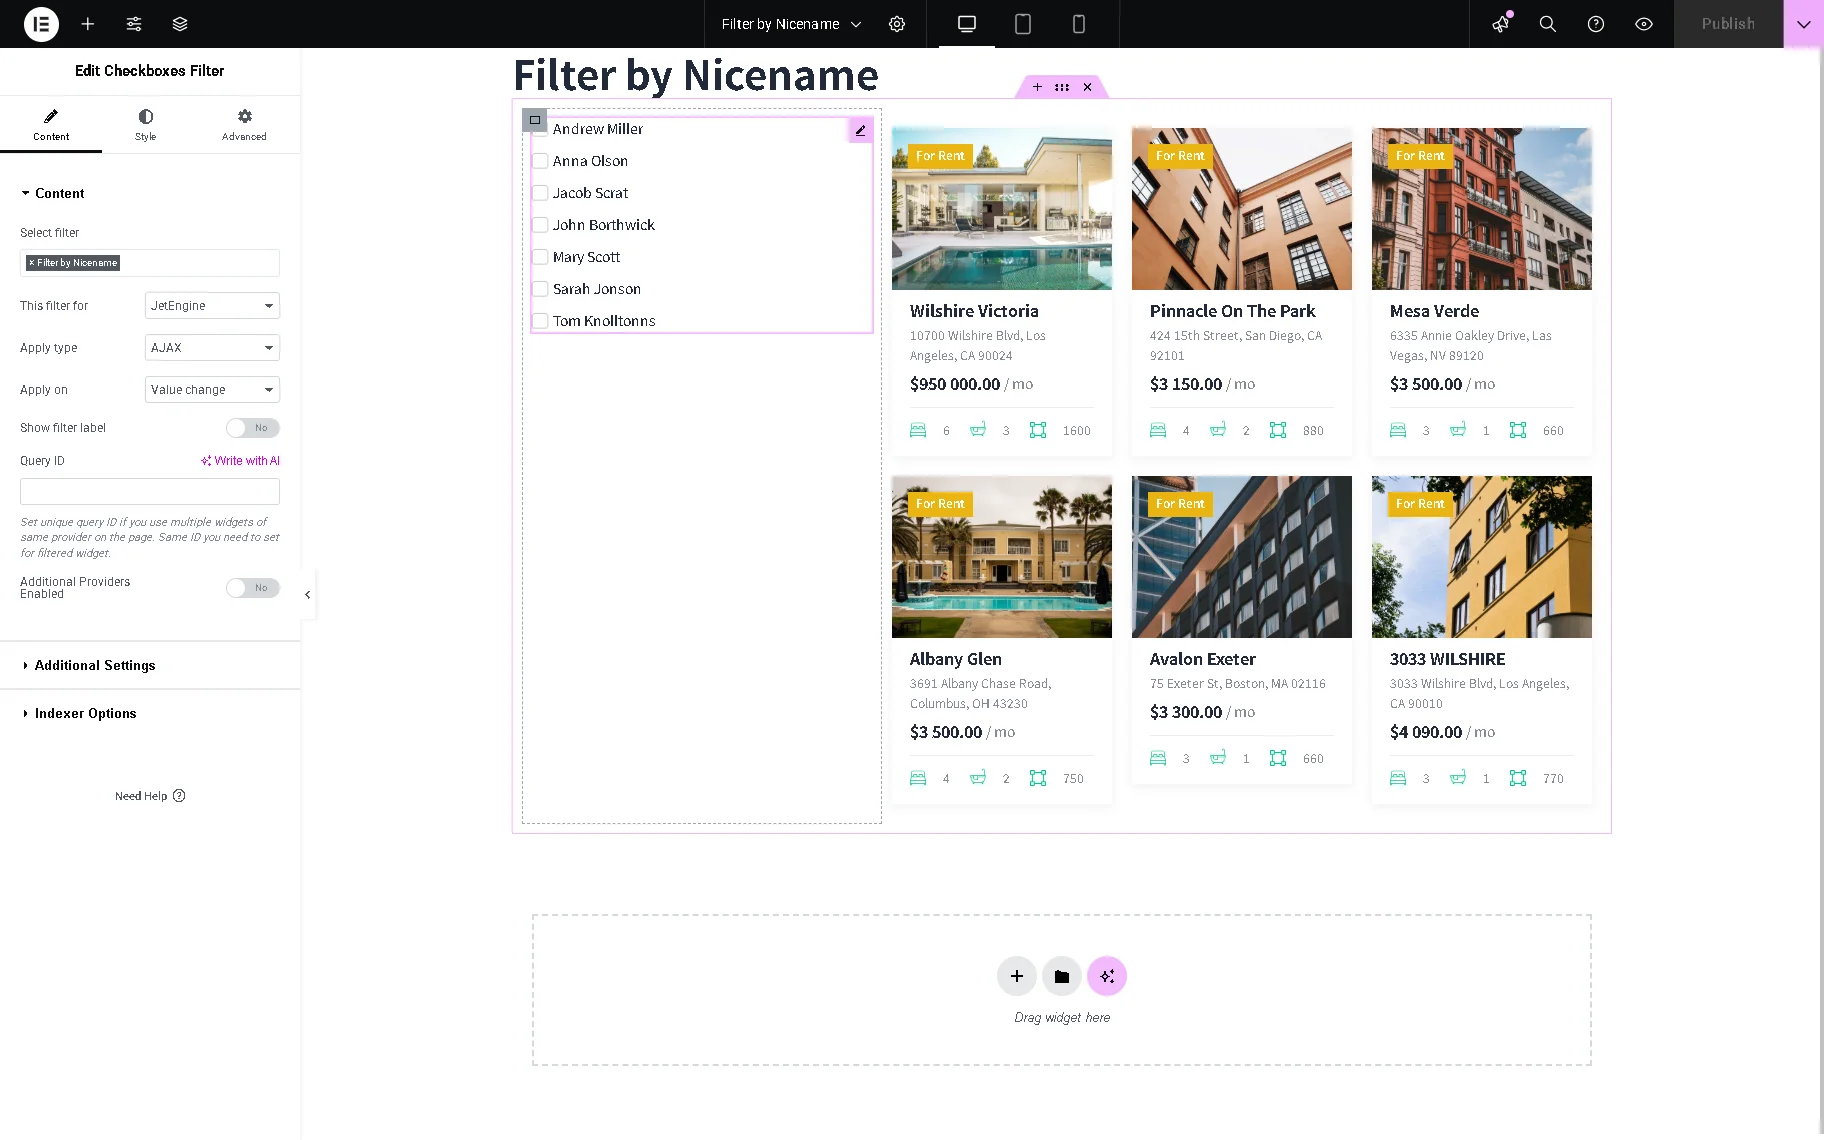
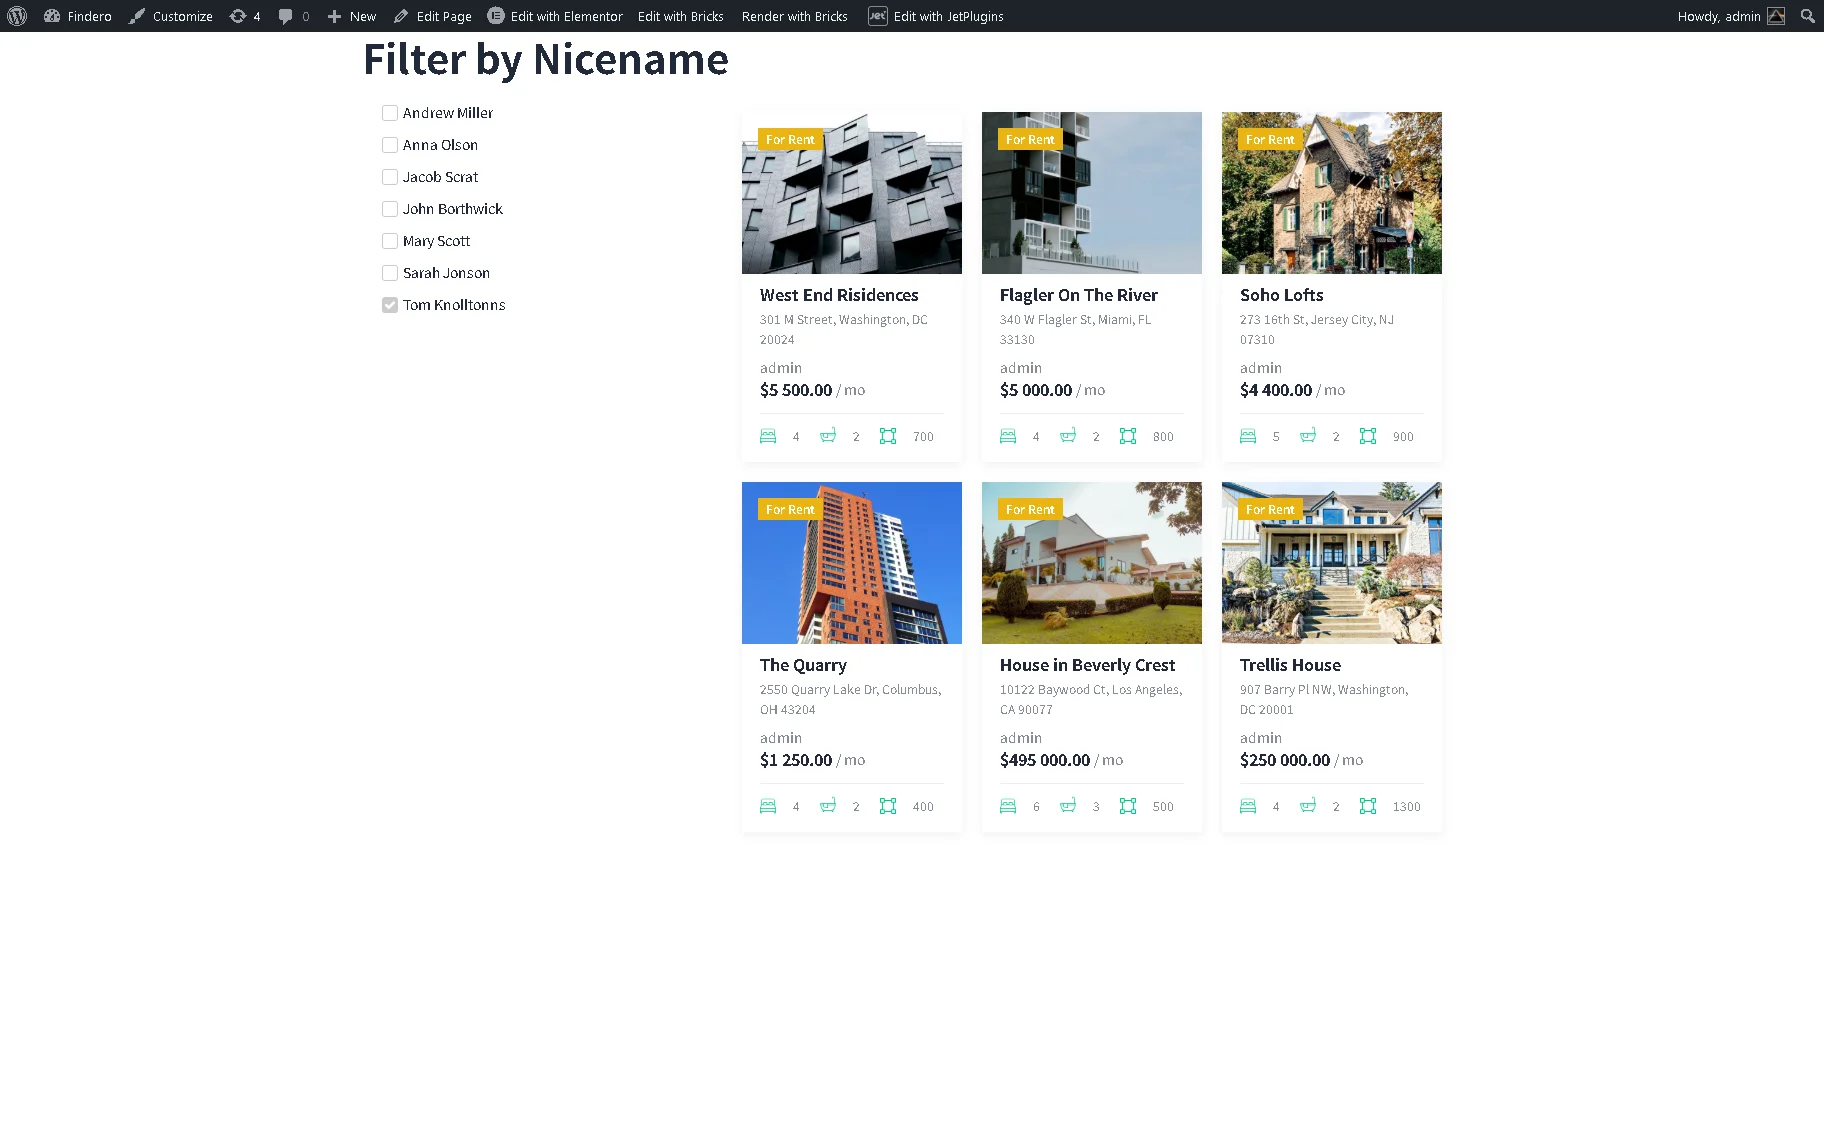
Select a widget corresponding to the filter you have created and add it to the page. In our case, we divided the page into two columns and inserted the Checkboxes Filter widget into the left column and the Listing Grid into the right one.
Type in the newly created filter title in the Select filter field and choose the filter provider in the This filter for drop-down list.
Customize other filter settings according to your needs.
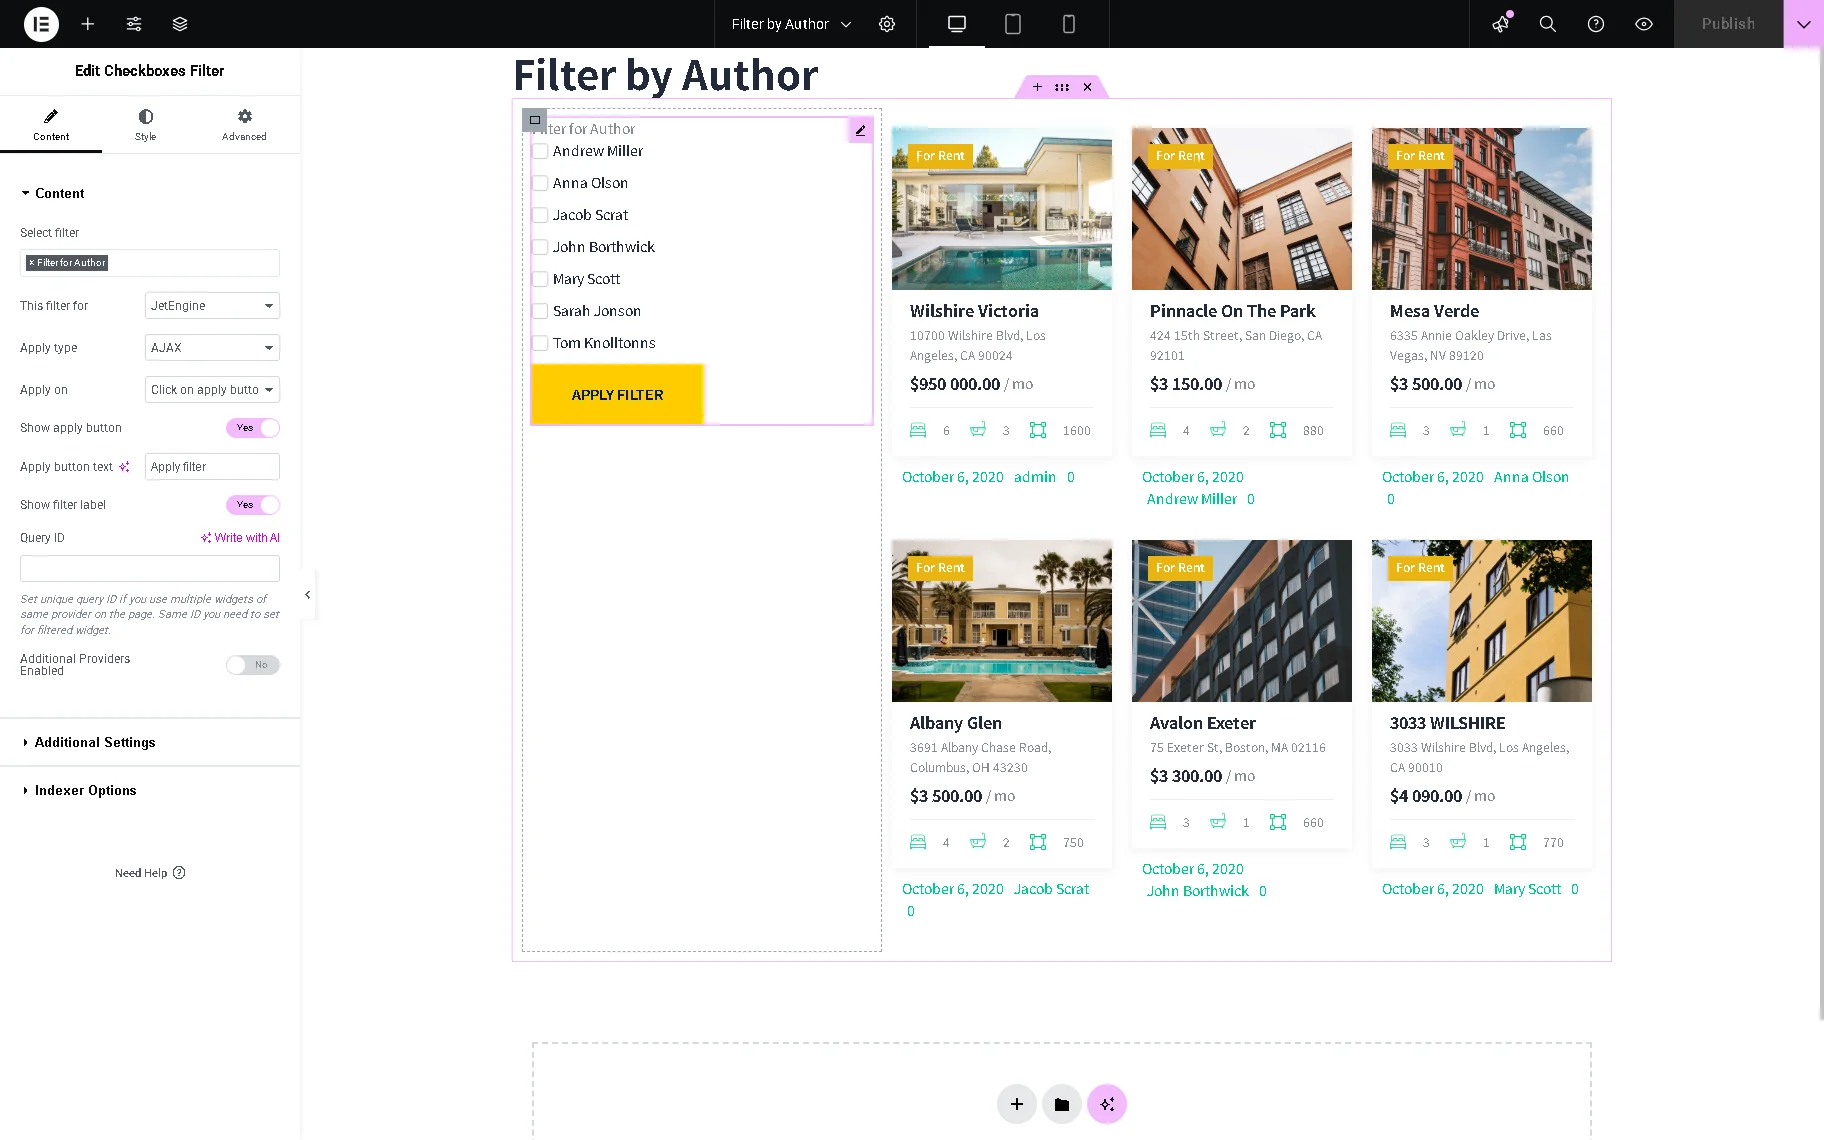
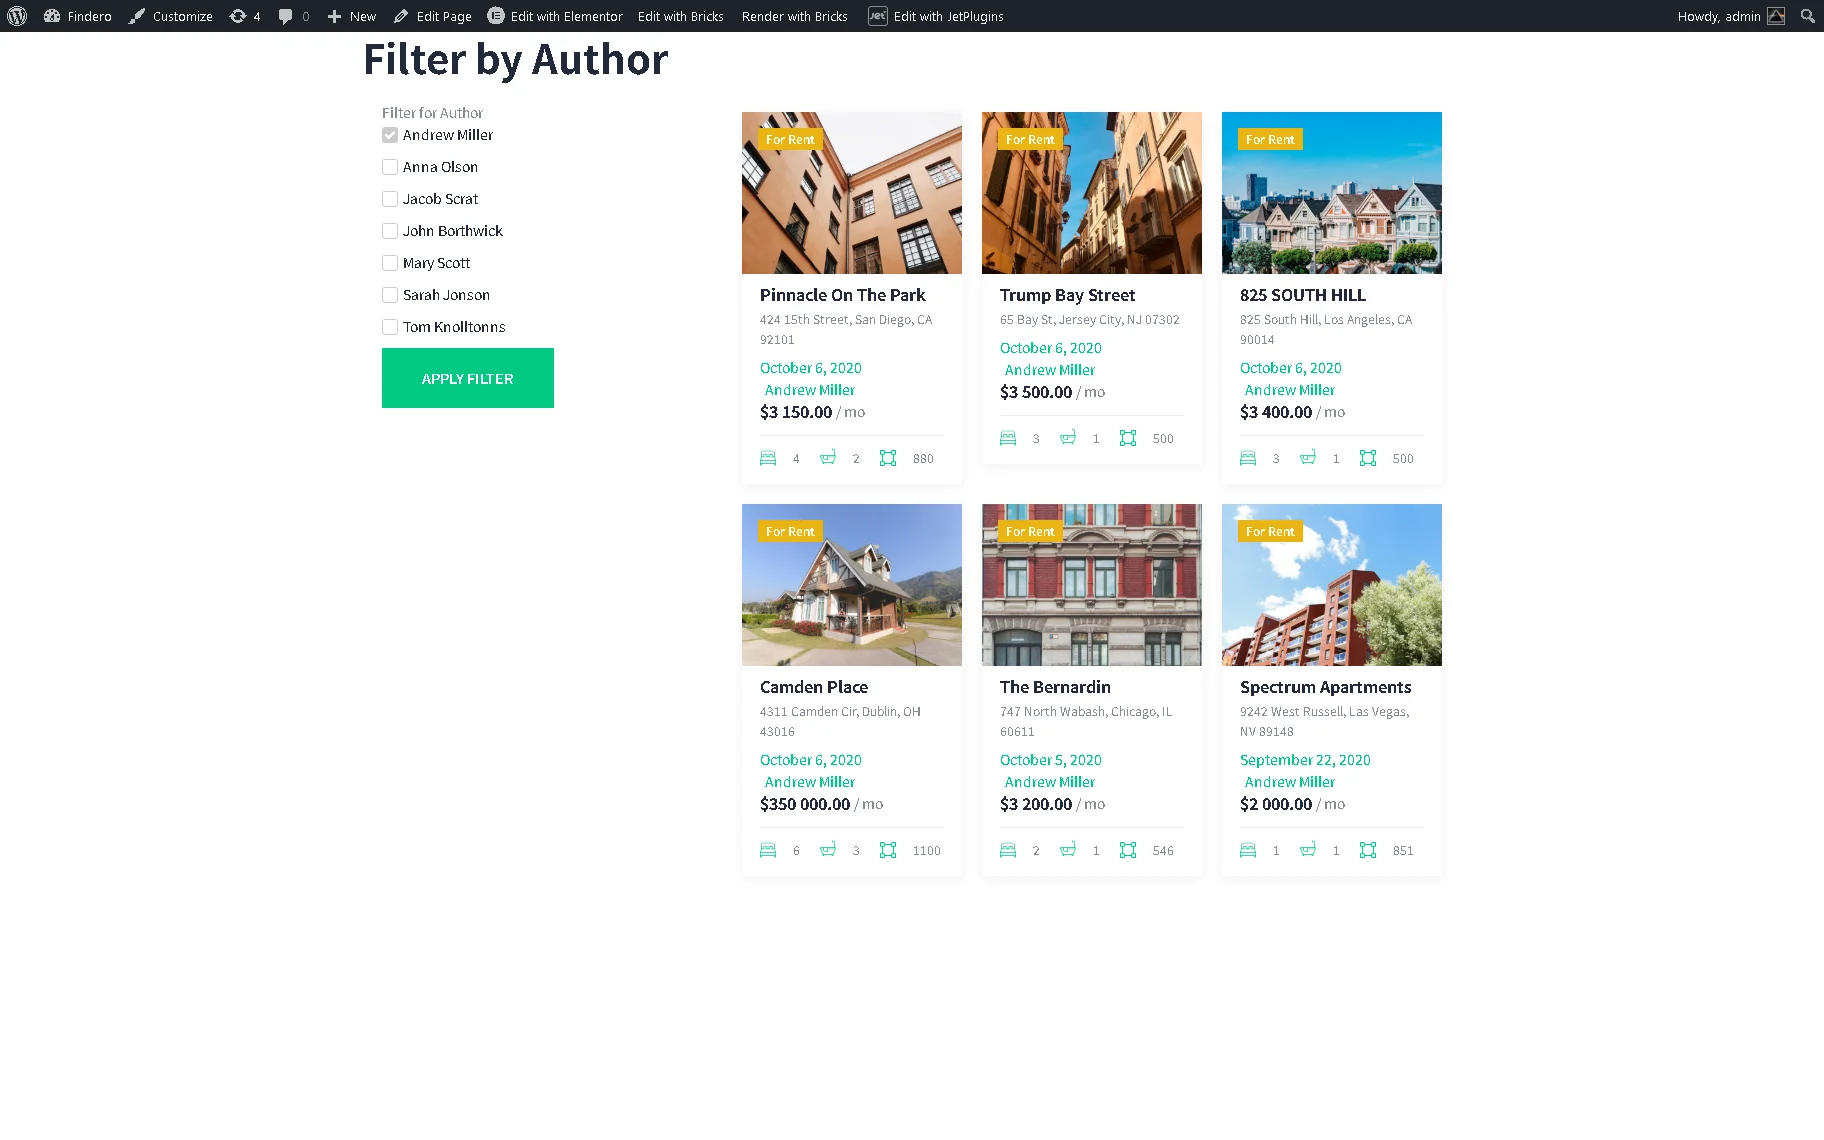
Click on the “Update” button. Move to the front end and check the results. Here, we select the needed author and press “APPLY BUTTON.” After that, the Listing Grid widget displays CPT posts referring to the specified author.
Create a Filter by “user_nicename”
Thus, if the user indicates their name during registration without special characters, it will also be used as the nicename, but in lowercase. So, if you use symbols in the login that cannot be used in the slug, they will not be displayed. For example, if a user chooses a “[email protected]” email as a login, the name will look like this: “testtest-com.”
The main difference between filtering by author and filtering by nicename is where you can take the Value displayed in the Options List.
Configure the filter settings
As in the previous case, head to the WordPress Dashboard > JetSmartFilters > Add New page to create a new filter. Next, enter a title in the Filter Name field and fill in the Filter Label and Active Filter Label fields (we inserted the “Filter by Nicename” text in this case). Then, select the Filter Type in the Filter Settings section (in this case, we chose the “Checkboxes list” type). After that, scroll this page, select the “Manual Input” option as the Data Source, and click on the “+ Add New” button.
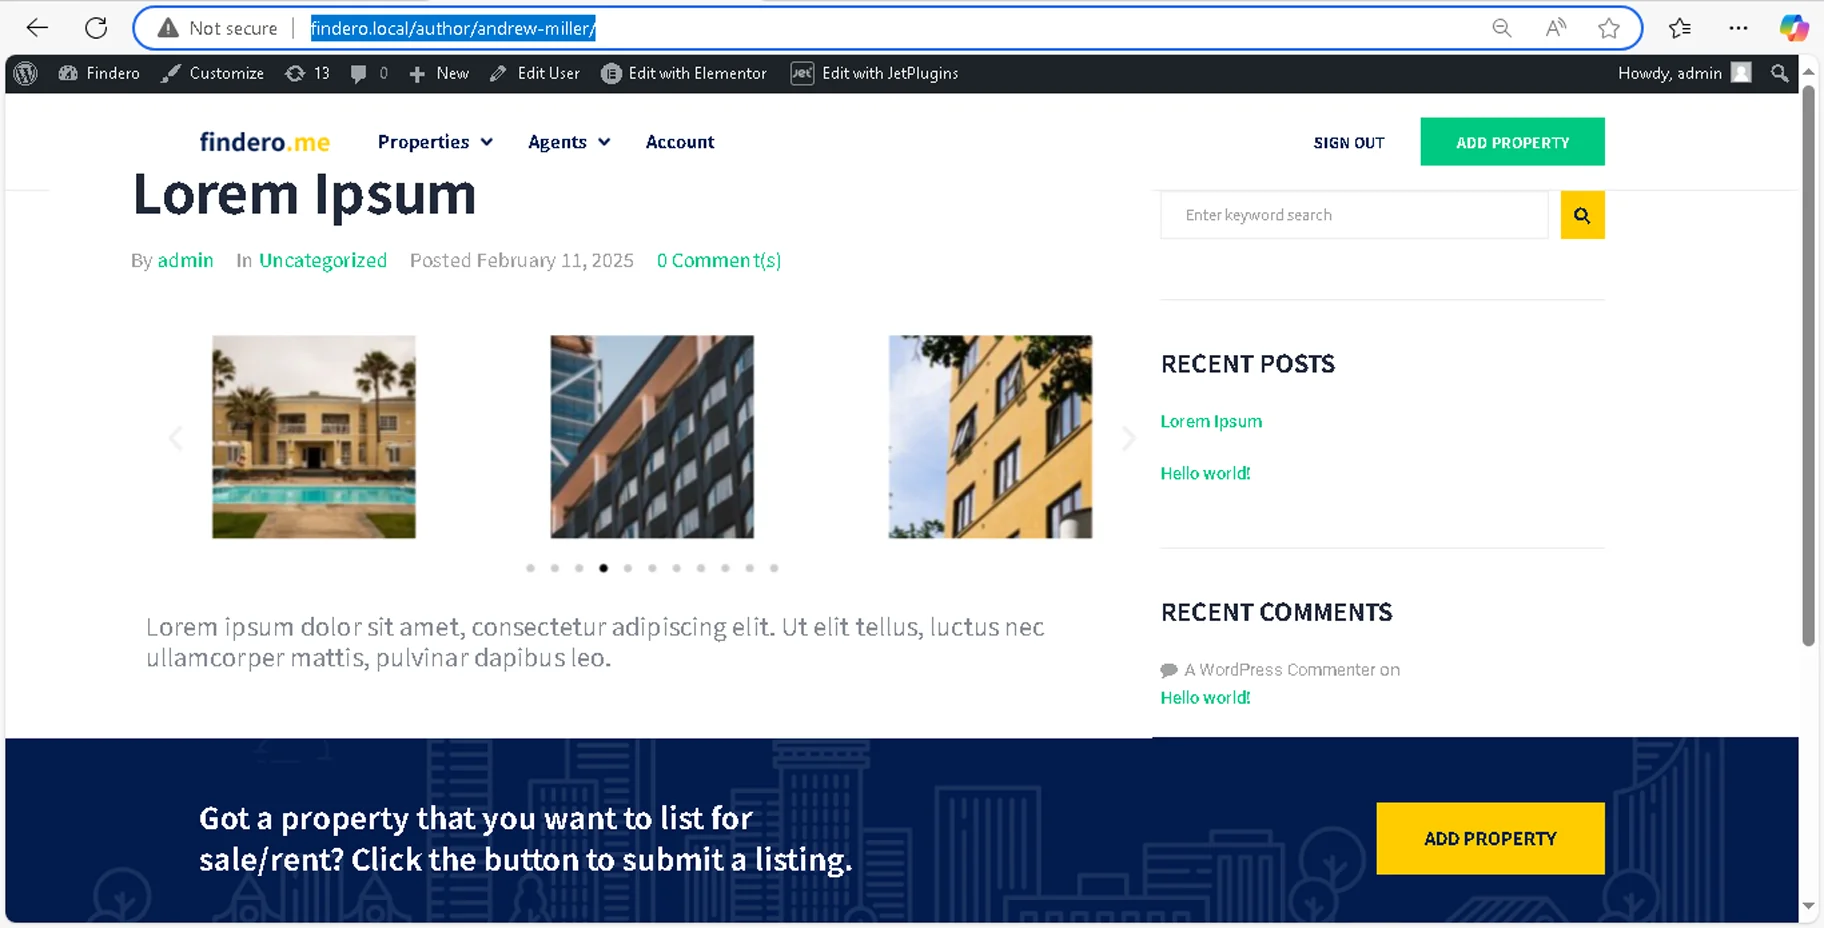
After that, to get the corresponding Values, move to the WordPress Dashboard > Users > All Users pathway and push the “View” button that appears when you hover over a user.
The user nicename will be displayed in the URL slug. In this case, the full slug text “findero.local/author/andrew-miller” includes the “andrew-miller” nicename. In turn, the “andrew-miller” nicename will be inserted into the Value field.
After copying all the needed slugs, return to the filter editor and enter all the required Values and Labels.
Head to the Query Variable field. Press the “dynamic tag” icon and select the “Plain Query Variable” option in the newly-appeared drop-down list. Then, put the “author” value in the Variable Name field. After that, the “_plain_query::author_name” will appear in the Query Variable field.
Once completed, save the filter by pressing the “Publish/Update” button.
Add the filter to the page
As in the previous case, place a widget that corresponds to the Filter Type you have chosen. Define the newly created filter and its provider in the Select filter and This filter for fields.
Publish the page and check the result on the front end.
Create a Filter for Different Post Types
Here, we consider applying a filter to the Listing Grid widget that displays some CPT posts.
Configure the filter settings
Go to WordPress Dashboard > JetSmartFilters > Add New. Complete the title, Filter Label, and Active Filter Label fields.
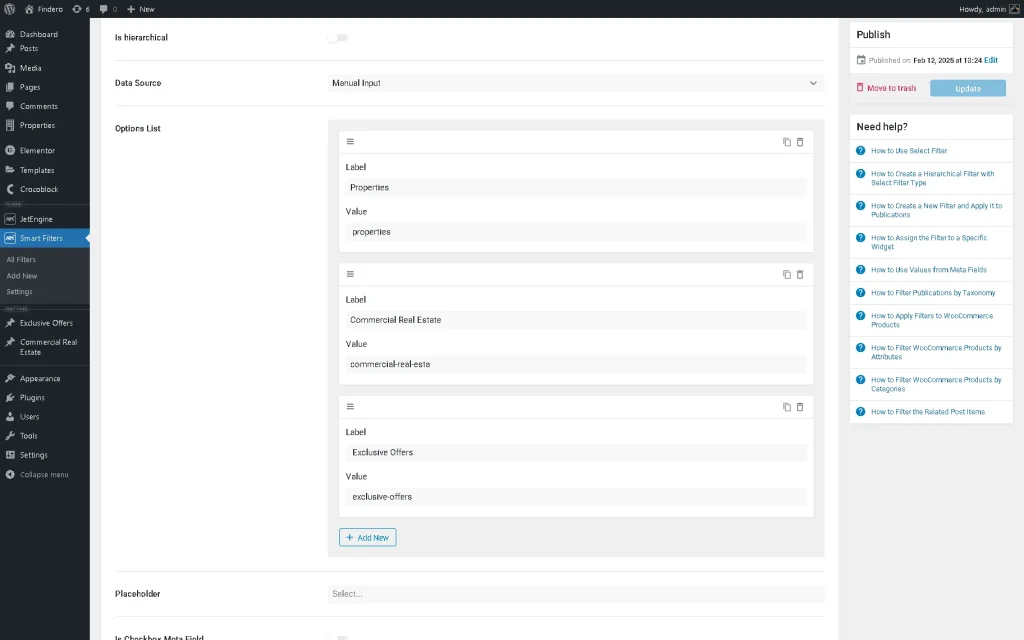
The next step is to choose the Filter Type. We will create a “Select filter” type now, but you can select any desired type. Also, pay attention to the Is Hierarchical toggle. Activate it to build a Hierarchical Filter. Then, choose the “Manual Input” Data Source. Move to the Options List section and push the “+ Add New” button.

To set the Value, you need to know the post type slugs. You can find them by proceeding to WordPress Dashboard > JetEngine > Post Types. The Post Type Slug column values are the ones you need to put in the Value fields.

Come back to the filter editor. Fill in the Value and Label fields.
Add as many options as you need and adjust the following “Select filter” settings if required.
In this case, we add three CPT posts to the filter and insert the “Properties,” Exclusive Offers,” and “Commercial Real Estate” values into the Label fields and the “exclusive-offers,” “commercial-real-esta,” and “properties” slug texts into the Value fields, respectively.
After that, paste the “post_type” value in the Query Variable field.
Set the Comparison operator value to “Equals (=)” and hit the “Publish/Update” button.

Create a query to display different CPT posts
Since the filter is intended to display filtered posts from some CPTs, a query should be applied to the Listing Grid widget as a filter provider.
Also, you can use the inject alternative listing items feature to the Listing Grid. Read the How to Set Alternative Listing Template Injections in Listing Grid Widget tutorial to learn how to manage the Listing Grid settings to display some CPT posts, taxonomies, and more via one Listing Grid.
First, move to the WordPress Dashboard > JetEngine > Query Builder tab. Here, press the “Add New” button on the top of the page to create a new query. Insert the query’s Name (“Query Posts”, in this case) and select the “Post Query” Post Type. In the next step, scroll the page down to the Posts Query > General Settings tab and choose the needed CPTs in the Post Type drop-down list.
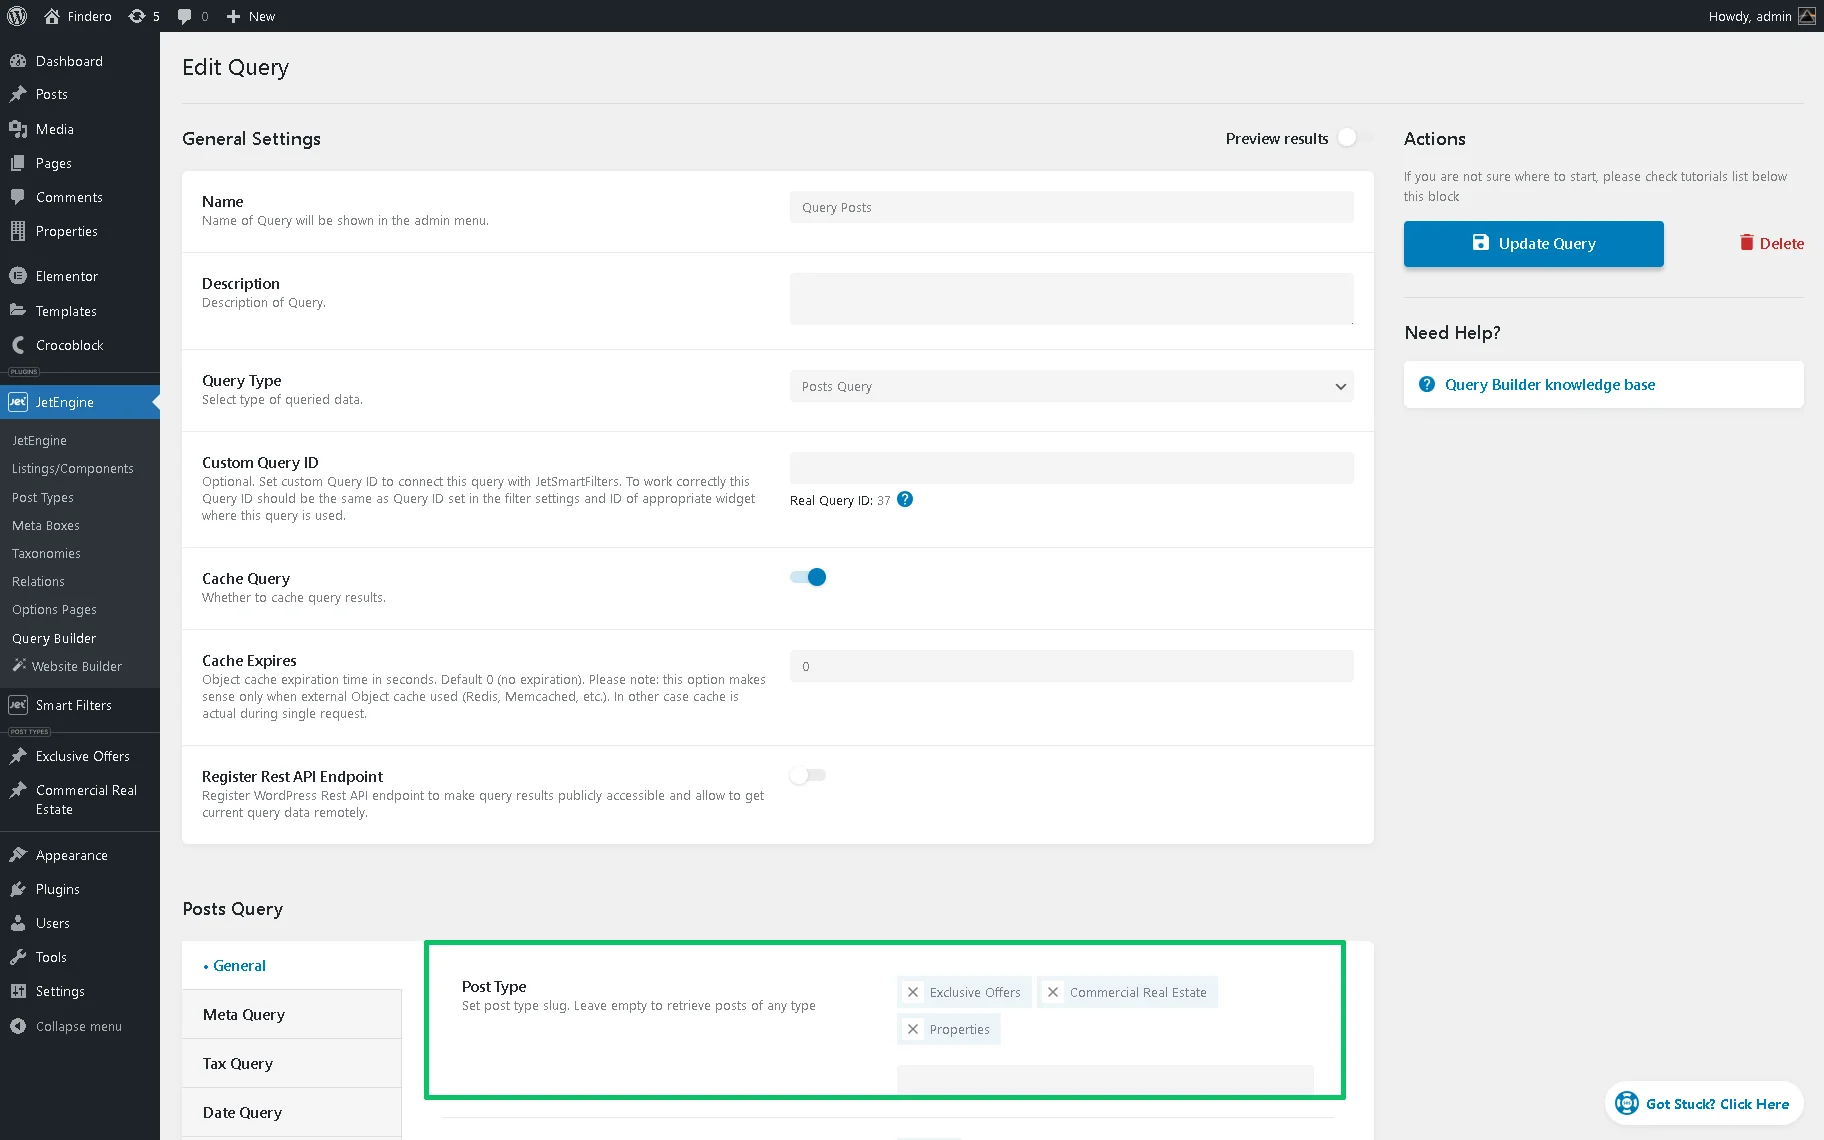
In the last step, navigate to the top of the page and click the “Add Query / Update Query” button.
Add the filter to the page
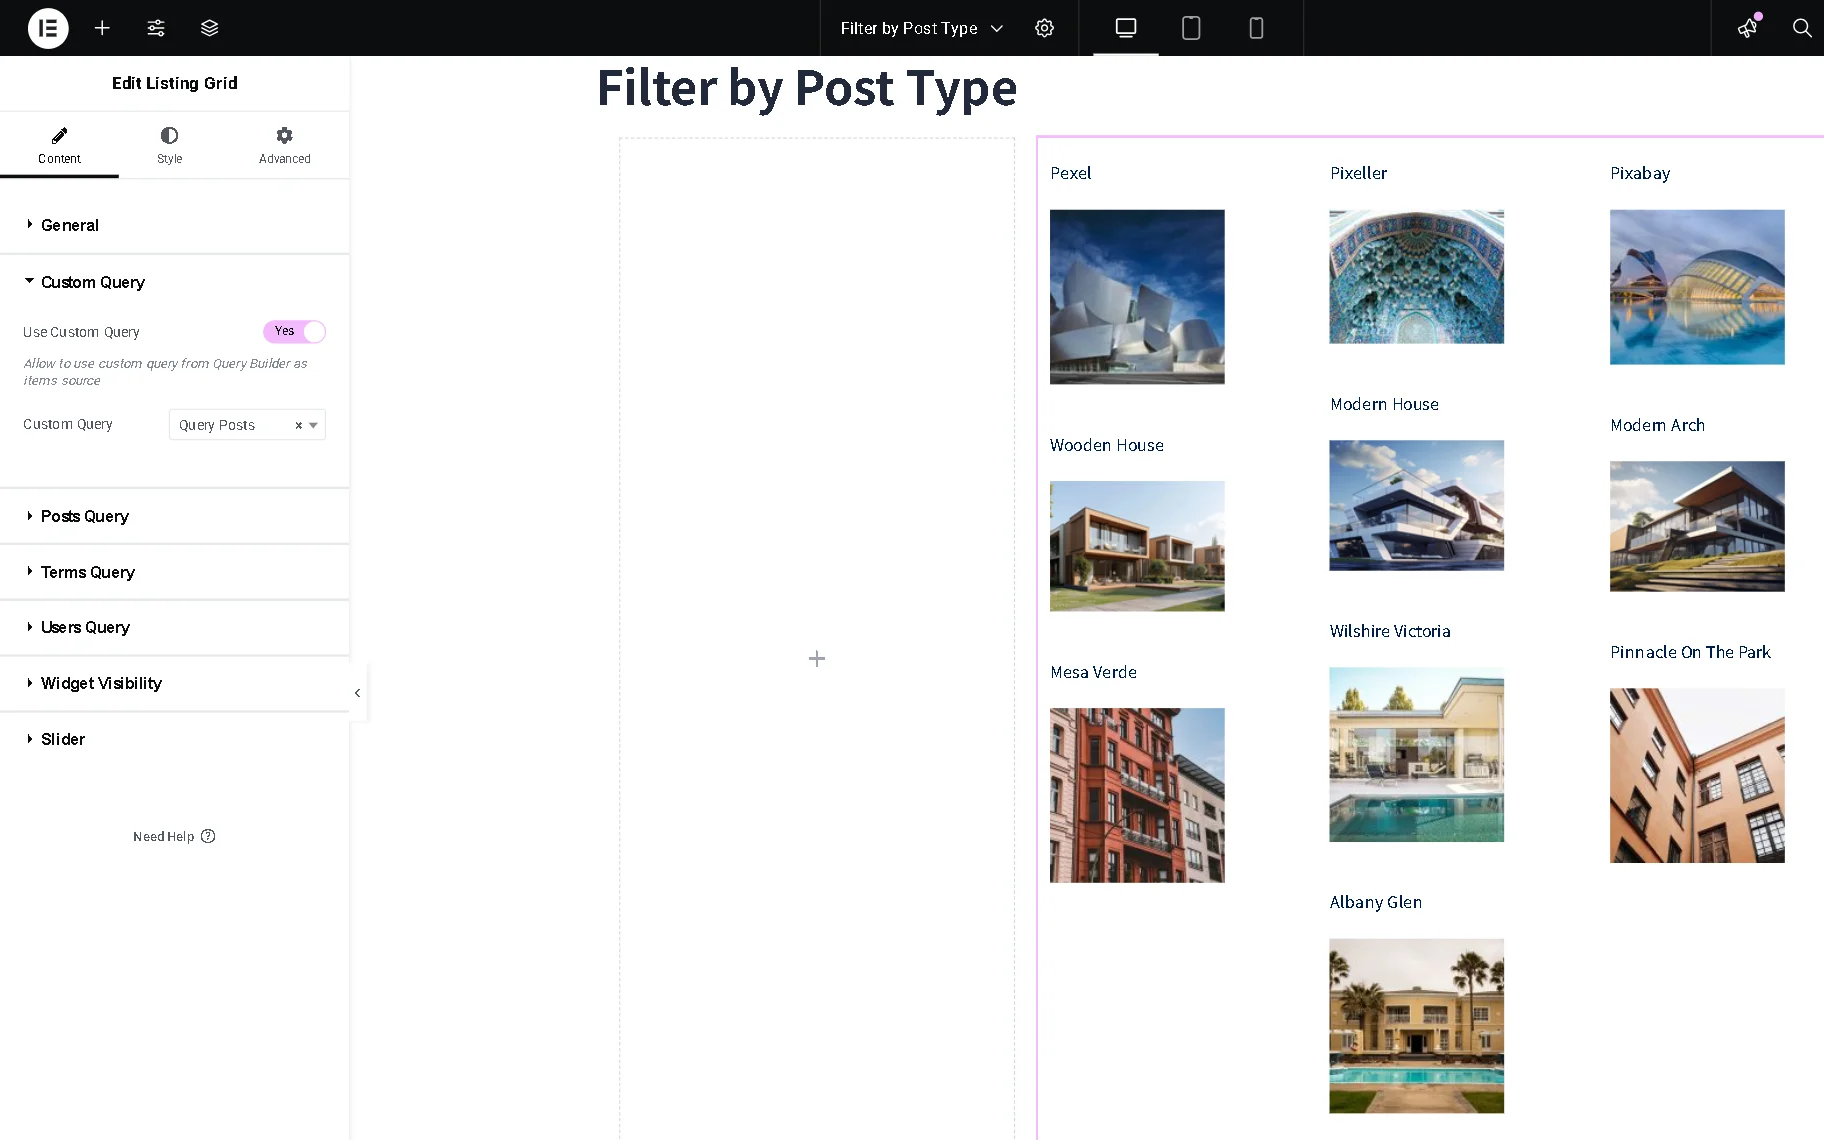
Head to the page where you want to place the filter. Here, we divide the page into two columns; this time, we choose the Select Filter widget and insert it into the left column and the Listing Grid into the right one.
Configure the Listing Grid settings: set the required listing in the Listing drop-down; then unroll the Custom Query tab, activate the Use Custom Query toggle, and choose the pre-created query in the Custom Query drop-down list (the “Query Posts” in this case).
For more details on managing some listings in the same Listing Grid, read the How to Display Several Custom Post Types in One Listing Grid Widget tutorial.
In the next step, adjust the Select Filter settings. Define the newly created filter in the Select Filter field and apply it to the needed provider with the help of This filter for drop-down list.

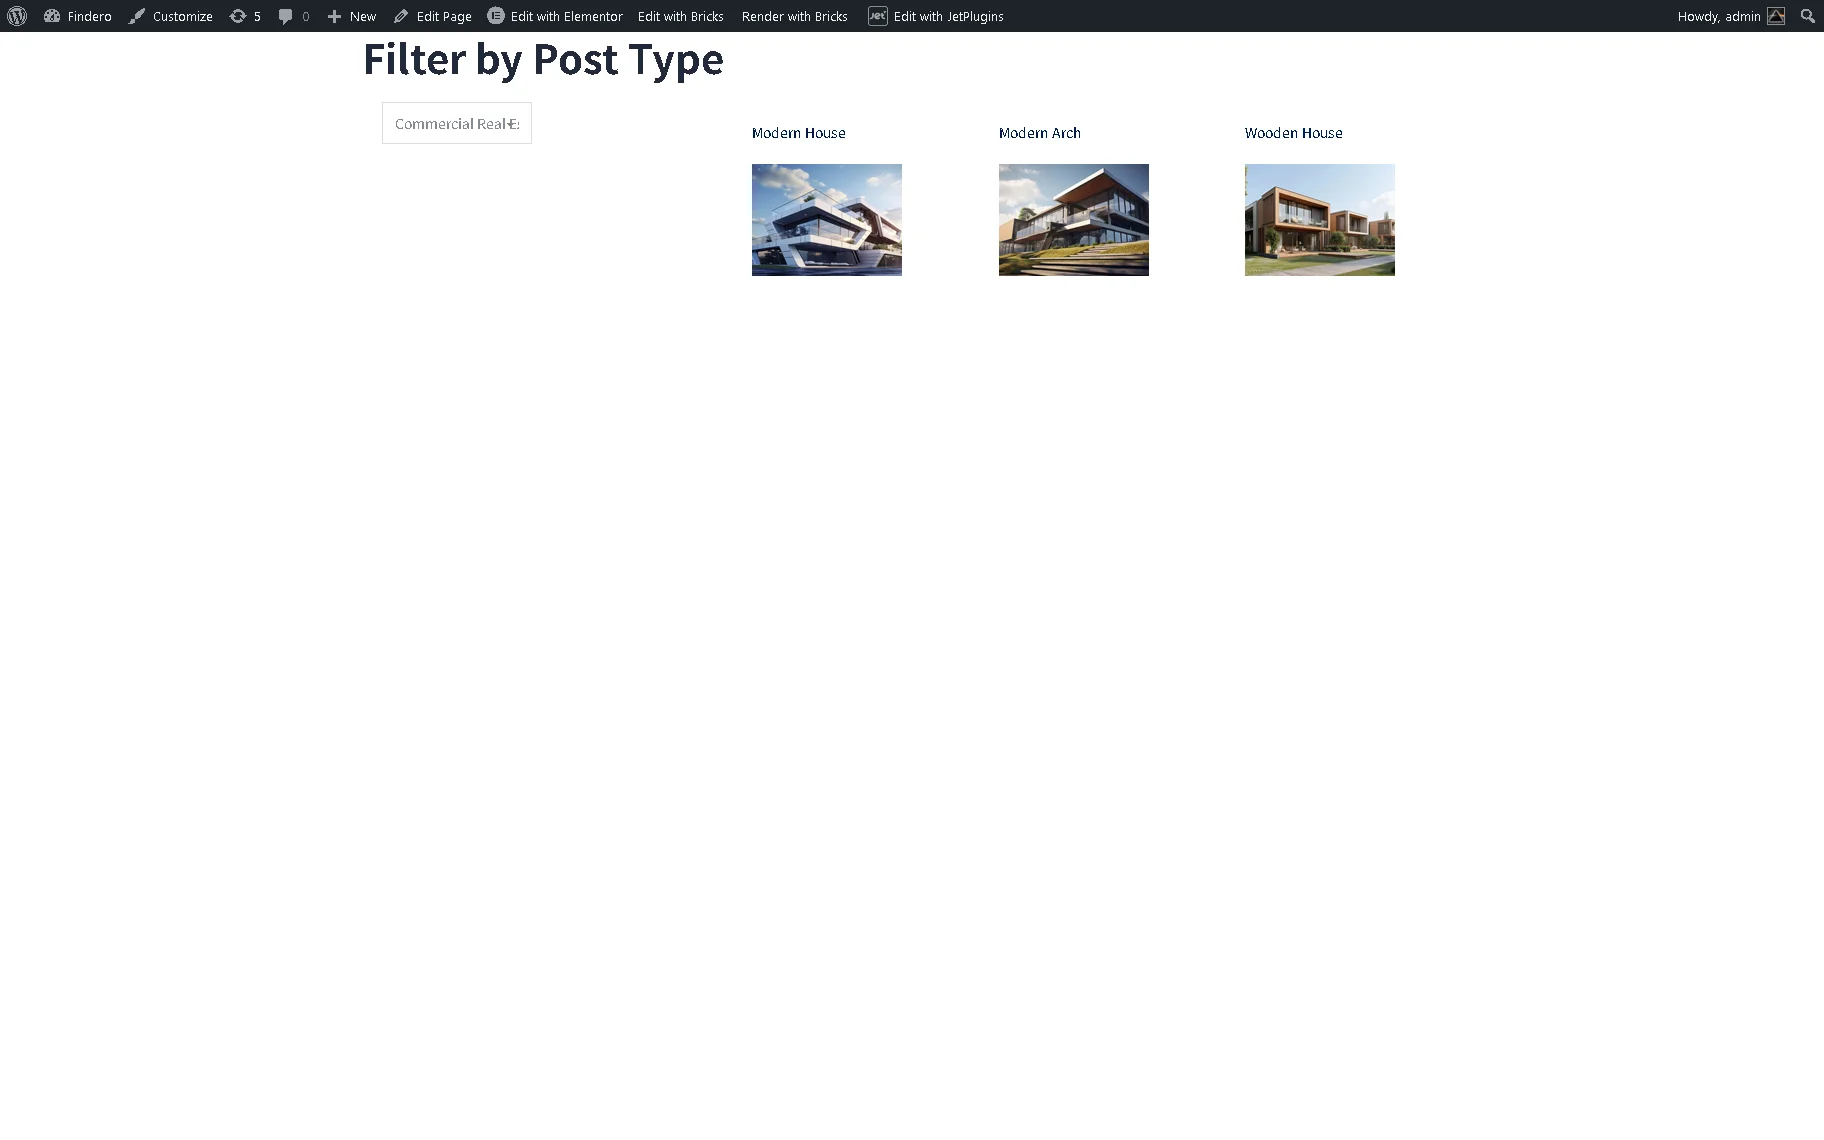
Adjust the remaining filter settings and style it up if needed. Click the “Publish/Update” button and look at the results. Select the needed CPT and observe if the filter works correctly.
That’s it. Now you know how to filter the content using the Author & post type filter add-on from the JetSmartFilters plugin for WordPress.