How to Set a Default Value for Filter
Learn how to manage the Default Value setting in different types of JetSmartFilters filters to display the results as the initial state, as well as to configure the URL Aliases to set the Default Value, and apply the Remove Filter to clear filters on your WordPress site.
Before you start, check the tutorial requirements:
- Elementor (Free version) or WordPress Block editor (Gutenberg)
- JetSmartFilters plugin installed and activated
- JetEngine plugin installed and activated
with CPT posts and taxonomies created
- JetThemeCore plugin installed and activated
In this tutorial, we consider configuring the JetSmartFilters Default Value settings in the Radio Filter, Select Filter, Date Range Filter, and Checkboxes Filter. Also, this setting is available for the Range Filter, Checkbox Range Filter, Date Period Filter, Rating Filter, Alphabet Filter, Search Filter, and Visual Filter, which allow setting the predefined values as the initial state and display the predefined data on the front end via the appropriate widgets, blocks, and elements.
Single-Select Filters
This tutorial section covers the Radio Filter, Select Filter, and Date Range Filter.
Radio Filter
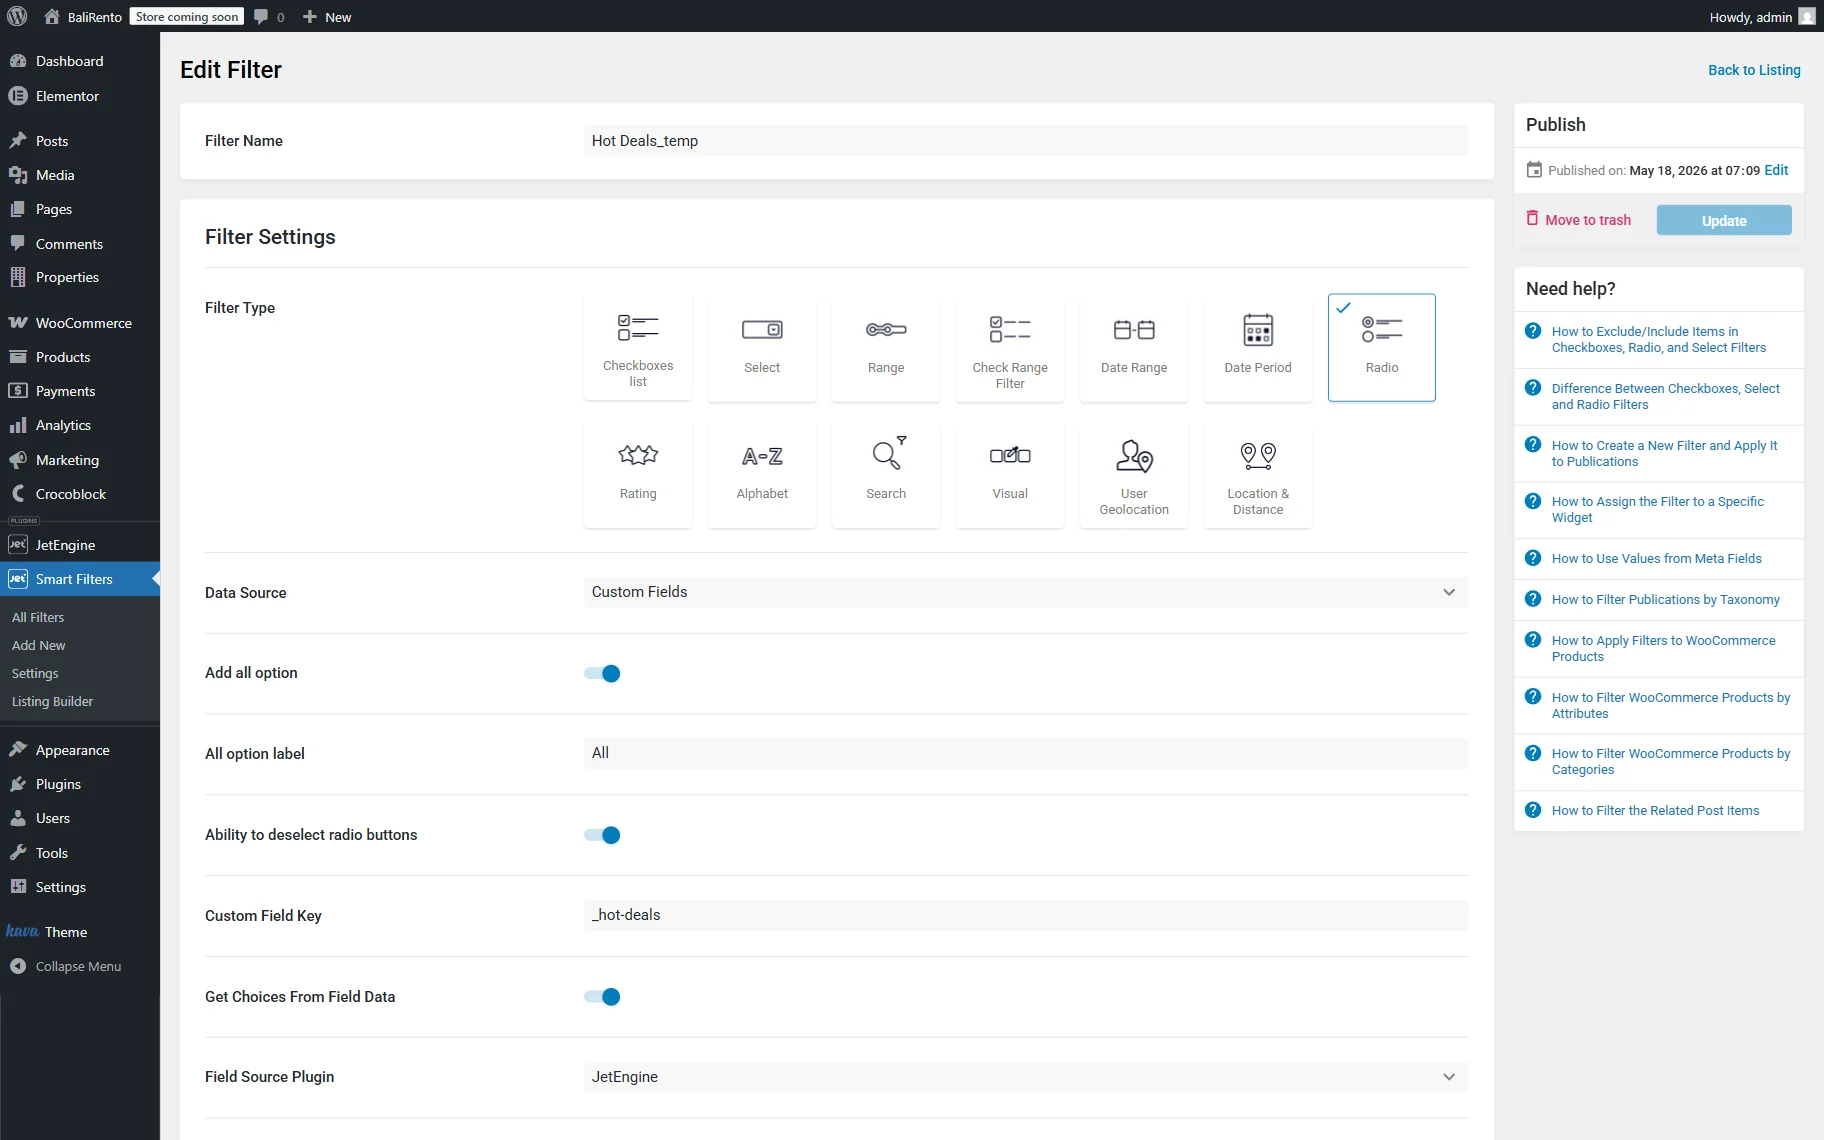
First, move to the WordPress Dashboard > Smart Filters tab and add a new filter or open a previously created one. Then, insert the Filter Name, tick the “Radio” Filter Type, and set the needed Data Source.
In this case, we intend to allow selection of the CPT posts that contain the “Yes” value in the Hot deals field.
We choose the “Custom Fields” option from the drop-down list. In the Custom Field Key, we type the ID of the meta field (here, “_hot-deals”). Then, we enable the Get Choices From Field Data toggle and select the needed plugin (here, the “JetEngine” option) from the Field Source Plugin drop-down menu.
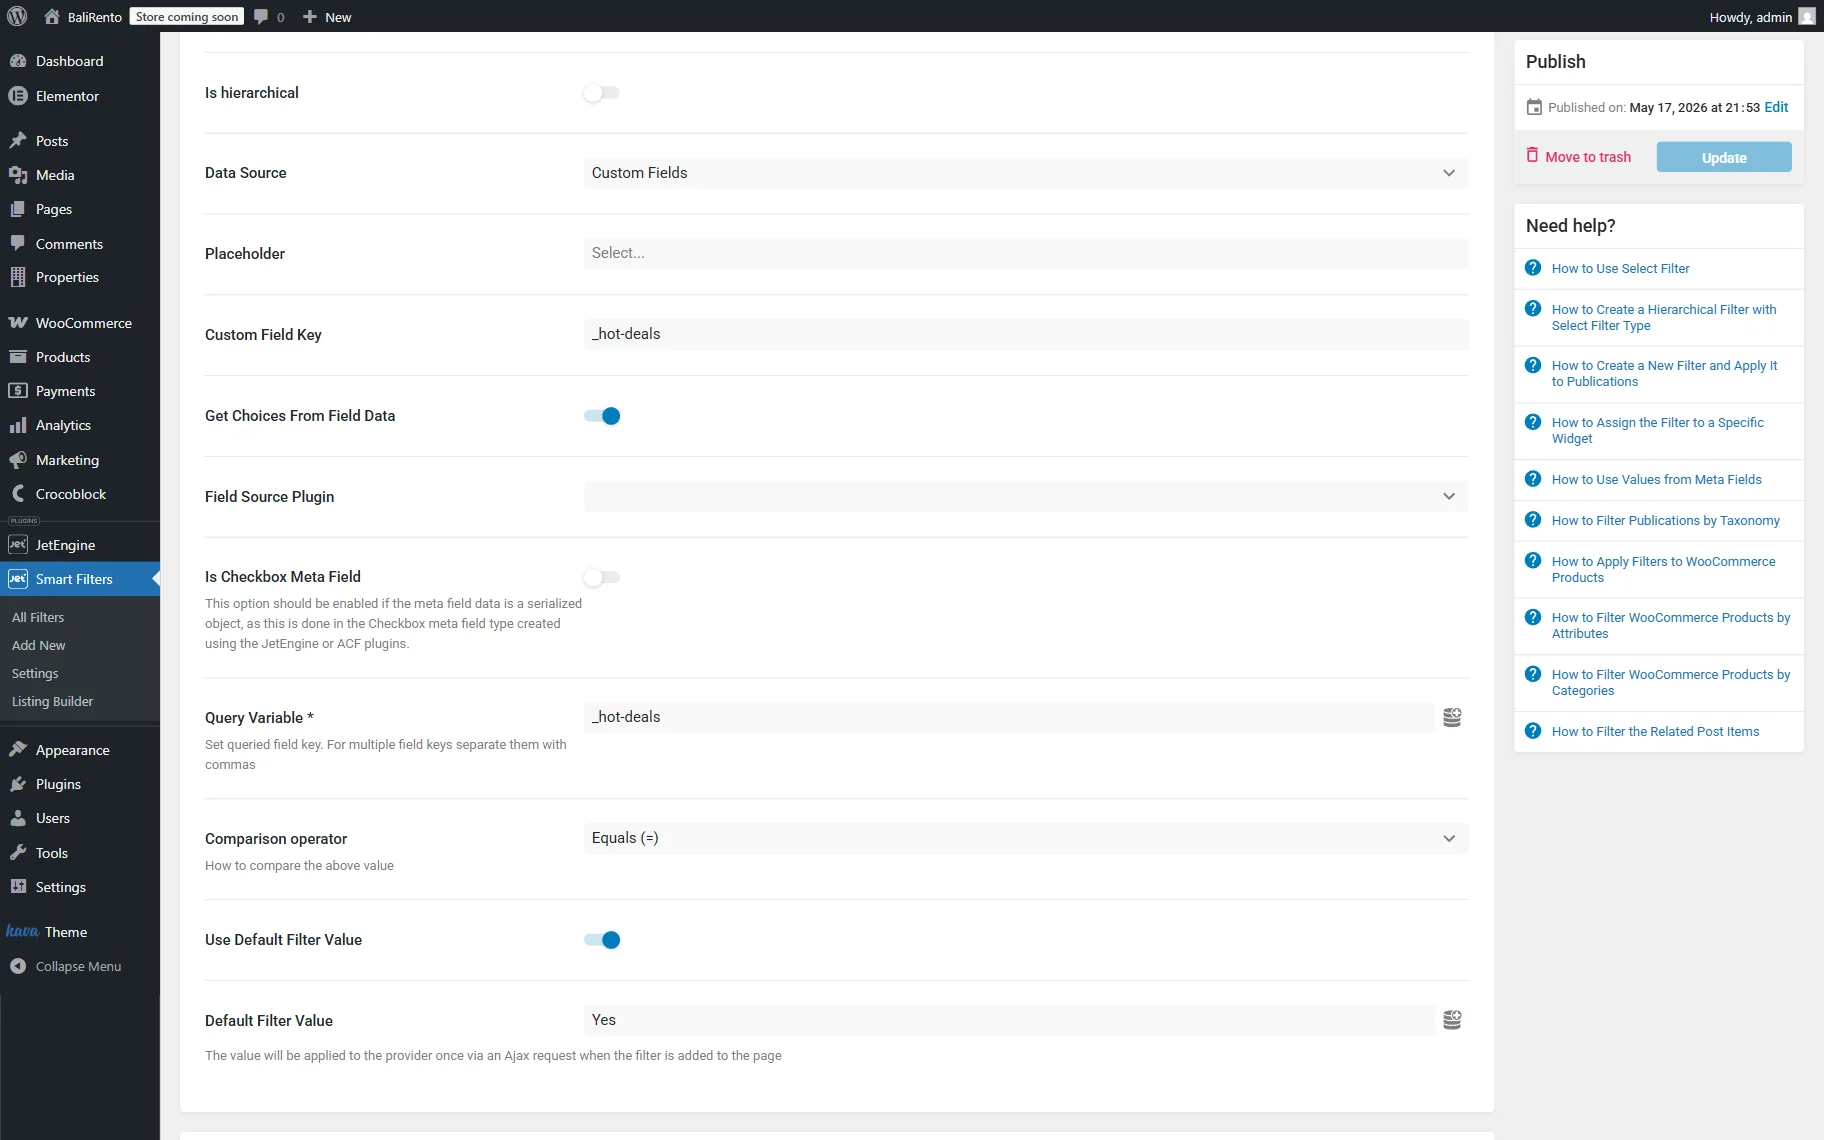
Scroll down the filter’s settings tab and type the ID of the meta field (here, “_hot-deals”) in the Query Variable field. Select the “Equals (=)” option from the Comparison operator drop-down menu. Then, enable the Default Filter Value toggle and type the needed value of the meta field (here, the “Yes” text).
Fill in the Filter Label and Active Filter Label fields (optionally).
Press the “Update” button to save the filter.
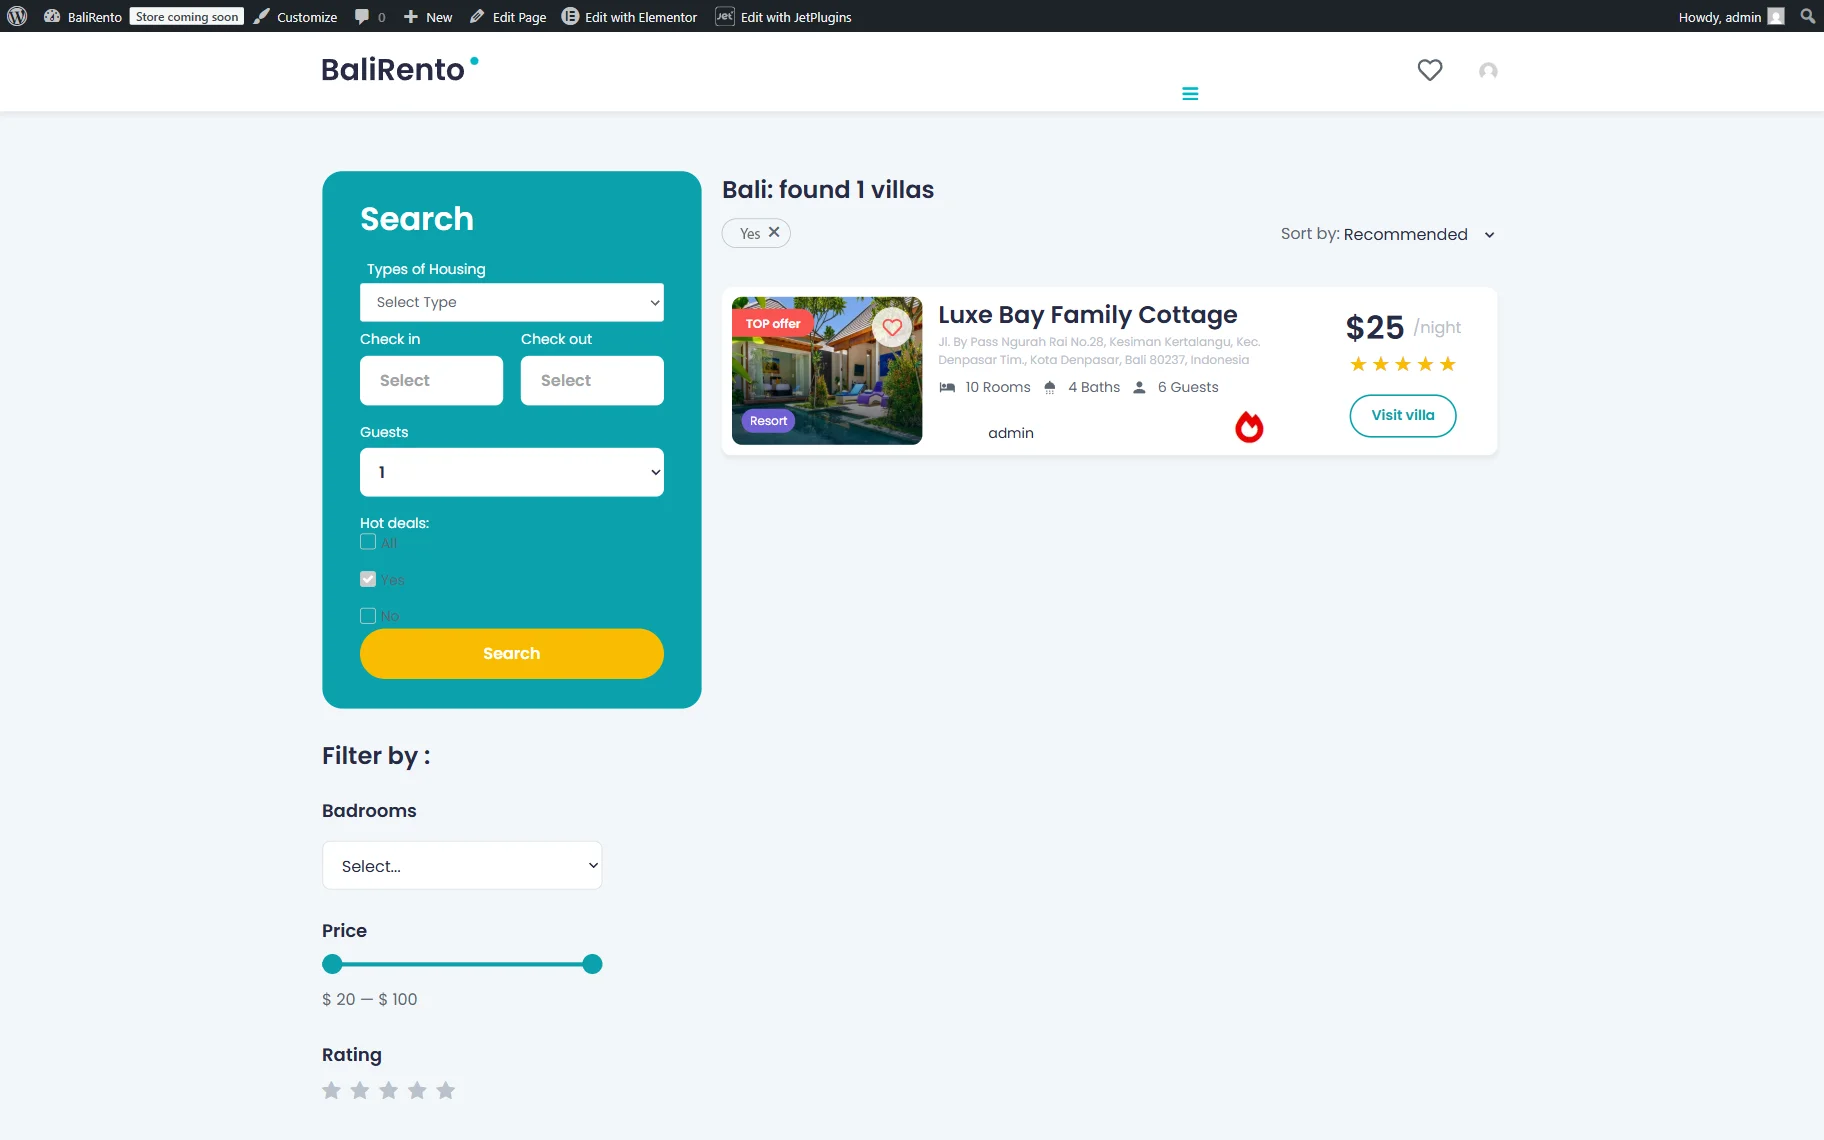
Next, move to the page where the filter is added, adjust its settings, and observe how it works on the front end.

In our case, since the “Yes” value is present in the filter’s settings, the listing shows all villas that have the “Yes” value set in the corresponding meta field.
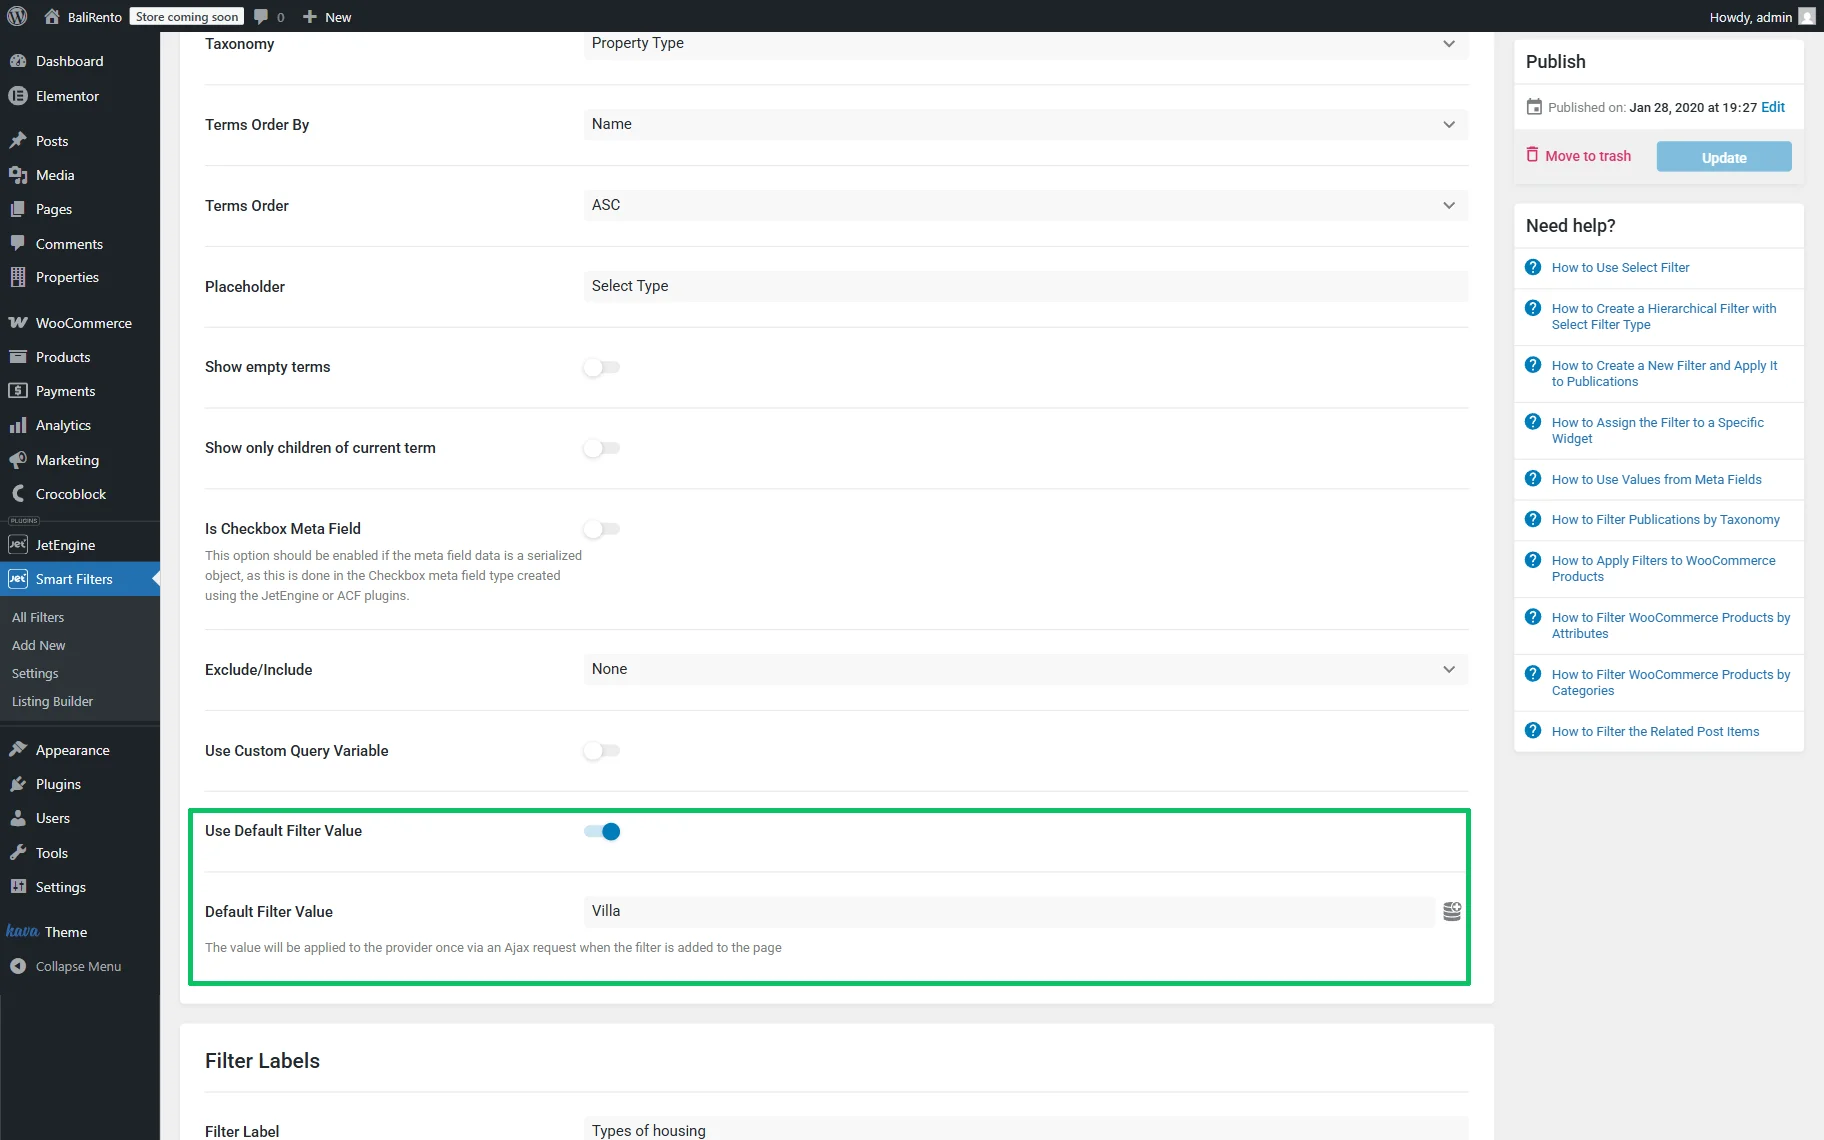
Select Filter
In this section, we describe how to filter CPT posts by taxonomies and meta fields. Since in this tutorial we focus on setting the Default Values while building queries, the issues on configuring the filter’s settings are described in the corresponding tutorials, links to which are presented.
Configure settings to filter taxonomies
First, move to the WordPress Dashboard > Smart Filters tab and add a new filter or open a previously created one. Here, insert the Filter Name, choose the “Select” Filter Type, and set the needed Data Source.
Watch the How to Add Manual Input Setting for Select Filters in WordPress video to learn how to create the Select Filter, add it to a page, and configure its settings.
In addition, read the How to Add Manual Input Data Source for the Select Filter to learn how to create the Select Filter with the “Manual Input” Data Source based on the “Select” meta field type.
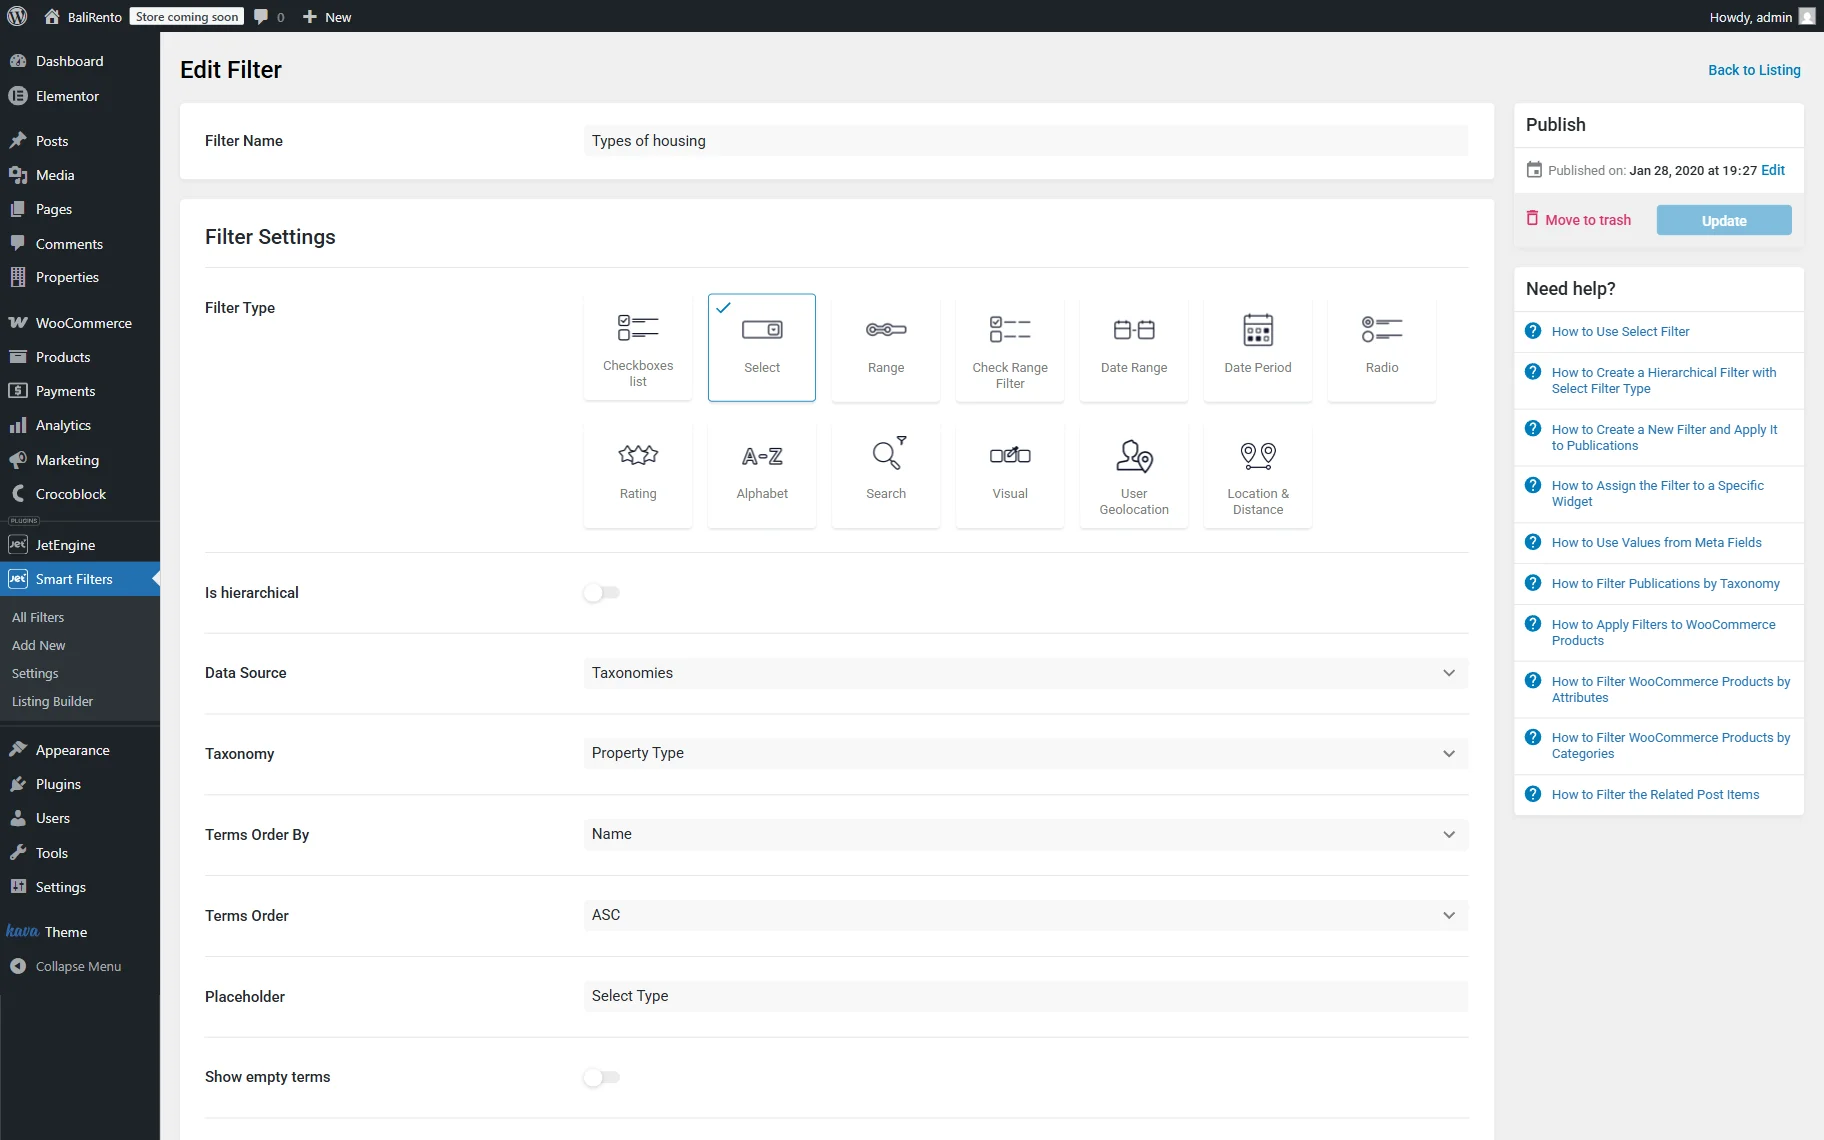
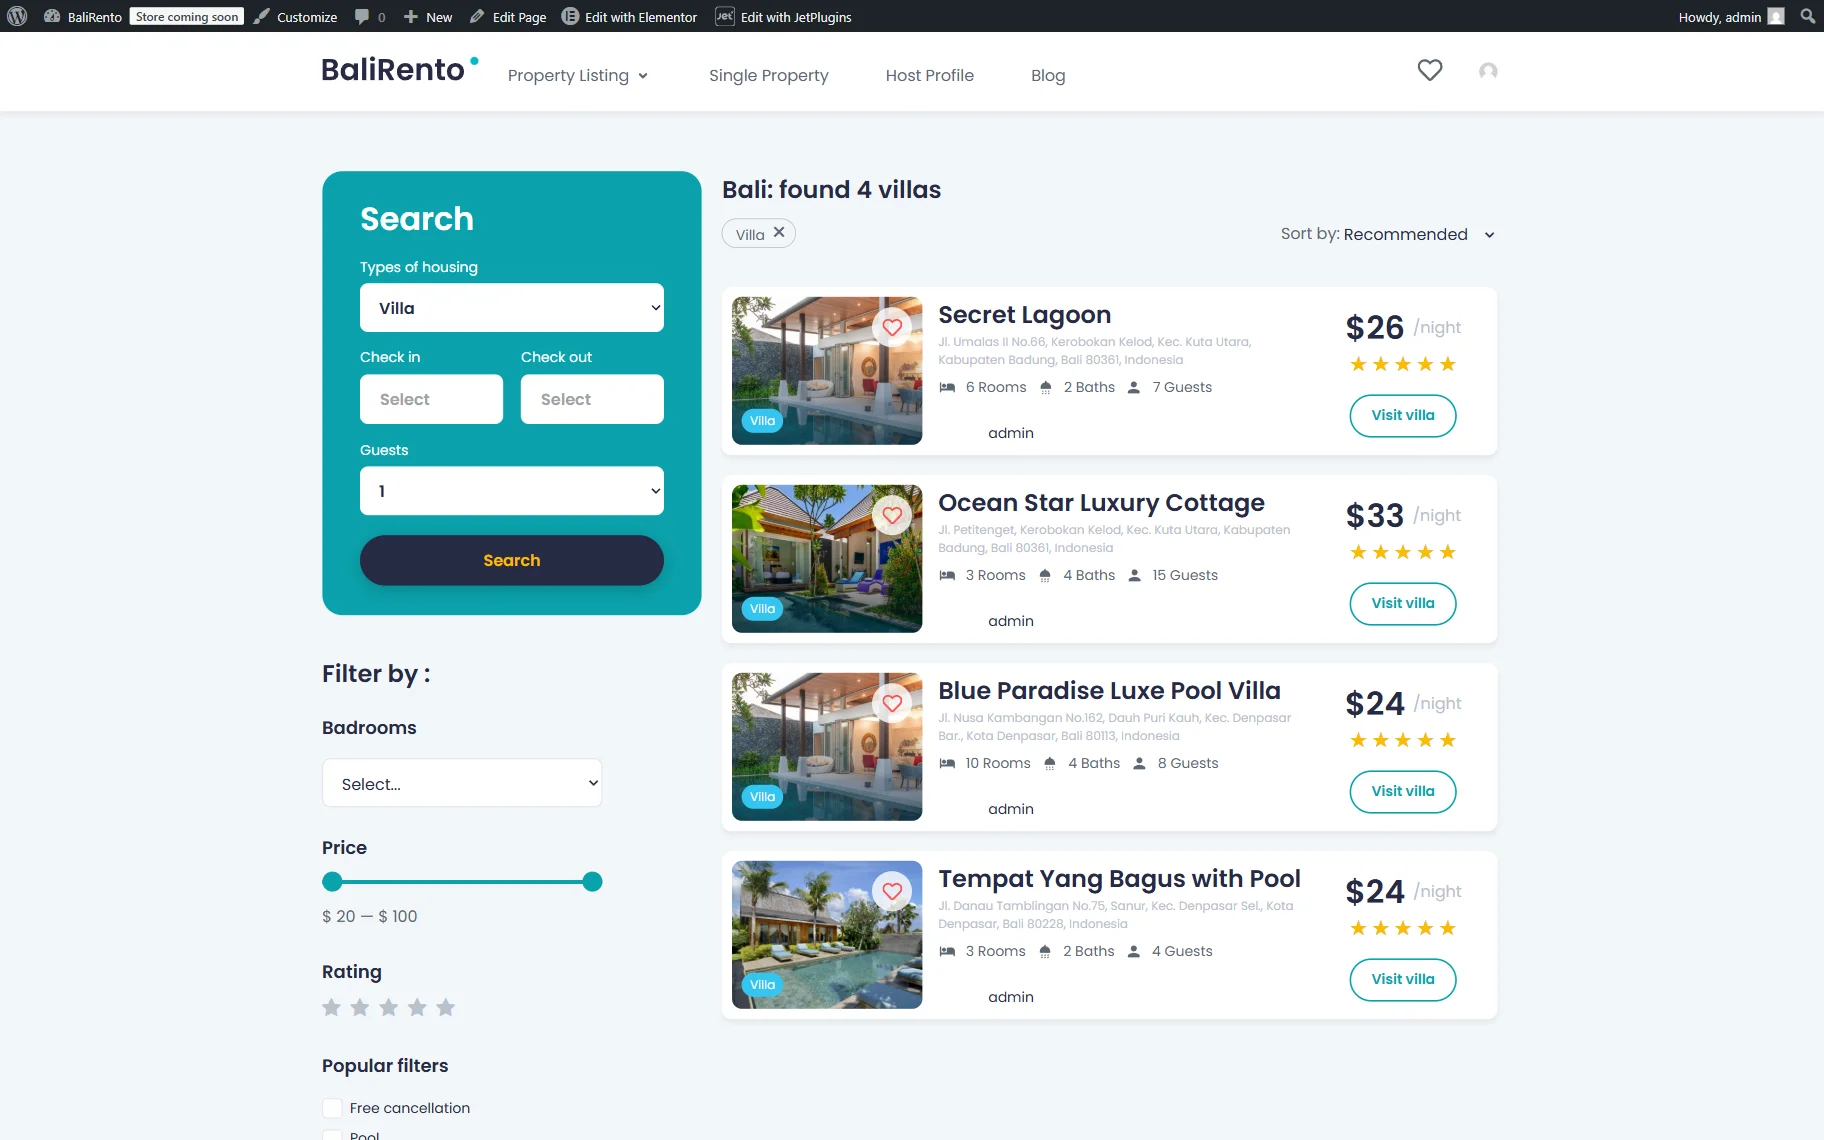
Then, scroll the page down and enable the Use Default Filter Value toggle. Next, insert the needed default value in the appeared Default Filter Value field. For example, since here we set the “Taxonomies” Data Source and specified the “Property Type” Taxonomy, in the Default Filter Value field we type the “Villa” text referring to the corresponding term.
Once the changes are saved, move to a page intended to add the filter. Here, we recommend dividing the page into two columns and inserting the filter into the first one and the Listing Grid widget with posts to the second column.
Then, move to the front end and check the result. Here, the Select Filter added to the listing shows the villas.
Configure settings to filter meta field data
In addition, you can build a filter to display data from CPT posts. In this case, we configure the following settings while creating the filter:

Then, scroll the page down and insert the field keys into the Query Variable field. Here, we insert the meta field Name/ID value of the corresponding meta field (that refers to the name field stored in the database) 一 “_hot_deals” text.
Watch the Search by Specific Meta Field Using Query Variables video to learn how to add a custom search box to your WordPress listing and configure it to search by specific meta fields — using query variables.
Now move to the front end and check if the filter works correctly.

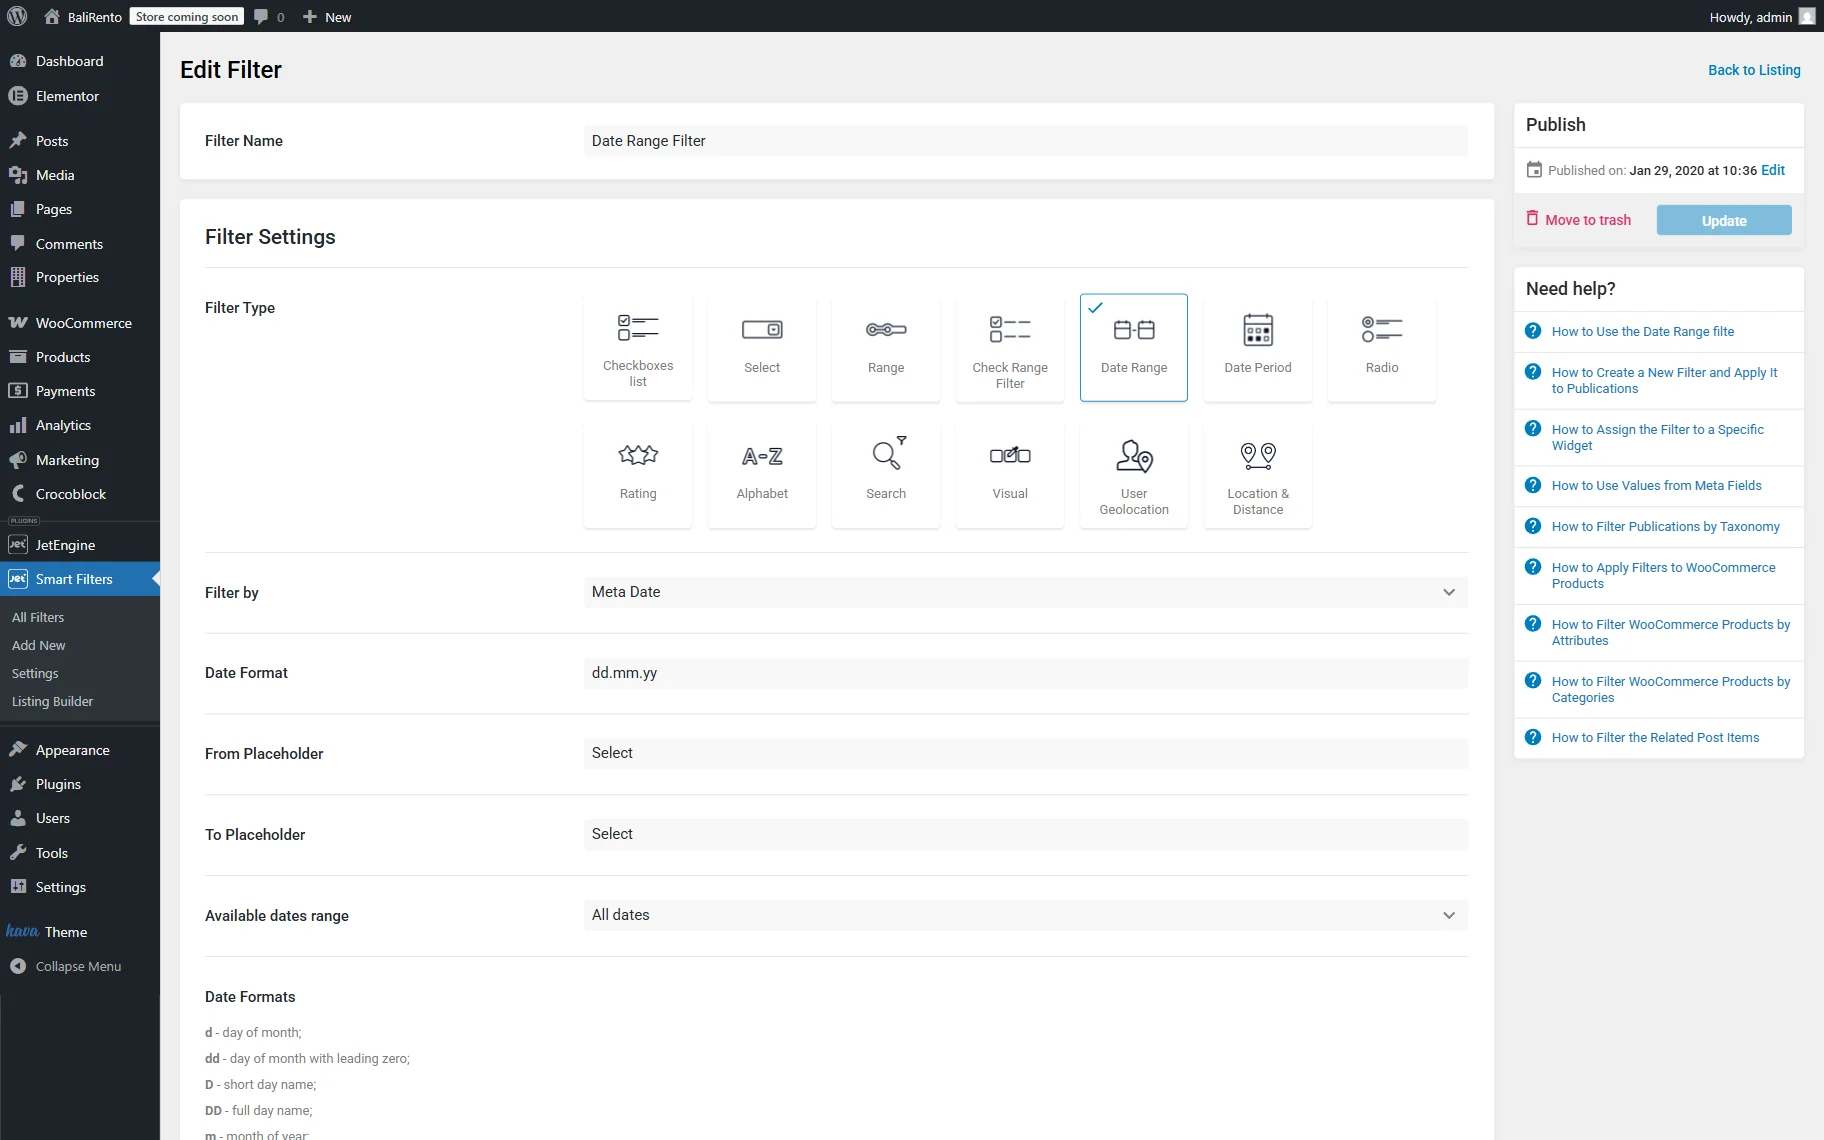
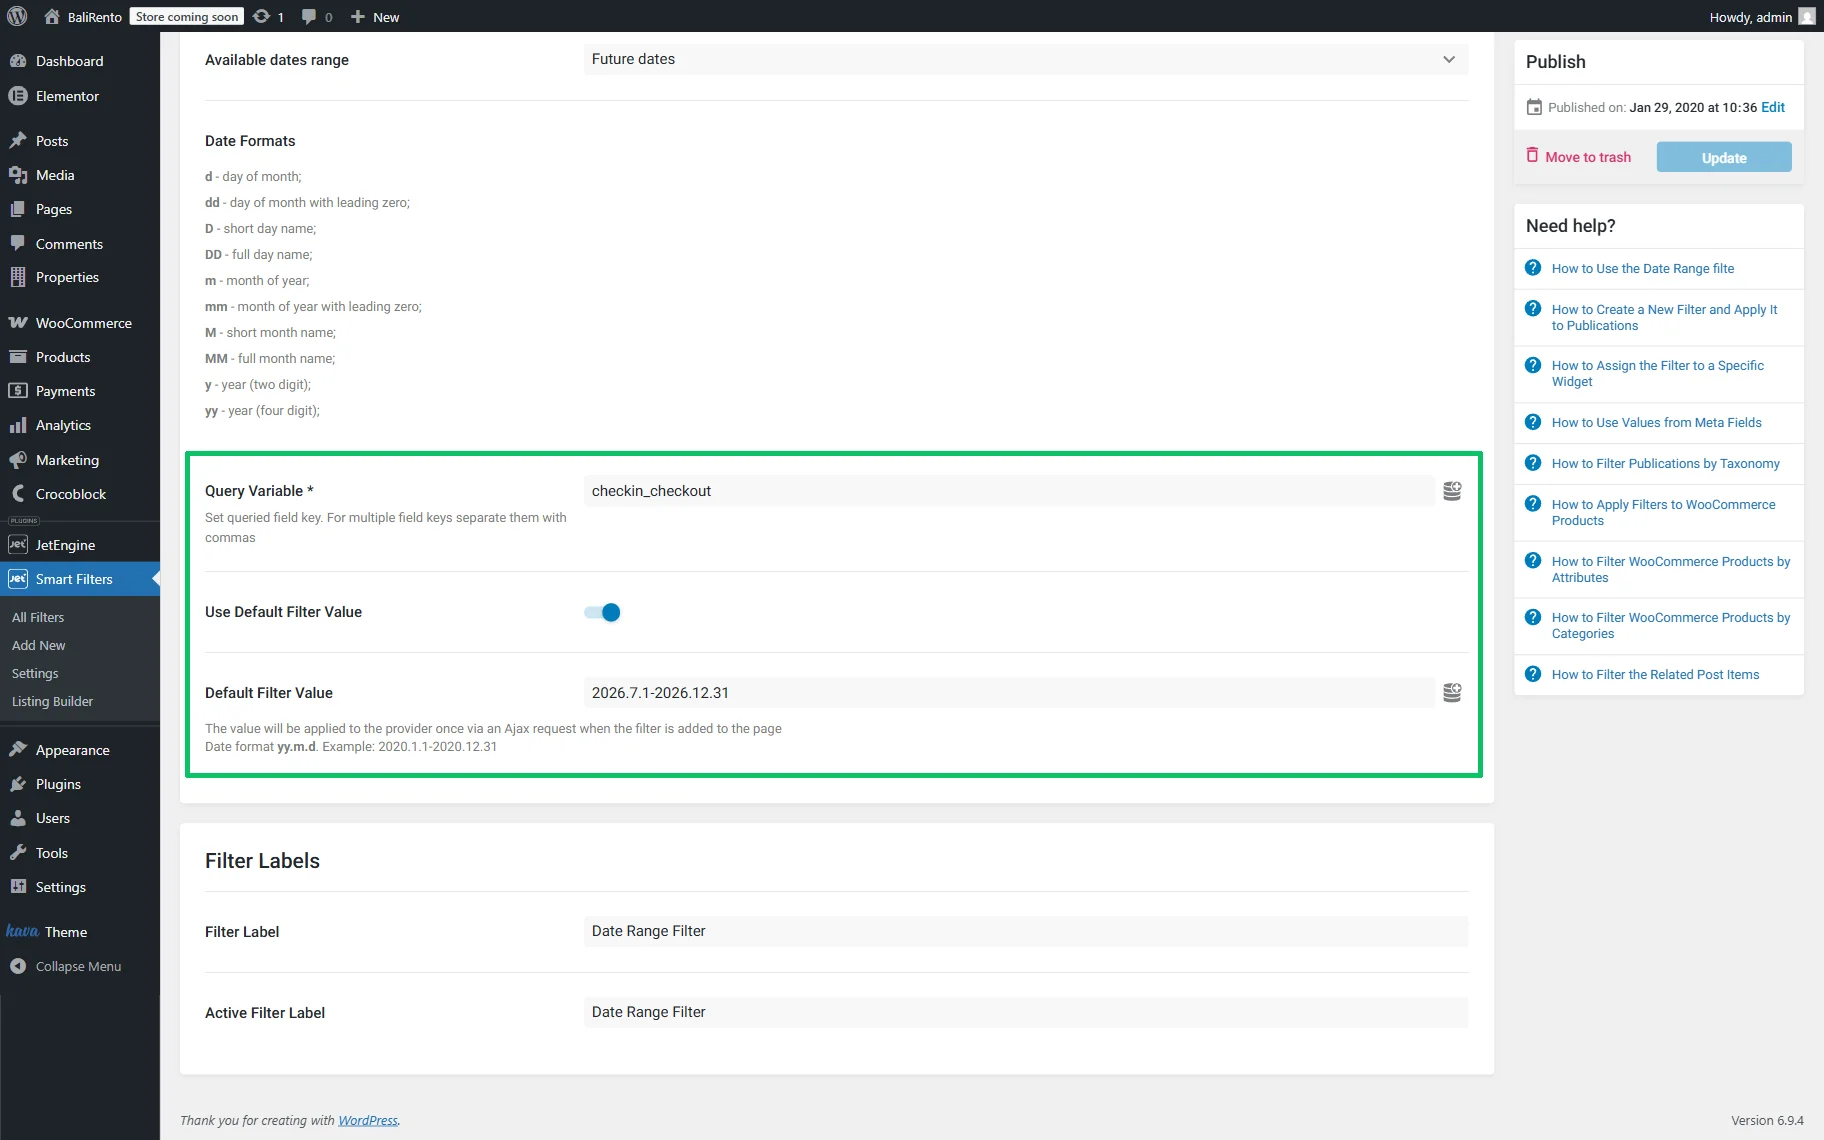
Date Range Filter
Add a new Date Range Filter or open a previously created one. Insert the Filter Name, select the “Date Range” Filter Type, and set the needed Data Source. Then, specify the “Meta Date” option in the Filter by drop-down list.
Watch the How to Filter Posts by Date Range and Last Modified in WordPress video to learn more details about implementing and customizing JetSmartFilters, limiting date ranges, formatting dates, and adding admin columns for better management.
Then, insert the needed Date Format: here, we type the “mm/dd/yy” text to display month, day, and year.
The Date Formats available are shown on the page below the Available date range field as follows:
d – day of month; dd – day of month with leading zero; D – short day name; DD – full day name;
m – month of year; mm – month of year with leading zero; M – short month name; MM – full month name;
y – year (two digit); yy – year (four digit).
Next, since we intend to make only future dates available, we choose the “Future dates” Available date range.
Then, scroll the page down and insert the field keys into the Query Variable field. Here, we insert the meta field Name/ID value of the corresponding meta field (that refers to the name field stored in the database) 一 “check_in_check_out” text.
In the last stage, enable the Use Default Filter Value toggle and insert the needed default value in the appeared Default Filter Value field (here we set the date period from July 01, 2026, to December 31, 2026) and type this period in the “yy.m.d” date format as follows: “2026.7.1-2026.12.31”.
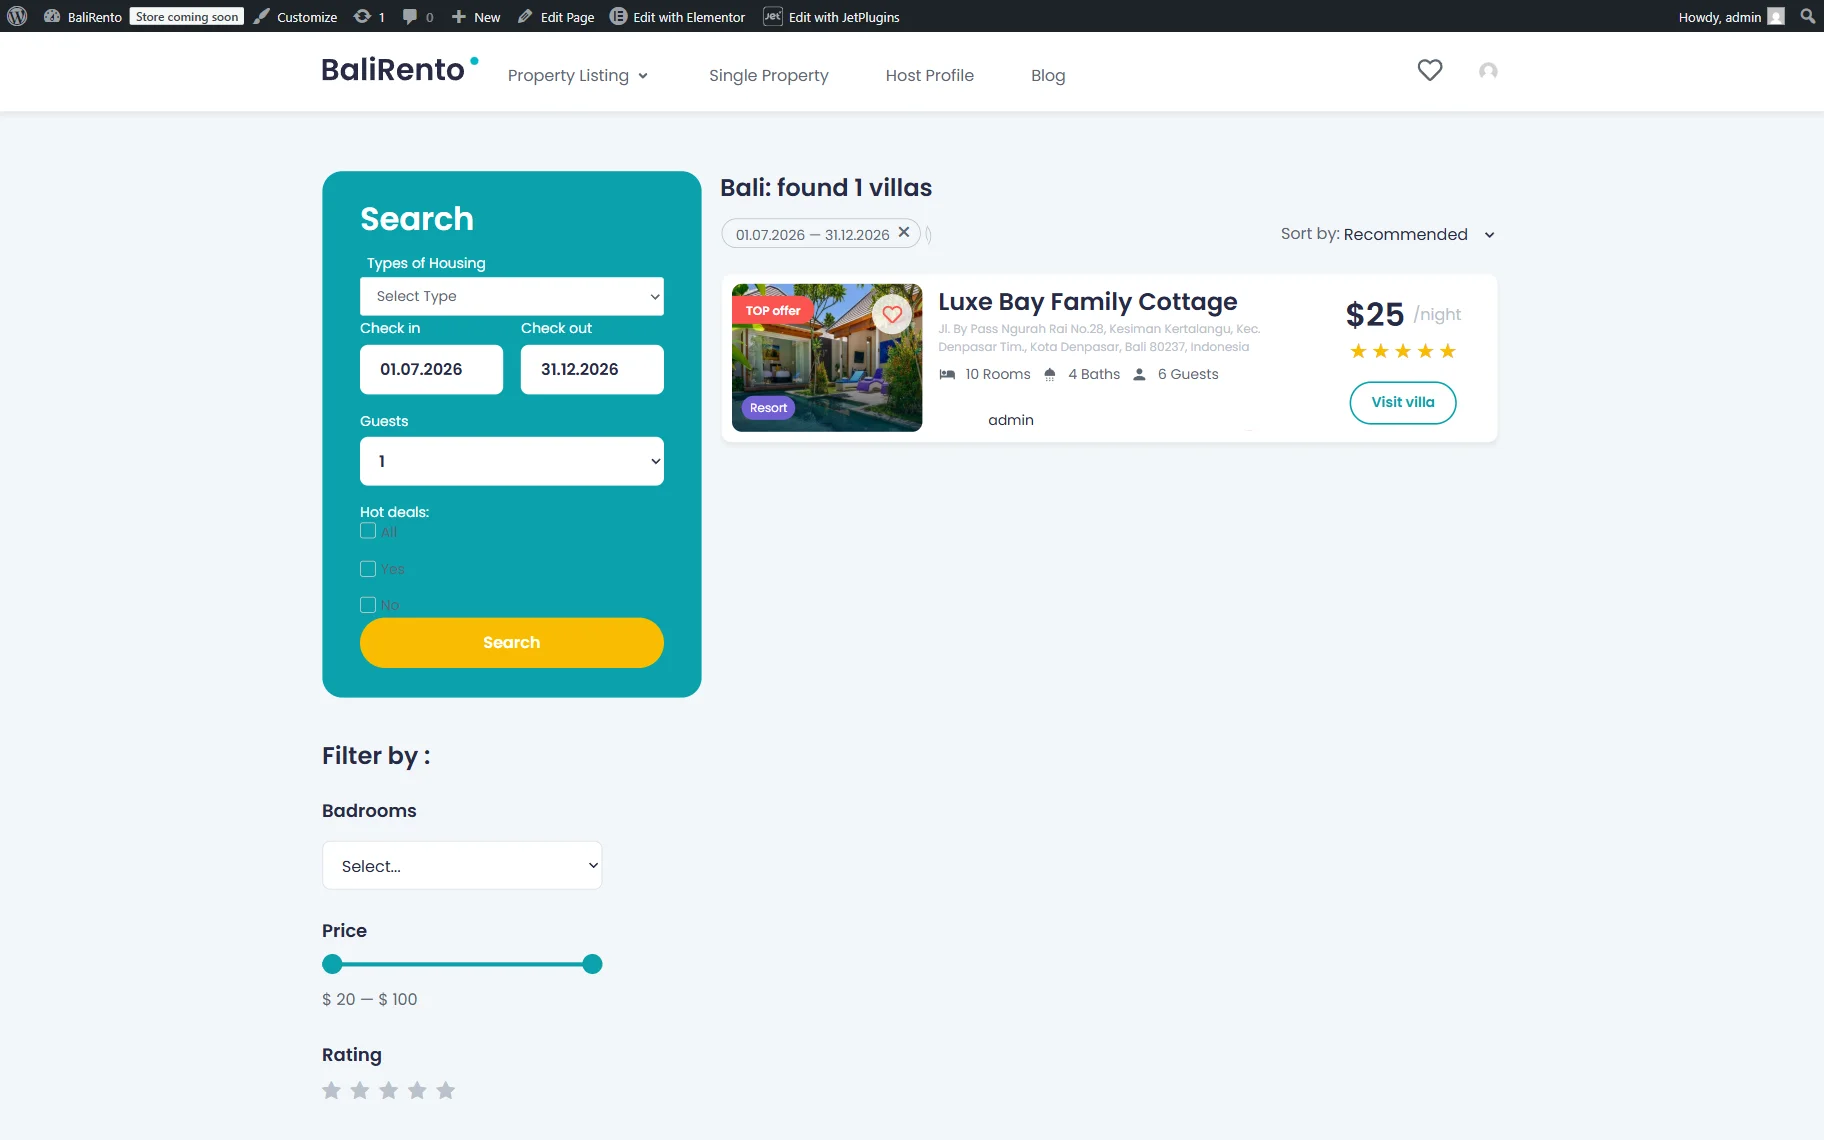
Once the changes are saved, move to the page where the filter is added, adjust its settings, and observe how it works on the front end.
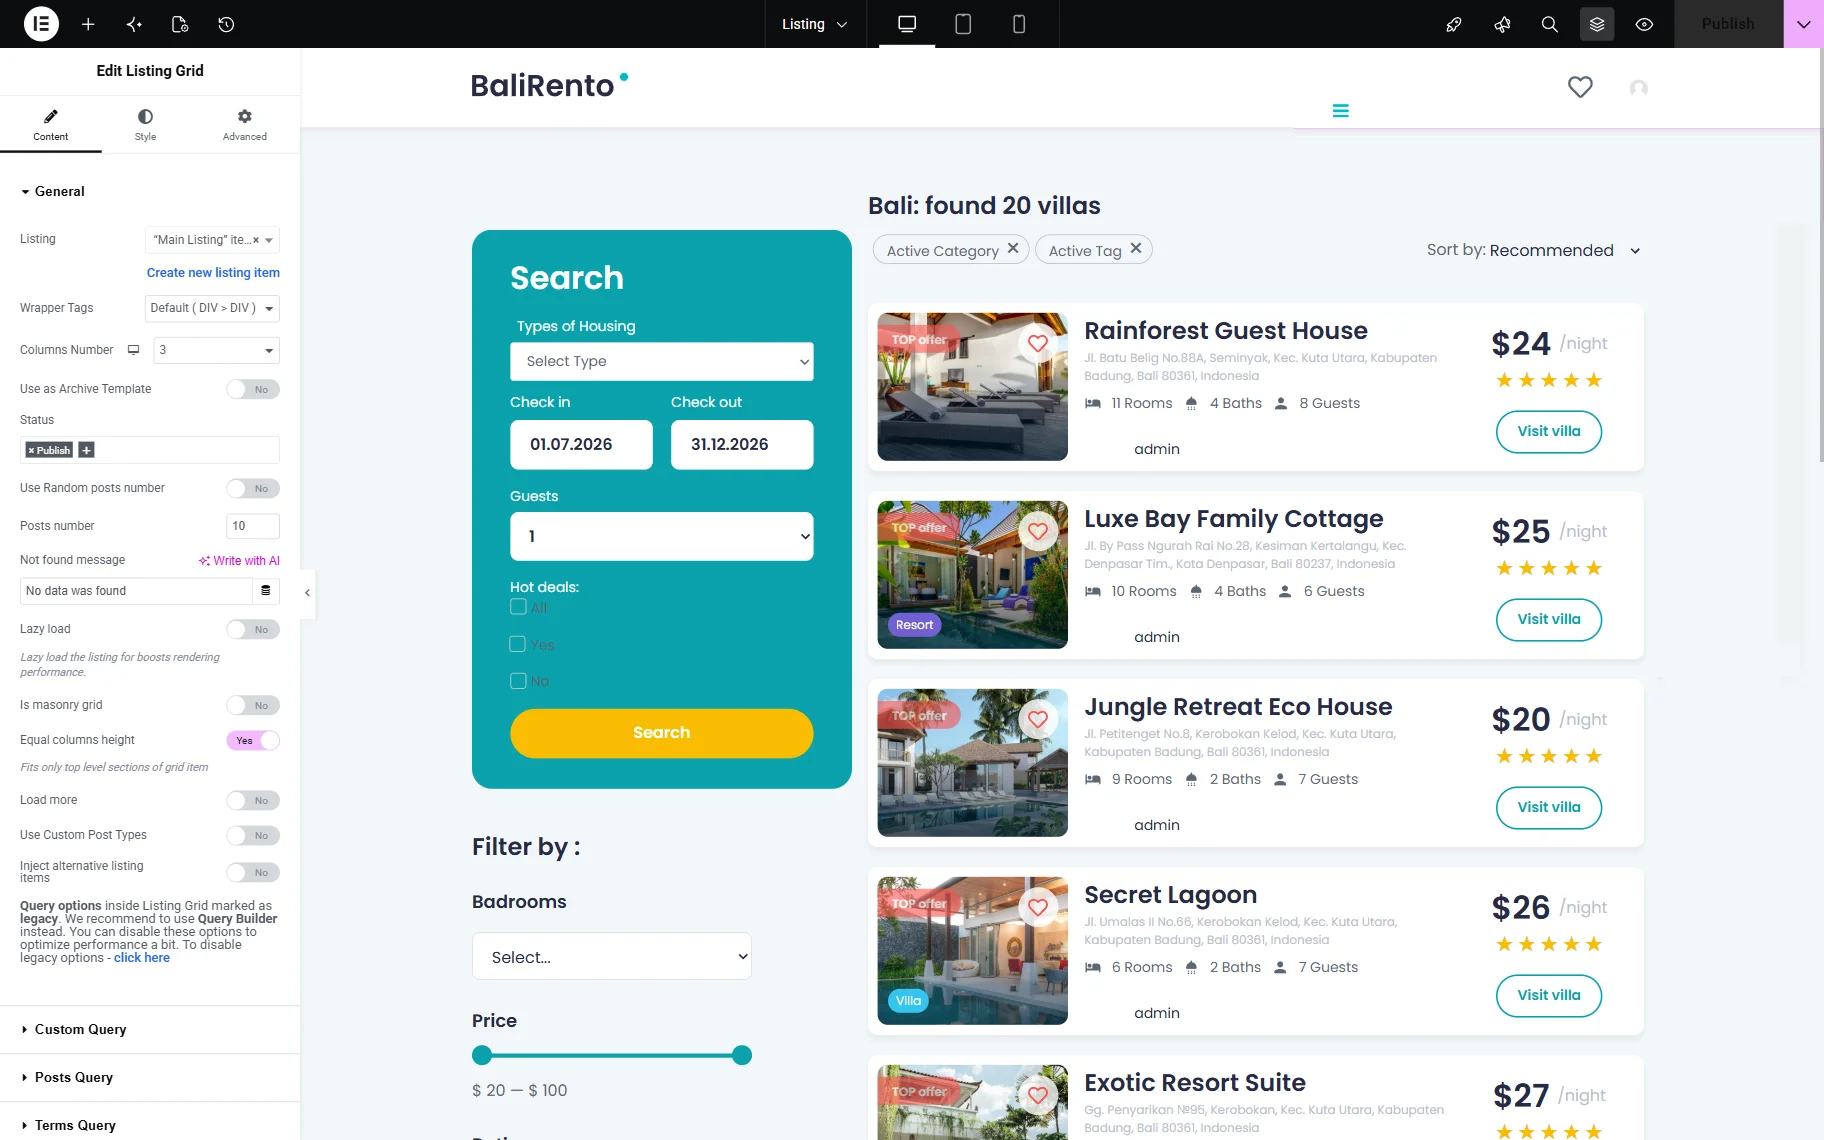
Here, the Date Range Filter added to a listing shows the posts available for the set date period.
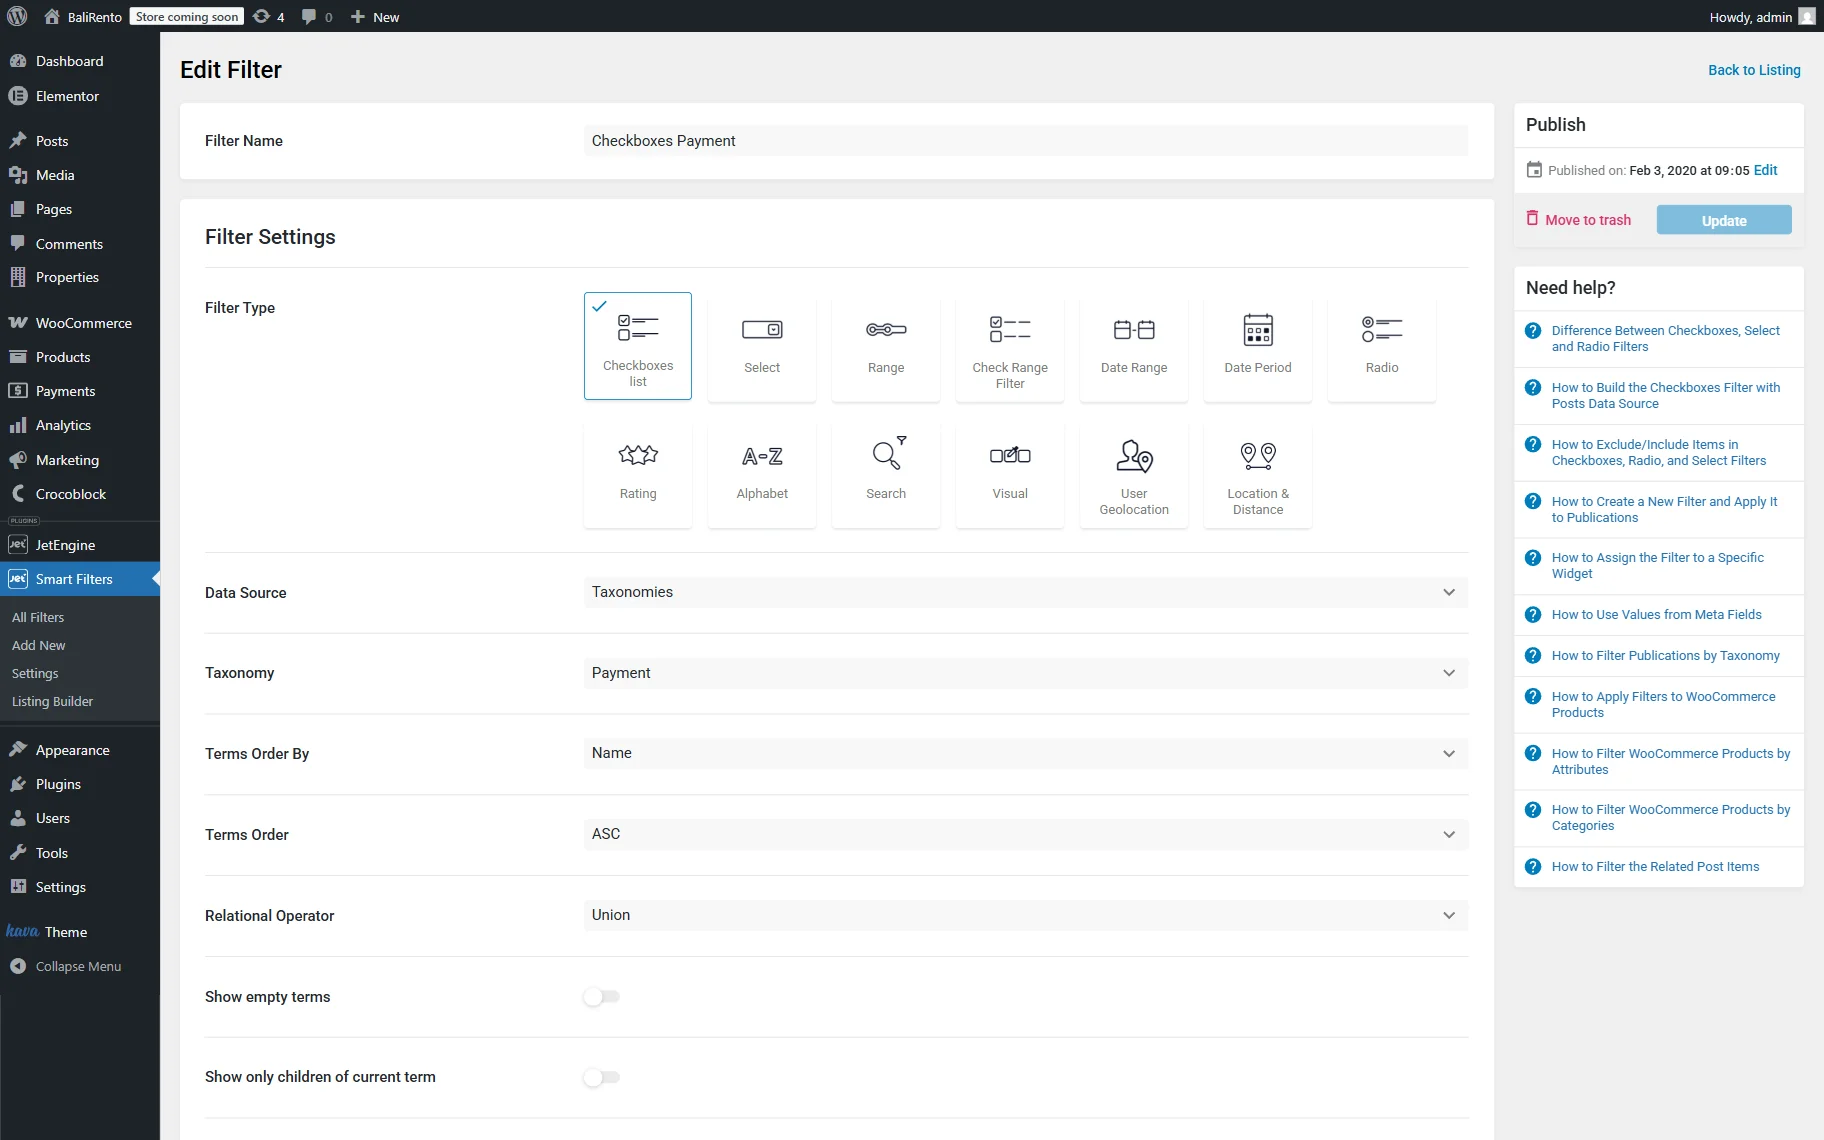
Checkboxes Filter
We consider the case of displaying the items with the predefined Custom Fields (the “Wi-Fi” Facilities, in this tutorial).
In particular, we complete the Filter Name field (“Checkboxes Facilities”), pick the “Checkboxes list” Filter Type, select the “Custom Fields” option in the Data Source drop-down menu, and select the necessary Custom Field Key (in our case, “_facilities”).
Then, scroll the page down and insert the field keys into the Query Variable field. Here, we insert the meta field Name/ID value of the corresponding meta field (that refers to the name field stored in the database) 一 “_facilities” text.
In the last stage, enable the Use Default Filter Value toggle and insert the required default value in the appeared Default Filter Value field (here we set “Wi-Fi”).
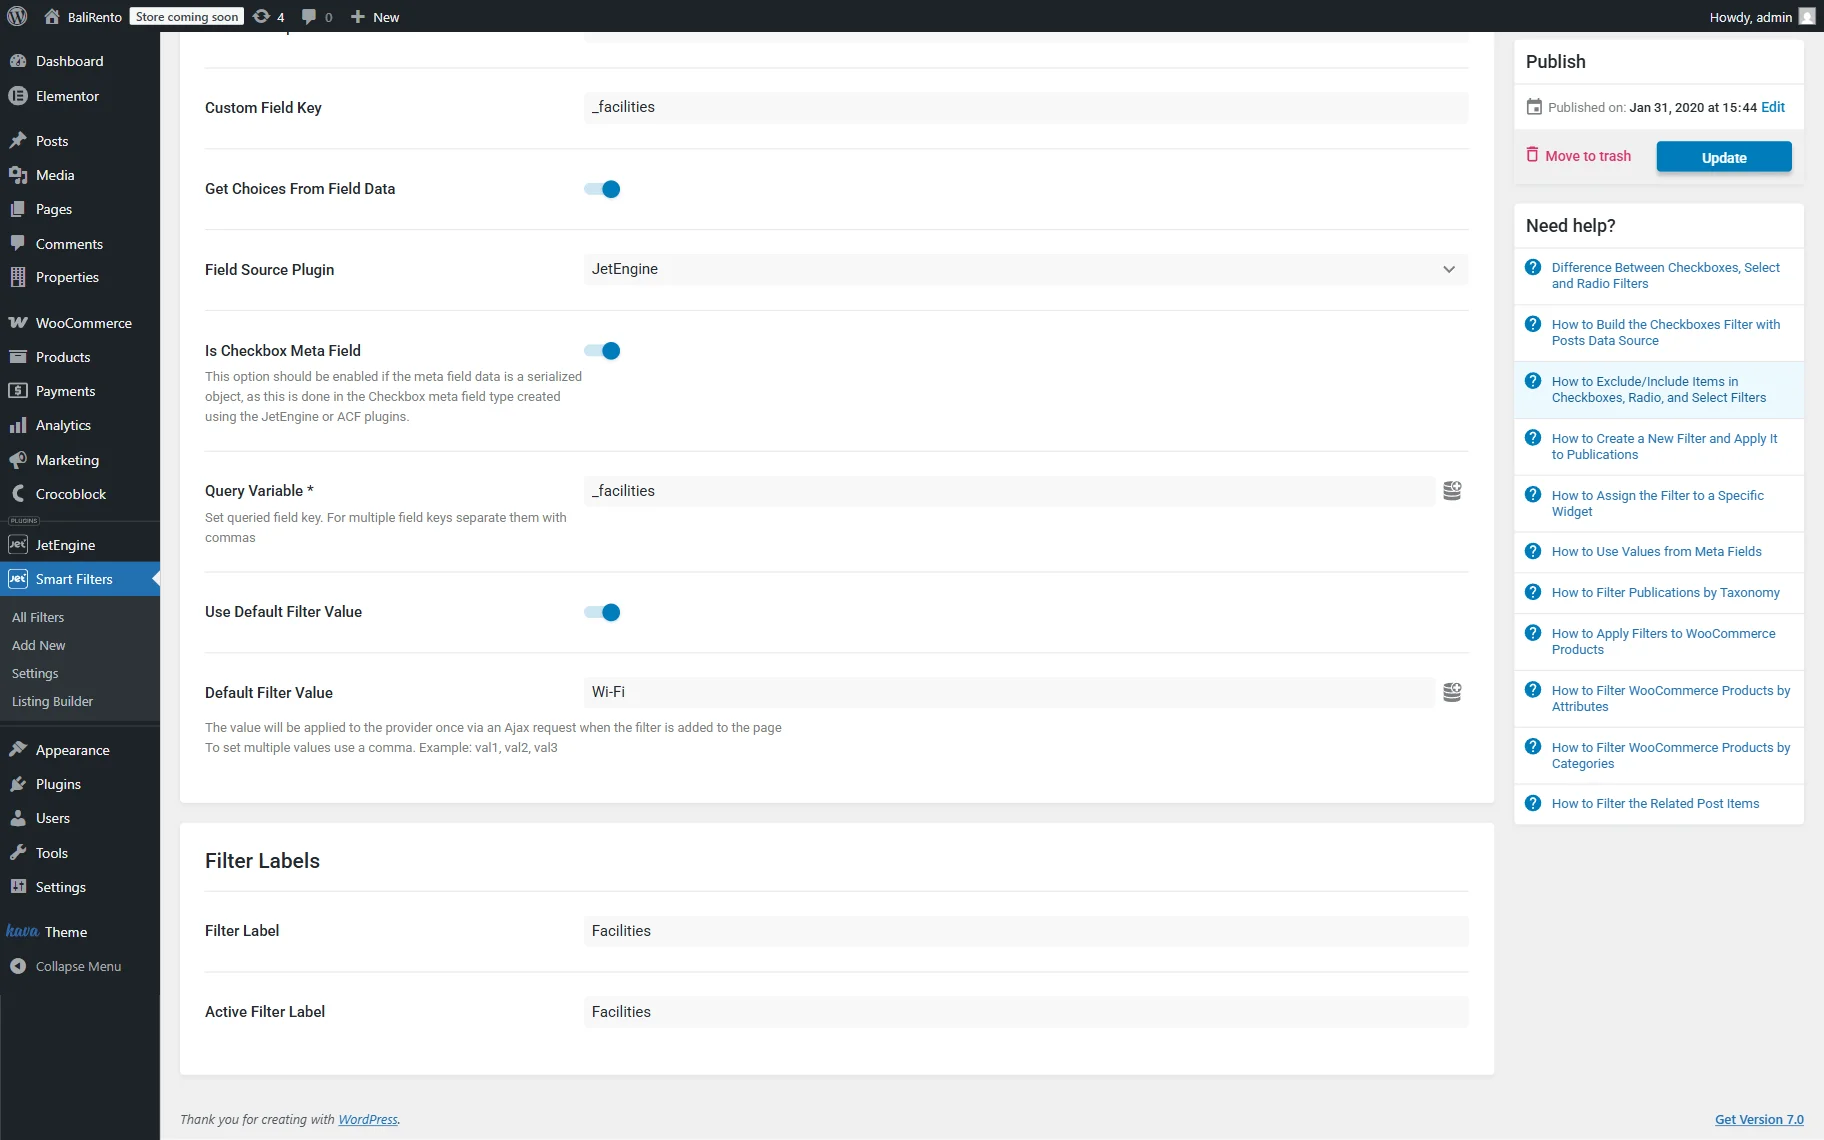
Fill in the Filter Label and Active Filter Label fields (optionally). Press the “Update” button to save the filter.
Next, add the filter to a page and configure its settings. We select the previously created filter (“Checkboxes Facilities”) in the Select filter field and set the “Page reload” or “Mixed” Apply type.
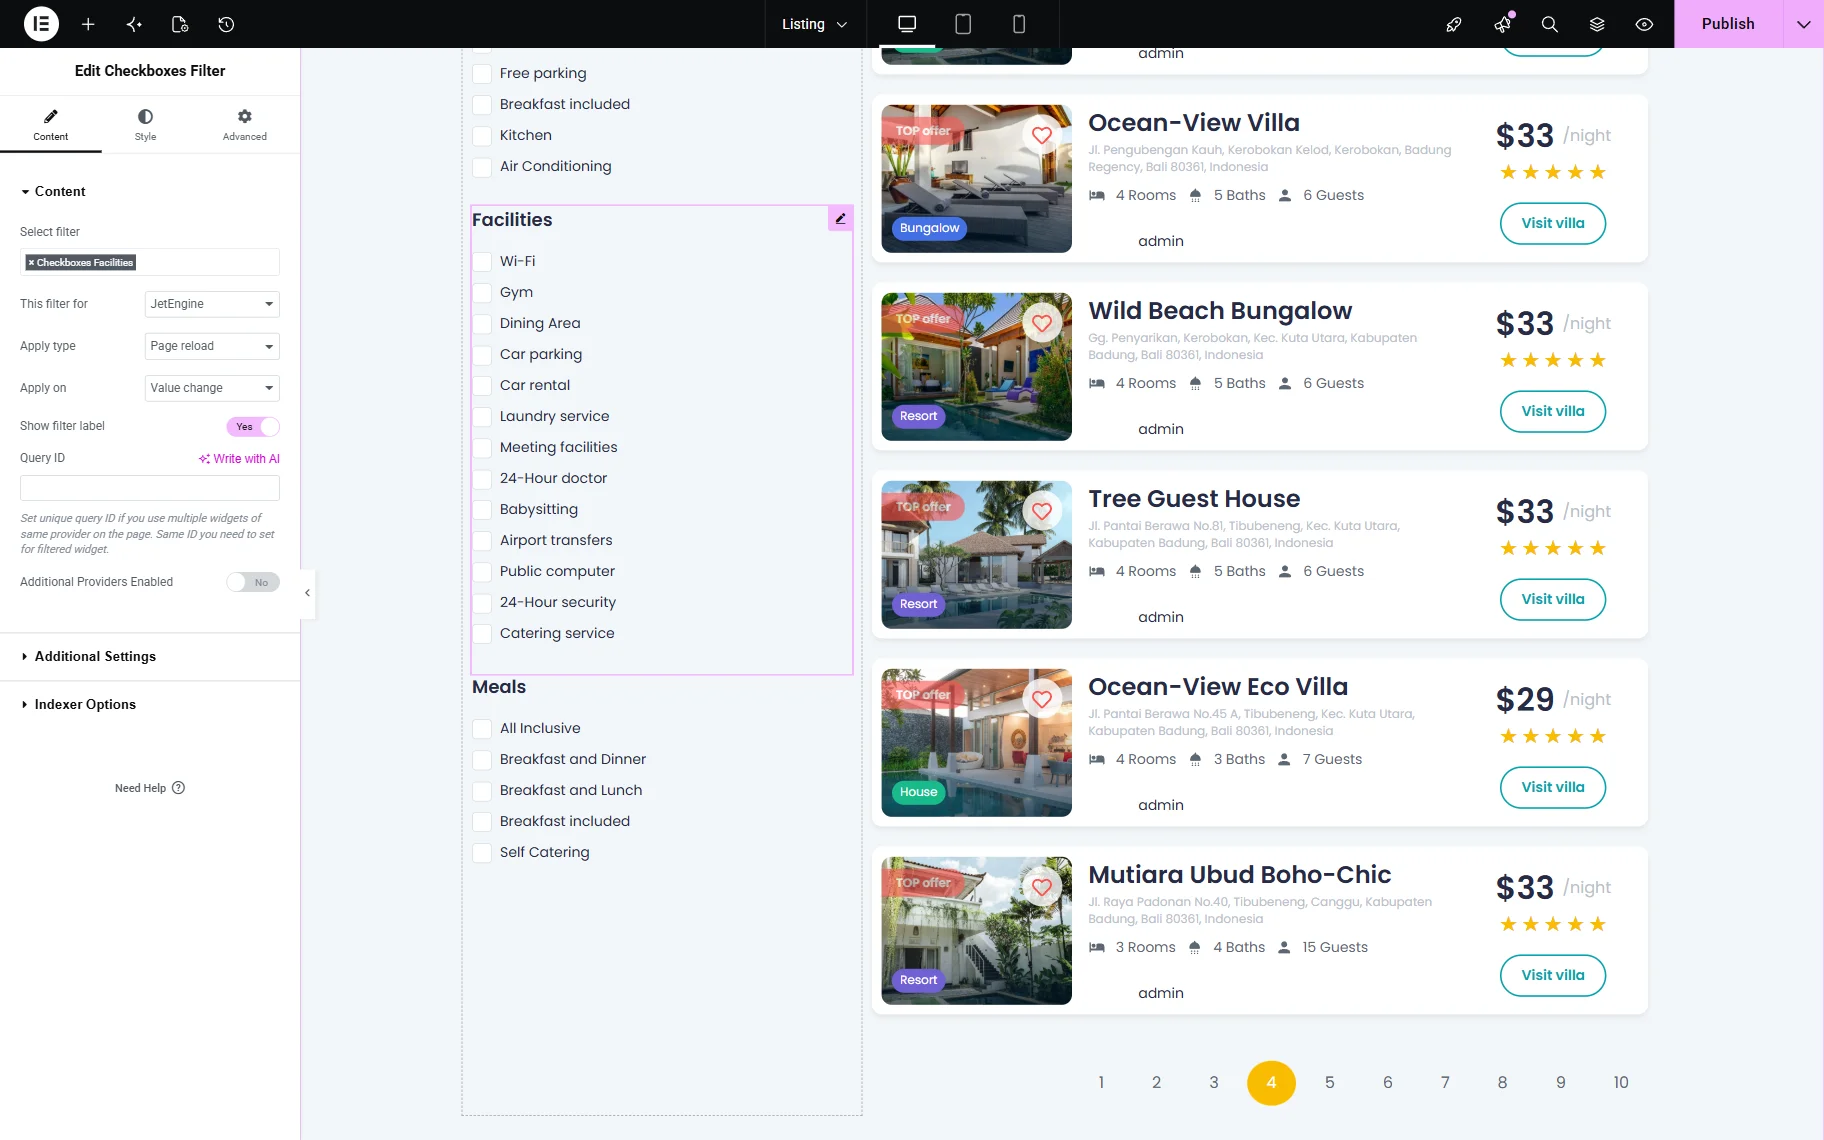
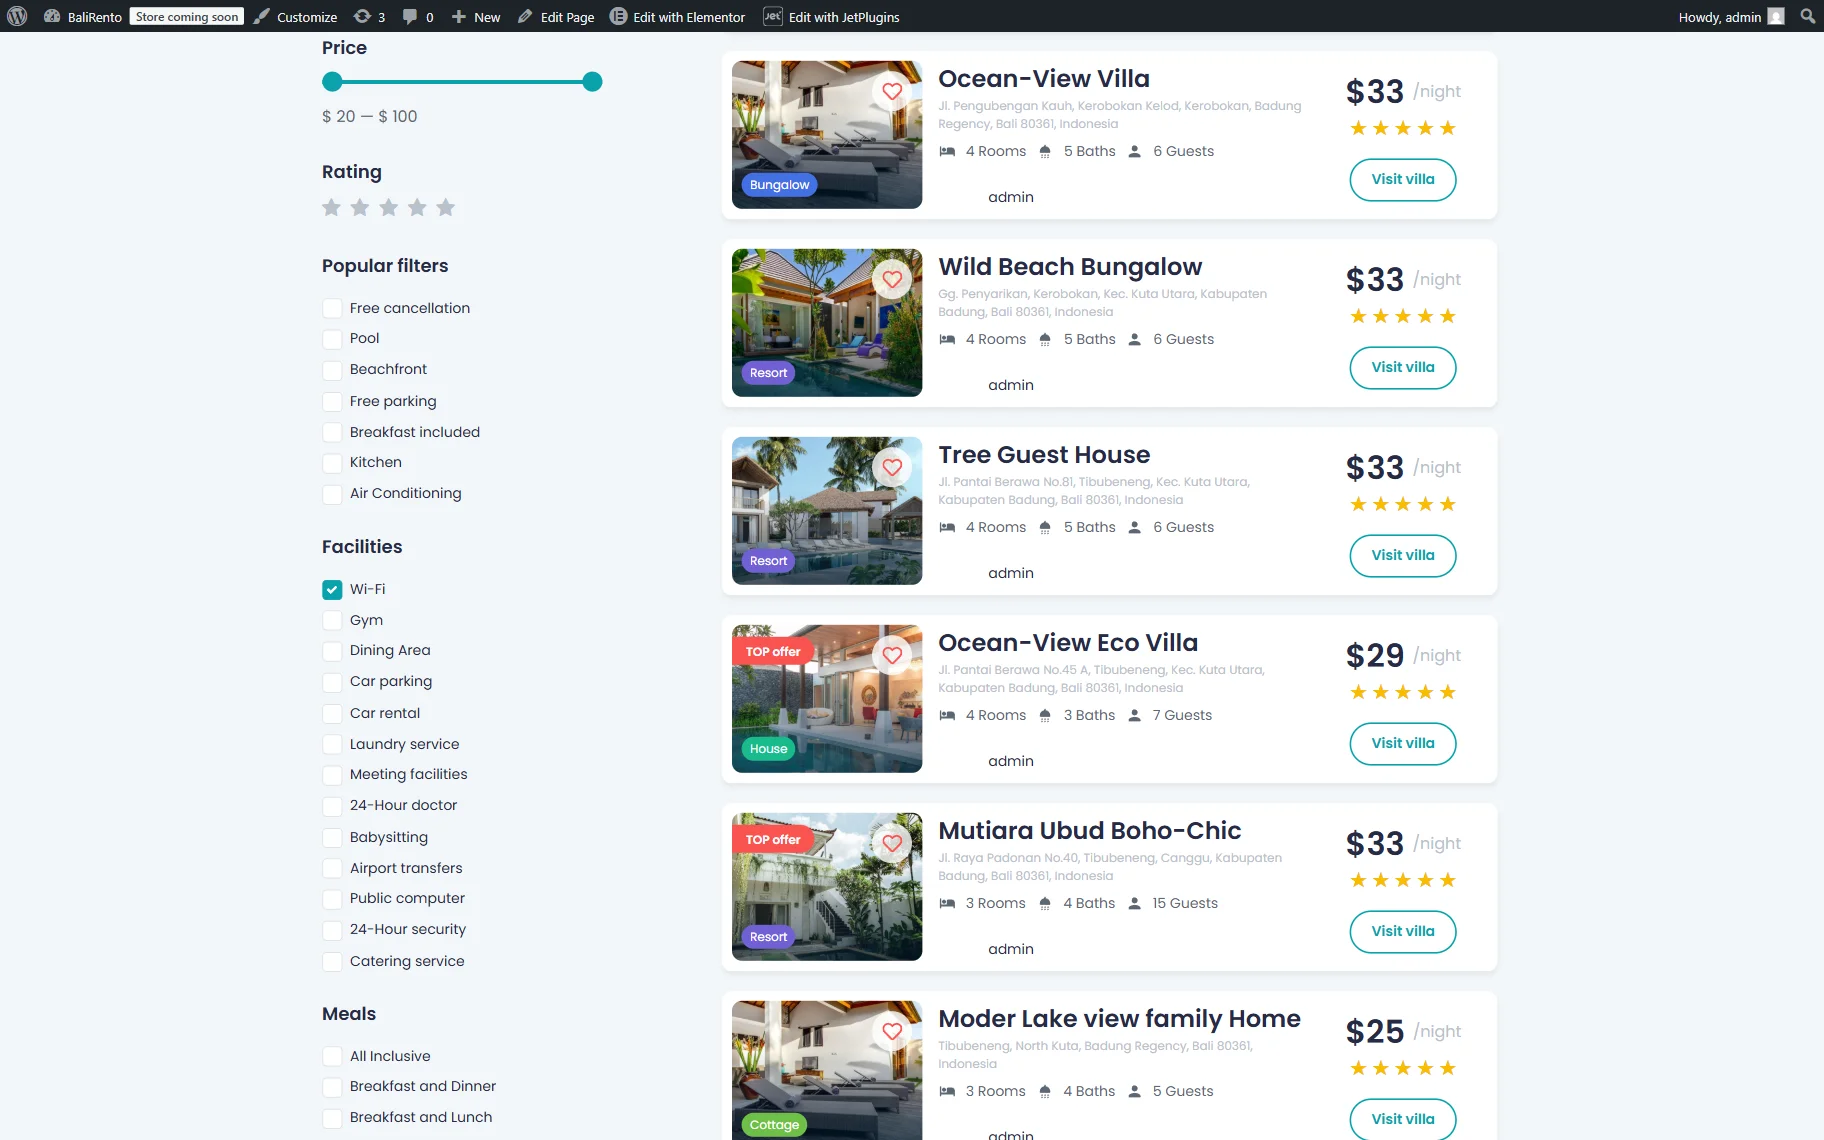
Move to the front end and check if the filter works correctly.
Set the Default Value Using the URL Parameters
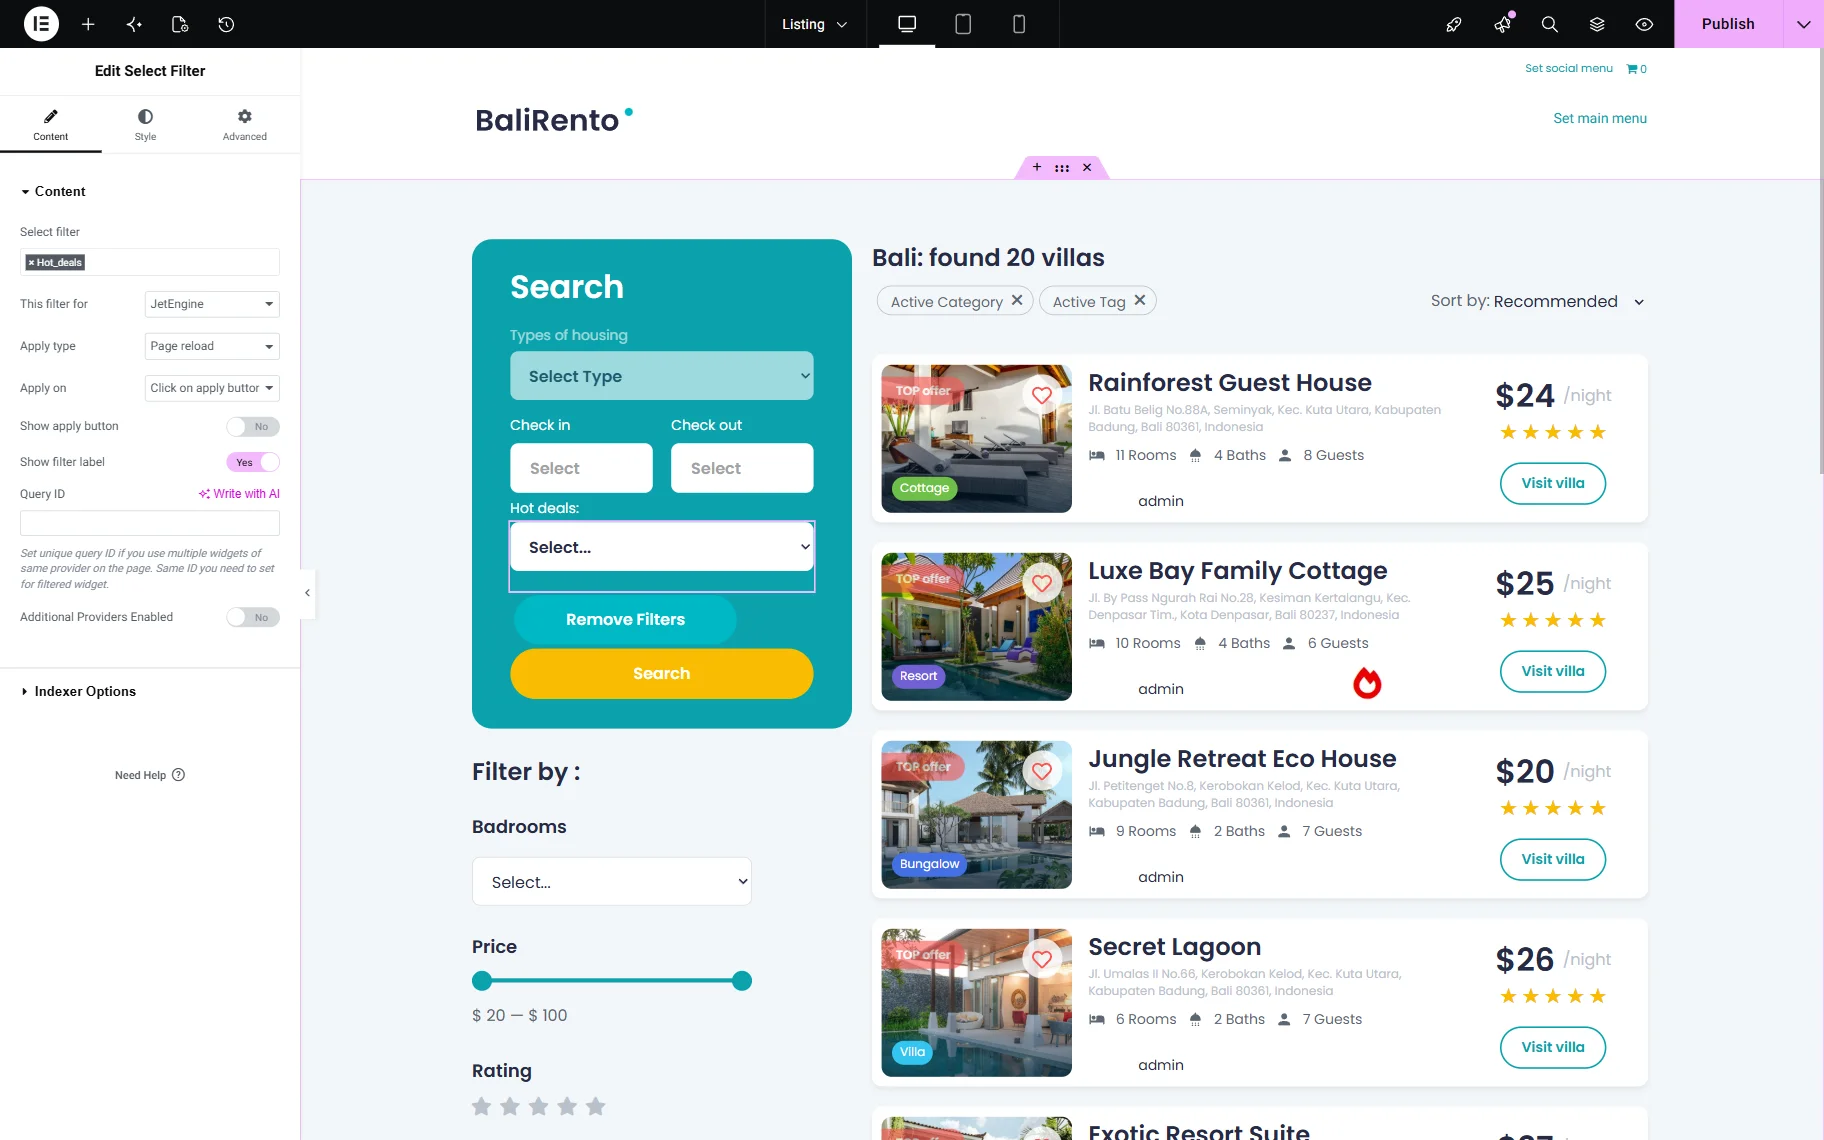
First, create the Checkboxes filter, add the Filter Name (“URL_checkbox”) with the Use Default Filter Value toggle disabled. Here, we create the Checkboxes filter to display posts with the needed taxonomy (the “Property Type” Taxonomy of the “Property” CPT).
Next, we build an archive template page for CPT posts (the “Property” CPT), divide it into two columns, insert the filter into the left one, and the Listing Grid widget into the second column. Then, we specified the previously created filter (“URL_checkbox”) in the Select filter field and set the “Page reload” or “Mixed” Apply type. Adjust the other Checkboxes Filter and the Listing Grid widget settings.

Watch the Step-by-Step Guide: Custom Listing Pages and Archives with Crocoblock JetEngine and Elementor video for practical tips, tricks, and insights on building a custom post type listing archive.
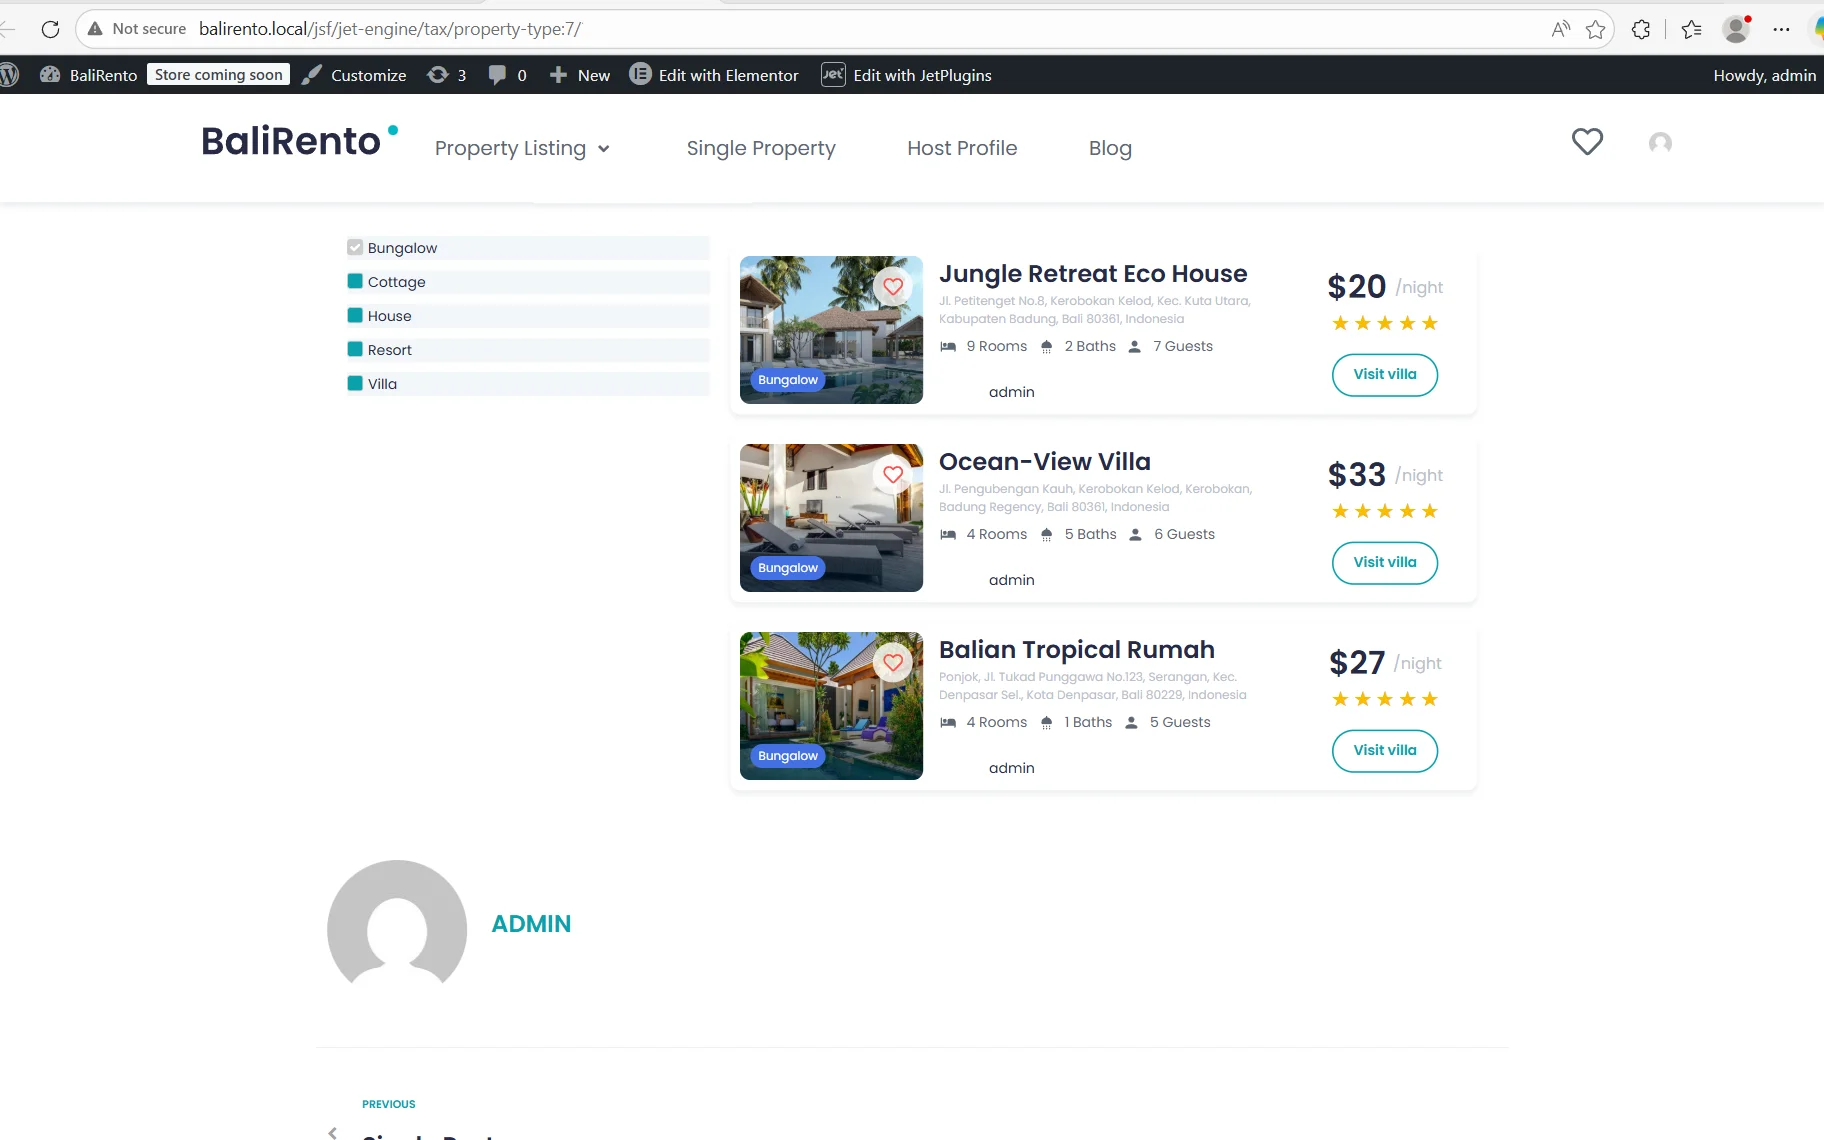
Then, publish the page, go to the front-end, and copy the page’s URL after applying the filter. In particular, since we intend to display the CPT posts with the “Bungalow” Taxonomy, we tick this option in the filter and get the next URL:
http://balirento.local/jsf/jet-engine/tax/property-type:7/
where:
- jsf – JetSmartFilters;
- jet-engine – shows provider for filters;
- tax – shows that the filter uses taxonomy as the data source. It changes depending on the option you selected in the Data Source when creating the filter;
- property-type:7 – “property-type” is the category slug, and “7” is the category ID.
The Filter URL Structure Settings Overview explains the filter URL structure settings for the JetSmartFilters and how such settings affect SEO, and how to fix related issues.
Further, the obtained URL can be used as a slug for a page that will be displayed with the filtered data. Also, users can email such URLs to get the filtered data.

In the next step, build the URL Aliases for the filtered items. Here, move to the JetSmartFilters > Settings tab on the WordPress Dashboard, open the URL Structure Settings tab, and turn the Use URL Aliases toggle on.
Then, the repeater with two fields inside will appear: the Needle (first field) to enter a value from a URL string to replace, and the Replacement (second field) to enter a value that replaces it in the URL.
Here, we insert the copied values into the Needle field: “/jsf/jet-engine/tax/property-type:7/ and into the Replacement field: /filter/tax/property-type:7/”.
To save changes, press the “Enter” key or remove focus from the input field and wait until the Settings have been saved pop-up appears.
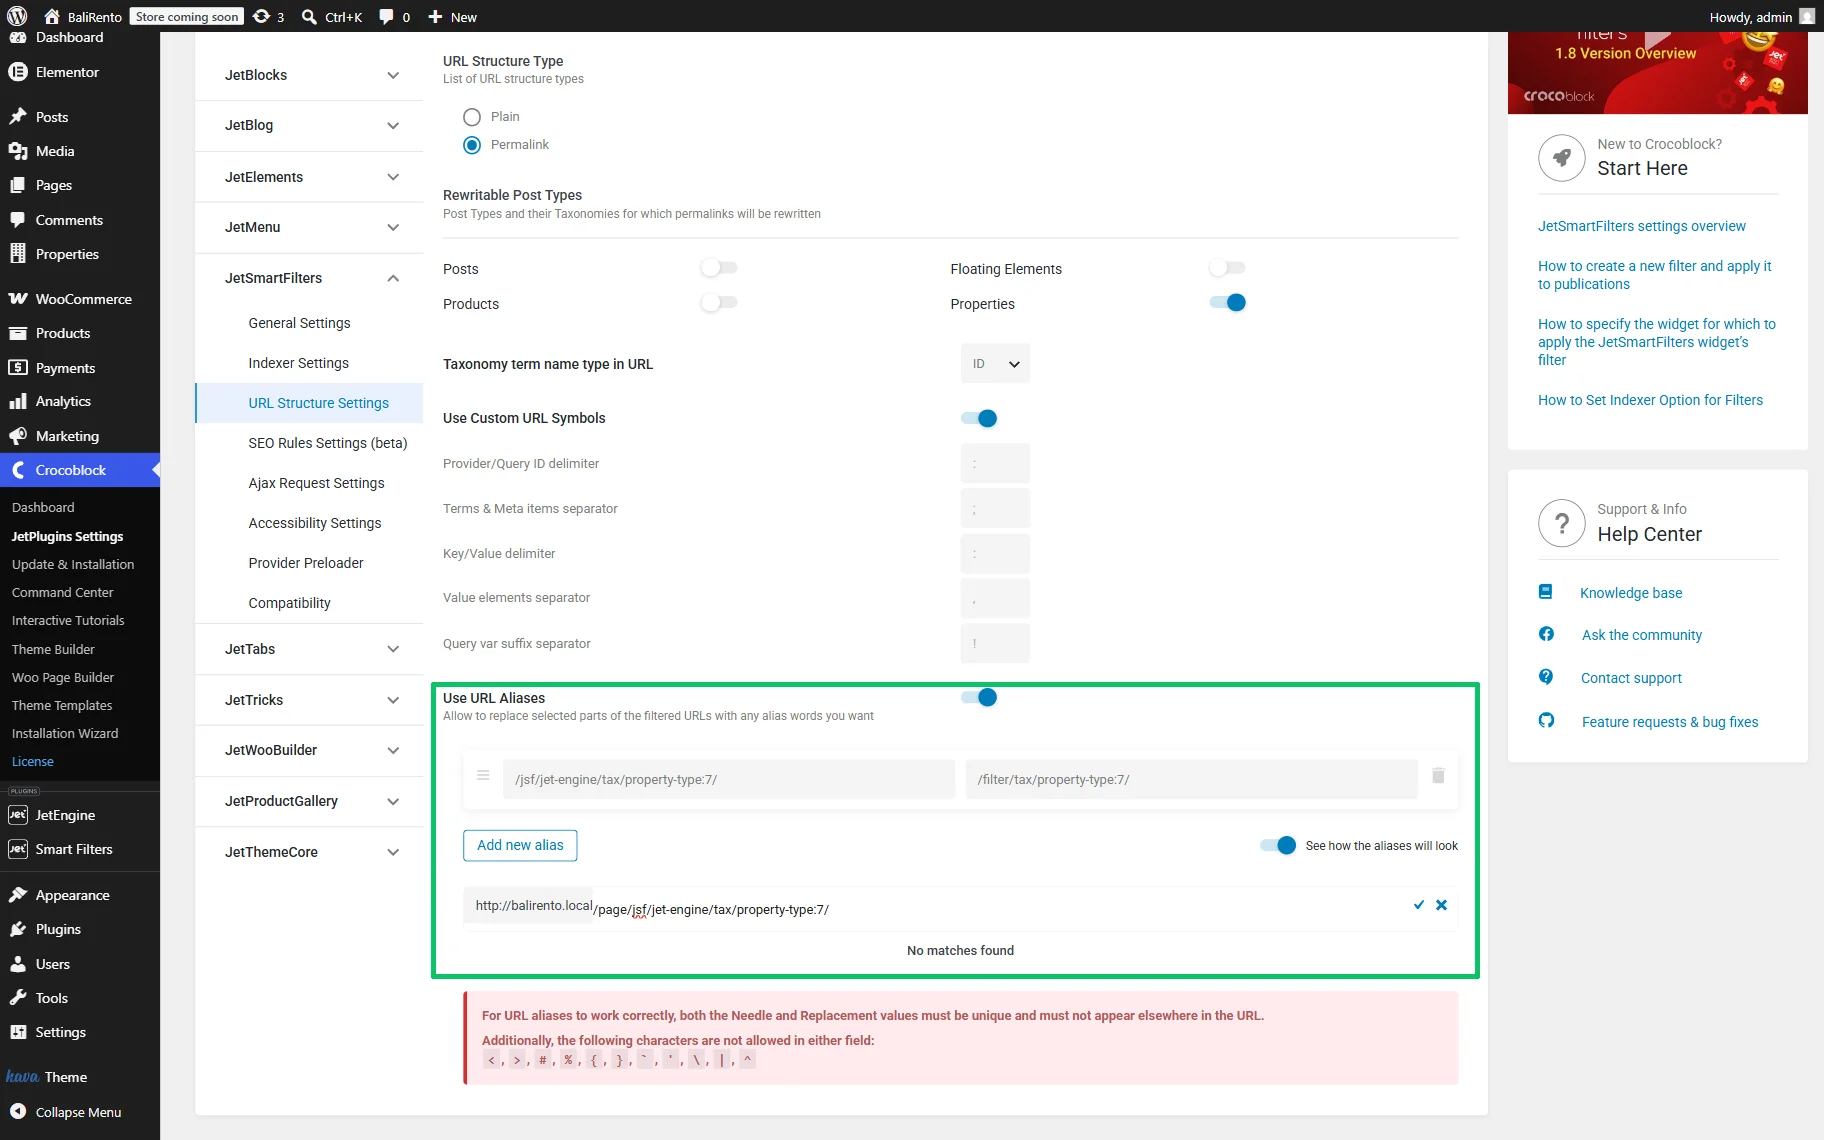
In addition, if you enable the See how the aliases will look toggle, you can see how changes occur in the URL during direct and reverse transformation.
Also, watch the How to Create User-Friendly URL Aliases in Filters video to learn the URL structure settings, enabling user URL Aliases, replacing the selected part of the URL, and affecting only a certain page’s URL.
Reset Behavior
To reset the filters, we add the Remove Filter to the corresponding page. In this case, if you set the default values in the filter’s settings, once clicked, the Select Filter, Checkboxes Filter, Date Range Filter, and Radio Filter return to the clear state.
Also, if you applied the Remove Filter to the filter with the default value set by the URL parameters, after clicking the “Remove Filters” button, the filter will return to the clear state, and the page will be redirected according to the data inserted in the Replacement field.
FAQ
The JetSmartFilters plugin allows filtering posts, terms, users, related items, glossary items, Custom Post Types, or Custom Content Types (CCT) posts. Read the Filters Data Source Overview to learn the data sources available.
You can expand/collapse categories in filters, show prefiltered results from the menu, exclude/include items, create responsive filters, create a custom taxonomy hierarchical filter with select filter type, set up a redirect path to filter results page, add pagination, and more.
No, currently this functionality is unavailable.
You can calculate and display the distance between users/terms/CCT, as well as filter listings based on geolocation. Read the Location & Distance Filter Overview for more details.
Yes, you can set up SEO rules for pages containing filters and SEO title and description for filtered URLs, as the How to Set up SEO Rules and How to Set Up SEO Title and Description for Filtered URLs tutorials describe
That’s it. Now you know how to manage the Default Value setting in different types of JetSmartFilters filters to display the results as the initial state, as well as to configure the URL Aliases to set the Default Value, and apply the Remove Filter to clear filters on your WordPress site.