How to Display Booked Items on the User Account Page
Find out how to display bookings made by the current user on the user account page created with JetEngine.
Before you start, check the tutorial requirements:
- Elementor (Free version) or Block editor (Gutenberg)
- JetEngine plugin installed and activated with the Account page created
Using the JetEngine plugin, you can query the created bookings by the current user and display them as a listing on the User Account page.
Once the user makes a booking on the site, information about this booking will appear in their account, where the user can track the booking status.
This tutorial covers configuring the custom query and displaying the query results in a listing.
Configure a Custom Query to Display Booked Items
The custom query will filter bookings made by the current user and allow displaying results as a listing.
Head to WordPress Dashboard > JetEngine > Query Builder and click the “Add New” button to create a new query.
Name the query and select the “JetBooking Query” Query Type.

This type of query returns all bookings created on the site. Using different query settings, you can narrow down the results. To learn more about these settings, proceed to the JetBooking Query Type in the Query Builder Overview.
To display only the list of bookings created by the current user, move to the body of the query and, in the General section, hit the “database” button near the User ID field, and select the “Current User ID” macro.
You can enable the Preview Results toggle to check how the query narrows the results.
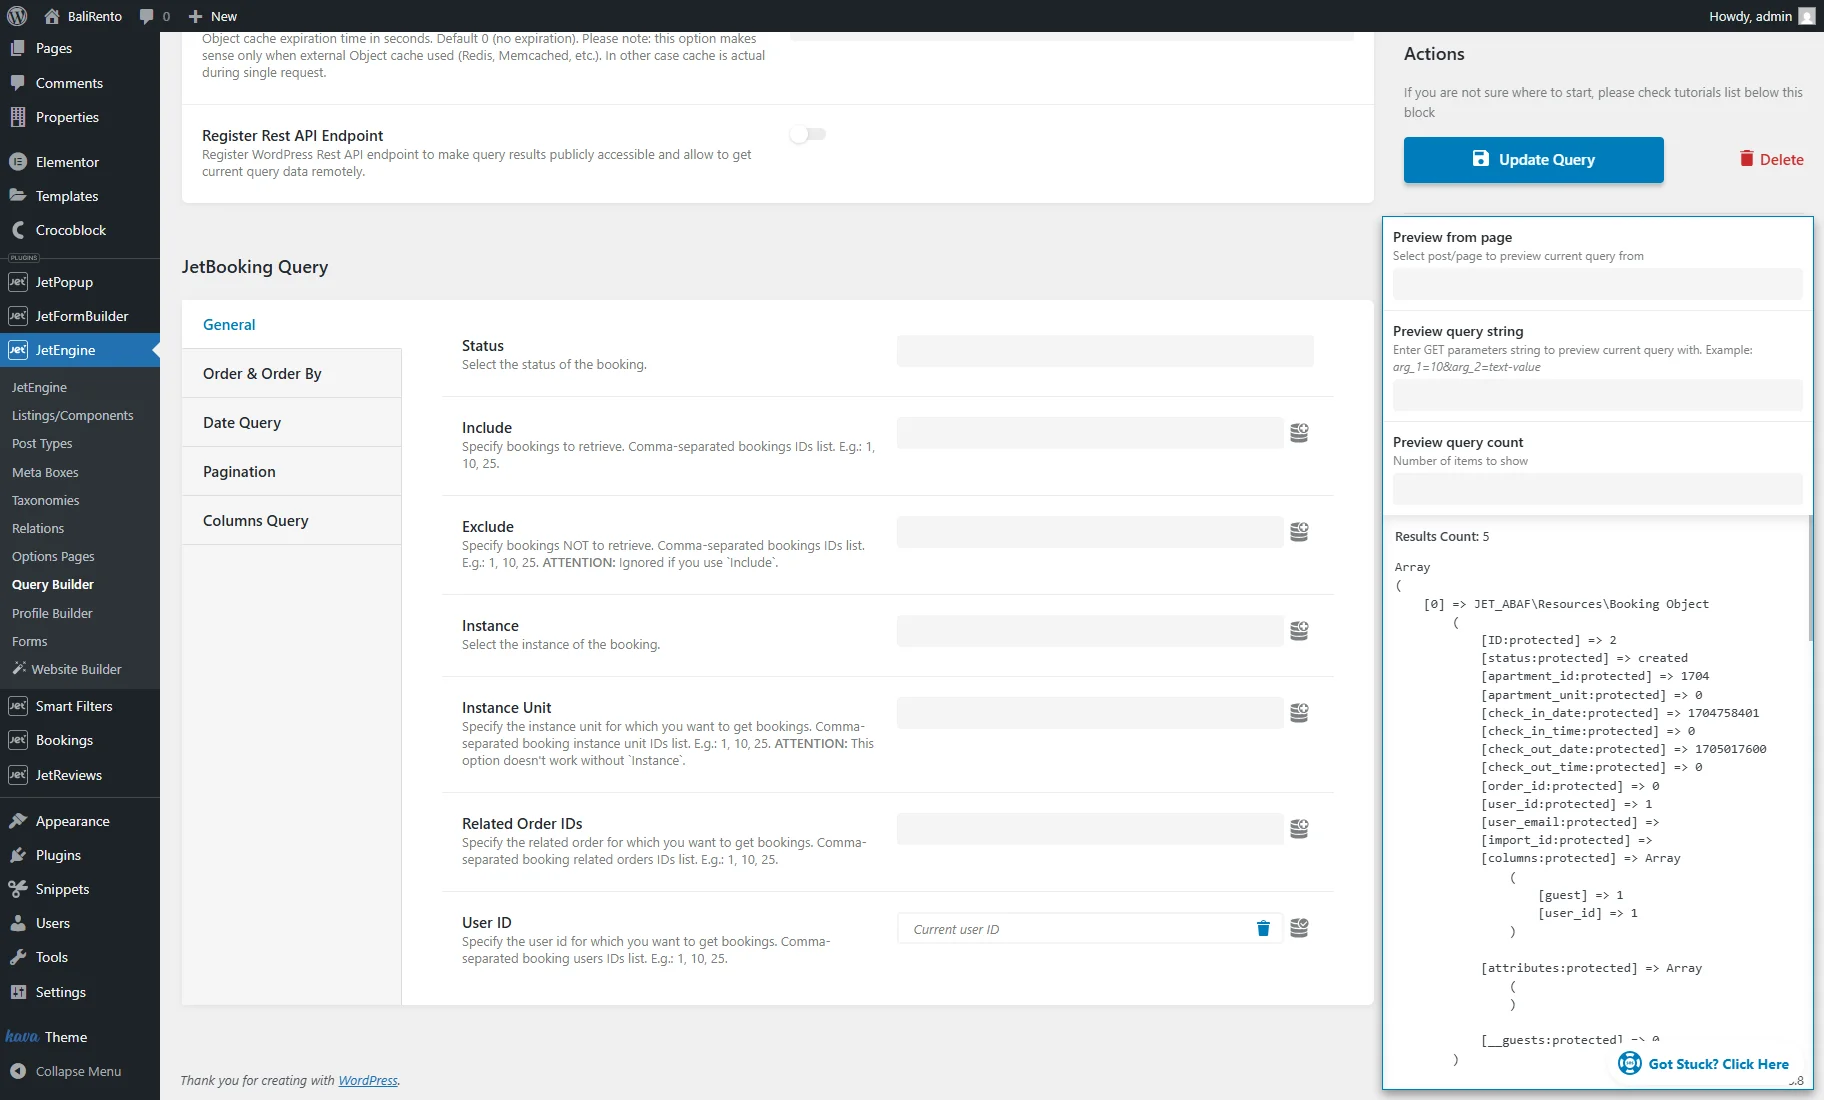
Now, the query retrieves only bookings created by the current user. Configure other custom query settings and push the “Add/Update Query” button.
Create a Listing to Display Bookings
The next step is to create and style the Listing template for the bookings on the User Account. The Listing template can be created using Elementor, WordPress block, Bricks, or Timber/Twig editor.
Building a Listing template in the Elementor editor
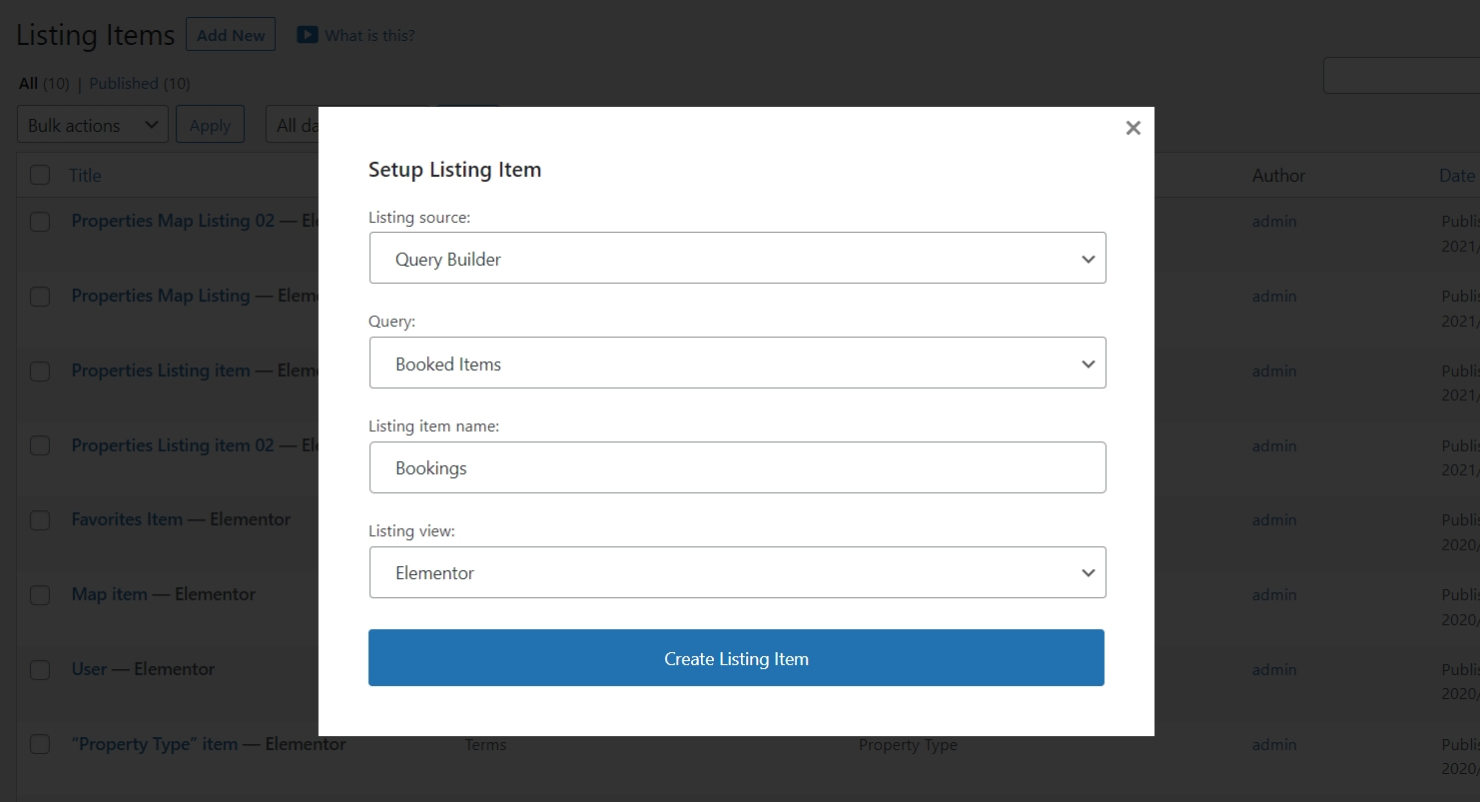
Navigate to the WordPress Dashboard > JetEngine > Listings/Components tab and press the “Add New Item” button to add a new template.
In the Setup Listing Item window, select “Query Builder” as the Listing source; then, select the custom query created in the previous step and give the listing a name.
Finally, select “Elementor” for the Listing view if you build the website with Elementor and click the “Create Listing Item” button.
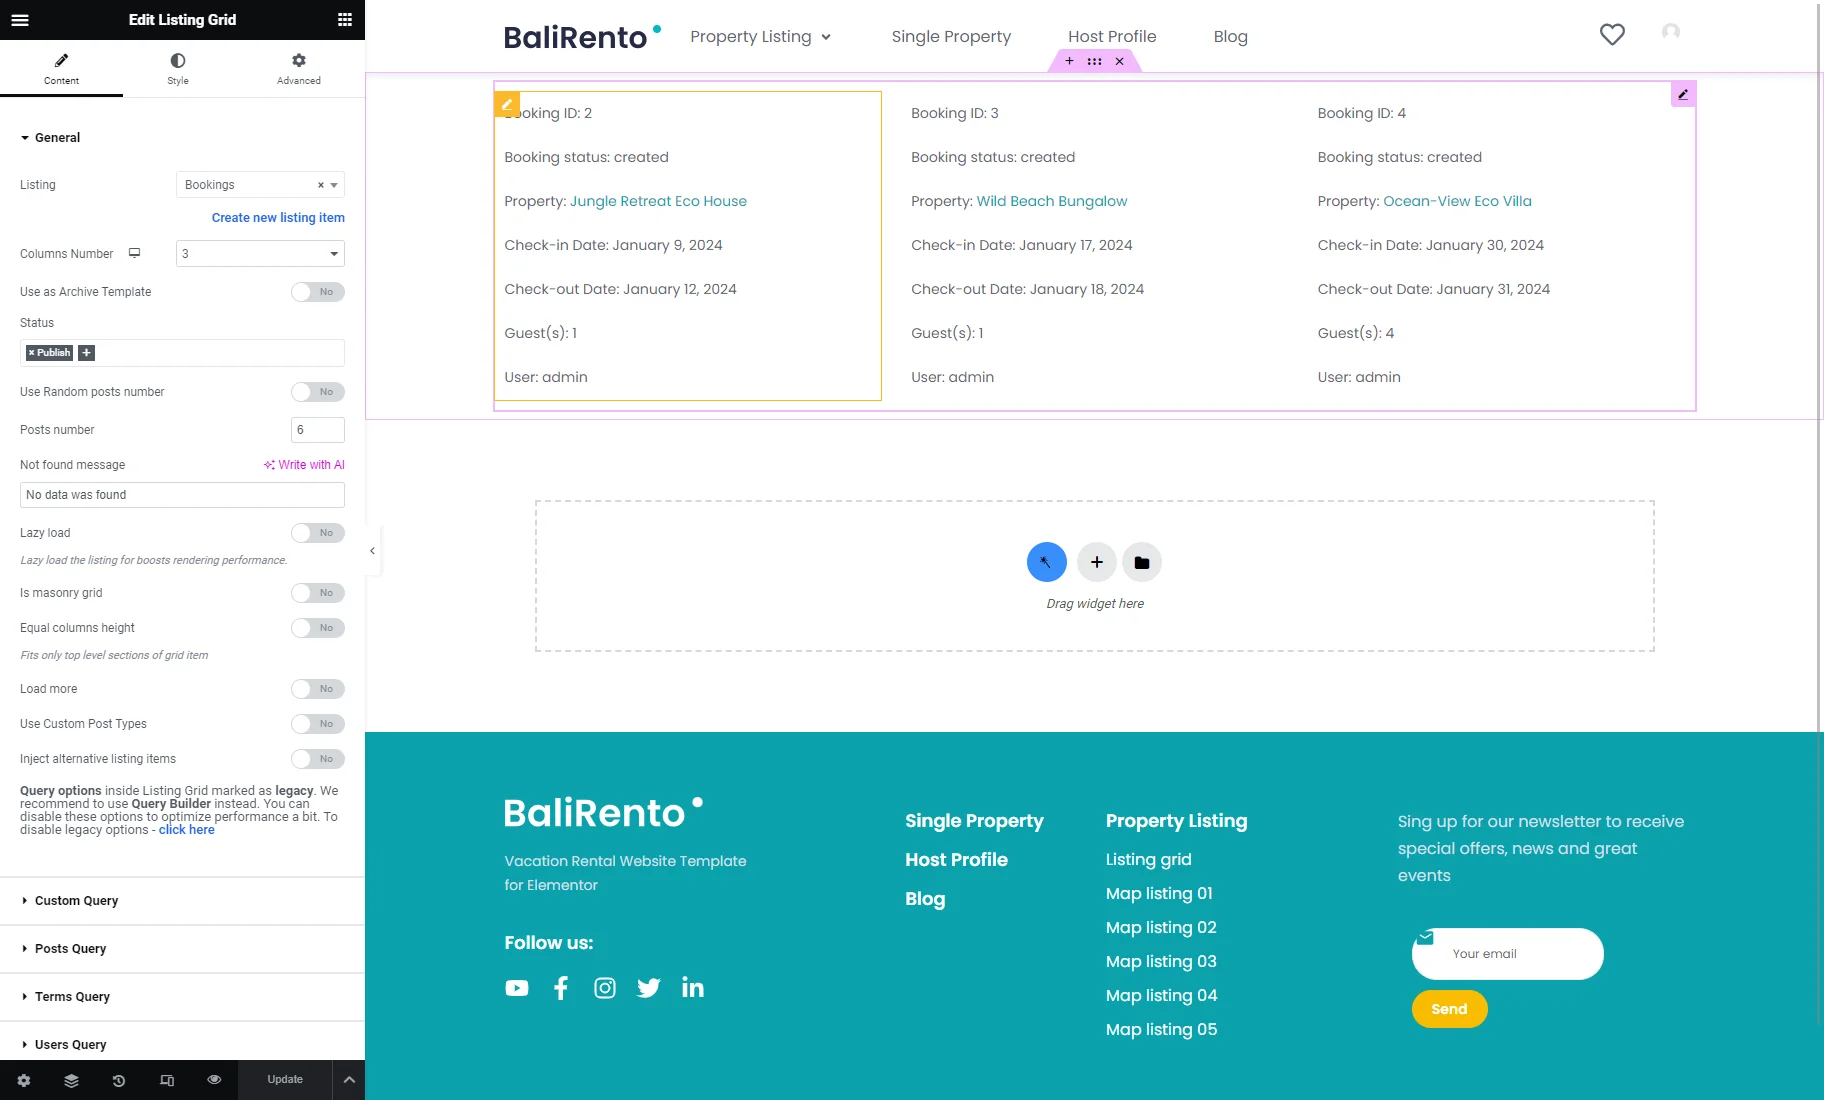
Now, it is time to customize the listing template for the booked items. You are free to display any column retrieved by the custom query. In our example, we will display the booking ID and status, the linked title of the booked instance, dates, number of guests, and user information. All of this data will be displayed with the Dynamic Field widget.
First, drag and drop a Dynamic Field widget to the editing area. Select the “Post/Term/User/Object Data” as the Source. In the Object Field drop-down menu, scroll down until you see the JetBooking section and pick the “Booking ID” option.

To include additional text to this value, enable the Customize field output toggle and customize the format area. For example, we typed “Booking ID: %s” into the Field format.
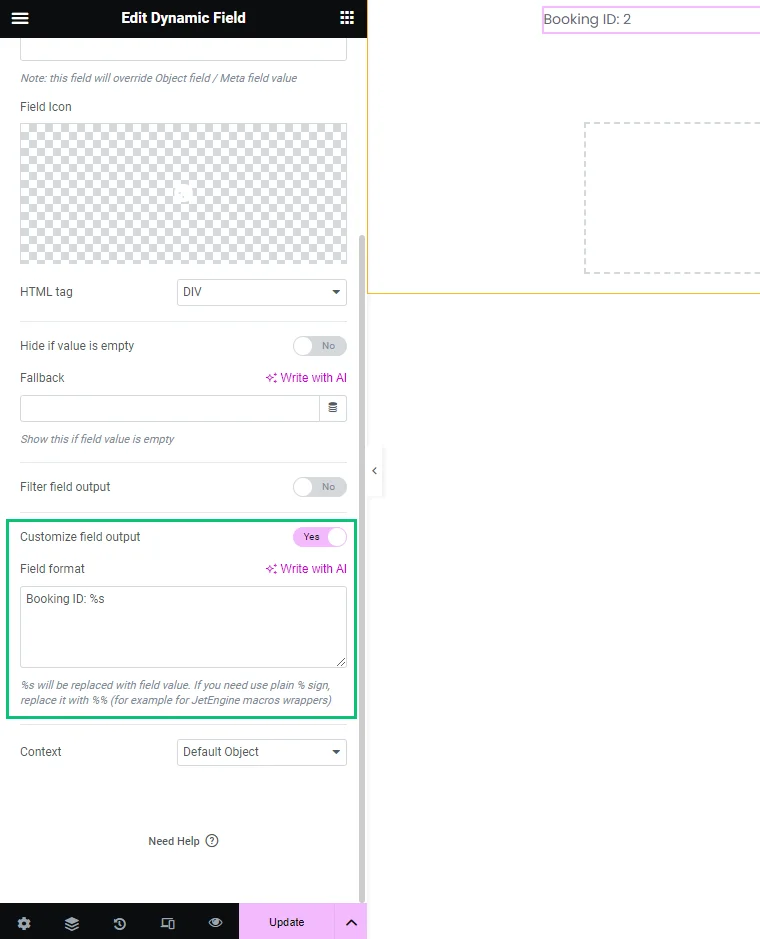
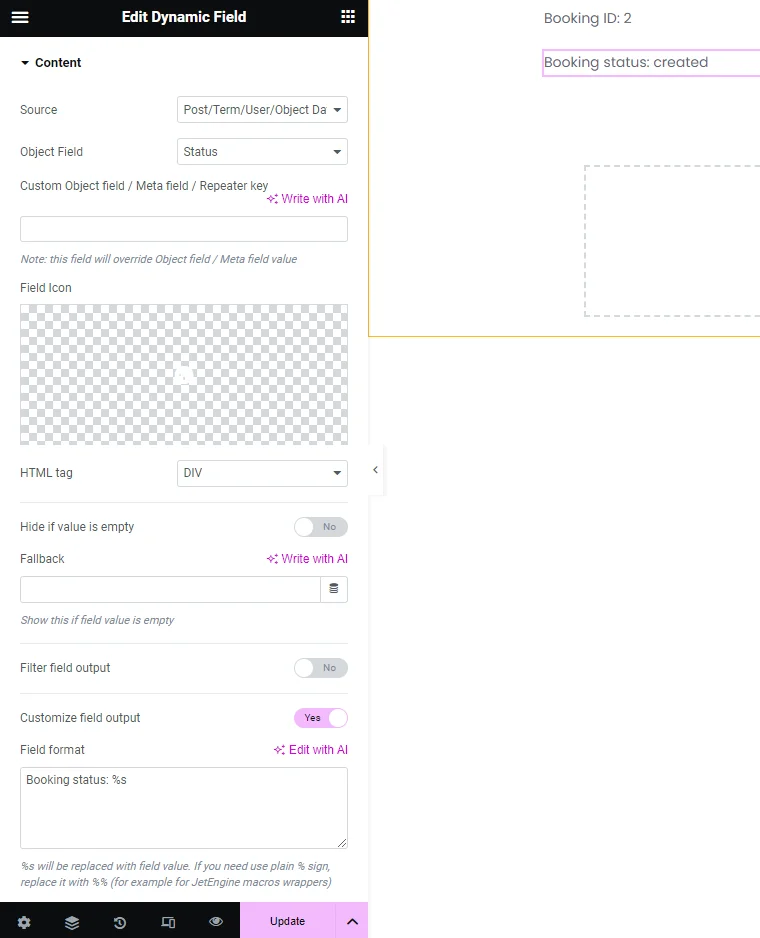
Now, the listing displays the booking ID. Similarly, add the booking status.
Add a new Dynamic Field widget or duplicate the existing one. Repeat the above steps to display the “Status” option and format it as needed.
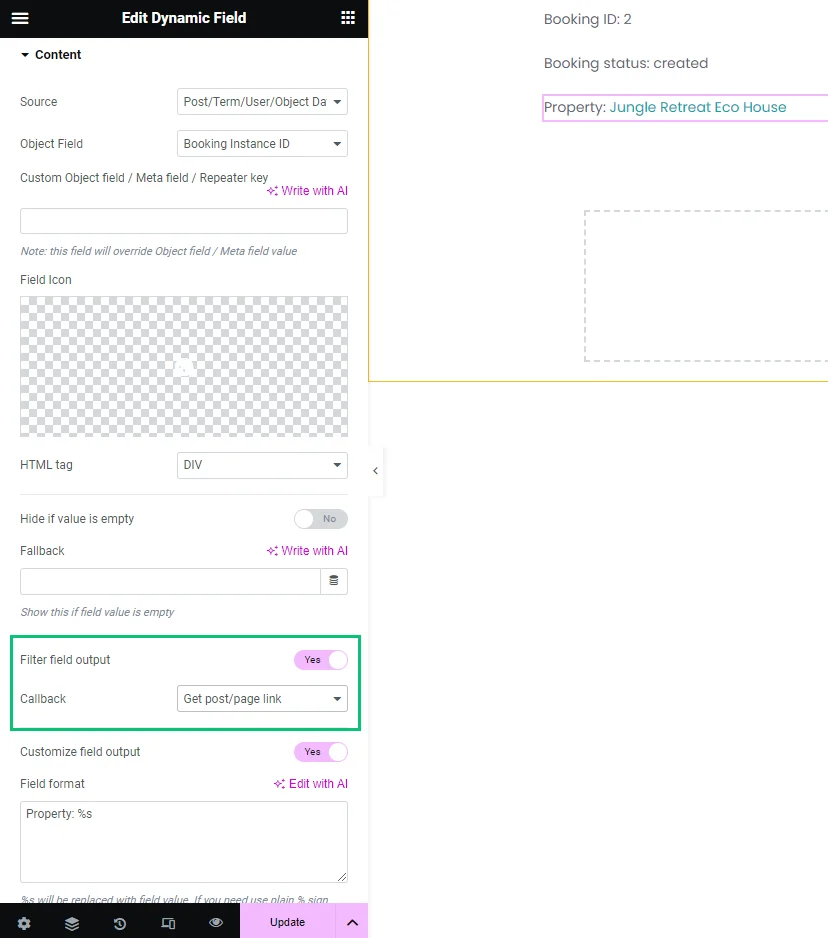
To display the name of the booked property (post title), add another Dynamic Field widget and select the “Booked Instance ID” option as the Object Field. The value of this option is the post ID.
To transform it into a linked title, enable the Filter field output toggle and select the “Get post/page link” Callback. This callback formats the value and outputs the name of the post instead of its ID. Also, you can display just a post title without a link, post URL, and post thumbnail with callbacks. Learn more in the Display post and term titles, links, and URLs chapter of the Dynamic Field Widget Overview.
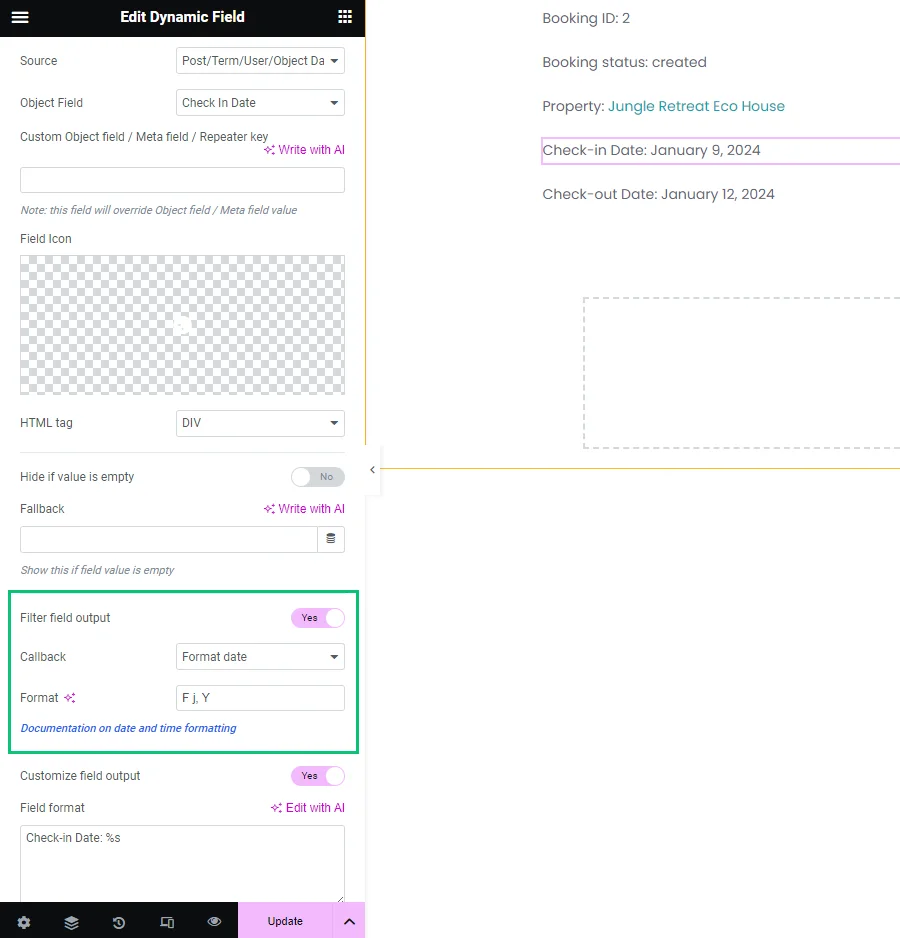
Then, we can display the booked dates. Add two Dynamic Field widgets: one showing the “Check In Date” option and the other displaying the “Check Out Date” option. These options contain the check-in and check-out dates in the timestamp format.
To convert the timestamp to a human-readable date, activate the Filter field output toggle and choose the “Format Date” callback. Don’t forget to define the date format according to the Customizing the Time and Date Format documentation.
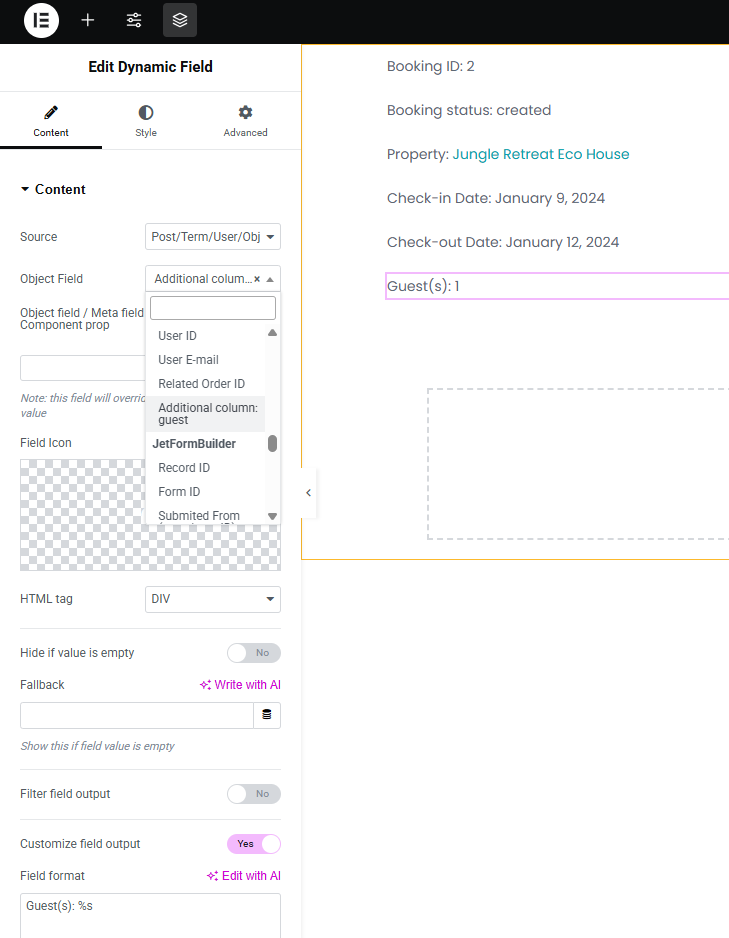
You can also display values from the additional JetBookings table columns added in the WordPress Dashboard > Bookings > Settings > Tools tab. For that, add another Dynamic Field and select the “Additional column: …” option. For example, in our case, we picked the “Additional column: guest” Object Field.
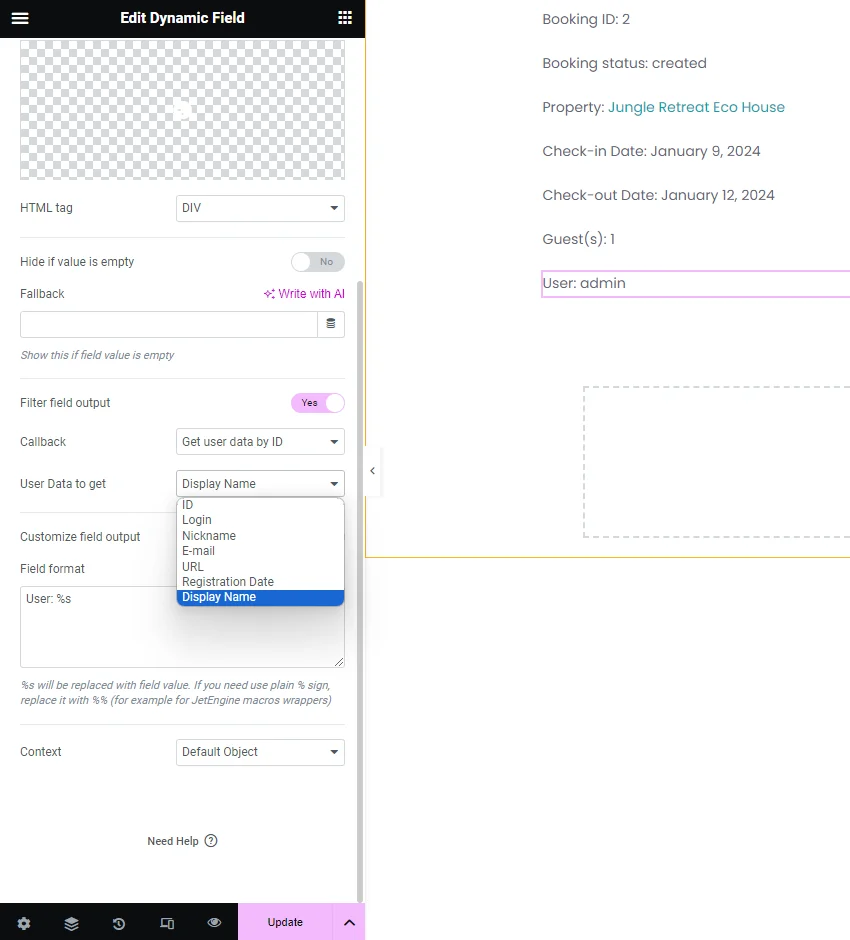
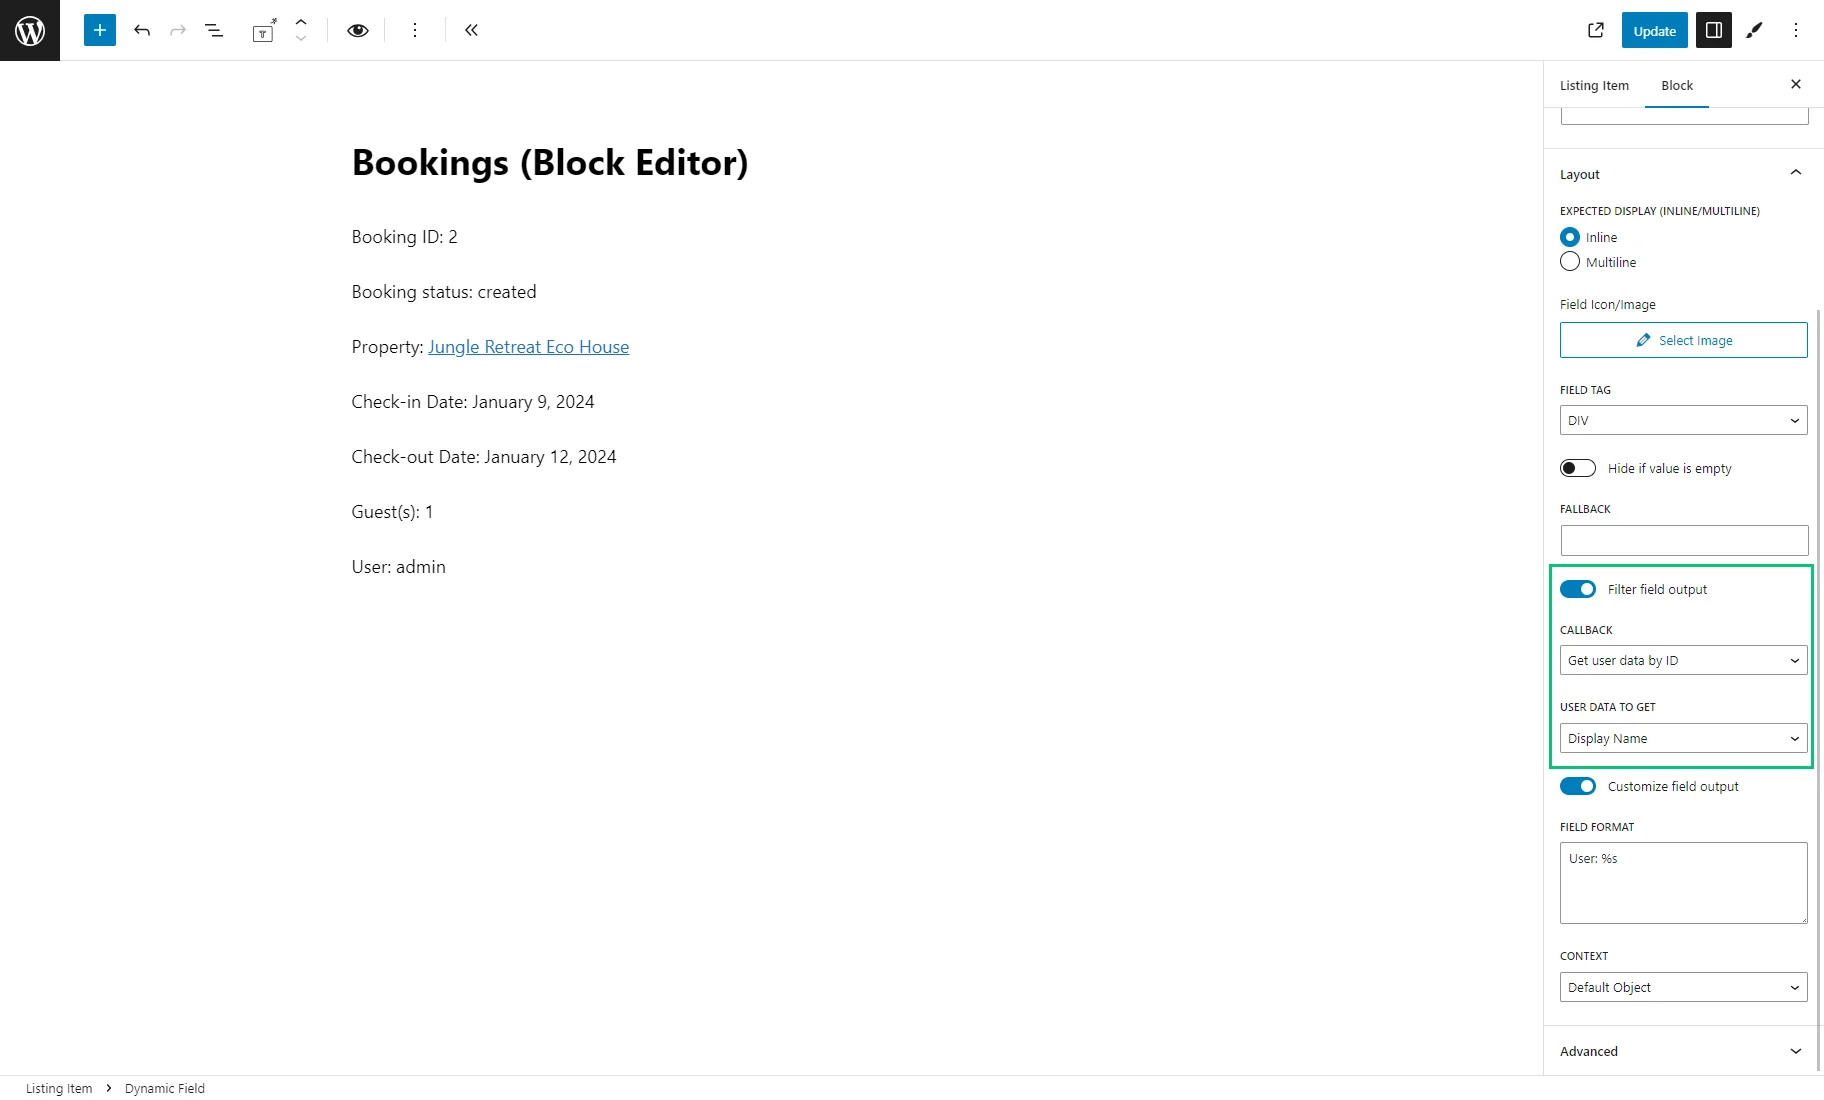
The “User ID” option contains the user ID that can be used to retrieve the default user information.
Add a Dynamic Field, select the “User ID” option for the Object Field, enable the Filter field output toggle, and set the “Get user data by ID” Callback. This callback retrieves default user fields by the user ID. Choose any desired option in the User Data to get drop-down menu.
That’s it for the main settings. Experiment with styling to achieve the best design for the listing. Once finished, don’t forget to update the changes.
Creating a Listing template in the WordPress block editor (Gutenberg)
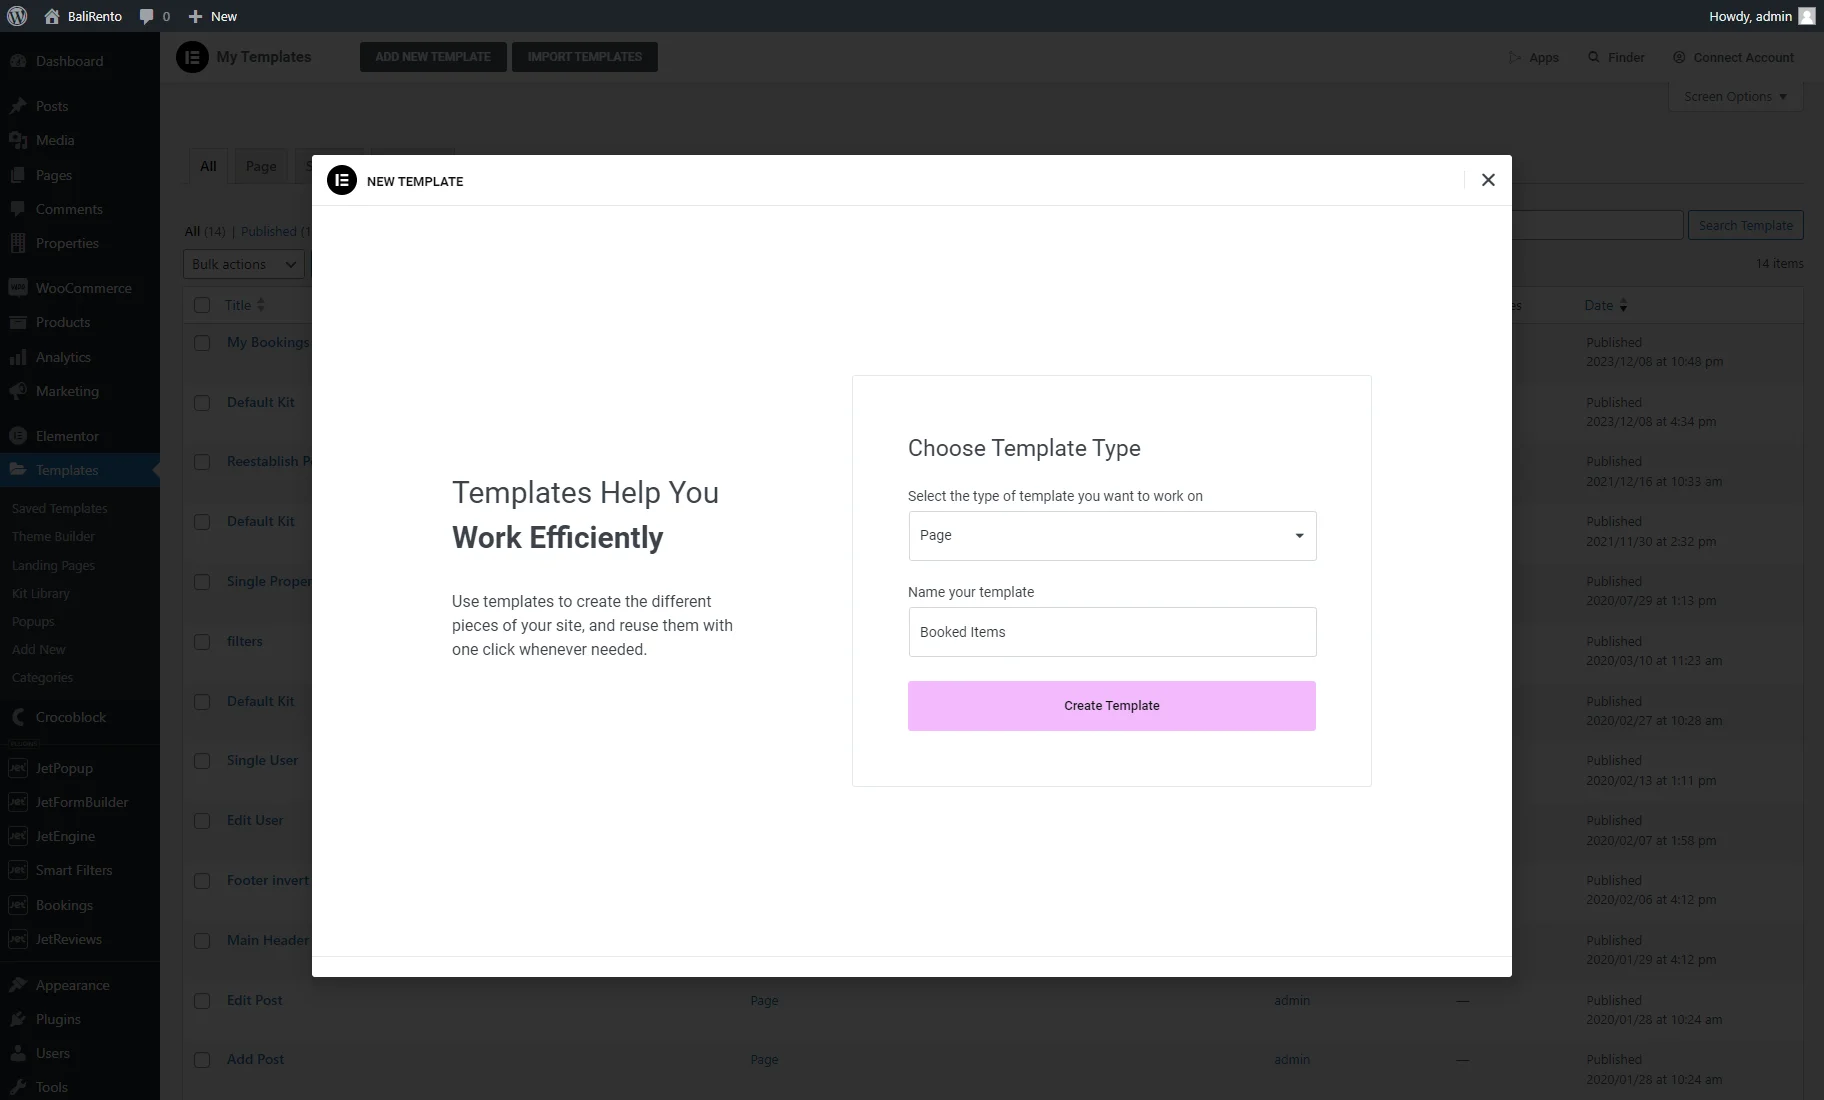
Navigate to the WordPress Dashboard > JetEngine > Listings/Components tab and press the “Add New Item” button to add a new template.
For the Listing source, select “Query Builder.” Then, pick the custom query created in the previous step and give the listing a name. Lastly, choose “Blocks (Gutenberg)” for the Listing view if you build the website with the WordPress block editor and click the “Create Listing Item” button.

Now, customize the listing template to display the booked items. You are free to display any column retrieved by the custom query. In our example, we will show the booking ID and status, the linked title of the booked instance, dates, number of guests, and user information using the Dynamic Field block.
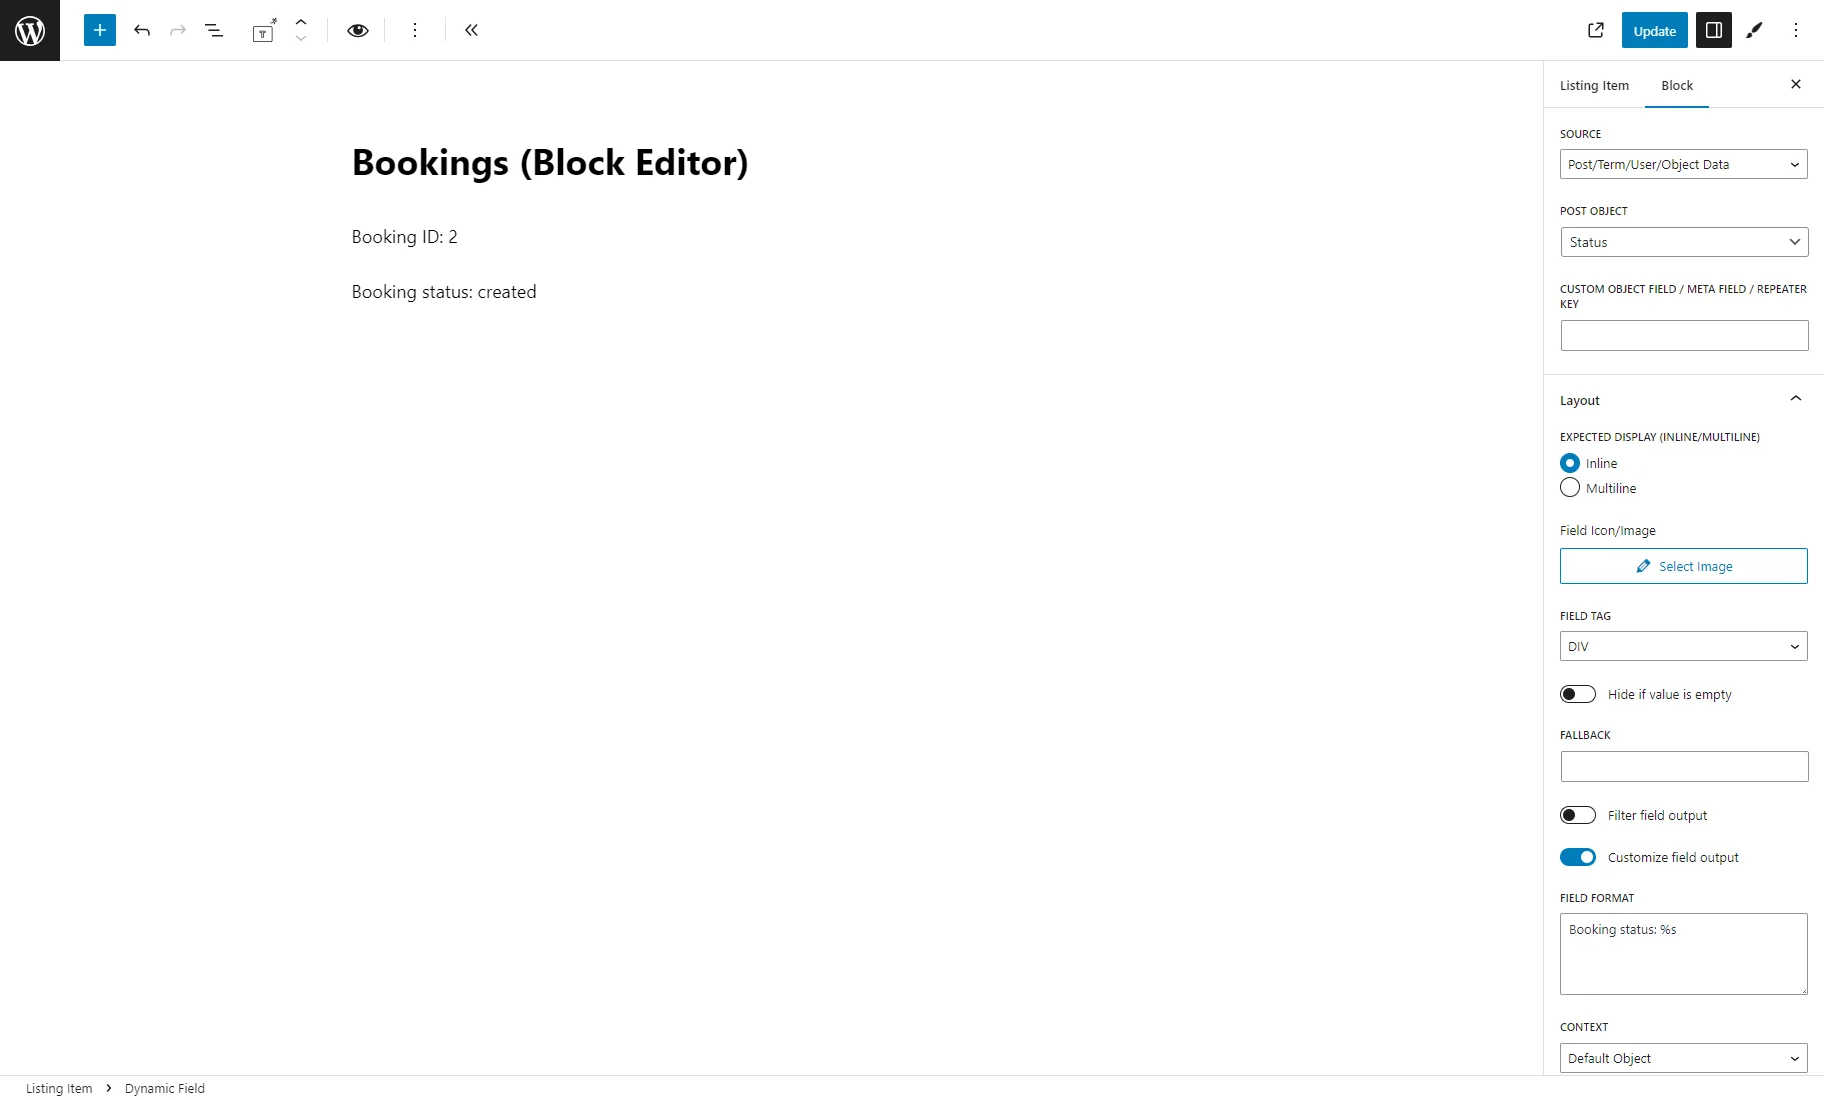
First, drag and drop a Dynamic Field block into the editing area. Pick a “Post/Term/User/Object Data” in the SOURCE field. In the POST OBJECT drop-down menu, scroll down to the JetBooking section and pick the “Booking ID” option.

To add text to this value, enable the Customize field output toggle and customize the format area. For example, we typed “Booking ID: %s” into the Field format.

Now, the listing displays the booking ID. Next, let’s add the booking status.
Add a new Dynamic Field block or duplicate the existing one. Repeat the above steps to display the “Status” option and format it as needed.
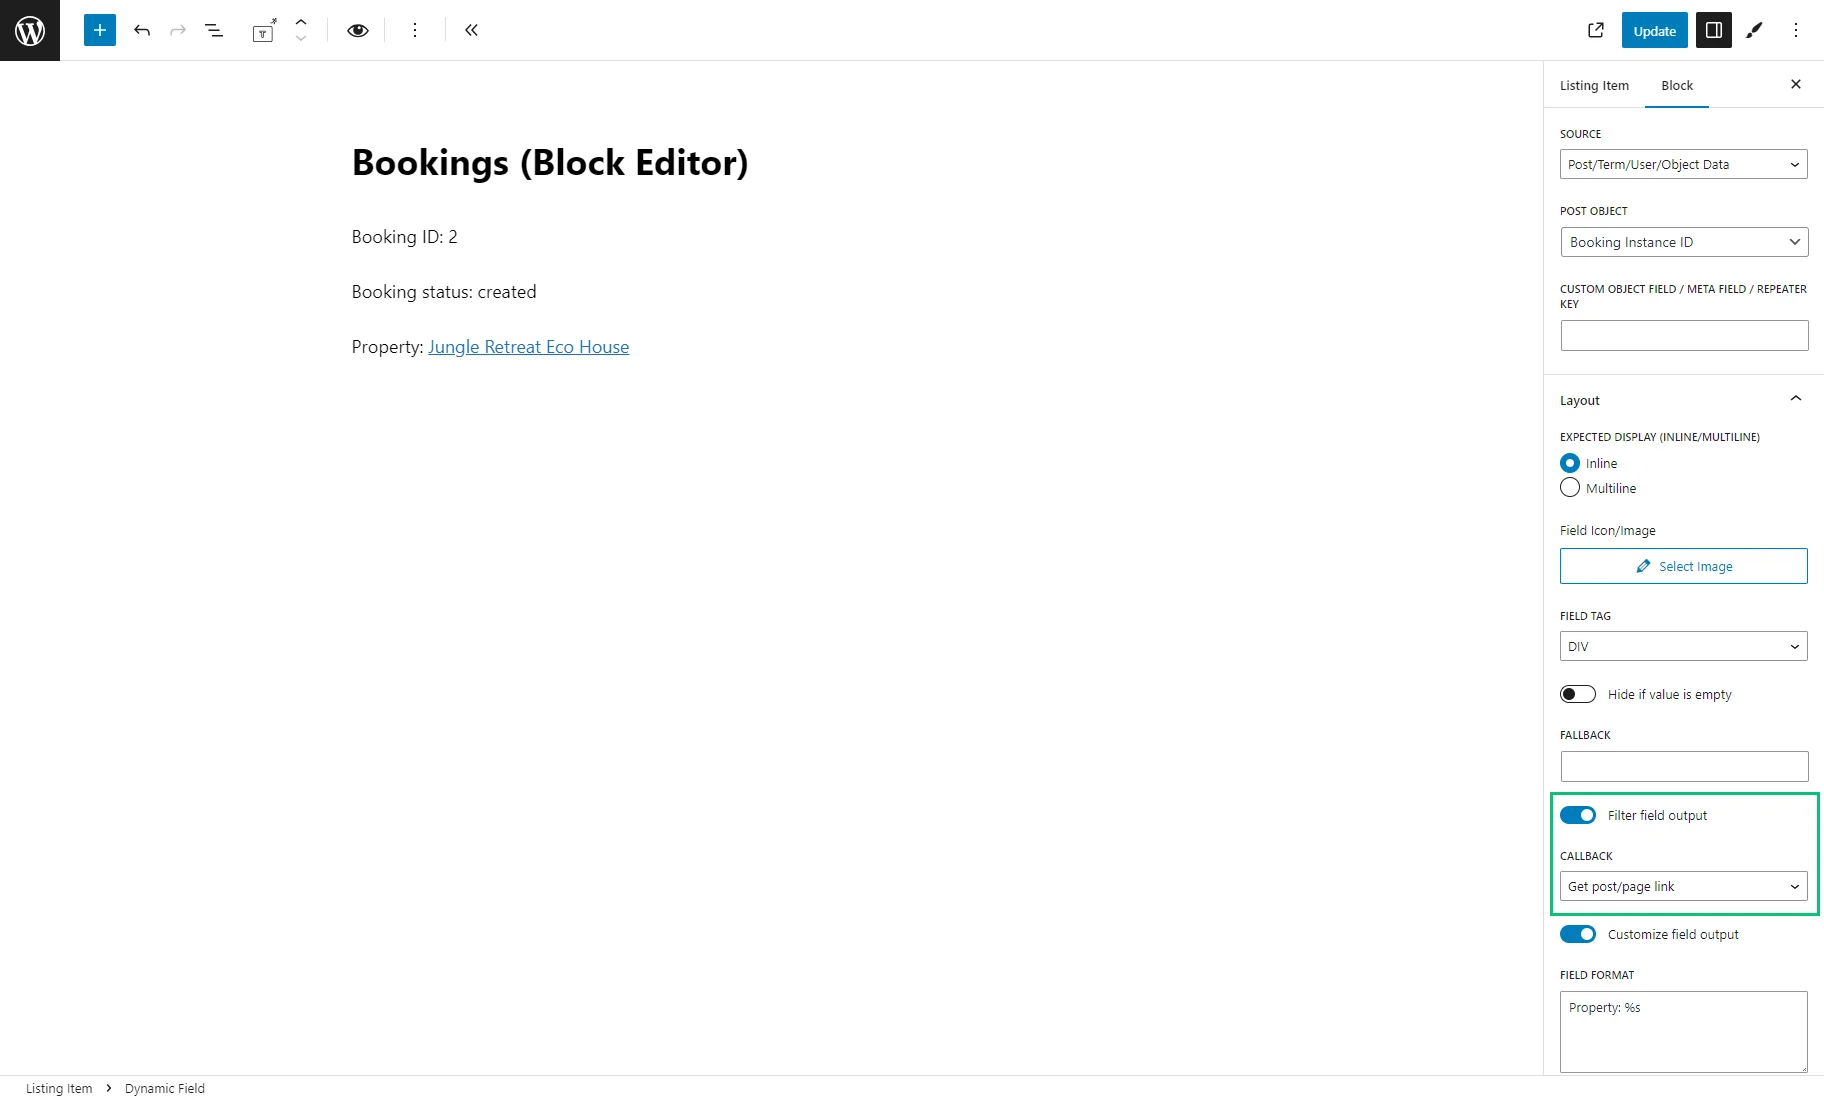
To display the name of the booked property (post title), add another Dynamic Field block and select the “Booked Instance ID” option as the POST OBJECT. The value of this option is the post ID.
To transform it into a linked title, enable the Filter field output toggle and select the “Get post/page link” Callback. This callback formats the value and outputs the name of the post instead of its ID. Also, you can display just a post title without a link, post URL, and post thumbnail with callbacks. Learn more about that in the Display post and term titles, links, and URLs guide.
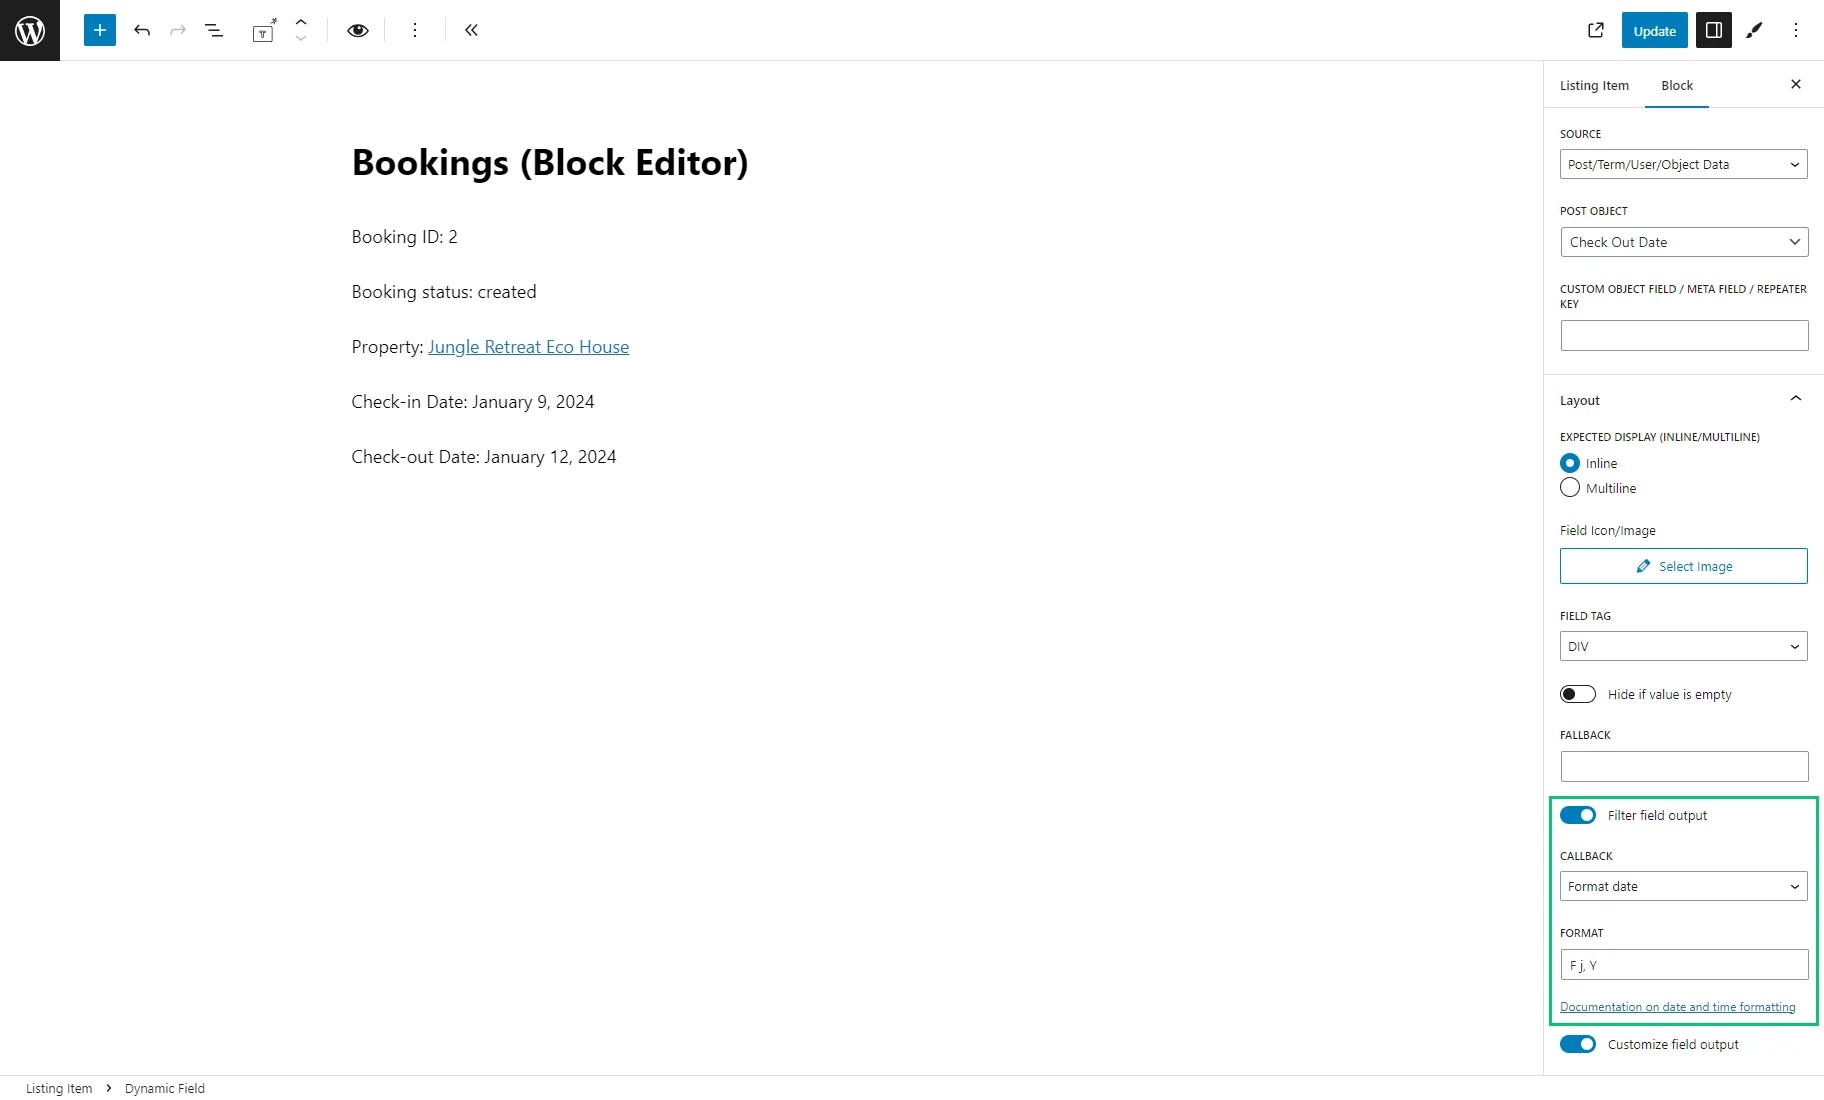
Then, we can display the booked dates. Add two Dynamic Field blocks: one showing the “Check In Date” option and the other displaying the “Check Out Date” option. These options contain the check-in and check-out dates in a timestamp format.
To format the timestamp as a human-readable date, activate the Filter field output toggle and choose the “Format Date” Callback. Don’t forget to define the date format according to the Customizing the Time and Date Format documentation.
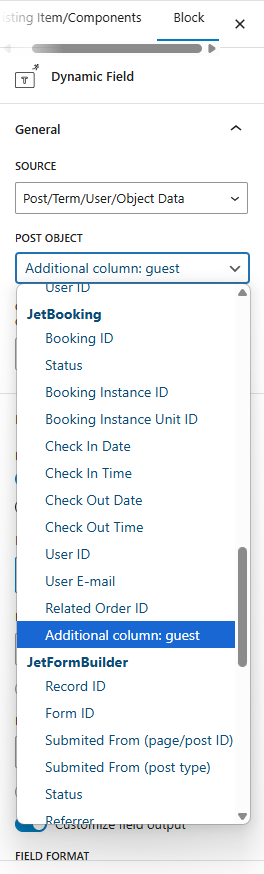
You can also display values from the additional JetBookings table columns added in the WordPress Dashboard > Bookings > Settings > Tools tab. For that, add another Dynamic Field and select the “Additional column: …” option. For example, in our case, we picked the “Additional column: guest” POST OBJECT.
The “User ID” option contains the user ID that can be transformed into the default user information.
Add a Dynamic Field, select the “User ID” option for the POST OBJECT, enable the Filter field output toggle, and set the “Get user data by ID” Callback. This callback retrieves default user fields by the user ID. Choose any desired option in the User Data to get drop-down menu.
That’s it for the main settings. To style the blocks, use the free JetStyleManager plugin. Once finished, don’t forget to update the changes.
Display the Booked Items Listing on the Account Page
The last part of our work is to display the created listing on the user’s Account page set with the JetEngine Profile Builder feature. We will create a new subpage template and place the Listing Grid widget or block inside.
Showing the listing in Elementor
Firstly, create a new “Page” template in the WordPress Dashboard > Templates > Add New tab under Elementor.
This template will display the account subpage with the list of booked items.
In the Elementor editor, find the Listing Grid widget and place it on the template. Choose the Listing option created previously.
These settings are enough to display the current user’s bookings as a listing. To adjust the rest of the settings, check the Listing Grid Widget Overview.
Once done with the styling, hit the “Publish/Update” button to save the changes and return to the WordPress Dashboard.
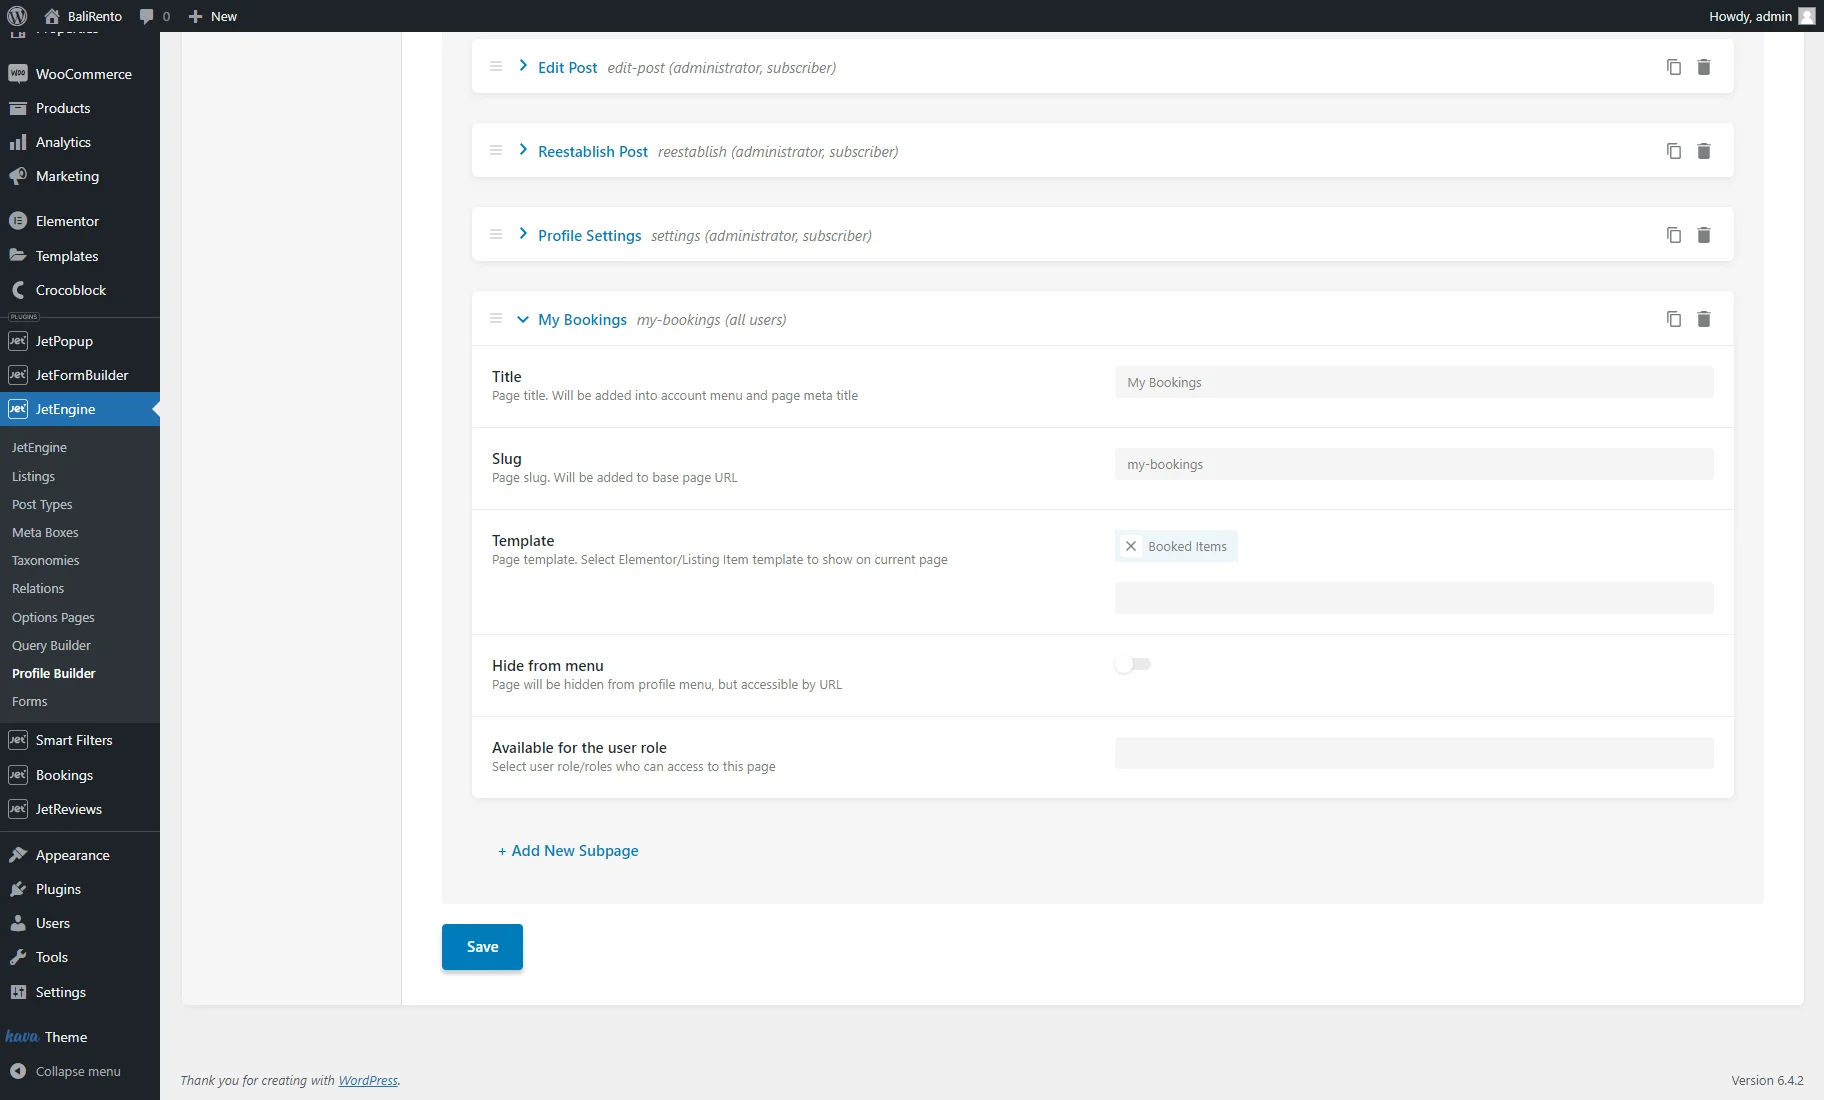
Now, apply the created template in the Profile Builder. Navigate to the JetEngine > Profile Builder > Account Page tab and click the “Add New Subpage” button to add a new subpage for users’ bookings.
Give a title to this subpage and attach the template created previously. Click the “Save” button.
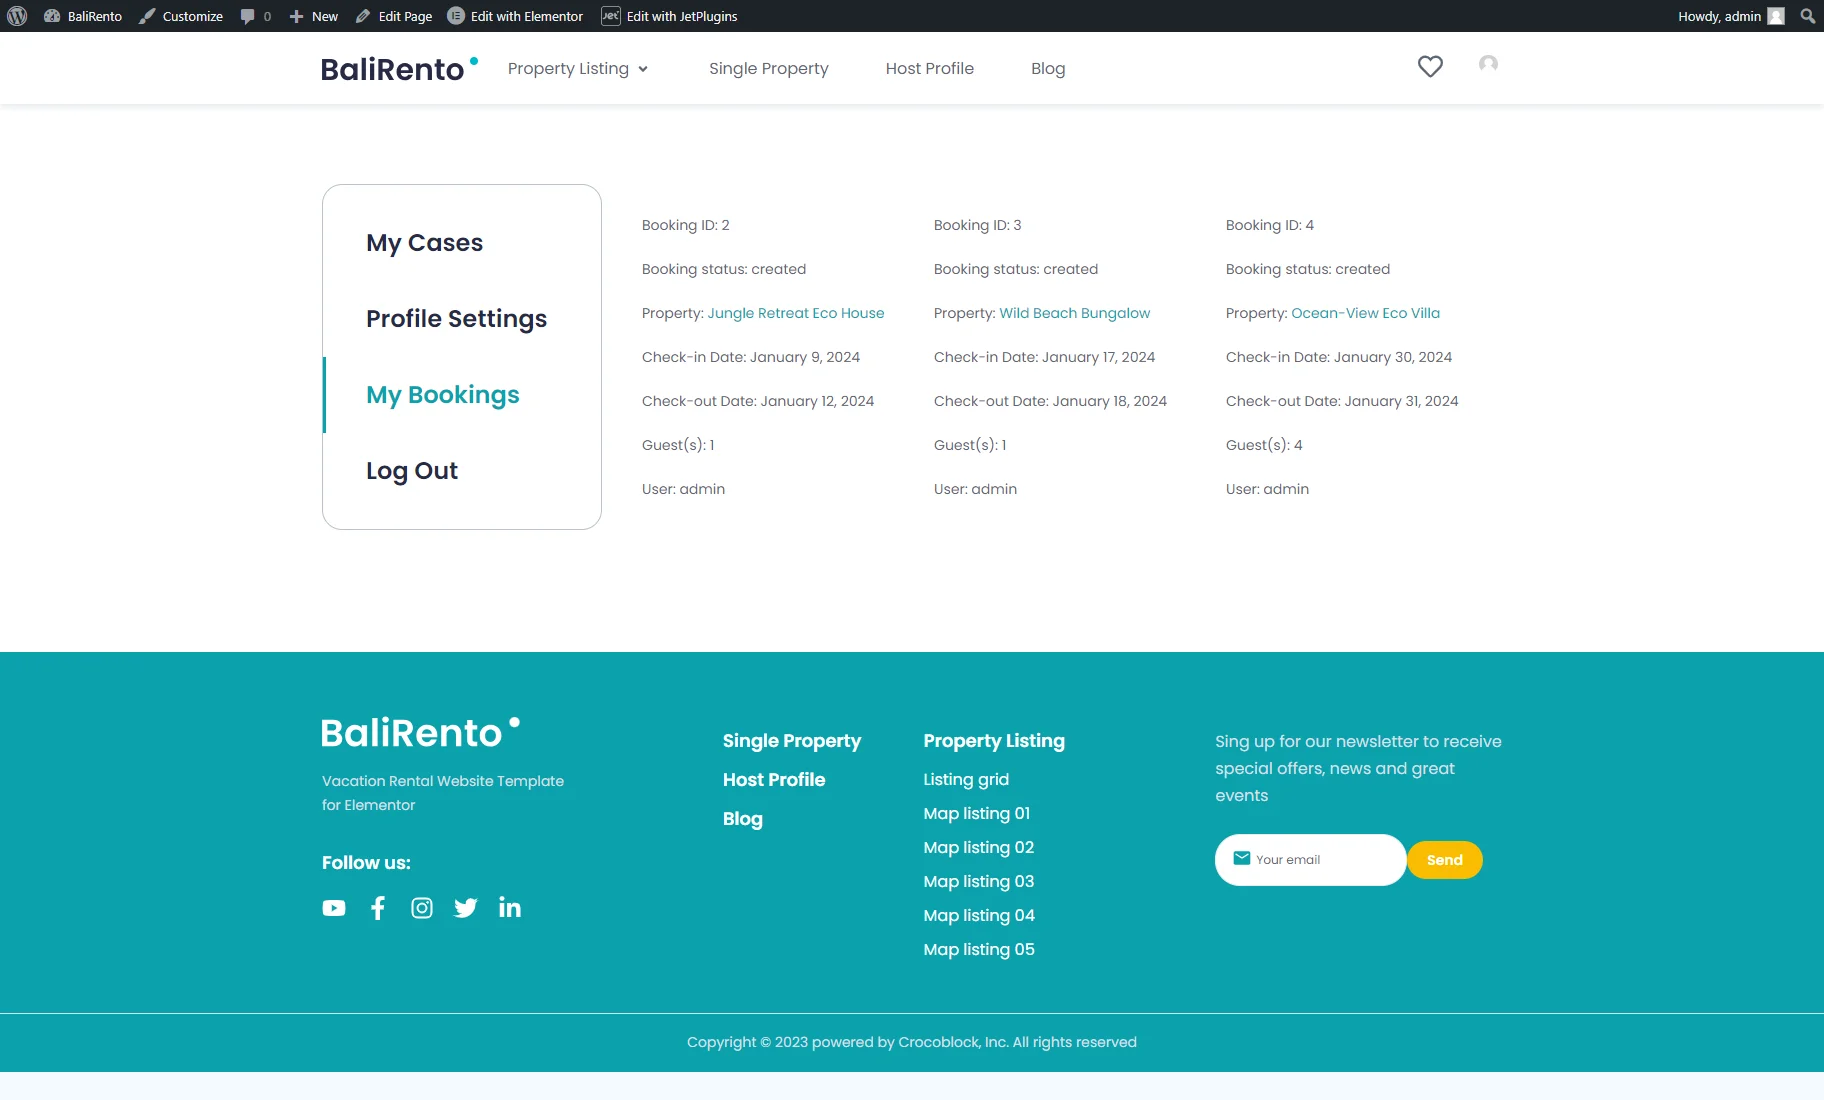
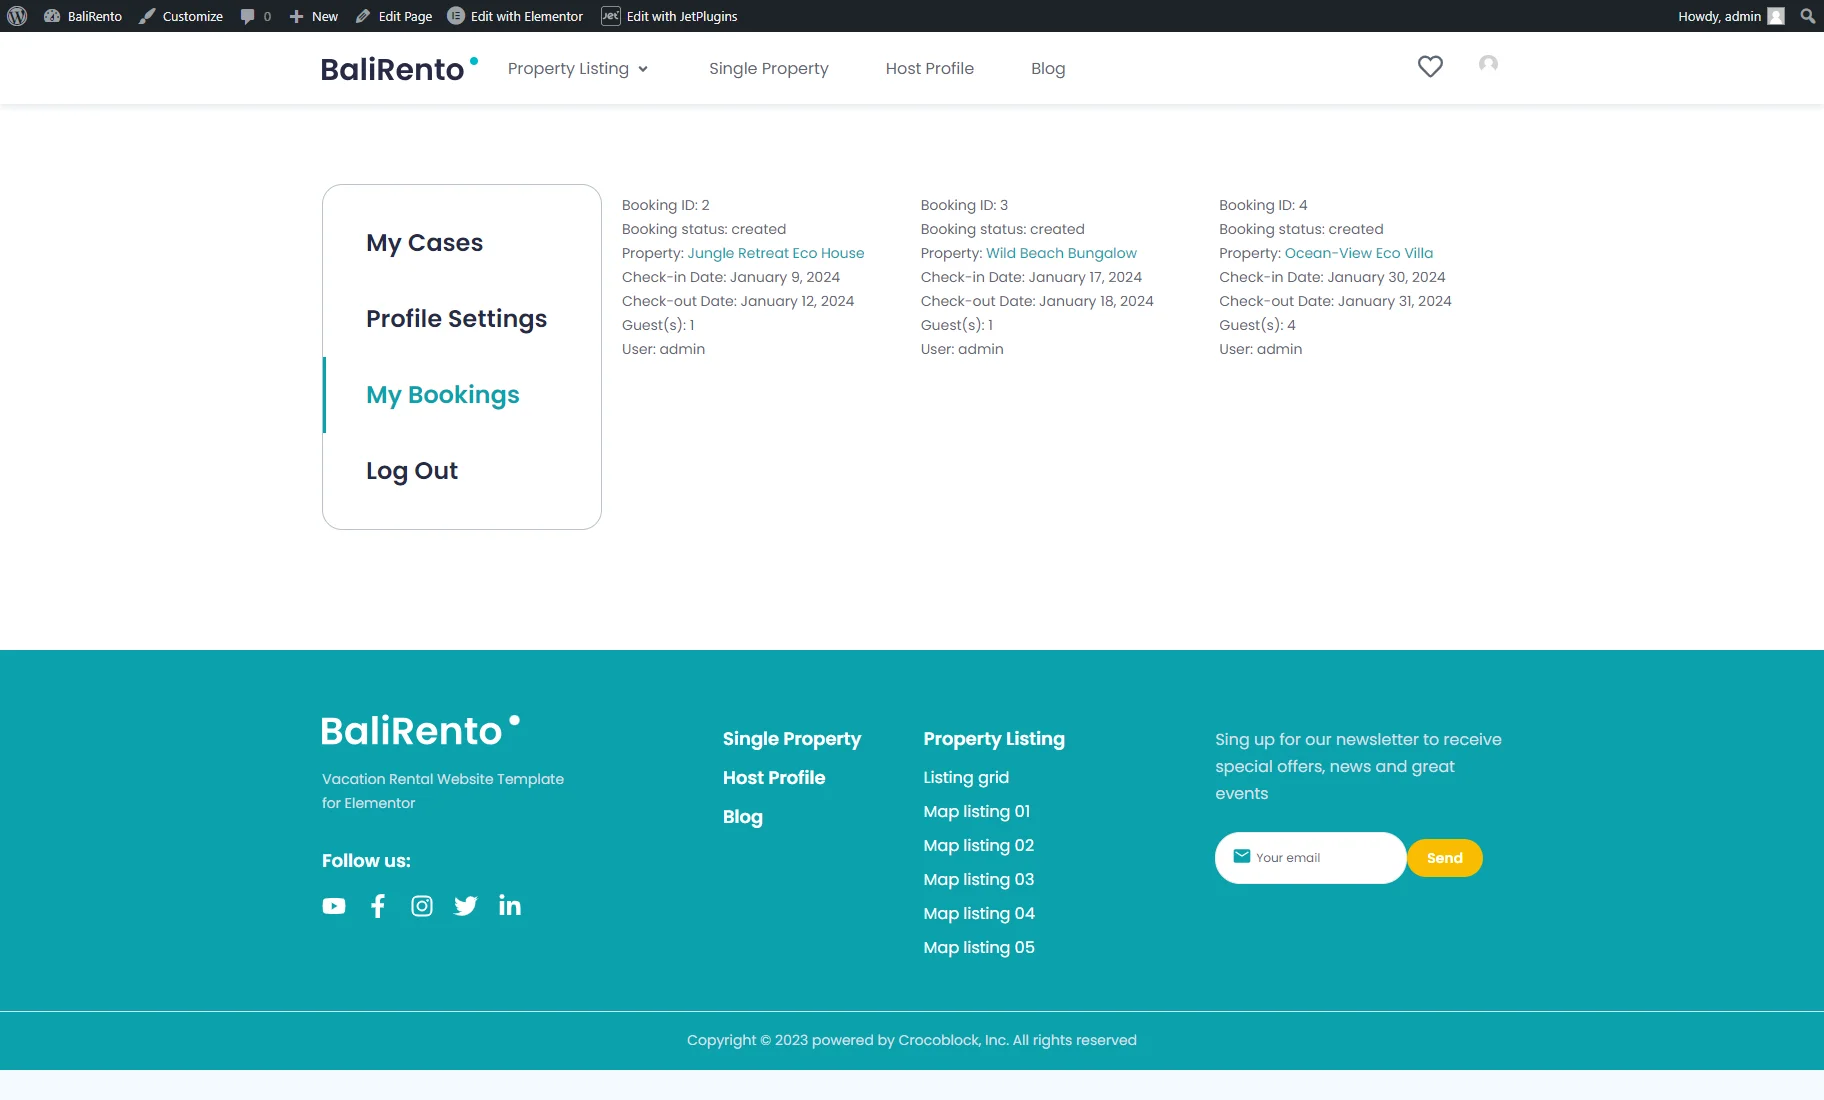
Finally, it is time to check the result. Open the Account page on the front end, proceed to the “My Bookings” subpage, and check if your bookings are displayed.
Building the listing in Block Editor (Gutenberg)
We will put the Listing Grid block inside the Listing template for users and attach the new Listing template to an Account subpage of the Profile Builder.
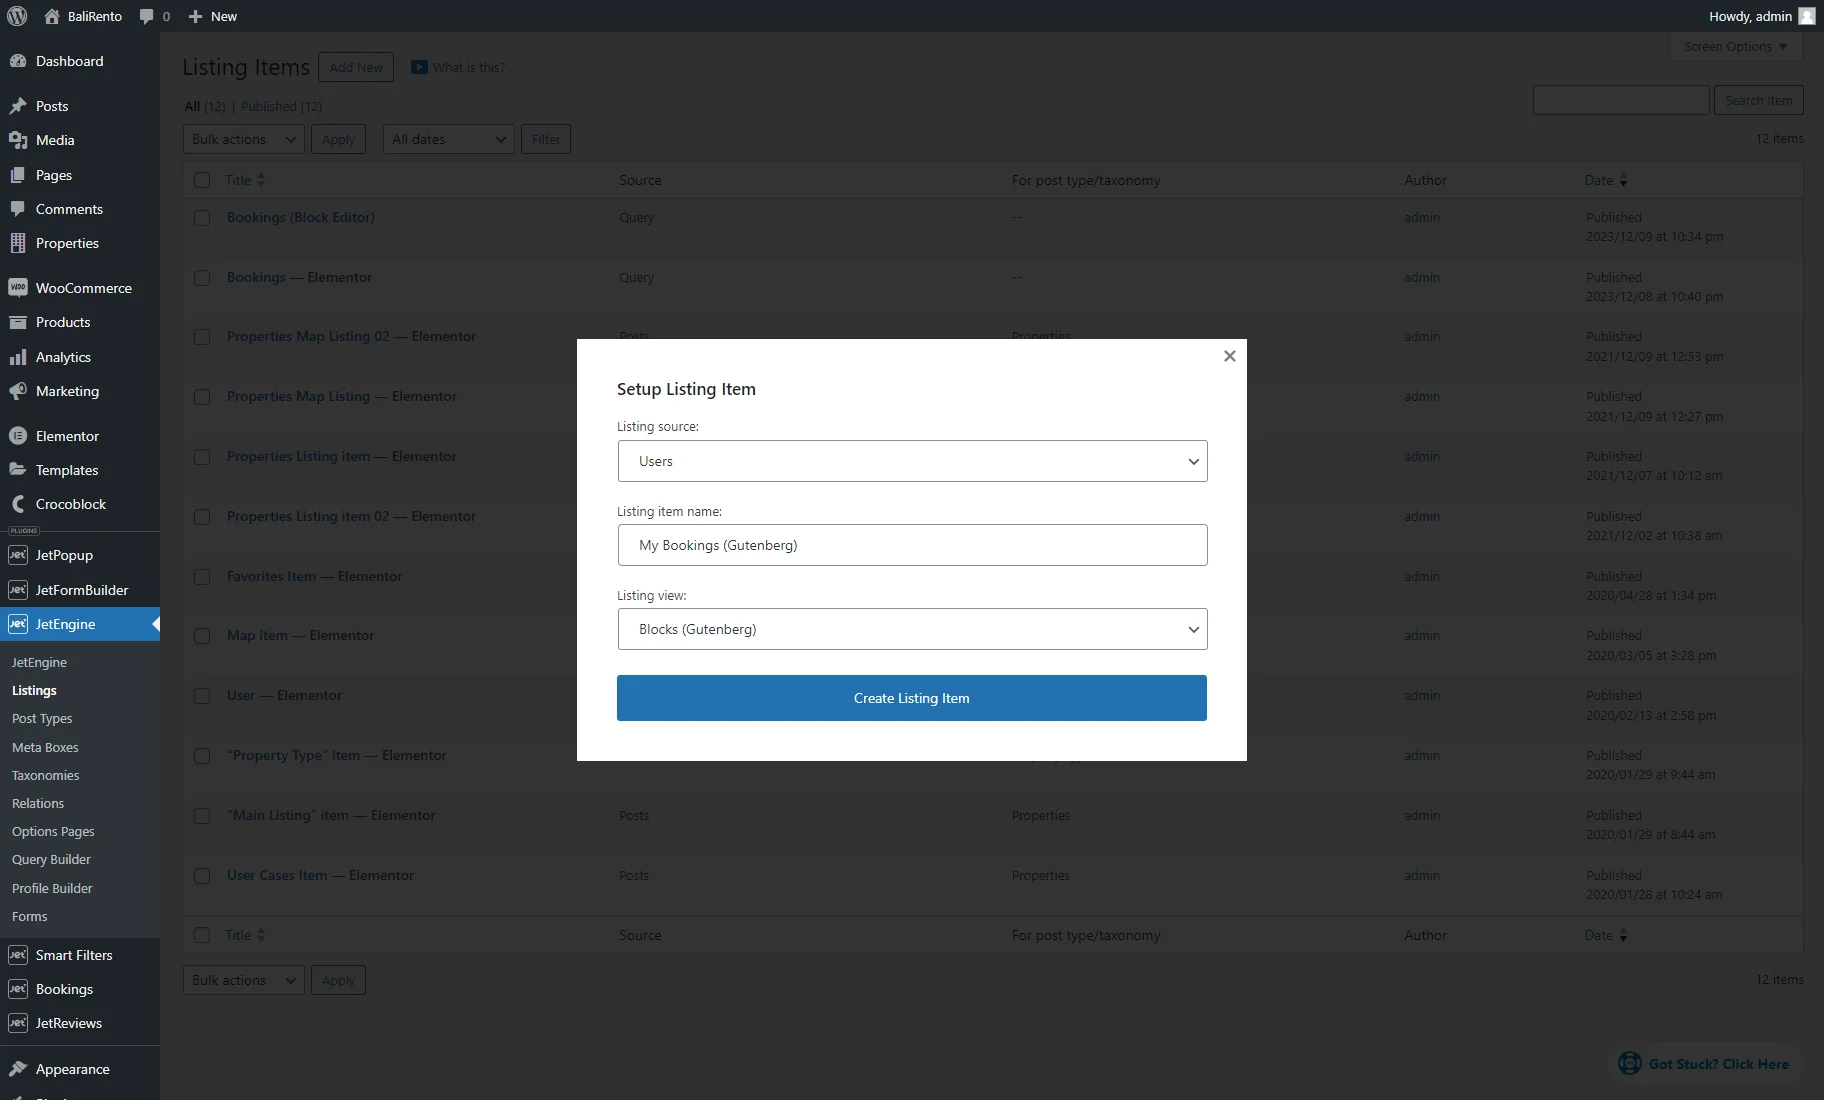
Navigate to the JetEngine > Listings tab and hit the “Add New” button.
In the Setup Listing Item pop-up, choose “Users” as the Listing source, give a name to the listing, and select “Blocks (Gutenberg)” in the Listing view drop-down list. Press the “Create Listing Item” button.
This template will be responsible for displaying the account subpage with the list of booked items.
Once the editor is opened, find the Listing Grid block and place it on the template. Choose the Listing option created beforehand.
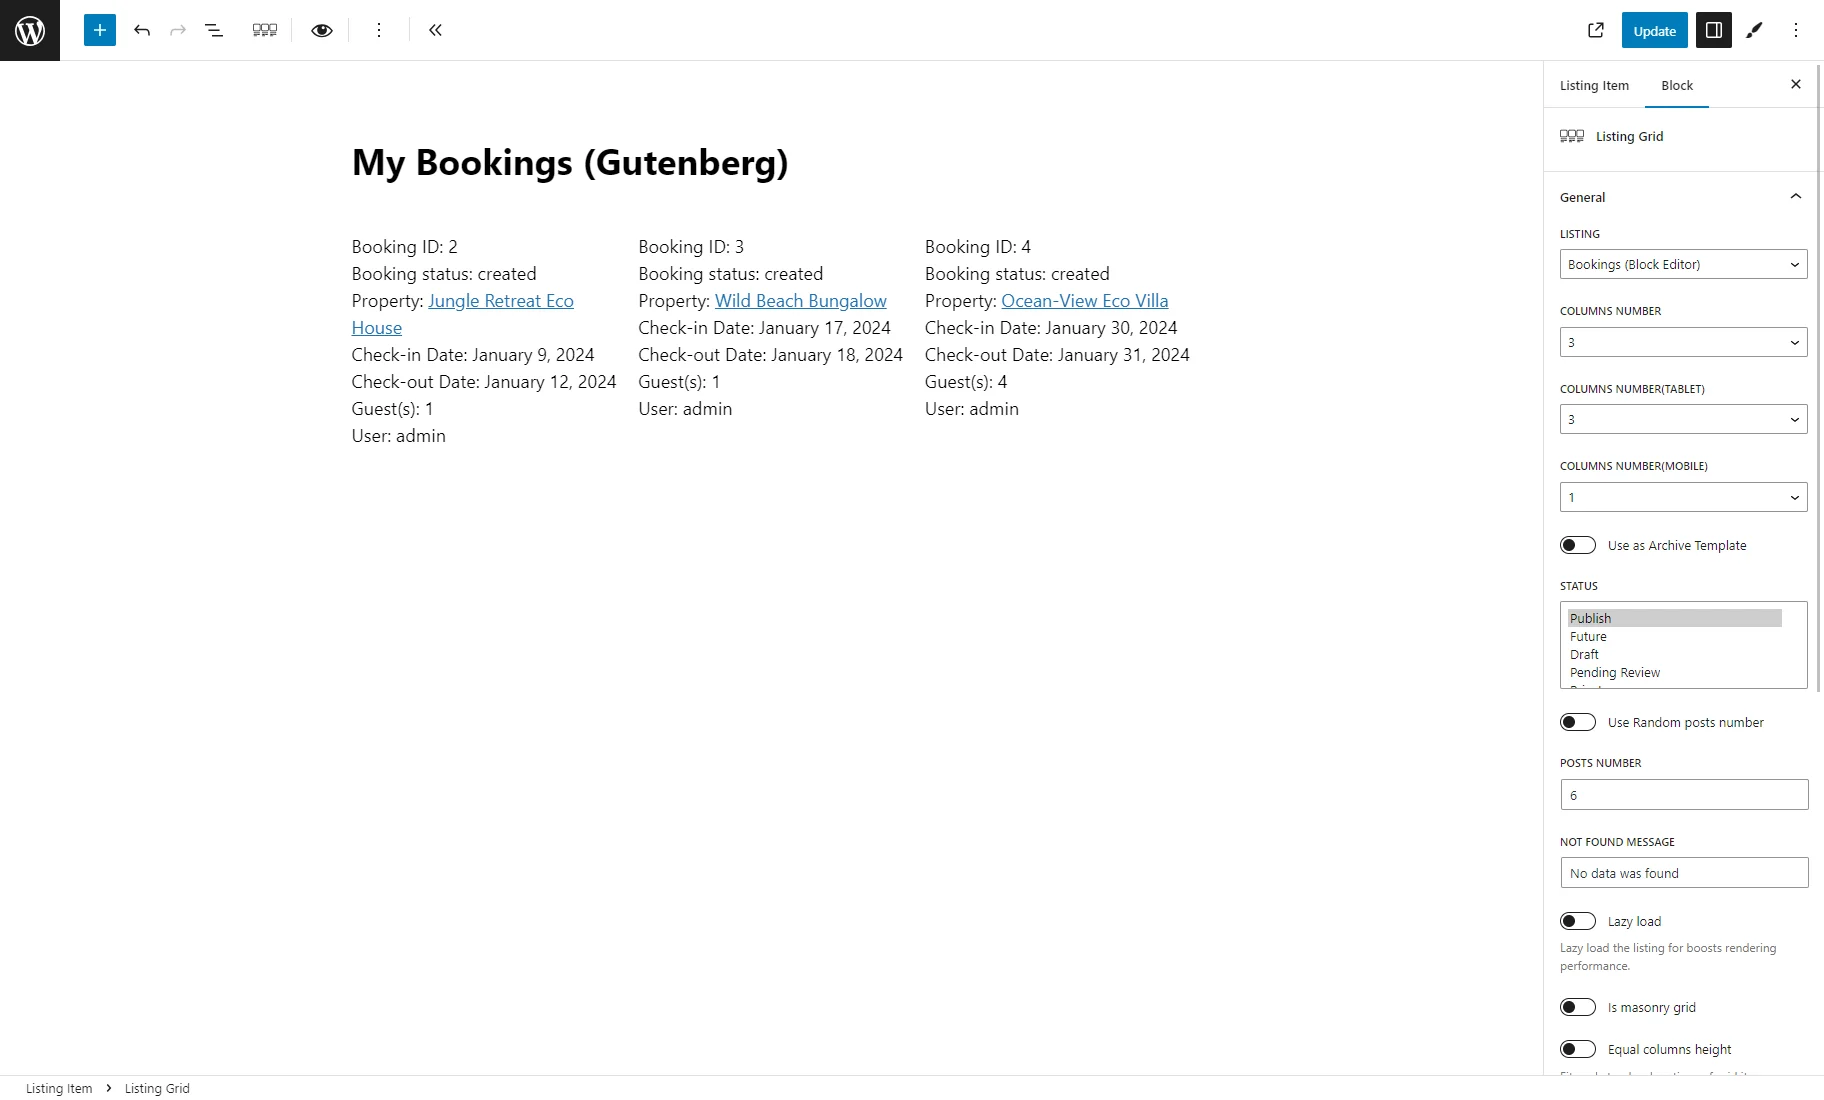
These settings are enough to display the current user’s bookings as a listing. To adjust the remaining settings, check the Listing Grid Block Overview.
Once done, hit the “Publish/Update” button to save the changes and return to the WordPress Dashboard.
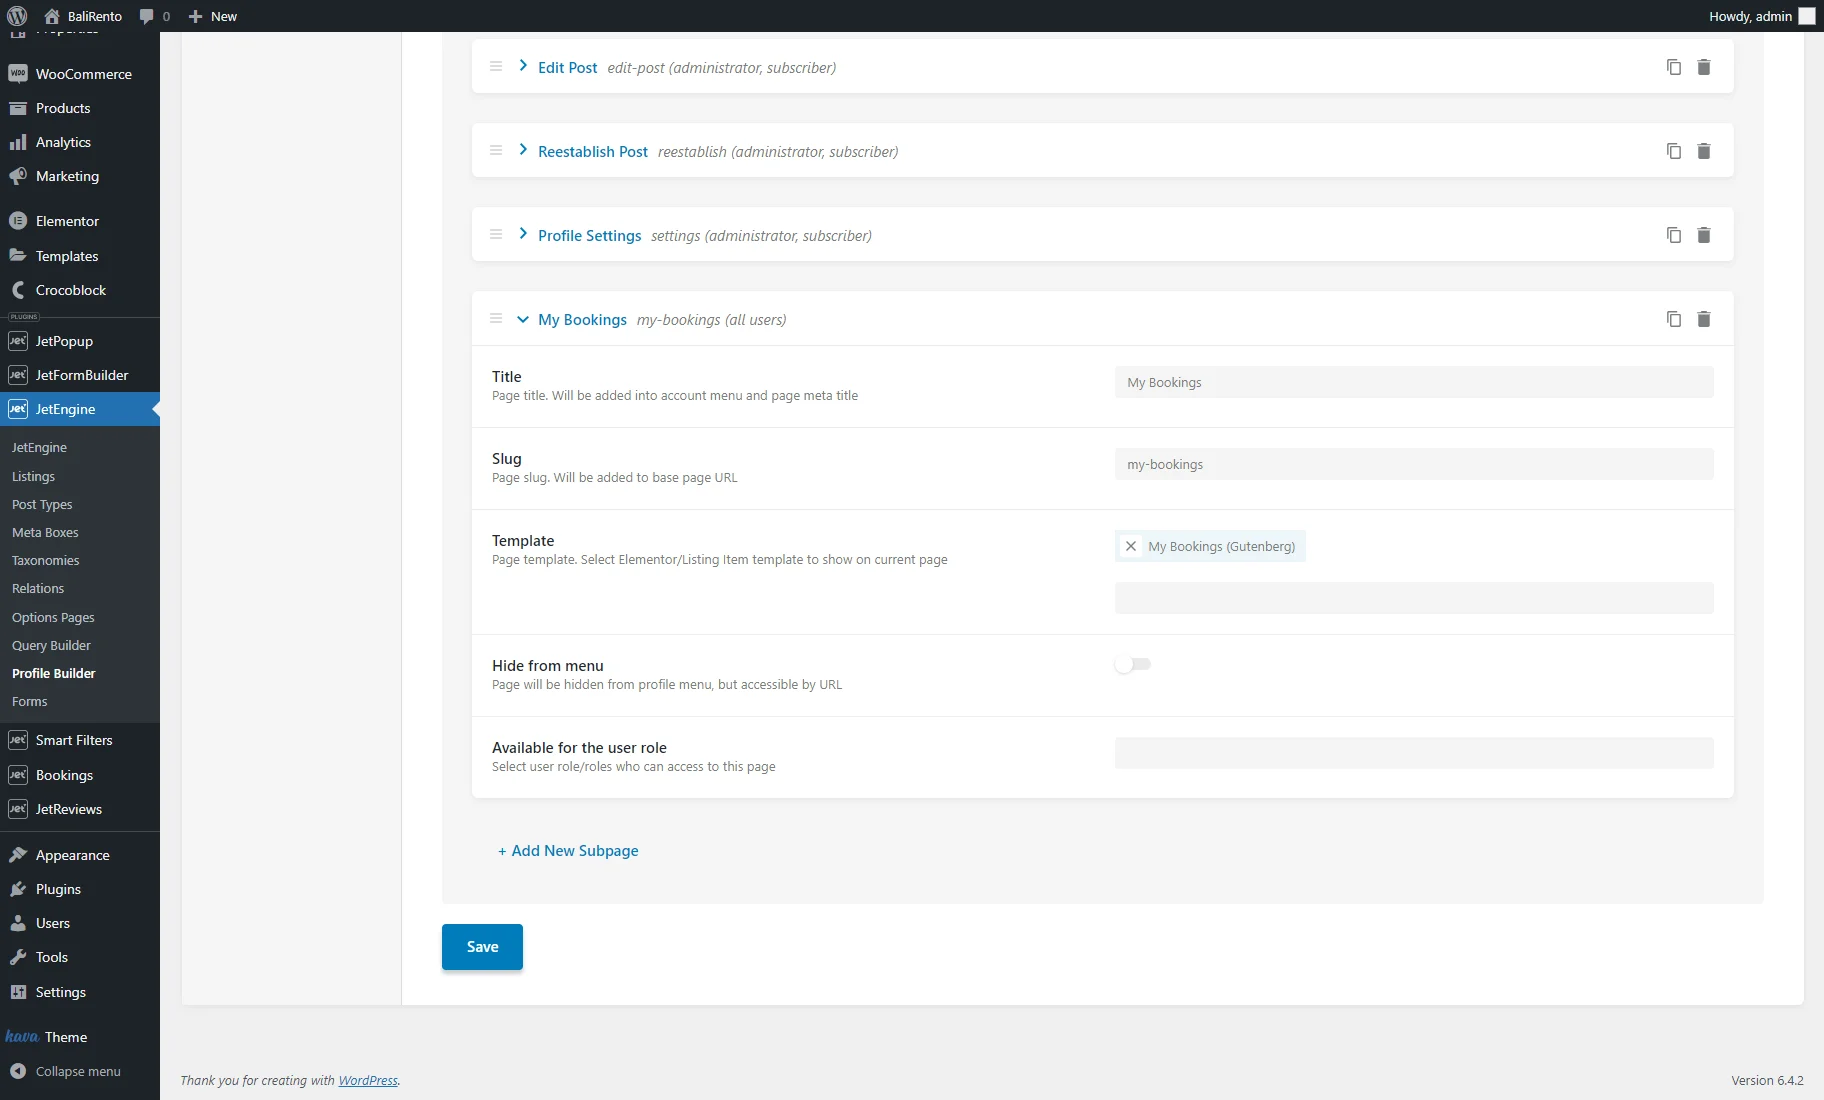
Now, it is time to apply the created template in the Profile Builder. Navigate to the JetEngine > Profile Builder > Account Page tab and click the “Add New Subpage” button to add a new subpage for users’ bookings.
Give a title to this subpage and attach the listing template for users created previously. Click the “Save” button.
Ultimately, it is time to check the result. Check out the Account page to see the created bookings.
That’s it; now you know how to display booked items on the Users Account page with the help of the JetBooking and JetEngine plugins on your WordPress website.