How to Set Repeater Query Type
This tutorial will describe the settings of Query Builder’s Repeater Query type, which is a part of the JetEngine WordPress plugin.
The “Repeater Query” type of Query Builder allows the creation of customizable lists with repeater items. The list can be used to build a Listing template and then displayed via the Listing Grid on the Single page.
Settings Overview
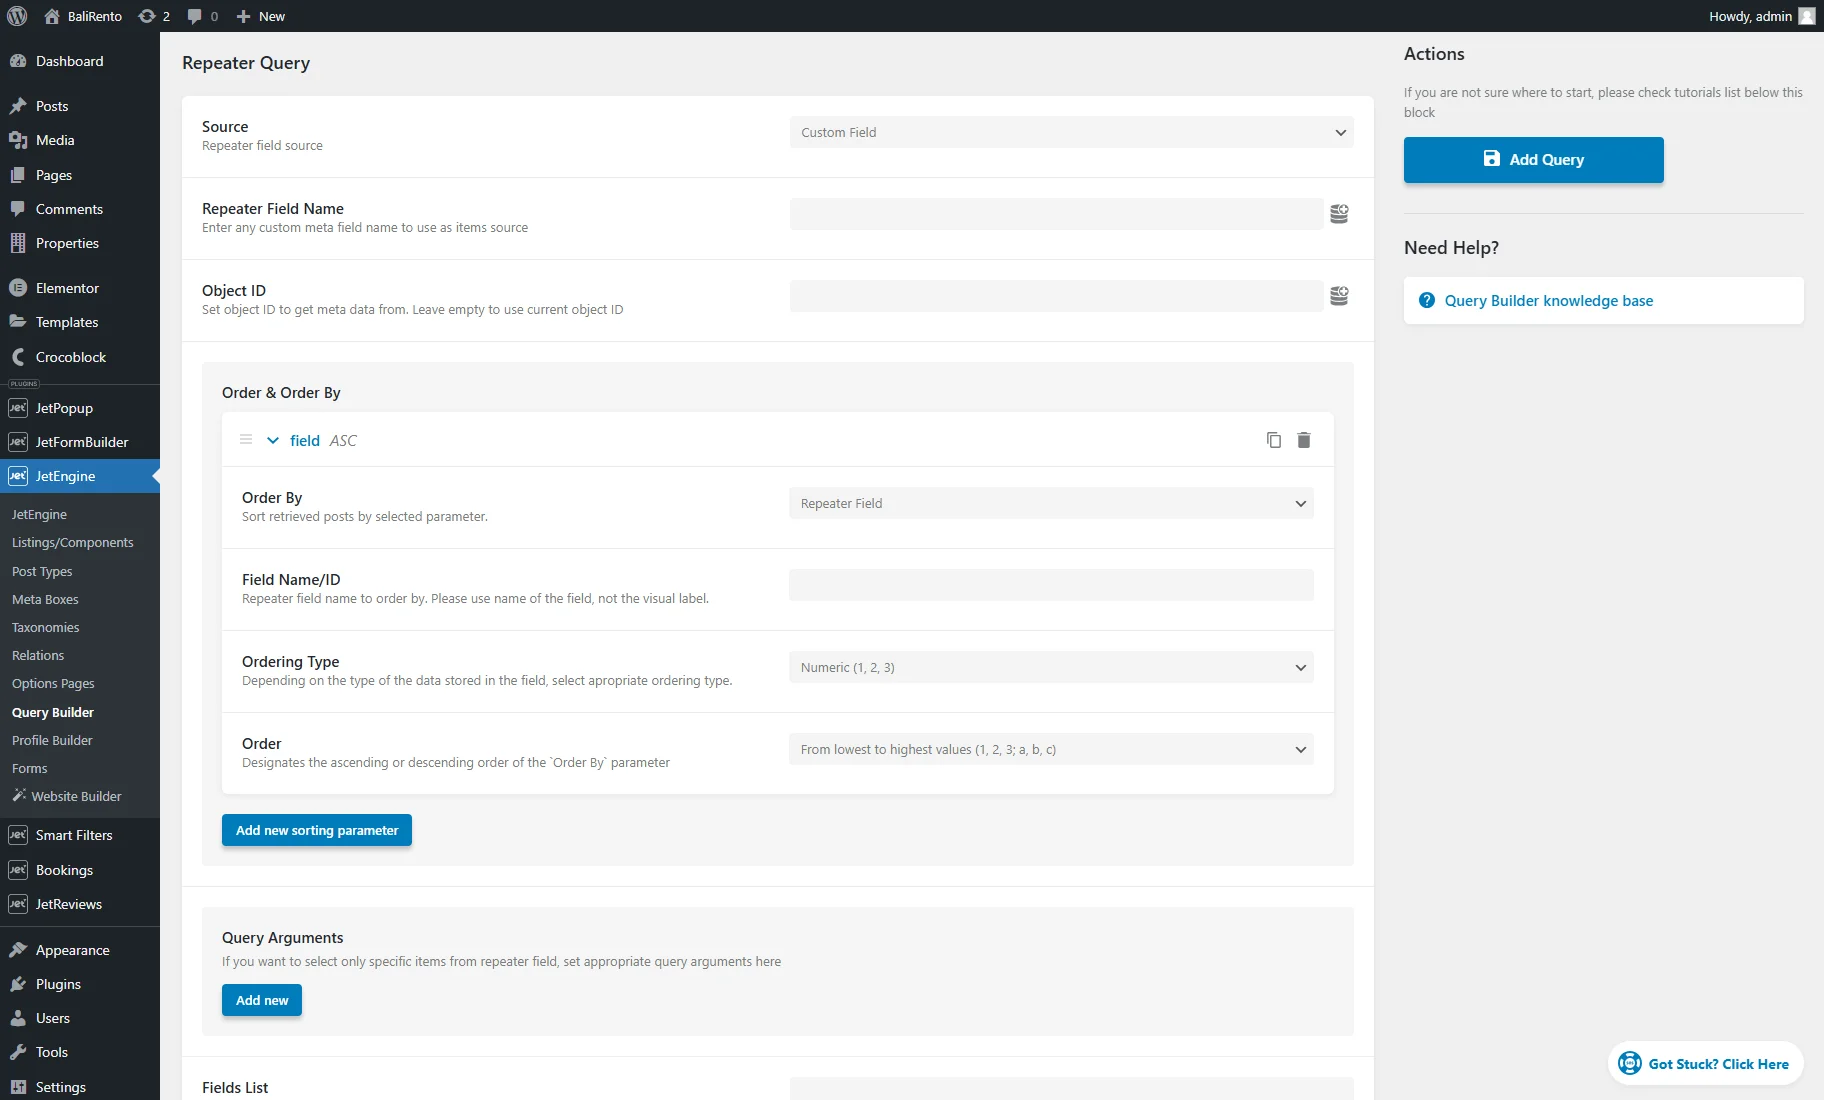
The Repeater Query section contains such settings:
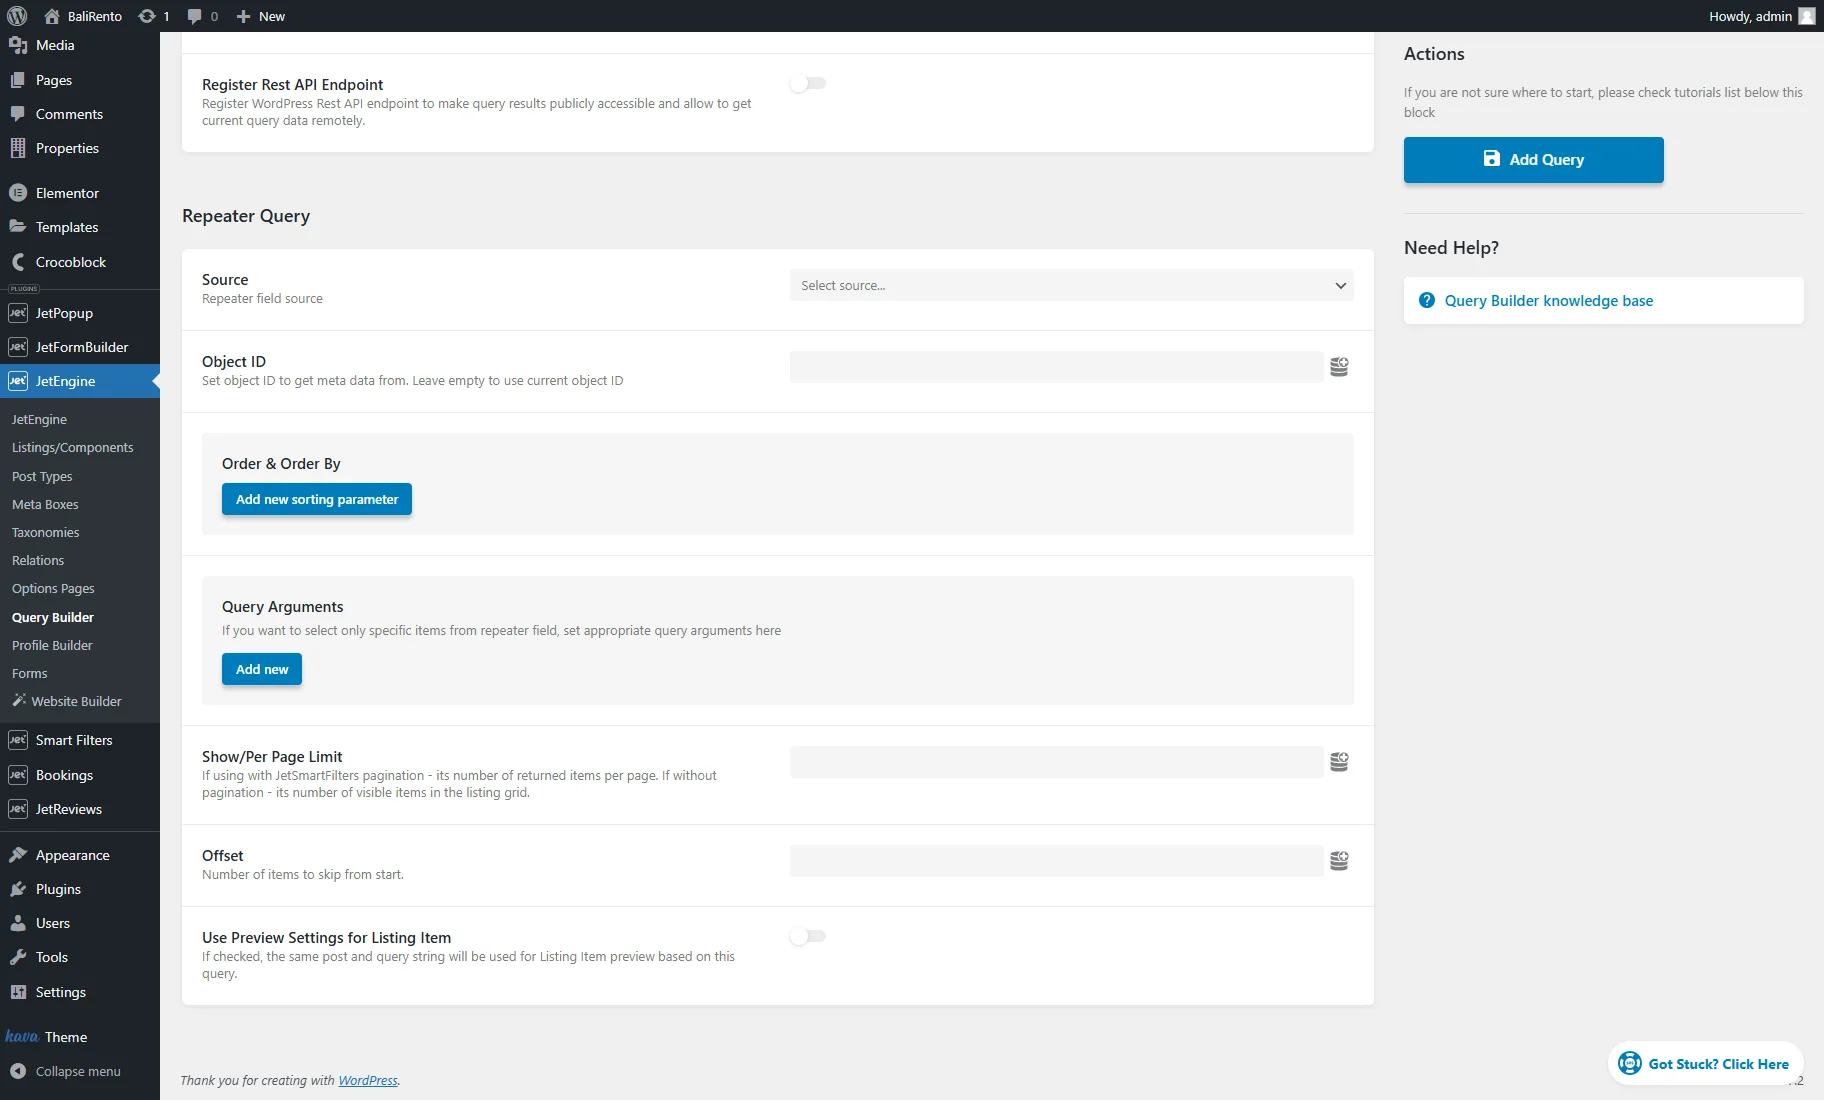
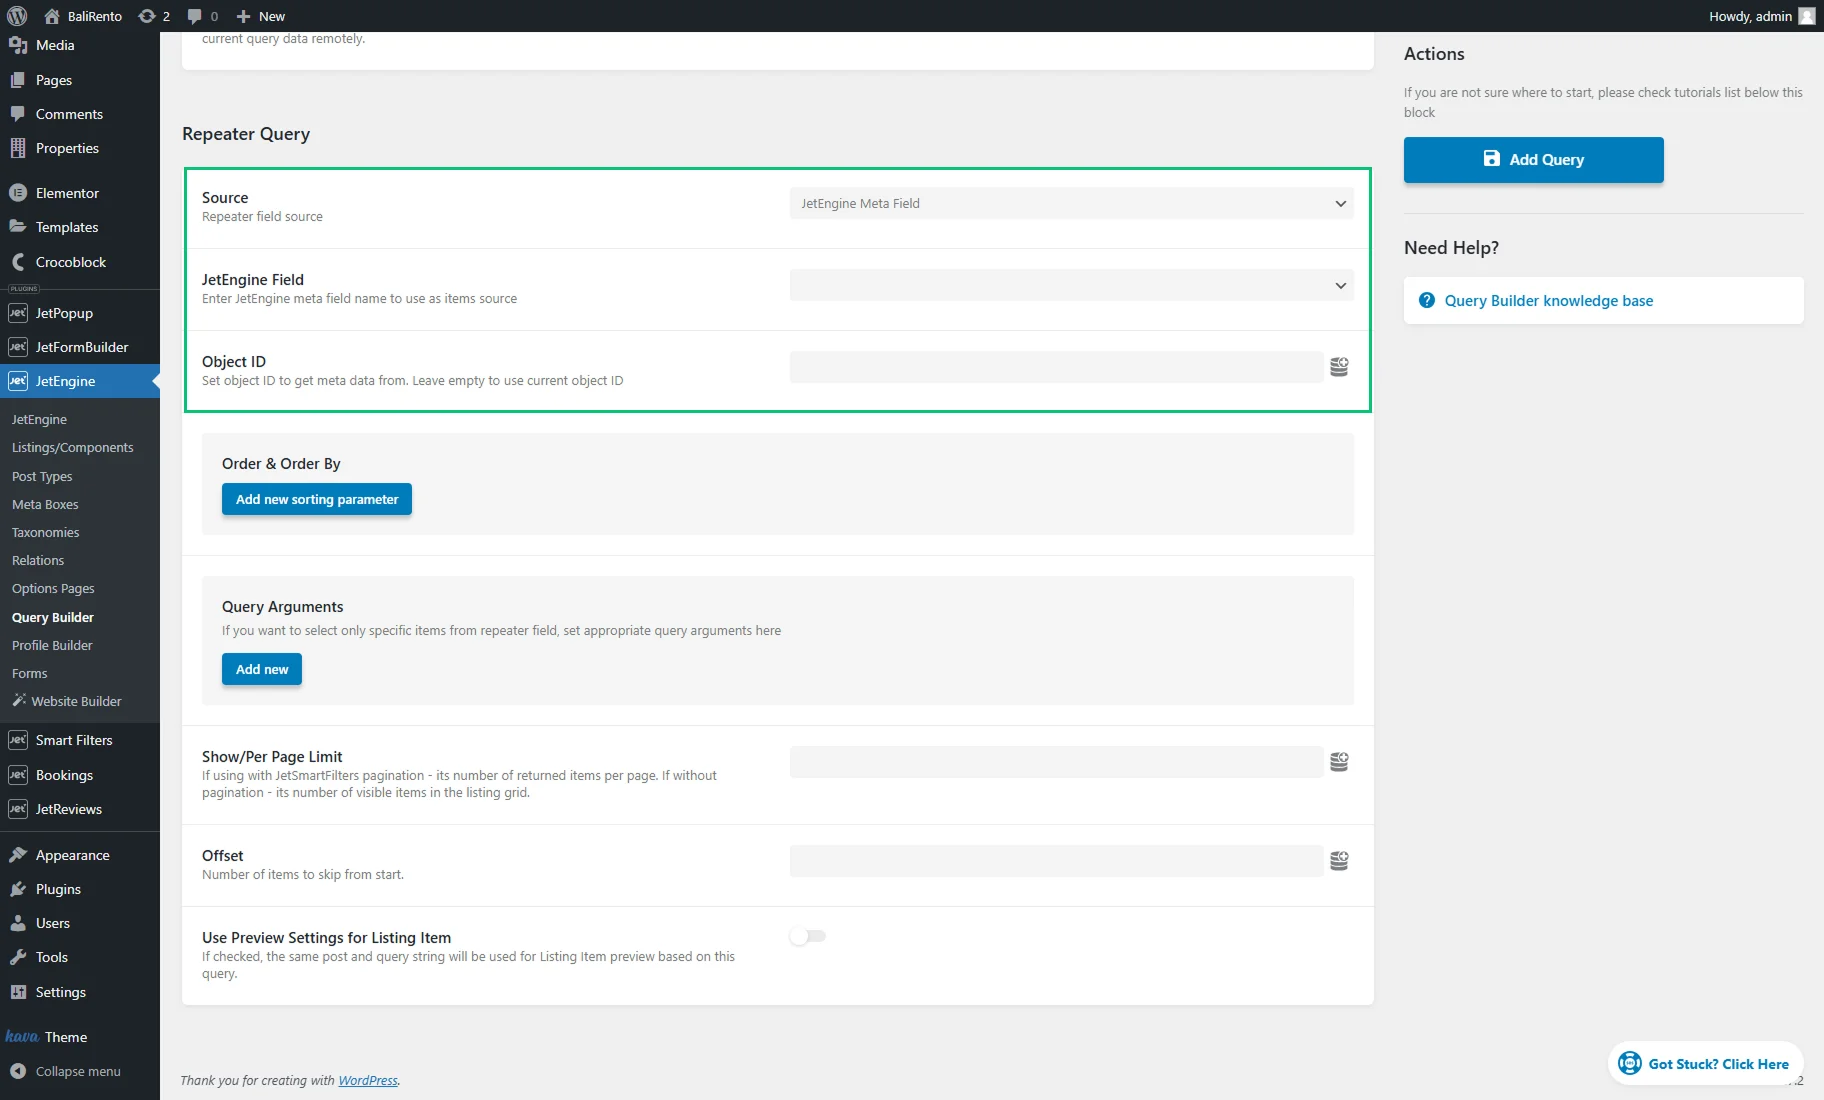
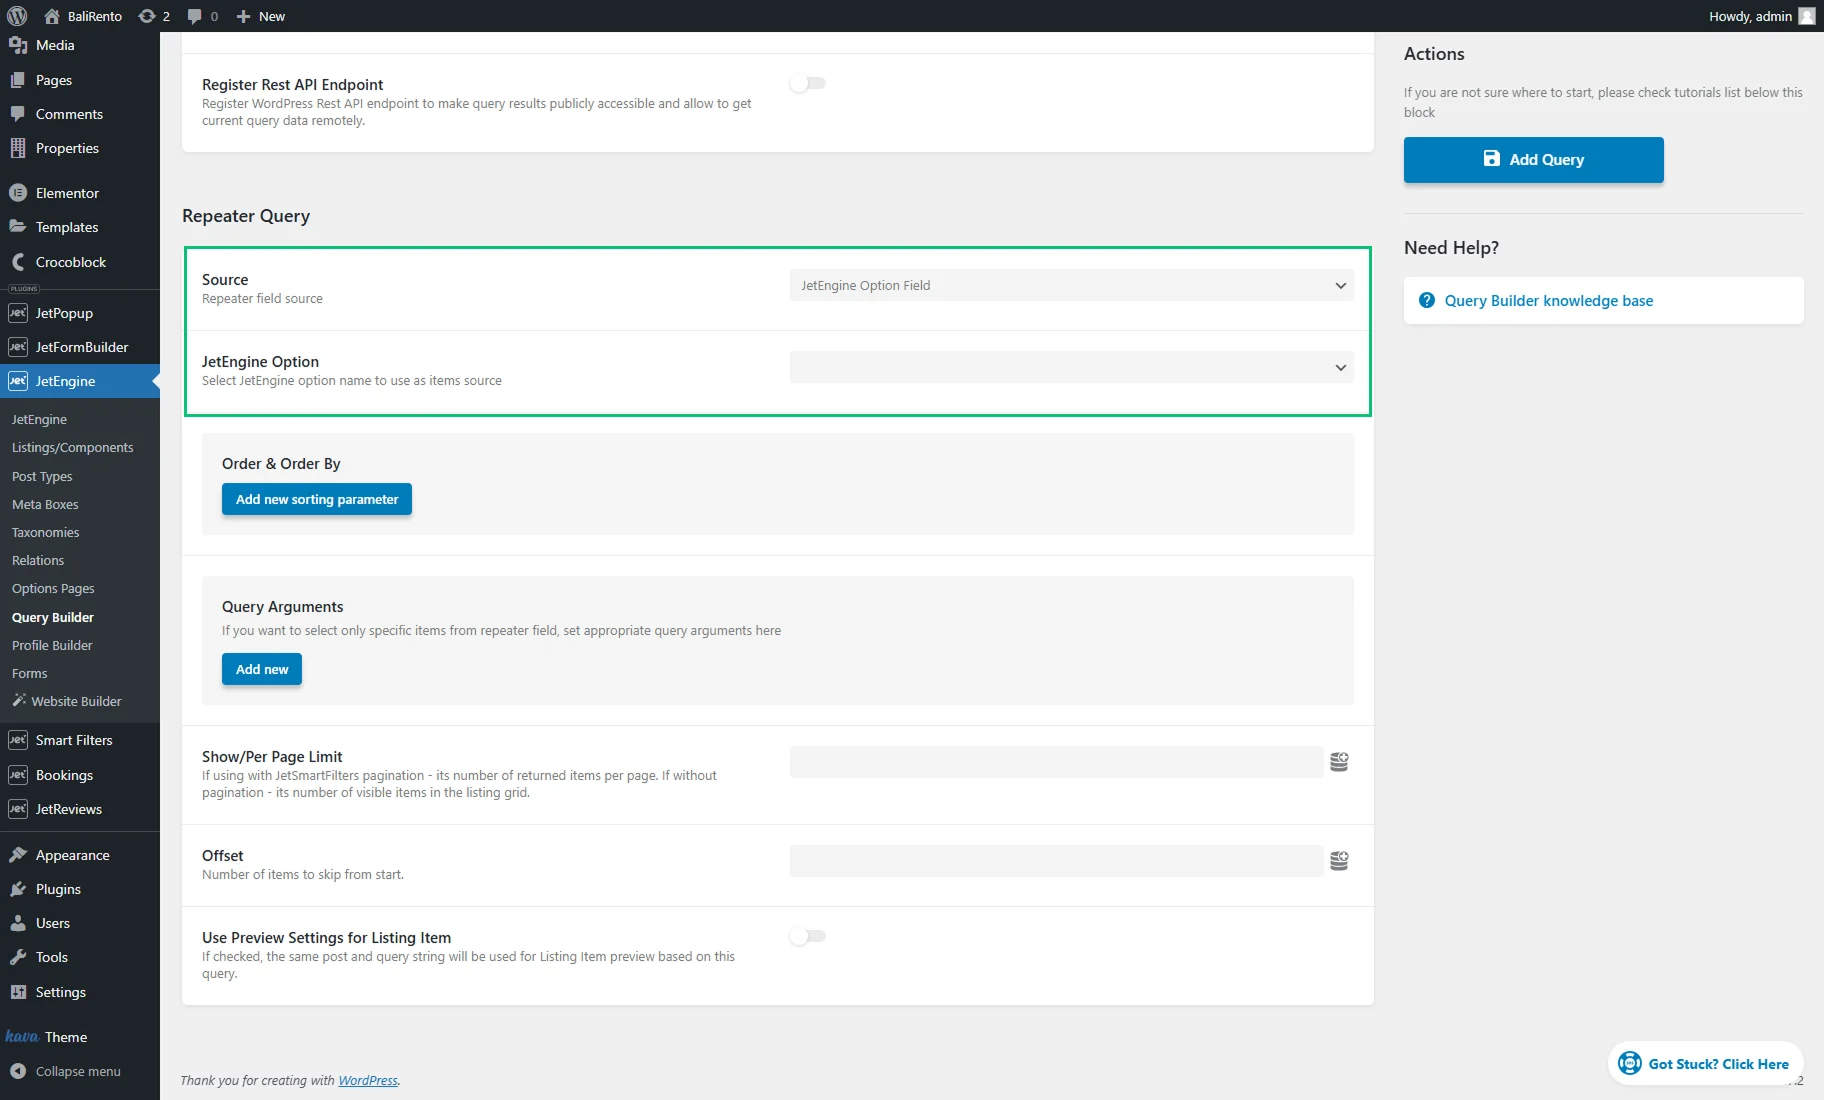
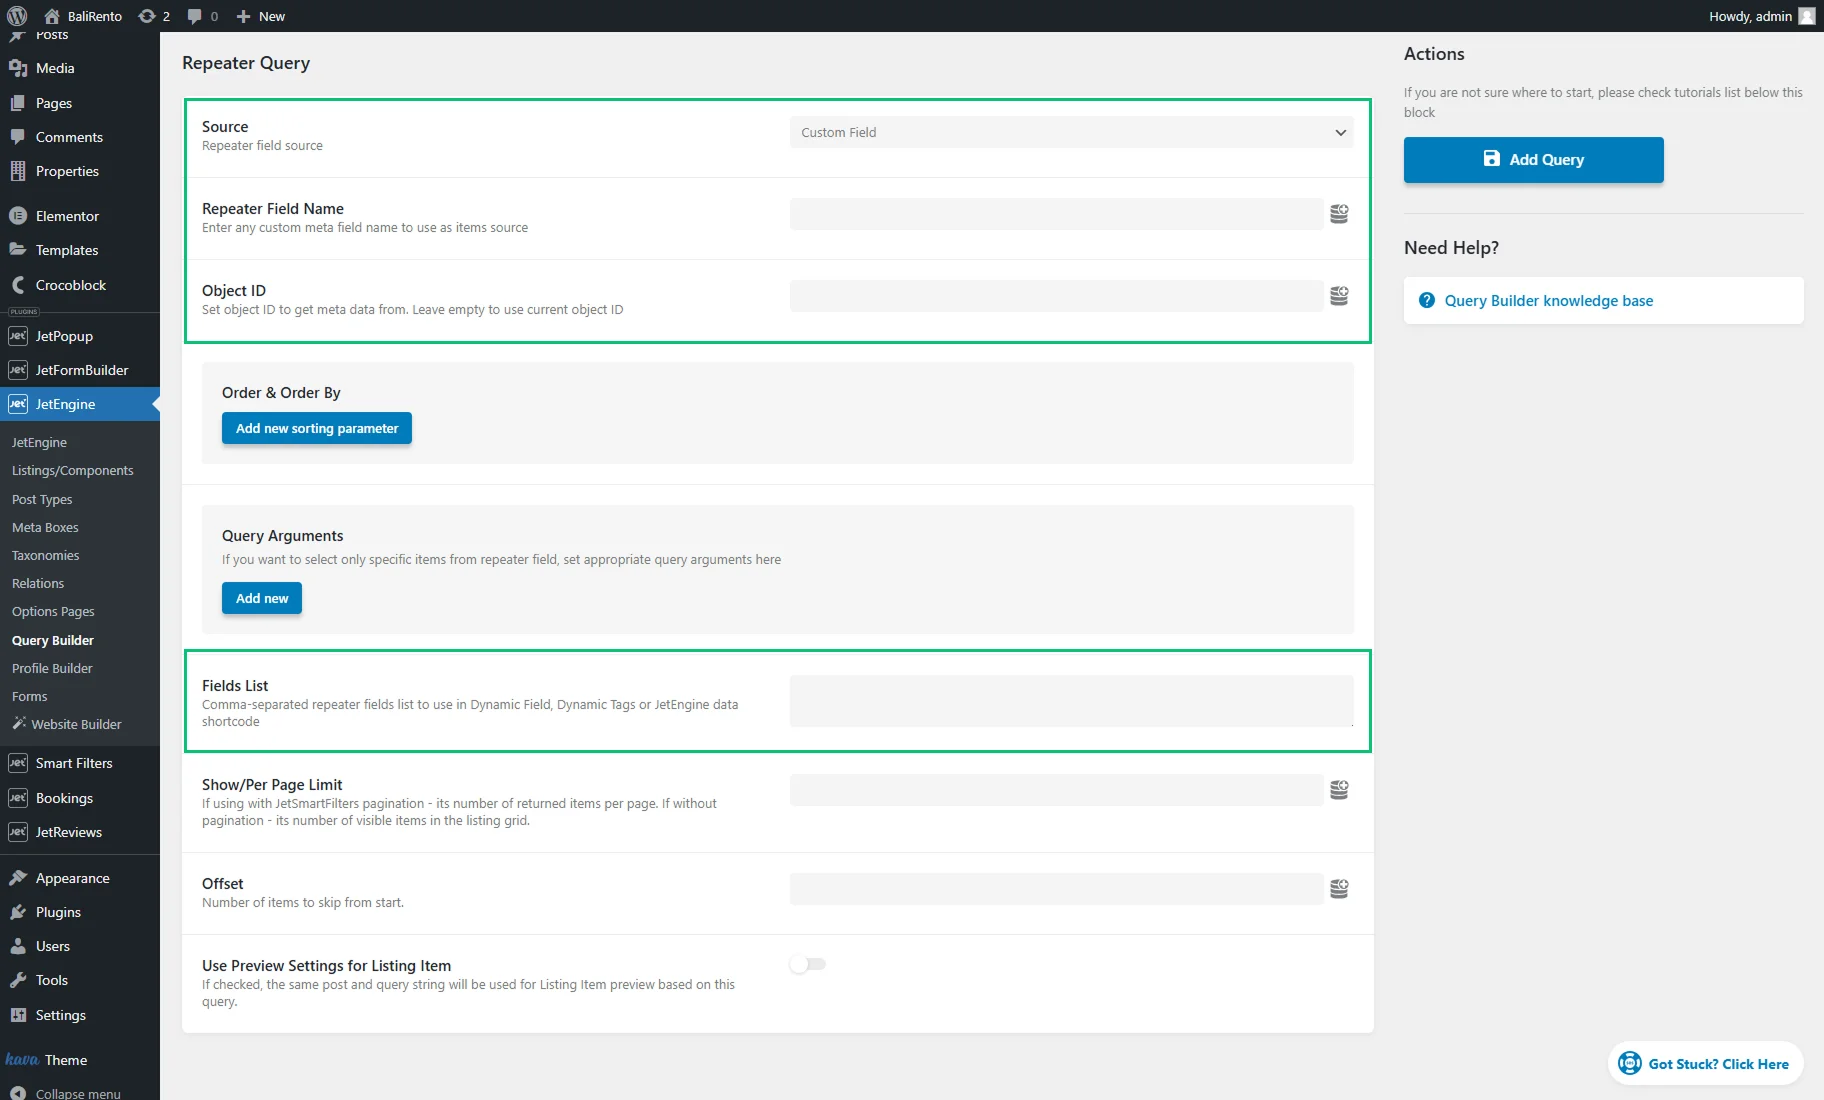
- Source — such sources can be selected for repeater:
- JetEngine Meta Field — this option activates the JetEngine Field dropdown menu, from which one can select the needed “Repeater” meta field created with the JetEngine plugin. One can create the Repeater meta field for the CPT or add such a field in the Meta Box for Post Types, Taxonomies, or Users. One can also add a macro for the “JetEngine Meta Field” source by clicking the “database” button near the Object ID field. For example, the “Queried User ID” macro can be selected for the “Repeater” meta field created for the users to display data on the user Profile Page;
- JetEngine Option Field — for this source, one needs to select the Options Page that contains a “Repeater” meta field in the JetEngine Option dropdown menu;
- Custom Field — this option activates the Repeater Field Name, where the custom repeater meta field name can be entered. One can also add a macro by clicking the “database” button near the Repeater Field Name and Object ID fields. In the Fields List, one can enter the field names contained in the “Repeater” custom field that needs to be displayed. For example, if a “Repeater” field has twenty fields, only three can be displayed by entering their names.
- Order & Order By — here, the “Add new sorting parameter” button should be clicked to add a new sorting condition. Multiple sorting parameters can be added per query, each with additional customization options:
- Order By — a dropdown menu to select the parameter by which the items will be sorted:
- Repeater Index — sorts elements within a repeater by their index, similar to sorting posts by ID. It can be sorted by ASC or DESC order;
- Repeater Field — sorts by the specified field;
- Field Name/ID — a field to enter the “Repeater” field name;
- Ordering Type — a dropdown menu to set the appropriate ordering type depending on the type of data stored in the field. It can be “Numeric (1, 2, 3),” “Alphabetical (a, b, c),” or “Dates”;
- Order — here, one can select ascending “From lowest to highest values (1, 2, 3; a, b, c)” or descending “From highest to lowest values (3, 2, 1; c, b, a)” order.
- Order By — a dropdown menu to select the parameter by which the items will be sorted:
- Query Arguments — to select only specific items from the “Repeater” field for display, one should set appropriate query arguments here. Multiple query arguments can be added per query by hitting the “Add new” button, each with additional customization options:
- Field key/name — a field to enter required meta field names within “Repeater.” The items will be queried according to the values in those meta fields;
- Compare — a dropdown to choose how the values will be compared:
- Equal — displays items having an equal value;
- Not Equal — shows items that don’t have an equal value;
- Greater than — shows items that have a greater value. It works with numeric values only;
- Greater or equal — displays items that have a greater or equal value. It also works only for numeric values;
- Less than — shows items that have a lesser value. For numeric values only;
- Less or equal — displays items that have a lesser or equal numeric value;
- Like — shows items that have the value you’ve set in the Value field mentioned in the content;
- Not like — displays only the items that don’t have the value you’ve set in the Value field mentioned in the content;
- In the list — after one adds several values to the Value field, it shows the items that have at least one of them in their content;
- Not in the list — displays items that have any values except the ones you typed into the Value field;
- Between — displays items that contain the value between two, which are set in the Value field;
- Not between — shows all the items except the ones that contain a value that matches the set interval;
- Exist — shows all the items that contain the Key. You don’t need to set the Value in this case;
- Not exist — displays all the items that don’t contain the Key. You don’t need to set the Value either;
- Regexp — displays items whose regular expression matches with the values in the meta field. For example, one can query users according to the values in the “Radio” or “Checkbox” meta field. The Creating Users Query and Displaying Specific Users in the Grid tutorial contains more details;
- Not regexp — displays items whose regular expression doesn’t match with the values in the meta field;
- Value — a field to set a value or values that will be compared to the value of the meta field chosen in the Field key/name bar;
- Type — a dropdown to specify what type of data is stored in the chosen fields:
- Char — alphabetic data;
- Numeric — whole numbers only;
- Date — date values;
- Datetime — date and time;
- Timestamp — date and time values stored as a timestamp. This format is particularly useful for tracking local events while accounting for time zones, as well as for use in analytics and statistical analysis;
- Decimal — fraction number data;
- Time — time values;
- Binary — data compared in a case-sensitive manner by treating it as raw binary;
- Signed — whole numbers, both positive and negative;
- Unsigned — whole numbers, only positive.
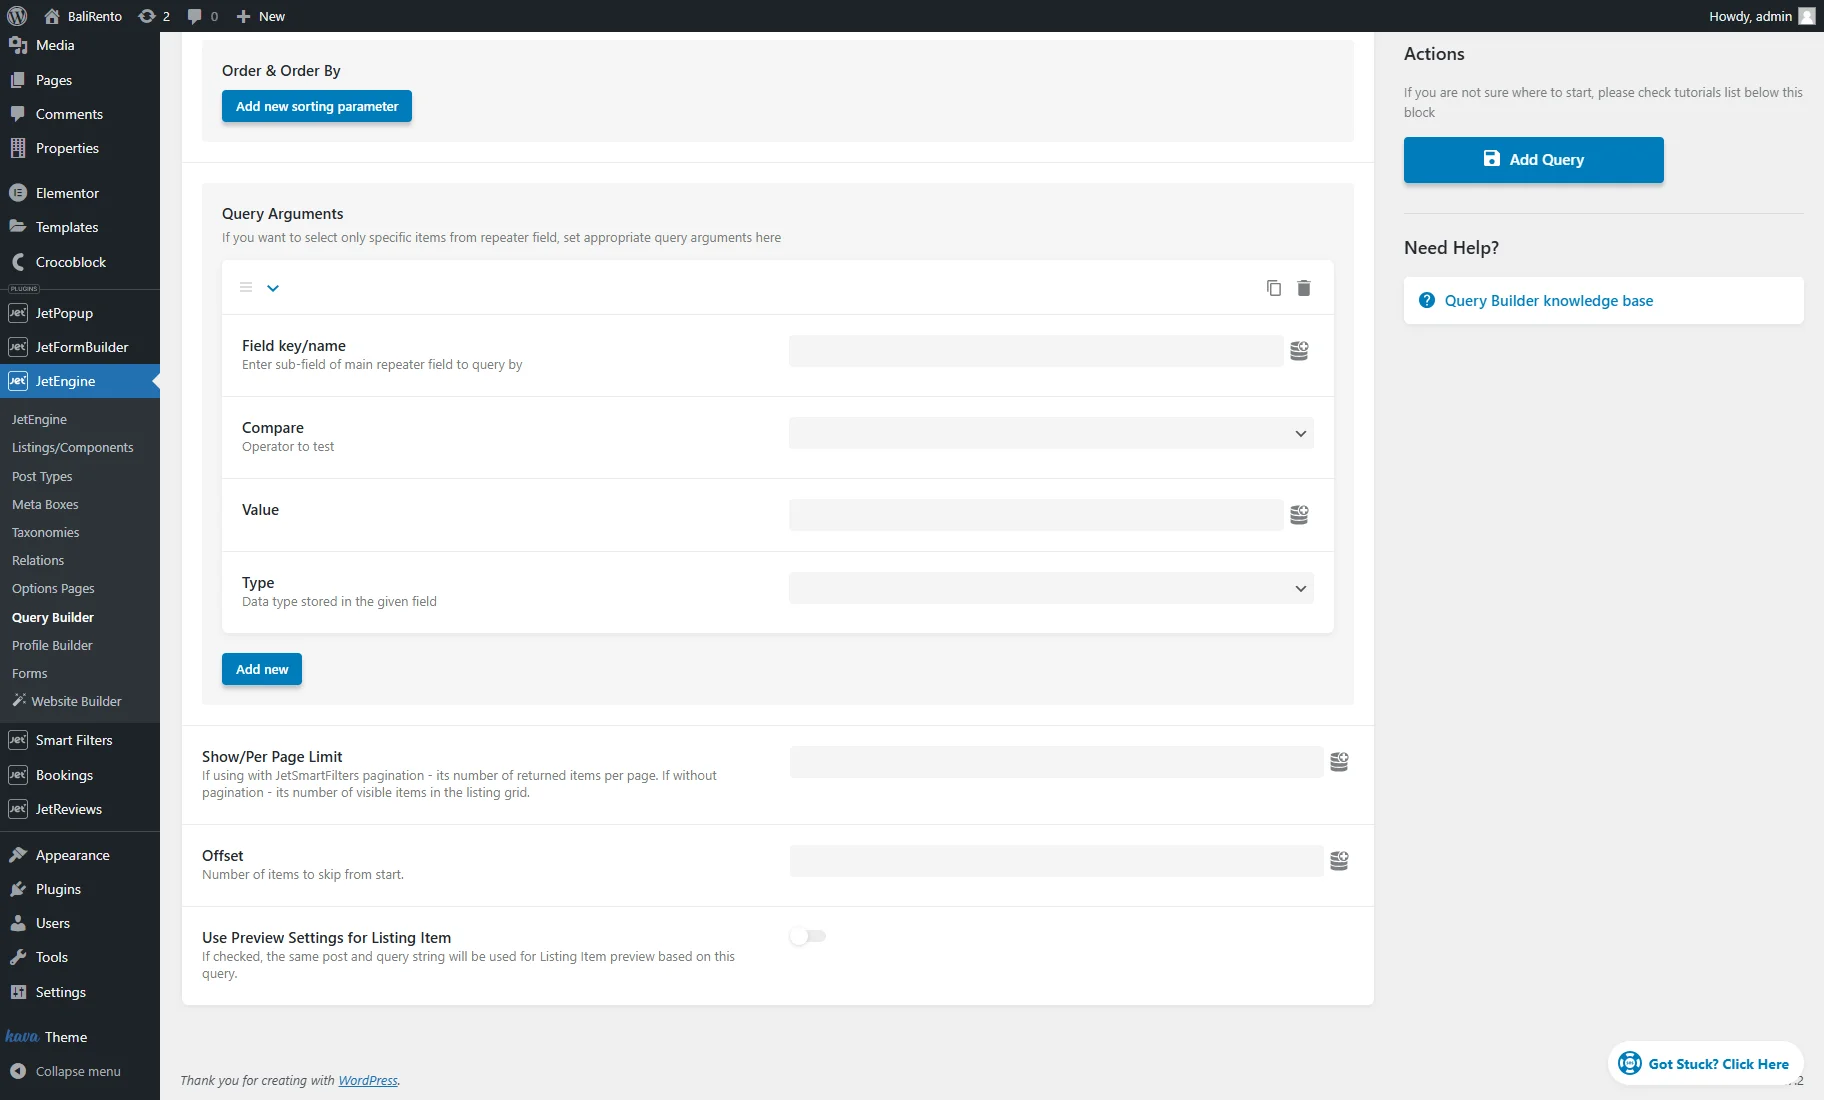
- Show/Per Page Limit — a field to define how many items will be shown at the same time (e.g., in the Listing Grid). If one adds the JetSmartFilters Pagination, this feature will define the number of items on one page;
- Offset — a field to type the number of first items to skip from the start;
- Use Preview Settings for Listing Item — if activated, the same post and query string will be used for the Listing item preview based on this query.
Usage Example
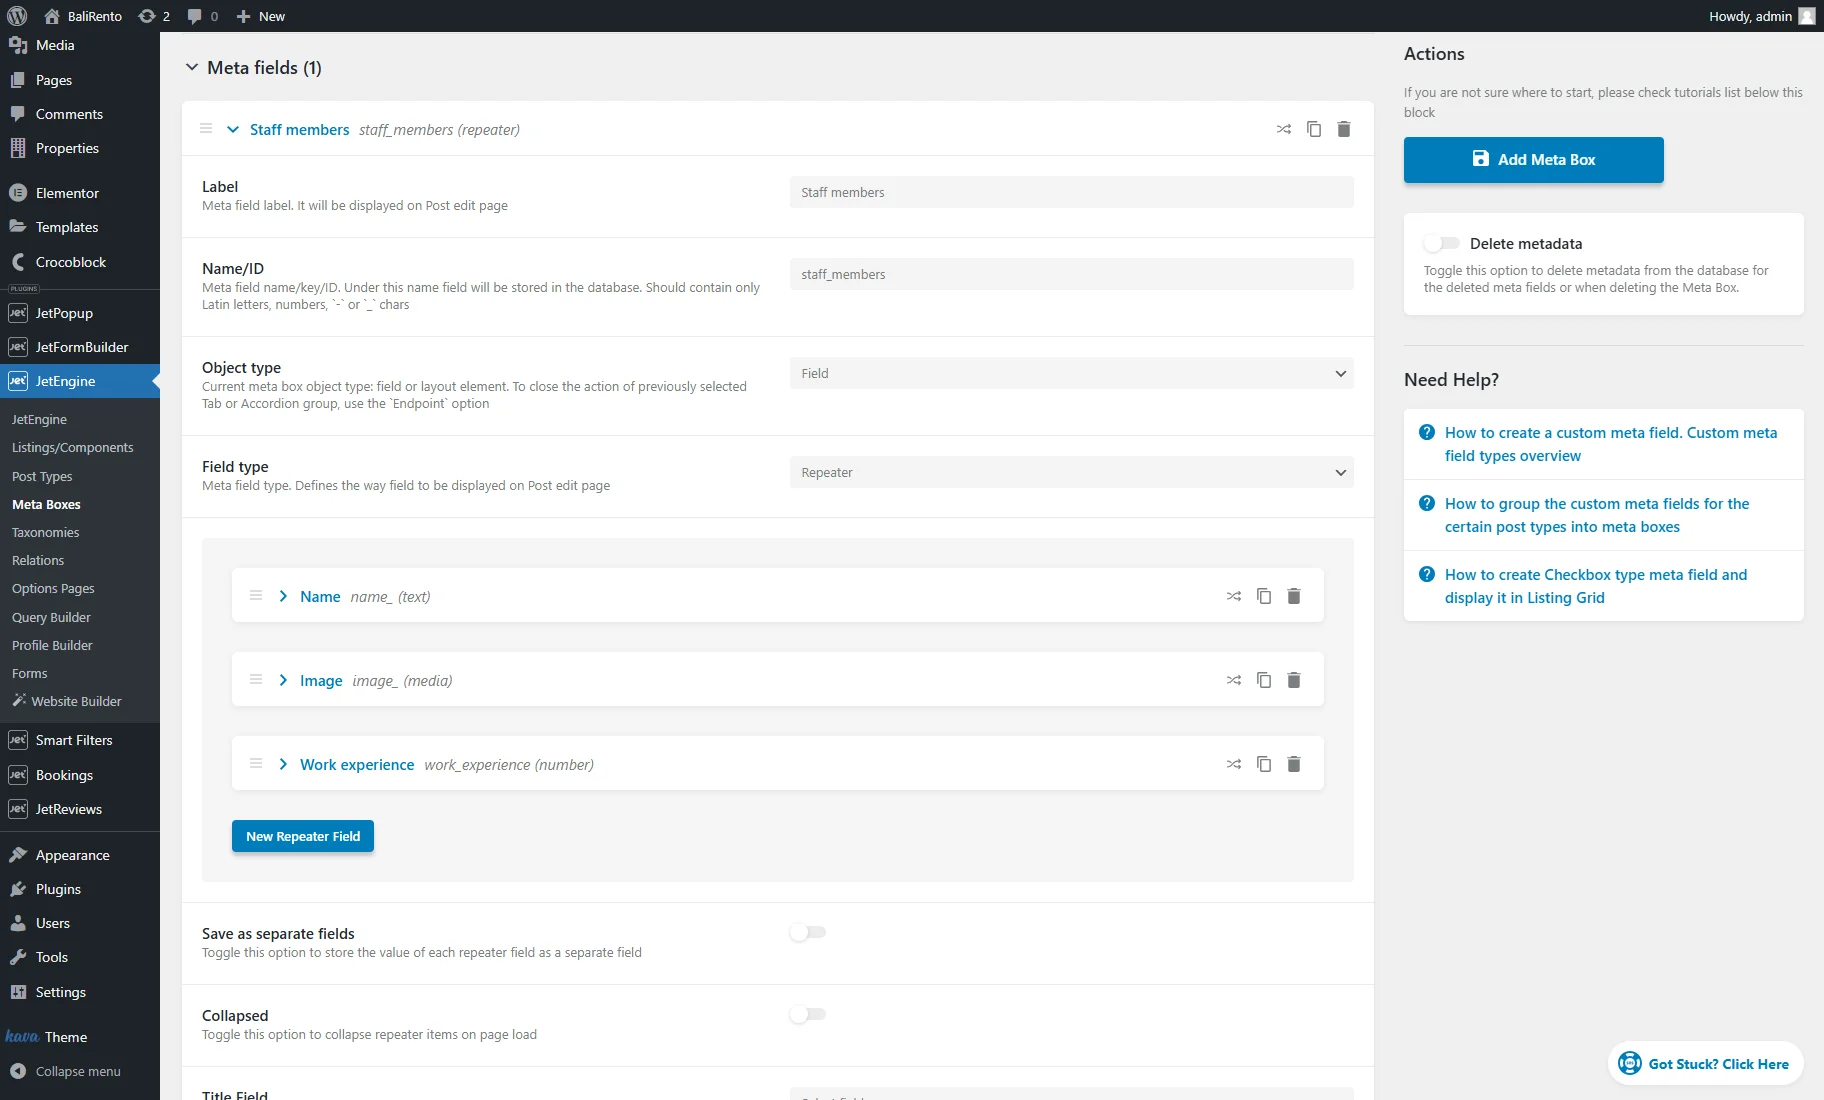
Firstly, we created a “Repeater” meta field in the Meta Box to add the staff members to posts. More details are described in the How to Add Custom Meta Fields to WordPress Post via Meta Boxes tutorial.
We added the “Work experience” meta field of the “Number” type to the repeater that we will use in the query.
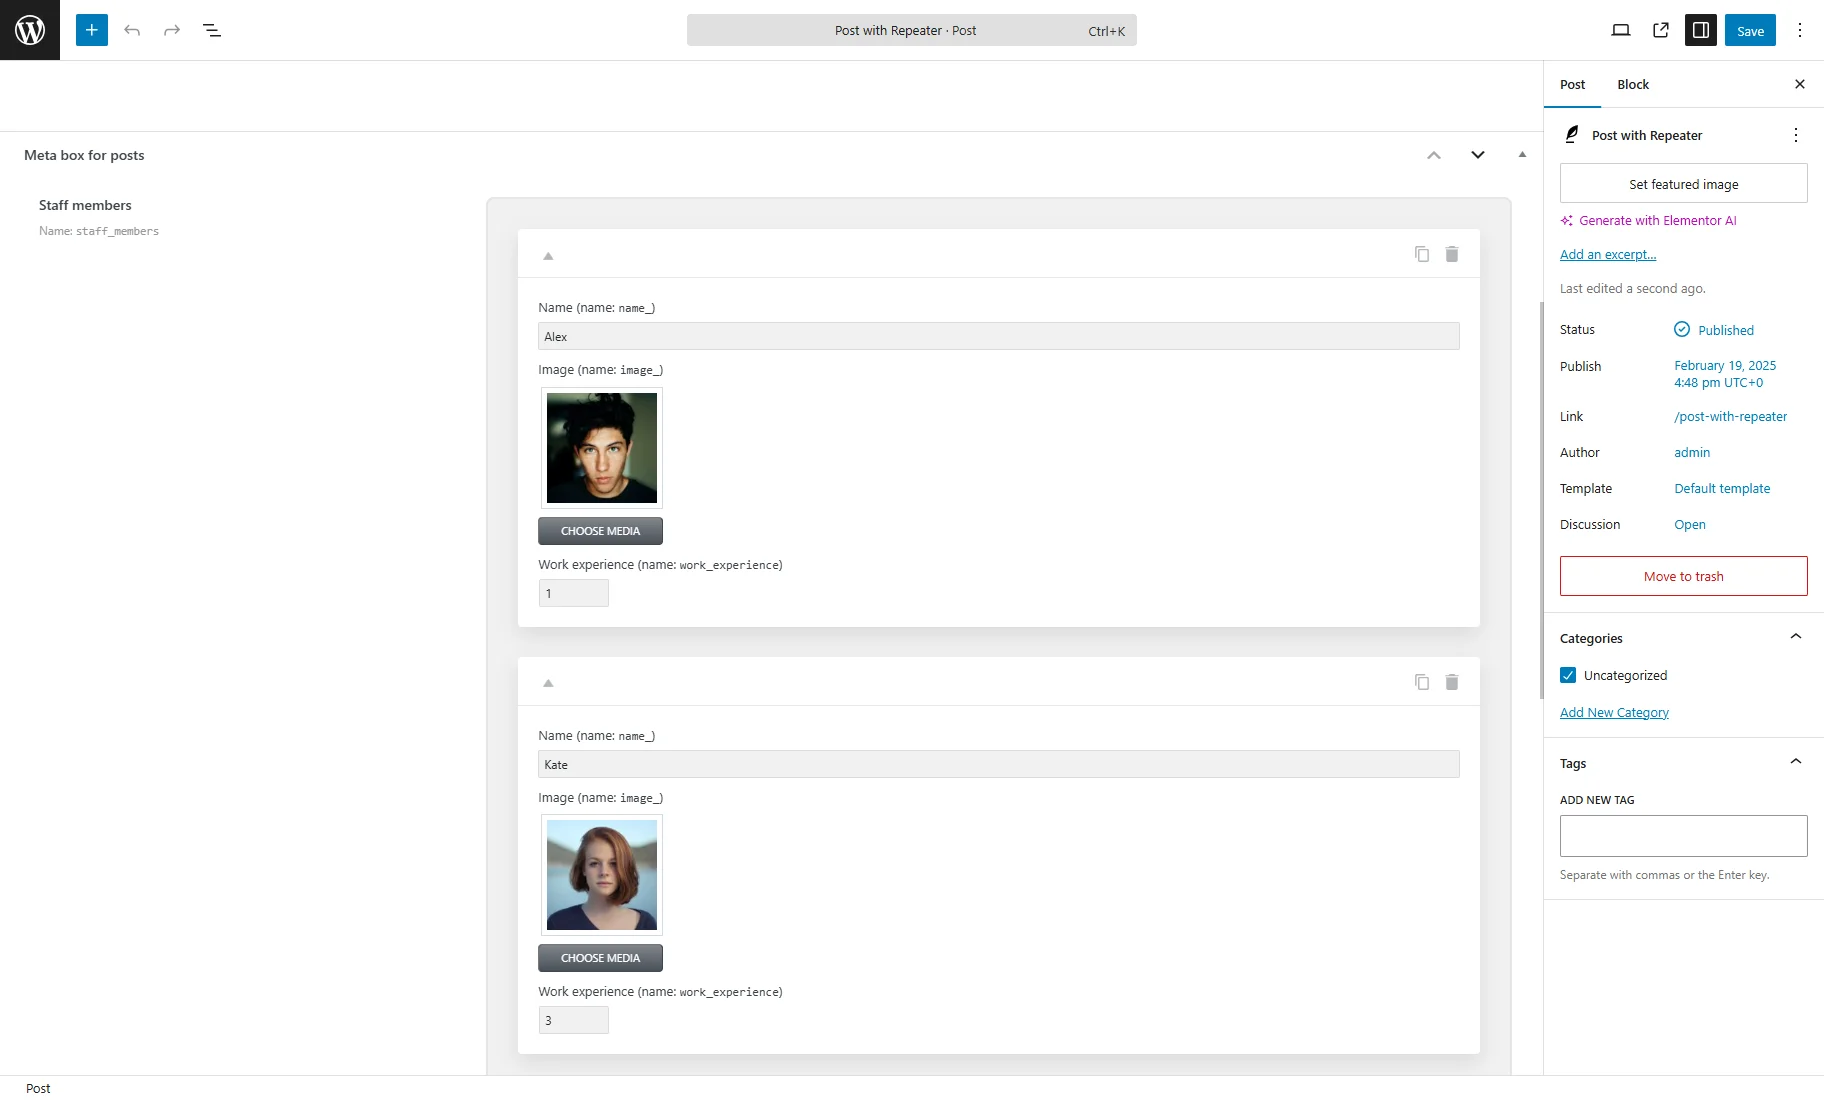
Secondly, we proceeded to a post and filled the repeater fields with the content.
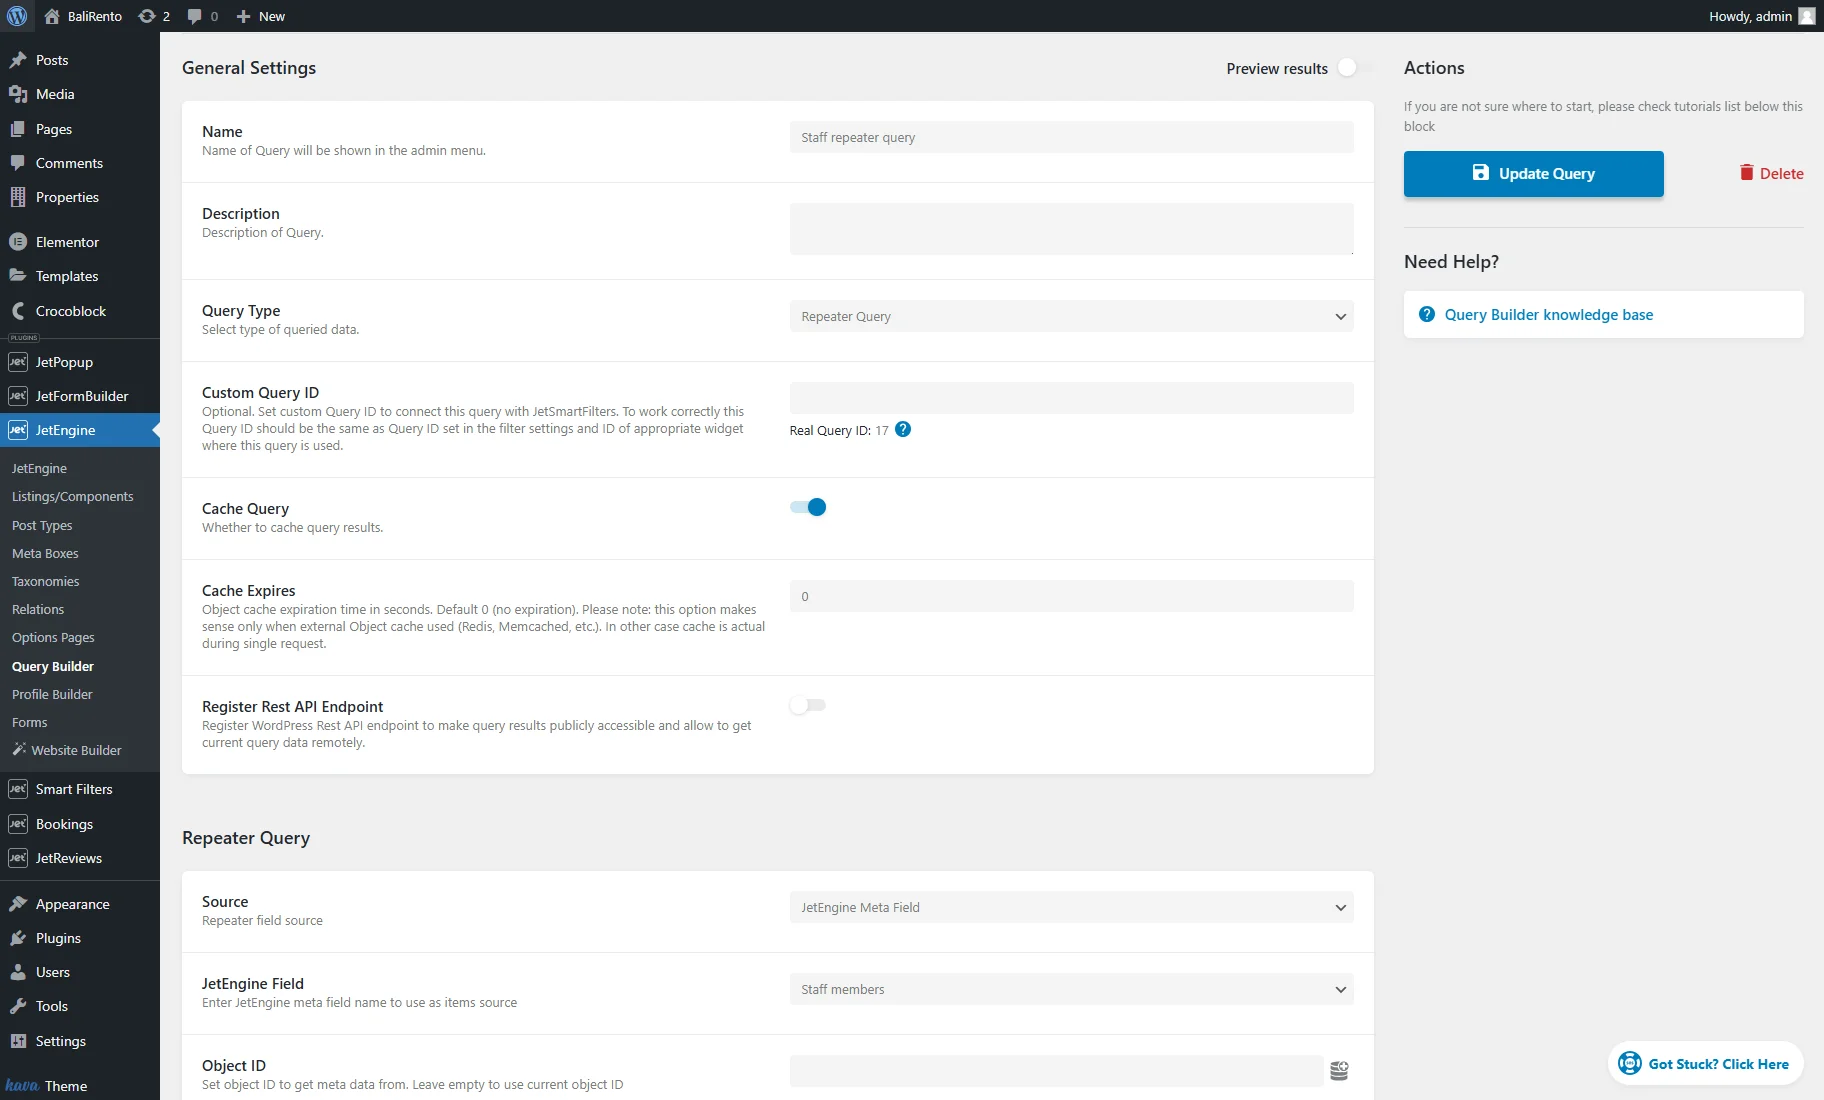
Thirdly, we went to the WordPress Dashboard > JetEngine > Query Builder tab and created a new query with the “Repeater Query” Query Type.
We picked the “JetEngine Meta Field” as the Source and selected the needed JetEngine Field name.
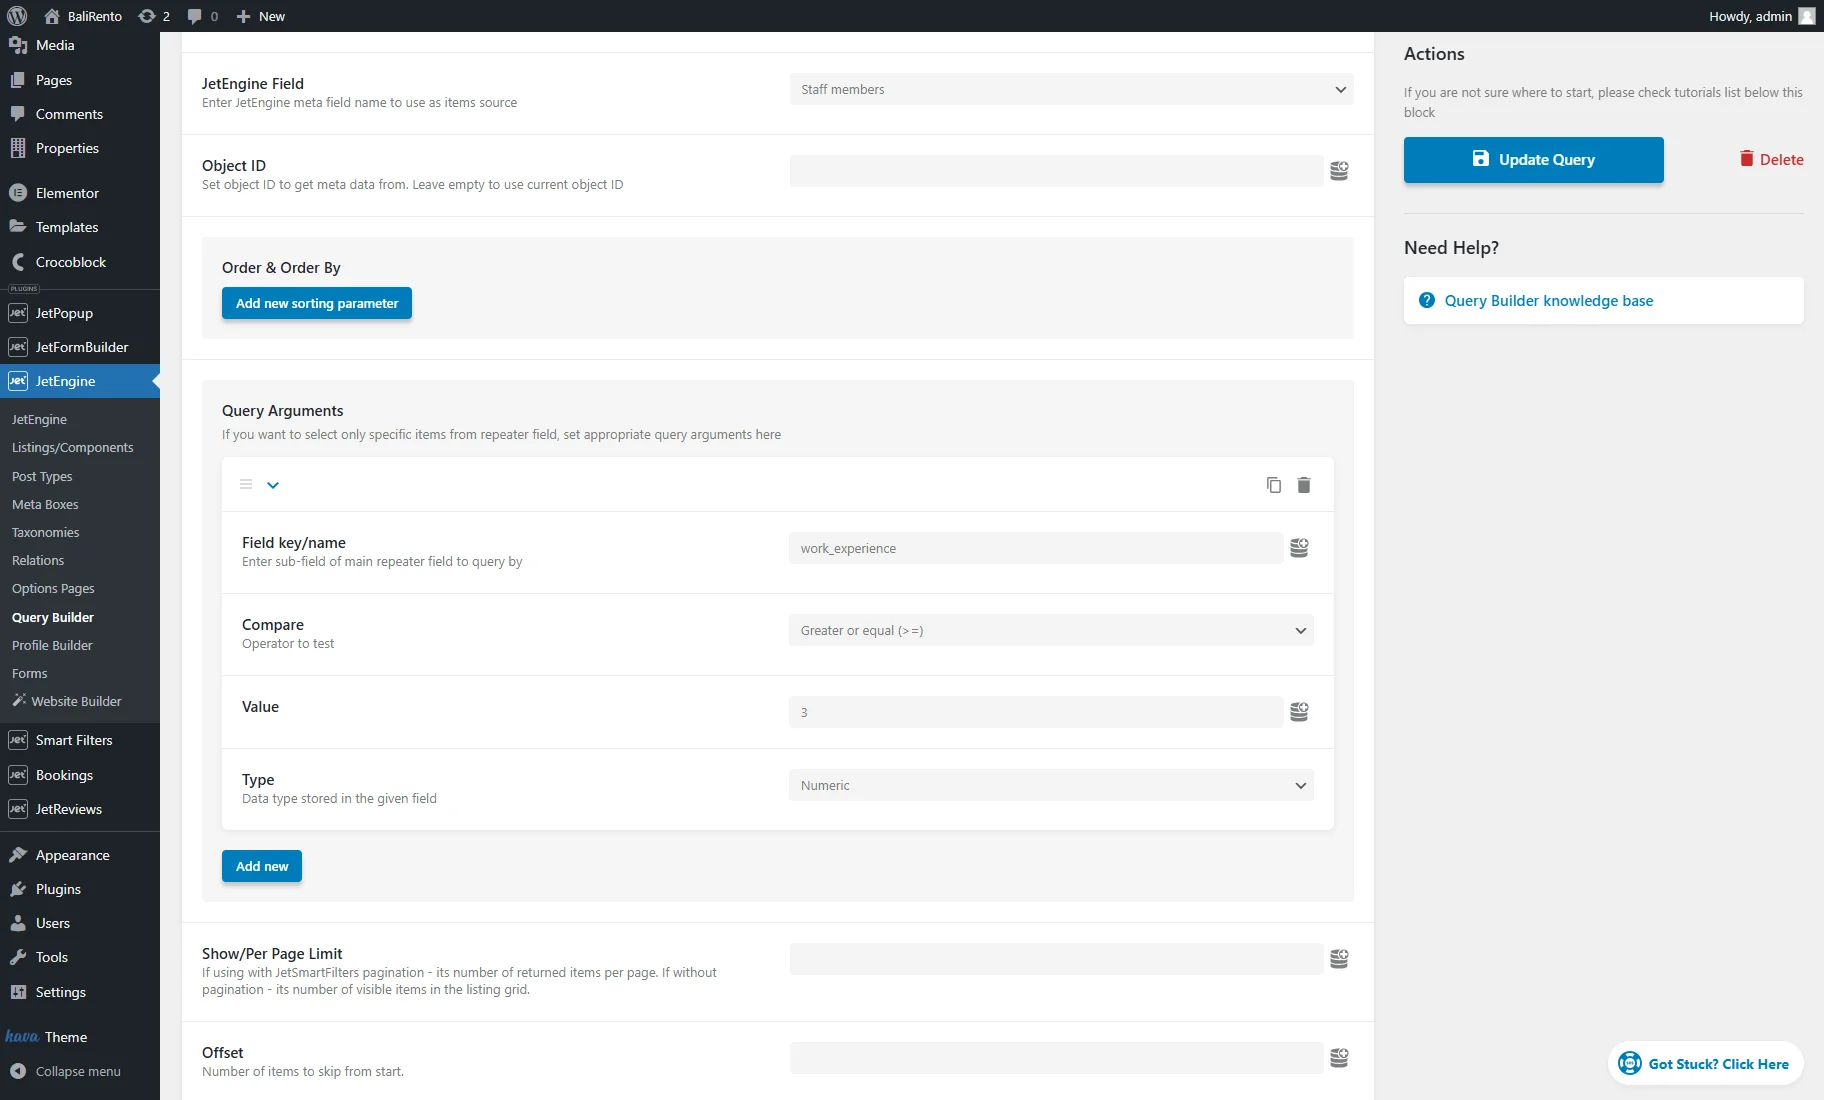
We want to display only the staff members with three or more years of work experience, so we hit the “Add new” button in the Query Arguments section.
In the Field key/name field, we entered the Number meta field name, selected the “Greater or equal (>)” option from the Compare selector, entered the “3” Value, and picked the “Numeric” Type.
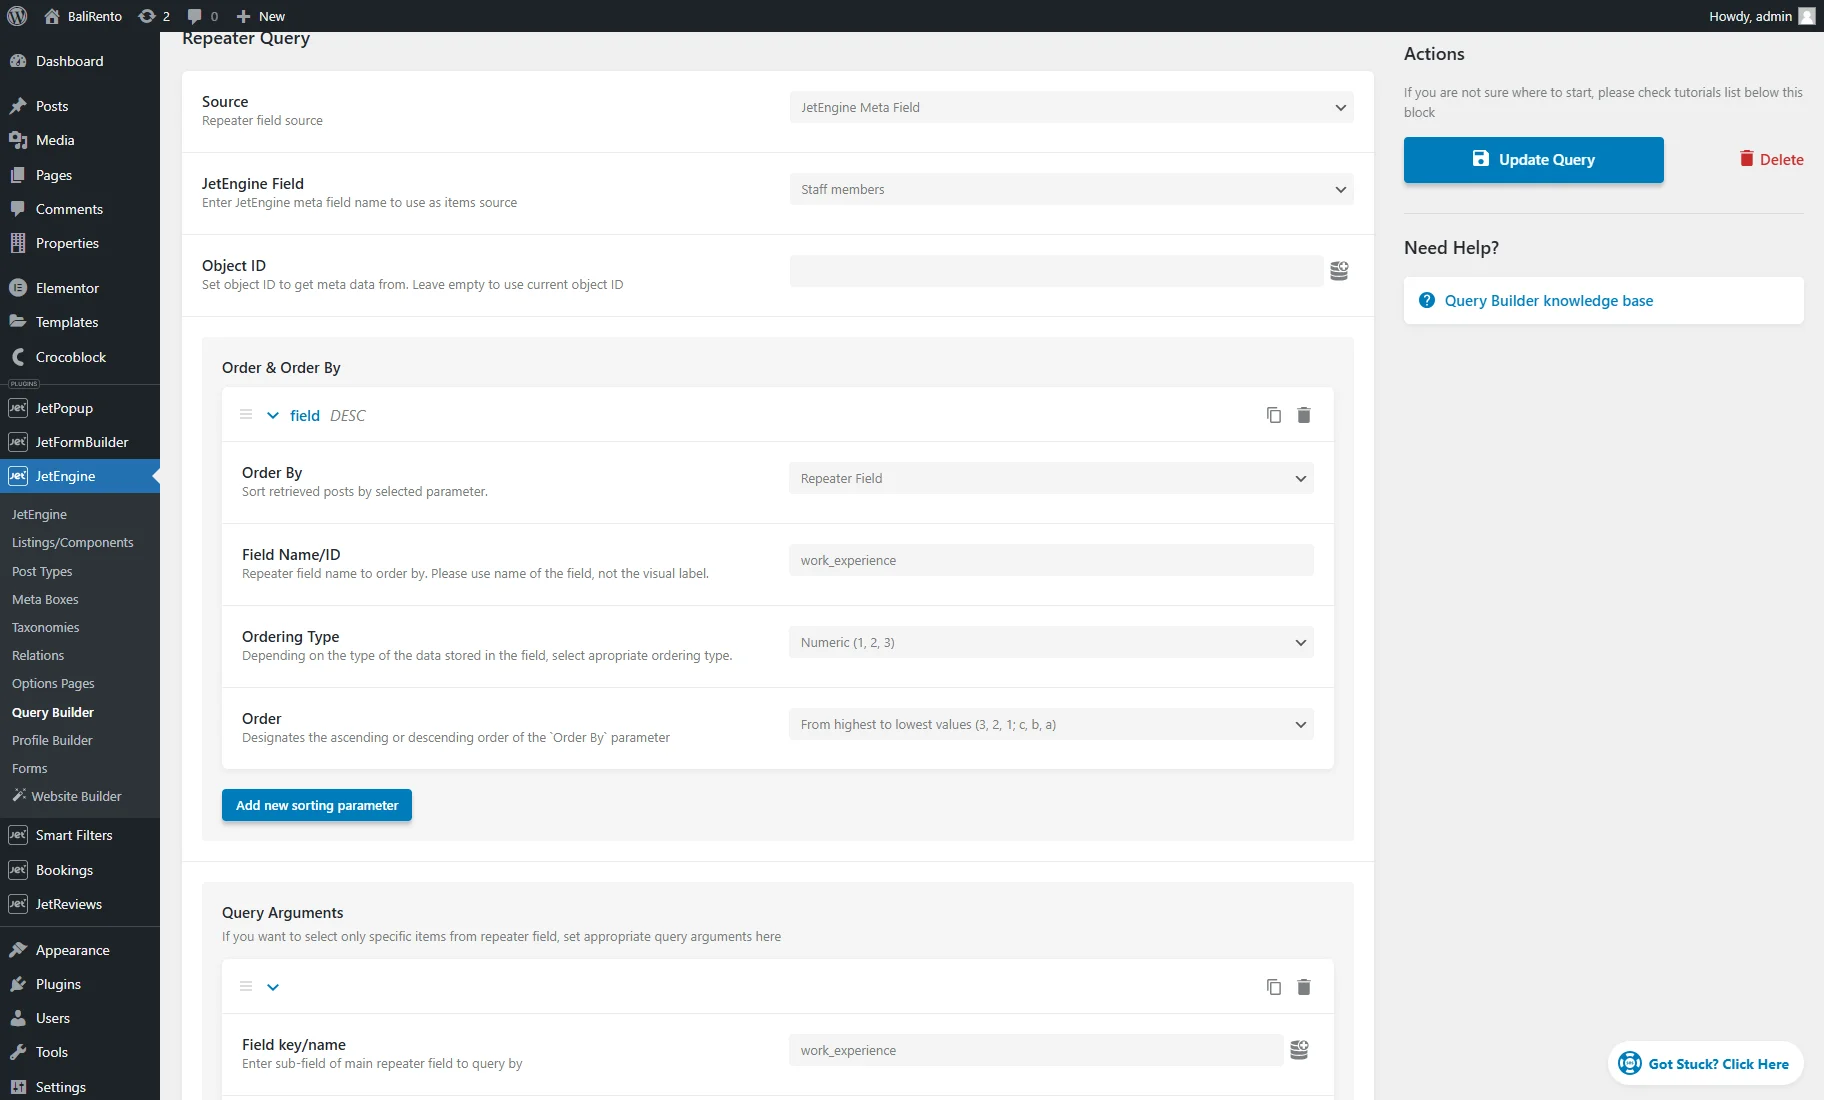
Also, we can order the members by their experience from highest to lowest.
We pressed the “Add new sorting parameters” button in the Order & Order By section, selected “Repeater Field” in the Order By field, entered the Field Name/ID, chose the “Numeric (1, 2, 3)” Ordering Type and “From highest to lowest values (3, 2, 1; c, b, a)” Order.
After that, we pushed the “Update Query” button to save changes.
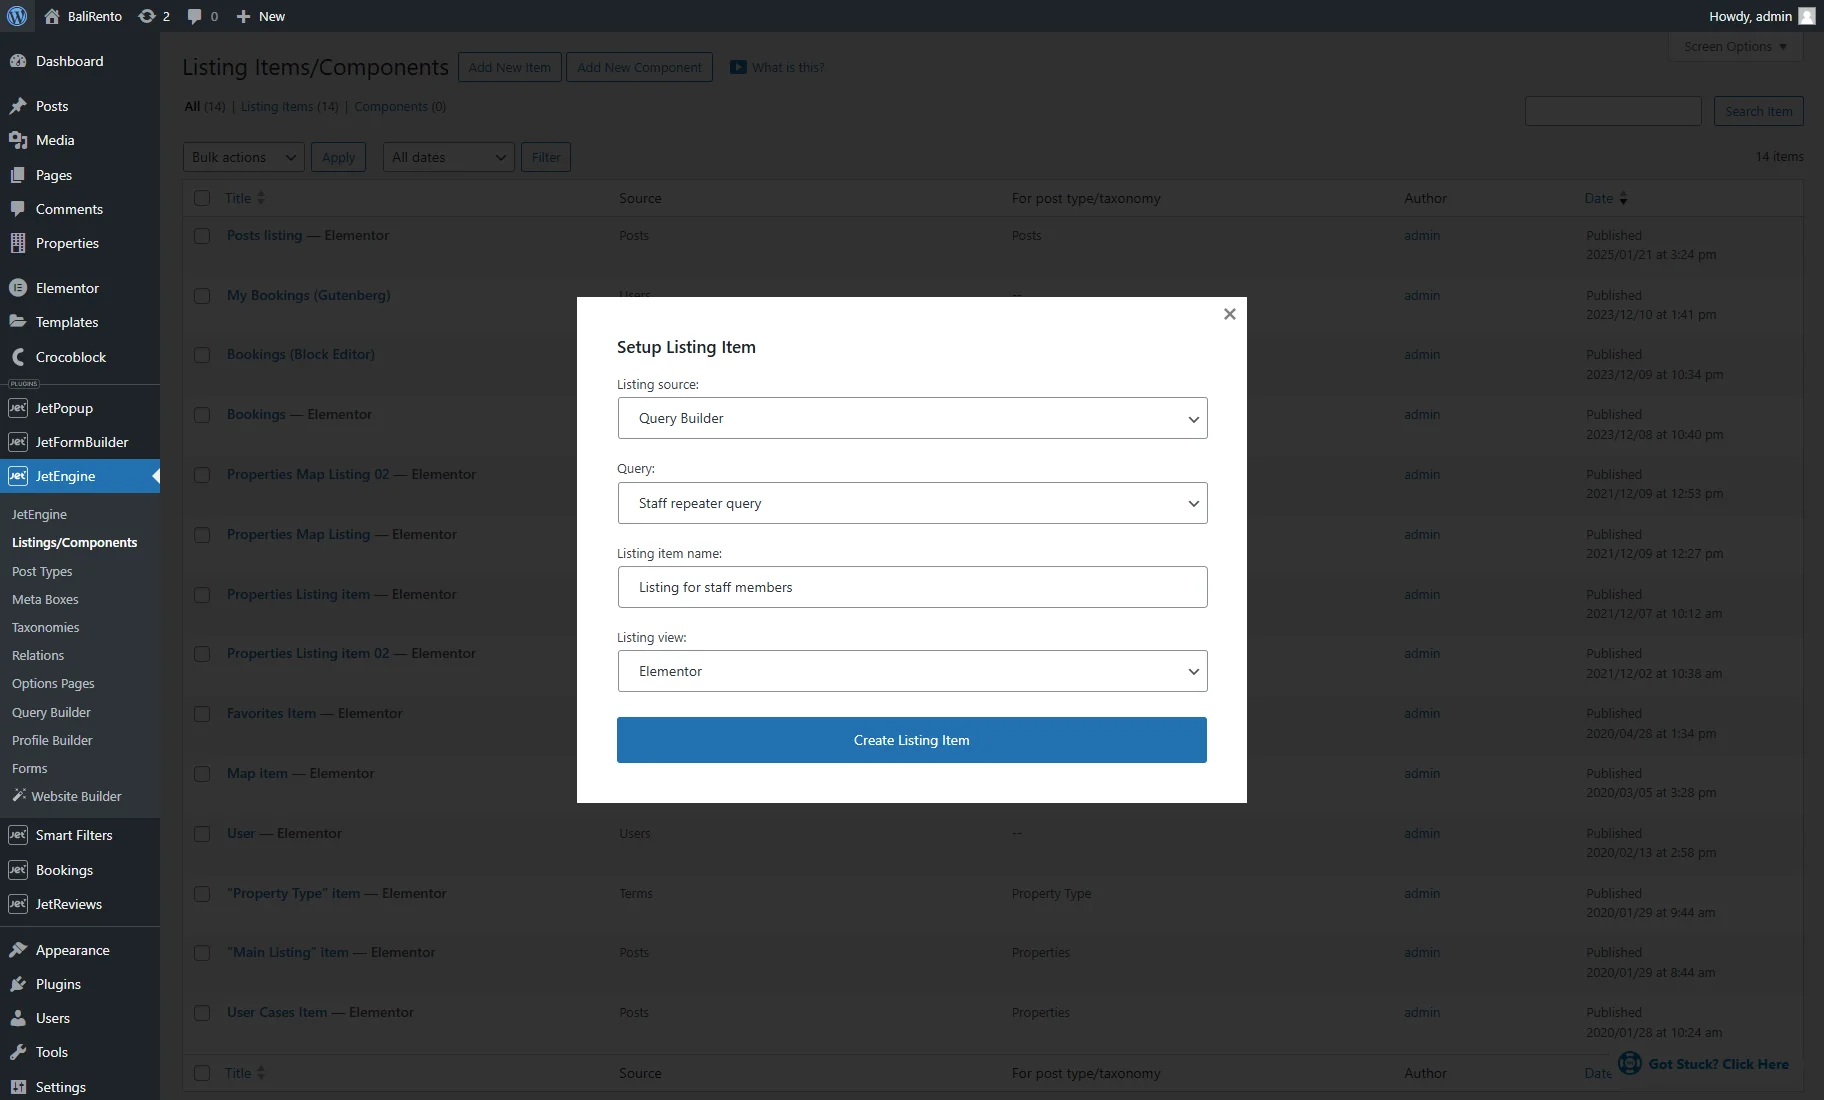
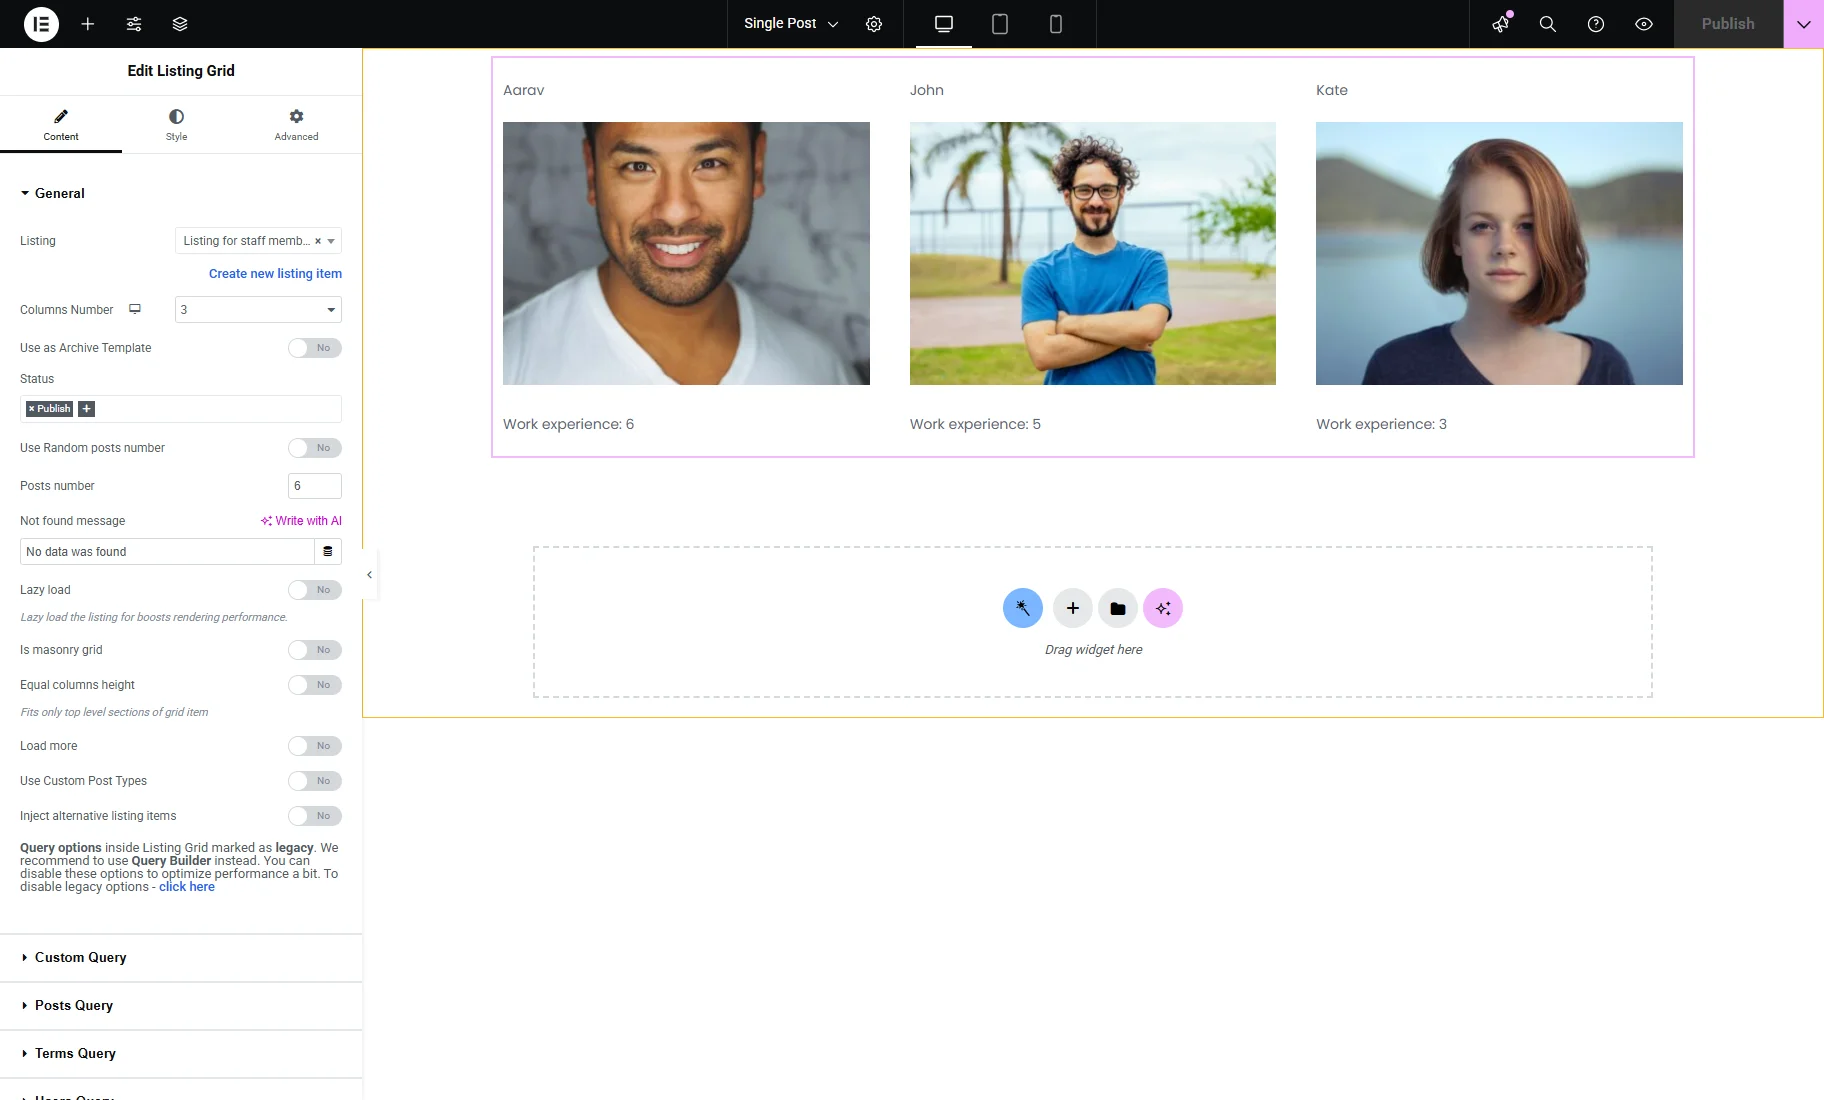
Fourthly, we headed to WordPress Dashboard > JetEngine > Listings/Components and clicked the “Add New Item” button. In the Setup Listing Item pop-up, we chose the “Query Builder” Listing Source, the recently created Query name for the repeater, entered the Listing item name, and picked the Listing view.
Then, we hit the “Create Listing Item” button.
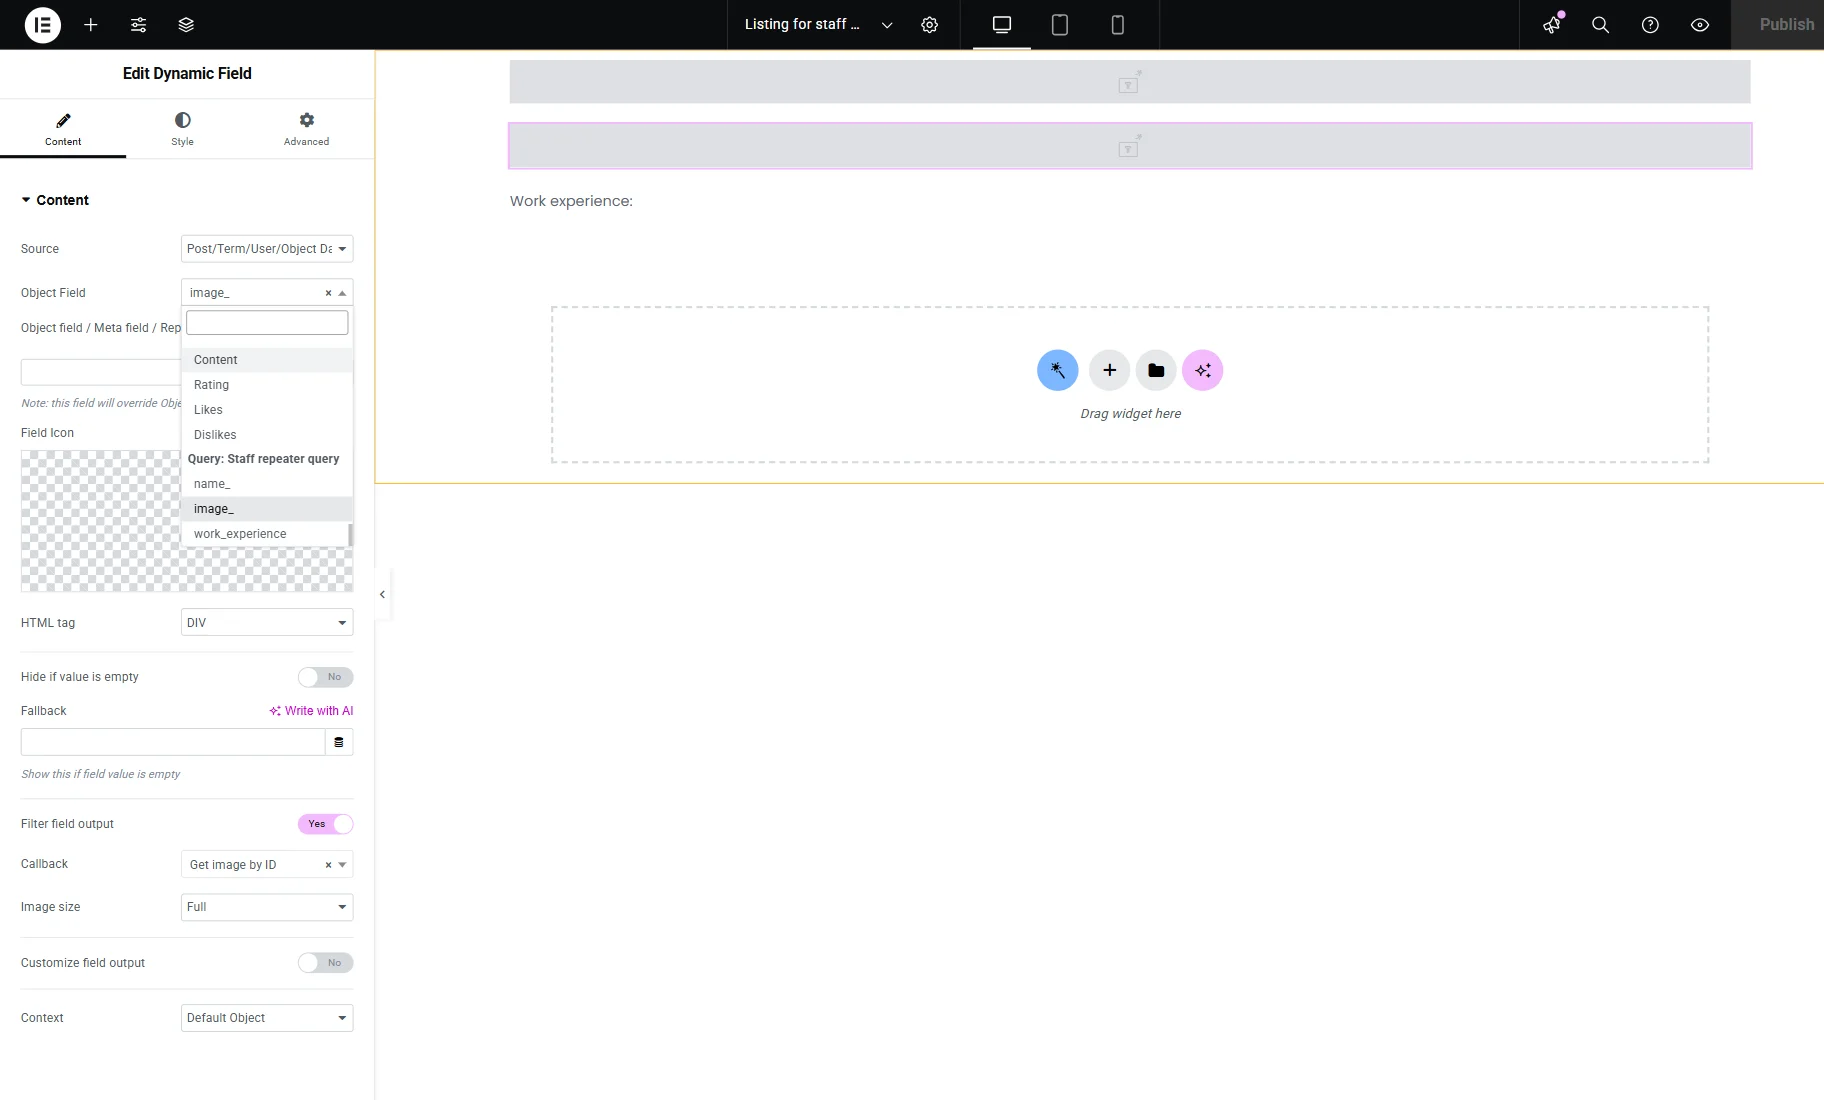
We drag-n-dropped the Dynamic Field to the editing page and duplicated it several times.
We picked the “Post/Term/User/Object Data” Source and selected the Query fields as the Object Field.
Be aware that the Dynamic Field widgets don’t show the values yet; they will be displayed in the Listing Grid.
Also, note that you need to use the Filter field output option for some field types. For example, we chose the “Get Image by ID” Callback for the “Media” meta field. Learn more in the Filter Field Output Overview.
Also, you can use the Customize field output option.
When we finished, we hit the “Update” button.
Finally, we navigated to the Single Post template. You can create a custom one with the JetThemeCore plugin. For more details, proceed to the How to Create a WordPress Single Post Page Template tutorial.
We put the Listing Grid on the template and selected the needed Listing. It shows only the repeater items where the value in the “Work experience” “Number” meta field is “3” and higher. Also, it orders items from the highest value from this field to the lowest.
Eventually, we saved the settings.
That is all for the “Repeater Query” type of the JetEngine plugin. Create a repeater item list and display it on a Single Page on the WordPress website.