How to Connect Filters and Listing Grid with Query ID
In this tutorial, we will cover the Query ID feature and explain how to connect JetSmartFilters to Listing Grid widgets in JetEngine using the JetSmartFilters Query ID setup.
Before you start, check the tutorial requirements:
- Elementor, Block Editor, Bricks, or Divi
- JetSmartFilters plugin installed and activated
- JetEngine plugin installed and activated
Query ID is a string value that links a JetSmartFilters filter widget to a specific Listing Grid on the page. This Listing Grid filter Query ID ensures the filter updates only the intended provider.
This setup is required when a page contains more than one Listing Grid, or when connecting Pagination and Sorting widgets to a specific grid.
This configuration applies to WordPress sites using JetEngine Listing Grid with Elementor, Gutenberg, Bricks Builder, or Divi Builder.
If you are new to filters, you can also check the How to Use Filters with the Listing Grid Widget tutorial and the How to Use Elementor Filters for Listings video from our YouTube channel.
What Is JetSmartFilters Query ID and Why It Exists
Query ID is a string value that applies a filter only to one specific provider. A provider is a widget that outputs data on the page, such as Listing Grid, Map Listing, Loop Grid, or similar elements.
Each provider displays a set of items based on its data source. JetSmartFilters works by updating what is shown in the provider according to the selected filter values.
Query ID exists to link all related parts of the process (filter, provider, and JetEngine query) into a single connection. When the same Query ID is set for all parts, JetSmartFilters understands which query should be filtered.
Without a Query ID, JetSmartFilters may automatically detect the first available provider of the selected type on the page and apply filtering to it.
This may work correctly when the page contains only one filterable widget. However, when there are multiple providers on the same page, like several Listing Grids, or a Map Listing and a Listing Grid, the filter needs a Query ID applied to know which widget is its provider.
Query ID is needed when you want to explicitly connect a specific filter to a specific provider and its JetEngine query. Set a Query ID when you need to ensure that a filter targets the intended provider. For example, when multiple filterable providers are present on the same page, or when you want to create an explicit filter-provider connection.
In more complex setups, such as when using an Additional Provider feature, one filter can be connected to multiple providers at the same time. In this case, each provider has its own separate query, and the filter applies to both of them.
Query ID can be left empty when the filter should target the only provider on the page, and no explicit provider-to-filter connection is needed. In this case, the filter can work even without the Query ID. However, setting it is still recommended if you want to have a more stable setup.
Where the Same Query ID Must Match
To connect a filter to a specific grid, the same string value must be used in all connected elements:
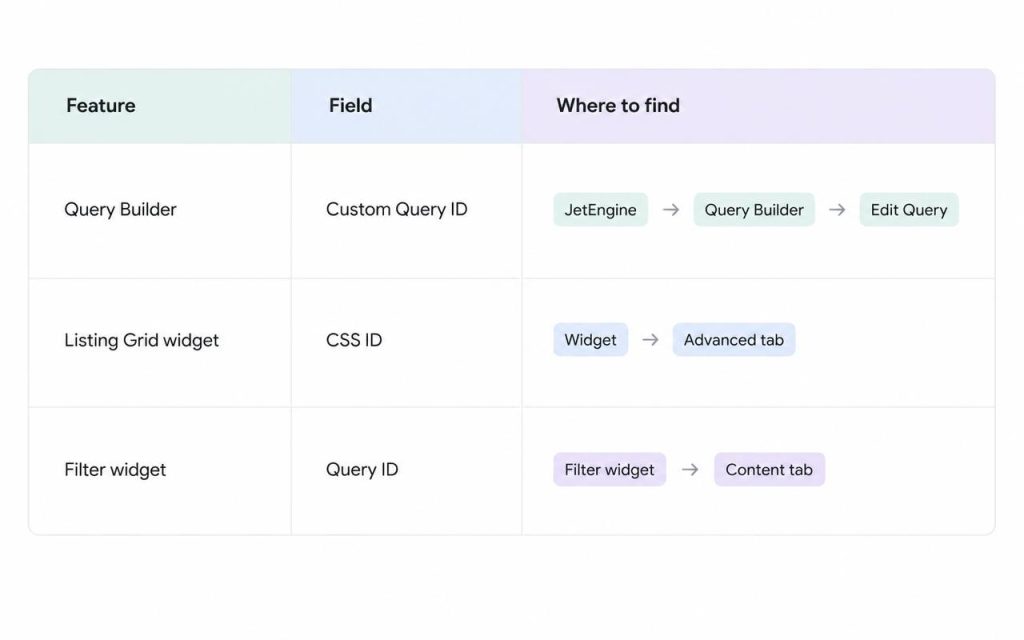
If one of these fields contains a different value (or one of them is empty), the filter connection may fail.
Query ID Rules
When entering a Query ID, follow these rules:
- Use letters, numbers, hyphens, or underscores;
- Do not use spaces;
- Use the correct letter case: “myGrid” is not “mygrid”;
- Start values from a letter, and not the number (like “listing1”).
Set Up JetEngine Listing Grid Query ID
Let’s check how to connect the filter to the needed Listing Grid with the Query ID.
Follow this step by step guide to Query ID setup for JetSmartFilters and JetEngine to connect filters correctly.
Set a custom Query ID in Query Builder (optional)
If your filter uses a custom query created with JetEngine’s Query Builder, open the query settings first in the WordPress Dashboard > JetEngine > Query Builder.
Locate the Custom Query ID field and enter the unique value there. For example, we use “properties-grid”.

Save the query.
Add the same value to the Listing Grid
Open the page where the Listing Grid is placed. Click the Listing Grid to open its settings and go to the Advanced tab.
Find the CSS ID field and paste the unique value you have used in the query here.

Add Query ID to the filter
Click the filter widget you want to use to filter the provider. For example, we have a Checkboxes Filter widget.
Paste the value used in the query and the Listing Grid to the Query ID field.
Also, make sure that the correct provider is selected in the This filter for select. In the case of the Listing Grid, it’s “JetEngine”.

Update the page.
Using Multiple Listing Grids with JetSmartFilters on One Page
This setup is required when filtering multiple Listing Grids on the same page using different Query IDs.
If a page contains several Listing Grids (or Map Listings), each filterable grid should have its own unique Query ID. Otherwise, the filter may affect the wrong grid or multiple grids at once. Another outcome is unpredictable working.
For example, we have a page with two filters and two Listing Grids.
We have the “properties-grid” Query ID in the first filter widget.
Next, we add the same ID to the CSS ID field of the Listing Grid we want to filter. These steps can be checked in the Set Up Query ID for Listing Grid chapter.
We repeat the same steps for the second filter widget, but this time we add a different Query ID, “favorites-grid”.

Finally, we add this CSS ID (“favorites-grid”) to the Listing Grid that needs to be filtered by the second filter.
If you have two (or more) providers and one of them should not be filtered, the CSS ID field can be left empty.

Save the page when ready.
Pagination and Sorting Must Use the Same Query ID
If you have Pagination and Sorting widgets on your page, they must have the same Query ID as the connected Listing Grid and a filter widget.
Otherwise, some issues can appear:
- Pagination disappears after filtering;
- Sorting is affecting the wrong grid;
- Page navigation does not preserve the filtered results.
For proper work, go to the Pagination and/or Sorting widgets and find the Query ID field. Enter the same value used in the Listing Grid, filter widget, and the query (if used) to this field.
This ensures that the related widgets work as a connected system.

Save the page when ready.
JetEngine Listing Grid vs Elementor Loop Grid
If you are using Elementor Pro Loop Grid with JetSmartFilters, the setup differs from JetEngine Listing Grid.
Elementor’s Loop Grid uses a different provider logic, and AJAX, pagination, and search behaviors work differently.
If you want to connect the JetSmartFilters filter to Elementor Loop Grid, check the How to Apply Filters to Elementor Pro Loop Grid guide.
Also, look through the most common things that need to be checked when connecting JetSmartFilters widgets to the Loop Grid.
If you use the Pagination widget with the Loop Grid, make sure that the pagination in the widget itself is disabled.

Next, disable the Nothing Found Message in the Loop Grid settings if enabled.

Instead, you can use the No Result Text feature that appears when the Is Filterable toggle is activated.
The Is Filterable Loop Grid toggle is obligatory for activation; otherwise, the filter will not be applied.

In some of the query sources, the Query ID field appears. If you use query features, complete the field with the “jet-smart-filters” value.
Also, make sure that the Source selected here matches the source selected for the Loop Grid when it’s created.

Known Issues
If the filter still does not work after entering the Query ID, check the following common causes.
The values don’t match exactly
Even if the values look similar, they still may differ because of:
- uppercase/lowercase mismatch (for example, “myGrid” and “mygrid” are different values);
- an extra character;
- a copied trailing space.
The Listing Grid was duplicated
If a page contains a copied Listing Grid widget, it may inherit the same CSS ID.
This creates a conflict because multiple widgets on the same page have the same identifier. Make sure that each filterable grid has a unique value.
“Use as Archive” feature enabled
If the Use as Archive toggle is enabled in the Listing Grid settings, it may override the expected query behavior and prevent the filter from working as intended.
Legacy query setup is used instead of Query Builder
We recommend using the Query Builder functionality and the Custom Query tab in the Listing Grid settings instead of the legacy query tabs.
Other queries are present on the page
If other JetEngine widgets using custom queries are added to the same page, they may interfere with filter detection.
To prevent conflicts, assign the “no-filter” Query ID to the Query settings of widgets that should not be affected by JetSmartFilters.
JetWooBuilder Product Loop widget is used
The Product Loop widget from JetWooBuilder does not support a Query ID feature. So, if you try to assign a Query ID to this widget and connect it to JetSmartFilters, the filtering may not work correctly or may break.
Due to the widget’s internal logic, it is recommended to use only one Products Loop widget per page and avoid applying a Query ID to it.
FAQ
No, the Query ID is optional when there is only one provider on the page.
If the Query ID value is different in the filter, provider, or query, the connection will fail, and the filter will not affect the intended widget.
No, each filterable provider should have a unique Query ID. Otherwise, filters may affect multiple widgets at once or work unpredictably.
No, some widgets, such as JetWooBuilder’s Products Loop, do not support Query ID and may break if it’s applied.
If filters don’t work as expected, check the JetSmartFilters Not Working: 7 Things You Need to Check guide for additional common issues and solutions.
That’s all about connecting JetSmartFilters widgets to the Listing Grid with the help of the Query ID feature on your WordPress website.