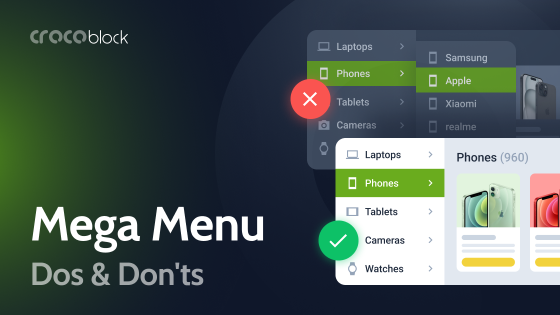
If you’ve ever tried to squeeze ten services, three blog categories, and a contact page into a standard navigation bar, you already know the problem. Things get cramped, visitors get confused, and important pages end up buried under multiple clicks.
A mega menu solves this. Instead of a thin dropdown with a few links, a mega menu opens a wide, organized panel that can display columns of links, images, featured products, recent blog posts, and even call-to-action buttons, all before a visitor clicks a single thing.
This guide walks you through three practical ways to build one using Elementor, from the simplest no-code approach to more advanced setups, so you can choose the one that fits your website and your comfort level.
Do You Actually Need a Mega Menu?
Before diving in, it’s worth asking whether a mega menu makes sense for your situation. If your website has fewer than five or six pages, a standard navigation bar is perfectly fine.
Mega menus shine when your site (or a WooCommerce store) has real complexity: multiple services, product categories, a blog, a portfolio, or anything else that creates layers of content your visitors need to find quickly.
If that sounds like your website, read on.
Using JetMenu to Create a Mega Menu
🎯 Best for agencies, multi-service businesses, blogs, and WooCommerce stores that want a mega menu that looks and functions like a mini website.
JetMenu is a plugin built specifically to extend Elementor menu capabilities. The core idea is simple but powerful: instead of a dropdown that only shows links, you can design an Elementor layout and attach it to a menu item as a dropdown. This layout can contain all sorts of Elementor widgets (Gutenberg blocks) to display text, images, dynamic content, videos, buttons, and so on.
Here’s how the process works
After opting for the Crocoblock subscription (starting at $199/year) or buying the JetMenu plugin as a standalone solution (for $43), install JetMenu as any other WordPress plugin.
Then go to WordPress Dashboard > Appearance > Menu.
When editing your selected menu (in this case, the Main menu), you’ll notice a new set of settings in the JetMenu Locations Settings section. These include the toggle Enable Jetmenu for the current location. When enabled, you’ll be able to use JetMenu widgets and mega menu functionality for the selected menu.
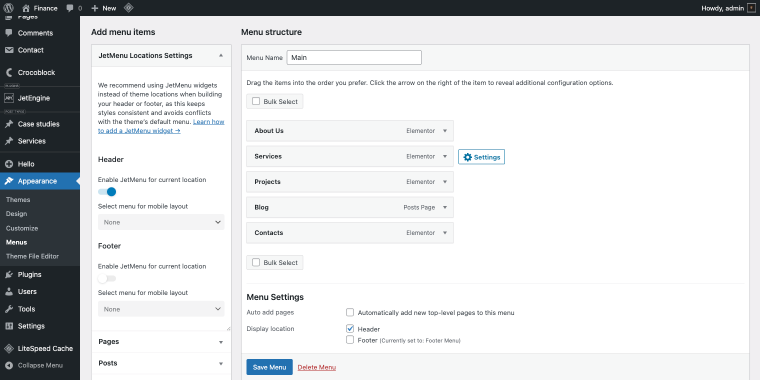
To add mega functionality to a menu item, hover over it and click on the “Settings” button to open the settings pop-up. There, you’ll see a Use Mega content toggle, which enables mega mode for that specific item.
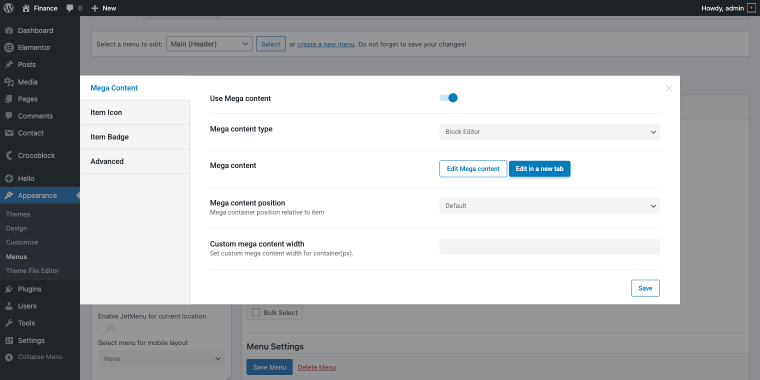
Once ON, you can open a dedicated Elementor editor for that menu item’s dropdown.
Inside that editor, you can design the dropdown exactly like you’d design any Elementor section. After clicking “Save,” it’s time to add the menu widget to the header template.
Don’t forget to choose the builder type in the Mega content type select field.
What makes the JetMenu plugin special is that it has three menu widgets:
- Vertical Mega Menu — displays a multi-level dropdown in a vertical sidebar-style layout;
- Mega Menu — shows wide, multi-column dropdowns in a traditional horizontal navigation bar;
- Hamburger Menu — hides the menu inside a toggle icon that opens a compact overlay or slide-in panel (commonly used on smaller screens, tablets, and mobile).
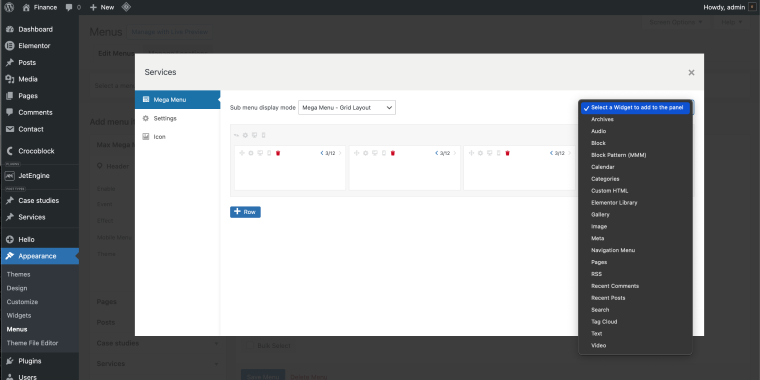
For our use case, we’ll opt for the Mega Menu widget.
In the Elementor editor, click the “Add Element” button, type “mega” in the search, and then toss the Mega Menu widget into the necessary layout column.
In the Content > Layout settings of the widget, we need to make minor adjustments to display the necessary WordPress menu.
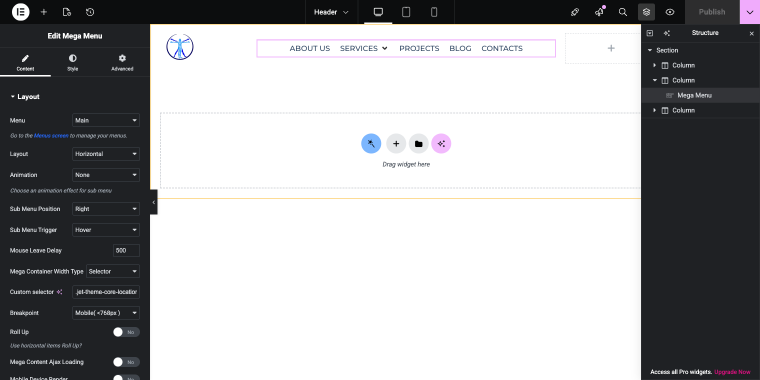
- Menu — set to “Main,” so it pulls and displays the items registered under the Main menu;
- Layout — set to “Horizontal,” so items are displayed in a row across the header, as seen in the preview with About Us, Services, Projects, Blog, and Contacts laid out side by side;
- Mouse Leave Delay — set to 500ms, giving users half a second before the dropdown closes, which prevents it from snapping aggressively on mouse-outs;
- Mega Container Width Type — set to “Selector,” which unlocks the Custom Selector field below it, allowing the mega container to stretch to match the width of a specific page element, like a header.
Creating a hypothetical small business mega menu
Imagine you run a marketing agency with core services, a blog, case studies, and a contact page. Here’s how a full-width mega menu might be structured under a single nav item.
A visitor hovers over SERVICES, and in that brief window, they’ve seen your full offering, proof that you deliver results, recent content positioning you as an expert, and a clear path to becoming a client.
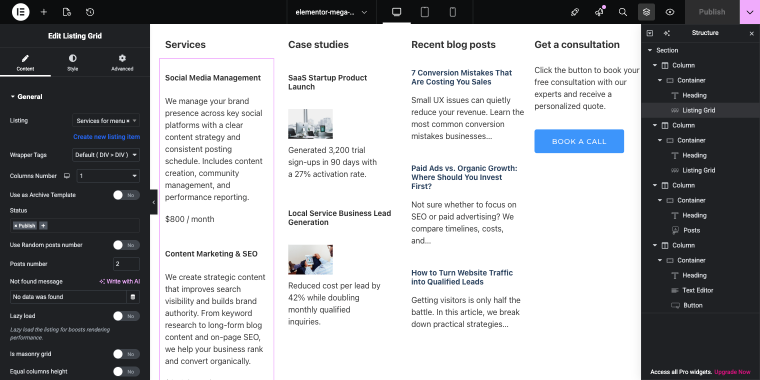
The dropdown menu opens wide across the page, revealing four columns:
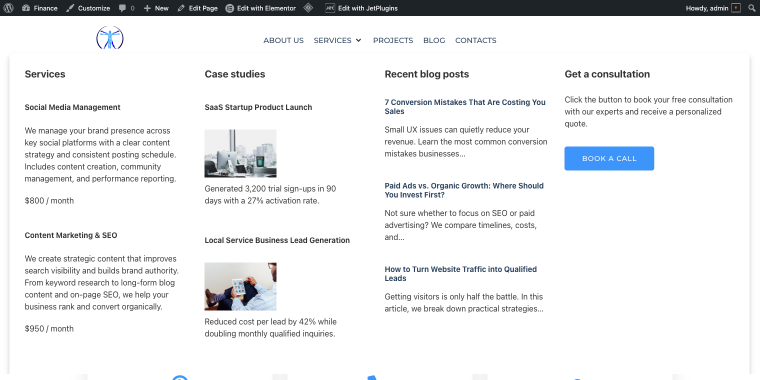
- The first column lists all five Services as clean, linked items with a short description under each.
- The second column shows recent Case studies (the title, a small thumbnail, and a one-line result) pulled in automatically so they always reflect your latest work.
- The third column displays blog posts by category, updating automatically.
- The fourth column contains a single large call-to-action button, “Book a Call,” with a few lines of text explaining what the call covers.
Creating a 4-column mega menu
First of all, we need to create two Custom Post Types (CPT) for storing Services and Case studies.
For our mega menu setup, both post types will have similar meta fields. To create a new CPT, go to WordPress Dashboard > JetEngine > Post Types.
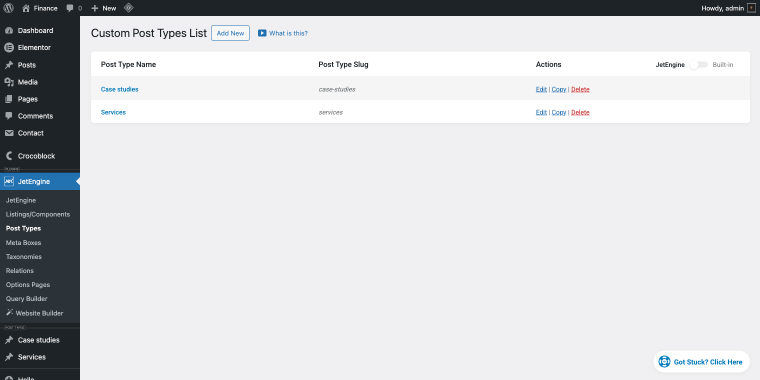
The Services CPT will have three meta fields.
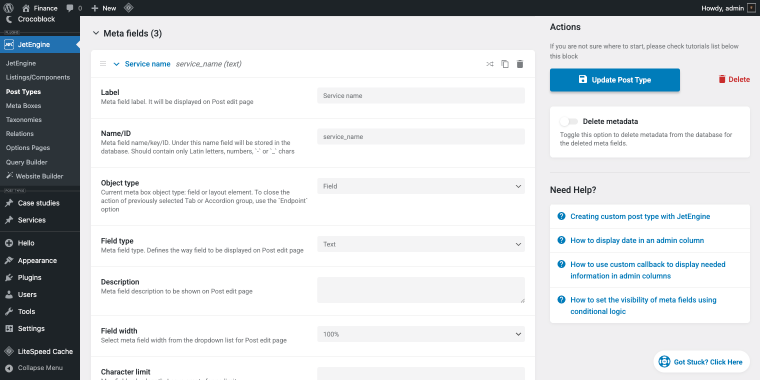
Each field is configured with:
- Label — the human-readable name;
- Object Type — set to “Field”;
- Field Type — set to “Text,” defines how the input is rendered on the “Post” edit page.
The three meta fields are:
- Service name with a Field Type set to “Text”;
- Service description with a Field Type set to “Textarea”;
- Service price with a Field Type set to “Text.”
The Case Studies CPT follows the same structure across its three meta fields: the title as a “Text” field, the description as a “Textarea” field, and the image as a “Media” field.
After creating the CPTs, we need a set of relevant listings to display their content dynamically. To create a new listing, go to WordPress Dashboard > JetEngine > Listings/Components.
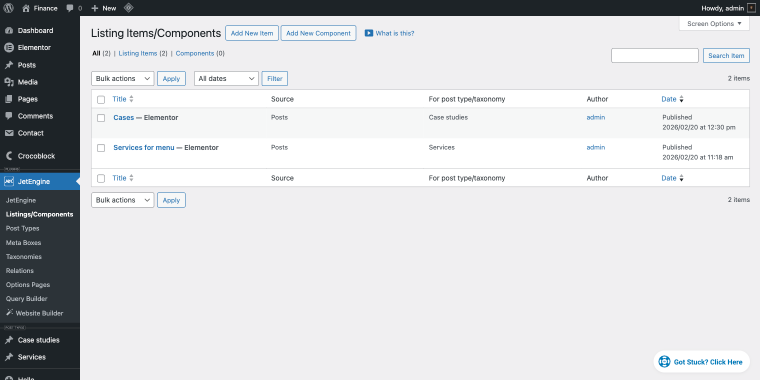
Click on the “Add New Item” button and in the pop-up, opt for the following set of settings:
- Listing source set to “Posts”;
- From post type set to “Services” or “Case studies”;
- Listing item name should display the listing name;
- Listing view set to “Elementor.”
When done, click the “Create Listing Item” button, and you’ll be redirected to the Elementor editor. To be able to display items dynamically, we need to use the dynamic widgets provided by JetEngine.

The case study title can be fetched using the Dynamic Field widget with the following set of settings:
- Source field set to “Meta Field”;
- Meta Field set to a corresponding meta field of the Case studies CPT, i.e., “Title” or “Description.”
For the case study image, we can use the Dynamic Image widget, where the Source field option should be mapped to a corresponding meta field of the CPT (“Image”). When done, click “Publish.”
After creating both listings, we can move on to editing the mega menu item. Go back to the WordPress Dashboard > Appearance > Menus section:
- Select the main menu (or whichever will contain the mega functionality).
- Click the “Settings” button next to a corresponding menu item.
Near the Mega content field, click either the “Edit Mega content” or the “Edit in a new tab” button; both of them will open a menu item in your selected editor.
Alternatively, you can access the mega item by hovering over the “Edit with Elementor” link in the admin bar and then selecting the corresponding item.
The first two columns of our mega menu will contain Listing Grid widgets to display the corresponding listing items we’ve created earlier.
Mega menu column 1
For the services column, I’ll use the Heading widget and the Listing Grid widget, which fetches data from the “Services for the menu” listing.
- Listing — set to “Services for menu,” meaning each post from the Services CPT will be displayed using that listing item’s layout;
- Column number — set to “1,” because we don’t need more than one column inside a column;
- Status — set to “Publish,” so only live, published Services posts will appear in the grid (you could also include drafts, pending, etc.);
- Posts number — set to “2,” so only two Services posts will be pulled and displayed, regardless of how many exist in the CPT.
Mega menu column 2
The Case studies column will also contain the Heading widget and the Listing Grid widget mapped to a corresponding listing “Cases,” and the settings are pretty much the same.
Mega menu column 3
The blog posts column will contain a Posts widget with the following set of settings:
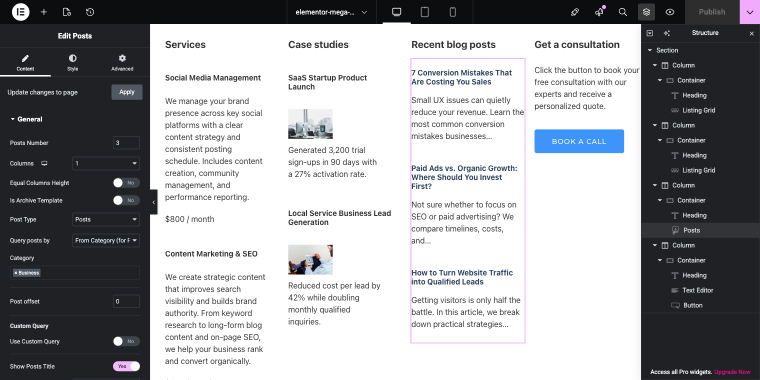
- Posts Number — set to “3,” so three blog posts from the “Recent blog posts” column will appear;
- Columns — set to “1,” so posts stack vertically in a single column;
- Post Type — set to “Posts,” meaning it pulls from the standard blog posts (not a CPT);
- Query posts by — set to “From Category,” so only posts belonging to a specific category are shown;
- Category — set to “Business,” so only posts tagged with that category are displayed;
- Show Post Title — the toggle is set to “Yes”, so each post’s title is rendered;
- Show Post Excerpt — the toggle is set to “Yes”, so a summary of each post appears beneath its title.
Mega menu column 4
The last column will contain three widgets: Heading, Text Editor, and a Button.
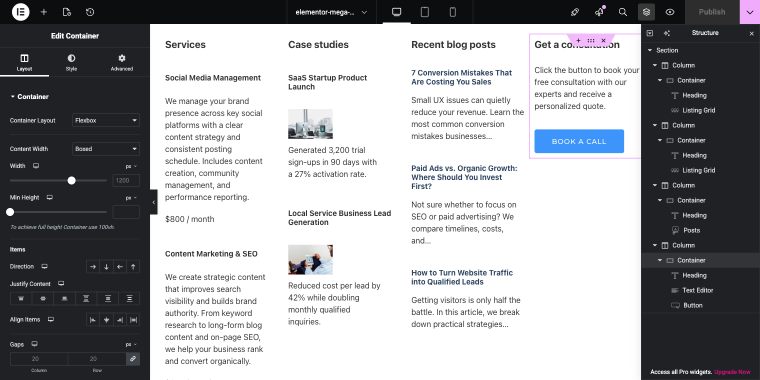
Making the mega menu full-width
This is the most interesting part. By default, the mega item is the same width as the Mega Menu widget container. To understand what it means, here’s an example: the Zolden template’s menu column/container width is 901px, making the mega menu width the same size.
To make the mega menu full-width, go to WordPress Dashboard > Crocoblock > JetPlugins Settings > JetMenu. Open the Layout tab and locate the Mega Container Width Type setting.
By default, it’s set to “Container,” but to tie it precisely to your page’s width, you should switch it to “Selector.”
Once you select that option, a Custom Selector field appears. Enter the CSS selector of the full-width element on your page that the mega menu should match in width, typically the site header wrapper (.site-header, .elementor-section-wrap, or whatever class your theme uses for its full-width container).
JetMenu will then calculate the mega menu’s width and position based on that element, stretching it edge-to-edge rather than the browser viewport or a narrower content column.
Alternatively, you can configure this directly in the Mega Menu widget without leaving the editor. Select the Mega Menu widget and open its Content > Layout tab:

- Find the Mega Container Width Type field and set it to “Selector.”
- The Custom Selector field will appear below it.
- Enter the CSS selector of your full-width page element, and the mega menu container will match its width and alignment to that element.
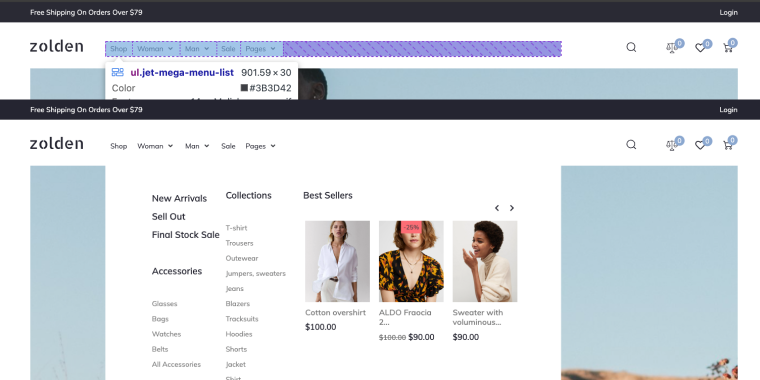
Here’s how the mega menu created with JetMenu will look on the front end.
If you want to build a mobile mega menu for your website, you can apply the same logic to the Hamburger Menu widget. Or use the same widget (Mega Menu) and enable the Mobile Device Render toggle, which reveals a new set of settings that let you adjust your mega menu for mobile devices.
- What this approach does well: JetMenu offers extensive design freedom, with a dropdown that acts as a full Elementor canvas. You can include dynamic content like auto-updating product listings, case study cards, and recent posts from CPTs, along with static elements such as headings, images, and CTA buttons. It supports the free Elementor version, full-width layouts, and scales as your site grows in complexity.
- Where it falls short: The setup has a steeper learning curve than the other methods, especially if you want dynamic content. Getting CPTs, listings, and the Listing Grid widget to work together requires familiarity with JetEngine, and first-timers can expect some trial and error. It also adds another paid plugin to your stack, increasing both cost and the number of dependencies to keep updated and compatible.
Using Elementor Pro’s Built-in Menu Widget
🎯 Best for small service businesses, consultants, and local businesses with a clean, straightforward site structure.
If you already have Elementor Pro, you have more mega menu capability than most people realize, without installing additional plugins. Elementor Pro includes a Menu widget that goes beyond basic dropdowns.
It lets you build multi-column layouts that look and feel like a proper mega menu, and the whole thing is managed inside the Elementor editor.
Here’s how to set it up step by step
Start by going to your website’s header. This is where you’ll define your actual menu structure, your top-level items (like Services or About), and the sub-items nested underneath them. Think of this as the skeleton of your navigation.
Next, go to WordPress Dashboard > Elementor > Theme Builder and create a Header template. This is where the visual design of your navigation lives, and add the Menu widget to this header.
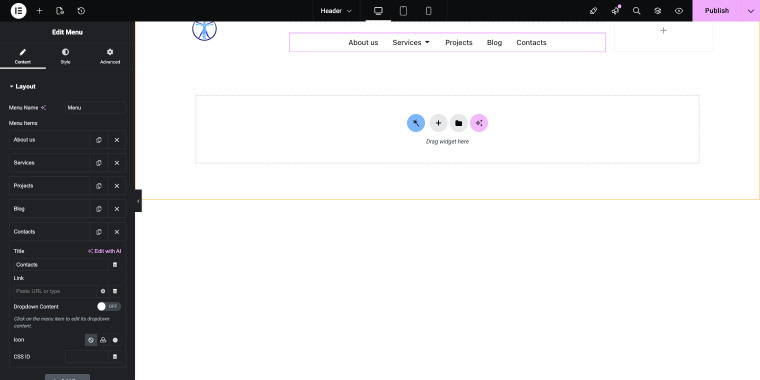
Within the Content > Layout settings, you can add as many top-level menu items as you need from the Menu Items field. As in the previous example, I’ll enable mega functionality for the Services item. To do that, enable the Dropdown Content toggle.
Now that you have the necessary number of columns, you can fill them with the widgets you need.
- What this approach does well: It keeps everything inside Elementor’s native workflow. You manage structure in WordPress menus and design directly in the Theme Builder, without relying on extra plugins. For simple multi-column dropdowns with clean layouts, it’s quick to set up, easy to maintain, and fully integrated with the rest of your header template.
- Where it falls short: It requires an active Elementor Pro subscription. If the subscription is not renewed, the Pro widgets remain editable in the backend and continue working on the front end. However, you lose updates and long-term compatibility guarantees.
Using Max Mega Menu (Free Plugin, No Coding Required)
🎯 Best for small business owners who want a significant upgrade over a basic dropdown without writing any code.
Max Mega Menu is a freemium WordPress plugin with over 300,000 active installations and a 4.8-star rating, and it’s confirmed compatible with Elementor. The core concept is straightforward: install the plugin, and it automatically converts your existing WordPress menu into a mega menu. From there, you customize it through a visual interface without touching a single line of code.
Here’s how to get started step by step
Go to your WordPress dashboard, navigate to WordPress Dashboard > Plugins > Add New, and search for “Max Mega Menu.” Install and activate it.
Once active, you’ll notice a new “Mega Menu” button appears alongside each item in your WordPress menu editor under WordPress Dashboard > Appearance > Menus.
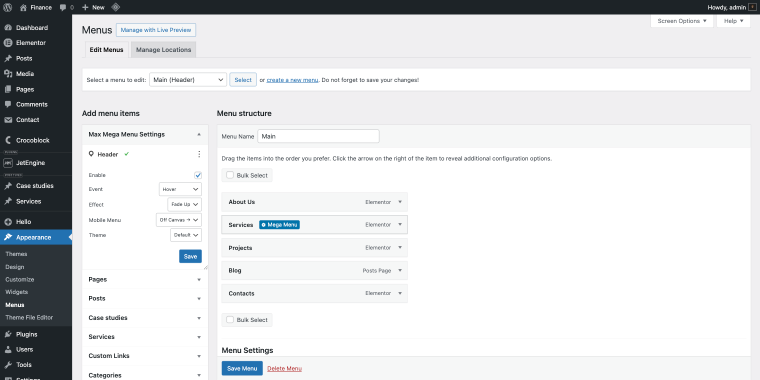
Clicking that button opens a settings panel where you can enable mega menu mode for that specific item and configure its dropdown layout.
In the plugin’s settings area, you can organize your dropdown content into rows and columns using a drag-and-drop grid layout builder. You can add any standard WordPress widgets to your menu (text blocks, image widgets, recent posts, custom HTML, and more) by dragging them directly into the dropdown area. No template editing, no CSS, no Elementor template management required.
- What this approach does well: It delivers a simple mega menu experience without requiring Elementor Pro or custom development. The drag-and-drop grid builder, built-in styling controls, mobile off-canvas support, and accessibility features make it especially practical for small business owners who want a structured, multi-column dropdown without touching templates or CSS.
- Where it falls short: Design flexibility is limited compared to building dropdowns directly in Elementor. You’re working inside the plugin’s widget and theme system rather than full visual layout control, and advanced dynamic content setups (custom post types, complex WooCommerce displays, custom-designed listing templates) require workarounds or the Pro version.
Key Things to Get Right (Regardless of Method)
No matter which approach you choose, a few fundamentals will make or break your mega menu.
Keep mobile in mind from day one
Mega menus are primarily a desktop navigation pattern. On mobile, a large hover-triggered dropdown becomes unusable. Ensure your chosen method collapses gracefully into a clean hamburger menu or accordion on small screens, and test thoroughly on real devices — not just browser resize previews.
Don’t overcrowd the dropdown
The temptation with mega menus is to include everything. Resist it. A mega menu with forty links and six images is more overwhelming than a standard dropdown. Focus on your most important content and give it room to breathe; the goal is clarity.
Optimize any images you include
Images in dropdowns can cause layout shifts or slow initial page interaction if they’re too large. Compress them and consider lazy-loading where possible.
Configure hover delay properly
If the menu disappears the moment the cursor moves slightly off the nav item, visitors will find it frustrating and stop trying. A small hover delay of 200–300 milliseconds makes a significant difference in usability without feeling sluggish.
FAQ
Most approaches require Elementor Pro’s Theme Builder and Menu widget for custom headers with mega menus, as these aren’t in the free version. JetMenu is an exception, compatible with the free Elementor, allowing a functional mega menu sans Pro. However, Elementor Pro offers many other valuable features, making it a worthwhile long-term investment.
It can, but only if built carelessly. Loading large uncompressed images, too many dynamic widgets, or poorly coded plugins cause issues. When built correctly (using optimized images, a lightweight plugin like JetMenu, and only necessary content), a mega menu adds little overhead and won’t significantly impact page speed scores.
Mega menus are a desktop navigation pattern, not hover-to-open. On mobile, they should collapse into a hamburger or accordion layout. All methods support responsiveness, but require deliberate configuration and testing. Don’t assume desktop mega menus work seamlessly on mobile without testing on real devices first.
Conclusion
If your website has depth, offers multiple services, features an active blog, includes case studies, or has a WooCommerce catalog, your navigation should reflect that structure. A mega menu isn’t decorative; it’s a functional part of how visitors discover what you offer.
Among the options covered, JetMenu stands out as the most complete solution. It lets you design dropdowns visually in Elementor, pull in dynamic content, display listings from custom post types, integrate WooCommerce products, and control full-width behavior with precision. The result isn’t just a multi-column dropdown: it’s a controlled, scalable navigation system that grows with your site.
- If your goal is to turn navigation into an active part of your content and conversion strategy, not just a list of links, JetMenu gives you the most flexibility and long-term control.
- Elementor Pro’s built-in Menu widget works well for simpler layouts where grouped links are enough.
- Max Mega Menu is the simplest improvement over basic dropdowns and works especially well for non-technical users who want structure without template editing.
Whichever method you choose, the principle remains the same: the easier it is for visitors to see what you offer, the more likely they are to take action. JetMenu simply gives you the most room to make that happen.
