After reviewing dozens of threads on r/recruiting, r/smallbusiness, and r/Wordpress, I’ve noticed that small recruiting agency owners are desperately seeking affordable, automated job board and CV publishing/application management systems because they’re consistently disappointed with what’s available.
The most common pain points they express:
- “We’re drowning in manual work,” with agency teams reporting spending 6-10 hours weekly manually archiving expired job postings.
- “Premium plugins are a money pit” because spending $300-500 annually on WP Job Manager add-ons, only to discover they still need some more add-ons.
- “Custom development quotes are absurd,” demanding $8,000-15,000 for custom platforms that feel completely disconnected from reality.
- “SaaS platforms bleed us monthly,” $200-500/mo dedicated job board software becomes one of their largest operational expenses, and customization options remain severely limited.
The most frequent question in these threads: “Isn’t there a WordPress job board solution that automates the busy work without costing thousands?“
Yes, there is.
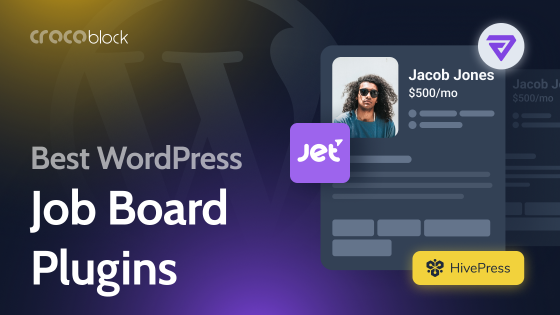
This guide will show you how to build a fully automated job portal using Crocoblock for $199/year, complete with automatic post expiration and custom job submission/application forms.
No $8,000 development costs.
No $400 monthly SaaS fees.
Just a professional WordPress job board plugin alternative that actually solves the publishing, automation, and handling problems small agencies face.
Why Crocoblock Beats Other WordPress Job Board Solutions
After evaluating the points above, one may have three possible options on how to build a job board portal:
Option 1: WordPress website with WP Job Manager plugin and add-ons (possible)
- $349/year WP Job Manager premium add-ons subscription.
- Each add-on handles one narrow function, creating plugin bloat.
- Add-ons from different developers often conflict, requiring constant troubleshooting.
Option 2: Crocoblock All-Inclusive (recommended)
- $199/year for the complete plugin suite.
- 3-4 days for core setup + 2-3 days for customization.
- The LaborTime dynamic template provides 95% of functionality out of the box.
- Full control over customization without developer lock-in.
Option 3: Hire a dev team to build a custom platform (unrealistic)
- $8,000+ upfront plus $100-200/hour for changes.
- God knows how many weeks the development will take.
- The post-release maintenance will require additional budget.
What Crocoblock Provides for Job Board Development
I hope you understand that we’ll cover Option 2. 😀
Let me explain what the Crocoblock LaborTime template includes that is essential for planning your WordPress job board project:
Core plugins you’ll use:
- JetEngine — creates Custom Post Types (for job listings), custom fields (for storing job listing data), Meta Boxes (for storing candidates and company data), and manages relationships between data:
- Post Expiration Period — an additional plugin that allows for expiring old job listings automatically.
- JetFormBuilder — builds submission forms (job posting, applications, registration, updating listing/account information).
- JetThemeCore — creates custom templates for all website parts.
- JetSmartFilters — adds dynamic filters for location, salary range, job type, and industry.
- JetPopup — allows displaying various pop-ups, including success messages and content update forms.
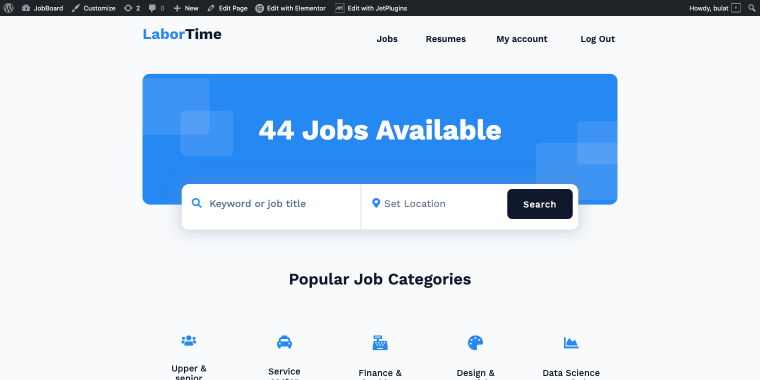
The LaborTime template is a professionally designed WordPress job board you can import and customize. Think of it as a WordPress dev’s month of work on your specific use case.
The Job Board Website Architecture
After purchasing the Crocoblock All-Inclusive subscription (starting at $199/year), download the Crocoblock Wizard, and install the LaborTime dynamic template and all required plugins.
When the sample data import dialog appears, select all available assets. This one-click installation gives you a fully functional job board WordPress plugin alternative immediately.
Managing the users
The cleanest solution is provided by the User Role Editor and JetEngine plugins.
- The first plugin allows you to add job board-specific user roles, such as Employees and Company representatives. Each of them can register on a website and perform their role-specific actions, such as applying for vacation time, posting or managing jobs, and so on.
- The second plugin provides all the necessary features to store and use information about our user roles; for that, we use Meta Boxes and Profile Builder.
To create a Meta Box, go to WordPress Dashboard > JetEngine > Meta Boxes. To display it on the user profile in the Meta Box, select the “User” option, then choose the relevant visibility conditions and set the “Employee” role in the Included for User Roles field.
Check the video to learn more about the Employee meta box Meta fields.
The same field we’ll use to display information on the profile and account pages.
Using profile data on account pages
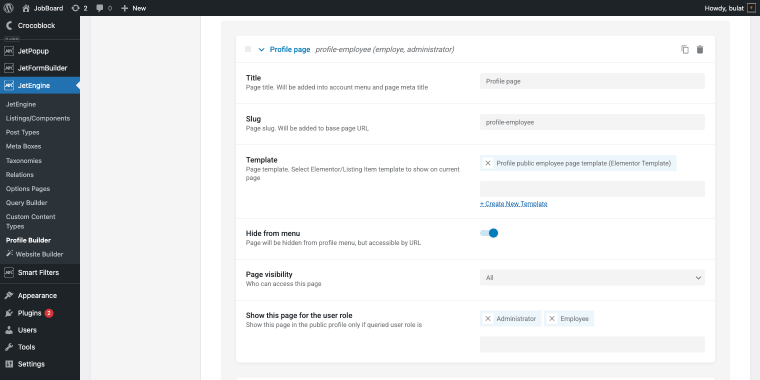
As mentioned earlier, the Profile Builder is the JetEngine tool that allows users to create personal accounts and submit information to the website from the front end.
To access it, go to WordPress Dashboard > JetEngine > Profile Builder.
The page contains lots of settings to fine-tune. The most important is the Account Page field, where you should select the user account page.
Since our user roles should have different information on their accounts, we need to create two subpages to store that information. Check out the overview of the Profile Builder settings for both Employee and Company user roles.
In the Profile Builder, go to the User page tab and scroll to the subpage section to add dynamic subpages that will be displayed based on user roles (sounds like exactly what we need).
For each of these subpages, you need to have a custom template that fetches data from the Employee and Company meta boxes and displays it on the Account page. This is pretty easy to implement.
Go to WordPress Dashboard > Elementor > Templates and create a new template for a specific account subpage.
Feel free to create a standard two-column layout where:
- the left column contains the user avatar, name, last name, and contact information;
- the right column contains career path details and professional background fields.
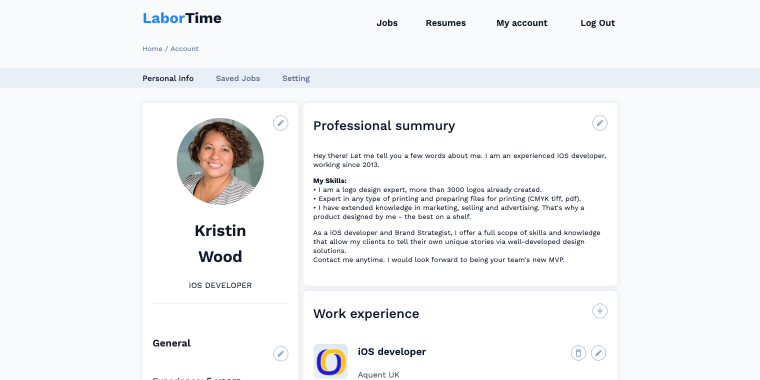
To do so, use Dynamic Field widgets to fetch all information (first name, last name, email, phone number, etc.) from your employee Meta Box’s meta fields, and match them accordingly.
Handling data storage areas
Now, let’s look at a set of CPTs (Custom Post Type) and CCTs (Custom Content Type) that store information about jobs and candidates. Also, we’ll look at how to store and retrieve data from these content entities.
Jobs-related areas
To store all vacancy data, we need to create a CPT. To do that, go to WordPress Dashboard > JetEngine > Post Types. The Jobs CPT may include the following meta fields: Salary, Job description, Requirements, Work conditions, and Responsibilities.
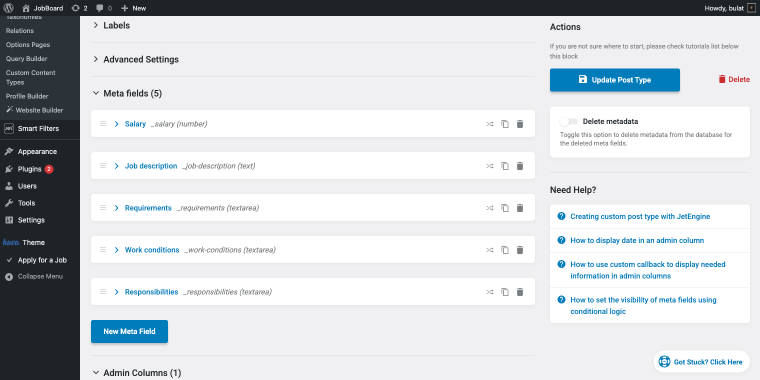
This is a basic set of fields; you’re free to add as many fields as you need.
To display this information on the front end, we’ll use another tool provided by JetEngine: Listing Items/Components.
Go to WordPress Dashboard > JetEngine > Listings / Components and click “Add New Item.”In the Elementor editor, feel free to use Dynamic Field widgets to display job item details.
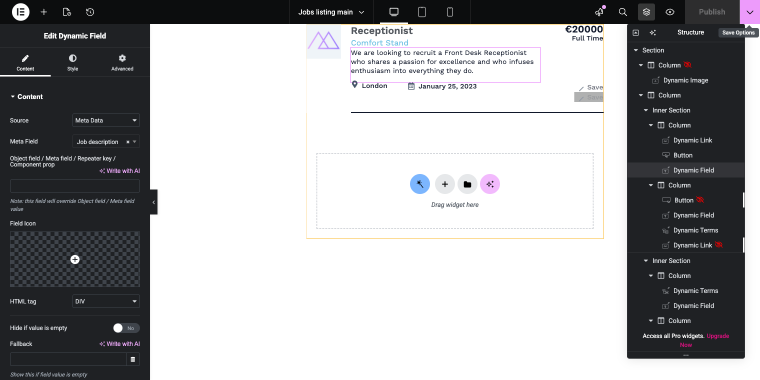
For example, to display the job description, on the Content tab of the Dynamic Field widget, opt for the following set of settings:
- Select — in this field, choose an option “Meta Data”;
- Meta Field — in this field, select the option “Job description.”
The same logic applies when matching the remaining widgets to their corresponding meta fields. After completing this listing, go to the jobs archive page to add a Listing Grid widget that will display all jobs available on your website.
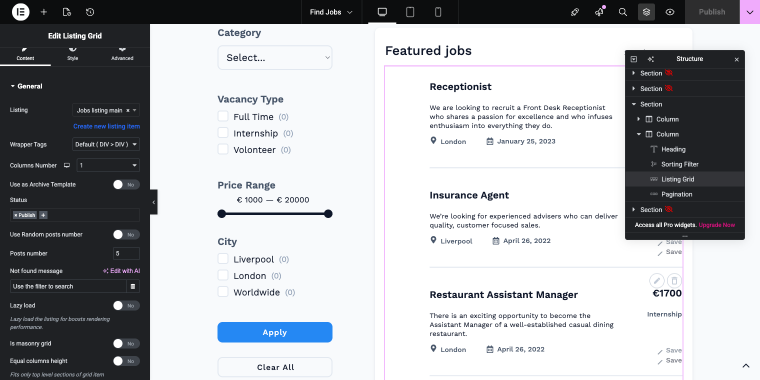
On the Content tab of the widget, apply the following set of settings:
- Listing — in this field, select the listing we’ve created in the previous step;
- Columns number — set to “1” to display one column;
- Posts number — set to the most convenient number of job items displayed simultaneously, in this case “5.”
Employee-related areas
Employee-related content areas include three CCTs (Custom Content Types) that store application submissions, portfolio items, and work experience items that candidates share on their profiles.
To create a CCT, navigate to WordPress Dashboard > JetEngine > Custom Content Types.
Apply for a Job CCT
It includes essential contact fields (work email, mobile phone), a resume upload field (media type), and a Post ID field that creates the relationship between the application and the specific job posting.
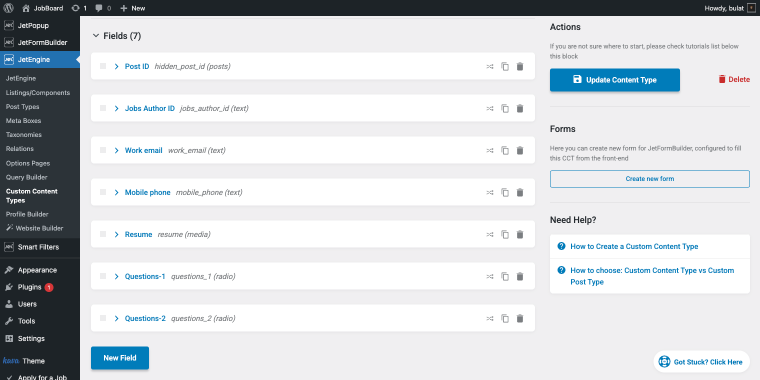
The Jobs Author ID field tracks which company posted the job, ensuring applications route to the correct employer dashboard. Custom screening questions (Questions-1, Questions-2) allow employers to add role-specific qualifying questions configured as radio buttons for standardized responses, simplifying candidate comparisons.
Portfolio and Work experience CCTs
The Portfolio CCT enables candidates to showcase their work samples and projects.
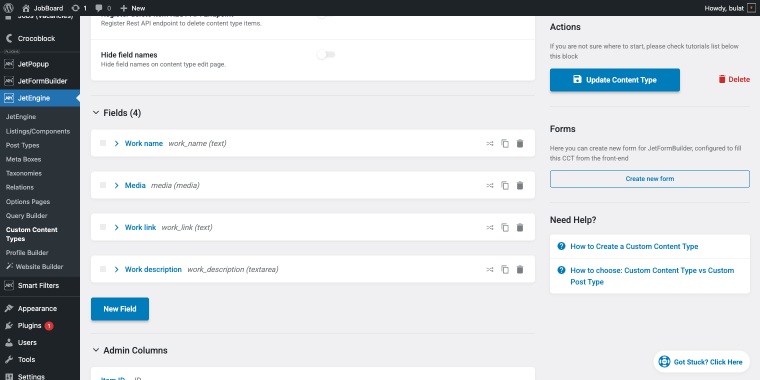
Each portfolio entry contains:
- Work name field for the project title;
- Media field for uploading work samples (images, PDFs, or documents);
- Work link field for external URLs to live projects or case studies;
- Work description textarea where candidates explain the project scope, their role, and outcomes achieved.
This structure allows candidates to build comprehensive portfolios directly within their profiles.
The Work experience CCT structures professional history in a consistent, searchable format. Each work experience entry includes:
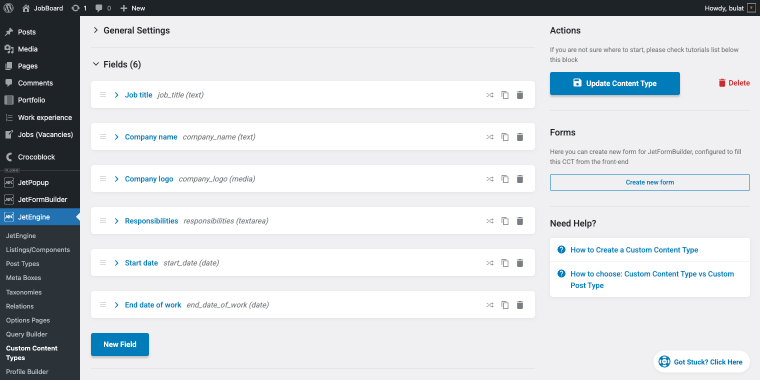
- Job title;
- Company name;
- Company logo upload to enhance visual presentation;
- Responsibilities textarea captures detailed role descriptions and achievements;
- Start date and End date fields track employment duration, automatically calculate tenure, and enable chronological sorting.
This structure makes candidate experience comparable across applications and easier for recruiters to evaluate.
Using Dynamic Visibility in templates
To ensure that users with a specific role can access the relevant website features, we can use the Dynamic Visibility feature provided by JetEngine.
For example, the Single Job page template includes a set of buttons displayed based on the user’s role or login status.
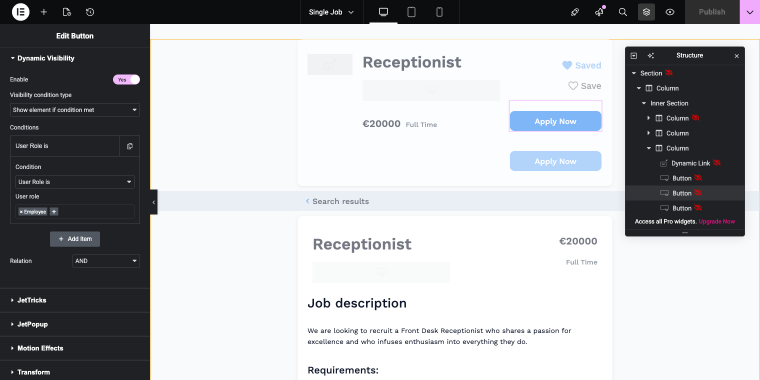
- “Apply Now” 1 — is displayed to a non-logged-in user, and when clicked, triggers a pop-up that says that one needs to register in order to apply;
- “Apply Now” 2 — is displayed to a user with an employee role, and triggers a pop-up with an application form.
The same logic applies to the “Save” button.
Handling the job submission form
This multi-step submission form allows company representatives to create new job listings through a guided, user-friendly process. The three-step structure reduces form abandonment by breaking the submission into logical sections.
- Step 1: Job Basics — captures the job title (Text Field) and job category (Checkbox Field that allows multiple categories);
- Step 2: General Information — collects job location (Checkbox Field for one or multiple locations), vacancy type (Checkbox Field for employment classifications), and salary range (Range Field with minimum and maximum values for transparent compensation disclosure);
- Step 3: Position Description — contains four Textarea Fields: job description for the role overview, requirements for qualifications and skills needed, work conditions detailing benefits and work environment, and responsibilities outlining key duties and expectations.
Upon submission, the form executes two actions:
- Insert/Update Post action maps all form fields to their corresponding meta fields in the Jobs CPT, creating a new job listing entry in the database.
- Show Popup action immediately displays a success message confirming the submission, providing clear feedback to the user that their job posting was created successfully.
Expiring job postings
This is where JetEngine’s related plugin, Post Expiration Period, comes in handy.
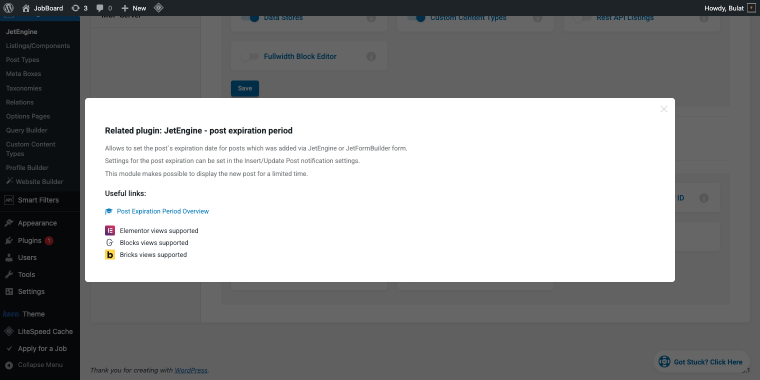
This feature alone justifies choosing Crocoblock. 😀
Go to WordPress Dashboard > JetEngine > Settings > Modules, and enable the Post Expiration Period module.
When company representatives submit a new vacancy, they can set a custom expiration timeline. When that deadline passes, the listing automatically moves to Draft status, invisible to candidates but preserved for the company’s records.
Then go to the WordPress Dashboard > JetFormBuilder and open the job submission form in the editor. Go to the Post Submit Actions block, and add/edit the Insert/Update Post action and scroll its content to the bottom.

Turn on the Enable expiration period toggle, set the EXPIRATION PERIOD to your desired duration, and set EXPIRATION ACTION to “Draft” or “Trash.”
Click “Update” and save the form.
What’s even cooler, you can configure the WordPress Dashboard to display an Expiration column in the Jobs CPT list. To do so, go to WordPress Dashboard > JetEngine > Post Types, open the Jobs post type in the editor, and scroll down to the section Admin columns.
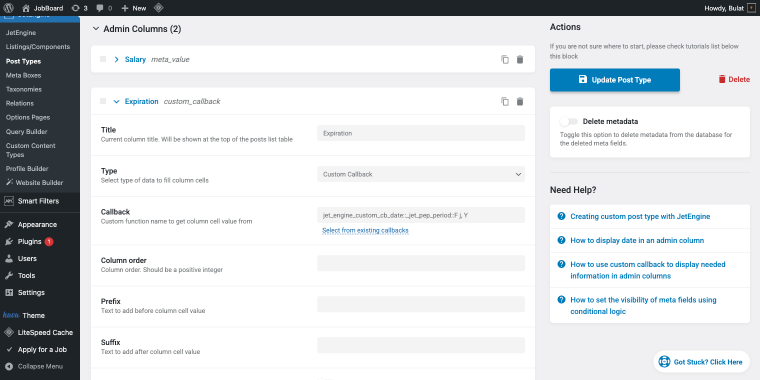
- Title — in this field, set the name of the column, e. g., “Expiration”;
- Type — in this field, select the type of data that will fill the column. In this case, it’s the “Custom callback”;
- Callback — click on the “Select from existing callbacks” link, and in the pop-up, choose “jet_engine_custom_cb_date” by clicking on it. This will change the pop-up to another set of settings:
- Set field — in this field, add value “_jet_pep_period”;
- Set format — leave as is.
Click “Apply” and update the post type, and then go to the Jobs CPT to check out the new column.
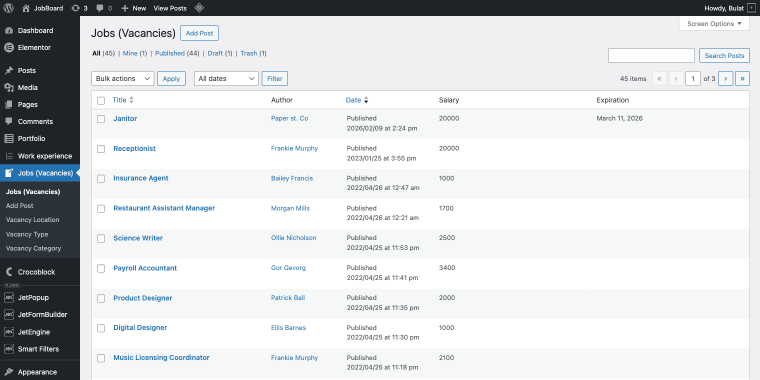
Now, company reps can set custom expiration periods for job postings (30 days, 60 days, or any custom duration). The system handles the rest automatically, moving expired listings to “Draft” status without any manual action.
Handling the job application form
The job application form is created using JetFormBuilder and appears as a pop-up when candidates click the “Apply to Job” button on individual job listings.
The form captures essential application data through five key fields:
- work email (Text Field) and mobile phone (text field) for contact information;
- resume upload field (Media Field) with a 5 MB maximum file size;
- two custom screening questions configured as Radio Fields.
Upon submission, the form executes two actions:
- Insert/Update Custom Content Type Item action maps all form fields to the Apply for a Job CCT, creating a new application entry in the database with the Post ID field automatically linking it to the specific job posting.
- Show Popup action immediately displays a success message confirming that the application was submitted.
To ease the application process for registered candidates, you can configure Email and Phone fields to autocomplete using saved user profile data.
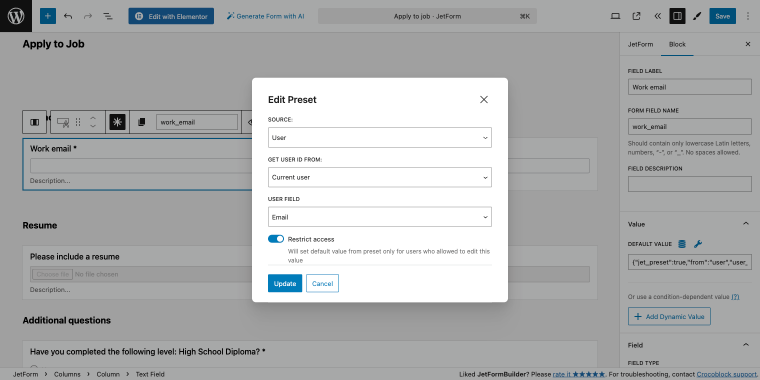
Go to the Text Field block settings, Value > DEFAULT VALUE, and click the database icon to trigger the Edit Preset pop-up. In the pop-up set:
- SOURCE to “User”;
- GET USER ID FROM to “Current user”;
- USER FIELD: select the corresponding field.
Now, when logged-in candidates open the application form, these fields pre-populate with their saved information, reducing friction and form abandonment.
Each submitted application will automatically appear on the company representative’s Applications page, accessible through their account dashboard.
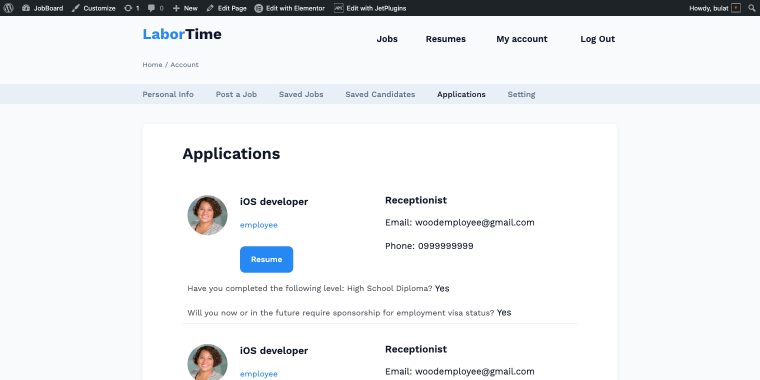
This page is powered by JetEngine’s Query Builder, which creates a custom query targeting the Apply for a Job CCT. The query filters applications to show only those where the Jobs Author ID matches the current logged-in user, ensuring company reps see their own job applications.
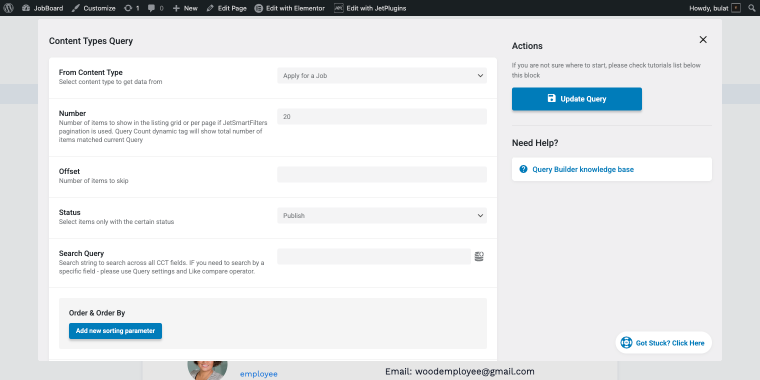
The query is set to display 20 items per page with “Publish” status.
Using the Query Builder, one can create even more complex dashboards with automated notifications.
Should Your Agency Build with Crocoblock?
Crocoblock is the ideal solution when your agency operates at a specific scale and has particular workflow requirements. If you’re managing anywhere from 50 to 1,000 active job listings simultaneously, the platform handles this volume efficiently without performance degradation.
However, Crocoblock isn’t the right fit for every scenario. Agencies with only 10-20 static job listings would find it over-engineered for their needs; a simple setup using Advanced Custom Fields with a custom post type delivers better value at that scale.
Looking back at the numbers, we might expect the following amounts to be spent on the first and second years of building, running, and maintaining a job board website:
| Crocoblock subscription | WP Job Manager | Custom development | SaaS job board platform | |
|---|---|---|---|---|
| Subscription price per year | $199 (All-Inclusive plan) | $300 (minimum viable package of add-ons) | $500-2,000 (depending on complexity) | $2,400-6,000 |
| Hosting like SiteGround’s to handle unlimited traffic | $39.99/month ($479.88/year) | $39.99/month ($479.88/year) | $39.99/month ($479.88/year) | $39.99/month ($479.88/year) |
| Email service like Mailgun | $35/month for 50,000 emails ($420/year) | $35/month for 50,000 emails ($420/year) | $35/month for 50,000 emails ($420/year) | $35/month for 50,000 emails ($420/year) |
| Premium theme | $60-90 one-time (if not using LaborTime) | $60-90 | – | – |
| Maintenance fee | – | $200/month ($2,400/year) | $200/month ($2,400/year) | – |
| Price per 1st year | $1,160-1,190 | ~$3,700 | $3,800-$5,300 | $3,300-$6,900 |
| Price per 2nd year | $1,098 | ~$3,600 | ~$3,300 | $3,300-$6,900 |
FAQ
Yes, migration is possible and relatively straightforward. Since both use WordPress custom post types, you can export your existing jobs and import them into JetEngine’s structure. The main task is mapping your existing custom fields to JetEngine’s fields. For 100-500 jobs, expect 2-4 hours of work, though this can be automated with a simple script.
You should be comfortable with basic WordPress administration: installing plugins, creating pages, and managing users. Crocoblock uses visual builders, so you won’t need to write code for most tasks. That said, initial setup benefits from developer assistance. Once configured, day-to-day management requires only standard WordPress knowledge.
Your site continues to function normally; all content, forms, and customizations remain intact. You won’t receive updates or support, but the platform will continue to work. This differs significantly from SaaS platforms, where losing access means losing everything. Your data remains yours, hosted on your own server.
Final Thoughts
This isn’t a “click Import and you’re done” solution. Expect to invest 5-10 days in building and customizing your WordPress job board. You’ll encounter challenges that require research, troubleshooting, and possibly asking questions in community forums.
However, the payoff is substantial: you’ll own a job board that operates exactly according to your agency’s unique workflow. No plugin limitations. No “sorry, our platform doesn’t support that” roadblocks. No monthly fees that escalate as you add features. And most importantly, no developer dependency for basic changes.
That’s the true value proposition, not just launching your job board but genuinely understanding its architecture so you can evolve it as your business requirements change and grow.
