Menus play a pivotal role in any WordPress website. They not only facilitate user navigation but also aid search engines in indexing the site, thereby enhancing its SEO. These menus come in various forms, ranging from sleek and minimalistic to the expansive mega menus often seen on large-scale eCommerce platforms.
While the primary menu is traditionally located at the top of the website, and an additional one is normally placed in the footer, there are many other use cases for this element. They can be placed on sidebars and used either for the main page or a particular section, like a blog. Different pages can have different menus as well. But there are also more non-obvious ideas for using menus, such as dropdowns for simple filters or for placing a few phone numbers with active links.
There are also a few ways to create and customize all kinds of menus, and this article is about four ways to do it.
Table of Contents
- WordPress Menus Using a Theme’s Built-In Functionality
- Creating Menus Using a Menu Plugin
- Creating Menus Using Builder Components
- Creating and Customizing Menus Using Custom Code
- FAQ
- Bottom Line
WordPress Menus Using a Theme’s Built-In Functionality
This is the most straightforward method because almost all themes have a menu by default. All you have to do is go to Dashboard > Appearance > Menus, create a new menu, add elements to it, and then choose a location for that menu.
Many themes have an interface for editing menus or choosing a location for them in the Customizer, so you can see changes live. But some themes, such as Hello Elementor, are made to be a canvas for a builder and don’t have built-in menu locations because they are made for a drag-and-drop editor, and menus are being placed in a particular location on the header, footer, sidebar, or page using a widget.
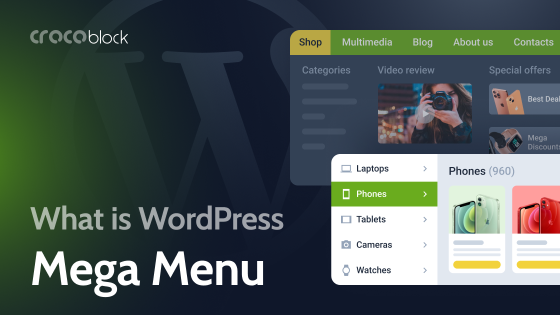
Some themes, such as Astra or Phlox, have quite advanced menu editors, while others offer only the basics. What themes don’t have in most of the cases is mega menus. Mega menu is a type of menu with advanced submenus, where a few columns, rows, and custom elements, such as images, videos, or sliders, can be placed. And this is the case when we definitely need a dedicated menu plugin.
Creating Menus Using a Menu Plugin
WordPress menu plugins not only offer mega menu functionality but also usually have more advanced settings for mobile menus. You can choose flyout, hamburger, or full-screen layouts, combine them, use them for different purposes, and so on.
One of the most advanced solutions for custom menus is a Crocoblock suite because it’s all about dynamic content, flexibility, and the ecosystem to cover almost all the needs of WordPress developers.
There are two interesting solutions for menus Crocoblock can offer – JetMenu and JetBlocks plugins. The first is for easily creating responsive mega menus, and the second will cover your needs for both menus and other widgets, offering a Navigation menu and a Hamburger panel in addition to other widgets. They will be helpful for various cases, and not only the header menu.
It’s a very easy way to create your mega menu, sidebar menus, or a classic dropdown. JetMenu is fully compatible with Elementor and Block Editor and supports not only media and custom layouts in mega menu sections but also JetEngine’s listing templates.
Creating Menus Using Builder Components
Speaking of builders, each of them provides tools for creating menus. For example, look what Bricks can do:
Elementor has a Menu Widget in its Pro version, but unfortunately, it’s not a mega menu and has minimal settings. So, a classic top menu with a few items can work perfectly. But if you need a more elaborate and responsive menu, you will have to consider using a plugin.
Creating and Customizing Menus Using Custom Code
If you prefer adding custom menu areas and customizing menus using code, this section may be useful. But first, let’s look at what cases for such menu customization can be:
- customizing styles of existing menus provided by the theme;
- creating custom menu areas;
- creating custom menu structures and behavior.
Depending on the goal, the task can be quite simple, or you might need some experience with PHP, HTML, and CSS.
Let’s start with the simplest case.
Customizing styles of existing menus
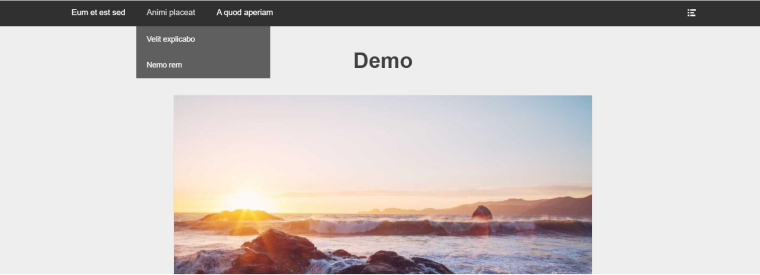
If you want to add some styles to the default menu provided by an active theme, in most cases, it’s all about adding some CSS. For example, my demo website menu doesn’t have a submenu indicator, and I want to fix it. Also, I want to add a menu items separator and make them change color on hover.
This is how it looks now:
The first thing to do is to inspect the existing code on your browser using DevTools.
For starters, I want to add a submenu indicator, so I need to find the CSS class responsible for the menu item with a submenu.
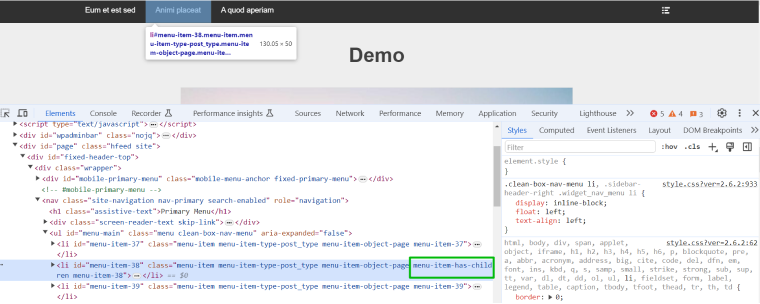
The class is menu-item-has-children, and I will open Customizer > Custom CSS and add some extra styles to it:
.menu-item-has-children > a::after {
content: '\25BC'; /* Unicode character for down arrow */
margin-left: 10px;
font-size: 0.7em;
display: inline-block;
transition: transform 0.3s ease;
}
/* Rotate the arrow when the submenu is open */
.menu-item-has-children:hover > a::after,
.menu-item-has-children:focus > a::after {
transform: rotate(180deg);
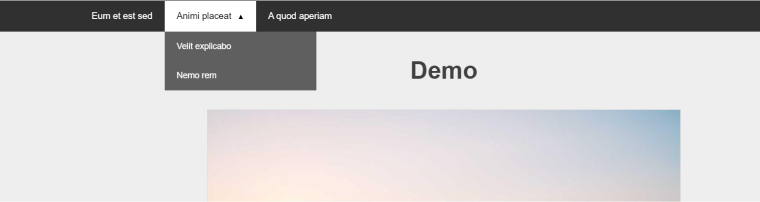
}Now, I find the class responsible for top menu blocks and have added some style for changing color on hover. Also, it’s important to change the color of the link, but in my case, if I just use the same class, it will also affect the submenus; that’s why I’ve used a descendant combinator instead (.nav-primary .menu li a:hover instead of .menu-item a:hover):
.menu-item:hover {
	background: white;
}
.nav-primary .menu li a:hover {
	color: black;
}
This is the result:
Creating custom menu areas
My theme has two menu areas at the top of the page by default. But I want to add a footer menu area as well, so I have to register a new menu area and place it on the footer template.
First, I need to register the new menu by adding this PHP code to the functions.php file:
function demo_register_menus() {
register_nav_menus(
array(
'footer-menu' => __('Footer Menu'),
)
);
}
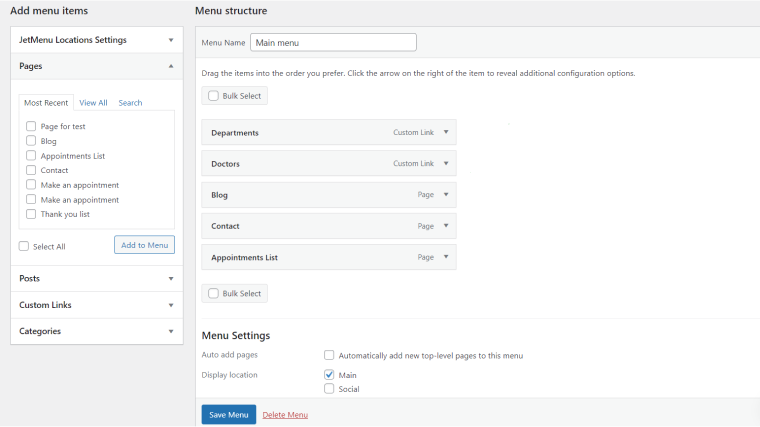
add_action('init', 'demo_register_menus');After this, the new location called “Footer Menu” will become available in the Dashboard > Appearance > Menus > Menu Locations tab and in the Menu Settings section here:
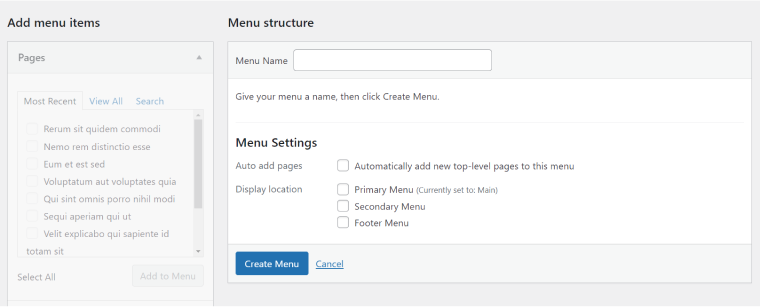
But if I create a new menu and try to assign it to this location, it will not appear on the front end because I haven’t inserted the menu itself into the theme template yet. And this is the next step.
Go to your theme files and find the one responsible for the footer content. It can be footer.php or one of the template parts.
Insert this code where you want to have your menu:
echo '<div id="my-footer"';
			if ( has_nav_menu( 'footer-menu' ) ) {
    wp_nav_menu( array(
        'theme_location'  => 'footer-menu',
        'menu_id'         => 'footer-menu',
        'menu_class'      => 'footer-menu-class',
        'container'       => 'div',
        'container_class' => 'footer-wrapper',
    ) );
}
echo '</div>';
As you can see, I wrapped the whole structure in the DIV with the “my-footer” ID. I also added the “footer-menu” ID and the “footer-menu-class” class to the menu itself.
Assign a menu to this area, and enjoy the result:
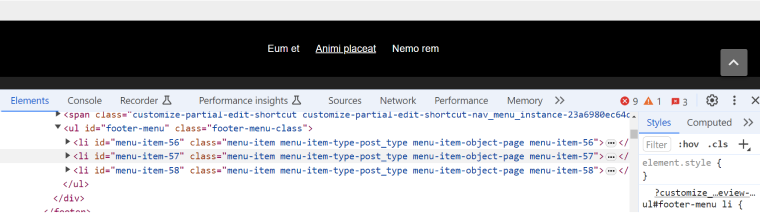
You can see the HTML structure here, as well as all the IDs and classes used in the PHP code above.
Also, to make it look properly on the black background and be inline, I added some extra CSS:
.footer-menu-class .menu-item {
	padding: 10px;
}

.footer-menu-class .menu-item {
	padding: 10px;
}

.footer-menu-class li a {
	color: white;
}

.footer-menu-class li a:hover {
	color:#ddd;
}
Creating custom menu structures
In the previous example, I added a custom menu location, assigned a custom ID and class, and, using them, stylized it to be inline, but the whole HTML structure of it is the same as the default top menu. The reason is that both use the default WordPress Walker_Nav_Menu class. It generates an HTML, where list (menu) items have this structure:
<li id="menu-item-1" class="menu-item menu-item-type-post_type menu-item-object-page menu-item-1">
        <a href="https://example.com/">Home</a>
    </li>
In case you want to change this structure for different purposes, a custom Walker is required. For example, you want to create a mega menu, add custom attributes, icons, badges, and submenu levels, or improve SEO and responsiveness.
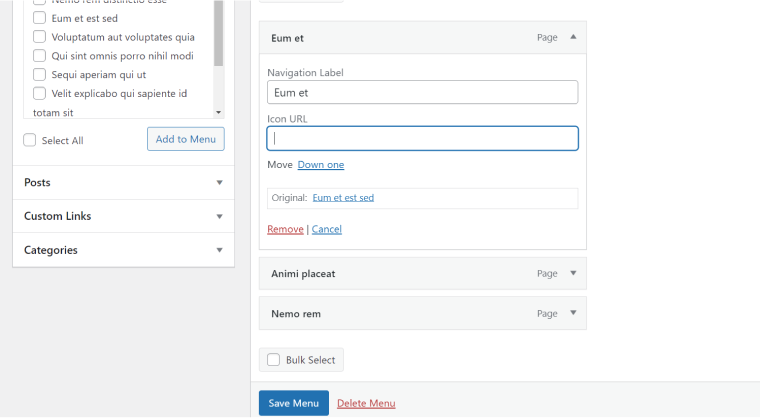
Let’s add to the functionality of uploading custom icons to the menu.
First, if there’s a need to upload or add custom data, a custom field is required. You can create them easily using JetEngine. If you do, skip the first step of creating the custom meta field I put below; just use its ID in Walker. To create it, go to JetEngine > Meta Boxes and assign visibility to the navigation menu.
I will create a custom meta field called “icon-field.” To do it manually, insert this code to the functions.php file:
function my_custom_menu_fields($item_id, $item) {
    $icon_url = get_post_meta($item_id, 'icon-field', true);
    ?>
    <p class="description description-wide">
        <label for="edit-menu-item-icon-<?php echo esc_attr($item_id); ?>">
            <?php _e('Icon URL'); ?><br>
            <input type="text" id="edit-menu-item-icon-<?php echo esc_attr($item_id); ?>" class="widefat code edit-menu-item-icon" name="menu-item-icon-field[<?php echo esc_attr($item_id); ?>]" value="<?php echo esc_attr($icon_url); ?>" />
        </label>
    </p>
    <?php
}
add_action('wp_nav_menu_item_custom_fields', 'my_custom_menu_fields', 10, 2);

// Save the custom field value
function my_custom_menu_fields_save($menu_id, $menu_item_db_id) {
    if (isset($_POST['menu-item-icon-field'][$menu_item_db_id])) {
        $icon_url = $_POST['menu-item-icon-field'][$menu_item_db_id];
        update_post_meta($menu_item_db_id, 'icon-field', $icon_url);
    } else {
        delete_post_meta($menu_item_db_id, 'icon-field');
    }
}
add_action('wp_update_nav_menu_item', 'my_custom_menu_fields_save', 10, 2);
Now, let’s create a custom Walker. Add this code to the functions.php file:
class My_Custom_Walker_Nav_Menu extends Walker_Nav_Menu {
    // Start element
    function start_el(&$output, $item, $depth = 0, $args = null, $id = 0) {
        // Retrieve the icon URL from the custom field
        $icon_url = get_post_meta($item->ID, 'icon-field', true);
        $icon_html = $icon_url ? '<img src="' . esc_url($icon_url) . '" alt="" width="16" height="16" style="vertical-align: middle; margin-left: 5px;" />' : '';

        // Construct the menu item output
        $output .= '<li class="menu-item ' . esc_attr(implode(' ', $item->classes)) . '">';
        $output .= '<a href="' . esc_url($item->url) . '">';
        $output .= esc_html($item->title);
        $output .= $icon_html; // Add the icon HTML after the link text
        $output .= '</a>';
    }

    // End element
    function end_el(&$output, $item, $depth = 0, $args = null) {
        $output .= '</li>';
    }
}
As you can see from the code above, between the “//Start element” and the “//End element” comments, there’s a structure for the menu item. I made an icon size 16x16px and put it on the right side from the menu item link. Alternatively, you can use CSS to add more elaborate styling.
At this stage, you will see the new meta field appear for the icon/image URL:
Now, the final step is to add the custom Walker to the menu. I want to apply the new structure and behavior. In the previous section, there was a Footer menu code that I added to the template. Now, all I need to do is add a line that assigns it a custom Walker. The full snippet looks like this. Remember, it goes to the template file, not functions.php. In my case, it goes to the footer.php one.
echo '<div id="my-footer"';
			if ( has_nav_menu( 'footer-menu' ) ) {
    wp_nav_menu( array(
        'theme_location'  => 'footer-menu',
        'menu_id'         => 'footer-menu',
        'menu_class'      => 'footer-menu-class',
        'container'       => 'div',
        'container_class' => 'footer-wrapper',
	'walker' => new My_Custom_Walker_Nav_Menu() //custom Walker
    ) );
}
		echo '</div>';
?>
You can fetch such icons in other menus. To do so, add the line with a custom Walker to their wp_nav_menu code at the theme template where they are located. For example, to add it to the Primary menu, I have to find the PHP code that fetched it in one of the templates and add the Walker element.
Now, you can upload icons (.png, .svg, etc.) to the Media library, insert the links into the field, and enjoy the result.

FAQ
Go to Dashboard > Appearance > Menus and create a menu. You can assign the location for each menu.
In most of the themes, you can assign the location (primary for the main menu, and many themes have a secondary location). Alternatively, you can use page builders and simply drag and drop a menu widget to fetch a menu whenever you want. Another option is to do it programmatically; check this article to learn more about it.
The best and easiest way to do it is to use a dedicated mega menu plugin.
Bottom Line
Website menus are a central and very important part of any website. They must be responsive and well-designed and match the site’s design and purpose.
The easiest way to create a custom menu is by using a menu plugin, especially when it comes to mega menus. Of course, it can be done programmatically from scratch, but it’s often a time-consuming process that feels like reinventing the wheel since many great solutions are already available.
In this article, though, I took you through the basics of WordPress menu customization to understand the main components and the idea of how it can be tailored to fit your specific needs and design preferences.