Most floating bars are decorations. They appear, they stay, and they convert nobody because they’re static, context-blind, and say the same thing to every visitor regardless of what page they’re on, what’s in their cart, or what filters they’ve applied.
The difference between a sticky banner in WordPress that gets ignored and one that drives action comes down to one thing: context-awareness. When a sticky bar knows who’s visiting, what they’ve done, and where they are in the funnel, it stops being an announcement and starts being a conversion trigger.
This guide walks through five real use cases (UC) built with Crocoblock plugins, ordered from the simplest setup to advanced dynamic implementations. Whether you have one plugin or the full stack, you’ll find a setup that fits your project.
- UC1: A contextual CTA bar/pop-up that shows different content per page type or CPT, uses JetThemeCore only.
- UC2: A limited-time offer with a countdown timer that actually expires, uses JetPopup.
- UC3: A sticky email opt-in bar triggered by scroll depth or exit intent, uses JetPopup.
- UC4: A cart reminder banner that shows live item count and hides when the cart is empty, uses JetPopup and JetEngine.
- UC5: An announcement bar/banner that updates its message based on active catalog filters, uses JetEngine Dynamic Visibility options, and JetSmartFilters.
5 Floating Bar and Sticky Banner WordPress Use Cases
Each use case below addresses a specific problem, lists the minimum plugins needed, and guides you through the setup step by step, starting with the simplest one-plugin build and ending with a fully dynamic, filter-aware setup implementation.
UC1: Contextual CTA bar for site pages or CPTs
- Complexity: Easy 🥱
- Requires: JetThemeCore
A single sticky CTA bar doesn’t work on every page. On some pages, it makes sense; on others, it can be irrelevant or less effective. Let’s have a look at how to create such a bar located in the header of a website.
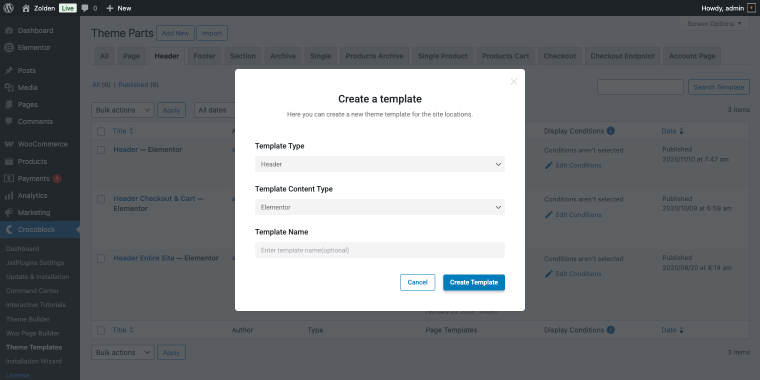
Step 1. Go to WordPress Dashboard > Crocoblock > Theme Templates > Header, and create a new Header template, or edit an existing template if you have one:
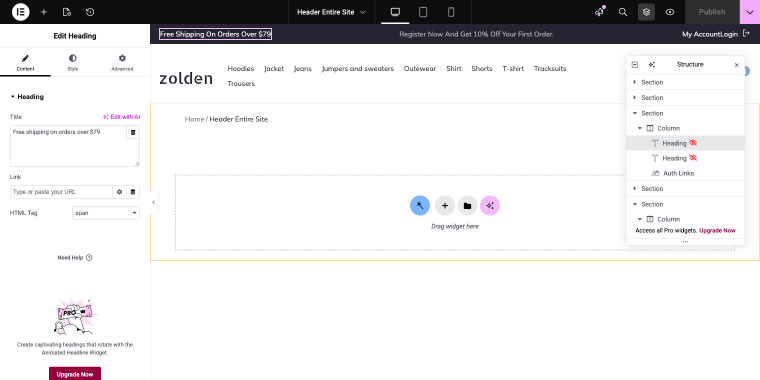
Design your sticky CTA bar inside this template using Elementor; mine will include two Heading widgets:
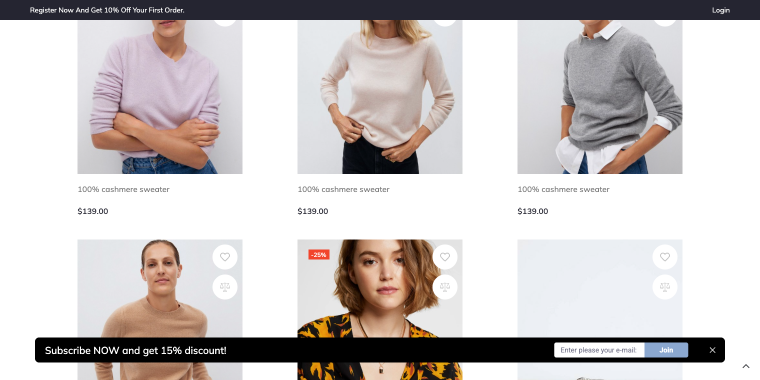
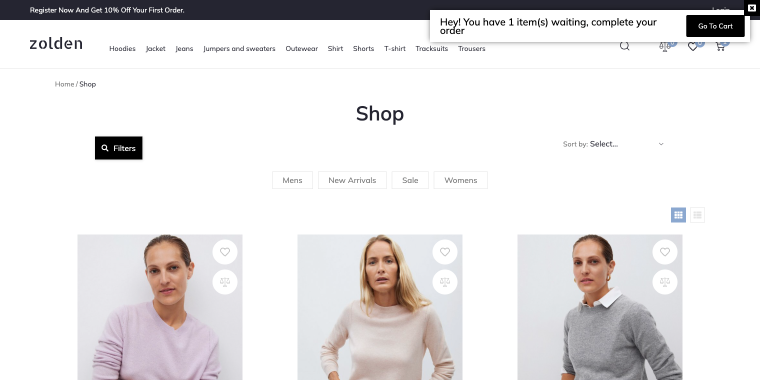
- “Free shipping on orders over $79” for logged-in users;
- “Register now and get 10% off your first order.” for non-logged-in users.
Step 2. Clicking on the widget, go to Advanced > Dynamic visibility and set the toggle Enable to “Yes” and then set:
- Visibility condition type — set to “Show element if condition met”;
- Condition — set to either “User not logged in” or “User logged in.”
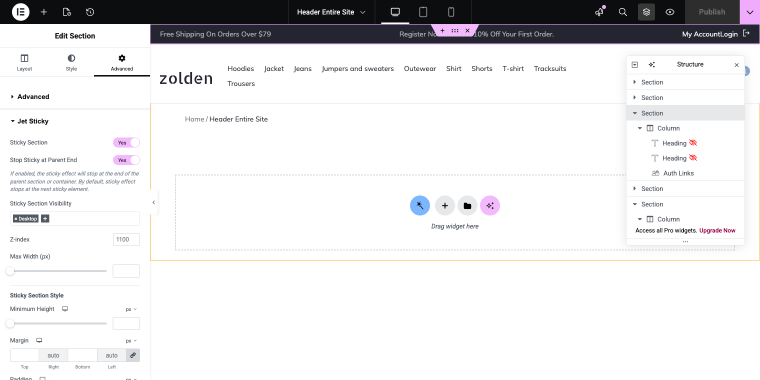
Step 3. Now let’s make the CTA bar sticky. Click on the Section, then go to Advanced > Jet Sticky and enable the toggle Sticky section. In the Sticky section visibility field, I’ll leave only the “Desktop” option:
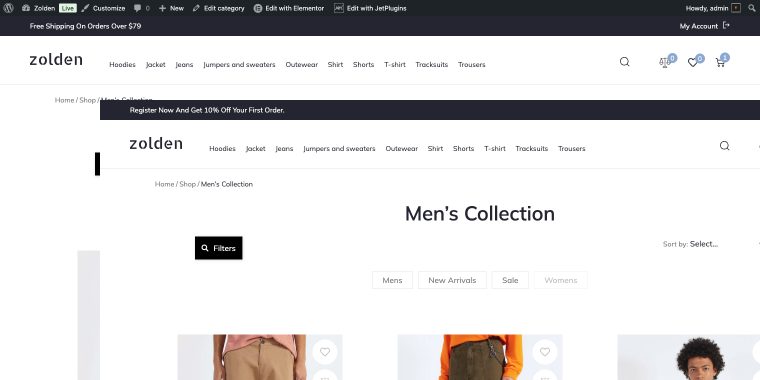
Here’s what the result may look like: logged-in and not logged-in users see different CTA messages.
The same template-based approach can be extended further using JetEngine’s Dynamic Visibility option on individual CTA widgets.
Let’s say you have a Locations CPT where you have single posts describing individual locations of your store. You can enable Dynamic Visibility on the same CTA widget and display it either across all posts within a CPT or on individual posts. To do so, use the following settings:
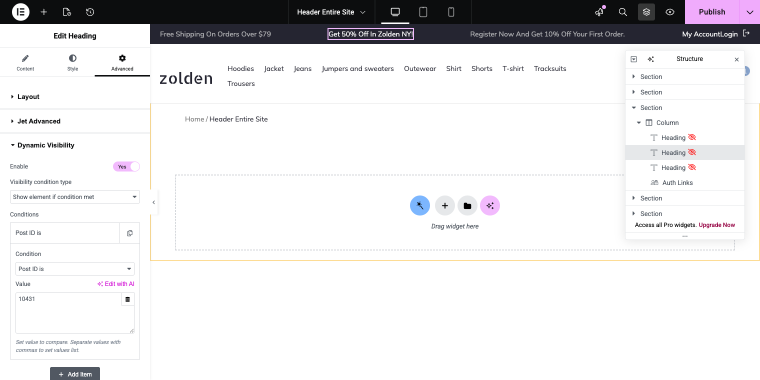
- Visibility condition type — set to “Show element if condition met”;
- Conditions — set to “Single Post Type is” or “Post ID is”;
- Value — set to the CPT slug (“locations”) or Zolden NY post ID (“10431”).
This lets you reuse a single header template across many page types while still showing context-specific elements only where they belong.
UC2: Limited-time offer bar/banner with a countdown timer
- Complexity: Medium 👌
- Requires: JetPopup
Adding a countdown timer creates urgency, but only if the timer actually expires and the bar disappears when it does. Without display conditions, the timer is visible to everyone, including users who have already purchased, resulting in a ticking clock that can cause distraction or irritation.
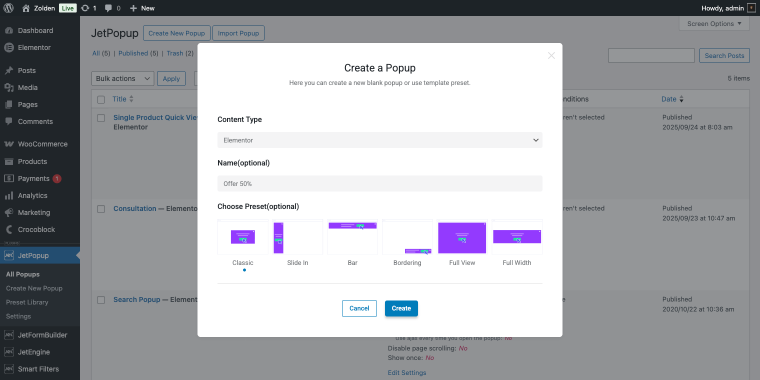
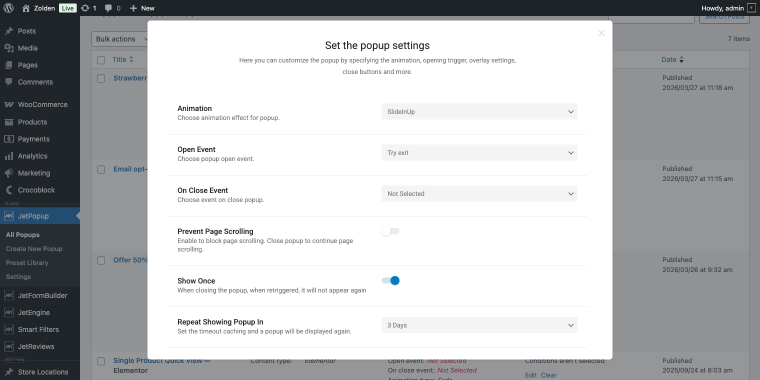
Step 1. Go to WordPress Dashboard > JetPopup, and click “Create New Popup.” Set the Content Type to “Elementor” and choose a Classic preset:
Step 2. Inside the pop-up editor in Elementor, add a Countdown widget by JetElements and set the end date to your offer deadline by going to the Settings tab, Due date feature:
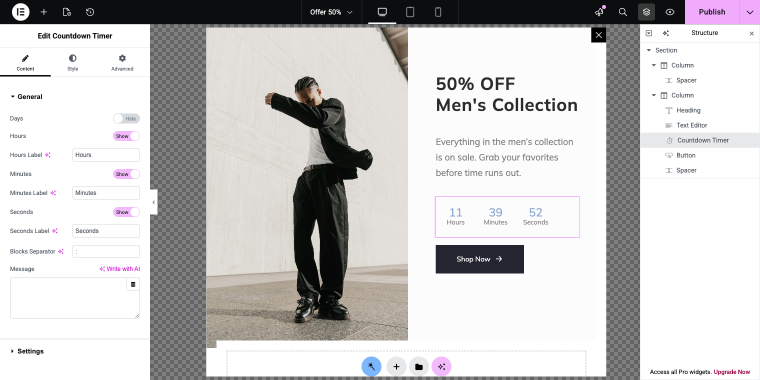
Step 3. Add your offer text and a CTA button inside the same pop-up.
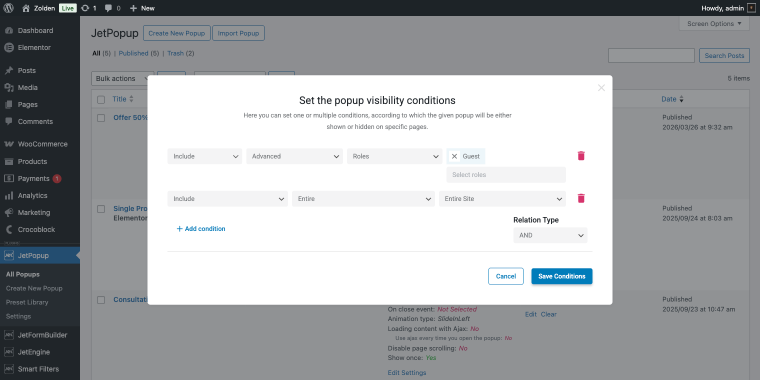
Step 4. Go to Display Conditions in JetPopup settings, add conditions: Include > Entire > Entire Site and Include > Advanced > Role > Guest. Set the Relation Type to “And.” This will hide the banner from people who’re registered on your website:
Step 5. In pop-up settings, set the Open Event to “On Date and Time”:
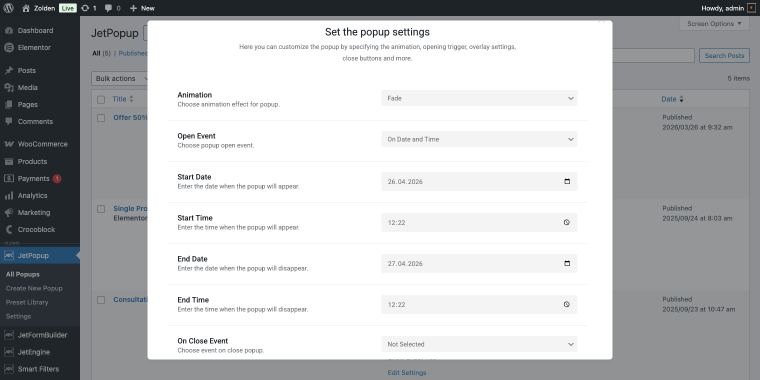
If you’re running a time-sensitive promo, you can set the time frame using the fields:
- Start Date / Start Time — to set the beginning of the promo;
- End Date / End Time — to set the time the banner will no longer be displayed.
Alternatively, you can enable the option, Prevent Page Scrolling, in the pop-up settings, which locks the page content from scrolling while the bar is displayed.
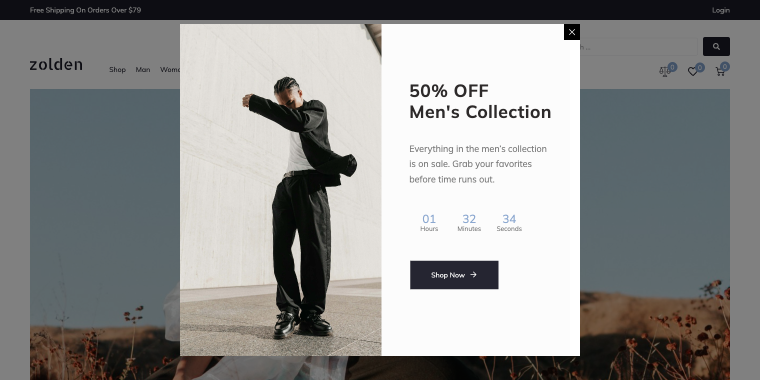
For a countdown offer bar where you want the user’s full attention before they continue, that’s a useful lever. With Crocoblock plugins and Elementor, you can customize this notification however you want. On the front-end, the banner with a timer may look like this.
UC3: Sticky email opt-in bar
- Complexity: Medium 👌
- Requires: JetPopup
Opt-in bars work best for users who haven’t decided if your website or store is worth sharing their email yet, so they dismiss it quickly. Conversion rates for “on load” opt-ins are consistently lower than trigger-based ones.
Let’s create an email lead magnet bar that will appear to the user role Guest and will have an Open Event “Try exit” meaning that the bar will appear when someone tries to close the tab. Step 1. This time, I’ll use a pop-up preset available at WordPress Dashboard > JetPopup > Preset Library:
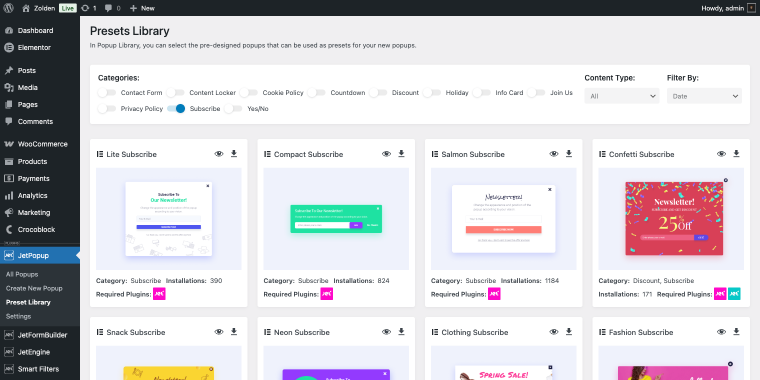
In the Categories list, feel free to enable the toggle Subscribe to filter email opt-in pop-ups.
Once you find a corresponding layout, click on the download arrow. Once it’s downloaded, the Elementor editor will be opened.
Step 2. Inside Elementor, you’ll notice that the layout has a Subscription Form widget added to the pop-up. It’s a JetElements widget that allows gathering subscribers to your Mailchimp lists:
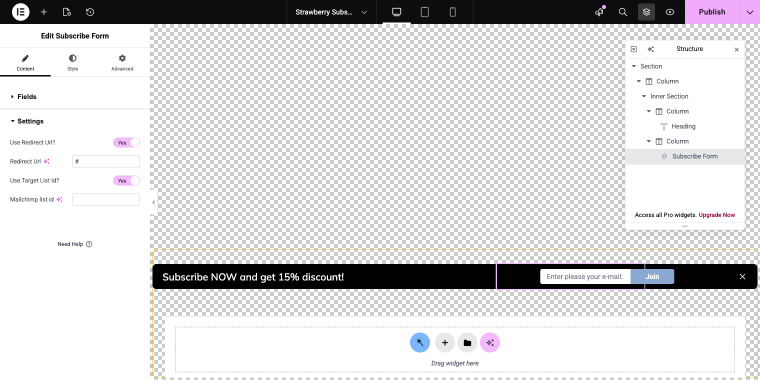
The Settings tab of the widget has a set of fields, including:
- Redirect URL — where you can add the URL of a page that will open once the user submits the form;
- Mailchimp list ID — that’s the audience ID that collects emails submitted through the Mailchimp subscription form.
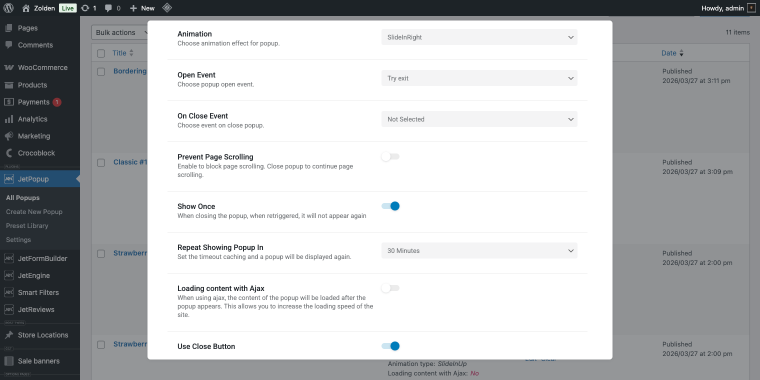
Step 3. In pop-up settings, set the Open Event to “Try exit,” and you may enable the toggle Show Once so you won’t annoy your guest, and choose some time interval when the bar will be revealed again in the Repeat Showing Popup In field:
Step 4. In the visibility conditions, add the following conditions:
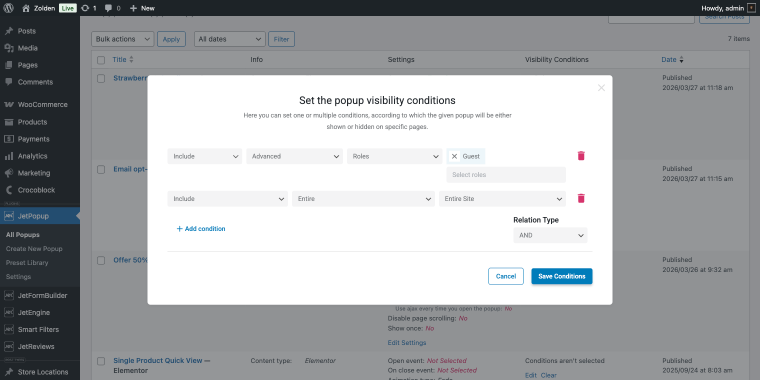
- Include > Advanced > Roles > Guest — to display the bar to guests;
- Include > Entire > Entire Site — to display the bar across all website pages;
- Relation Type — set to “AND”.
On the front end, the final result may look like this:
UC4: Dynamic cart reminder banner
- Complexity: Medium 👌
- Requires: JetPopup + JetEngine
The WooCommerce Shopping Cart widget in the header can be effective in terms of displaying the contents of the cart, but it only works if the user hovers over the cart icon.
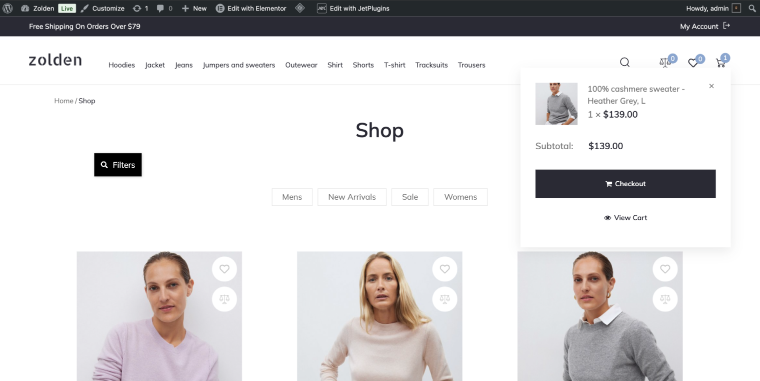
The cart icon displays the product counter, but it doesn’t prompt users to complete the purchase. Visitors add items to the cart, leave the site, and forget about it.
A sticky announcement bar or a pop-up that says “Hey! You have X item(s) waiting, complete your order” offers a simple reminder and is displayed if there’s anything in the cart.
Step 1. In your WordPress Dashboard, go to JetPopup > Add New to create a new pop-up or go to Presets to download a ready-made pop-up design.
Step 2. Before editing the pop-up in Elementor, set up the data source. In WordPress Dashboard > JetEngine > Query Builder, create a new Posts Query:
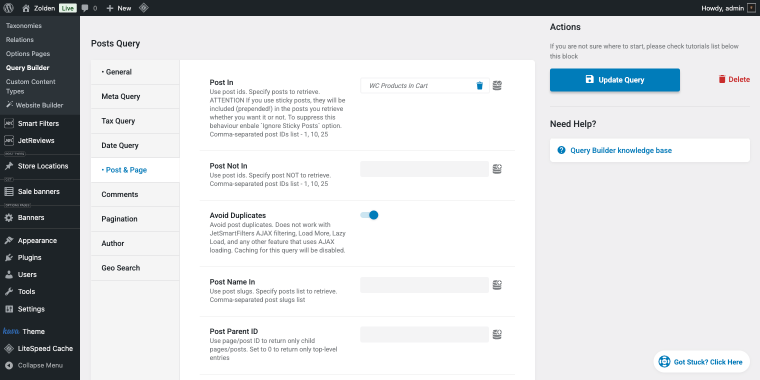
- General tab, set the Post Type option to “Products”;
- Post & Page tab, set the Include field to “WC Products In Cart,” then enable the Advanced settings and set the Fallback option to “no.”
Step 3. Open the pop-up in the Elementor editor. Add a Heading widget where the item count will appear. In the Title field, click the dynamic tag icon and select “Query Results Count”:
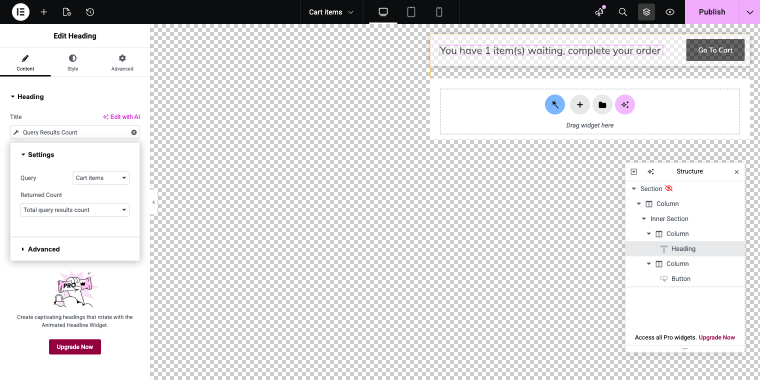
In the tag settings, set:
- Query — to “Cart items”;
- Returned Count — to “Total query results count”.
Then go to the Advanced tab to fine-tune the output:
- Before — “You have”;
- After — “ items in your cart”.
Step 4. Select the Section that wraps all the pop-up content. Go to Advanced > Dynamic Visibility. Set:
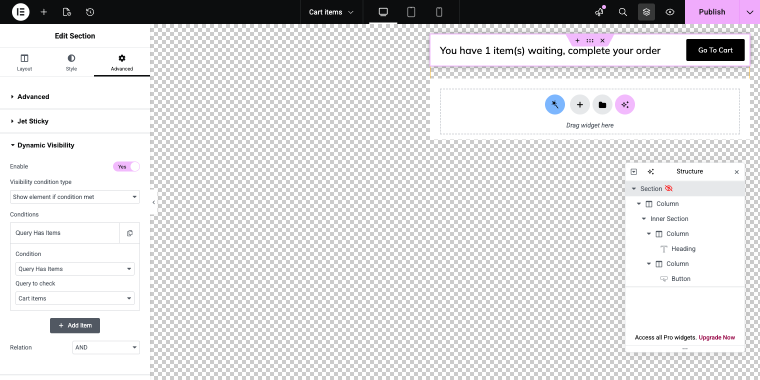
- Enable — to “Yes”;
- Visibility condition type — set to “Show element if condition met”;
- Conditions — select “Query Has Items” and select your query.
Step 5. Go to the JetPopup settings panel:
Set Open Event to “Try Exit”; this fires the banner when the user moves to leave the page, the most effective moment to remind them about an abandoned cart. Enable Show Once and set Repeat Showing Popup In to “30 Minutes” so the banner doesn’t reappear immediately after being dismissed.
Step 6. In JetPopup Visibility Conditions, let’s configure the following rules with Relation Type “And”:
- Exclude > WooCommerce > Product Checkout;
- Exclude > WooCommerce > Product Cart;
- Include > Entire > Entire Site.
This ensures the reminder appears across the whole site but never fires on the Cart or Checkout pages, where it would interrupt the purchase flow.
Here’s what the cart announcement bar made with Crocoblock may look like.
UC5: Banner that is displayed based on the Checkbox Filter results
- Complexity: Medium 👌
- Requires: JetEngine + JetSmartFilters
The setup uses JetEngine’s Dynamic Visibility with a JetSmartFilters Macros condition. Instead of checking the current page or post type, the condition reads the active filter state, specifically, which taxonomy term is currently selected in the filter. The banner widget is hidden by default and becomes visible only when the filter value matches the target category ID.
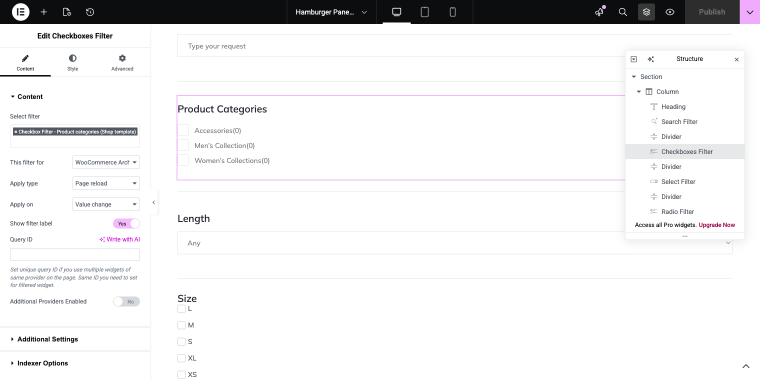
One important thing to mention: this approach requires the Checkbox Filter‘s Apply type to be set to “Page reload,” not “AJAX.”
Step 1. On your Shop page template in Elementor, add the promotional banner, in this case, an Image widget with your category-specific creative (e.g., a Spring Sale banner for the Accessories product type).
Step 2. With the Image widget selected, go to Advanced > Dynamic Visibility. Apply the following settings:
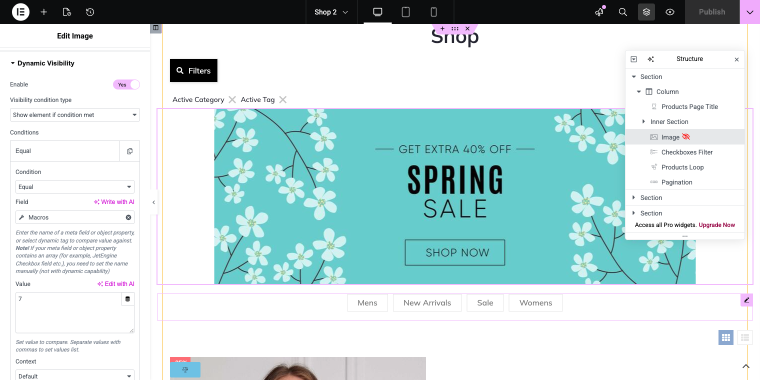
- Enable — set to “Yes”;
- Visibility condition type — set to “Show element if condition met”;
- Condition — set to “Equal”;
- Field — set to ”Macros”;
- Value — set to “7” (the term ID of the Accessories category). You can find a category’s term ID in WooCommerce > Product Categories; it appears in the URL when you edit the category.
In the “Macros” Settings panel, configure:
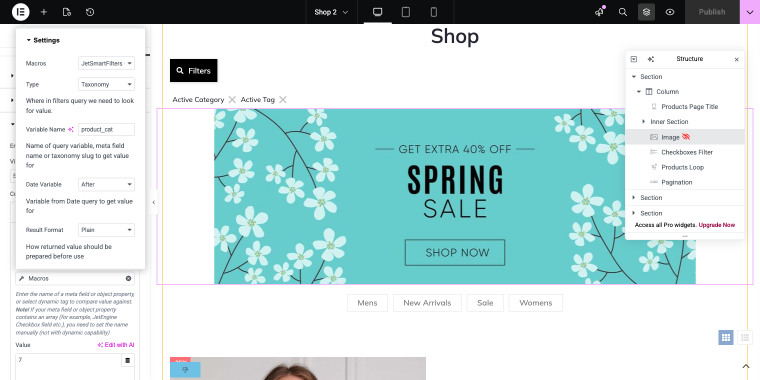
- Macros — set to “JetSmartFilters”;
- Type — set to “Taxonomy”;
- Variable Name — set to “product_cat”.
Step 5. In the Checkboxes Filter widget settings, set the Apply type option to “Page reload”; this is required:
When a visitor selects Accessories in the filter, the page reloads with the filter parameter in the URL, the server evaluates the Dynamic Visibility condition, and the banner renders only if the active category ID matches.
The final result of a banner triggered by a category selected in a Checkbox Filter.

FAQ
Set the condition to Condition > “User Role is,” User role > [role]. You can stack multiple role conditions with AND/OR logic to cover several roles in one rule.
JetEngine applies Dynamic Visibility for widgets, sections, and containers. Make sure you have the latest versions of Elementor and JetEngine on your website.
Use the “Query Has Items” condition in Dynamic Visibility. The element shows when the query returns at least one result and hides when it’s empty.
Use the “Time Period” condition, and then set a “Time From” and “Time To” date. The element will only be visible within that window.
Conclusion
Sticky bars and floating banners only deserve their spot on a page if they deliver relevant content. A static bar that shows the same message to every visitor creates noise. The examples above highlight the opposite: bars that understand where the user is, what they have done, and what they are likely to do next.
The plugin you require depends entirely on what the bar needs to communicate:
- JetThemeCore alone is sufficient when the content is static, and the only variable is the page type.
- JetPopup introduces triggers and conditions for time-sensitive or behavior-based scenarios.
- JetEngine provides live data: cart status, post context, and query results.
- JetSmartFilters completes the loop when the bar needs to accurately reflect what’s occurring in a filtered catalog in real time.
Start with the simplest setup that addresses your actual problem. Not every site needs dynamic cart data or filter-reactive messaging, but every site benefits from CTAs that match the context the visitor is already in.


