If you’ve ever uploaded an image to WordPress through a form or a custom field in the admin panel or importer, then you might have wondered why it doesn’t appear in the Media Library, there’s no preview in the admin, and why your dynamic widget refuses to render it. Also, why can’t you set it as a featured image?
Well, you’ve run into the single most misunderstood concept in working with media in WordPress. The good news is that this article gives answers to all of these questions.
The cause is almost always the same: WordPress has two completely different ways of storing an uploaded file, and they behave nothing alike.
This guide explains how WordPress media uploads from forms actually work at the platform level, and I will show it on practical examples using JetFormBuilder file upload and JetEngine media field setups.
Before we dive into the concept, here are the most common complaints that all trace back to the same root cause:
- I uploaded an image through a form, but it’s not in the Media Library.
- There’s no preview in the admin – just a grey box or broken-image icon.
- I can’t set the uploaded image as the post’s Featured Image.
- I uploaded multiple images, but only one shows up in the gallery.
- The image displays fine on the front end but looks broken in admin (or vice versa).
If any of these match your situation, the explanation is below.
2 Ways WordPress Stores an Uploaded File
When something gets uploaded to a WordPress site, it can be stored in one of two fundamentally different ways:
- A plain file on your server (to be found by URL).
The file lands in some folder under /wp-content/uploads/, and WordPress just remembers the URL pointing to it. That’s it, and no metadata, no entry in the Media Library, resized variants, or alt text.
WordPress doesn’t even “analyze” what kind of file it is – it could be an image, a PDF, a ZIP, a Word doc, etc.; from WordPress’s perspective, it’s just an object that can be found by URL. - A WordPress attachment (with a database record).
The file is wrapped inside a special WordPress object called an Attachment. Now, it’s not just a file somewhere on a server, but it has a database record because it’s a specific post type – attachment. This is a full post – with an ID, a database row, metadata, and a place in the Media Library, as the Media Library displays attachments, not just all media files on your website.
If WordPress recognizes it as an image, it generates resized image versions and stores the alt text.
What Is a WordPress Media Attachment?
This is the part most users skip, and it’s the part that makes everything else click.
Attachment is a post type
WordPress has seven built-in post types:
- post;
- page;
- attachment;
- revision;
- nav menu item;
- custom CSS;
- customize changeset.
The rest are custom post types (CPTs) that users create themselves for their needs.
So, let’s get back to attachments and see what they are:
- An attachment has its own row in the wp_posts database table, with its own ID.
- It has metadata rows in the wp_postmeta database table.
- It is editable from the admin – you can give it a title, alt tag, caption, description.
- It can be queried, filtered, and referenced like any other post.
📌 Everything in the Media Library is an attachment post. Conversely, every attachment post appears in the Media Library. If a file lives in /wp-content/uploads/ but isn’t wrapped in an attachment post, it won’t show up in the Media Library.
Why attachments get previews, alt texts, and resized versions
When you upload an image as an attachment, WordPress runs it through its image-processing pipeline. It generates multiple resized versions (thumbnail, medium, large, plus any custom sizes registered by your theme), stores them on disk, and saves an array describing all of them in wp_postmeta under key _wp_attachment_metadata.
This is exactly why the admin can show preview thumbnails, why srcset works, and why image-rendering helpers like wp_get_attachment_image() know which size to pick. None of this exists for plain-file uploads, as there’s nothing to introspect, nothing to look up.
You can explore media attachments yourself. Install a plugin like SQL Buddy or similar and get the attachment ID of the media file. Then, find it in the database to see the data it stores.
Why Does the Way of Storing Images Matter?
The same image uploaded as a plain file vs. as an attachment produces different behavior in four major areas:
| Plain file on a server | Media attachment | |
| Backend / Admin display | Renders as a grey placeholder with a filename with no preview thumbnail. | Renders as a real image preview, because WordPress can look up the attachment metadata and pick a thumbnail size. |
| Front-end rendering | Tools that just need a URL (basic <img src=”…”> widgets) work in both modes. But anything that calls wp_get_attachment_image(), generates srcset, fetches alt text from the attachment, or uses ID-based dynamic callbacks will only work with attachments. This is the core of why some setups can show uploaded images on the front end cleanly, while others can’t. | |
| Reusability and editing | It is invisible to content editors using the “Add Media” button (because it’s not in the Media Library). | Browsable, searchable, and editable from the Media Library – they can update its alt text, replace it, or reuse it on another page. |
| Database footprint | Just one URL string. | Creates a full post plus two meta rows in a database, plus several physically resized files on the disk. |
Shall all images be stored as attachments?
Here comes this very logical question, because I was talking mostly about the advantages of storing images as attachments and the disadvantages of the other method.
But actually not, it doesn’t mean that every image should be stored as an attachment, and here are my takes on it.
Save images as attachments when:
The image is content the site owns and manages: e.g., editorial photos in posts, product images in WooCommerce, gallery images, featured/hero images, author avatars uploaded to the Media Library, and anything a non-technical editor needs to swap, reuse, or search later. Attachments give you the post_id, metadata (alt text, caption, EXIF), automatic thumbnail sizes, integration with the Media Library and builders, and the ability to be queried like any other post type. They also play nicely with SEO plugins, image optimization plugins, CDN offloading, and srcset/responsive image generation. If editors ever need to find that image again, it should be an attachment.
Use raw URLs when:
The image is just a part of the theme/plugin, not the content. Logos, background patterns, decorative SVG icons, social media icons, default placeholder images, and anything bundled with the theme.
The same goes for externally hosted images you don’t control, like images pulled from third-party APIs, or images served from a headless CDN where WordPress is just consuming a URL. Storing these as attachments adds database rows for no reason, since you don’t need versioning, metadata, or Media Library discoverability for, let’s say, a hamburger icon.
It can also apply to the data uploaded via forms if you don’t want these images to become a part of a post. For example, users upload their images as part of orders that are further processed by a CRM, you want to save form records, but that’s it.
When to think about performance
In cases I’ve mentioned for attachments, there’s one thing to be considered – how many of such records are you planning to have? If you’re dealing with massive volumes, say, hundreds of thousands of user uploads, the wp_posts and wp_postmeta bloat may become a real performance problem, and offloading to storage services in a cloud with just a URL stored in user meta starts to make sense.
Same logic for high-volume sites with auto-imported feed images, as attachments are correct in principle, but will be punishing at scale.
So, the general idea is the following: attachments are much easier to reuse and to work with, but they take up space in a database. But if, for some reason, you can’t do it, you still will be able to use an image, just not that easily.
Practical Guide and Real-World Examples Using JetEngine
The reason JetEngine and JetFormBuilder are great for understanding this is that they make the file-vs-attachment choice explicit. Most other plugins hide it, but these expose it as toggles and dropdowns. Let’s start with JetEngine and the options for media it offers.
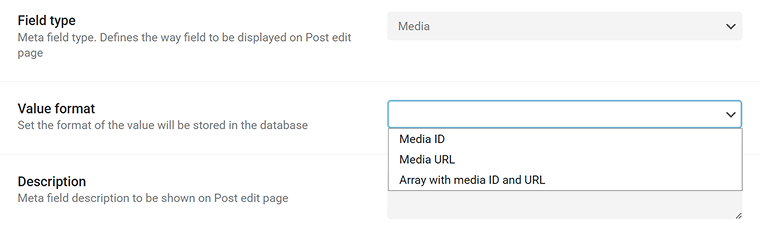
JetEngine image format settings
When you create a CPT and add its meta fields, or when you use the Meta Boxes functionality to add a group of fields, you can add a Media or Gallery field. They both come with the following format settings:
Once you know what those toggles actually do, every other media-handling situation in WordPress becomes easier to debug.
So, if you choose Media as a field type, it will be saved as an attachment by JetEngine. Then, there are three formats to choose from. They don’t change the way WordPress handles them dramatically, but if you have certain scenarios in mind, they will be useful. Let’s see how they will be saved, and then discuss the scenarios.
Let’s create a CPT with one Media field and change formats every time, and see how the records look.
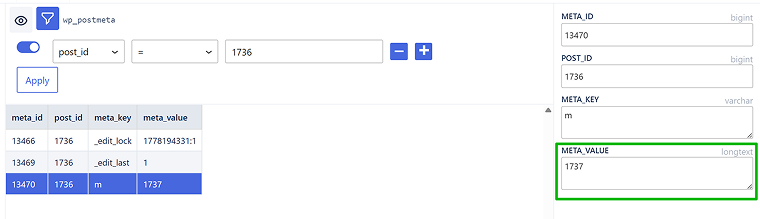
To find a record, go to your SQL Buddy, open the wp_metadata table, and in the post_id (not meta_data ID), insert the post ID that can be found in the post URL (pay attention: post ID, not attachment ID).
Media ID
When you upload an image, the attachment is created, and the ID is assigned. And this ID can be found in the DB cell:
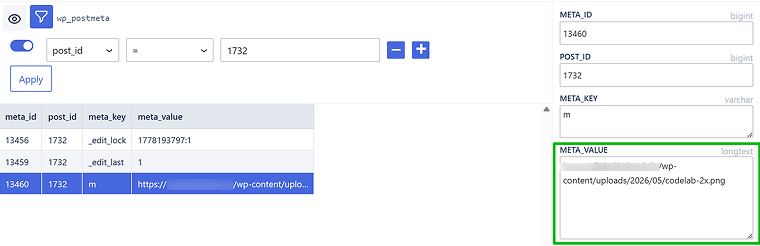
Media URL
Here we have a similar story, but a URL instead of the ID.
Array with media ID and URL
In this case, we have an array, but arrays are a PHP data type and can’t be stored directly in the database. That’s why the data is encoded as JSON. When needed, WordPress can decode it back and work with it as a normal PHP array.

For the gallery field type, you will get basically the same, but comma-separated records.
When to use each format?
So, this is a quick cheatsheet on when to use each format.
- Media ID: use this as your default. It’s the most flexible for working with it on a website, as from an ID, you can pull any image size, get metadata, generate URLs, and survive domain changes or CDN migrations without breaking anything. Pick this when you’ll render the image through PHP/template functions like wp_get_attachment_image() and want responsive srcset output.
- Media URL: use this when you need the raw URL and nothing else – typically for inline use in custom HTML, REST API responses consumed by a headless front end, email templates, or passing the value to a third-party script. It saves you a lookup step, but locks you to one image size and breaks if the site URL changes (but it’s fixable with some SQL commands).
- Array with media ID and URL: use this when you really need both in the same place without extra queries. For example, rendering a gallery where you display the URL directly, but also need the ID to fetch alt text, captions, or alternate sizes. It’s the most convenient for templating, but the heaviest to store and the trickiest to query against in SQL.
If you don’t choose any specific format, JetEngine will save media as ID by default.
How JetFormBuilder Handles Media Uploaded via Forms
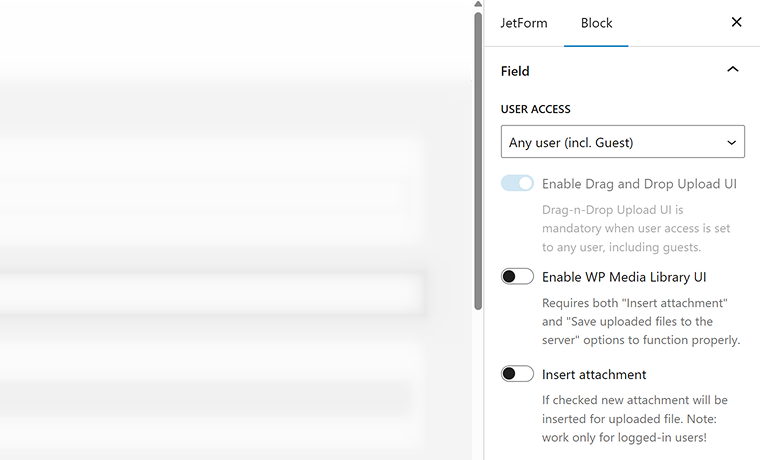
Forms are the point of interaction between front-end users and a website, so form media field settings should cover all scenarios – when saved as an attachment or just like a file on a server.
💡 The main idea here is that non-logged-in users don’t have permission to create or edit posts for obvious security reasons, and attachments in WordPress are also stored as posts. When it comes to file uploads, they introduce even greater security risks than, for example, submitting plain text content, since uploaded files may contain malicious code or exploit vectors.
But if you need to allow attachment upload to non-registered users anyway, check this code snippet.
JetEngine has two tools for uploading files:
- Media field – a simple field for file upload, available in the core plugin version.
- Drag-and-Drop File Upload Addon – a paid add-on with additional features and a fancier interface.
Neither of them allows non-registered users to upload files as attachments, for security reasons I’ve mentioned above.
JetFormBuilder scenarios for storing media
Now, let’s look at all the scenarios JetFormBuilder has for storing uploaded files.
Option 1: File uploaded as a simple file on a server (not an attachment)
💾 In this case, the file will be saved in: yoursite.com/uploads/jet-form-builder/2eba74ac98ea….{unique identifier for your form}/year/month/filename.jpg
You can find these records in JetFormBuilder > Save Form Records. Also, you can find all of the files by creating a query in JetEngine > Query Builder, Query Type – JetFormBuilder Records. There, you can preview all the results or even display them on the front end.
I really recommend always to have the Save Form Records action on, as it’s a great way to have not only actual records but a log of actions. It’s extremely helpful for debugging – you can see which actions fired and at which point something went wrong.
What if there’s an Insert/Update Post action?
You can allow, even non-registered users, to add posts using the Insert/Update Post action and add files to such posts. Of course, it’s a very questionable solution from the security point of view, but it’s possible.
So, let’s say I’ve created a CPT with a Media field, and this CPT can be updated via a form (allowed for all users, including guests). As you remember, JetEngine’s Media field saves records only as attachments, right?
So, what will happen in this case? Will JetEngine turn it into an attachment? No, because JetFormBuilder already saves it as a file, in its own folder, so when the post is created, JetEngine only takes this record and places it in the field for a media:
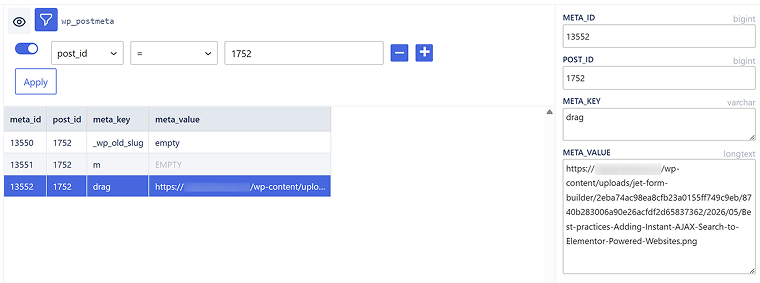
If you open the created post in the Dashboard, there will be no preview for this media, just a gray square, because it’s not an attachment, and there’s no preview for such records:

That’s why, if you have this issue (which is quite often among WordPress users), now you know the reason.
Option 2: File uploaded as an attachment
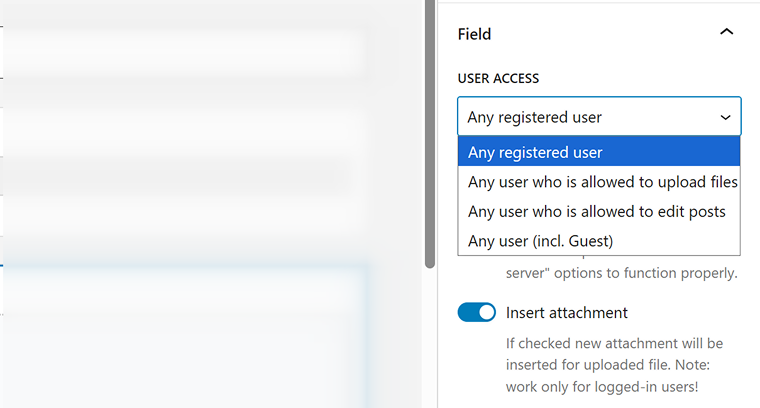
This is an option for registered users (allowed to upload files), with the Insert attachment toggle on, and here, the setup is pretty straightforward – an image is being saved as an attachment, with all the advantages it entails. Which means a post of attachment type is created with all the data about the file.
💾 In this case, you can also choose the way the records about the physical file will be saved in a database, in the same column of JetFormBuilder’s Drag-and-Drop field:
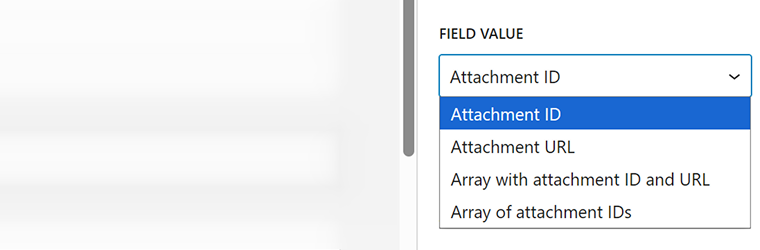
The description below this field gives a very clear explanation: If you’re using this field with an ACF Gallery, always choose “Array of attachment IDs.” For JetEngine, make sure the format matches the one used in the corresponding JetEngine meta field.
Image preview on submitted post (Insert/Update Post action), and why is there still no preview?
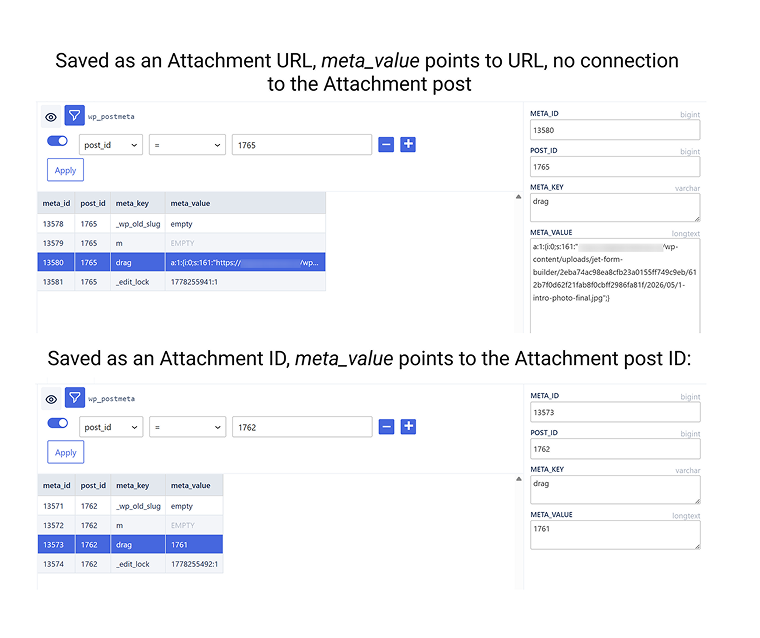
Here, we have an interesting distinction. If you use a form to submit an image (via the Insert/Update Post action) and choose the Attachment ID option in the dropdown above, the submitted image will have a proper Media preview in the editor.

However, if you choose the Attachment URL option, the preview will not be available, even though the image itself is still saved as an attachment in the Media Library. Why? Because the main post stores only the image URL instead of a reference to the attachment post ID.
In other words, the uploaded image still exists in the Media Library as an attachment post, but the main post is not linked to it through its ID. Instead, it simply stores a plain URL string pointing to the file.
So, if you later edit the attachment metadata, for example, the alt text, caption, or generated image sizes – those changes will not automatically affect the media field in the main post, because the post references only the file URL, not the attachment object itself.
That’s why, if you want your uploaded media to have a proper preview in the editor and fully use WordPress media functionality, you should use the Attachment ID option. In this case, the main post stores the ID of the attachment post, giving WordPress access to all related media data, including alt text, image sizes, captions, and other metadata.
This is how these two options look in the database:
Yes, it’s a pretty geeky thing, and you don’t have to dive into all this too deeply: simply use Attachment ID when saving media from forms.
I gave such a detailed explanation to help you understand how WordPress handles uploaded media internally.
Other saving options
There are two other options to save media:
- Array with Attachment ID and URL
and - Array with Attachment IDs.
They are options for particular configurations, e.g., if you work with a headless setup or REST API, having both IDs and URLs can be useful for better performance. And, of course, saving as an array is needed for populating gallery fields.
So, JetFormBuilder offers all possible options for storing media to ensure the highest flexibility for any development configuration.
Additional: For very specific cases – saving images in Base64 format
‼️For 99.9% of cases, keep this toggle on (it’s enabled by default) and save a file to a server. If you turn it off, images will be saved in your database in Base64 format. Keep in mind that Base64 takes much more space than even JPG files. So, unless it’s necessary, don’t use this option.

Saving Media Files in CCTs from Forms
If you have the Insert/Update Custom Content Type action for the form, and media is supposed to be saved in a CCT field, there will be the same logic as for CPTs or default post types. The only difference between CPTs and Custom Content Types (CCTs) is where the data physically lives:
- CPT: the post lives in wp_posts, all meta (including the media field’s URL or ID) lives in wp_postmeta. Of course, you can use custom meta storage settings for JetEngine CPTs for better performance.
- CCT: the entire item, including the media field, lives in a single custom database table that JetEngine creates specifically for that CCT, because CCT is a set of fields.
The file-vs-attachment behavior, the backend display, and the front-end rendering all work identically. Only the database schema differs.
Practical Cheat Sheet on Storing Media on WordPress
| Use case | Recommended approach |
| You want users to upload downloadable files (PDFs, contracts, ZIPs). | Storing as a URL. You don’t need Media Library presence; a Dynamic Field rendered as a download link is enough (you can use Dynamic Field callbacks for more options). |
| You want an image that displays cleanly on the front end and previews properly in the admin. | Storing as an attachment with Attachment ID. |
| You want users to upload multiple images (gallery, photo set, multi-document submission). | Storing as an attachment with an array of Attachment IDs. Pair with a JetEngine gallery field, not a single image meta field. |
| You’re building an image upload that needs to become the post’s Featured Image. | Storing as an attachment with Attachment ID. |
| You’re storing user-uploaded images that should be reusable site-wide and editable. | Storing as an attachment with Attachment ID. Editors can manage these from the Media Library. |
| You specifically need both ID and URL stored together. | Storing as Attachment with Array (ID + URL). |
Bonus: Displaying Editable Image Fields on Front-End Forms in User Profiles
This is a specific use case, not directly connected to the topic of this article, but Crocoblock users have this question quite regularly, so I will mention it.
So, let’s say, there’s a front-end form and you want to display a form that already has values, right in the form.
Check an example using this demo site.
It looks like this:
It’s very easy to achieve: in the JetForm tab, open the Preset Settings section and click “Enable.” Then, choose a source for every field – you can get values from the current post, the current or queried user, query variables, option pages, etc. – there are a lot of options for any case. For a full guide, check this article.
Special Mention: External Media Storage for JetFormBuilder
This is a community solution provided by a Crocoblock user – use it at your own risk. You can sync JetFormBuilder file uploads to external cloud storage providers (Dropbox, Google Drive, Cloudflare R2). Supports automatic token refresh, per-form overrides, file-type filtering, size limits, and a flexible folder-template system.
FAQ
Two ways, depending on the form’s settings. Either as a plain file (just a URL string in a meta field, no Media Library entry, no metadata), or as a full WordPress attachment (a complete post object with its own ID, metadata, resized variants, and a place in the Media Library). An advanced form builder like JetFormBuilder has a dedicated option to choose from.
For displaying images, yes, almost always. ID-based storage gives you preview thumbnails in admin, srcset support, alt text retrieval, Featured Image compatibility, and full integration with dynamic widgets that expect attachment objects. URL-based storage gives you a string that works for basic <img src> rendering and not much else. The only legitimate reason to store URLs is if you specifically don’t want attachment behavior, usually for non-image downloads or files you don’t want in the Media Library.
Yes, but by default, WordPress only allows logged-in users with the upload_files capability to create attachments. So, guests can upload files to be stored just as files on a server (not as an attachment) using JetFormBuilder. However, it’s highly recommended to pair such guest uploads with strict MIME type filtering, file size limits, and anti-spam protection and validation.
Use a single image meta field when each post has exactly one image in that slot (primary photo, banner, avatar, headshot). Use a gallery field when the post needs multiple images (photo galleries, portfolios, multi-angle product shots).
The right tool depends on your storage mode. If the meta field stores an attachment ID, use any image-rendering widget, e.g., JetEngine’s Dynamic Image, Elementor’s Image widget with a Dynamic Tag, or “Get Image by ID” callbacks with the Dynamic Field widget by JetEngine, which will all work. If the field stores just a URL, you’re limited to widgets that accept URLs.
In JetFormBuilder, use the “Insert/Update Post” post-submit action and map your Media Field to the target meta field on the CPT.
Because it was stored as a plain file URL, not as an attachment. Only attachment posts appear in the Media Library, and you can see their previews in the editor.
Wrapping Up
Understanding how WordPress stores uploaded media is one of those small pieces of knowledge that quietly solves a huge range of problems, from form submissions to custom fields to headless setups.
Once you know the difference between a plain file and an attachment, you stop guessing and start making deliberate choices that fit your project. Attachments give you flexibility, reusability, and full integration with the WordPress ecosystem, while plain URLs keep things lightweight when you don’t need any of that overhead. The format you pick to store media links in a database, be it ID, URL, or array, should follow the actual use case, not a default habit.
The good news is that JetEngine and JetFormBuilder make this choice explicit, which gives you so much flexibility for a project of any complexity.

