Any complex WordPress website can’t work without custom post types and custom fields, but the default functionality for creating and managing them is… well, coding. That’s where plugins come in, and JetEngine doesn’t just give you one way to do it – it gives you two. Let’s discuss them in this article.
Also, I will demonstrate some use cases and add some theory for those who like it. 🤓
Table of Contents
- Understanding WordPress Custom Meta Fields
- 2 Ways to Add Custom Fields Using JetEngine
- Displaying Custom Fields on the Front End With JetEngine
- FAQ
- Bottom Line
Understanding WordPress Custom Meta Fields
WordPress is flexible, but out of the box, it only gives you a few fields to work with – like the title, content, and featured image. That’s fine for a basic blog, but as soon as you need something more structured, you start running into limits. What if you’re building a movie database and need to store director names, release years, and IMDb links? Or an online store with product specifications? That’s where custom meta fields come in.
Meta fields let you attach additional information to posts, pages, users, or even taxonomies. They don’t change the core structure of WordPress but act like extra storage slots for whatever data you need. If you’ve ever used custom fields in the editor or seen plugins like JetEngine or ACF in action, that’s exactly what’s happening behind the scenes.
Technically, every piece of custom meta data is stored in the wp_postmeta database table (or a similar meta table for users, terms, etc.) and linked to a specific post or object. WordPress itself doesn’t impose a structure on these fields – it just saves whatever key-value pairs you throw at it. This means you can store anything from plain text to serialized arrays of complex data.
The real power of custom fields comes into play when you start querying them. You can fetch posts with specific meta values, filter search results based on field data, or even use them to create dynamic templates where content updates automatically. However, performance becomes a concern if you’re dealing with thousands of records and inefficient queries. That’s why understanding how and when to use custom fields – along with smart indexing and caching – can make a huge difference in site speed.
At the end of the day, custom meta fields transform WordPress from a blogging tool into a full-fledged content management system. Whether you’re building a portfolio, a real estate listing, or an app-like experience, they’re the backbone of any custom setup.
How it works: a deep dive
🧐 If you’re not too interested in the technical details or how things work under the hood, feel free to skip this section and jump straight to the next one, where you’ll find practical solutions.
Let’s start with the way custom fields are stored in a database. Every time a custom meta field is added to a post or custom post type, it’s stored as a row in the wp_postmeta table. The table has four main columns: meta_id, post_id, meta_key, and meta_value. The meta_key is the name of the field, and the meta_value is the data you want to store. When you add a custom field, WordPress automatically links it to the corresponding post by associating the post_id to the row in the table.
For example, if you’re creating a product post for a chair, you might add a custom field with the key material and the value “wood.” This field would be stored in wp_postmeta, and every time the chair post is queried, the associated material can be retrieved based on its meta_key. WordPress doesn’t enforce any structure on this data, which means you can store simple text, numeric values, serialized arrays, JSON objects, or even complex data structures, depending on what the site needs.
Querying custom meta fields
Custom meta fields become powerful when you start querying them. WordPress provides the meta_query argument in functions like WP_Query, get_posts(), and get_users(), which lets you filter posts, pages, or users based on the data stored in the meta fields. For example, if you’re running an event listing site, you could filter all events happening after a certain date using the event_date custom field.
A simple query might look like this:
$args = [

    'post_type' => 'event',

    'meta_query' => [

        [

            'key' => 'event_date',

            'value' => '2025-01-01',

            'compare' => '>=',

            'type' => 'DATE',

        ]

    ]

];

$query = new WP_Query($args);
This query would fetch all events scheduled after January 1st, 2025, based on the custom event_date field. The meta_query argument is powerful because it supports various comparison operators like =, !=, >, <, and more. You can also perform meta queries with numeric, date, and even serialized data types, though performance can degrade with complex queries.
Performance considerations
While custom fields are a great way to extend WordPress, querying large datasets with many meta fields can become inefficient. By default, WordPress stores meta fields as strings, which means even numeric or date fields are treated as plain text. When you query this data, WordPress will often perform slower searches because it needs to perform a string comparison rather than a more optimized numeric or date comparison.
To improve performance, it’s important to plan your queries carefully. Using meta_key and meta_value indexes, especially on frequently queried meta fields, can drastically speed up search times. WordPress itself doesn’t automatically index meta fields, so adding custom indexes to wp_postmeta for specific fields might be necessary for larger sites.
Serialization and arrays
One of the more powerful (but also tricky) features of custom meta fields is the ability to store complex data types, like arrays or objects. For this, WordPress uses serialization, which turns an array into a string that can be stored in the database. However, this serialized data is not directly queryable without deserializing it first.
For example, if you store a list of product sizes in a meta field as an array, WordPress will automatically serialize that array before storing it. But when it comes time to query this field, you can’t simply use a meta_query to filter by a specific size. Instead, you’d have to perform custom logic to deserialize the data or use more advanced querying techniques like LIKE or even custom SQL.
$meta_value = serialize(['small', 'medium', 'large']);

update_post_meta($post_id, 'product_sizes', $meta_value);
Although using serialized data can be convenient, it adds complexity to queries and performance, so it’s important to consider whether it’s the right choice.
The role of plugins and custom solutions
While you can use the default WordPress interface to add custom fields manually, it’s much more convenient to use plugins like JetEngine to handle custom meta fields more efficiently. It not only provides a user-friendly interface for creating, managing, and displaying custom fields without directly interacting with the database but also offers a dozen other powerful features.
If we consider only custom fields, using a plugin instead of custom coding offers powerful features for custom fields in particular, such as field validation, conditional logic, or data relationships, which would be overly time-consuming to code manually. This approach also allows non-developers to manage the meta fields with little technical expertise, making it easier to maintain complex websites without constant developer input, not to mention that it’s much more cost-effective than forking out a lot of cash to a developer.
Custom meta fields can be further extended with third-party APIs and services, so you can integrate additional data sources into your site. For example, you can pull product details from external databases or collect data from remote websites without having to dive into custom code.
2 Ways to Add Custom Fields Using JetEngine
With JetEngine, you can add custom fields in two ways:
- while adding or editing custom or default post types;
- using the Meta Boxes tool.
The difference is that by using Meta Boxes, you can add custom fields to Users and particular sections of WooCommerce products. We will discuss these details below.
On the other hand, it can be more convenient to add custom fields while adding custom post types or taxonomies; plus, you can use the Custom Meta Storage feature.
Let’s compare the functionality based on different features, but again, you can combine both approaches:
| Feature | Meta Boxes tool | Fields added directly to posts/taxonomies |
| Scope & reusability | Can be assigned to multiple post types, taxonomies, users, or WooCommerce products (specific locations) | Tied to a specific post type or taxonomy, making them more isolated. It can be added to WooCommerce products. It can’t be added to users |
| Flexibility | Works across different content types and user roles | Limited to the assigned post type |
| Interface & organization | Groups fields in a separate Meta Box UI, making large sets of fields easier to manage | Fields are stored within the post editing screen without separate UI grouping |
| Maintenance & management | Easier to manage when the same fields are used across different content types | Simpler when dealing with fields that only belong to one post type |
| Conditional logic & visibility | Can be conditionally displayed based on user roles, taxonomy terms, or particular post IDs. You can set up conditional visibility based on other field values | Visibility is tied to the post type where the fields are assigned. You can set up conditional visibility based on other field values |
| Customization & extensibility | More flexible for complex workflows, global settings, or user-specific fields | Works well for post-specific content structures |
| WooCommerce products | You can add custom fields to the specific sections of WooCommerce Product Data and WooCommerce Variations | You can add custom fields to the product in general and then fetch dynamically wherever you need it |
| Additional optimization | Stored in postmeta/usermeta/termmeta database tables | By default, stored in postmeta/usermeta/termmeta database tables but can be stored in a custom table for better performance |
As you can see, Meta Boxes are ideal for cases where fields need to be reused across different content types or just for specific cases.
Adding custom fields directly to the post type is more convenient when you want to maintain the overall logic and consistency while setting up a particular post type.
So, let’s dive into some specific use cases.
JetEngine’s Meta Boxes tool: use cases
Custom fields created using the JetEngine > Meta Boxes tool are global, which means they are not tied to a particular post type.
This is how they work:
You can add fields to any post type, taxonomies, and users, as well as WooCommerce Product Data Tab and Product Variations. In the Visibility section, you can set up user roles that can deal with these fields and particular conditions for the chosen content type.
Custom fields for Users
It’s not that easy to add custom fields to users without plugins, but it’s an absolute must-have if you create a membership website or a directory. You might need specific information about their profession, education, interests, and contact details.
You can add as many fields as you need and make them visible to particular user roles as well.

💡Read this comprehensive guide on building a Job Board website and adding custom fields for participants.
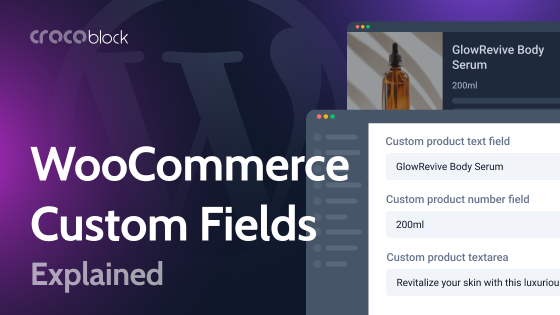
Custom fields for WooCommerce products
You can add custom fields to the WooCommerce product page back end in several ways using Meta Boxes. If you prefer to display the fields below the Product Description fields rather than within the Product Data tabs, navigate to JetEngine > Meta Boxes. In the Meta Box for field, select “Post,” and under Enable For Post Types, choose “Products.” You can also include other post types if needed and set additional visibility conditions, such as including or excluding specific posts by ID, restricting user roles, or filtering based on product taxonomies.
Once configured, simply add the custom fields you need.
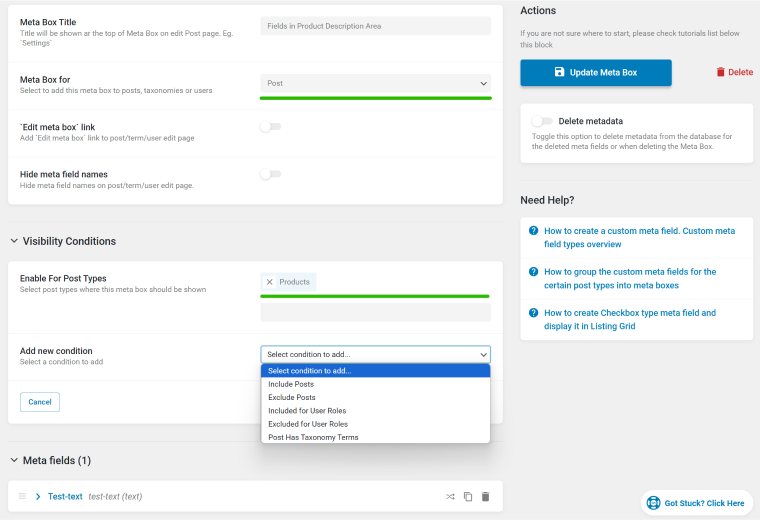
There, choose from over a dozen field types and add them to the product. Later on, you can display them beautifully with the help of JetWooBuilder.
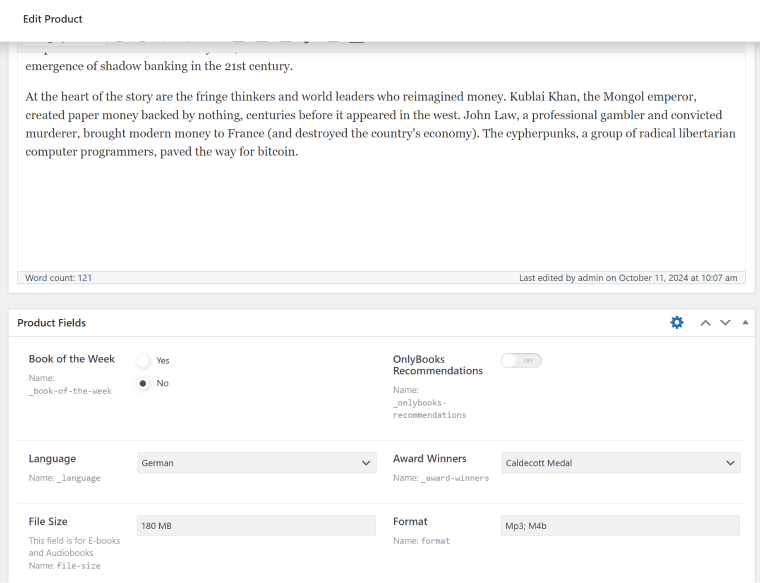
This is how such fields will look like on the back end:
Custom fields for WooCommerce Product Data Area
This method is specific to WooCommerce and provides additional visibility conditions, allowing more flexibility in assigning custom fields. To add meta fields in this location, go to JetEngine > Meta Boxes, set the Meta Box for field to “WooCommerce Product Data,” and choose the tab where the custom fields should appear. You can also control their visibility by including or excluding certain user roles.
Keep in mind that the General tab isn’t available for Grouped products, while the Shipping tab only appears for “Simple” and “Variable” products. If your custom fields shouldn’t be placed in these specific tabs, select “Custom” instead.
This option also lets you refine visibility conditions further. You can specify which product types (Simple, Grouped, External, or Variable) should display the fields and set the tab priority, which defaults to the first position.
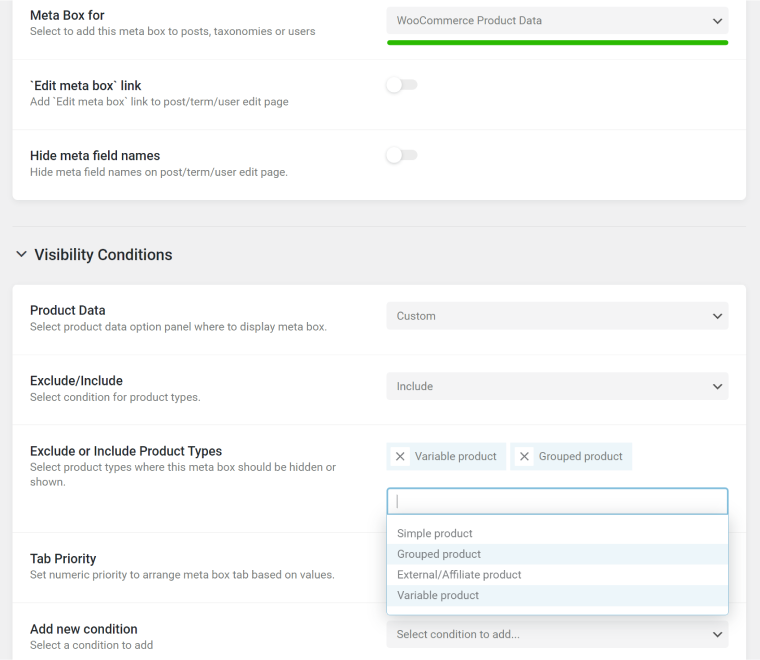
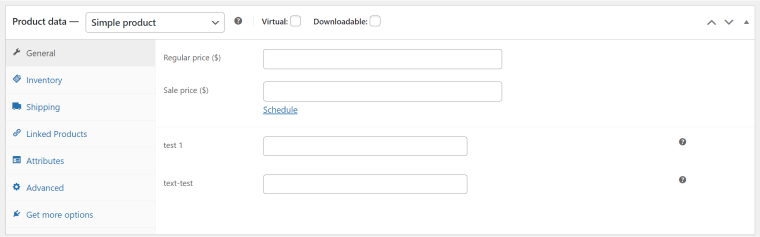
After that, you will see the fields on one of the tabs if you choose one of them or on a dedicated tab if the “Custom” option is selected.
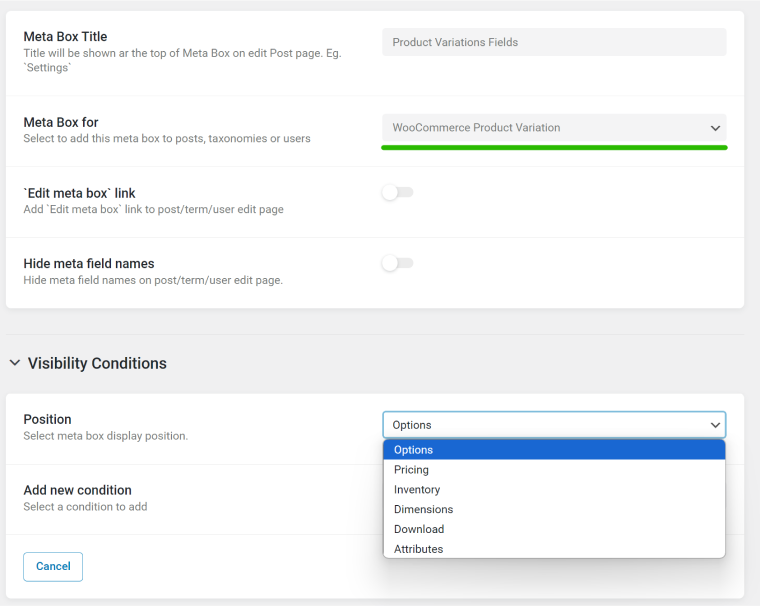
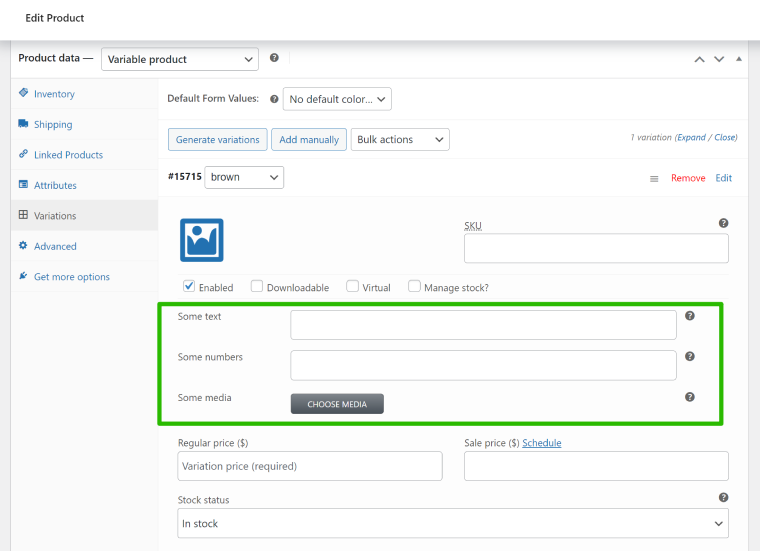
Custom fields for WooCommerce Product Variations
Crocoblock offers quite many cool tools for dealing with WooCommerce product variations, including adding custom fields to such products. To add meta fields there, go to JetEngine > Meta Boxes, and choose the WooCommerce Product Variation option in the Meta Box for field.
In the Position field, you can select where the field group will be placed.
Now, you will be able to see the custom fields in the editor for each variable product.
To display such fields on the front end, you can use JetWooBuilder, add them using Dynamic fields by JetEngine, or insert them using shortcodes that can be generated in JetEngine > Shortcodes.
Adding Meta Boxes to posts and taxonomies
Adding custom field groups (Meta Boxes) is even more straightforward when it comes to posts and taxonomies. Choose “Post” in the settings, then a post type, and add visibility conditions and meta fields you want to apply to these posts or taxonomies.
Custom fields added directly to posts
The interface for adding custom fields is available when you create custom post types or even deal with existing ones: you should switch the Built-in toggle in the top right corner within JetEngine > Post Types, and you will see all existing post types, including default ones.
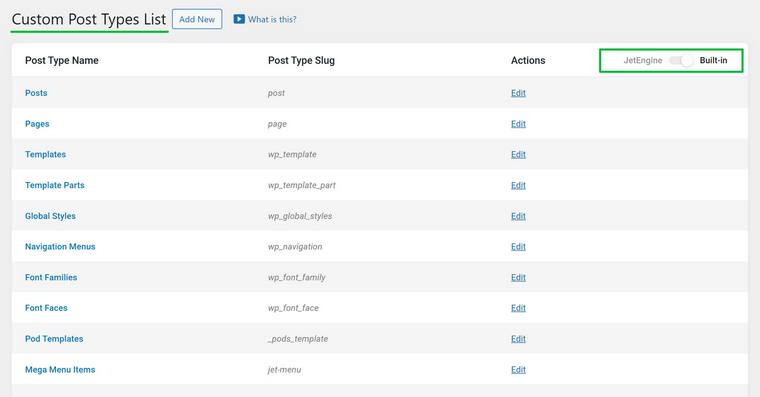
If you click “Edit,” you will see an interface where you can add custom meta fields. Thus, you can add them to any custom or default post type.
But most often, such fields are added when you create a new custom post type. It feels very natural to create it and then immediately add the fields that will work as containers in this post type, doesn’t it?
There are a lot of various settings and features, from Conditional Logic to Admin Columns and Filters, so you can easily manage the posts and their fields on the back end.
Displaying Custom Fields on the Front End With JetEngine
After creating custom fields either way I’ve mentioned above, you need to display them on the front end, so the second part comes in. But this is very intuitive with JetEngine as you can use JetEngine’s dynamic widgets/blocks/element for Elementor, Block Editor, and Bricks. Also, you can work with them using Timber (Twig).
Go to JetEngine > Listings > Add New and create a reusable loop template called Listing, where you can fetch the custom fields using dynamic blocks or other elements with Dynamic Tags that JetEngine has added to them. After that, go to any page or template, choose the Listing Grid widget/block/element, and select the Listing item you’ve just created. Add extra styling, and that’s pretty much it.
💡Read the full guide on dynamic widgets/blocks here.
FAQ
Custom fields store additional metadata for posts, pages, and products, allowing for more dynamic and structured content management. Plugins like JetEngine make it easier to create and manage them without coding.
JetEngine provides two methods for adding custom fields: directly to a post type or using Meta Boxes. This flexibility allows for better control over where and how custom fields are displayed and managed.
Regardless of the approach used, all custom field values are stored in the wp_postmeta table, ensuring compatibility with WordPress’s native meta storage system.
Yes, JetEngine allows you to add custom fields to WooCommerce products, either as fields to be placed anywhere, inside the Product Data tabs, or for product variations.
Bottom Line
Using custom fields offers great flexibility and benefits, especially if you build complex websites. There are plugins for custom fields that have existed on the market for many years, including JetEngine, which took the WordPress community by storm with its extensive features and adaptability.
In this article, I covered just one example of its many capabilities, as the plugin offers limitless customization possibilities. Understanding its tools, along with their advantages and differences, makes website development with Crocoblock an even more efficient and enjoyable process.