A membership system can enhance a bookstore’s offerings by providing exclusive content, discounts, or priority access to new books. With JetFormBuilder and the PayPal Recurring Payments add-on, you can create an automated membership registration process that handles recurring payments.
Table of Contents
- Configure JetFormBuilder Payments Gateways
- Create the Membership Registration Form
- CCT vs. Meta Boxes
- Configure PayPal Recurring Payments
- Test the Membership Registration Process
- FAQ
- Conclusion
In this guide, I’ll walk you through setting up a simple membership registration system where users (members) can:
- subscribe via a JetFormBuilder form, paying the subscription fee at PayPal;
- have their roles assigned automatically;
- be tracked within a Custom Content Type (CCT) using JetEngine (optional).
Before moving on, make sure you have the following items installed on your WordPress website:
- JetFormBuilder plugin — for membership registration form creation;
- JetFormBuilder PayPal Recurring Payments add-on — for handling recurring PayPal subscriptions;
- JetEngine plugin — for creating CCT that lists member records;
- Members plugin — for creating and managing member roles.
If you have four checks, we can move on.
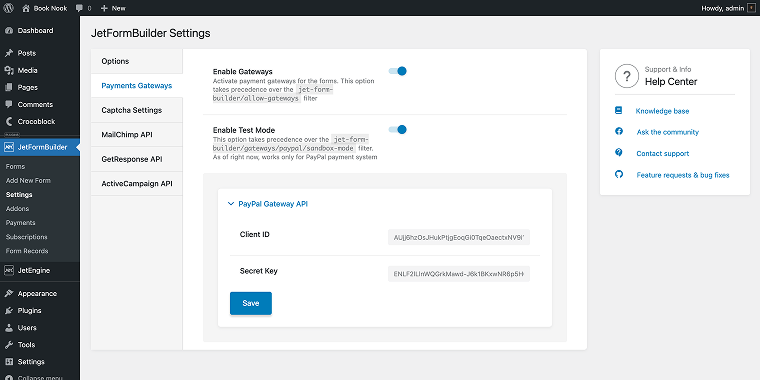
Configure JetFormBuilder Payments Gateways
Go to JetFormBuilder > Settings > Payments Gateways. In this section, turn on the Enable Gateways switch (or both switches, including Enable Test Mode, if you want to test the system before going live). In the PayPal Gateway API tab, you need to enter your PayPal account credentials, which are located in the Apps and Credentials section of your PayPal Business account, in the PayPal Gateway API tab.
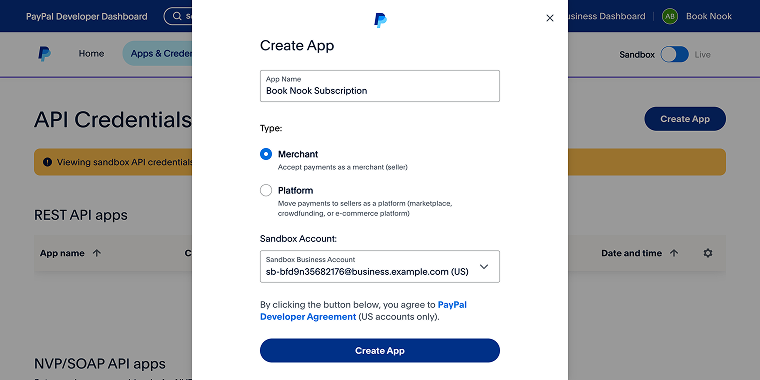
If you don’t have them, log into your PayPal account, go to the Apps and Credentials section, and click on the “Create App” button. Add the app’s name, choose an appropriate type, either “Merchant” or “Platform,” and click on the “Create App” button.
Right after that, you’ll be redirected to the page with your app credentials.
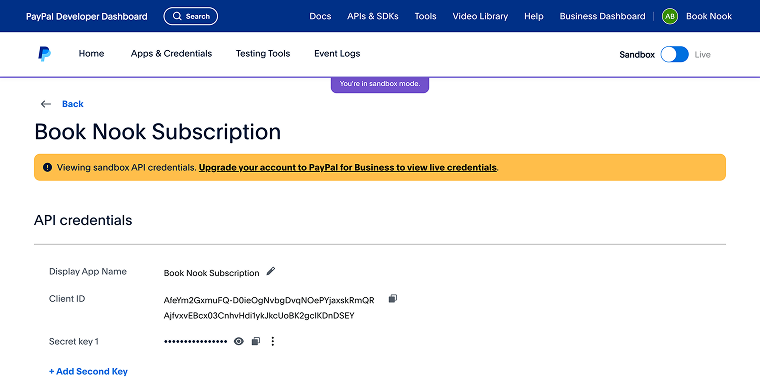
Once you add the Client ID and Secret key 1 in the JetFormBuilder Settings, click the “Save” button. Now, we can move on to creating a membership registration form.
Create the Membership Registration Form
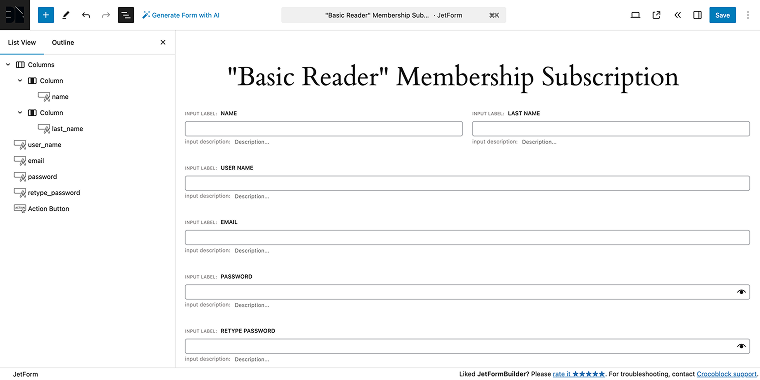
The registration form will include a basic set of fields (added as Text Fields), including:
- Name, Last Name, and Username;
- Email;
- Password, Retype password;
- Action Button.
In your specific case, you can add other fields like Media Field (where users can add their photos). Go to WordPress Dashboard > JetFormBuilder > Forms, click “Add New,” and add the fields mentioned above.
The Email and Password fields need minor fine-tuning. To do so, go to the block’s settings and scroll down to the Field tab.
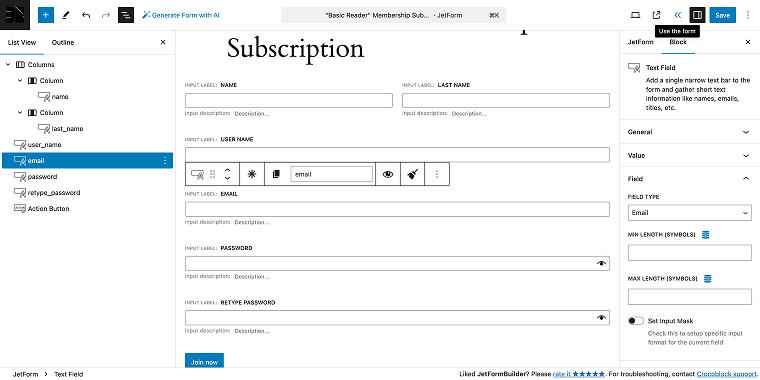
In the FIELD TYPE, you need to select a corresponding value for the Email field, which is “Email,” and for the Password field, which is “Password.”
Feel free to save the form (click on the “Save” button in the upper right corner) before proceeding to post-submit actions. However, before that, we need to complete several intermediate steps: create a CCT to host our store members and create new user roles for the members.
NOTE
These intermediate steps are necessary because one of the post-submit actions involves mapping CCT meta fields and selecting a new user role.
CCT vs. Meta Boxes
For this particular use case, there are two potential methods we can use to track the members. If you’re creating a membership site with standard WordPress integrations and don’t require complex user management, the native WordPress users with Meta Boxes approach will work well for you.
However, if your membership site requires high-performance data handling and unique user customization, and you’re comfortable with more advanced configuration, the CCT method offers great database efficiency and flexibility in user management capabilities.
The CCT approach allows you to create completely custom user structures, distinct from WordPress’s default user table, which can be vital for websites with complex user roles, extensive custom fields, or high-traffic environments. The compromise is that CCT might require more technical expertise to implement authentication, access controls, and plugin integrations than the standard WordPress method.
Your decision ultimately depends on your technical skills, the specific requirements of your project, and the level of customization needed for user management. When uncertain, begin with the native WordPress method, and only transition to CCT if you face performance issues or require advanced customization that Meta Boxes cannot offer.
I’ll select the CCT method because I want a transparent subscription management system in which I can track the growth of the subscription base.
Create a CCT
Since I don’t need to have single pages or an archive for the members, I decided to create a CCT instead of a Custom Post Type (CPT) to store members’ information.
To create a CCT, go to WordPress Dashboard > JetEngine > Custom Content Types > Add New. I’ll name it Book Nook Members and then scroll to the meta fields section.
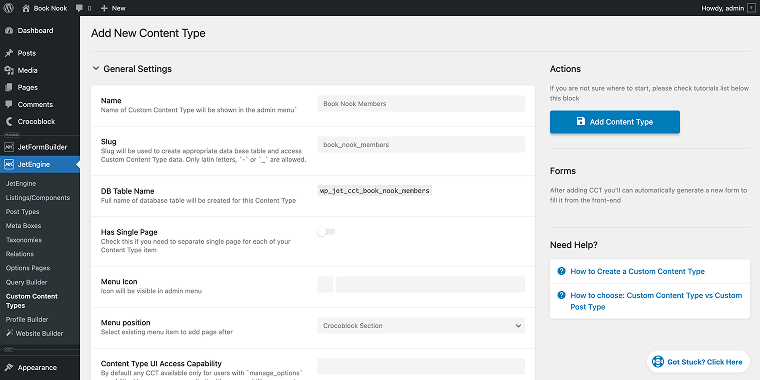
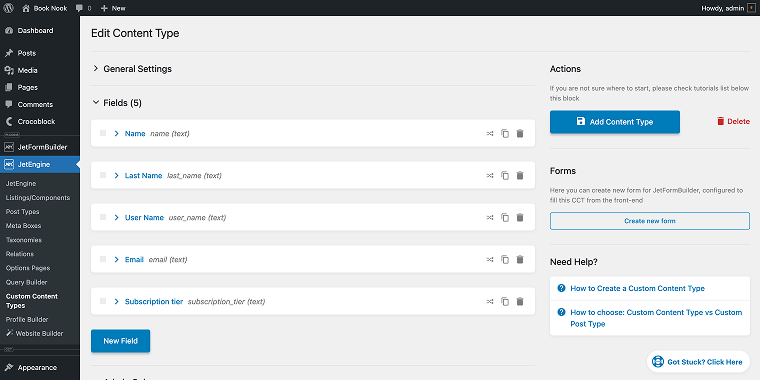
In my use case, I’ll need the following set of meta fields:
- Name (name);
- Last name (last_name);
- User name (user_name);
- Email (email);
Subscription tier (subscription_tier).
Then, we can move on to the Admin Columns section, where we can enable columns that will display members’ information in the dashboard. Here, we need to enable Show in the admin columns switcher in the field we want to display.
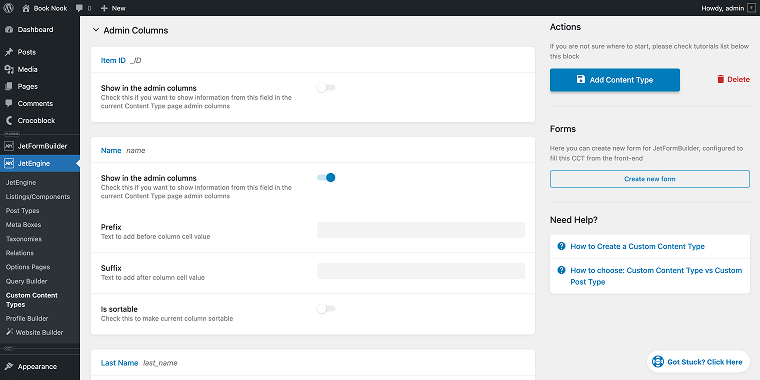
When done, click on the “Add Content Type” button.
Here’s how a CCT will look in the dashboard.

Install the Members plugin
Now, we need to install the Members plugin. Go to WordPress Dashboard > Plugins > Add New Plugin, and type “members” in the search bar to install the Members – Membership & User Role Editor Plugin.
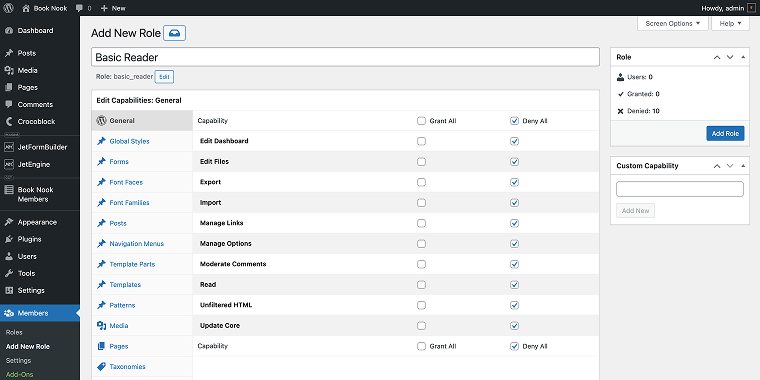
After activating the plugin, a new section, Members, will appear in the dashboard; click on it, and then click the “Add New Role” button.
What’s great about this plugin is that it allows you to grant or deny all possible capabilities and permissions for all existing or newly created roles on your website.
For example, if you plan to allow members to publish posts on your website, you can allow subscribers to create and publish posts, add media, and so on.
In the same way, you can create other roles for your members. Now, let’s get back to the registration form; we’ll add and configure post-submit actions.
Configure Post-Submit Actions
Once the form fields are set, let’s configure the following post-submit actions. To add a post submit action, go to the JetForm tab in the form settings, scroll down to the Post Submit Actions section, and click on the “+ New Action” button to open the Add new action pop-up, then add the following items:
Save Form Record
This form action ensures all submitted data is stored in JetFormBuilder’s form records section, which is available via the following path: WordPress Dashboard > JetFormBuilder > Form Records.
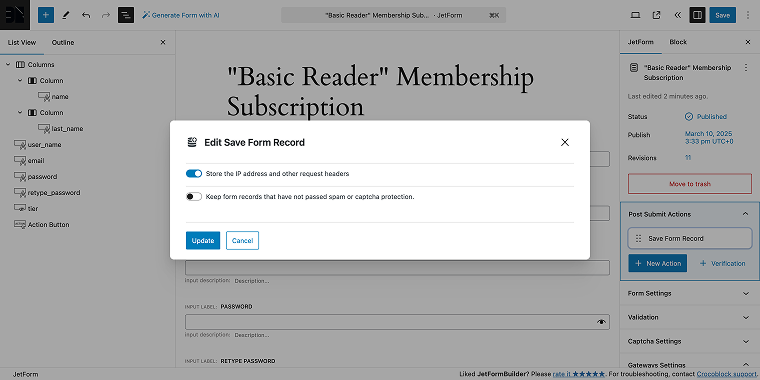
After adding the form action, click “Update” and move on to the next post-submit action.
Register User
This form action creates a new user in the WordPress dashboard section Users when a member registers.
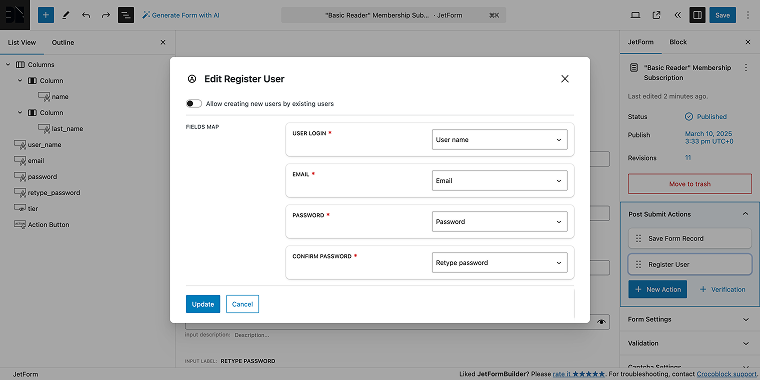
Here, we need to map the fields so that the information users enter into the form is stored in the corresponding user profile fields. For example, USER LOGIN is the User name form field, EMAIL is the Email form field, and so on.
We previously installed the Members plugin and created a new user role. In this form action, there’s a field called User Role, where we need to choose the role that corresponds to this form. In this case, it’s a “Basic Reader.”
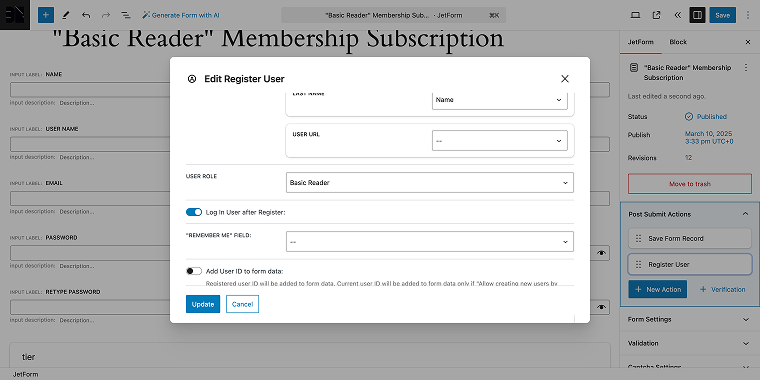
After adding the form action, click “Update” and move on to the next post-submit action.
Insert/Update Custom Content Type Item
This form action creates a new entry in CCT Book Nook Members.
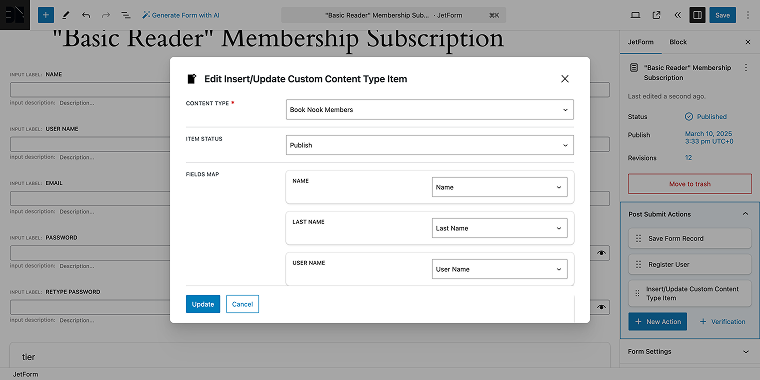
After adding the form action, let’s configure the fields.
- CONTENT TYPE — in this field, we need to select the CCT where a new entry will be created;
- ITEM STATUS — set to “Publish”;
- FIELD MAP — here, we need to map form fields onto the corresponding meta fields of the CCT; in the dropdowns, you can easily find a corresponding field.
After mapping the form fields, click “Update” and “Save” to save the progress.
Configure PayPal Recurring Payments
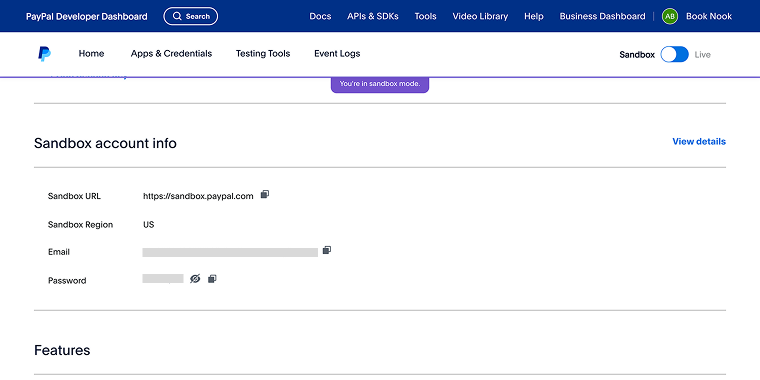
Since you’ve already installed the PayPal Recurring Payments add-on, we can configure it on our registration form. However, we need to create a subscription plan in our PayPal account. If you’re in Sandbox mode, grab the login credentials from the Sandbox account info section and log in from incognito mode.
After logging into your account, go to the Sales > Subscriptions section to create a membership plan for your website.

Once you’re redirected to the Manage Subscriptions section, go to the Subscription Plans tab and click on the “Create plan” button.
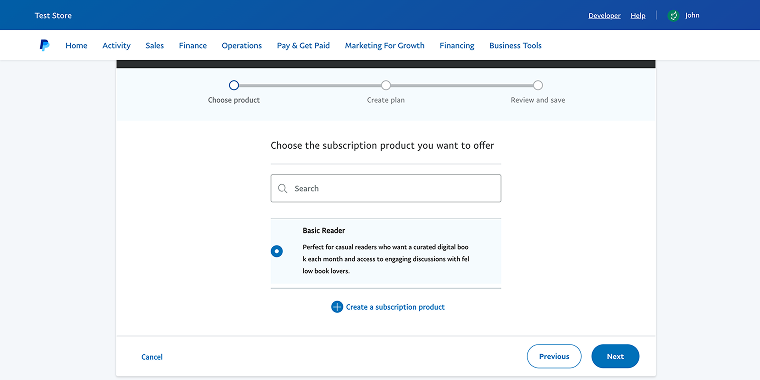
At the next step, click on the “Create a subscription product” button. Then, you need to provide detailed information about your subscription product, including its name, short description, product ID, link, and so on.
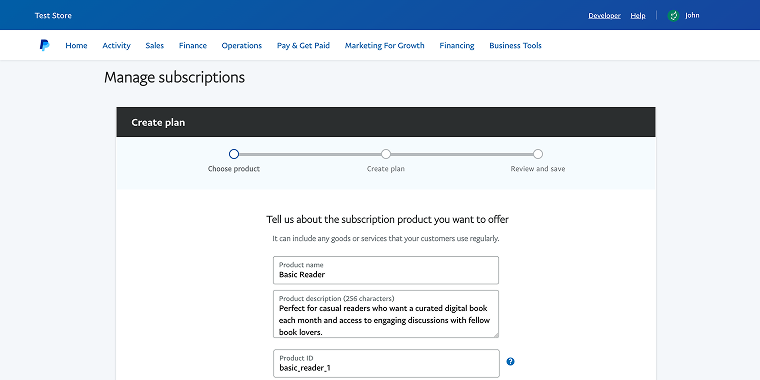
Save the information and proceed to the next step. When your subscription product is created, select it and click “Next.”
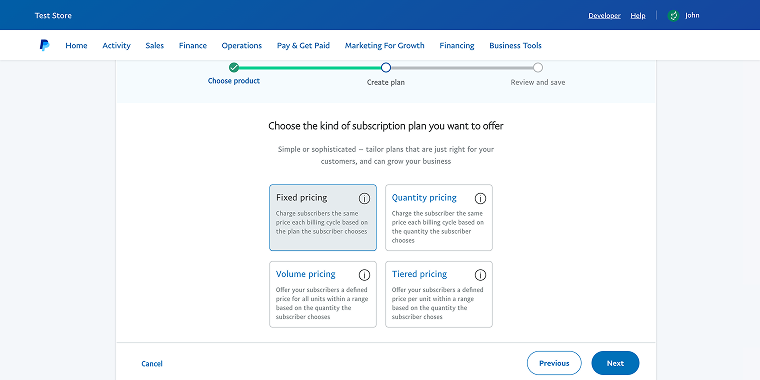
For our simple monthly subscription, I’ll choose the Fixed pricing plan.
On the next step, you’ll be prompted to enter the name and short description of the pricing plan. After you do this, click “Next.”
In the pre-final step, you’re asked to define pricing for this subscription plan. Feel free to fill in the information on currency, pricing, subscription period, and taxes. After you’ve done so, click “Next.”
The last step is to review. Here, you can confirm whether all the information you’ve entered is correct.
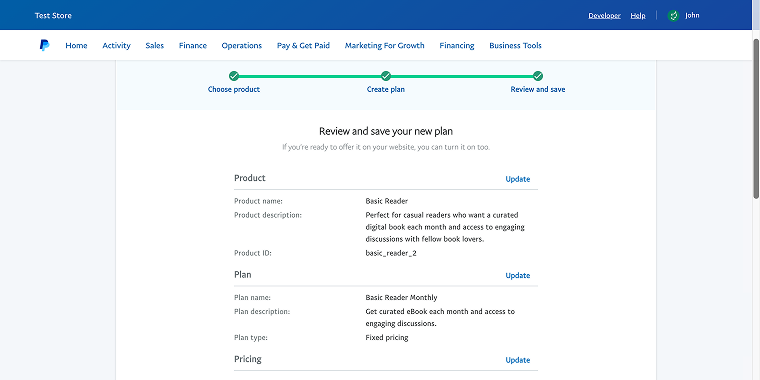
If you’re satisfied with the pricing details, click the “Turn Plan On” button to enable the pricing plan.
After that, you can return to your website to finalize the form settings.
In the JetForm settings panel, scroll down to the Gateways Settings tab. Select Paypal Checkout and click on the “Edit” button to trigger the Edit PayPal Checkout Settings pop-up.
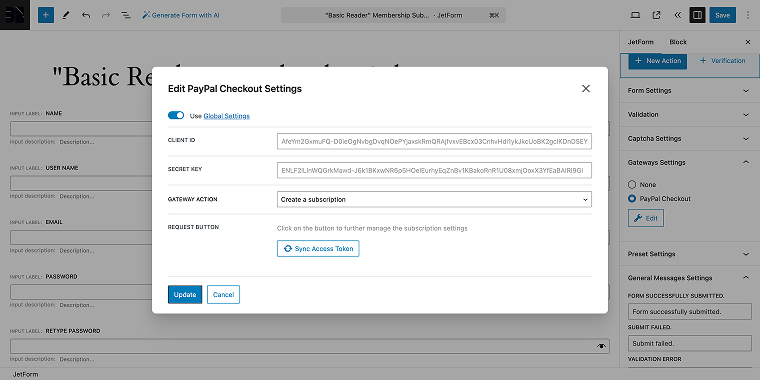
Since we’ve already added Client ID and Secret key 1 in JetFormBuilder > Settings > Payments Gateways, we can enable the switch Use Global Settings.
In the GATEWAY ACTION field, we need to select the “Create a subscription” value and then click the “Sync Access Token” button to synchronize the data. Once the synchronization is complete, the corresponding text will appear on this button.
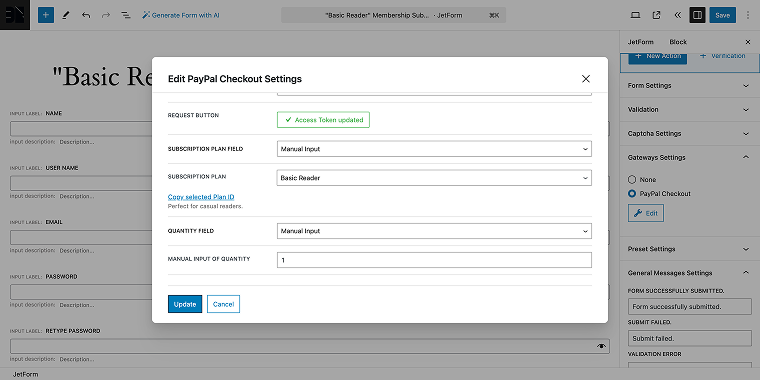
In the SUBSCRIPTION PLAN FIELD, we should select “Manual input” because I want to assign this form to one subscription plan.
The logic is simple:
- if the form is linked to a single subscription plan, choose “Manual input”;
- if the form has a field where users select a membership plan, choose the option that matches the field listing all membership plans.
Since we have chosen the “Manual input” option, we need to select the required plan from the SUBSCRIPTION PLAN drop-down list (here, we selected the “Basic Reader” subscription plan we built earlier).
In the QUANTITY field, also select “Manual input” and MANUAL INPUT OF QUANTITY set to “1.”
Down below in the pop-up, you can alter PAYMENT SUCCESS/FAILED MESSAGE values.
When done, click the “Update” button to save changes, and then click the “Save” button to save the form.
Don’t forget to create a registration page where you will place your membership registration form.
Test the Membership Registration Process
Now, let’s try out the setup. On the membership landing page, I have a pricing table, with each button leading to a separate registration page or form.
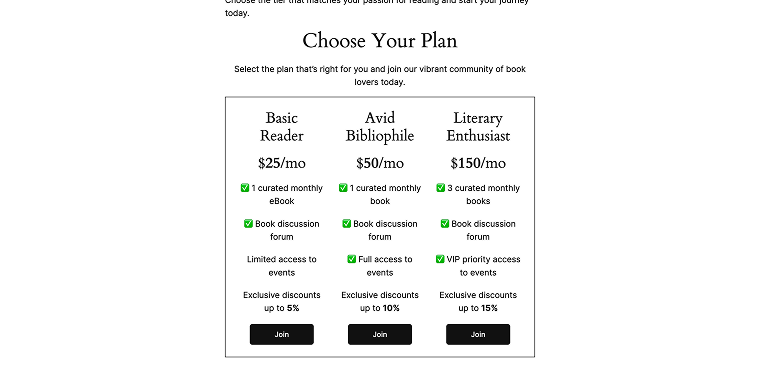
Let’s choose the Basic Reader plan and click the “Join” button. We’ll be redirected to the registration page.
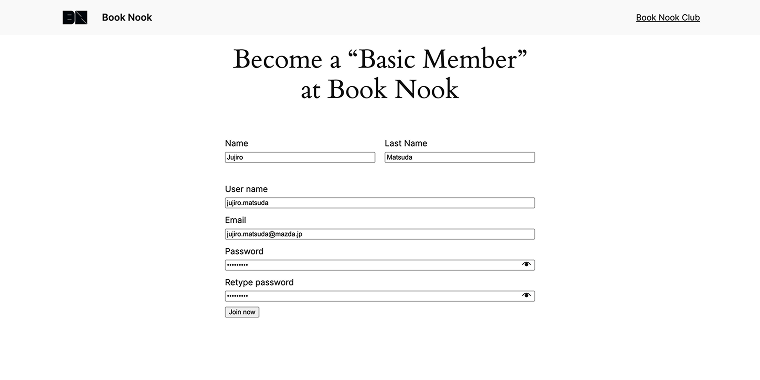
On this page, we can fill in the form and click the “Join now” button; right after that, we’ll be redirected to the PayPal login page, where we can pay for the membership.
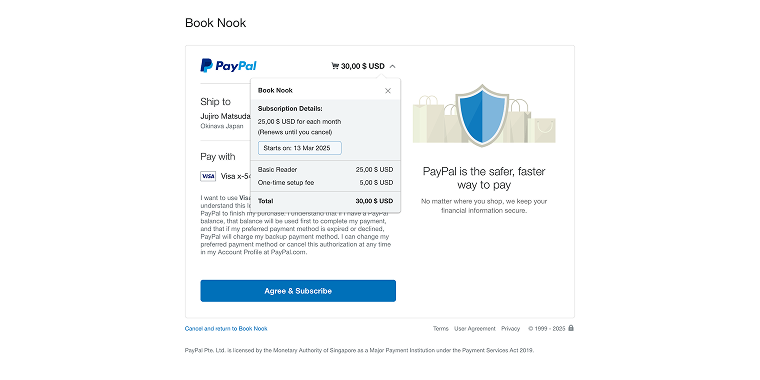
Click on the “Agree & Subscribe” button to confirm the payment. After the payment is made, you will be redirected back to the website form.
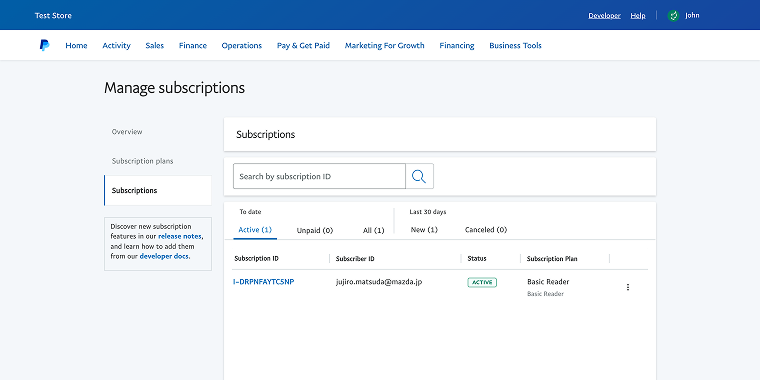
If we log back into the PayPal Business account, Pay & Get Paid > Subscriptions > Subscriptions, we’ll find our new Basic Reader subscriber with an active subscription.
Now, let’s get back to the website admin to see CCT with a new user.
The setup is working as expected; feel free to modify it to your liking. If you prefer a front-end user dashboard instead of a WP-based one, consider using the JetEngine Profile Builder.
FAQ
Yes, you can use JetFormBuilder’s Register User post-submit action along with the Members plugin to assign roles based on membership tiers.
Yes, you can set up multiple pricing plans in the PayPal Recurring Payments settings and map them to the membership selection field in JetFormBuilder.
Use JetEngine’s Dynamic Visibility feature or a membership plugin like Members to restrict access to exclusive content based on user roles. If you want to restrict entire pages or sections, consider using JetThemeCore conditional visibility settings for specific user roles.
Conclusion
In this case study, we’ve used JetFormBuilder with the PayPal Recurring Payments add-on and JetEngine to build a simple bookstore membership registration system. This setup ensures users are correctly registered, assigned a membership role, and tracked via a custom content type.
Furthermore, you can use JetEngine’s dynamic visibility to create exclusive content for specific user roles, provide them with premium benefits, and maintain a smooth payment and registration flow.


