As you may know, Crocoblock has JetWooBuilder, a dedicated plugin for creating WooCommerce pages in Elementor. What cool features does it offer, when to use it, and how to combine it with other Crocoblock plugins – these are the main topics I will cover in this article.
Table of Contents
- Why Use JetWooBuilder for Elementor?
- Starter Settings
- JetWooBuilder Use Cases You May Have Missed
- FAQ
- Bottom Line
Why Use JetWooBuilder for Elementor?
For starters, let’s admit that default WooCommerce templates are very basic, and you can’t edit them out-of-the-box, like other pages, because the WooCommerce-specific pages use shortcodes and loop the dynamic content of the shop. To modify them, you can rearrange blocks using hooks and some custom CSS. But even then, you will operate only with default blocks. What if you want to add more, e.g., custom product galleries, swatches, badges, etc.? This is where extra plugins for editing WooCommerce templates come in handy.
Elementor Pro vs. JetWooBuilder functionality for WooCommerce
There’s an obvious question: why use JetWooBuilder when there’s a set of WooCommerce widgets and functionality for creating templates in Elementor Pro? The first reason is that you may have a free Elementor. Other than that, JetWooBuilder is a plugin created specifically for WooCommerce, aimed to cover all the potential needs of website developers and offer maximum flexibility. That’s why if Elementor Pro is enough for you – great, but if you want more widgets, settings, and controls over your shop templates – JetWooBuilder is your best choice.
Here are just a few of the categories to compare:
- While Elementor Pro has 24 WooCommerce widgets, JetWooBuilder offers 67.
- For the Product Grid widget only, JetWooBuilder has ten presets and a lot of settings (to trim product descriptions and even titles, add tooltips, wrap blocks, show/hide stock status, etc.), while Elementor only has styling options.
- You have full control over the way products are displayed in the archive if you design it with JetWooBuilder. In contrast, Elementor Pro WooCommerce archive widgets rely more on the Single product design and other, more general settings.
- JetWooBuilder offers a unique Product Loop widget for the Shop page, where clients can switch between list and grid views using the premade archive templates, so you have full control over everything.
- JetWooBuilder offers more premade templates for each WooCommerce page type than Elementor Pro.
For more details about JetWooBuilder and its interface, check out this video:
Understanding the difference between Elementor Pro and JetWooBuilder logic
If you worked with Elementor Pro templates before, it’s important to understand the key differences in approaches in JetWooBuilder page builder and Elementor templates.
While Single product templates almost don’t have it, you can feel it when it comes to Shop and Categories, where products are looping.
So, Elementor works with the archive grid as a whole, and there’s a certain list of styling settings that you can change. You create an archive template, add a Product Grid widget there, and operate with the existing widget settings and all the options available in this widget, plus in the front-end Customizer (but it depends on your theme). Then, using conditions, assign it to the particular category, main shop page, etc.
This approach is cool and working, but you don’t have full control over the individual product tile (item), the way it looks, and its functionality.
Now, let’s look at the JetWooBuilder logic regarding product archives. If you go to Crocoblock > Woo Page Builder > Add New, you will see a list of available templates:
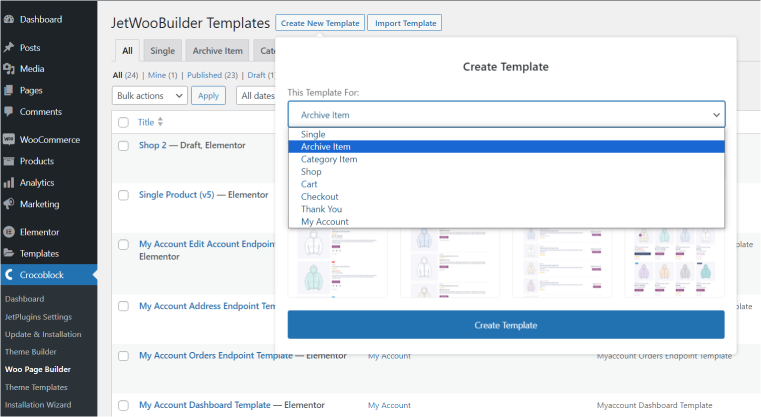
- Single – for a single product page;
- Archive item – for designing an individual product item for a grid or list that will be looped;
- Category item – the same, but for the category items;
- Shop – for a grid/list that will display products;
- Cart, Checkout, Thank you page, and My account page are for the corresponding pages if you want to override the default WooCommerce design for them.
First, you design an individual item that will be looped in the Shop later. And then, just fetch it in the Shop template. The advantage of this approach is that you have complete control over the individual items, and you can add extra widgets from other plugins; for example, in my case, there are JetCompare&Wishlist widgets and the Unfold widget from JetTricks.
After designing the item, create a Shop template, add the Product Loop widget, and simply select the archive template you’ve just designed.
Important Settings to Start With
There are three things you should do before actually creating your templates using JetWooBuilder widgets.
- Go to Dashboard > Crocoblock > JetPlugins Settings > JetWooBuilder > Widgets, activate the widgets you will use, and deactivate those you will never use. This is made to improve the website’s performance.
For even better results, go to Dashboard > Crocoblock > JetPlugins Settings > JetWooBuilder > General Settings and set up template styles and thumbnail effects.

- Go to Dashboard > WooCommerce > Settings > JetWooBuilder tab and go through these settings. As you can see, the custom default templates created with JetWooBuilder can be specified there. So, specify other settings, and later on, after creating your templates, go back there and assign them to the particular template types (Single, Archive, Shop, etc.).
- Set up Cart, Checkout, and Account pages and their endpoints correctly in Dashboard > WooCommerce > Settings > Advanced. It’s a WooCommerce-specific setup, but users often forget or don’t know about these options, which leads to confusion. Also, make sure they are set up in the Elementor Site Settings > WooCommerce, as some themes require it.
JetWooBuilder Use Cases You May Have Missed
In this section, I will show you JetWooBuilder features that you may have missed, as well as some extra tricks that may be useful for your projects.
Using free JetWooBuilder add-ons
Many users don’t even know about the existence of this page: free add-ons for JetPlugins, while it has a ton of useful tools, particularly for JetWooBuilder. How to set up the most popular of them is featured in this article, but they are easy to use even without any documentation.
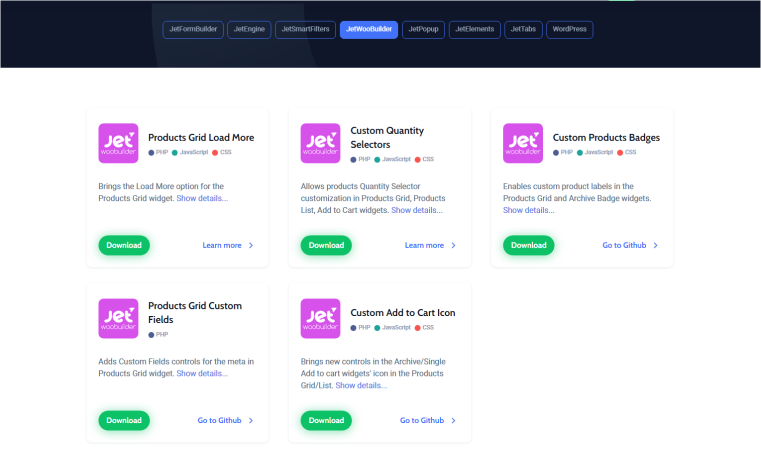
Using these free add-ons, you can create custom product badges, have complete control over quantity selectors and the “Add to Cart” icon, add custom fields before and after Product Title and Product Description fields, and set custom Load More to choose from the infinite scroll, “Load More” button and even a custom trigger.
To use one of these add-ons, download it from the Crocoblock website and install it as a plugin.
JetWooBuilder templates in JetThemeCore
Crocoblock has a plugin for designing all the possible templates (for all post types, including Products) – it’s called JetThemeCore, and it has amazing conditional functionality, as well as a clean and user-friendly interface.
There are two main use cases for combining the power of JetThemeCore and JetWooBuilder.
Setting custom headers and footers for JetWooBuilder templates
JetWooBuilder functionality can be divided into two parts:
- A set of widgets (which can be used by other builders, such as Elementor or JetThemeCore).
- A Woo builder for the WooCommerce body area.
It’s very important to understand when combining JetWooBuilder and JetThemeCore blocks. So, because JetWooBuilder is responsible for the WooCommerce body area only (not headers and footers), you can create any kind of WooCommerce page using it. Still, you can’t create or conditionally set custom headers or footers for these particular pages.
And this is where JetThemeCore comes into play.
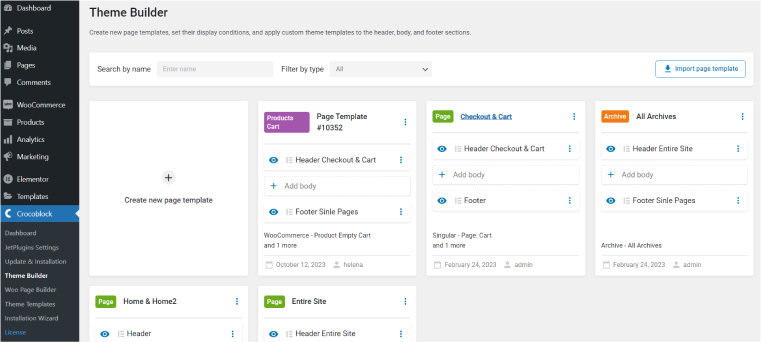
If you want to display a custom header or footer on your WooCommerce pages, go to Crocoblock > Theme Builder > Create New Page Template, and assign the conditions (WooCommerce and other pages you want to have custom headers/footers). The builder will give you a choice either to create new header/footer templates or to select from the existing ones. The “body” part should remain empty if it’s been made with JetWooBuilder.
So, if you do it this way, the header/footer will be created in JetThemeCore, while the corresponding body part will be fetched from the JetWooBuilder templates.
For example, in this video, I set custom headers and footers for Thank You and Product Empty Cart pages. I’ve already created this header and footer in JetThemeCore and now only link them to my template. While the body area was made using JetWooBuilder (and set as templates in Dashboard > WooCommerce > Settings > JetWooBuilder).
Using JetWooBuilder widgets for JetThemeCore templates
You can use JetThemeCore as a template builder for WooCommerce pages, too, and JetWooBuilder will provide all the widgets but not act like a template builder. In this case, don’t leave a “body” part empty in the Crocoblock > Theme Builder (which is JetThemeCore), but create it entirely here.
In other words, you can use both methods for making WooCommerce templates: either creating them with JetWooBuilder (it’s handy if you use premade templates) or entirely in JetThemeCore, not to be confused with two builders. But in this case, you will still need the JetWooBuilder plugin activated to have its powerful set of widgets for WooCommerce available.
Where to find the templates?
To avoid confusion, this is a small cheatsheet for you:
💡 JetThemeCore templates can be found in Crocoblock > Theme Builder (as a combination of header+body+footer with the conditions for such combinations):
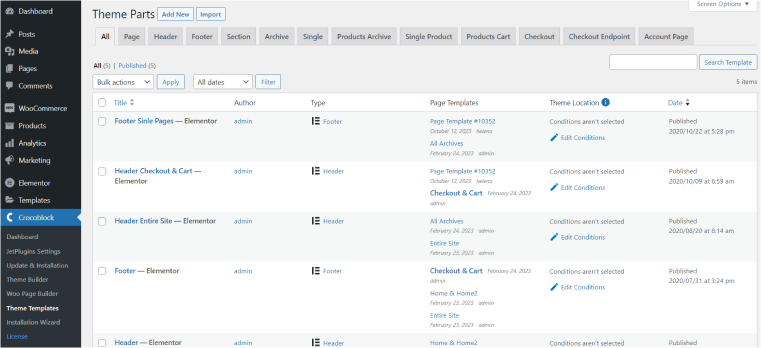
Also, JetThemeCore templates can be found as a list of individual templates in Crocoblock > Theme Templates. This page has many tabs for all types of pages and template parts that JetThemeCore supports:
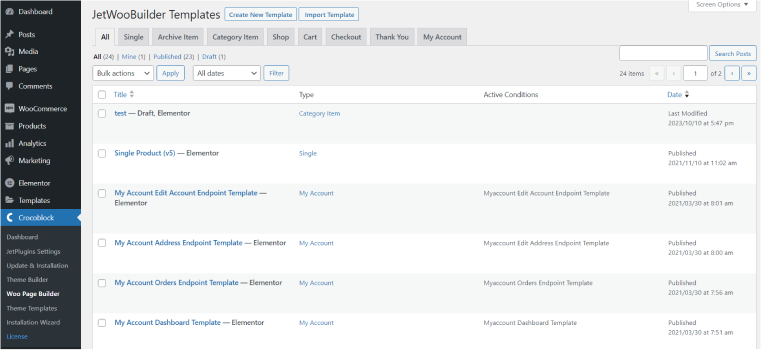
🛒 JetWooBuilder templates can be found in Crocoblock > Woo Page Builder:
Creating a quick preview/purchase pop-up
It’s great to have a quick preview of the products in the grid or even order it right there, right? Crocoblock has you covered here with the dedicated functionality in the JetPopup plugin, so you don’t even have to use any workarounds. Edit the Archive item and use the same logic as I’ve described above with the Unfold widget.
Look how fast it is to implement:
- First, create a Single Product template to be displayed in a pop-up. As a rule, it should be narrower and have more details than the proper Single Product page to fit in the pop-up and not be overwhelming.
- Then, go to JetPopup (make sure it’s installed and activated) and create a new pop-up. You don’t have to add any design there, but go to Settings (the gear icon in the bottom left corner) and switch on “Loading content with Ajax” and “Force loading.” You can also choose an entrance animation, pop-up width, etc.
- Then go back to your Archive template and add any button widget for a Quick View. In the Advanced tab, go to JetPopup, select the pop-up you’ve just created, activate the JetWooBuilder Quick Preview toggle, and select the product template you just created for display in a pop-up. That’s it.
- Make sure this template is selected in your Shop template in the Product Loop widget.
And it takes just a couple of minutes:
- You can also use a quick preview functionality with a Product Grid widget; check out this article for instructions.
- This tutorial will help you to build a quick purchase pop-up.
Creating dedicated templates for different taxonomies
If you want some of your categories/tags pages to look different than the default shop, it’s easy to do with JetWooBuilder. This link will lead you through the process.
Creating custom product queries with JetEngine
It’s not directly about JetWooBuilder, but this feature can literally change the way your shop looks and convert users, bringing it to a whole new level. Using the JetEngine plugin by Crocoblock, you can create very custom product queries (specific collections of products for a particular page, need, user, relationship to the current project, and so on). Check out this tutorial about how to make them.
Here are some examples of when custom queries are exactly what you need:
- You want to show a list of products created or modified over a certain period of time.
- Display products only with specific features, e.g., downloadable.
- Show products bigger or smaller than a certain size or weight.
- Show only products with specific meta field values, giving you almost unlimited flexibility and control over the product you can show your customers.
To know more about such cases, check out this guide about how the Only Books demo website, which uses custom queries a lot, has been created. You can also dive deeper into its backend, see the logic, and use it for your own complex eCommerce projects by purchasing the All-Inclusive plan, which comes with 14 dynamic templates, including Only Books.
FAQ
Some widgets will not be available, particularly for the My Account template. Use JetWooBuilder instead.
Yes, you can, but it might not be very good from the performance point of view, especially if there are many products in your shop, as Elementor loads extra styles.
No, because they are not a part of a template. Use CSS instead.
Bottom Line
This article discussed the unique features, widgets, and options available in the JetWooBuilder plugin for creating WooCommerce templates in Elementor. Its functionality can be divided into two main parts:
- JetWooBuilder is a set of 67 widgets for WooCommerce with many settings, giving you full freedom to customize your eCommerce website the way you want. Most of these widgets are supported by Elementor Pro template builder or Crocoblock JetThemeCore if you prefer to use them. However, for setting up templates that use account endpoints, you should use a native JetWooBuilder built-in page builder.
- JetWooBuilder also has a built-in page builder; it uses the Elementor interface, and to use it, you don’t need Elementor Pro. All the templates will be created and can be found in Crocoblock > Woo Page Builder.
For complex eCommerce projects, it would be a great idea to use the power of JetEngine in addition to JetWooBuilder for creating custom product queries. Other than that, plugins like JetCompareWishlist or JetMenu for mega menus are a must-have for most shops. The best and cheapest way to use them all together and enjoy premade dynamic templates (basically, ready websites made for you, where you need to replace content) is to get a Crocoblock All-Inclusive suite.
