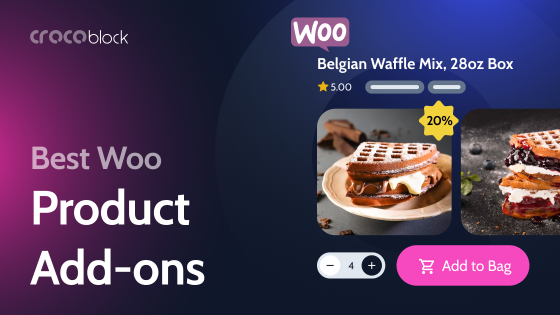
Every WordPress developer understands the power of the WooCommerce plugin – its flexibility and the significant boost it can offer to a business. However, it doesn’t come with extensive template customization options. This isn’t a flaw but a practical choice because including every possible shop page customization feature would make the plugin bulkier and harder to maintain, especially given that it’s a free tool. That’s why there are a lot of various third-party add-ons that exist on the market: to customize product pages, pricing, cart, checkout, and more.
This article is about customizing WooCommerce shop pages with Crocoblock, but I will also discuss the options for modifications using custom code.
Table of Contents
- WooCommerce Shop Pages Customization Using Elementor and JetWooBuilder
- What If You Don’t Use Elementor?
- WooCommerce Product Dynamic Table
- Custom Fields and Tabs for WooCommerce
- Dynamic Visibility
- FAQ
- Conclusion
WooCommerce Shop Page Customization Using Elementor and JetWooBuilder
Suppose you build your website with Elementor (free or Pro), and the default template for the shop and other WooCommerce pages that your theme provides is not what you are looking for. In that case, the JetWooBuilder plugin is a solution for creating WooCommerce custom shop page templates.
Using this tool, you can create new templates and assign them instead of the default ones. To do that, go to Crocoblock > Woo Page Builder and create a template for the page you want.
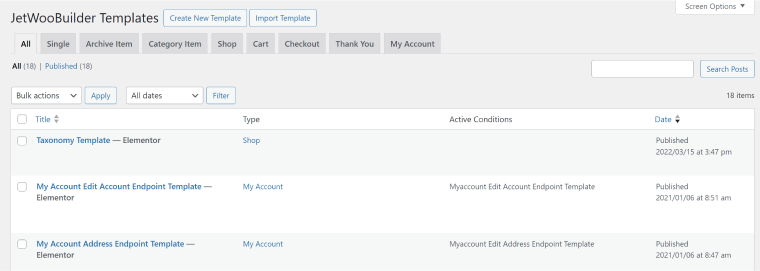
If you are not ready for this, just use templates that are predesigned for you and then change them to your liking. As you can see, there are plenty of templates to choose from and over 60 widgets for Elementor.
After creating templates, go to WooCommerce > Settings > JetWooBuilder and change the default templates to those you’ve just created.
What If You Don’t Use Elementor?
If your eCommerce store is quite big, you probably want it to be fast and don’t want Elementor involved. I have a few options for you.
- Let’s code.
If you love the power of custom code just like I do, this is a chapter for you.
You can check how your WooCommerce templates look by examining the theme files or the plugin templates. The plugin template files look pretty much the same, but if you copy them to the theme directory, they will stay untouched even after the WooCommerce plugin updates.
So, if you modify these WooCommerce shop page templates and use WooCommerce hooks in combination with some CSS, you can change the look of your store. With this method, you can change the order of the blocks on the pages or hide some, and, of course, CSS will help you make it look different. Modifying templates will work for editing the HTML of the blocks, but not everything is editable this way.
- Shortcodes.
This is a much more limited method of changing something in your WooCommerce shop layout, but it still can work in some cases. By default, the WooCommerce plugin adds shortcodes to pages that serve for Cart, Checkout, Shop, and others. What you can do is add, combine, or delete certain shortcodes. Read this article to learn more about them.
WooCommerce Product Dynamic Table
If you want to display your products in a table that is generated dynamically, look no further because, as usual, JetEngine, one of the most versatile and powerful plugins on the market, is there for you. One more good thing is that JetEngine works with Gutenberg, Elementor, and Bricks.
Using this plugin, you can not only display all of your products or filter them by categories but also use any parameter to select the goods to be presented in the table, e.g., publishing date, author, SKU, meta fields, literally anything.
Let’s see how it works and why it has such flexibility.
So, Table Builder by JetEngine is a module of this plugin. After the plugin installation, go to the settings and activate it. And this is where the magic of querying the data for the table begins. Tables take data from custom queries. Don’t freak out: you don’t have to code anything; just go to JetEngine > Query Builder, add the custom query, and select what exactly you want to display there according to the list of parameters. You can create as many queries as you wish:
But let’s get to practical examples: imagine you want to create a table of products where only books from the category “Popular” with the meta field “E-books” are presented. First, go to JetEngine > Query Builder > Create New and set up a new query, choosing these attributes in the settings, which is pretty intuitive. But if you get lost, the documentation will guide you.
Now, activate the Dynamic Table Builder module in the JetEngine > JetEngine. The new submenu item called Tables Builder will appear in the JetEngine section of the dashboard. Go there, click “Add New,” set a name, and select a query you’ve just created. After that, set up columns and the data you want to see there.
A useful tip: if you want a product title to be clickable, choose Product ID, activate the “Filter Callback,” and choose “Get post/page link” from the list.
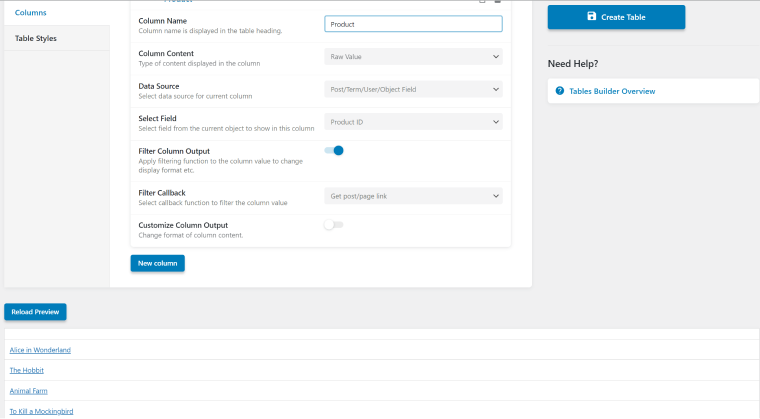
Using the same logic, callbacks, and the “Customize Column Output” toggle, you can add and modify the way your column looks. Always click “Reload Preview” after adding new things to see the result.
To display dynamic tables on the front end, just add the Dynamic Table widget/block to the page using Gutenberg/Elementor/Bricks.
💡 You can find the full information about Dynamic Table Builder in the documentation here.
Custom Fields and Tabs for WooCommerce
One more thing we often need when developing WooCommerce stores: custom fields and tabs. Yes, WooCommerce is powerful by default; you can create product variations, add custom attributes, and so on, but what if we need even more custom meta fields? It’s time to mention JetEngine again.
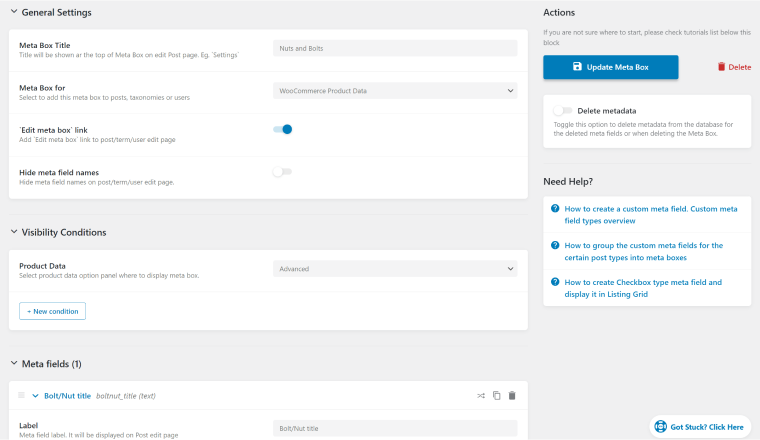
Using this plugin, you can add custom fields not only to custom post types but also to existing default post types, users, or WooCommerce products: just use the Meta Boxes tool. The idea is simple: just add a set of custom fields that will appear in the post types you choose.
Let’s imagine a use case when we sell plumbing equipment and some nuts and bolts come together with the main product, so the goal is to show these additional goods in custom fields. Go to JetEngine > Meta Boxes, create all the required fields (name, type, photo, etc.), and assign the meta box to the post type.
Now, it’s time to display this data. The best and most convenient way to do it is by using the JetWooBuilder plugin. The main advantage of it is that it can completely customize WooCommerce shop page templates and fetch any fields, including custom fields. To do so, just add the Dynamic Field widget and choose the meta field name. You can do the same if you don’t use JetWooBuilder and prefer Elementor Pro.
But if you don’t use Elementor at all, you can fetch these custom fields using either Gutenberg block (Dynamic Field) or generate a shortcode for that field and use it in any builder or even custom code.
Typically, there are a lot of tabs in WooCommerce product templates. It’s a convenient way to display a lot of details about the goods. So, what if you want to add more tabs and display your custom fields there? That is no problem. The Crocoblock suite includes the JetTabs add-on for Elementor, which you can use to add not only tabs but also advanced accordions and switchers.
Dynamic Visibility
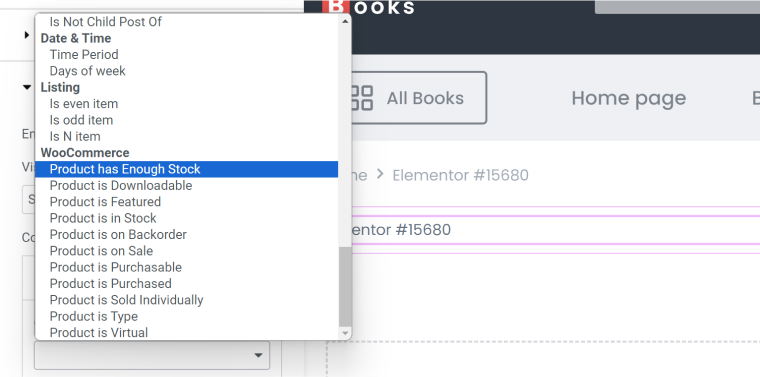
One more thing that JetEngine can offer you for your store, especially if you use it in conjunction with JetWooBuilder, is the Dynamic Visibility feature. Depending on user role, page, device, and over 50 other conditions, you can set up visibility for any Elementor/Gutenberg/Bricks widget or block. If WooCommerce is installed, you will get a set of extra conditions:
- Product has Enough Stock;
- Product is Downloadable;
- Product is Featured;
- Product is in Stock;
- Product is on Backorder;
- Product is on Sale;
- Product is Purchasable;
- Product is Purchased;
- Product is Sold Individually;
- Product is Type;
- Product is Virtual.
FAQ
You have a few options to modify shop pages in WooCommerce. If you use Elementor, the JetWooBuilder plugin will be the best solution for it. Also, we recommend JetEngine for custom fields and dynamic product tables. You can use the latter without Elementor as well.
Use JetEngine’s Table Builder module. It can display a very refined selection of products, not just particular categories.
Don’t forget to include a powerful AJAX filter plugin like JetSmartFilters so customers can find what they are looking for easily.
Conclusion
Using the Crocoblock suite, you have plenty of options for customizing your WooCommerce store. The easiest way to tweak the templates is by using the JetWooBuilder plugin for Elementor. But that’s only the beginning: the JetEngine plugin can add to it a lot, including dynamic product tables, custom meta fields, dynamic visibility, and much more.
Using Crocoblock, you can turn the default website into a product catalog, create custom user profiles, add powerful forms, and offer customers things based on their geolocation – the possibilities are almost endless, limited only by your creativity.