Product badges in eCommerce sites are small labels like “Sale” or “New” that appear on product images to highlight key details. They help customers quickly spot deals, new arrivals, or bestsellers, making shopping easier and encouraging faster decisions.
WooCommerce’s default badges are limited and hard to customize, but using Crocoblock’s JetWooBuilder together with JetEngine, you can create fully custom, dynamic product badges and labels tailored to your brand and product data.
In this guide, you’ll learn how to build flexible badges that make your store stand out and drive more sales.
Why Use Product Badges in eCommerce?
In eCommerce, product badges are useful tools to guide user attention and improve on-site engagement. Since shoppers often scan product listings visually before reading any details, badges such as “Sale” or “New Arrival” act as visual triggers that highlight special offers, limited-time deals, or popular products. This allows potential buyers to focus on items of interest faster, improving the overall shopping experience and increasing the likelihood of a purchase.
Beyond their psychological impact, product badges also serve practical purposes in site navigation. Common badge types include “Sale,” which draws attention to discounted items; “New” for recently added products; “Best Seller” to showcase popular choices and leverage social proof; and “Limited Stock” to create urgency. These labels influence click-through rates, reduce bounce rates, and help move inventory more efficiently. When implemented correctly, badges contribute to a more intuitive shopping experience while supporting your store’s overall sales strategy.
Tools You Need: JetWooBuilder and JetEngine
To create dynamic, fully customized product badges in WooCommerce, you’ll need two core tools from Crocoblock: JetWooBuilder and JetEngine. This Crocoblock set is available for $86 per year.
JetWooBuilder is a Crocoblock plugin designed specifically for building and customizing WooCommerce product pages using Elementor. It allows you to create custom templates for product grids, single product pages, custom archive pages, and more. Importantly, JetWooBuilder lets you insert product badges directly into your product listings and customize their design and placement using Elementor’s visual interface. However, JetWooBuilder alone supports only basic badge functionality, because it serves as a visual customization layer for existing WooCommerce features.
To extend JetWooBuilder’s power, JetEngine adds dynamic capabilities for WooCommerce products. For example, you can set badges to appear only when there’s a price difference between the regular and sale price.
Then, using JetEngine’s dynamic visibility, you can take it a step further, showing those badges only to logged-in users, specific user roles, or under any other conditions. This lets you create badge systems that not only match your brand style but also adapt dynamically to different segments of your audience.
Creating Dynamic Product Badges with JetWooBuilder and JetEngine
Before you start creating dynamic product badges, make sure the JetWooBuilder and JetEngine plugins are installed and activated.
Use сase 1: Creating a sales badge
Let’s start with the simplest example, creating a sales badge for your WooCommerce products.
Step 1
In your WordPress dashboard, go to Dashboard > Crocoblock > Woo Page Builder > Single Template. Open your single product template in Elementor. Add the Single Sale Badge widget to your layout.
NOTE
If the badge doesn’t display correctly in the Elementor editor, don’t worry, it will look fine on the live site after publishing.
Step 2
You can make your sale badge display dynamic discount information by using macros (they appear as hint text in the widget interface):
%percentage_sale% — shows the discount percentage (e.g., -20%)
%numeric_sale% — shows the discount amount in currency (e.g., -$10)
Customize the style, position, and content of the badge as you like. Once done, click “Publish.”
Step 3
But the badge won’t appear if your product doesn’t have a sale price. To set it up:
- Edit the product in WooCommerce.
- In the Product data section, set a Sale price.
- Click “Update.”
Now check your product page, and your sales badge should appear!
Adding dynamic visibility to the badge
Let’s take it a step further and control when the badge appears. For example, you might want the discount to be visible only on weekends.
After adding and customizing your badge, open the Advanced tab in the widget settings. Enable Dynamic Visibility.
- Set the Visibility condition type to Show element if condition met.
- Choose Days of the week as the condition.
- Select Saturday and Sunday.
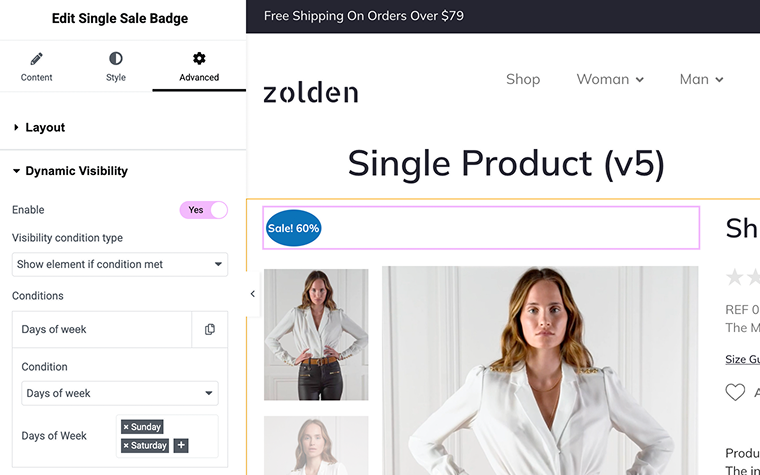
Publish your changes. Now, your badge will only be visible during the weekend.
Use сase 2: Creating a special offer badge
You can also create a fully custom badge for special promotions, for example, a Hot Deal badge. Simply add a Title, Icon, or Image widget, depending on how you want to design your badge.
After styling and customizing it, go to the Advanced tab and enable Dynamic Visibility. Set the Visibility condition type to Show element if condition met, choose the Time Period condition, and define the dates for your offer, for example:
Time From: 01.08.2025
Time To: 30.08.2025
Click “Publish,” and your special offer badge will only appear during the selected period. Also, there are 50+ different conditions available, so you can display badges based on purchase history, user role, device type, and much more.
How Crocoblock Enhances WooCommerce for Online Stores?
Building a WooCommerce store that’s both flexible and easy to manage can be a real challenge, especially if you’re trying to piece together different plugins. In this case, Crocoblock can help you. It offers a complete toolkit that covers everything you need to create a professional, fully functional online store, without relying on third-party solutions that may not work well together.
Let’s start with product filtering and search. With JetSmartFilters, you can add advanced filters: checkboxes, price sliders, rating filters, and more, that help customers quickly find exactly what they’re looking for. Pair that with JetSearch, which brings fast, real-time search results, and your store becomes easy to navigate even if you have a large product catalog.
Next, there’s JetFormBuilder, a powerful form plugin that you can use alongside WooCommerce. Use it for product inquiry forms, quote requests, or any custom interaction beyond direct online purchases.
What makes Crocoblock truly valuable is how all these tools work together seamlessly. With the Crocoblock toolkit, you’re not stuck with basic templates or features. You have the freedom to customize your store exactly how you want it, and everything stays fast, responsive, and easy to manage.
FAQ
No. Crocoblock plugins are built with performance in mind. Dynamic badges work seamlessly with WooCommerce and won’t noticeably affect your site speed.
Absolutely. You can design badges for events like “Winter Sale” or “Black Friday” and control their visibility based on dates, user roles, product conditions, or many other conditions.
Yes. JetWooBuilder lets you fully style badges with custom text, colors, shapes, and icons, so they fit seamlessly with your store’s branding.
Final Thoughts
Dynamic product badges can improve how your store highlights key products, from promotions to bestsellers. With JetWooBuilder and JetEngine, you’re not limited to default WooCommerce options. You can create fully custom badges that display automatically based on real product data.
This approach not only saves time but also helps your store look more polished and professional. By using Crocoblock tools, you gain more control over your product presentation, without relying on additional plugins or manual edits.

