When it comes to filtering custom post types (CPTs), it’s good to know what it is, why and how to filter them, and where to do it, isn’t it? So, in this article, we will discuss the ways and tools for filtering custom post types.
Table of Contents
- Why Filtering Custom Post Types is Essential?
- Understanding WordPress Filtering for Default and Custom Post Types
- AJAX vs. Page Reload Post Filtering
- Filtering Custom Post Types Using JetSmartFilters
- Creating Custom Post Type Filter Without a Plugin
- Custom Query Filter for Elementor
- Filtering Custom Post Types in Dashboard
- FAQ
- Takeaway
Why Filtering Custom Post Types is Essential?
The whole idea of custom post types (CPTs) and custom taxonomies is about the creation of a better website structure to easily manipulate these CPTs and present them in an organized and meaningful way both to the users and to the website administrators (and that’s why I will talk about both front-end and back-end filtering).
But let’s focus on the front-end filtering now, the one that website users can see. I guess, needless to say, that such filters enhance their experience and provide them with a more personalized and relevant content display, especially when it comes to content-filled sites and eCommerce ones.
If your site has good filtering, it will lead to higher user engagement, longer site visits, and potentially increased conversions.
One more reason filters are important is SEO. Properly structured and filtered content can improve SEO by making it easier for search engines to understand and index your site’s content. This can lead to higher rankings in search engine results pages (SERPs) and increased organic traffic.
Understanding WordPress Filtering for Default and Custom Post Types
WordPress doesn’t make any difference when it comes to filtering default post types or custom ones.
📚 If you still need help understanding these terms, check out this article about custom post types and this one about the plugins for creating and organizing CPTs.
WordPress uses the WP_Query class to filter any post type. This powerful class allows developers to retrieve specific content from the WordPress database. It serves as the primary mechanism for querying posts, pages, and custom post types based on various parameters such as post type, category, tag, author, date, etc. There are so many of them, and you can check the full list in the WordPress Documentation. As a result, there are hundreds of parameters and their combinations to filter posts.
Here are the examples of the most popular cases:
- by taxonomies;
- by meta fields;
- by date;
- by author;
- by number of comments, etc.
This is an example of how the query looks under the hood in the case when filtered by custom fields:
$args = array(
    'post_type' => 'post',
    'meta_key' => 'custom_field_name',
    'meta_value' => 'desired_value',
);
$query = new WP_Query( $args );
AJAX vs. Page Reload Post Filtering
A lot of things can be fetched in WordPress without page reloading, such as form submissions or content updates based on the user’s actions, including filtering posts by the parameters that the user chooses. This works thanks to AJAX technologies and grants a much better user experience when the user doesn’t see how the whole page got repainted. This is the most popular approach used by most filter plugins nowadays.
However, a good old page reload method can also be used, and it still is.
So, let’s look at the pros and cons of each of them.
AJAX filtering in WordPress: pros and cons
AJAX filtering pros:
- Better performance, as the whole page doesn’t have to reload, which means fewer requests to the server and almost instant results for the user.
- Enhances user experience and engagement, as the user doesn’t see the whole layout shift when the entire page reloads. It’s extra important for big eCommerce websites, as waiting each time you change filter values while the whole huge page reloads is quite annoying.
AJAX filtering cons:
- Performance overhead. As they say, too much of a good thing is a bad thing. So, when using AJAX too much on a page, it can overload the server because there are still requests to it, even if they are asynchronous (which is the core idea of AJAX). As a result, the page rendering time can be slower, especially if the website traffic is high.
- JavaScript dependencies. While the Page Reload method is simple, thus reliable, and predictable, like clockwork, AJAX filtering can be more difficult because of its JavaScript-based nature. There can be plugin conflicts, or if JavaScript is disabled in the browser, it will not work.
- Issues with caching plugins, especially if the cached content includes dynamic elements generated by AJAX requests. This can lead to outdated or inconsistent content being displayed to users. So, just pay attention to the caching settings.
- Requires extra attention from the SEO point of view. As AJAX-generated content is highly dynamic, it’s important to be sure that it’s indexed properly.
- Security risks, as AJAX is susceptible to CSRF and XSS attacks if not implemented securely. Also, some hosting providers, firewalls, or security plugins may block AJAX requests, and you should change settings manually to make it work.
To boil it down, AJAX-driven plugins should be made by professionals who understand this technology’s complexity because it’s quite complex.
Filtering on Page Reload in WordPress: pros and cons
Page reload post filtering pros:
- Simplicity and compatibility, as it’s easy to implement and works even with JavaScript deactivated and old browsers.
- It’s more SEO-friendly, as the page reloads can trigger fresh page indexing.
- Browser history support allows users to navigate back to the previous result pages.
Page reload post filtering cons:
- User experience and workflow interruptions occur because the whole page reloads. Users can see layout shifts, have longer waiting times, and any unsaved user input or form data they entered will not be saved on page reload, which can be very frustrating and cause customers to leave a website.
- Slower filtering results, as one filter means one page reload, so selecting multiple filters can take a while.
- Slower page load times, especially if the page layout is complex. Caching might help in this case, but it’s still not as fast as AJAX.
Filtering Custom Post Types Using JetSmartFilters

To implement post filtering on your website, use a plugin, and JetSmartFilters is a great choice here; it offers:
- 15 filter types with various settings;
- fully compatible with Block Editor, Elementor, and Bricks editors;
- supports ACF fields;
- AJAX, Page Reload, and Mixed types are available;
- it can filter various providers (widgets/blocks), such as Elementor Loop, Archive, Posts widget, Bricks Query Loop, WooCommerce archives, JetEngine’s Listings, Dynamic Tables, Calendar and Map modules;
- works perfectly with JetBooking and JetAppointment;
- in combination with JetEngine, provides a Geolocation filter to output post/term/user/CCT data closest to the user’s geolocation on the map;
- various permalink structure options for better SEO;
- various URL aliases for better SEO and URL structure;
- supports hierarchical filter structure;
- has a free add-on for an off-canvas block for better UX on mobile devices;
- Indexer feature;
- a unique feature of the JetSmartFilters + JetEngine combination is to use a listing as a filter for another listing; check the details here;
- and so on.
📚 Read more about JetSmartFilters settings in the Help Center section.
Bonus: CPT filtering and Query Builder by JetEngine
JetEngine’s Query Builder provides a visual UI for creating any type of query, in other words, filtering content by certain parameters. As I’ve already mentioned, the WP_Query class has a lot of parameters for filtering posts, so you can write the desired parameters in code like this from scratch or using a Query Generator to streamline the process because this is how much code is required just to select all the CPTs named “cars” that belong to the “sedan” category:
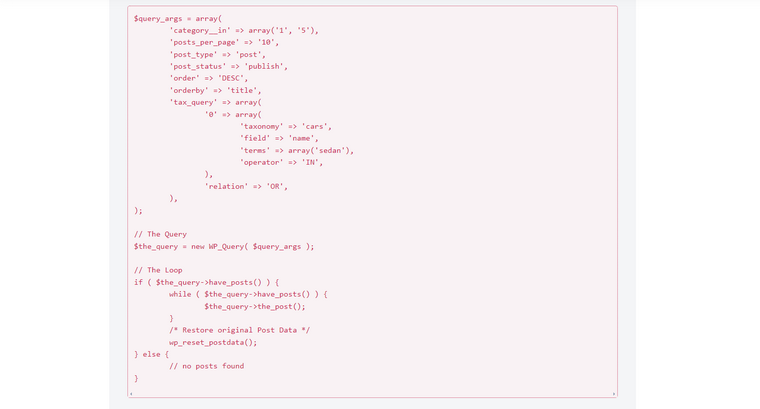
This is just the beginning, as you should then display the results of this query on the front end. It’s a little bit too much hassle, isn’t it?
That’s why the Query Builder tool was created, and this is how the equal query creation looks like using this builder:
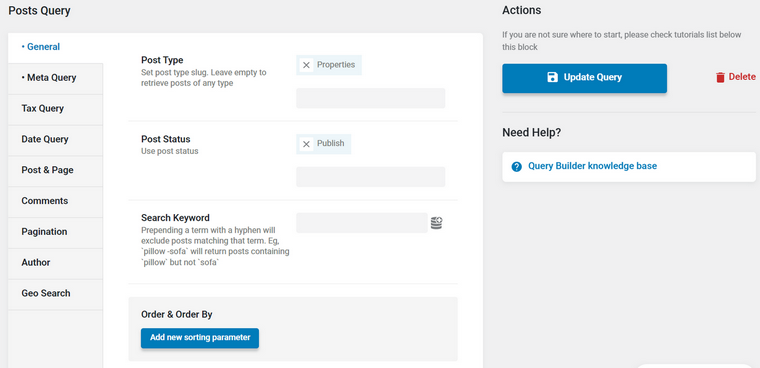
It’s much better, isn’t it? You save as many custom queries as you need and then build Listings (in other words, Loop templates) using one of the editors (Gutenberg, Elementor, Bricks, or Twig) to display them on the front end. Then, using the Listing Grid widget (in other words, a tool for displaying loops), you can display them wherever you want, in the shape of a grid, slider, calendar, etc.
But you might say, “Wait, but this is not a filter plugin!” Yes, you are absolutely right. However, it uses the same key processes under the hood as filter plugins. So, you can creatively use it for something similar to filtering, along with dedicated AJAX filter plugins.
A use case off the top of my head is a switcher with two types of packages – for Gold and Platinum members. Each package has a list of services, and each service is a CPT, so the clients can click on the link and read the full info about each.
Generate custom queries for both packages in Query Builder and then place the results on different tabs. If you are using Elementor, the JetTabs plugin is exactly what you need to add a switcher or tabs with templates to display your query results.
This is an example of how it can work:
To sum up, Query Builder by JetEngine is not a filter plugin but a tool for generating queries of any complexity without writing code. My idea here is that the Crocoblock suite is a comprehensive set of tools that you can use in different ways depending on the project and the goal. Understanding how they work under the hood gives even more space for your creativity.
Creating Custom Post Type Filter Without a Plugin
For a better understanding of how post filters work behind the scenes, I want to demonstrate a simple example of creating an AJAX filter for a custom post type with code.
- The CPT name is “properties.”
- The custom taxonomy is “property-type.”
- I want to filter the properties by terms that belong to that taxonomy: villas and bungalows.
Step 1. First, I will create a JavaScript file. This script reacts to the value change in the HTML dropdown (the HTML will be in Step 3), then creates an AJAX request and sends the “filter_properties” parameter (which is handled by the PHP callback in Step 2).
jQuery(function($){
    $('.filter-category').change(function(){
        var category = $(this).val();
        $.ajax({
            url: ajax_filter_params.ajax_url,
            data: {
                action: 'filter_properties',
                category: category
            },
            type: 'POST',
            success:function(data){
                $('.properties-list').html(data);
            },
            error: function(jqXHR, textStatus, errorThrown){
                console.log('AJAX Error: ' + textStatus + ' - ' + errorThrown);
            }
        });
    });
});
You can change the name of filter_properties to match your CPT name (e.g., filter_doctors). Make sure to also update the corresponding hooks in PHP in Step 2:
add_action( 'wp_ajax_filter_doctors', 'filter_doctors' );
add_action( 'wp_ajax_nopriv_filter_doctors', 'filter_doctors' );
The same applies to $(‘.properties-list’).html(data); you can change it, but don’t forget to update the class name in the HTML (Step 3).
Now, I need to enqueue (register) this script in WordPress by adding these lines to functions.php:
function enqueue_custom_scripts() {
    wp_enqueue_script( 'filter-script', get_template_directory_uri() . '/filter-script.js', array( 'jquery' ), null, true ); //change to the proper name of your JS file and the path
    wp_localize_script( 'filter-script', 'ajax_filter_params', array( 'ajax_url' => admin_url( 'admin-ajax.php' ) ) );
}
add_action( 'wp_enqueue_scripts', 'enqueue_custom_scripts' );
Step 2. Now, add there a callback function that processes AJAX requests to filter properties based on a selected category, retrieves and displays the properties matching the category, and sends the HTML response back.
function filter_properties() {
    $category = $_POST['category'];

    $args = array(
        'post_type' => 'properties', 	// Change to your CPT slug
        'posts_per_page' => -1,
        'tax_query' => array(
            array(
                'taxonomy' => 'property-type', 	// Change to your taxonomy slug
                'field' => 'slug',
                'terms' => $category,
            ),
        ),
    );

    $properties = new WP_Query( $args );

    ob_start();

    if ( $properties->have_posts() ) {
        while ( $properties->have_posts() ) {
            $properties->the_post();             // Change “properties” to your CPT slug
            echo '<a href="' . get_permalink() . '">' . get_the_title() . '</a><br>';
                      if ( has_post_thumbnail() ) {
                echo '<a href="' . get_permalink() . '">';
                the_post_thumbnail( 'thumbnail' ); // Adjust the image size and styles as needed
                echo '</a>';
            }
            echo '<br>';
        }
    } else {
        echo 'No properties found';
    }

    wp_reset_postdata();

    $response = ob_get_clean();
    echo $response;

    wp_die();
}
add_action( 'wp_ajax_filter_properties', 'filter_properties' );
add_action( 'wp_ajax_nopriv_filter_properties', 'filter_properties' );
Step 3. Finally, place this HTML block on the page (you can use the HTML widget/block if using page builders):
<select class="filter-category">
<option value="bungalow">Bungalow</option>
<option value="villa">Villa</option>
<!-- Add more options for other categories if needed -->
</select>
<div class="properties-list">
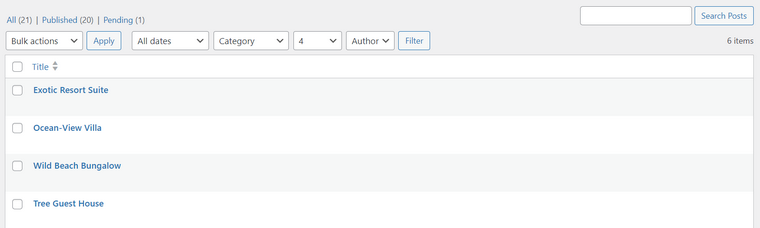
<!-- Properties will be displayed here via AJAX -->
</div>This is the result:
Custom Query Filter for Elementor
Elementor Pro has posts and portfolio widgets that can work with custom query. To add custom query filter for Elementor, edit the functions.php file and add this code:
function my_query_by_post_types( $query ) {
	$query->set( 'post_type', [ 'custom-post-type1', 'custom-post-type2' ] );
}
add_action( 'elementor/query/{$query_id}', 'my_query_by_post_types' );
Replace query_id with your unique ID, as well as custom-post-type1 and custom-post-type2 with custom post type names that your website has, and you want to display using portfolio or posts widgets.
After that, when editing a page, add an Elementor custom query filter by inserting the query ID in the “Query ID” input.
Filtering Custom Post Types in Dashboard
To make a WordPress dashboard easy to operate, it’s essential to have things organized over there. So, let’s see how admin filters work using JetEngine tools.
After registering a new custom post type and setting its custom fields and taxonomies (if needed), go to JetEngine > Post Types and scroll down to the last section called Admin Filters. The further process is pretty intuitive; all you have to do is choose a filter type among the following options:
- Taxonomy;
- Meta Field;
- Relation (if your post type has any relations created).
Then, choose the taxonomy, meta field, or relation from the dropdown. For filters with meta fields, there’s an “Option Source” field, and in most cases, the “Choose from database” option is the right one.
You can add as many filters as needed. For more details, check this Help Center article.
As a result, you will get a set of dropdowns with your filters. Choose the desired values from these dropdowns, and don’t forget to hit the “Filter” button to see the results.
For an even better experience, consider using the Admin Columns option as well to sort the posts.
With JetEngine, you can add admin filters and Admin Columns not only to custom post types but also to default post types, such as Posts and Pages, or the post types created by other plugins (e.g., Products, Forms, etc). To do it, go to JetEngine > Post Types, and switch the toggle in the right top corner from “JetEngine” to “Built in.” Now, you can see all the post types existing on the website and work with them.
FAQ
If you use Elementor Pro with Post Loop, you can use a taxonomy filter tool. However, the best option is to use a dedicated filter plugin. In Elementor, a custom query filter can also be added using a hook and posts or portfolio widgets.
Filtering custom post types is actually the same as filtering any post type. This article is entirely about the methods and tools for doing it.
Takeaway
Filtering WordPress custom post types is quite essential as long as you use CPTs because the whole idea of making the website structure elaborate implies that filtering will be needed as well.
Filters improve user experience, and many websites that use them have converted occasional site visitors into happy clients. Using Crocoblock, you can work with Bricks, Block Builder or add custom query filtering for Elementor.
