While the WordPress plugin market has kind of enough membership and profile builder plugins available, I’ve noticed one important drawback of them – they have a fixed set of tools, functionality, and even design, where you are locked in.
Yes, you can add or remove a couple of registration fields, or switch off some of the functionality. But overall, you’re still confined to the predefined framework. It would be far more powerful to have a set of Lego-like building blocks, so you can assemble exactly what your project needs.
This article is about such a solution – the Crocoblock suite, particularly JetEngine and JetFormBuilder combo to build advanced membership functionality. You can add other JetPlugins if needed – e.g., filters, booking or appointment functionality, and more.
Planning Profile Elements
A very important thing here is proper planning, so you don’t have to fix it afterwards.
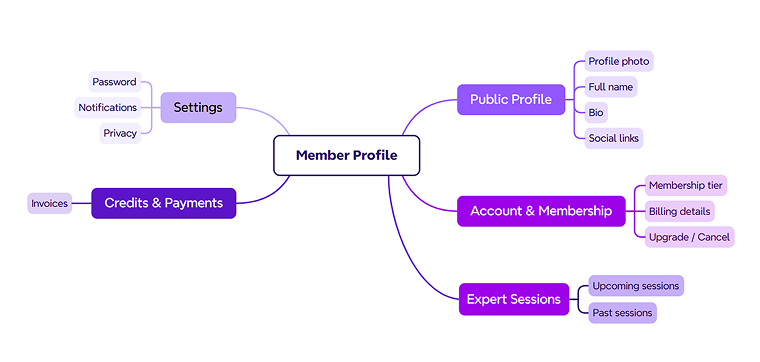
So, my future platform is a mix of a business community and an educational platform, with two types of users: members and experts.
These are the elements a member’s profile should have:
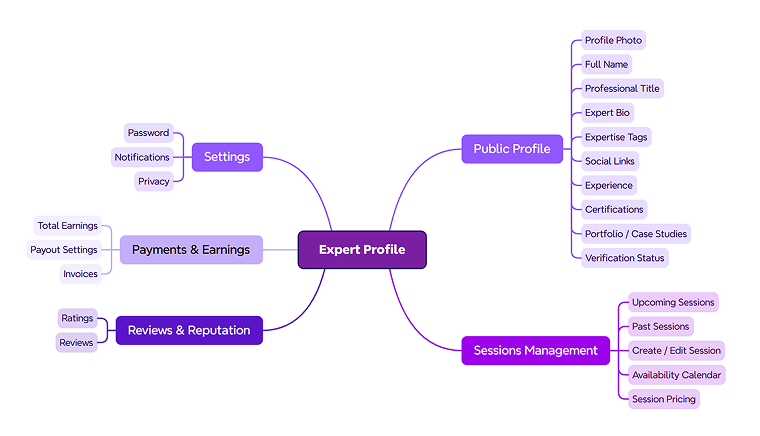
And these are the elements for the expert’s profile:
Now, let’s create these two user roles – Member and Expert, using one of the free user role editors, e.g., the User Role Editor.
User Custom Fields
As you can see from the mindmaps, we require more than the default fields WordPress offers – most of the listed elements are actually custom fields.
JetEngine has two tools for adding custom fields: when creating a custom post and using the Meta Boxes tool. The latter allows adding custom fields to users of a particular role. That’s how I will add these fields, particularly those for the Public Profile of both user roles (except the Expert Tags for Expert, as it will be a taxonomy).
Most of the field types are quite obvious – Text, WYSIWYG, or Media. I just want to specify that the Social Links and Certificates are Repeaters – the first Text field, and the Certificates are Media.
As a result, I have two Meta Boxes with sets of fields for each of these user roles.
Building a User Profile Structure with JetEngine’s Profile Builder
Profile Builder is one of many JetEngine’s modules that should be first switched on in JetEngine > JetEngine.
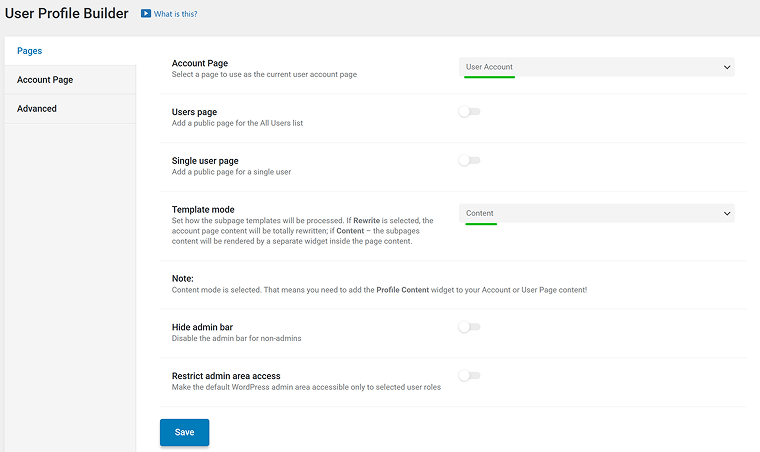
Now, go to JetEngine > Profile Builder, and you will see the first settings page where all you need to do for now is choose a page to be the account home page. Just create an empty page for that and then choose it. Also, I want to restrict the admin area access and hide the admin bar for these user roles.
Make sure you’ve set Template mode to “Content.”
‼️ Now, let’s build the profile structure – a set of subpages – and we’ll populate them with content later.
This is simply a clean and organized way to approach it, especially when you’re just getting familiar with the Profile Builder.
If you start adding content right after creating each subpage, it can become harder to see the overall structure. So first, we’ll outline everything clearly, then we’ll fill it in step by step.
Go to the Account Page tab and add all the subpages listed in the diagrams as the second level (Public Profile, Session Management, etc.). Add subpages for both user roles and set the visibility in the Available for the User Role field.

Adding Profile Builder Content
In the very beginning, we added the Account page – a page to be the foundation for the user profile. Now open it and add two widgets – Profile Menu and Profile Subpage Content.
Choose the Account context in the Profile Menu settings.
You can play with the layout and styling, just remember that the Profile content area is the place where all of the subpages will be displayed.

There are three important things to do before adding subpage templates:
- including Administrator in the settings for User custom fields, and for all templates – so you can preview changes.
- Add some content to these fields, so you can test them properly.
- Add a link to the Profile Page in the header, so you can easily see and test the results.
To add the Profile Page link, open the header template (in JetThemeCore, Elementor Pro, or Bricks) and use the Dynamic Link widget. Use these settings:
- Source: Profile Page;
- Profile Page: Member Profile;
- Label: User Field > Full Name (will work for both user roles, as both of them have this field).
You can also add the Auth Links widget by JetBlock for Login/Logout front-end functionality.
Now, you are ready to test the user profile properly.
Adding subpage templates
Now, it’s time to add some content to the subpages. Elementor or Bricks Builder is the most convenient tool for that, as you can create templates with them.
Open the subpage toggle and click “Add Template.” Name it, choose the builder, and now you can edit the content.
Most frequently, you will need the Dynamic Field widget, as you can fetch most of the dynamic data using it, in particular, custom field values.
Edit profile forms
Of course, just displaying some user’s information is cool, but the whole point of the front-end user profile is to be able to edit data – e.g., edit your name, photo, and other details.
Everything that should be editable should be implemented with JetFormBuilder forms. Let’s see how to do it.
Create a form with all the fields you want to be editable for the user – let’s do it, taking as an example the Member user role fields. Add all the fields. For Photo, I recommend using the Drag & Drop File Upload add-on and switching on the Insert Attachment toggle to make a photo preview available.
After all the corresponding fields are there, add the Hidden field and choose the Current User ID value from the list – it’s necessary to update user fields when they submit the form.
After that, open the JetForm tab and add the “Update User” post-submit action. Map the fields by choosing Meta Field Value and copying and pasting the corresponding field names from JetEngine > Meta Boxes > [your metabox for the particular user role].
When the form is ready, add it to the Subpage template, Member Profile one in my case, and style it with Elementor or Bricks on the front end. You can change the name and other information and see these changes.
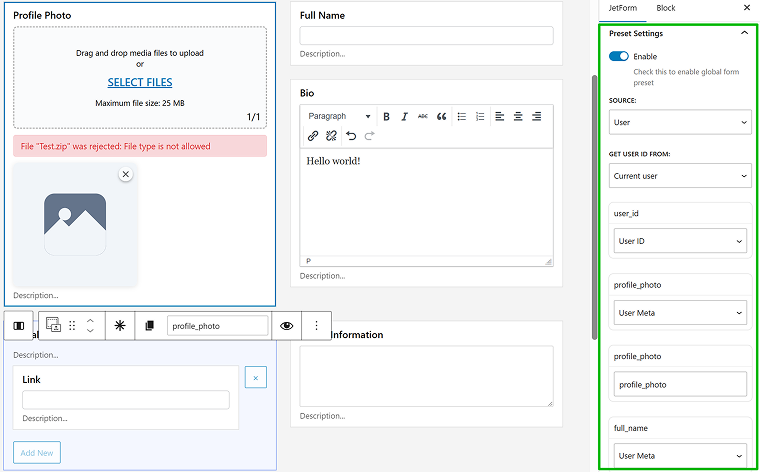
We have one nuance here – normally, form fields are empty, but it would be much better to see them filled out with the current information, right? See the current user name, photo, bio, etc., just like you have it on social media, and be editable. No problem, you can do it using the Preset feature by JetFormBuilder.
In the JetForm tab, find the Preset tab and enable it. Now, choose the User as Source, Current User, and map all the fields just as you did to save updated field values.
Now, when you open the front-end form, it will show the information about the user in the corresponding fields, and all you need to do is just edit it, if needed.
Talking about the rest of the pages – find our articles about Membership. But to make a long story short, to book a session, you need the JetAppointment plugin. Using it, you can place a booking calendar, appointment times, and the Expert role has all the tools to edit it.
Depending on your business model, it can be either admin-controlled or multi-vendor, where users can set up their calendar, availability, and see booked slots. The feature will be implemented later in 2026.
If you are still not there, but want to implement it, the JetBooking plugin, with its already existing multi-vendor functionality. In some cases, JetBooking can be even a better option – read this article on car reservations to learn more about use cases when JetBooking can be used not only for property rental websites.
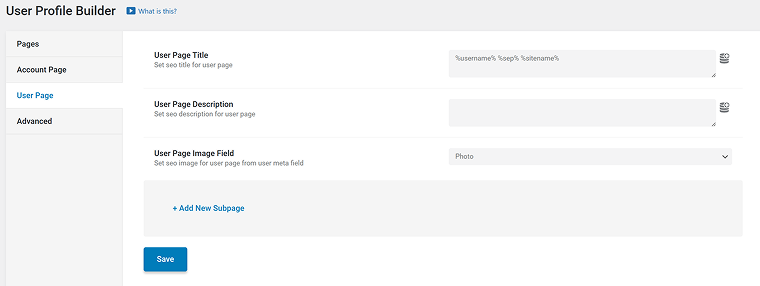
User Public Page
Now, the users have profile pages to edit their data.
But what about their public representation? Profile Builder can do it as well.
Switch on the Single user page toggle.
Now, you will see one more tab of the Profile Builder editor, where you can also add subpages and edit them the same way as the Account pages, but with more flexibility: here, you can hide certain pages to make them not public and be flexible with their slugs.
Single User page content
Think about the Single User page as a user’s business card, where all information associated with this user should be displayed.
Let’s start with a simple example – user name and profile photo. Use the Dynamic Field and Dynamic Image widgets, respectively.
What if you want to display, let’s say, a list of posts published by this user? Then, go to JetEngine > Query Builder and add a new query. For posts, it will be the Post Query type, where you should select “Current user” in the Author tab. Read more about creating user page templates.
Some of the templates, both in Account and Single User (public) pages can be used for both user roles. With the help of the Dynamic Visibility feature from JetEngine, you can show or hide certain sections based on user roles.
Linking the Single User page
When you activate the Single User page, its link becomes available in JetEngine’s Dynamic Field and Dynamic Link widgets.
The same with the Profile Menu widget – just choose the Single User page instead of the Account in the Context field.
📌Want to continue setting up membership website and populate Profile Builder pages further? Check this guide on creating membership website.
FAQ
A membership site focuses on restricting content based on user roles or subscription levels. A profile builder, on the other hand, focuses on creating customizable user dashboards and editable profile pages.
To create a membership site in WordPress, you need to set up user registration, define user roles, restrict content, and build user account pages. Most solutions rely on plugins that manage access rules and front-end user dashboards.
The best WordPress membership plugin depends on your project’s needs. Look for a solution that allows dynamic content and front-end profile editing. Flexibility and scalability matter more than pre-built templates.
Go to JetEngine > Profile Builder and open the Account Page tab. Click “Add Subpage.” You can add subpages the same way for a Single User (public) page.
If the Subpage Content widget is not available, it means that you use the Rewrite mode instead of Content in the Template mode. Go to JetEngine > Profile Builder > Pages tab and select Content in the Template mode settings.
Most probably, you changed something in URL settings, and the old URL is still cached. Refresh the page, and if it doesn’t help, go to Settings > Permalinks on your website dashboard and click Save. It will reset the permalink structure.
Wrapping Up
The real strength of building profiles this way is control and flexibility, where you decide what fields exist, how roles behave, what’s public, what’s private, and how everything is structured. Instead of adapting your project to a plugin, you build the structure around your actual business model.
JetEngine’s Profile Builder is one of the most powerful profile builders on the market, and its main strength is the flexibility and full control that you can have over every little detail.