Is it really possible to recreate an Airbnb-like booking system on WordPress using JetPlugins? Yes, it is.
You might even be surprised how close it can be to the original. In this article, I will give a step-by-step walkthrough.
If you only need certain functionality, e.g., setting up JetBooking or handling listings, you can go directly to that part of the guide.
But before we start, I recommend installing one of the Crocoblock dynamic templates available to all All-Inclusive users. In particular, BaliRento would help you because it already has many of the functionalities I’ll discuss set up for you.
Wrap up your sleeves and let’s get started.
Planning the WordPress Booking Airbnb-Like Website: Core Features
First things first, let’s plan exactly what this website should include to have a clear picture of what to implement.
- User roles
The platform has two main user types: Hosts, who offer their property for rent, and Guests, who are looking to stay. Hosts manage their listings, check bookings, and communicate with guests. Guests search, book, and review their stays.
Tools: any custom user role plugin or custom code. - User profiles
Every user has a personal profile. Hosts have info about themselves, a photo, a short bio, and their payout details. Guests have their own profiles, which help hosts feel safe about who is booking. Verification steps (such as email, phone, or ID) make everyone appear more trustworthy. Profiles also track reviews and booking history, so users can build credibility.
Tools: JetEngine and its Profile Builder module. - Listings system
Hosts create property pages called listings. Each listing includes the property’s photos, description, location, amenities, rules, and pricing.
Tools: JetEngine, JetThemeCore, and other design plugins for custom templates. - Search and filters
Guests need to find the right property quickly. The platform allows searching by location, dates, number of guests, price, property type, and amenities.
Tools: JetSmartFilters. - Booking system
Booking is the heart of the platform. Guests pick dates, the system checks whether the property is available, calculates the price (including any extra fees or taxes), and lets the guest request a booking or book instantly. Hosts can approve or decline requests if needed.
Tools: JetBooking and JetFormBuilder. WooCommerce Order Approval plugin (optional). - Payments and commissions
Guests pay for their stay online. The platform takes a commission, and the host receives their payout once the stay is completed.
Tools: JetBooking’s WooCommerce integration with one of the plugins for split payment. - Messaging
Hosts and guests need a secure way to communicate. A built-in messaging system allows them to ask questions, send instructions, or share updates before and during a stay.
Tools: JetEngine’s custom notification system for chat functionality. - Reviews, ratings, and favorites
After a stay, guests can leave a review of the property and the host, and hosts can leave a review of the guest. Ratings help future users make decisions and build trust in the community.
Tools: JetReviews and JetEngine for favorites/wishlist. - Verification
The platform uses verification steps such as email, phone, and ID checks to ensure users are real and accountable. Verified profiles give both guests and hosts confidence.
Tools: JetFormBuilder and JetEngine’s Profile Builder module. - Notifications
Users are notified of important events, including booking requests, confirmations, cancellations, and messages.
Tools: JetBooking’s workflows and/or JetFormBuilder’s post-submit actions.
Now, let’s move to the practical part.
How to Build an Airbnb-Like Booking Website on WordPress: Main Steps
There are six main workstreams here:
- Booking functionality;
- User management;
- Design and UX;
- Messaging;
- Reviews and ratings;
- Payments.
Now, which tools to use? I’ve already mentioned the plugins to be used; this is the full list.
Plugins to implement the functionality:
- Elementor (you can use Bricks or Block Editor – all key Crocoblock plugins are compatible with them too);
- WooCommerce for handling payments;
- JetEngine;
- JetFormBuilder;
- JetBooking;
- JetSmartFilters;
- JetReviews (doesn’t work with Bricks);
- JetPopup;
- JetThemeCore.
Plugins for styling, most of which are for Elementor only:
- JetElements;
- JetTabs;
- JetProductGallery;
- JetTricks;
- JetBlocks;
- JetWooBuilder (to customize WooCommerce checkout).
And the JetMenu plugin.
All these plugins (and more) are included in the All-Inclusive Crocoblock (JetPlugins) subscription.
Part 1: Setting Up Booking Functionality
You can start with either the Booking functionality or the User management. I’ll begin with the Booking workstream, as it can be implemented relatively quickly and immediately provides a tangible foundation for the platform.
User management, on the other hand, has essential components that must be in place from the start, as well as areas that can be expanded and improved over time with additional features.
Go to JetEngine > Post Types and create a Custom Post Type (CPT) “Properties” with all the custom fields you want to have. I’ve also added a Hot Deals field to boost certain posts using it.
Now, in the dashboard, go to Properties > Add New and create a test property, filling out all fields.
After that, let’s proceed to JetBooking’s settings.
Setting up JetBooking
What is important to understand before you start your setup is that JetBooking has three modes or variations in the way it works:
- Plain Mode – uses the JetFormBuilder’s checkout, with payments handled entirely by JetFormBuilder. WooCommerce is not required in this case.
- WooCommerce Basic Integration (checkout) – essentially the same as the Plain Mode, but WooCommerce manages the checkout process, connects to payment gateways, and stores orders. But the price is still being calculated in JetFormBuilder.
- WooCommerce-Based Mode – bookable items are actually WooCommerce products of a special “Bookable” type, with additional fields and functionality provided by JetBooking. In this setup, WooCommerce handles everything, while JetFormBuilder is not involved at all.
I will use WooCommerce Basic Integration, combining the flexibility of CPTs for Properties (instead of treating them as products) with WooCommerce’s checkout options and a great dashboard for orders and statistics.
So, go to JetBooking > Set Up. You will see a Wizard open for you. Use it, and then you can adjust details in the Settings.
The booking form has been automatically created for you with post-submit actions already added and fields mapped. However, I should improve it and add additional services, the number of guests, and the total.
Now, you can open your sample property again and add a price per night/day. There, you can adjust the availability.
Additional columns explained
As you can see from the video above, I’ve added additional DB columns. These columns are for name, additional services, total, and number of guests. Let me explain why we need them.
I can just add extra services directly in the form and sum their values in the total calculated field. It will be passed to the payment gateway, and it can work this way, with the name in WooCommerce orders.
But if I go to JetBooking > Bookings to see a table/calendar of all bookings, they will not be displayed there, unless I add these columns.
After adding these DB columns, I can pass these values to the Bookings dashboard. Here, I outlined them:
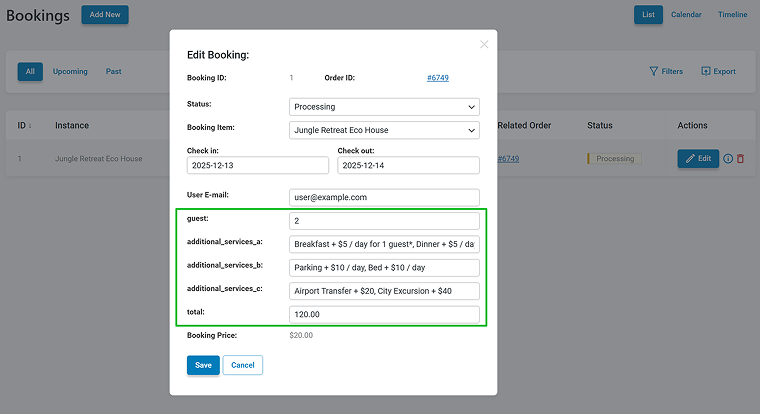
Adjusting the booking form
Make adjustments to the automatically created booking form. Add extra services and other extra fields, and map them in the Apartment Booking post-submit action.
Here are two things I want to draw your attention to:
- I made the Number of Guests field dynamic, as each apartment has a different “Maximum number of guests” value. So, I set it to “Generate dynamically” > “Numbers range by meta value,” with the meta value copied from the Properties CPT (“Maximum number of guests” field). Thus, it will generate the range that doesn’t exceed this number.
- ‼️In the Total field, where the price is calculated, I used macros for the apartment price – it can be found on the right panel as a hint.
%META::_apartment_price% – fetches the apartment price of the current property.
And, because we calculate form fields with external fields, it’s necessary to add FIELD:: to normal field macros.
For example, when you press the wrench icon to get all the field macros, you see them like this %field_name%. Just make it %FIELD::field_name%.
You don’t have to style the form in the editor – you will do it right in Elementor using the JetForm widget styling settings.
Booking form for registered and unregistered users
In this form, you can use other post-submit actions, and even register a user on the same workflow as booking an apartment. However, the best approach is to make the form available only to registered users.
You can do it using JetEngine’s Dynamic Visibility feature. If the user is registered and logged in, show the booking form; otherwise, display the Register/Login form.
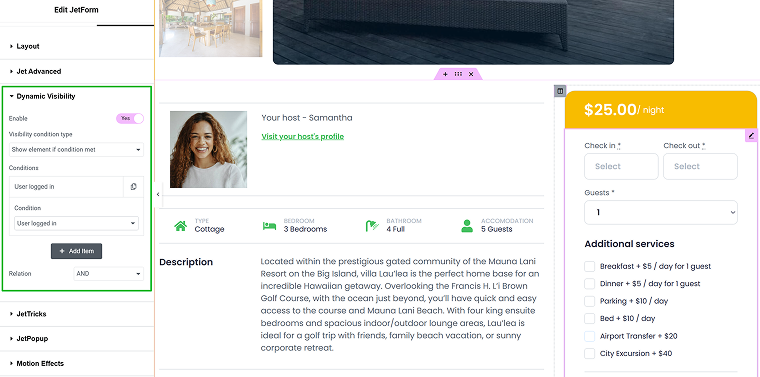
📌 This guide will help you build such forms.
As you remember, I’ve created a custom column for user name and email. But if we deal with registered users, this information will automatically be passed to the WooCommerce checkout. However, if you still want to see the full data in your Bookings dashboard, you can use hidden fields to fetch the current user’s information and map it to the Name and Email fields.
This way, you can fetch additional user data and pass it to your Bookings dashboard.
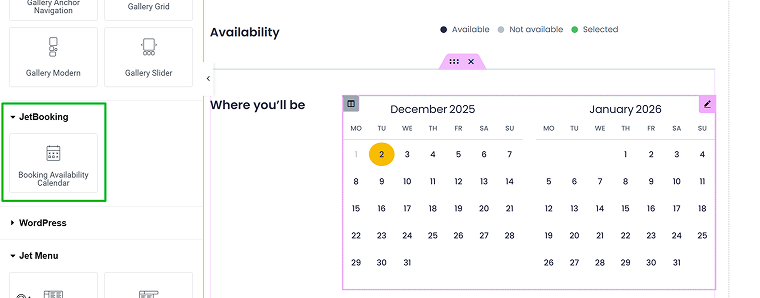
Displaying Property on the front end with a booking form
Using JetThemeCore, create a Single template for your Property post type.
To display custom fields, use JetEngine’s Dynamic Field, Dynamic Image, and Dynamic Link widgets.
One more very cool widget is the Booking Availability Calendar widget:
Useful links on setting up the JetBooking system and forms
- Probably you want to validate users? Read how to do it.
- The booking can be updated using a form. We will discuss it a bit later, but you can read how to do it using JetFormBuilder.
- This video will tell you how to connect JetBooking with Google Calendar and Gmail.
Part 2: User Management and Front-End User Profiles
For now, we’ve set up booking functionality, but properties are supposed to be submitted by hosts using front-end forms. Also, they should have a dashboard to edit and delete them, view their ratings, and receive messages. So, we need this functionality.
Also, I want to create a dashboard for guests that lets them view their past and future bookings, write reviews, and more.
That’s why we need User Profile (Membership) functionality.
But first, I create two user roles: Host and Guest, using a free plugin. Because they will use front-end forms and will not have access to the WordPress dashboard, keep their capabilities the same as Subscribers.
Now, go to JetEngine > Meta Boxes and add additional fields for both Host and Guest. In Visibility Conditions, select “Edit User & Profile.” For both Host and Guest, I’ve added:
- Country and Location;
- Language;
- Profile picture;
- Phone number;
- Social links (one field per one link);
- the “About me” field;
- a toggle field for verification. If the verification procedure is successful, the admin will complete it manually. On the front end, it will be displayed either as Verified or Not Verified.
These fields will appear at the bottom of a user dashboard on the backend and can be updated using forms from the front end.
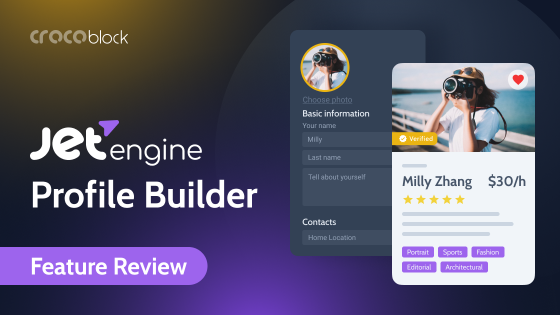
Creating a WordPress front-end user profile with JetEngine
Now, go to JetEngine > JetEngine and activate the Profile Builder module.
📌 Here is a comprehensive overview of setting up a user profile page.
📌 And here, you can find documentation on Profile Builder.
‼️The two main components of a Profile Builder are templates (page and section) in Templates > Saved Templates by Elementor, and forms. Think of forms not as contact forms but as interfaces. Anything the user can edit from the front end is a form.
So, wherever you want editable content, create a dynamic form for that.
And this is the plan for setting up a user profile, in short.
Step 1. Plan what you want to see on the profile dashboard
The JetEngine profile page has two main elements: the menu (for navigation) and the content. So, what do I want to see on the menu?
- Profile settings.
- Properties (submitted for Hosts and booked for Guests).
- Links to forms and subpages with these forms to edit properties for Hosts and edit bookings for Guests.
Step 2. Outline the profile subpages
Create a blank page called Account.
Go to JetEngine > Profile Builder and assign the Account page as a Profile page.
Then, go to the Account Page tab, add all the subpages you want to see, and choose whether each page will be visible to Hosts or Guests (or both).
As you can see, I haven’t assigned templates yet. But just created a structure for the user profile page.
Now, go to the Account page you’ve created in the beginning and add two widgets there:
- Profile Menu – choose the “Account” context in settings;
- Profile Subpage Content.
To add a Log Out link, use the Auth Links widget by JetBlocks.
Style the menu, and preview the page. As you can see, we already have something – you see the menu links and empty subpages. Now, it’s time to create templates for your subpages.
Step 3. Create templates for profile subpages
Now, you can create templates right from the Profile Builder. Choose Elementor Templates, not Listing Templates.
Let’s create an Edit Profile subpage template. Create a template, and, as I mentioned before, everything the user can edit is a form. So, we need an Edit User Form. Create a form with fields that match the user fields, and use the Update User post-submit action.
As a result, you get a page with editable fields:

Some of the templates can be used for both user roles. With the helpf of the Dynamic Visibility feature from JetEngine, you can show or hide certain sections based on user roles.
For the Add New Property subpage, do the same thing: create a form with fields corresponding to the Property CPT and use the Insert/Update Post post-submit action, and don’t forget to map the fields.
Now, something a bit more complex – My Properties subpage.
First, go to JetEngine > Listings/Components and design a Listing (loop) template for a single item using JetEngine’s dynamic widgets. Read more about Listing templates here.

Now, create a template for the My Properties subpage. Using the Listing Grid widget, choose the listing you’ve just created, and you will see all the properties from the website.
But we only need the current user’s properties, right?
So, it’s time for a custom query by Query Builder.
Go to JetEngine > Query Builder > New Query and name it Properties by Author.
Set the Query Type to “Posts Query,” Post Type to “Properties,” and Post Status to “Published.”
Switch to the Author tab, then in the Author ID, click the database icon to select the Queried User ID macro. In the Pagination tab, you can select the number of posts per page. Lastly, save the query.
Get back to your My Properties template, open the Listing Grid settings, and in the Custom Query tab, choose the query you’ve just created. Now, you will see only the properties by the current author.
Another cool thing is that you got a new dynamic source – Profile Builder, and you can use it to link subpages, even those hidden from the profile menu.
In this particular example, I’ve added a Dynamic Link “Add Property,” selected Profile Builder, and then the Add Property page.
This is how you can interlink everything on your profile page.
Using different queries, you can display different posts, users, and taxonomies. For example, you can display all the bookings and separate them by upcoming and past. Also, you can display deleted listings and republish them (use the same query as above, but with the “Deleted” post status).
Step 4. Edit/Delete Property and other dynamic buttons
Have you noticed the “Edit,” “Delete,” and “Reestablish” buttons in the Property Listing Item? They are also linked using the Dynamic Link and Profile source, which directs to the Edit Property subpage with a form for editing properties.
But how to ensure that this form will edit this particular property?
The secret tool that lets JetFormBuilder “know” which post to edit is the Hidden field that fetches the URL Query Variable. After that, in the Insert/Update Post post-submit action, map the fields with the corresponding ones and enjoy the result.
But it will not work properly in preview because the URL Query Variable is required – you should be redirected from a specific post.
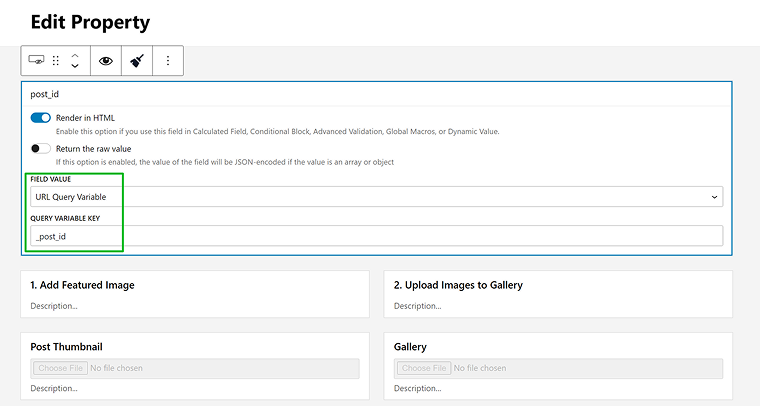
But how does it fetch this URL Query argument? Thanks to the Add Query Argument toggle in the Dynamic Link settings, which retrieves the post ID of the current listing item/property.
Activate the toggle and type the macro:
_post_id=%current_id%
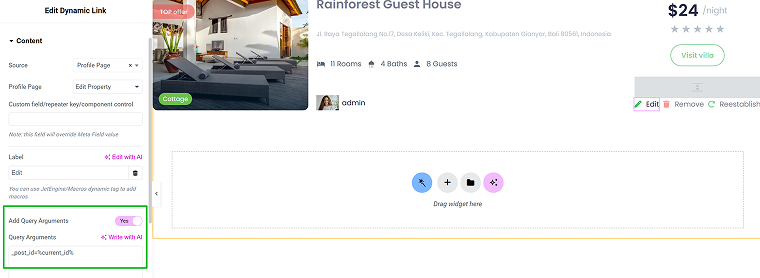
Using this method, you can “connect” any listing item with a form that can edit it.
For example, the “Reestablish” button to publish deleted properties.
The “Remove” button, though, is much simpler – choose the “Delete current post link” in the Source of the Dynamic Link widget.
Public user page
All these settings were for the user dashboard – you can access it using this URL:
https:://yoursite.com/account/[url of the subpage you want to see]
But what about a public profile where users can see your information, rating, and properties? It’s actually quite easy.
Go to Profile Builder, activate the User Page toggle, and you will see the new tab appear – User Page. The routine is the same as with the dashboard subpages – create a template and assign it there. Follow this link for full documentation.
You can create several public pages for different purposes, if needed.

There, using Dynamic Field and other widgets, add all the information you want.
To display the information for the correct user, set Context to “Queried User.”
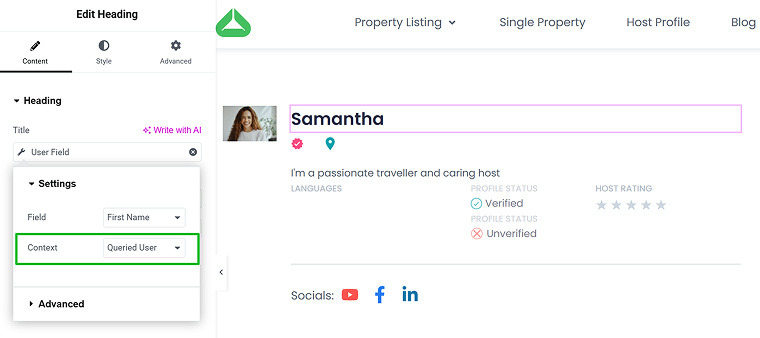
And for listings, use the Properties by Author query just like we already did.
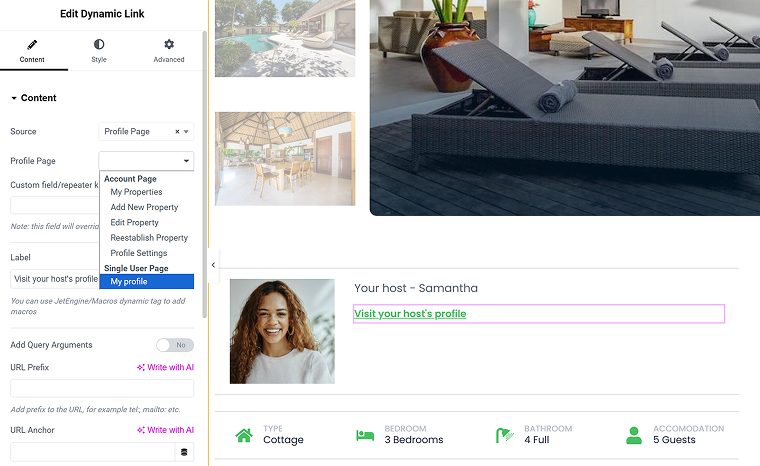
Now, you can return to the Single Property template, link the host profile using Dynamic Link, and choose the public page you want.
Displaying booked items on the Guest’s page
Using Query Builder, you can display not only properties on the Host’s page but also booked items at the Guest’s dashboard or public page.
You can skip the part on creating a booking form, as it uses the legacy UI and doesn’t address displaying items directly.
Part 3. Design and UX
This part is much less specific and complicated than the previous one. Use JetSmartFilters for filtering and initial search, and JetEngine Listing Templates for displaying properties.
However, you will also need to display properties on the map. It’s quite easy with the Map Listing module by JetEngine. This video will guide you through.
Part 4. Internal Messaging System
Emails might be enough for your case, and then JetFormBuilder’s Send Email action, as well as JetBooking Workflows.
However, if you want to implement a custom messaging system using Crocoblock, this guide is for you:
Part 5. Reviews, Ratings, and Favorites
The Crocoblock suite has a dedicated plugin for reviews and ratings – JetReviews.
Using it, you can write reviews with ratings, but that’s not all – users can even upvote each other’s comments, if needed.
After the plugin is activated, you create a review type and assign it to a specific post type or user. The setup process is very straightforward.
You can also display all the reviews the user has submitted on their profile page.
Favorites and recently viewed
Users can add Properties to favorites, and you can implement the “recently viewed items” functionality using JetEngine’s Data Store feature.
You can add the “Like” button, display a counter for posts, and create a My Favorites page with all the liked properties.
Part 6. Payments
The final part is payments. In my case, I’ve chosen WooCommerce checkout because it offers the best flexibility in payment methods and additional integrations. When you choose this option during JetBooking setup, WooCommerce is automatically connected, and a transactional product is created. Don’t delete it. The remaining payment setup is handled just like any other WooCommerce setup.
Payouts for different hosts
As it’s basically a multi-vendor marketplace and hosts should receive payment, we will need a dedicated solution to split payments so hosts can connect their accounts while the website owner receives their commission. You can find various WooCommerce solutions, for example, the Split Pay for Stripe plugin.
Booking approval by hosts
What makes Airbnb different is that hosts can approve a booking before payment goes through. If you also need this functionality for your site, you can choose from WooCommerce add-ons, such as the Order Approval plugin.
FAQ
You can build an Airbnb-like booking system on WordPress by combining custom post types, user profiles, a reservation system, filters, and a booking calendar. Plugins like JetEngine, JetBooking, and WooCommerce help cover most of the functionality without custom coding.
A solid reservation system should support availability calendars, dynamic pricing, user roles, messaging, and payment processing. This ensures guests can book smoothly while hosts can manage their listings effectively.
Yes. WordPress reservation systems typically integrate with WooCommerce or other gateways to process online payments securely. This allows you to charge guests, apply fees, and automate confirmations.
Takeaway
In this article, I walked through the core steps of building an Airbnb-style booking system on WordPress using Crocoblock plugins. The great thing about this setup is its flexibility and scalability – you’re not locked into predefined workflows. It’s a solid foundation that you can continue to expand as your platform grows.
