A membership website is a real deal for many businesses, and I’m not only speaking about massive LMS platforms. Even small course projects – like those for training your technical specialists – require user roles, gated content, profile management, and flexible content relationships. In this guide, I’ll give you a walkthrough on how to structure and build an educational membership website using Crocoblock, from architecture to implementation.
Building a membership website with JetPlugins offers incredible flexibility, as you have full control over structure and functionality. Still, it may seem overwhelming if you just started working with JetEngine – it’s one of the most powerful plugins on the market, with dozens of tools and settings you can use. And setting up a membership website requires a good understanding of most of these tools.
However, when you already mastered it, it’s fun to create complex projects. So, in this article, I’ve done my best to give clear instructions – please, follow them step-by-step, to understand the idea and logic of building a membership website and create your own great projects.
Project Scope: What We’re Building
To keep things practical, let’s define a clear and controlled scope.
In this tutorial, we’re building a membership website called Business Circle, an educational and business membership platform where experts can share their knowledge and members can buy a subscription.
So, there are two main roles: Experts and Members.
The idea is simple:
- Experts can publish gated educational content – an article and questions.
- Members can access that content based on their permissions.
- Members can submit responses (like short papers or answers) after reading an article.
- Experts give feedback.
- Additional feature: experts have a bookable calendar so members can schedule private sessions.
User roles, post types, taxonomies, and relations
To implement this, here are the elements I will need:
Custom user roles
- Expert – can publish articles and give feedback to the members’ submissions. Also, they can have their session calendar and get private sessions booked.
- Member – pays for the membership, has access to the gated content, can read it, and send answers to article questions.
Use any free user role plugin, e.g., User Role Editor – all you need to do is just create the roles and then set up post editing capabilities. This particular plugin has a Pro version, where you can select specific CPT for editing. But, because we will not give users access to the admin dashboard, the following settings will be enough for Expert:
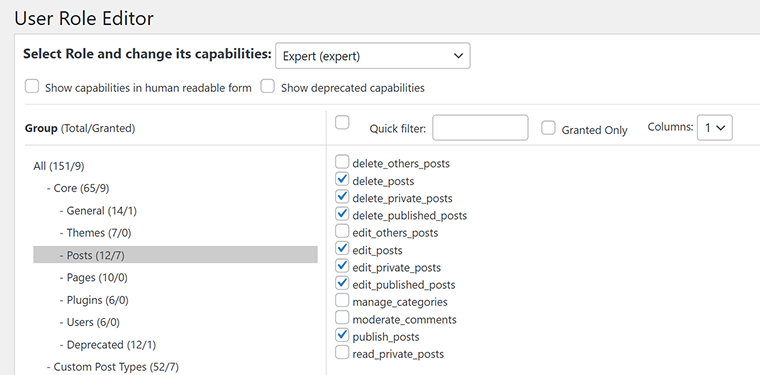
The Member role doesn’t have any specific settings here; we will control their access to content using other tools.
Custom post types, taxonomies, and relations
✏️ I will add these CPTs:
- Article – so the Experts can publish their articles.
- Member’s Assignment – for Members to submit the answers to the Experts’ questions and get the Experts’ feedback.
⛏️ Go to JetEngine > Post Types and add these post types.
✏️ Custom Content Type (CCT):
- Expert’s Feedback – because I don’t need a dedicated page for this content, I prefer using a CCT instead of CPT.
⛏️ Go to JetEngine > JetEngine, activate the Custom Content Type module. Then, in JetEngine > Custom Content Types, add this CCT. Because CCT is just a set of fields, add these fields:
- Title (Text type) for the feedback title;
- Feedback (WYSIWYG type) for full feedback;
- Rating (Number type) with a range from 1 to 10 to rate the assignment – you can turn them into a star rating on the front end.
Make Title and Rating visible on the Admin Columns for your convenience.
✏️ Taxonomies
- Article Topics for Article CPT, and add these tags: Marketing, Finance, R&D.
⛏️ Go to JetEngine > Taxonomies, and add this taxonomy for Articles CCT. If you want it to be tags, leave the default settings. If you want them to act as categories, in Advanced settings, check “Hierarchical.” Then, in Articles > Article Topics, add your tags (or categories).
✏️ Relations
- The Expert’s Feedback CCT should be connected to a specific Member’s Assignment. That’s why I will create a one-to-many relation where Member’s Assignment is the parent and Expert’s Feedback is the child, since one assignment may include multiple feedback entries.
⛏️ Go to JetEngine > Relations and create such a relation.
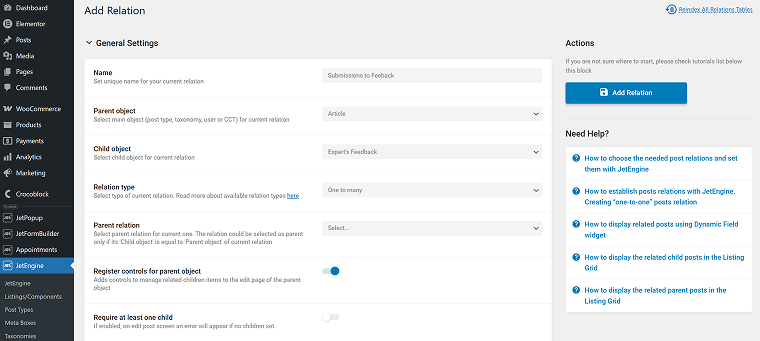
- Each Member’s Assignment should be connected to a specific Article. I will create a one-to-many relation where Article is the parent and Member’s Assignment is the child, as there can be many assignments for one article.
🛠️ You can use the AI Structure Builder for this task – just give a proper prompt, and JetEngine will create them all for you.
As an alternative to the idea of having many articles sorted by categories, you can create a Course CPT with courses, e.g., Marketing, Finance, R&D, and have a many-to-many relation with Article CPT – so you can create a course with the series of articles.
User Profiles
Definitely, these users need proper front-end user profiles.
📌Please read how to set up JetEngine Profile Builder (User Profile). It will guide you through every step of the process for these user roles.
This article also tells how to edit profile information using front-end forms.
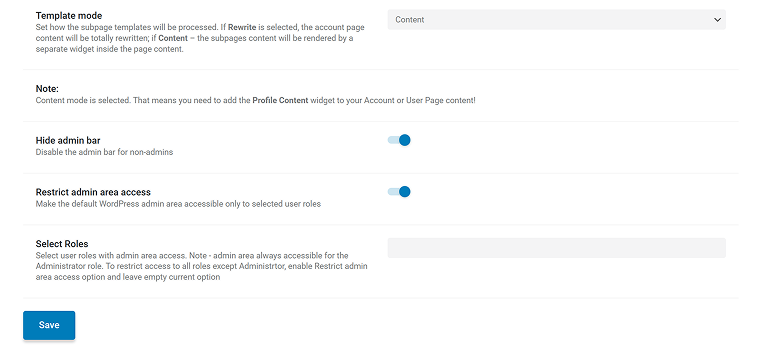
On the Pages tab of the Profile Builder, restrict the admin area access and hide the admin bar, so users can only see the front-end profile when logged in.
You can do it after setting up and testing, for your convenience.
Also, you can restrict the number of articles Experts can publish in the Profile Builder > Advanced tab.
Adding the Expert’s articles to their Profile Page
The article I referred to above doesn’t cover the topic of adding users’ articles. So, let’s do it here.
First, add at least one user for each of your custom user roles and fill out their custom meta fields. Then, add some test articles and assign the Expert as an author.
Now, we can create a Listing Template for the Article post type – go to JetEngine > Listings/Components > Add New. Choose:
- Listing Source – Posts;
- Post Type – Article.
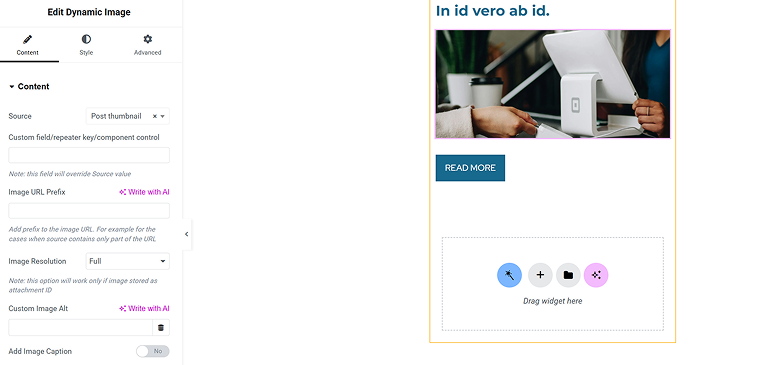
Using Dynamic Field and Dynamic Image widgets, design a template for the template – it will be a base for an article grid.
But we need to display only the posts of the current author on their profile page.
It’s easy to implement with Query Builder.
Let’s create a query – go to JetEngine > Query Builder > Add New, add a new “Expert’s Article” query, and use these settings:
- Query Type – Posts Query;
- Post Status – Published;
- you can set up sorting parameters, if needed;
- Author tab – in the Author ID, click the Database icon and find the Queried user ID option.
Now, go back to the Profile Builder > User Page and add one more subpage for articles. There, add the Listing Grid widget, select the Article listing template, and add Custom Query – the one you’ve just created. This query filters and displays only the posts that belong to the Expert whose page you are currently viewing.
If you want to add pagination, follow this guide.
Adding certificates to Experts’ pages
Because I have a Repeater field type for Experts’ certificates, it’s a little bit trickier to display them – that’s why I want to mention this specifically.
To display the media field inside the Repeater, use the Dynamic Repeater widget and this macro:
<img src="%certificate|img_url_by_id%"> Where “certificate” is my media field name, and Source = “Certifications” (the Repeater field name).

For text fields, just %your-field-name% macro wrapped in the proper HTML to display it the way you want will be enough. Read the full guide on repeaters here.
If you don’t want to deal with repeaters, you can just add, let’s say, 10 Media fields for certificates and display them with the Dynamic Image. The only downside is that if an expert wants to show more than those 10, they can’t.
Article Publishing, Assignment, and Feedback Submissions
Above, I talked about displaying content, but what about submitting it? Experts should be able to submit articles from the front end, send Feedback, and Members should be able to submit assignments.
Let’s implement it using the JetFormBuilder plugin.
Article posting by Expert user role
Experts should have a functionality to submit articles. So, go to JetFormBuilder > New Form and create a form with all the fields the article has. In my case, it’s just Title and Content. Then, in the post-submit actions, add an Insert/Update post action. Map the fields with the Article fields.
Now, add a new subpage to the Profile Builder > Account page (don’t put it in the User Page section by mistake, as it’s for the user’s non-public account) and add a template, and there, add this form using the JetForm widget. Alternatively, you can add it to an existing template of an existing subpage.
Displaying articles on the front end
I will create the template using JetThemeCore in Crocoblock > Theme Builder and add a new template with the condition Single / Article / All:

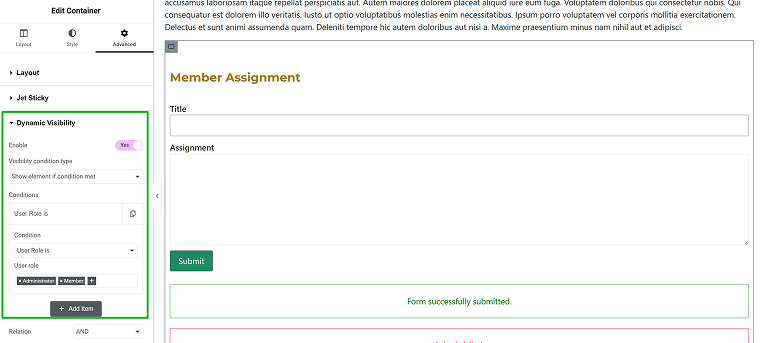
But these articles are only for members, so first, I will add a container and add Dynamic Visibility with the condition that User Role is Member, Expert, or Administrator.
Inside this container, I will add Dynamic Field widgets to display the article Title and Content (and other fields if you have them).
But what if a non-registered user finds this page? Let’s make them register. Create another container with a CTA message and a button that leads to a registration form. Read about creating a registration form in the final section of this guide.
Add Dynamic Visibility to this container as well, but add these display conditions (connected with the “AND” operator):
- User is not logged in;
- User role is [add user roles your site has that are not allowed to view this content].
Members’ assignment submissions
Members should be able to add their answers to the questions from articles using forms as well. Create a form with the fields that the Member’s Assignment post type has. In my case, this post type has only Title and Content, so no custom fields.
That’s why I will create the same form as in the previous example (for the article), add the Insert/Update post action, and map fields with the Member’s Assignment post type.
What’s also important is that each assignment should be connected to the particular article it’s been submitted for. Add a Hidden field and choose the Current Post ID from the list. We will fetch the article ID using it to create a relation connection.
Then, add the Connect Related Item post-submit action. Choose the relation and for the Parent ID choose the Hidden field, and for the Child ID choose the one that appears in the list automatically – inserted_item_your-postname.
NOTE
Put Insert/Update Post action first in the list. If you can’t see the inserted_item_your-postname option in the list for the Child ID, save the form, refresh the page, and then check again.
Placing the assignment form
I will place this form in the Article template – so members can fill it out after reading an article.
After placing the Article’s Title and Content using the Dynamic Field widget, I will add a container and the form for members’ assignments using JetForm, as usual.
There, I will add Dynamic Visibility – so this container with a form is visible only for Members and Administrators.
Displaying members’ assignments next to articles
Experts should see members’ assignments, that’s why let’s first add a few of them for testing using a form, and then display them for the Expert user role.
We already have the relation and both CPTs. Let’s display them on the front end.
Go to JetEngine > Query Builder > Add New and add a new query with these settings:
- Name – Related Assignments;
- Query type – Relations Query;
- Relation – Articles to Assignments;
- Items to Get – Get Children Items for Fixed Parents;
Thus, you can fetch related assignments of a particular article. Add pagination and sorting for a better UX.
Now, go to JetEngine > Listings/Components, and create a Listing template for Assignments, just like for Articles. You can display a title, an excerpt, and a “Read more” button.
Go back to the Article template and add the Listing Grid widget with the Assignments listing template. Then click the Custom Query control, and select the Related Assignments query you’ve just created. As a result, only the assignments related to the current article will be displayed.
Finally, make this section visible only for Experts or, better, choose the Is Current Post Author display condition (in the Posts section of conditions) – so only the article author will see all the assignments.
You can use a cool way to display assignments described in this article, using a timeline widget.
Displaying members’ assignments on their profile dashboard
I think you now understand the logic of displaying someone’s posts on their profile page – you build a listing template, create a query that pulls only the posts where the queried user is the post author, and place it on a user’s profile page.
So, just like you’ve done with Expert’s articles, you can do with Members’ Assignments on their page.
Well, we have one little thing left – they should see not only a list of assignments but also the articles they were made for, right? So, open the Assignments listing template and add a Dynamic Link widget, but in the Context field, choose the Related from Assignments to Articles. Voila, and you have the article link!
You can add an article name using the Dynamic Link with the same settings as well.
You definitely can display the members’ assignments on experts’ private pages using the same relations logic, if you want – next to their articles.
🔥 Also, you can notify experts via an e-mail when members post their assignments. Follow this guide to learn how to do it.
Experts’ feedback for members’ assignments
Now, experts should be able to answer and evaluate members’ assignments. Use exactly the same logic as for the Article + Members’ Assignments combo, both for creating forms and for displaying these answers. It doesn’t matter that we use CCT for Feedback – just use the Insert/Update Custom Content Type action in the form instead of Insert/Update CPT.
Editing and Deleting Articles by Experts from the Front-End User Profile
Users definitely should be able to delete their articles right from the front-end profile, shouldn’t they? Query Builder can help here as well.
We’ve already placed articles on their author’s (Expert) public page (User Page) – to make them available for Members to read and post their assignments.
But we also need the article list on the Account page (non-public), where experts can edit and delete existing ones. And let’s add the Edit and Delete buttons in front of each article.
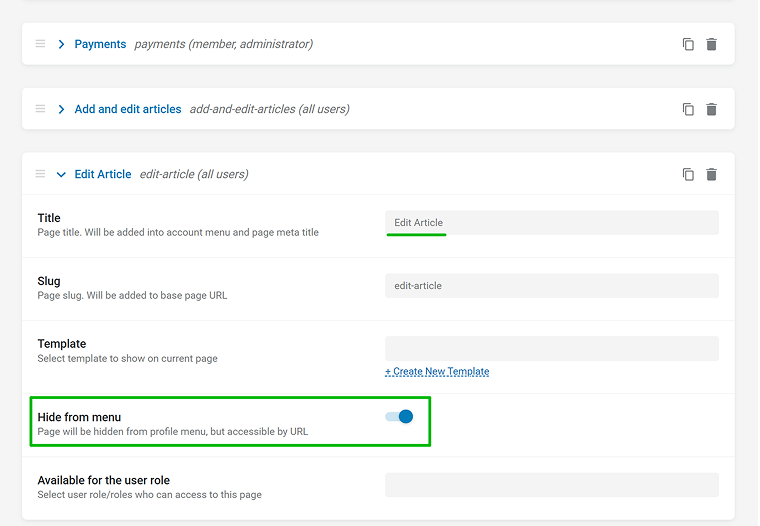
But before, add a subpage to the Profile Builder > Account Page tab called “Edit Article.” Click “Hide from menu,” so we will see it only after clicking the “Edit” link, and it will not distract us in the menu.
When done, let’s switch to JetEngine > Listings/Components, find and clone the Articles listing template, name it “Edit Article,” and add these buttons using Dynamic Link.
What’s crucial is to switch on the “Add Query Arguments” toggle for both of them with URL Query Variable settings – just leave them as default _post_id=%current_id%. This macro passes the ID of the current article, so WordPress “knows” what to delete or edit.
- For the “Delete” button – choose Delete current post link in the Source.
- For the “Edit” button – choose Profile Builder > Edit article subpage (that we’ve just created) in the Source.
Now, we need the Edit form – clone the Add Article form and add a Hidden field with the URL Query Variable value chosen from the dropdown. Type _post_id in the “key” field. In the Insert/Update post action settings, choose this field as a source for post ID – it will update the post with this ID (passed using query variables when clicking the “Edit” button).
In the Preset settings, choose Post, post source – query variable, and map the fields with your post fields.
Go back to the Profile Builder > Account Page > Edit Article subpage, create a template, and insert this form there. Remember, it’s hidden from the menu, so don’t try to find it there.
And, finally, go to the Add and Edit subpage of the Account and add the Listing Grid widget with the “Edit Article” listing template that has Edit and Delete buttons, plus the Custom Query – “Expert’s Articles” – we’ve used it to display articles of the current expert on the public page before.
We are done! The video below shows the whole process of adding the Edit/Delete buttons.
You can also display deleted articles on the Expert’s profile subpage – copy the “Edit Articles” listing template for the listing grid, and, instead of the “Expert’s Articles” custom query, create another similar query, but with post status “Trash” instead of “Published”.
You can add the “Restore” button for such articles. It should lead to another subpage and form, just like the Edit post one, but for deleted articles, so when you click “Submit article,” it will be published again.
Other Membership Features
Let’s briefly go through other features a membership website can have.
Member registration
Such an essential feature as member registration can be implemented using JetFormBuilder. It has complete out-of-the-box functionality for building such forms. They can combine the register and login forms in one.
So, you can add a pricing table, offering different plans, and then register users.
Session booking
At the very beginning of this article, I mentioned the functionality that allows members to book sessions with experts. You can implement this using JetAppointment.
At the moment, it doesn’t support multi-vendor functionality, so you’ll need to use an admin-controlled setup. However, this feature is expected to be added very soon, in 2026, so stay tuned.
As an alternative, you can use JetBooking, which already supports multi-vendor functionality. Users can manage availability, pricing, timing, and more from the front end. This plugin can also be used for booking sessions, although it’s not as flexible time-wise as JetAppointment.
You can also check out this article about car rental functionality, where I compare how these two plugins work in very different scenarios.
FAQ
To create a membership website in WordPress, you need user roles, gated content, and a way to manage subscriptions or access rules. Typically, this involves custom post types, custom fields, and front-end forms. The key is to plan the structure first, then build the logic step by step.
With Crocoblock, you can gate content two ways: using Dynamic Visibility by JetEngine (for page blocks) and using JetThemeCore Conditions > Advanced > User Role or Query.
You can use JetFormBuilder front-end forms that create or update posts. These forms map submitted fields to post fields and can also connect related content. Users don’t have to open the WordPress dashboard.
You can connect related content using post relationships. You set up a Relation between certain post types, users, taxonomies, etc. Then, you can connect specific posts of these post types/taxonomies/users either from the backend or from the front end using JetFormBuilder forms.
You can create a user dashboard of any complexity using JetEngine’s Profile Builder module. Follow this guide for details and the current article.
Yes. You can build a structured educational membership website without a traditional LMS plugin. By combining custom post types, relationships, gated access, and forms, you can create flexible learning environments tailored to your needs.
Takeaway
A membership website is not just about locking content behind a paywall, but about structure, logic, and clear relationships between users and content.
If you take time to plan the architecture first, everything else becomes much easier to implement. And once you understand how the pieces connect, building even complex educational platforms stops feeling overwhelming and starts feeling… actually fun. Hopefully, this guide will help you. Share your thoughts in the Facebook community!
