Creating a car rental website on WordPress is straightforward when you combine the right tools. JetEngine, JetBooking, and JetAppointment work together as a flexible booking reservation plugin setup for WordPress that lets you handle both daily and hourly rentals inside one clean system.
The idea is simple: standard cars use a daily reservation form powered by JetBooking, while luxury cars use an hourly reservation widget powered by JetAppointment. JetEngine controls which form appears, based on a taxonomy like Luxury. This gives you a practical way to run two rental models without fighting the limitations of a single WordPress plugin for reservations.
If you are looking for a WordPress online reservation plugin with payment support, this guide shows you exactly what tools will come in handy and how to build a reservation system.
Plugins to Use
To build a car rental website that supports both daily and hourly bookings, you need a combination of tools that cover custom post types, bookings, appointments, and conditional visibility. WordPress alone cannot handle this structure, so JetPlugins fill in the gaps with a more flexible reservation system. Below is the exact stack used in this guide, along with what each part is responsible for:
WordPress with Elementor
Used for page building and template control, this is where your single car layout and reservation sections will live. However, Crocoblock plugins support Block Editor and Bricks as well, so you can select them instead of Elementor.
JetEngine
This plugin creates the Cars custom post type, the Luxury taxonomy, and all the necessary meta fields. JetEngine also provides visibility rules that hide or show the correct reservation form based on the car category. It is the backbone that connects everything.
JetBooking
Handles daily reservations, similar to a WordPress room reservation plugin, but is adapted to cars. It is ideal for full-day or multi-day rentals, with check-in and check-out logic and dynamic pricing.
JetAppointment
Handles hourly bookings with time slots, buffers, and service-based pricing. This is what turns your luxury cars into premium assets that can be booked by the hour.
JetFormBuilder
Both JetBooking and JetAppointment work through forms, so JetFormBuilder is required for the daily and hourly reservation widgets that appear on the car page. It also supports online payments if you need a WordPress reservation plugin with payment integration. It has calculation functionality and supports many dynamic features, so you can add additional services to charge users.
WooCommerce
In JetBooking, you can select WooCommerce mode – then you don’t need JetFormBuilder for creating forms, as WooCommerce will handle all the front-end and payment data.
Also, for both JetAppointment and JetBooking, you can select WooCommerce checkout to handle payments.
NOTE
In case you just need daily-based bookings, stick with JetBooking only; you don’t need JetAppointment.
If you need only hourly-based bookings, stick with JetAppointment then; you don’t need JetBooking. In this article, I describe both methods and explain how to combine them on a single site. But you can skip one of the options if you don’t need it – they work independently from each other.
Also, you can create two different post types – one for Luxury cars with hourly rental (that will work with JetAppointment) and another for Economy with daily rental (to work with JetBooking).
How to Build a Reservation WordPress Site: Step-By-Step Guide
Creating and designing the Cars post type
The first step is to structure your data, as every reservation system relies on clear, consistent content. In JetEngine > Post Types > Add New, create the Cars custom post type that stores all essential information for each vehicle. This CPT serves as the foundation for both daily and hourly bookings and enables every plugin in the stack to use the same data source.
Each car needs details, so add custom fields. The most common fields include transmission type, fuel type, seating capacity, and so on. You can add more fields later if your rental workflow requires them.
Pay attention that pricing will be handled by JetBooking and JetAppointment plugins, so you don’t have to create custom fields for that.
Custom taxonomies
Using JetEngine > Taxonomies > Add New, add custom taxonomies for your cars – they will be used for filtering. And one particular taxonomy will be used for dynamic visibility as well – Class. In my setup, I will have Economy and Luxury class categories, so JetAppointment (hourly rent) will be used for Luxury, while JetBooking (daily rent) will be used for Economy. Thus, I will display one of the two rental forms.
Designing a template for the Cars post type
To display cars on the front end, you will need a custom post type template. For template building and assigning display conditions, use the JetThemeCore plugin. Or, if you use Bricks or Elementor Pro, you can use their theme builders.
To display custom fields dynamically, use JetEngine’s Dynamic Field widget – it lets you get full control over the data and how it’s shown, thanks to many custom callbacks.
Leave space for the reservation form and a price – we will get back to this template later to add the forms.
Setting up JetBooking for daily-based reservations
After installing the JetBooking plugin, the easiest way to set it up is to go to JetBooking > Set Up and use the Wizard, then adjust the details in JetBooking > Settings. Using a Wizard, you can do all the major steps of the setup, and even the form will be created for you automatically.
But before you start, it is important to understand the following information, as it might be confusing.
JetBooking basically has three modes or variations in the way it works:
- Plain Mode – uses the JetFormBuilder’s checkout, with payments handled entirely by JetFormBuilder. WooCommerce is not required in this case.
- WooCommerce Basic Integration (checkout) – essentially the same as the Plain Mode, but WooCommerce manages the checkout process, connects to payment gateways, and stores orders. But the price is still being calculated in JetFormBuilder.
- WooCommerce-Based Mode – bookable items are actually WooCommerce products of a special “Bookable” type, with additional fields and functionality provided by JetBooking. In this setup, WooCommerce handles everything, while JetFormBuilder is not involved at all.
Regarding additional services: if you want to add them in Plain or WooCommerce Basic integration, use a calculated field in the form builder and multiply the additional service price by the number of days (if it’s daily) or add them once.
In WooCommerce-Based mode, such services are added as attributes, and you have all the instruments to make them daily-based on a single. Watch this video for the full guide.
Starting with JetBooking Wizard
As I mentioned earlier, I first go to JetBooking > Set Up and use the Wizard. As you can see from the video below, Wizard does most of the job for you, and setting up the booking is quite easy. If you choose WooCommerce mode, it’s only one step of the Wizard – after that, you should add a product of a special Bookable Product type.
In my case, I used Plain mode with WooCommerce checkout – as for me, this method is the most convenient, as it combines the flexibility and control I have over CPT (instead of WooCommerce products) and its design, and the abundance of payment methods WooCommerce supports.
After the plugin setup, go to each product and set up a price. You can build an individual schedule for each item, add special prices, and so on.
The booking form for daily reservations
The form was created automatically for me, so the only thing left to do is go to JetFormBuilder > Booking form and adjust the fields if you want to add additional services or make other changes. No need to style it here – you will do it using Elementor.
Now that we have a booking form and cars that will be rented daily have pricing set, let’s get back to the Car template and add the form and price using JetEngine’s Dynamic Field widget. The form has all the styling controls right in the Elementor editor.
As you remember, only Economy class cars will be available for daily reservations; the rest will be available only for hourly reservations. That’s why, go to JetEngine > JetEngine and activate the Dynamic Visibility module. Then, refresh your page in Elementor and in the Advanced tab, enable Dynamic Visibility for the Booking form. In the conditions, choose the category and copy the slug – “economy” in my case.
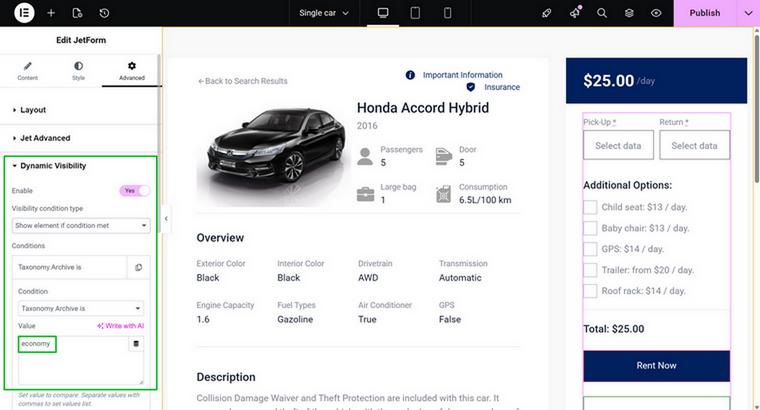
Also, if this car belongs to the Luxury category, you will have another price source (fields added by JetAppointments), so apply Dynamic Visibility to the price as well.
Further, you can add Workflows to notify users and admins, connect bookings to Gmail and Google Calendar, and more. Read more in the Documentation here.
Timepicker functionality and why it should not be confused with hourly-based booking
This section is important for understanding the key differences between JetBooking and JetAppointment, and why I use both plugins in this example.
JetBooking has the Timepicker tool, which some users often confuse with the hourly-based reservation functionality, which it isn’t. Timepicker is a tool for clearer, more flexible time management of your rental items, but it doesn’t affect the price.
In the Timepicker settings, you can select the specific time range during which the item is available. For example, a car can be rented only from 6 a.m. to 10 p.m., and you can also specify the buffer time. But this is not a tool for hourly-based booking, as the pricing will still be what you set for a day/night.
If you have ever booked using Booking.com, you’ve probably filled in the “Your expected arrival time” at the very last step of a booking, right? Or, if you booked using Airbnb, the host would ask about your arrival time. This is made to ensure smooth check-in and checkout for previous guests. But it doesn’t affect your rental price. So, the Timepicker tool does the same.
Setting up JetAppointment for hourly-based reservations
For my Luxury car category, I will charge customers an hourly rate. To implement this, I will install the JetAppointment plugin. The process is pretty similar to what we did with JetBooking – first, use the Wizard, then add all the adjustments in Settings. But unlike JetBooking, it doesn’t have WooCommerce mode; it only has WooCommerce checkout.
JetAppointment has another entity – Service providers, as it’s honed for the service industry – think about barbershops, where you have a service, such as a haircut, and the providers – barbers. So you match a particular service’s price and availability with the provider, then get the final price.
This approach can be very useful if you have several offices/shops that charge a bit differently. To use the Providers functionality, create the corresponding post type with all the details about the provider. You can set up a price for this provider – either per hour or per time slot – and it will be added to the service price.
If you don’t add it and choose “Inherit Service Price,” it will not be increased.
So, let’s get back to the JetAppointment plugin Wizard.
In this case, choose the Car post type as Service, and set up either:
- The Slot option for rental and then set up its length – e.g., 5 hours. Thus, customers can only rent for 5, 10, 15, 20 hours, and so on.
- The Time Picker option lets you adjust the minimum and maximum time. It’s a bit more flexible variant than the Slot one.
Then, you proceed to the forms – you can generate two forms:
- Single Service Booking Form – a form to be placed at the Service (Car) single page; it doesn’t have a “Choose a Service” dropdown.
- Static Page Booking Form – a form for any other page of your website, with “Choose a Service” and “Choose a Provider” dropdowns.
You can easily edit and add or remove dropdowns, so these forms are created automatically just to save you time.
As you can see in the video above, there are many other settings for automatic reservation confirmation, notifications, and integrations.
Just like with JetBooking, you can add DB columns to create custom fields if you need to store more information about your rental items.
After all is set up, go to the cars that should be booked hourly, and set pricing either hourly or for the time slot, depending on your setup.
NOTE
If you have both JetAppointment and JetBooking installed, you will see two dashboards for pricing and other settings above your main editor on the backend, so just don’t get lost.
But don’t worry – these plugins don’t overlap. Just make sure you haven’t added the same car to both the Economy and Luxury categories, and display the correct price and form on the front end using the Dynamic Visibility feature.
Now, it’s time to do exactly what you did for the JetBooking form – edit the front-end template and display the price and booking form by the JetAppointment using Dynamic Visibility.
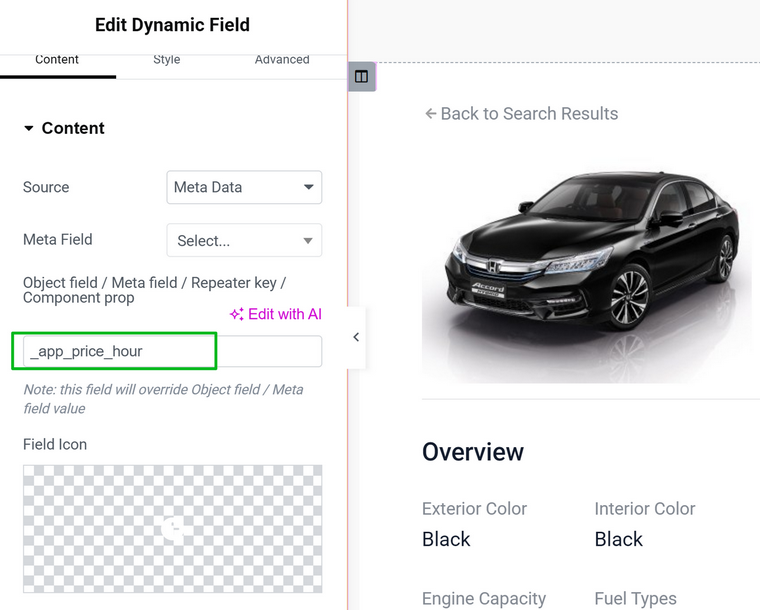
If you want to display pricing for Appointment booking, use one of these three field keys:
_app_price – price for the slot;
_app_price_hour – price per hour;
_app_price_minute – price per minute.
Depending on your pricing, choose the suitable value in the Object field / Meta field / Repeater key / Component prop field while selecting “Meta Data” Source in your Dynamic Widget.
📚 Learn more about JetAppointment settings in the Documentation.
I think, in many cases, JetAppointments alone can be enough for car booking websites (or similar), as you can set the booking slot length to 23 hours, which covers the day-based case, plus, it offers the flexibility of hourly bookings at the same time.
Now, create a nice Home page with JetSmartFilters that will help users select their cars.
Congratulations! You have a dynamic WordPress car rental website with two rental options: daily and hourly.
Payments
In my case, I chose WooCommerce checkout for both JetBooking and JetAppointment. If you did the same, connect the Woo payment gateways as usual. If the WooCommerce checkout forms are too long and have issues, you can edit them using JetWooBuilder.
If you prefer direct gateway integration, JetFormBuilder supports Stripe and PayPal.
If you want to save time, become an All-Inclusive Crocoblock user to access not only all the plugins, but also 14 dynamic templates, including RentGo – a ready website for daily car rental.
FAQ
There is no single best WordPress reservation plugin, because the right one depends on whether you need daily bookings, hourly bookings, or both. Look for a flexible WordPress plugin for reservations that supports custom post types, forms, and pricing logic.
You can add a reservation widget in WordPress using a form builder that supports dynamic data and booking logic. Embed the widget inside your vehicle template and connect it to your pricing source or booking system.
Yes, most modern solutions work with WooCommerce or direct gateways so that you can accept online payments for reservations.
Start with a custom post type for vehicles, then connect it to a booking reservation plugin for WordPress that supports your rental model.
Wrapping Up
A mixed-model booking system on WordPress does not have to be complicated. When you properly structure your cars and use the right booking tools, you get a clean, flexible reservation flow that feels professional without being over-engineered. Build it once, keep it organized, and your customers will always know exactly how to book the car they want.
