JetBooking Dashboard Overview
This tutorial overviews the JetBooking dashboard settings and explains how to create, edit, filter, and export bookings from the WordPress Dashboard.
JetBooking is a WordPress booking plugin that allows the creation of booking and rental websites where users can book services and make payments on a daily or nightly basis.
The path to the JetBooking Dashboard is WordPress Dashboard > Bookings.
The JetBooking Dashboard has the following tabs: Bookings, Settings, Set Up (optional), and Calendars (optional).
Booking Data Collecting
The JetBooking plugin receives the booking data in the following ways:
- If a user books an item from the Custom Post Types (CPTs) preset in the dashboard settings. The How to Create a Booking Form tutorial explains how to allow booking order data collection using the JetEngine and JetFormBuilder plugins;
- If the site administrator(s) add(s) the booking order(s) manually via the JetBooking dashboard. More information is available in the Manual booking chapter of this tutorial.
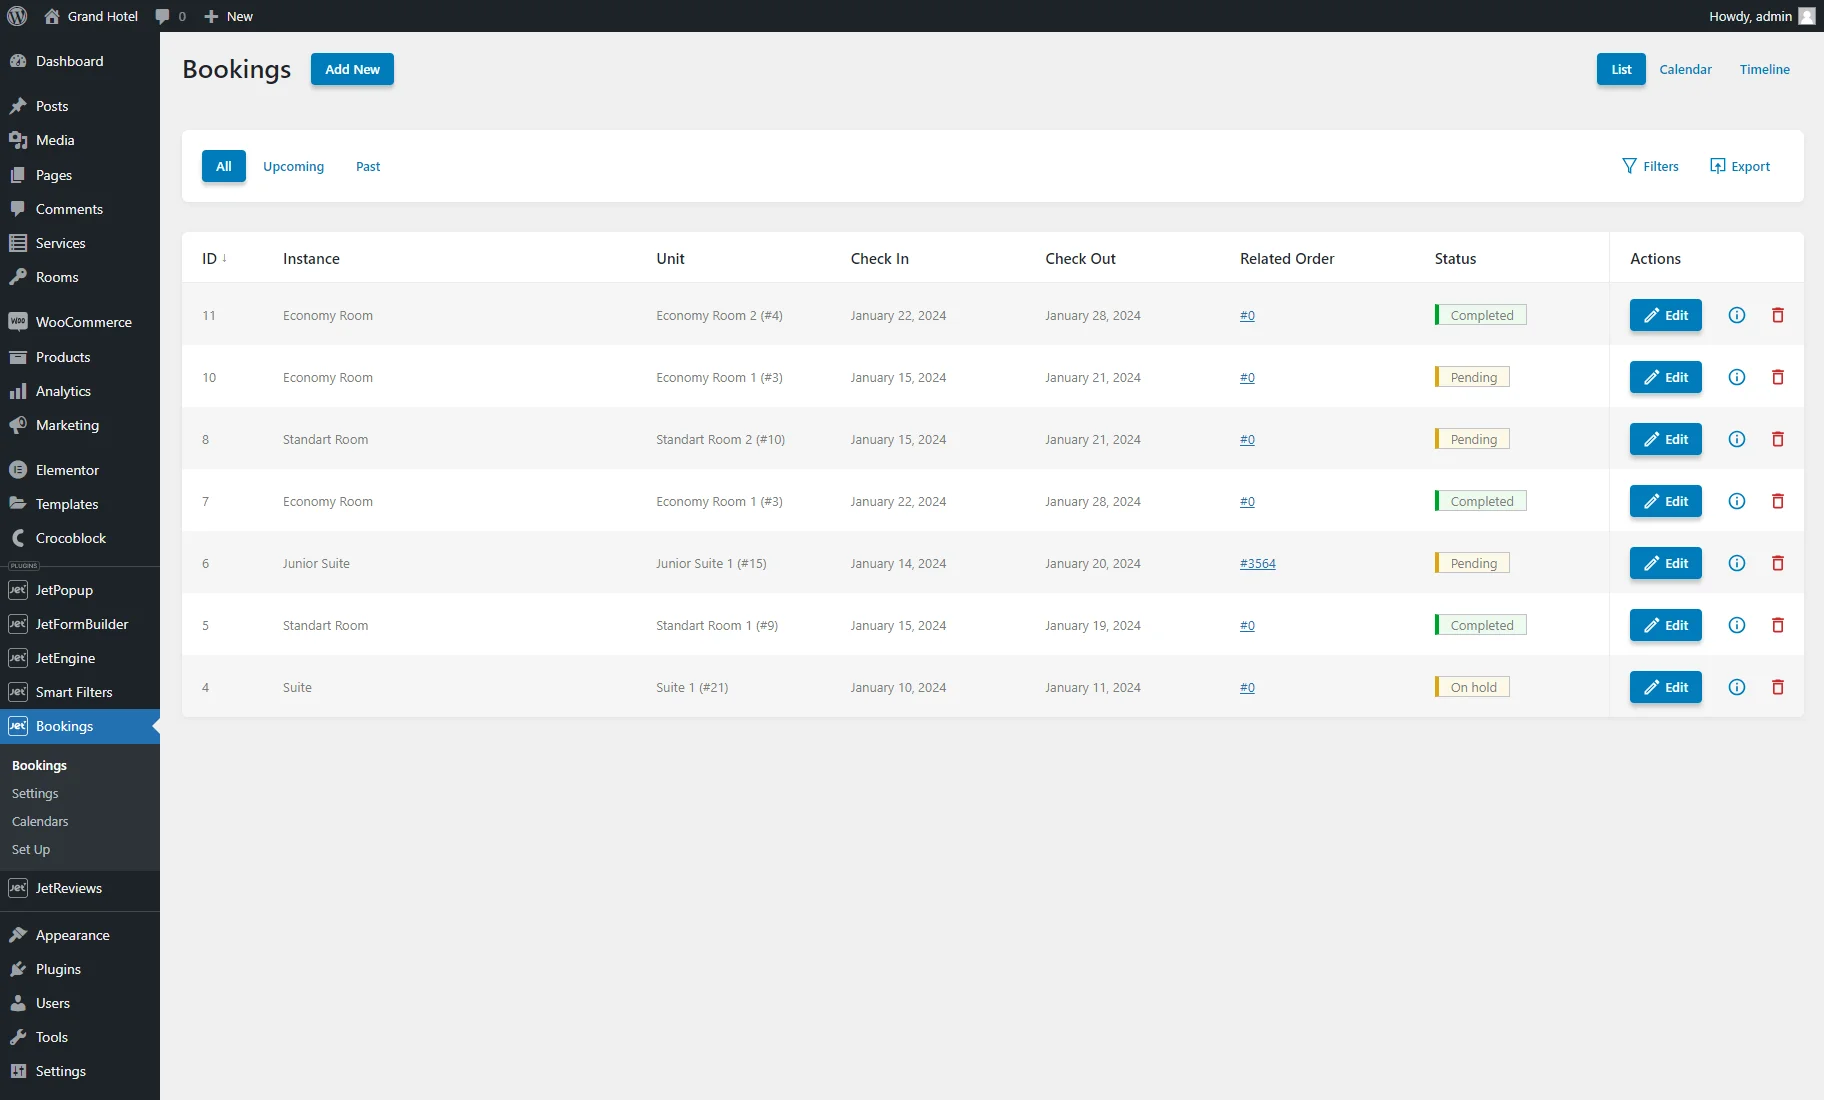
Bookings Tab
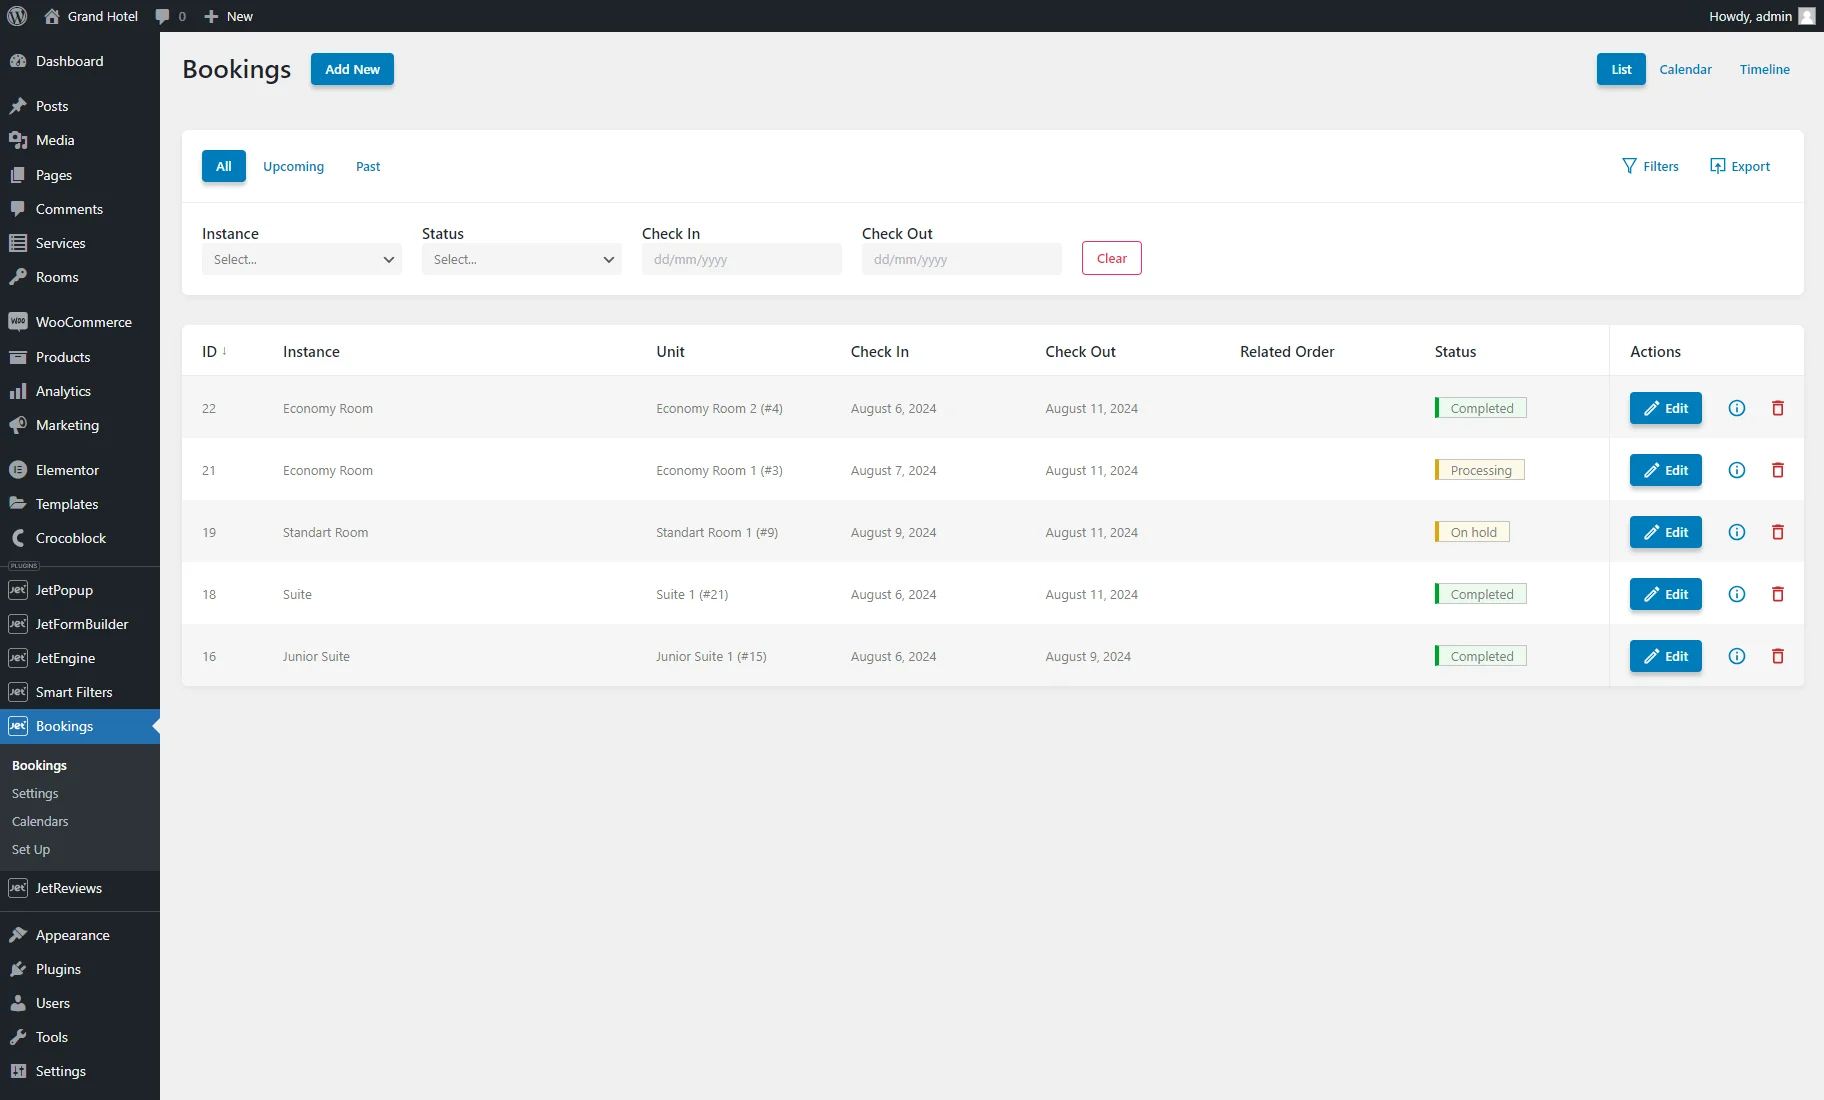
The Bookings dashboard shows the following booking order data: ID, Instance, Unit, Check In, Check Out, Related Order, Status, and Actions. This tab shows all bookings made on the website by users and administrator(s) without differentiation.
Manual booking
Pressing the “Add New” button allows creating a new booking with the following settings:
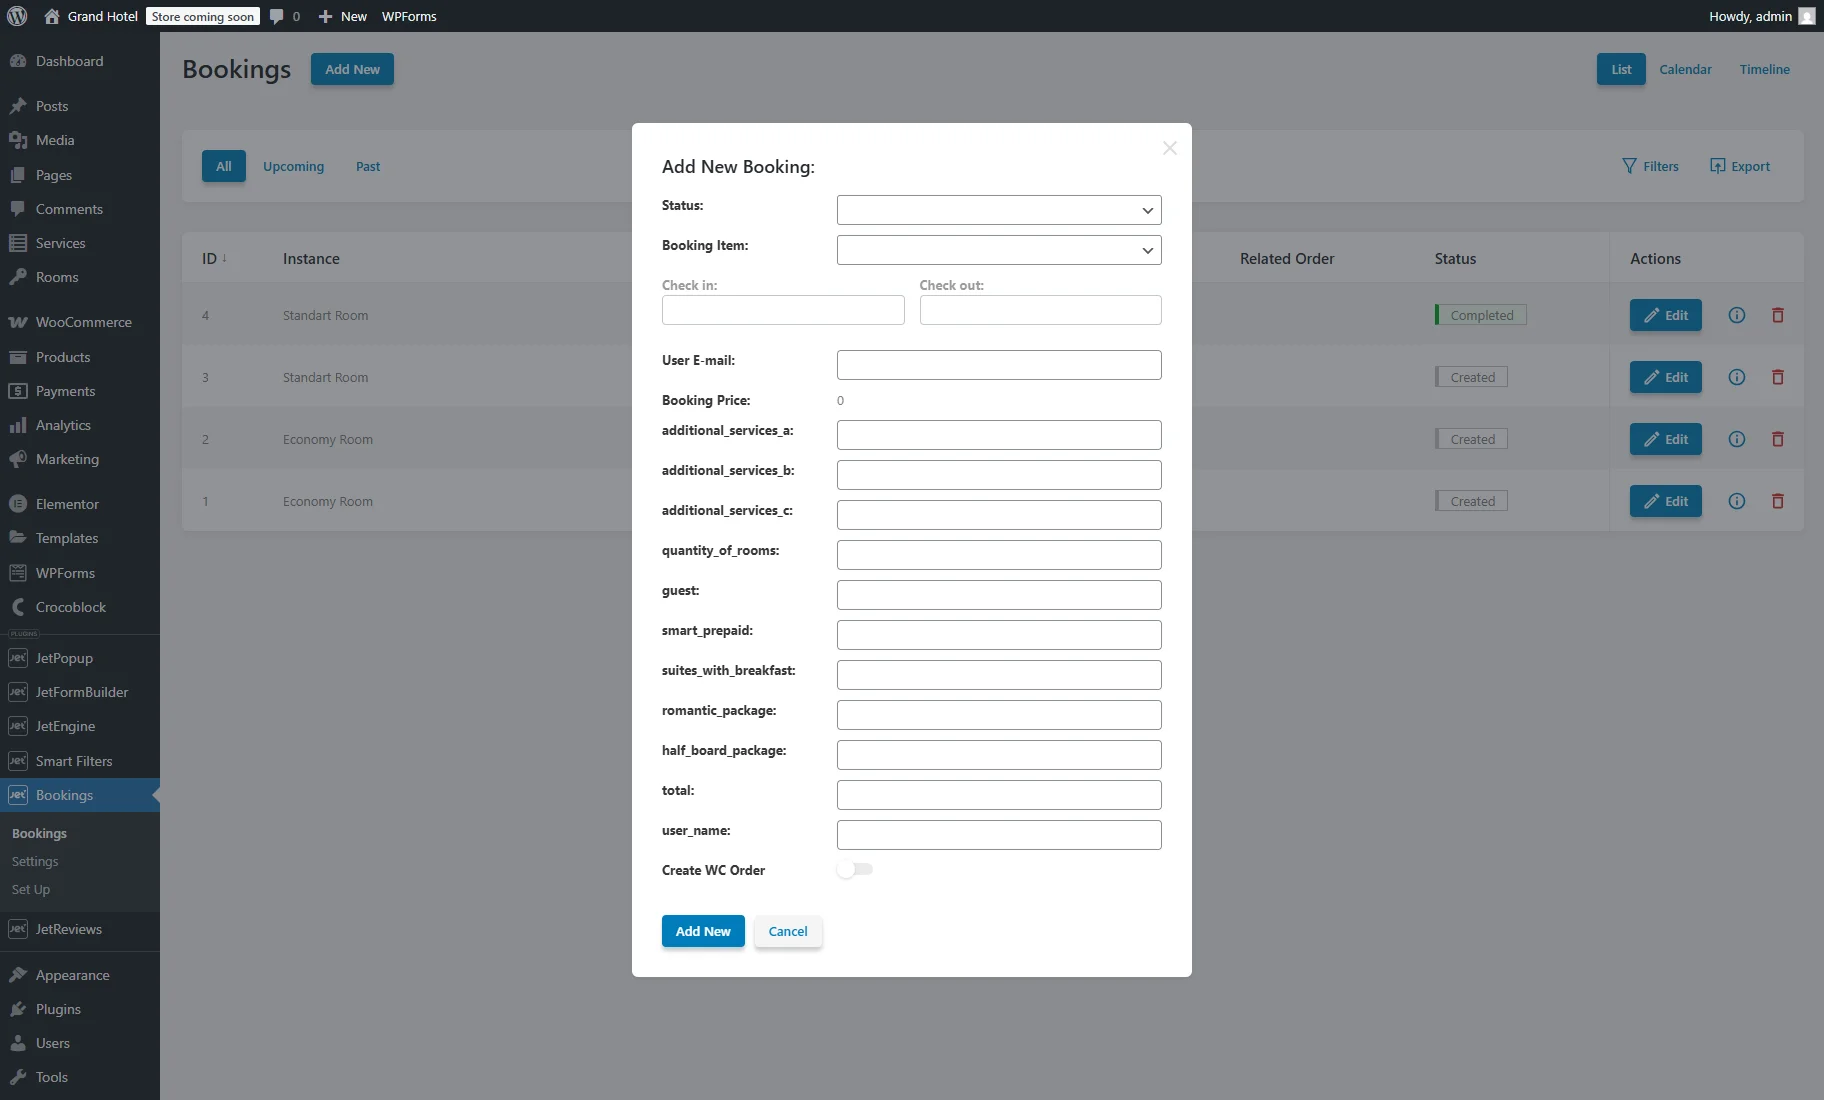
- Status — a drop-down menu that allows the order status selection. The list of statuses is the same for the WooCommerce integration:
- Completed — the booking has been successfully fulfilled;
- Processing — the booking is confirmed and being prepared or handled;
- On hold — the booking is temporarily reserved, awaiting confirmation or further action;
- Pending — the booking has been requested but not yet confirmed;
- Refunded — the booking has been canceled and a refund has been issued;
- Canceled — the booking has been canceled, and no service will be provided;
- Failed — the booking attempt was unsuccessful due to a payment or processing error;
- Created — the booking entry has been created but may require further review or confirmation.
- Booking Item — a drop-down menu where the necessary item can be selected from one or several CPTs assigned in the Bookings > Settings > General > Booking instance post type drop-down menu;

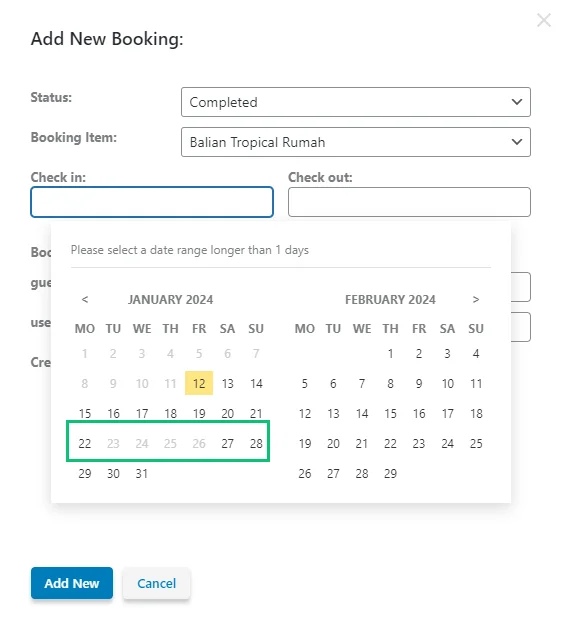
- Check in and Check out dates — these two fields will remain locked until the Booking Item option is selected. Once set, they open calendars to select available dates. After these dates are selected for the current item, day slots will be blocked from being booked by another order;
- User E-mail — a field that shows the email of the user who booked the instance;
- Booking Price — a field that shows the calculated price for the booked apartments, depending on the price rates. More information is available in the Adjust booking price and pricing rates chapter of the How to Set Automatic Price Calculator tutorial;
- DB tables — the following fields were added during the booking setup that can be filled with the additional information (e.g., additional services, number of guests, breakfasts, etc.);
- Create WC Order — this toggle is available with the WooCommerce plugin installed and activated, and the WooCommerce integration toggle enabled in the WordPress Dashboard > Bookings > Settings > General tab. It creates the booking order in the WordPress Dashboard > WooCommerce > Orders tab. This toggle also turns on the First Name, Last Name, Email Address, and Phone fields, which should be completed.
Once all desired options are set, the “Add New” button can be clicked to create a new booking.
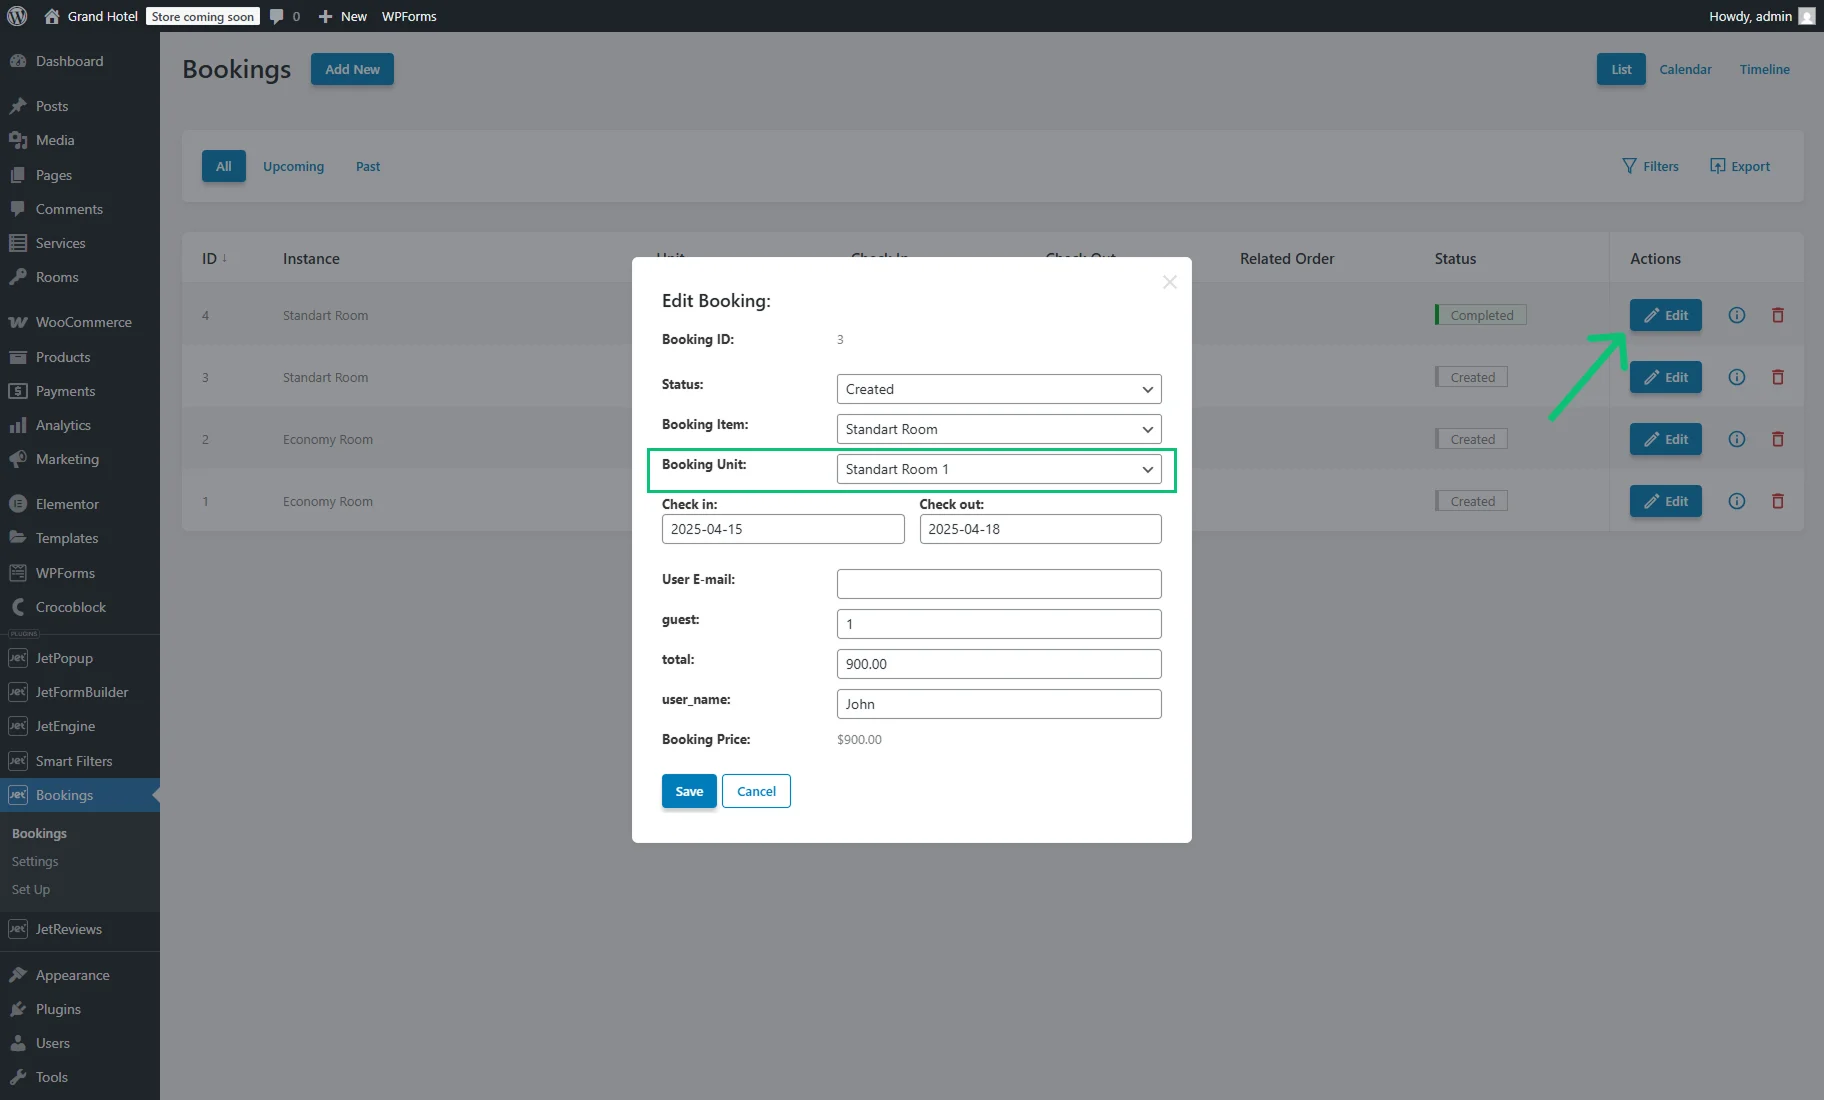
Booking units
With the JetBooking plugin, the booking units feature is available.
After a new booking is created, it will automatically be assigned to the first or next available item, for example, a unit in the hotel. The assigned unit can be modified in the Edit Booking pop-up after clicking the “Edit” button next to the respective booking.
If the multibooking units feature is enabled, multiple bookings will be created for each unit.
Booking filters
Under the “Add New” button, there is a menu tab where bookings can be filtered by such categories placed on the left side:
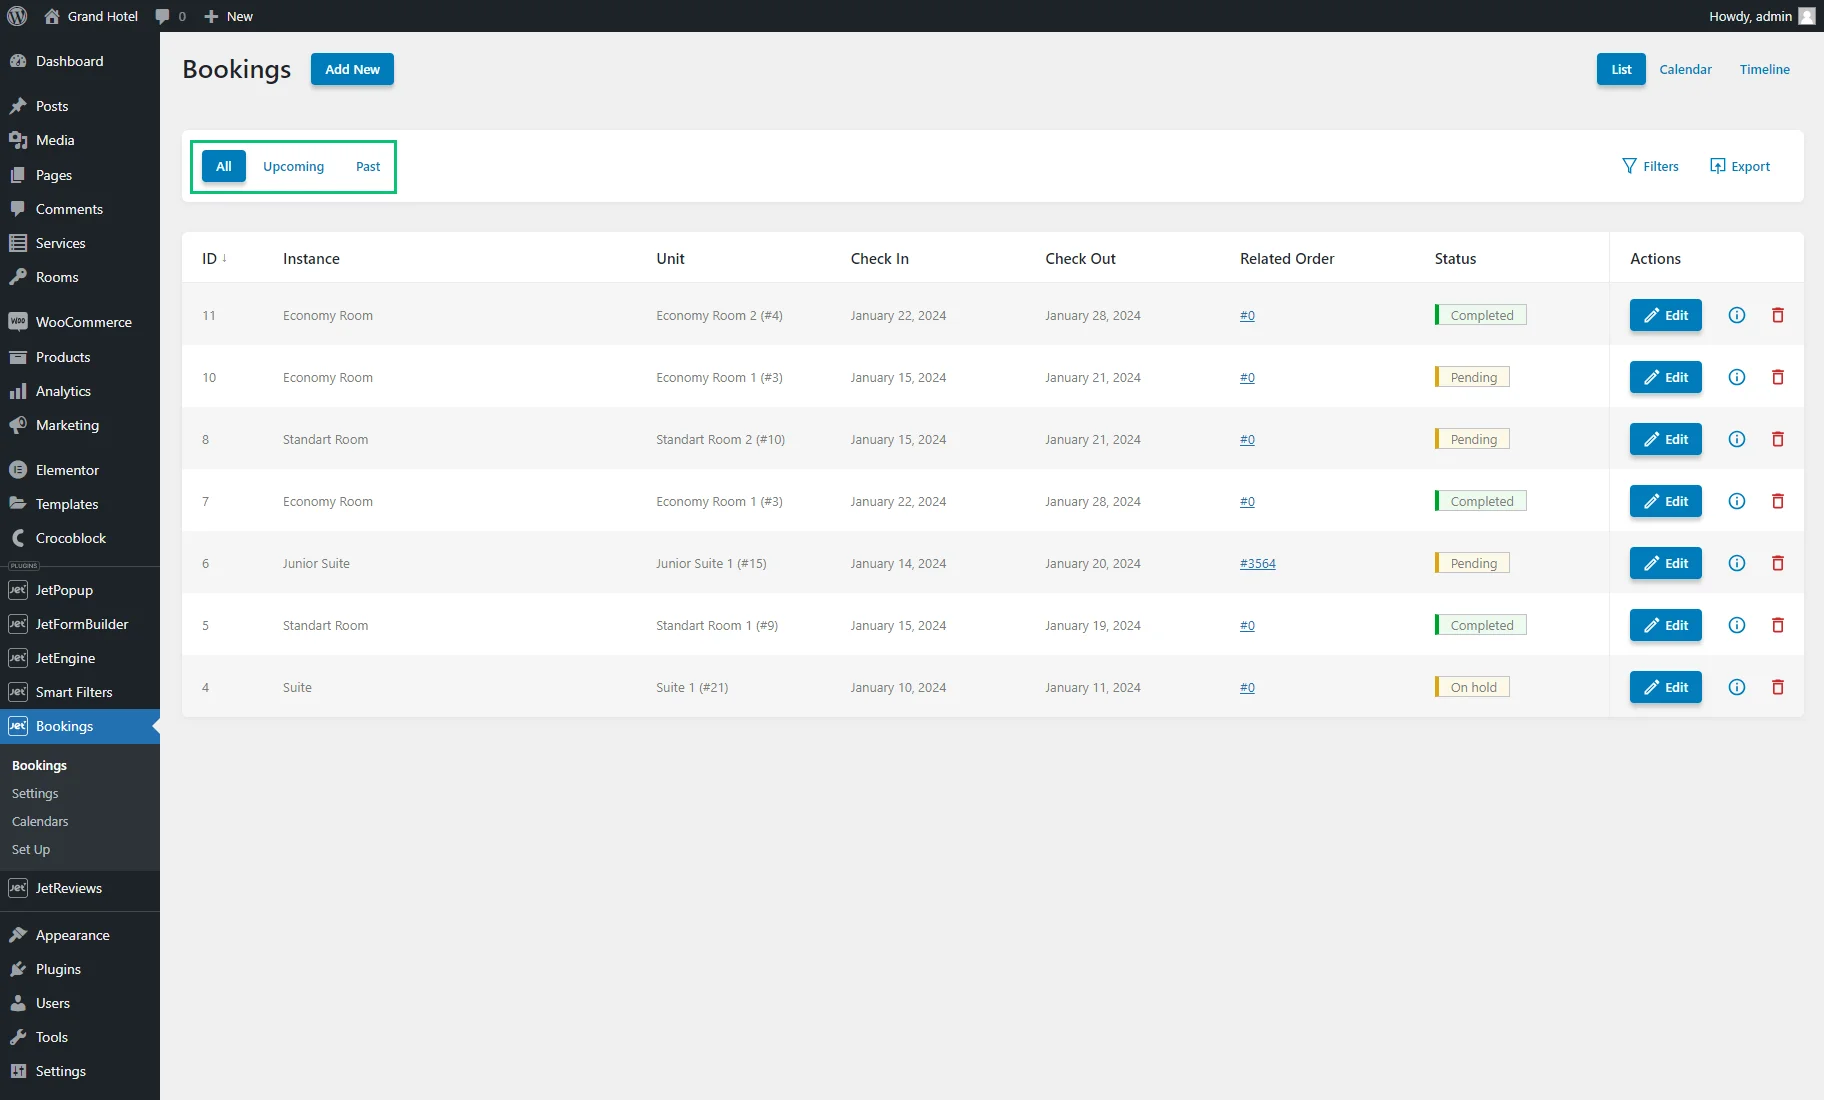
- All — shows all bookings;
- Upcoming — shows bookings that are scheduled to occur in the future;
- Past — shows only those bookings that have already taken place.
The “Filters” button on the right side unfolds a tab with booking filters. Bookings can be filtered by Instance (CPT items), Status, and Check In and Check Out dates.
The “Clear” button resets all applied filters.
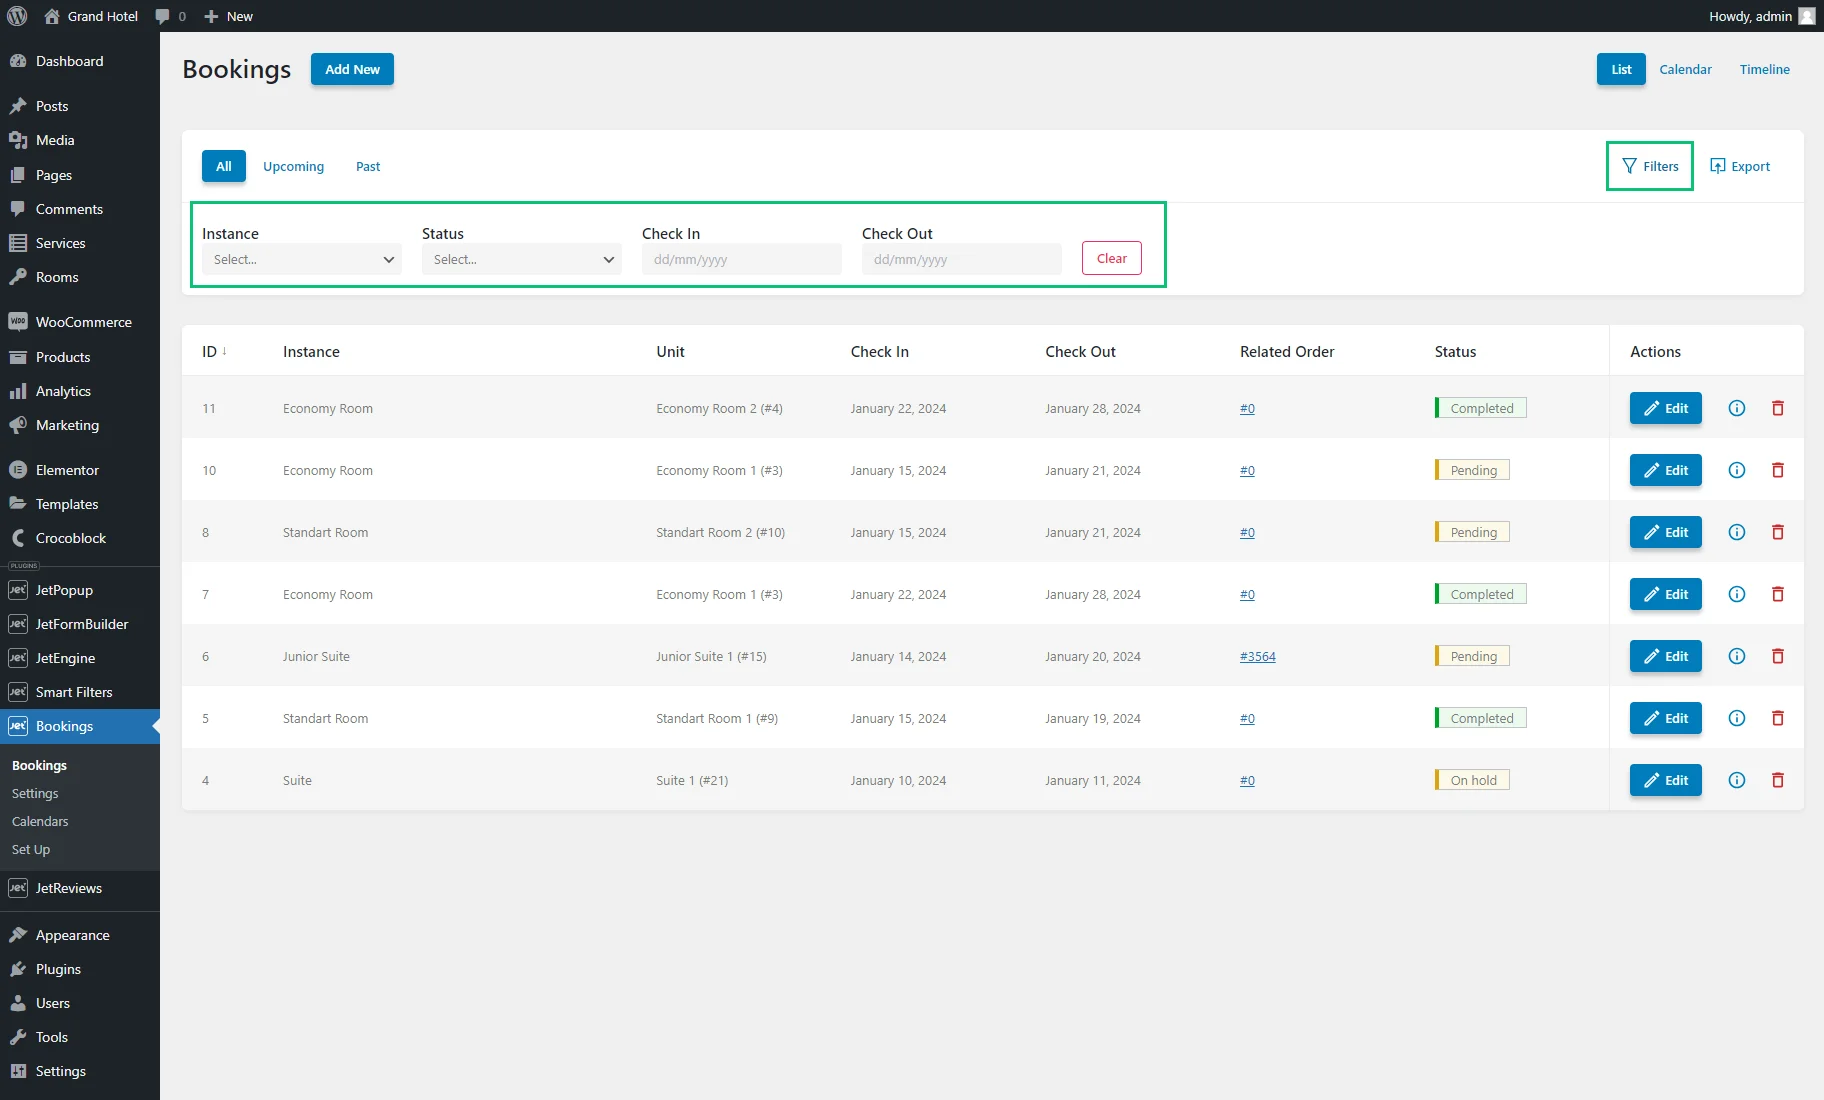
Booking export
The “Export” button on the right side of the menu tab triggers the Export bookings pop-up with such settings:
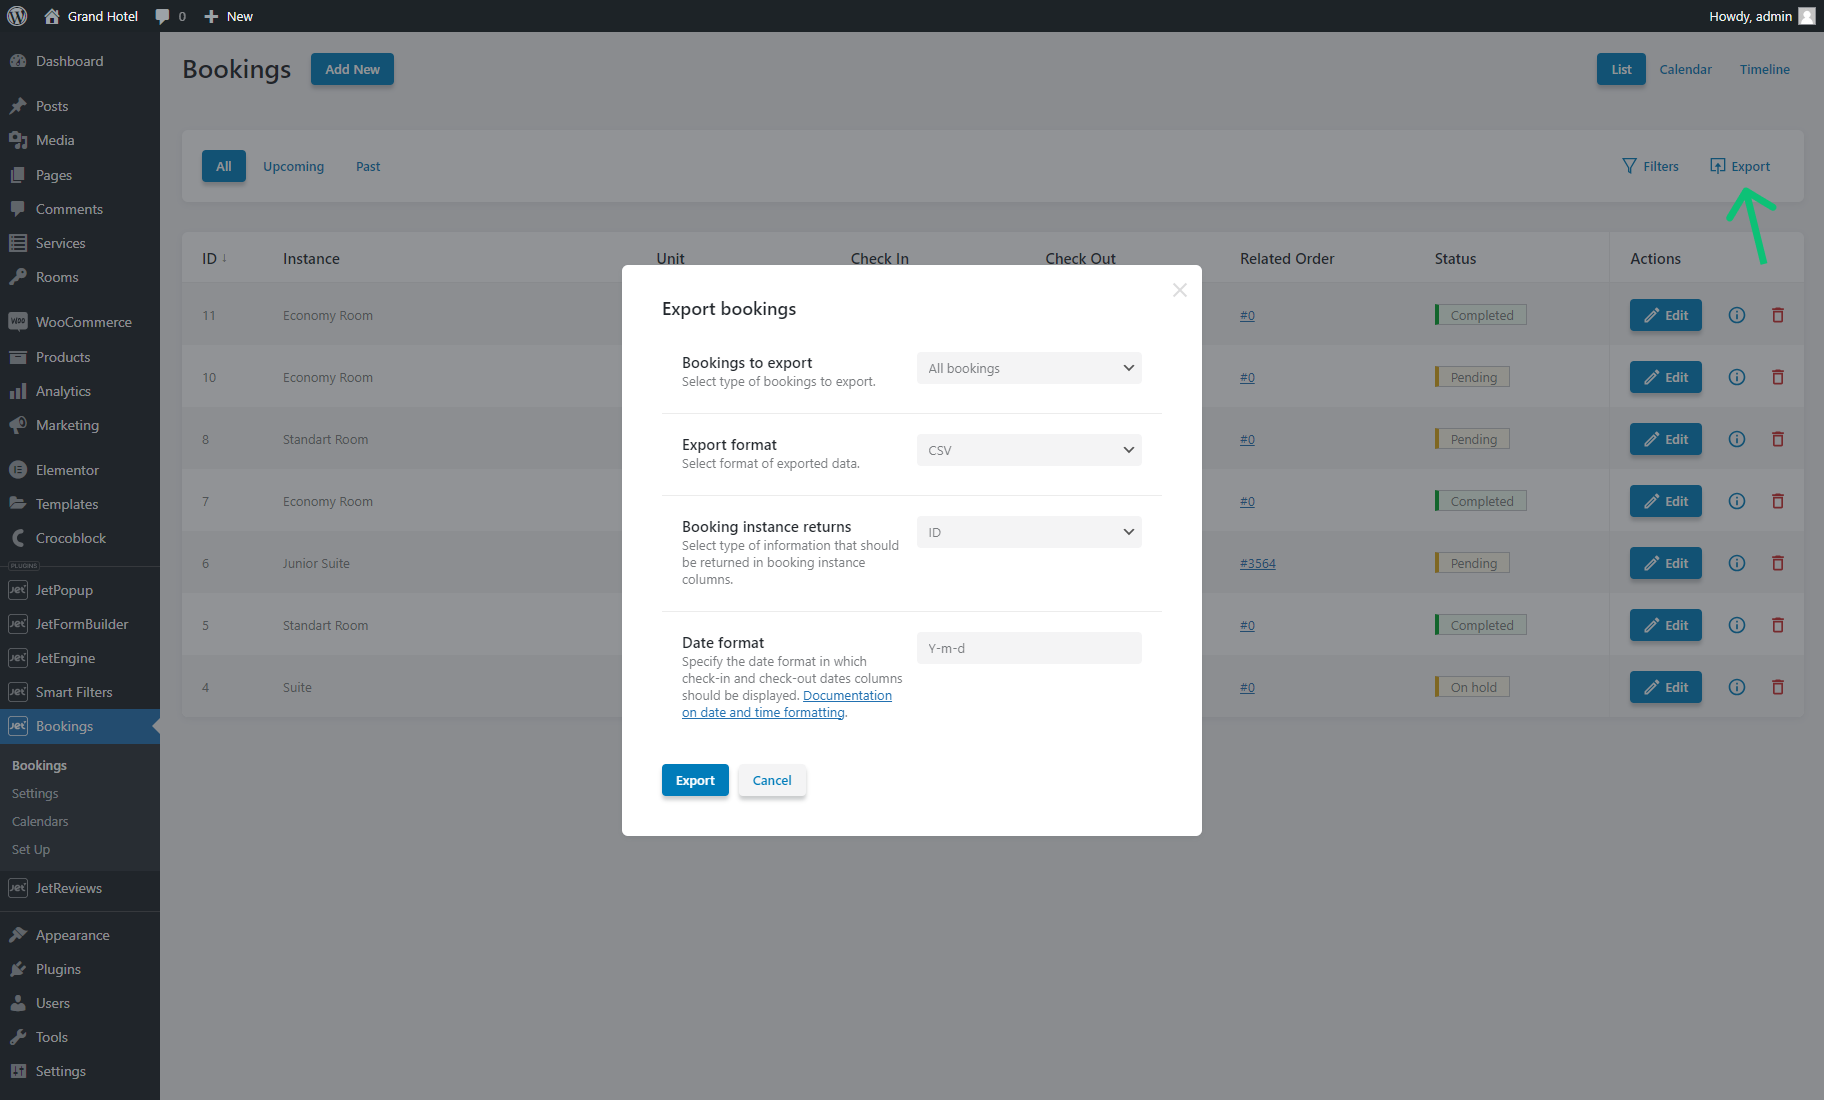
- Bookings to export — a drop-down menu to select what bookings should be exported: “All bookings” or “Filtered bookings.” The second option allows exporting specific bookings, such as upcoming bookings with the “Completed” status. With the “Filtered bookings” option, the booking list should be narrowed down with the booking filters before exporting;
- Export format — a drop-down menu to select the “CSV” (Excel sheet) or “iCal” format;
- Booking instance returns — available only for the “CSV” option. Selects the type of information to be displayed in the columns for the booking instance: “ID” or “Title”;
- Date format — available only for the “CSV” option. Allows specifying the format in which check-in and check-out dates should be displayed in the sheet columns. For more information, proceed to the Customize date and time format article.
After setting the pop-up option, one should hit the “Export” button to complete the booking export process; otherwise, the “Cancel” button can be pressed.
Booking views
There are three available booking views:
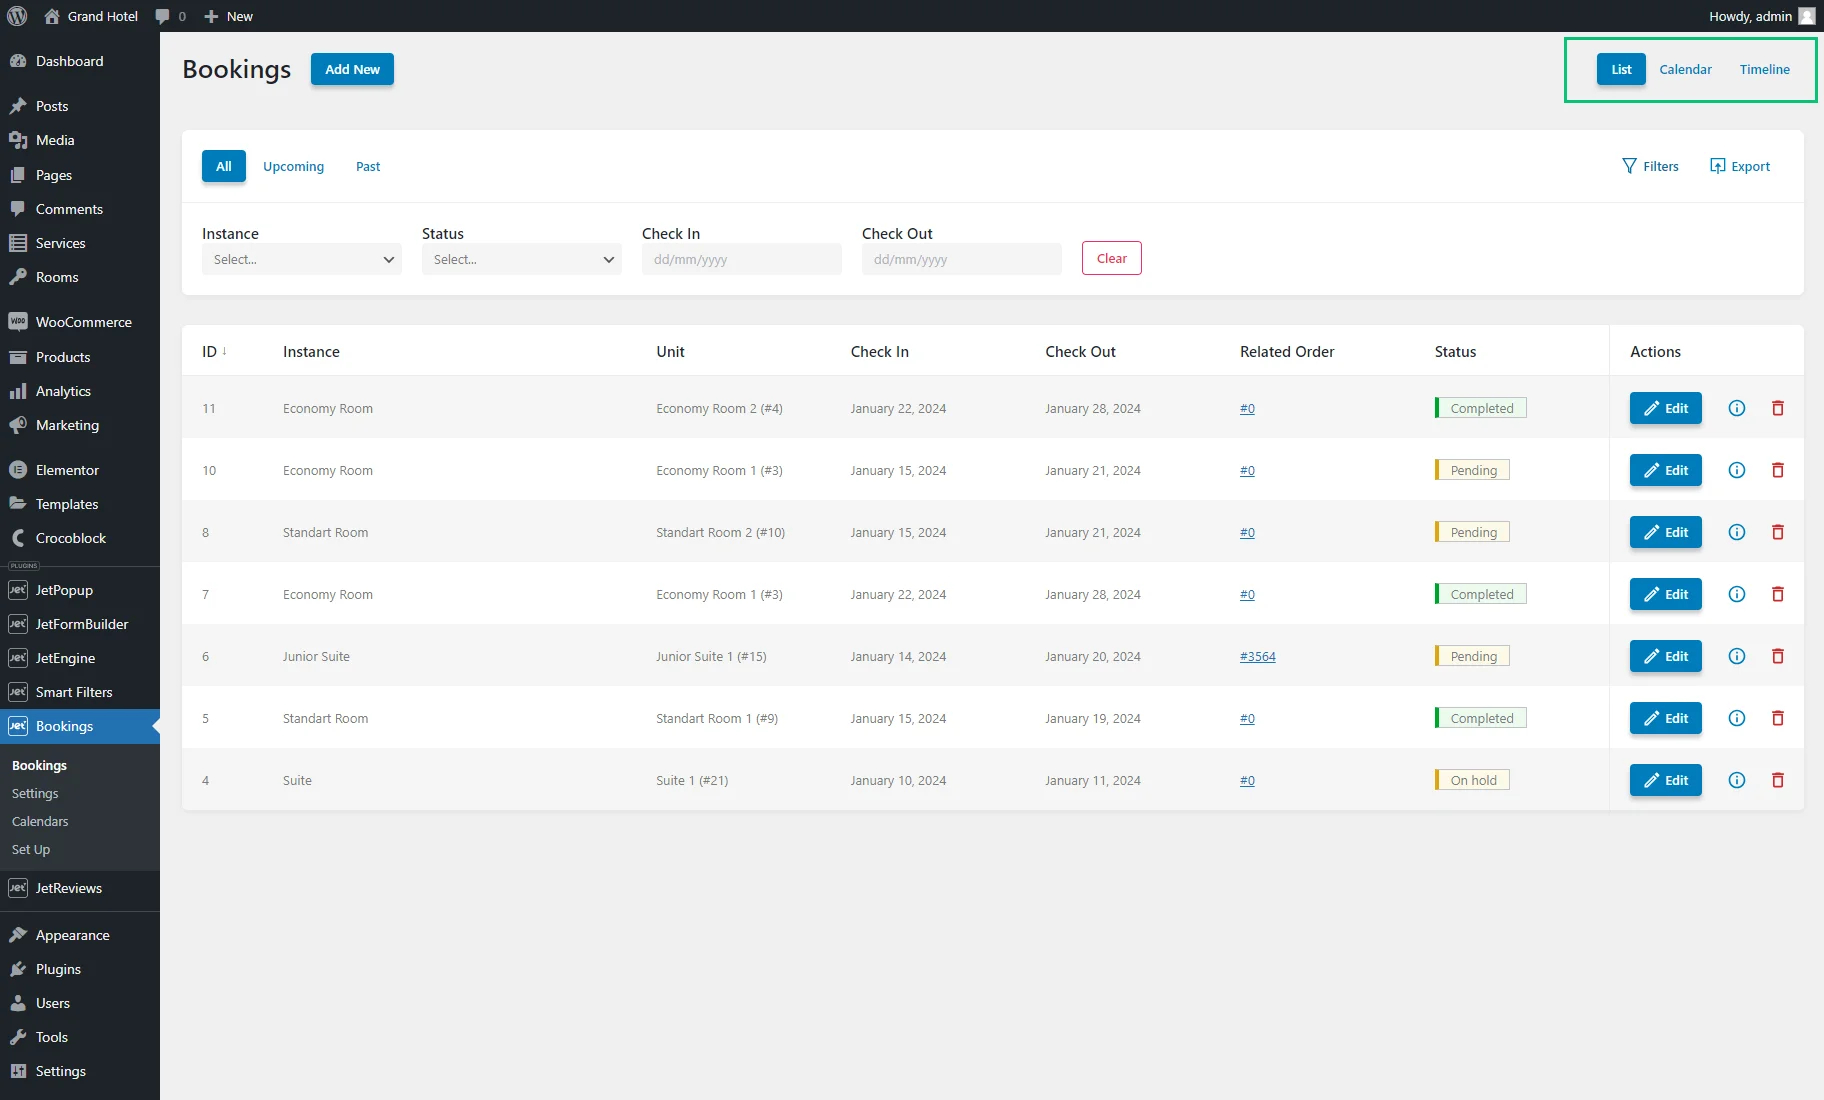
- List — the default view, which shows the following data in the sheet: ID, booked instance, booked unit ID, check-in/out date, related order, and booking status;
- Calendar — displays bookings in the calendar. This view allows booking filtering by Instance and Status. Filtering by the Check In and Check Out dates is unavailable since the calendar shows bookings within one month, and the current month is defaulted.
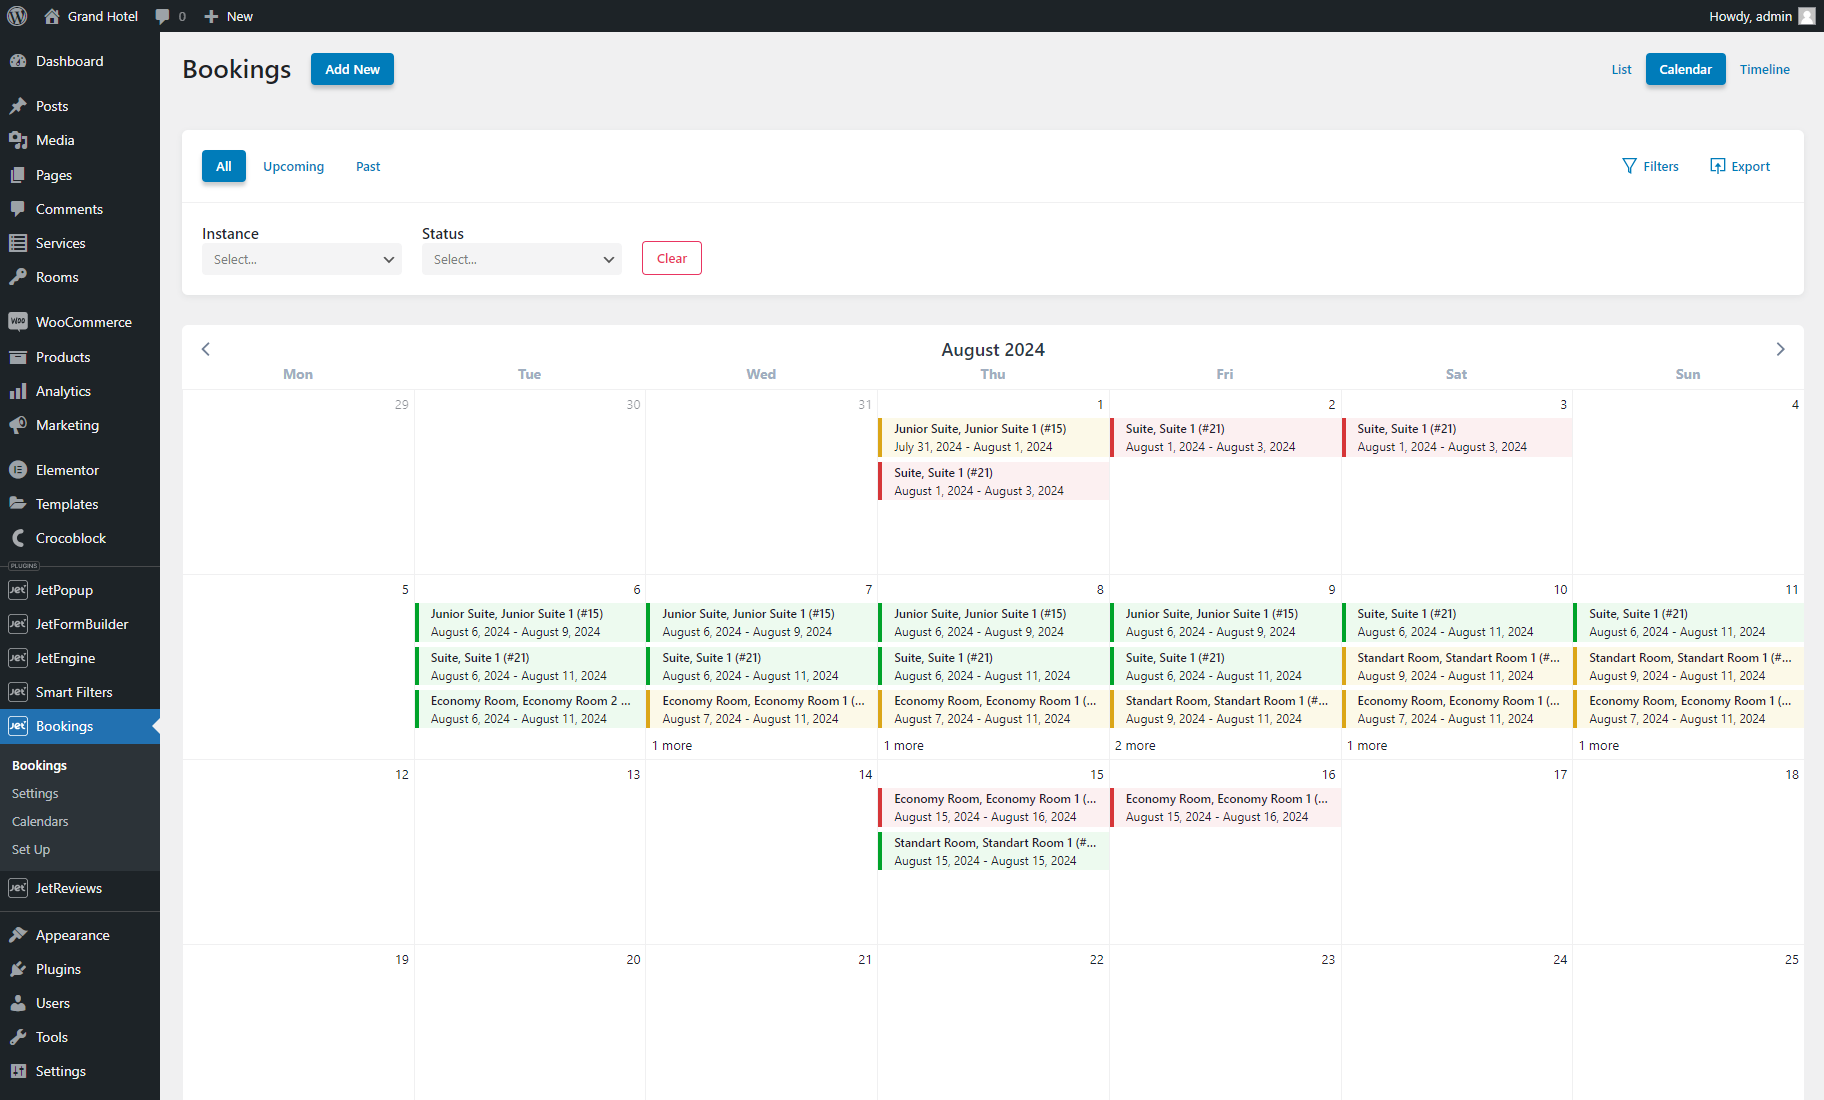
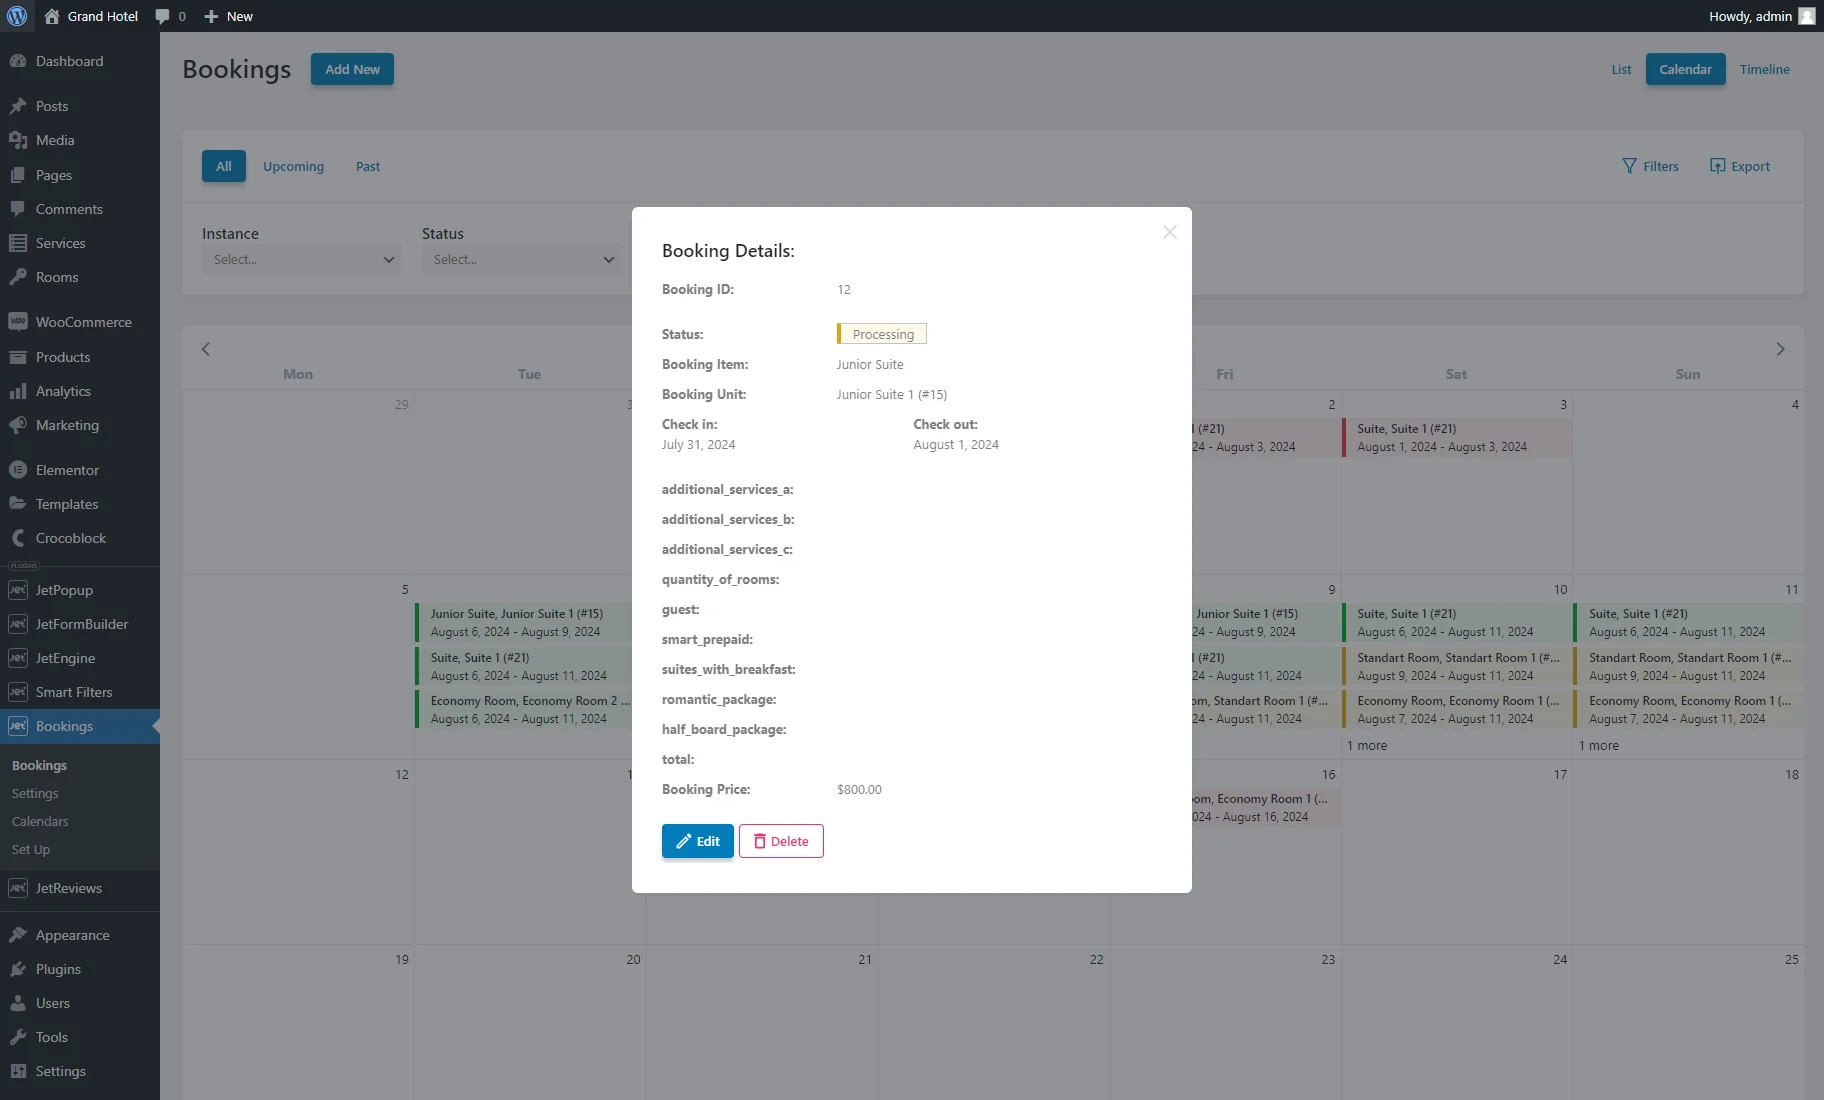
The calendar slots show the name of the booked apartment and unit (if such functionality is set) and check-in and check-out dates.
Bookings of different statuses are highlighted with different colors: green for “Completed,” yellow for “Processing,” “On hold,” and “Pending,” and red for “Canceled,” “Refunded,” and “Failed.”
Clicking on a booking opens a pop-up with more details.
One calendar slot shows up to three bookings; if there are more for one date, the load more button will appear at the bottom of the slot with the “… more” dynamic text. Clicking on this button will redirect to the list of bookings which date period matches the selected date.
- Timeline — displays bookings as a schedule over time, displayed in a grid format. This view allows booking filtering by Instance and Status. The filtering by the Check In and Check Out dates is unavailable since the timeline shows bookings within one month. The upper part of the timeline shows the chosen month days, and on the left are the CPT items that were booked (apartments). The grid shows the name of the booked apartment and unit (if such functionality is set) and the booked period.
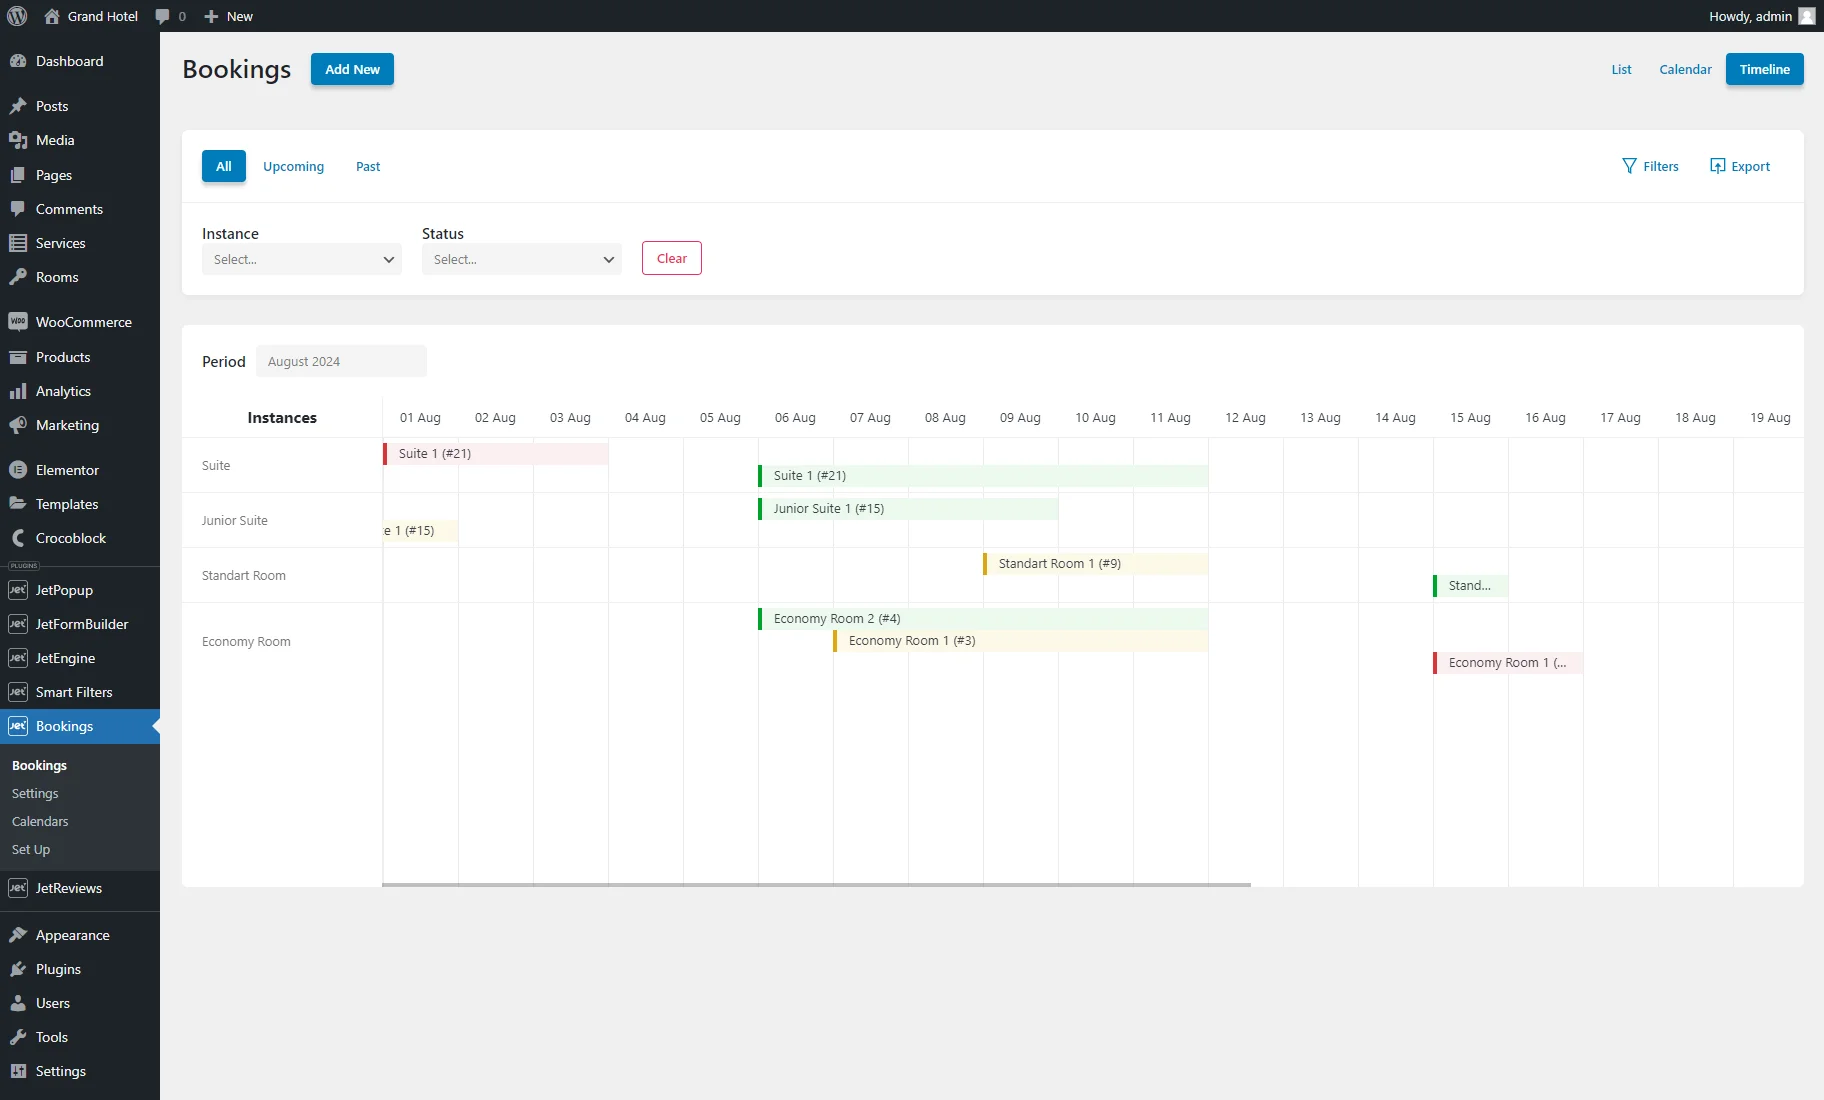
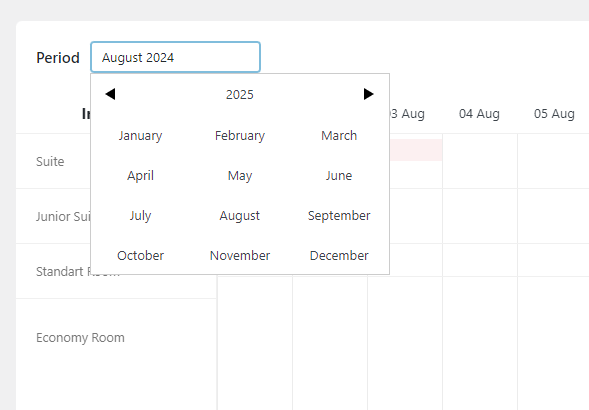
The timeline shows bookings within one month, and the current month is defaulted upon opening the Bookings tab. To switch the timeline period, one should click the Period field and choose the required month and year.
Bookings of different statuses are highlighted with different colors: green for “Completed,” yellow for “Processing,” “On hold,” and “Pending,” and red for “Canceled,” “Refunded,” and “Failed.”
Clicking on a booking opens a pop-up with more details.
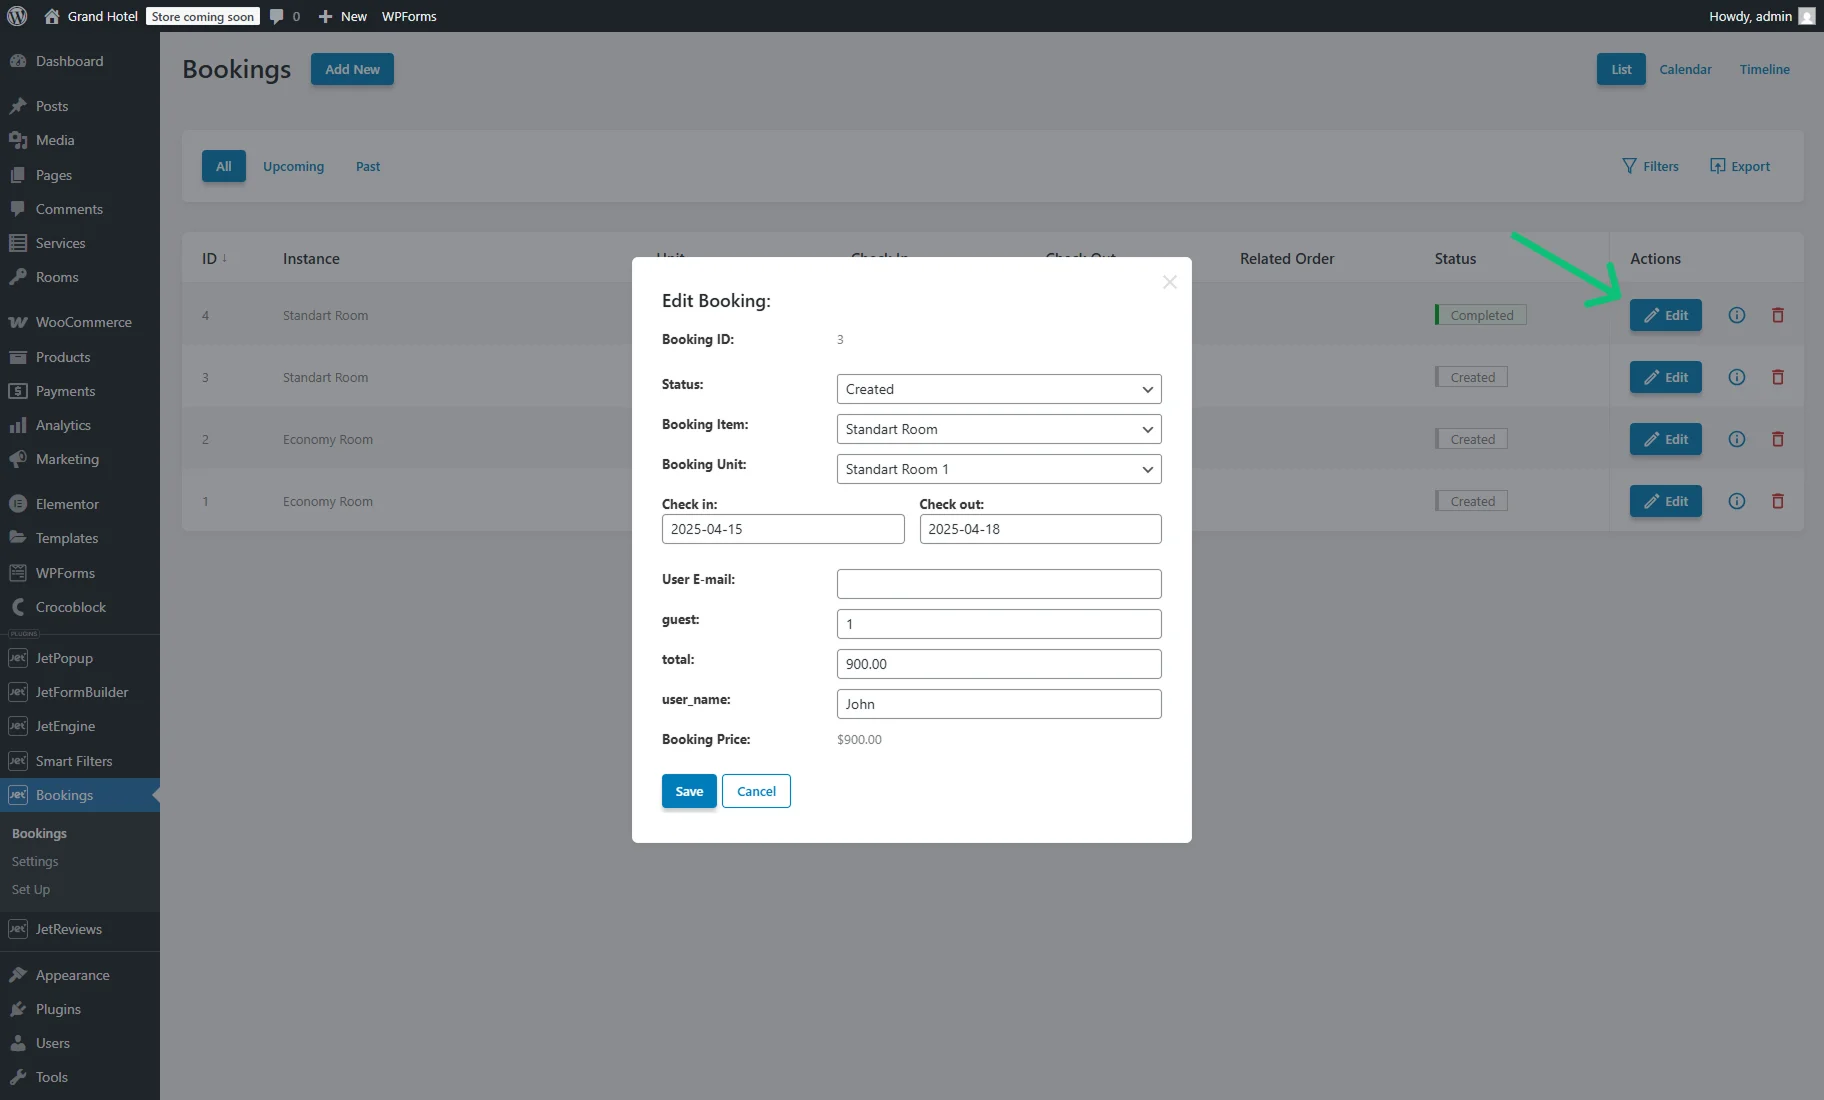
Booking editing
Pressing the “Edit” button opens the pop-up window with fields allowing the booking to be altered. After changes have been made, they can be saved or canceled.
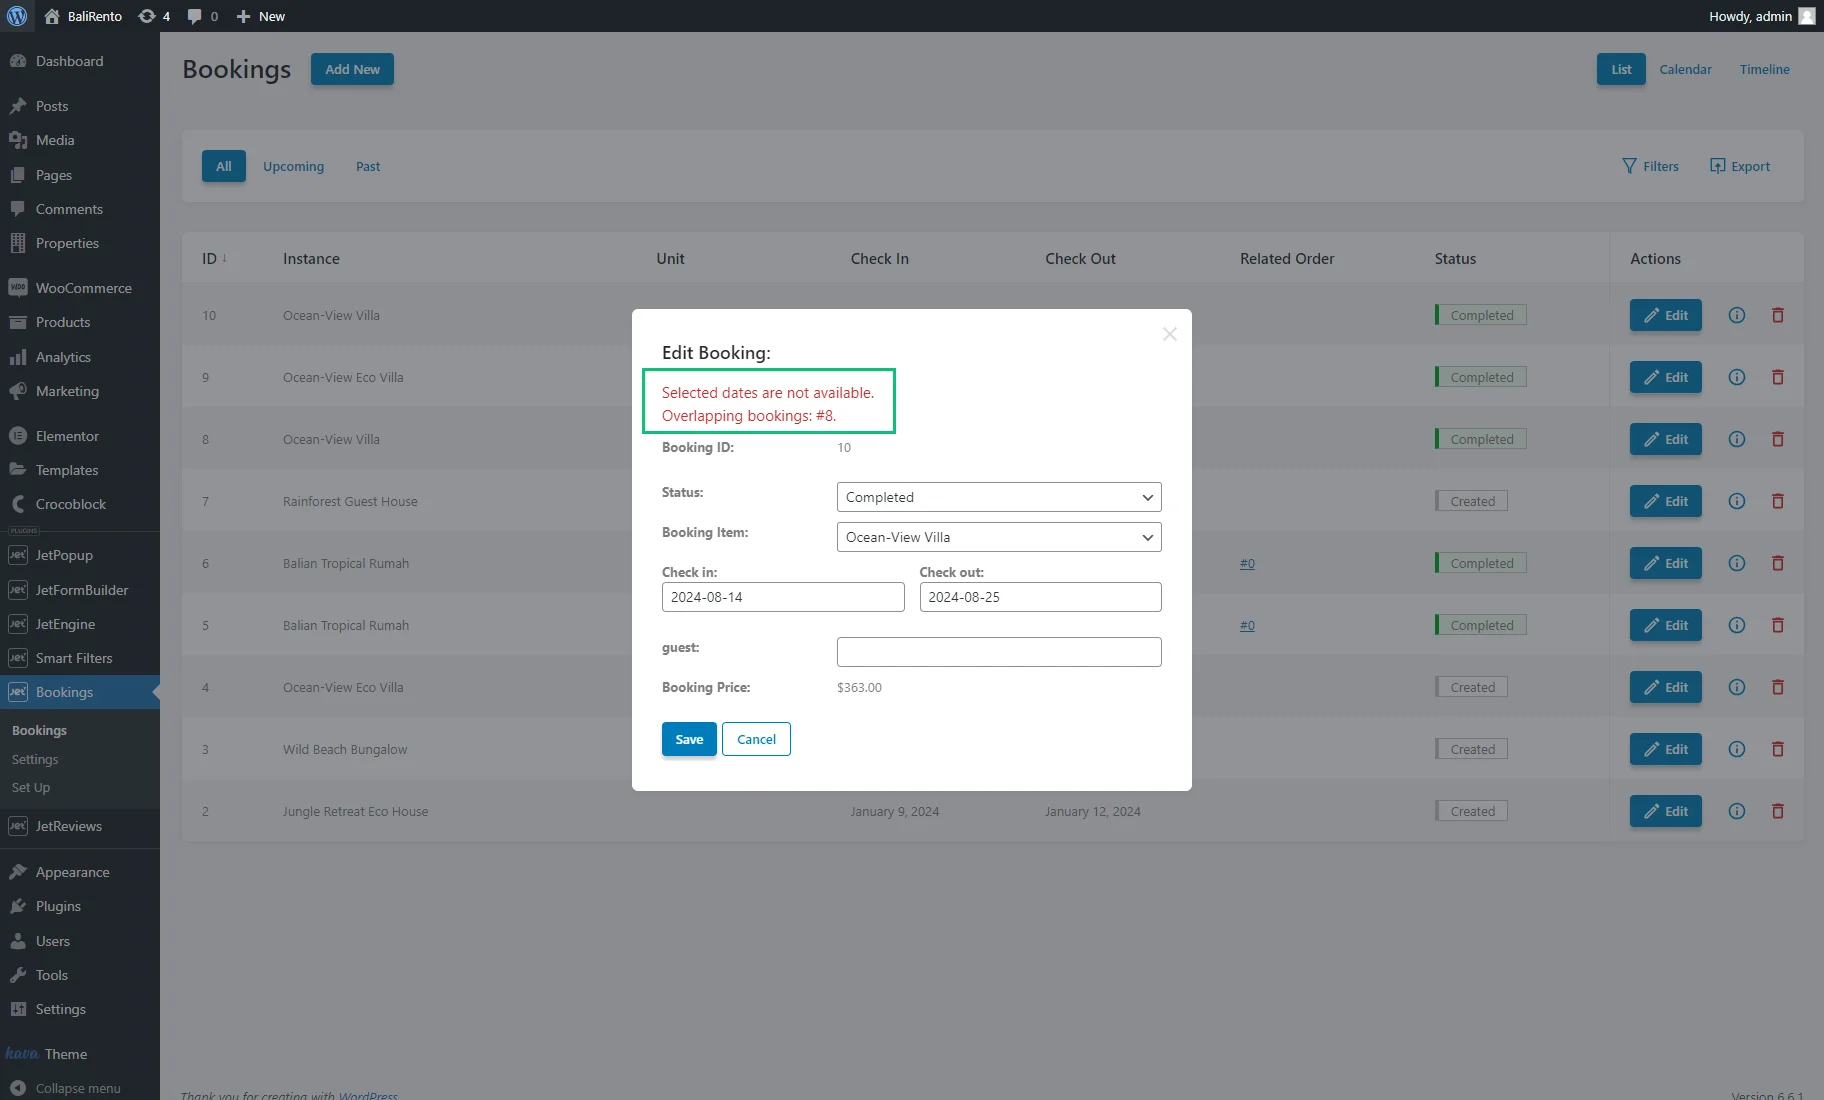
If one enters the already booked dates, causing overlapping, and hits the “Save” button, the changes won’t be saved.
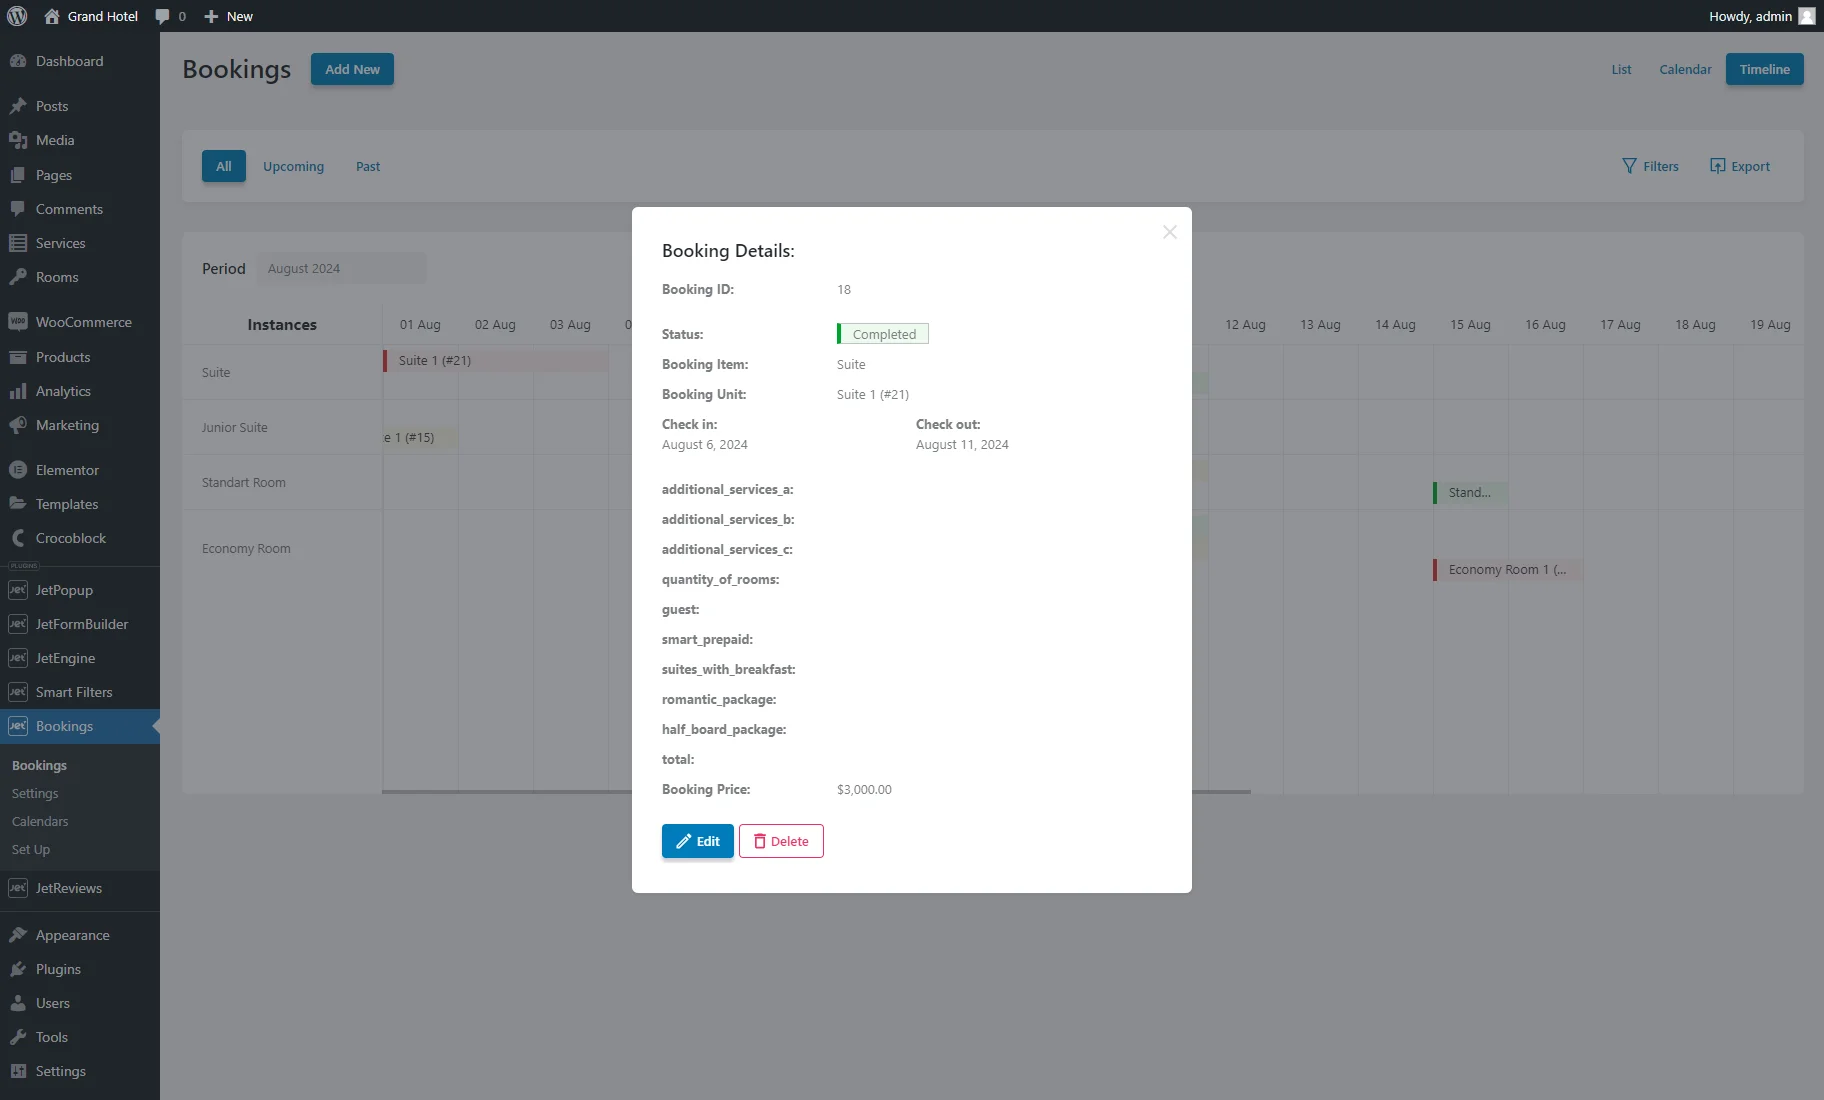
Booking details
Pressing the “Details” icon opens a pop-up window with booking details. The “Edit” button allows for booking modification, and the “Delete” button cancels the order.

Booking date overlapping
The JetBooking plugin averts date overlapping as follows:
- The Check in and Check out date fields of the Add New Booking pop-up exclude the previously booked dates from the calendar for the item (the blocked dates are gray);
- The Edit Booking pop-up shows the occupied dates in the calendar similarly. If one attempts to manually type a new date into the Check in and Check out date fields and it’s already booked, the text will appear: “Selected dates are not available. Overlapping bookings: #.” and it won’t be possible to save the changes.
Settings Tab
This tab has the following settings for booking customization: General, Labels, Advanced, Configuration, Schedule, Workflows, and Tools.

General
These settings allow specification of the post types for booking, WooCommerce integration, filter storage type, and more.
The Booking mode option allows choosing the booking mode type to customize the appearance and functionality of the booking interface according to the selected mode:
- Plain — the booking system focuses on the core functionality for managing bookings. For this mode, a Custom Post Type (CPT) for booking should be created (as described in the JetBooking Preparation Guideline), and the booking form should be set (can be generated during the booking setup);
- WooCommerce based — the booking system enables the creation and administration of custom product types tailored for booking and seamlessly integrates them into your online store.
For the “Plain” mode, such settings are available:

- Booking orders post type — allows selecting the post type related to the created booking records;
- Booking instance post type — allows selecting the previously created post type containing the units to be booked and shown in the Bookings database table (e.g., “Properties,” “Rooms”);
- WooCommerce integration — available only when the WooCommerce plugin is installed and activated. It allows connecting the booking system with WooCommerce checkout;
- Two-way WooCommerce orders sync — available when the WooCommerce integration toggle is enabled. If this toggle is activated, the WooCommerce order status will automatically adjust whenever the booking status changes. By default, altering a booking status doesn’t affect the associated order status;
- Filters storage type — allows selecting the filter storage type for the searched date range: “Session” or “Cookies.”
For the “WooCommerce based” option, other settings are displayed:
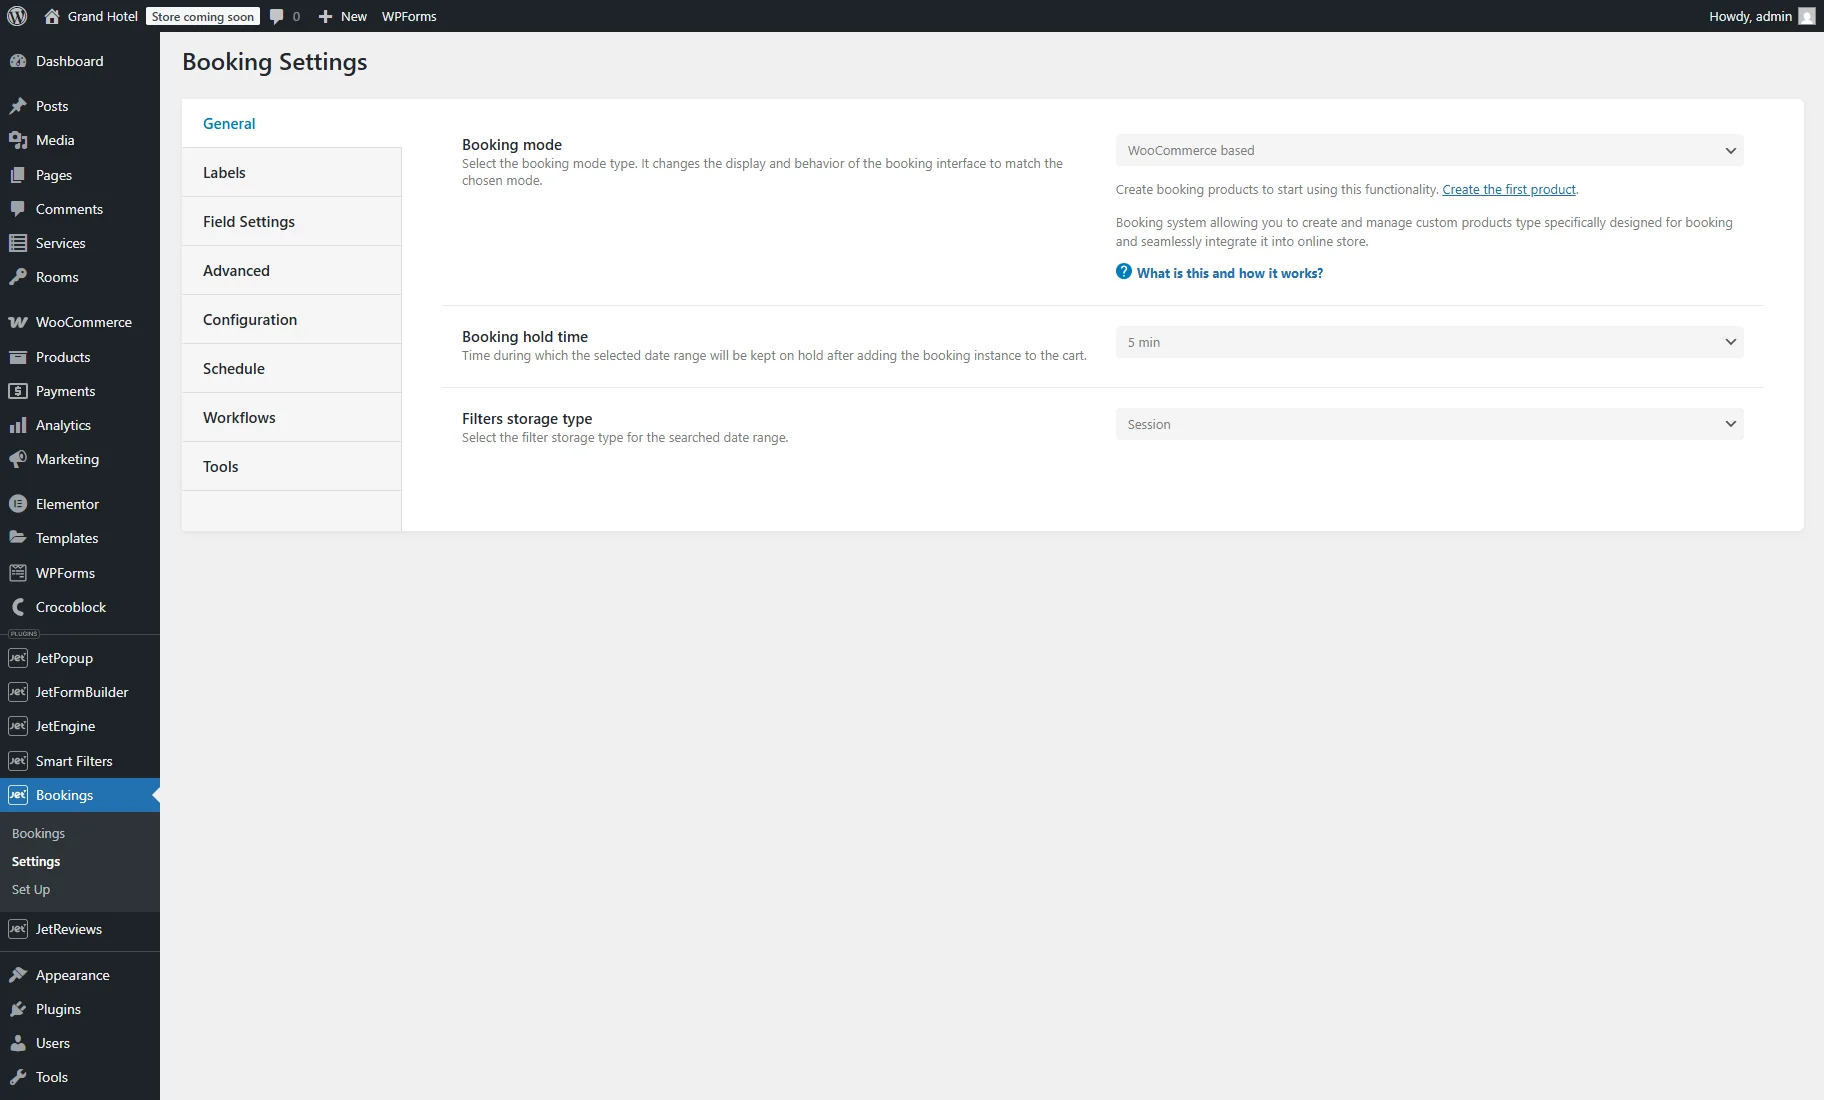
- Booking hold time — picks the duration for which the chosen date range will be reserved after adding the booking instance to the cart;
- Filters storage type — allows selecting the filter storage type for the searched date range: “Session” or “Cookies.”
Labels
This tab adds custom labels to days of the week, months, etc. The Use custom labels toggle activates additional options.

- Excluded dates — allows typing a tooltip text for already booked dates instead of the “Sold out” default text;
- Only checkout allowed — intended to modify labels for dates when only checkout is permitted. The setting is active for the “Per Nights” Booking period option with the Allow checkout only days toggle enabled in the Configuration booking settings tab;
- Before selected dates — allows typing text before the selected dates range instead of the сhosen default text.
Other settings allow custom labels to be added to the booking form, such as the “Nights”/”Days” text fields for typing custom texts instead of the default Nights/Days texts. One can also set custom text or translation for the weekdays, months, and past and previous days.
Field Settings
This tab is available when the “WooCommerce based” Booking mode option is selected in the General tab.

Disable email field is a toggle that is turned off by default. It removes the email input field from the WooCommerce booking form on the single product page.
The Date range picker field section contains such fields:
- Layout — specifies the layout and organization of the field within the interface: “Single field” or “Separate fields”;
- Label — defines a label for a single field layout;
- Placeholder — sets a placeholder for a single field layout;
- Description — specifies a description to explain and provide context for the field within the interface;
- Date format — selects a distinct format and representation to present dates in a standardized manner. This applies exclusively to dates within check-in/check-out fields;
- Separator — picks a character that will be used to separate the day, month, and year components within a date;
- First day of the week — sets the start of the weekday in the date picker: “Monday” or “Sunday.”
Advanced
The following settings manage additional functionality of the plugin.

- Hide DB columns manager — if enabled, it hides the additional table columns in the Tools tab to prevent accidental DB or plugin settings changes; only the “Update Booking Tables” button will be available in the Tools settings tab;
- Enable iCal synchronization — if enabled, it turns on the Calendar synch interval drop-down menu to select an interval between calendars synchronizing (from “Every minute (1 min)” to “Monthly (1 month)”) and the Calendar sync start menu to choose a start time for synchronizing. It also activates the Calendars tab in the WordPress Dashboard. The How to Transfer Bookings from Google Calendar via iCal Synchronization tutorial explains how to synchronize the events from the calendar with the items on the website;
- Automatically switch bookings statuses — if activated, it allows automatically updating in-progress statuses — “Pending,” “On hold,” or “Processing” — to either invalid statuses (“Cancelled” or “Failed”) or the temporary status (“Created”) after the selected period of time. This toggle activates such fields: Switch interval — to select the interval from “Every minute (1 min)” to “Monthly (1 month)”; Target Status(es) — to set status(es) that will be changed; New Status — to select the new status to which the target status(es) will be changed;
- Automatically remove temporary bookings — if activated, it allows the booking removal with the temporary status “Created” from the database automatically. It also activates the Remove interval drop-down menu, where the interval can be chosen from “Every minute (1 min)” to “Monthly (1 month)”;

- Booking modification deadline — sets a time limit for modifications before the reservation’s start time. After this deadline, modification requests will not be accepted. Be aware that the number field’s value cannot be less than “1”;
- Booking cancellation — if activated, this allows customers to cancel bookings after they have been reserved. It also activates the Cancellation deadline option, where a cancellation time limit can be specified. Be aware that the number field’s value cannot be less than “1,” and a refund will not be sent automatically. More information is provided in the How to Cancel Booking with the WooCommerce Bookings Endpoint tutorial;
- Hide Setup Wizard — if enabled, this option hides the WordPress Dashboard > Bookings > Set Up tab to prevent unnecessary plugin reset.
Configuration
These settings manage the booking period, define the earliest and latest selectable dates, set the minimum and maximum number of booking days, enable the “Clear” button and month and year selectors, and allow the price to be displayed in the calendar during booking. All these settings refer to regular, weekend, and seasonal prices.
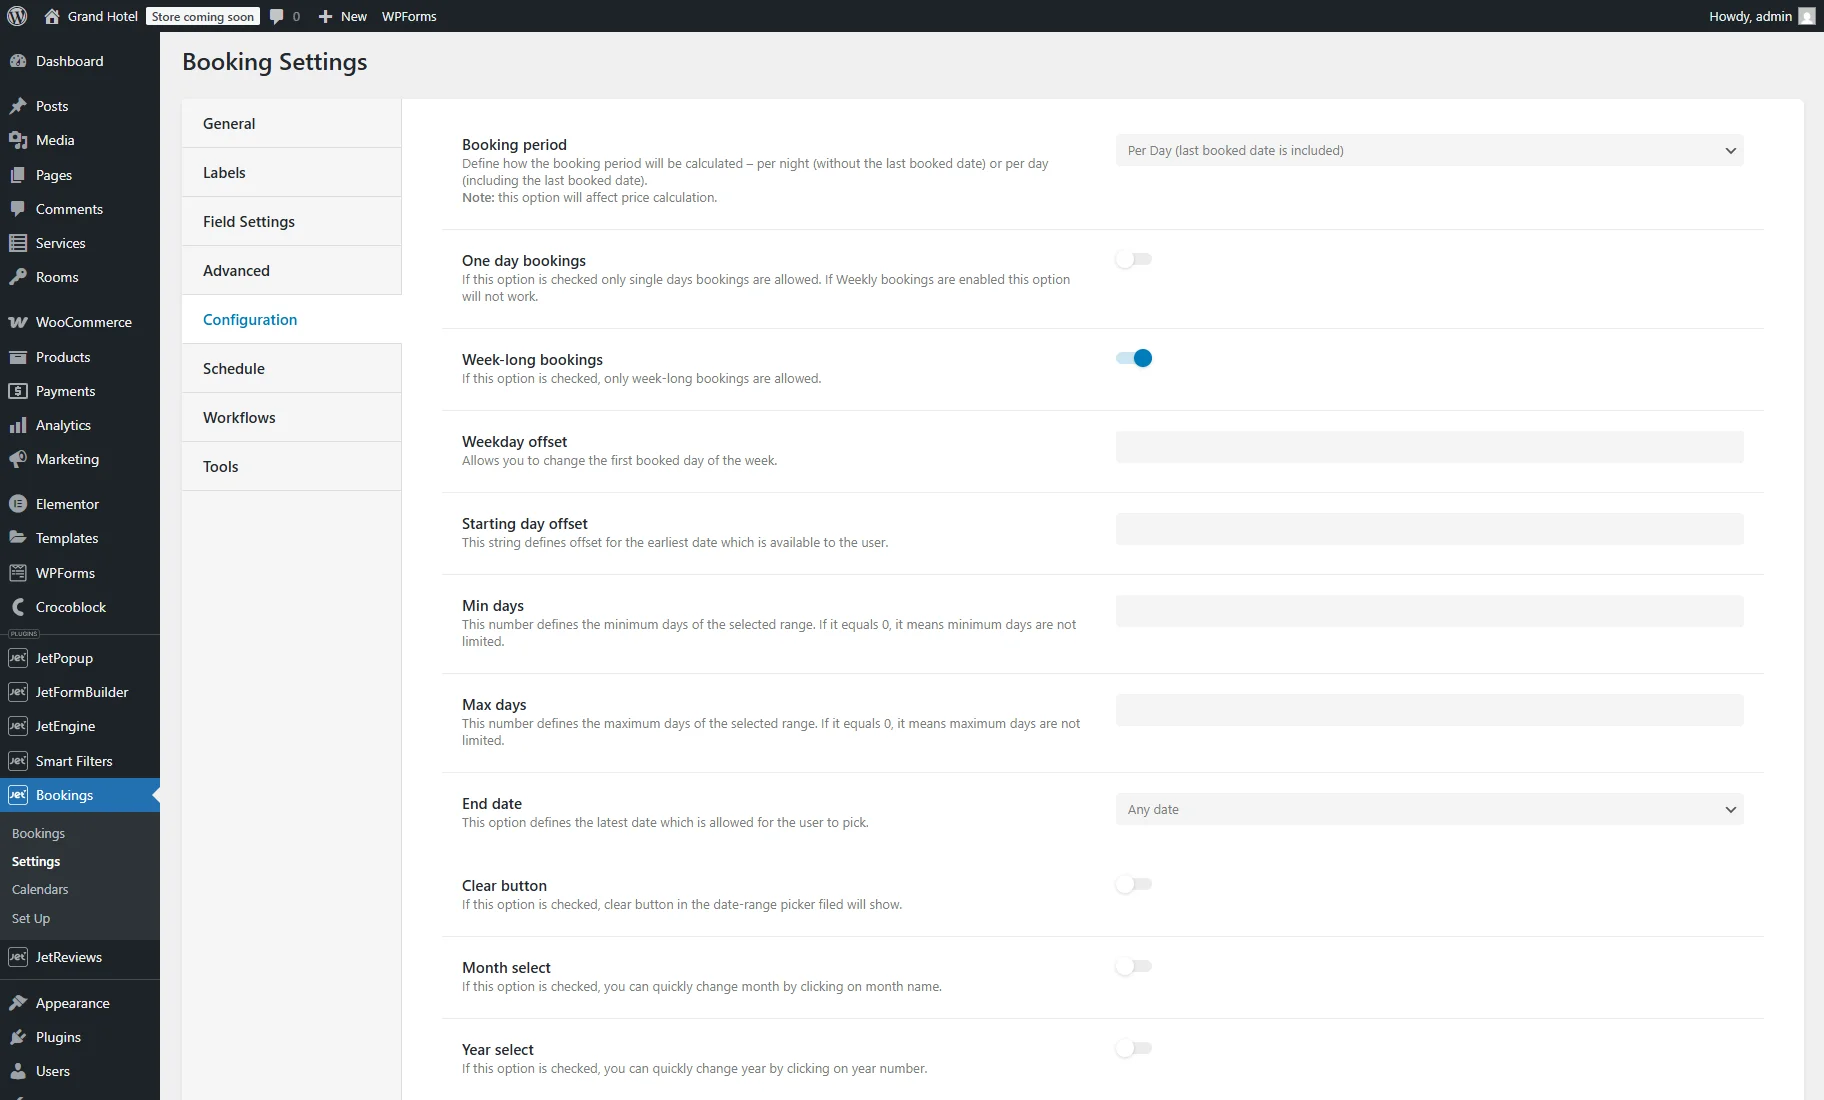
- Booking period — proposes two ways to specify the booking periods: per night (last booked day is not included) or per day (last booked day is included);
- Allow checkout only days — this option is available when the “Per Night” Booking period is selected. If enabled, the first day of the already booked period is available for check-out only;
- One day bookings — this option is available when the “Per Day” Booking period is selected. If this option is turned on, only single-day bookings are permitted. Note that this option won’t function if the Week-long bookings are enabled;
- Week-long bookings — if enabled, it allows only full-week bookings and turns on the Weekday offset field, allowing changing the first booked day of the week;
- Starting day offset — defines offset for the earliest date available to the user;
- Min/Max days — defines the minimum and maximum days available for one booking;
- End date — defines the latest date that the user is allowed to pick. If the “Any date” option is selected, there are no limits. The “Limited range” option activates the number field and drop-down menu with the “Day(s),” “Month(s),” and “Year(s)” options. For example, if “1” and “Year(s)” values are set, customers are allowed to select booking dates within a year;
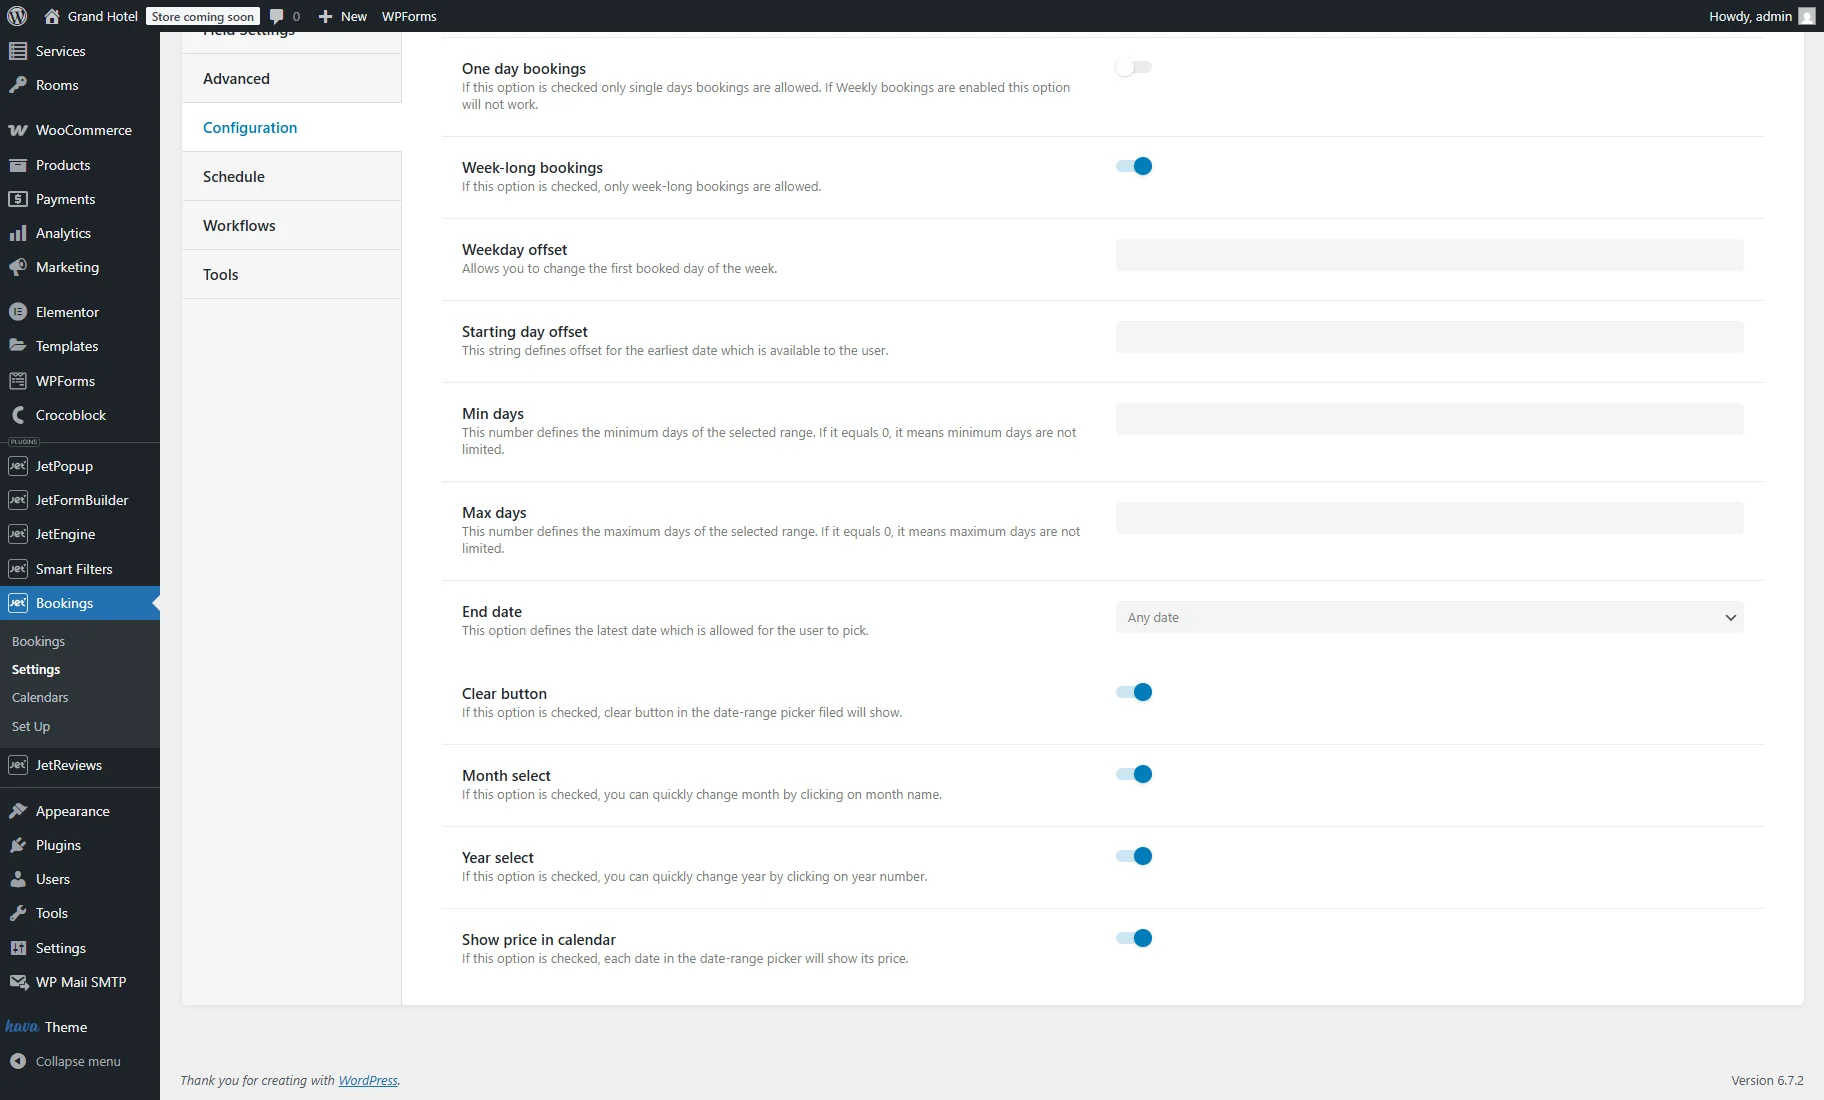
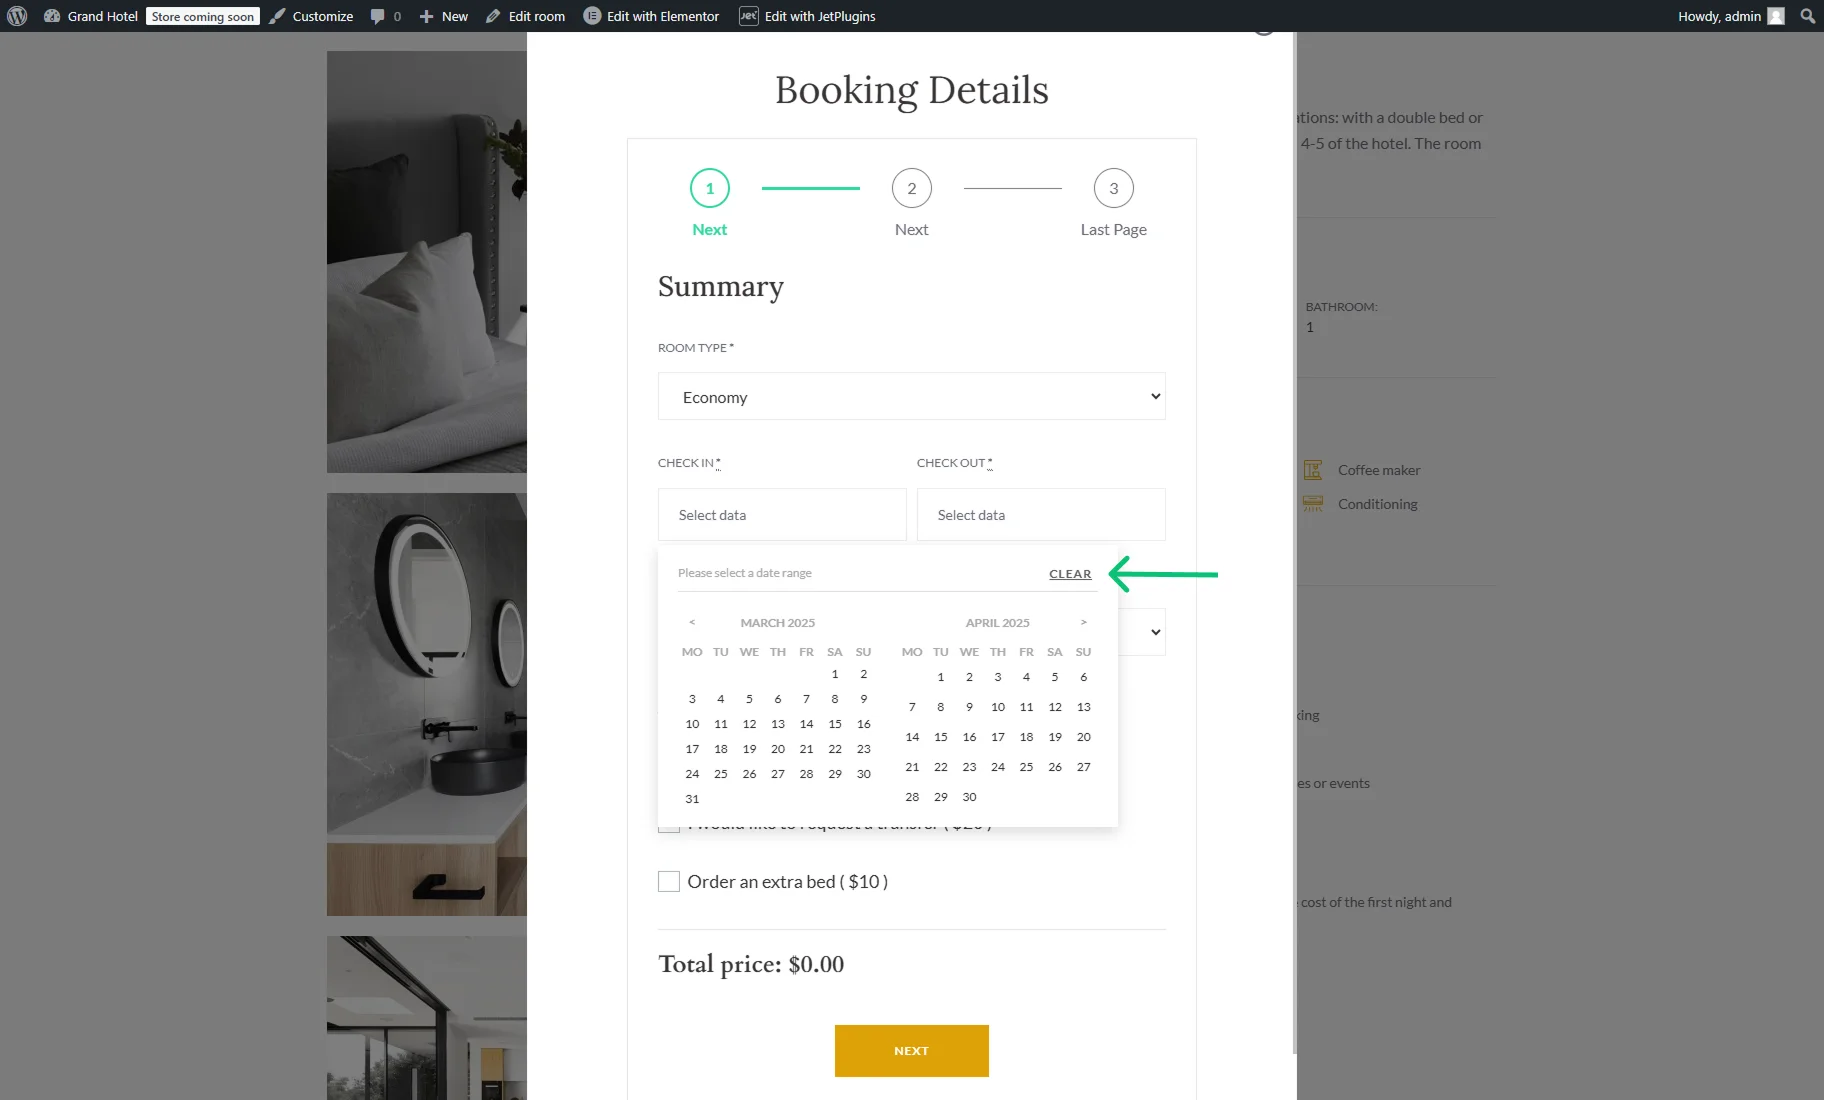
- Clear button — if activated, it enables a “Clear” button in the date-range picker field. The text of the button can be customized in the Labels tab in the `Clear` text field;
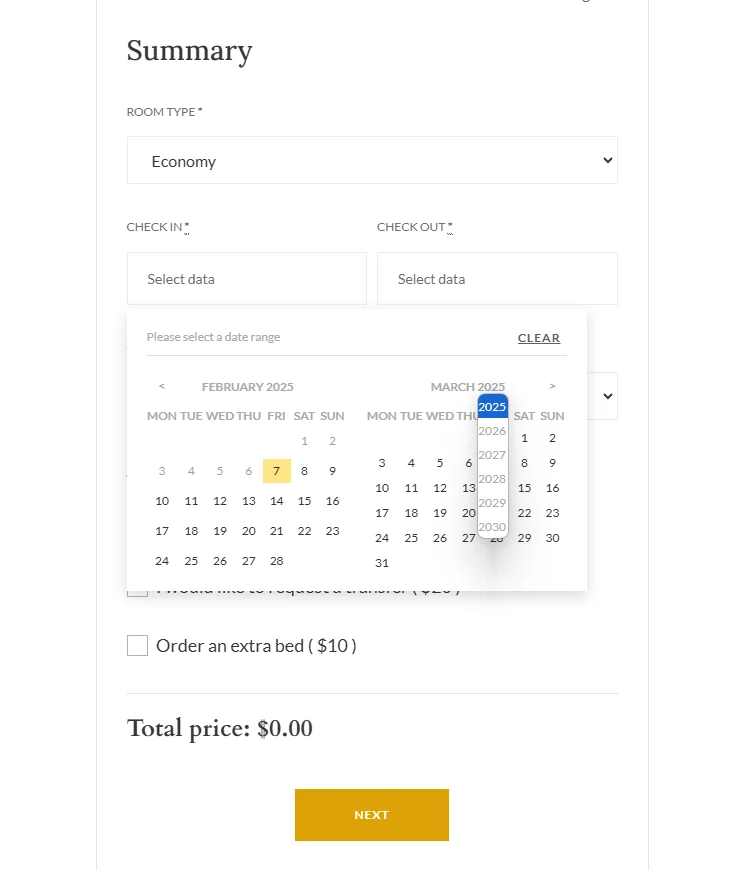
- Month select — if activated, it allows selecting a month directly from the booking datepicker;
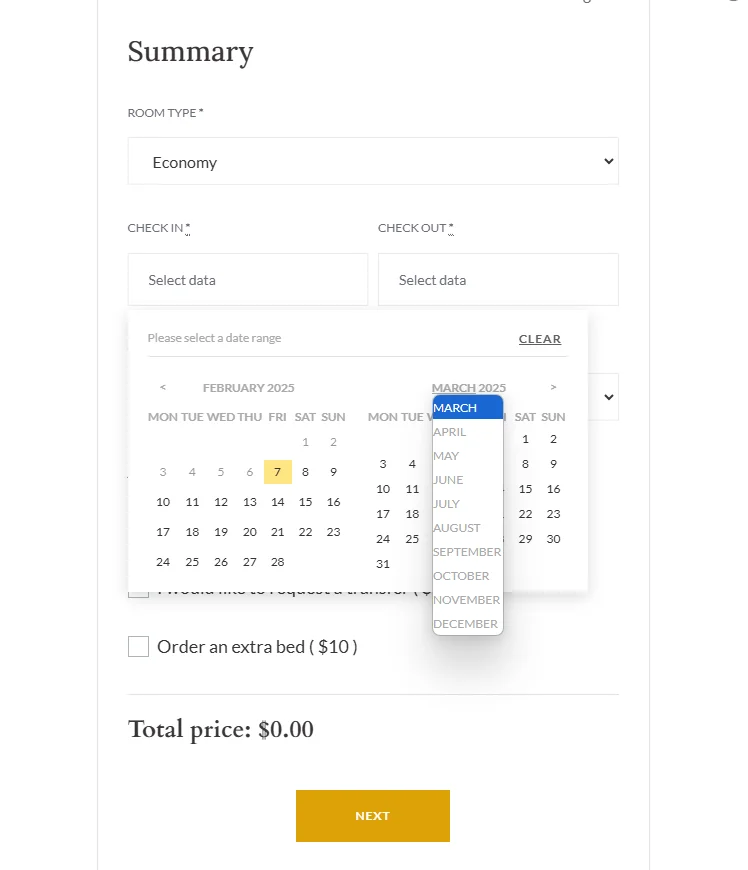
- Year select — if activated, it allows selecting a year directly from the booking datepicker;
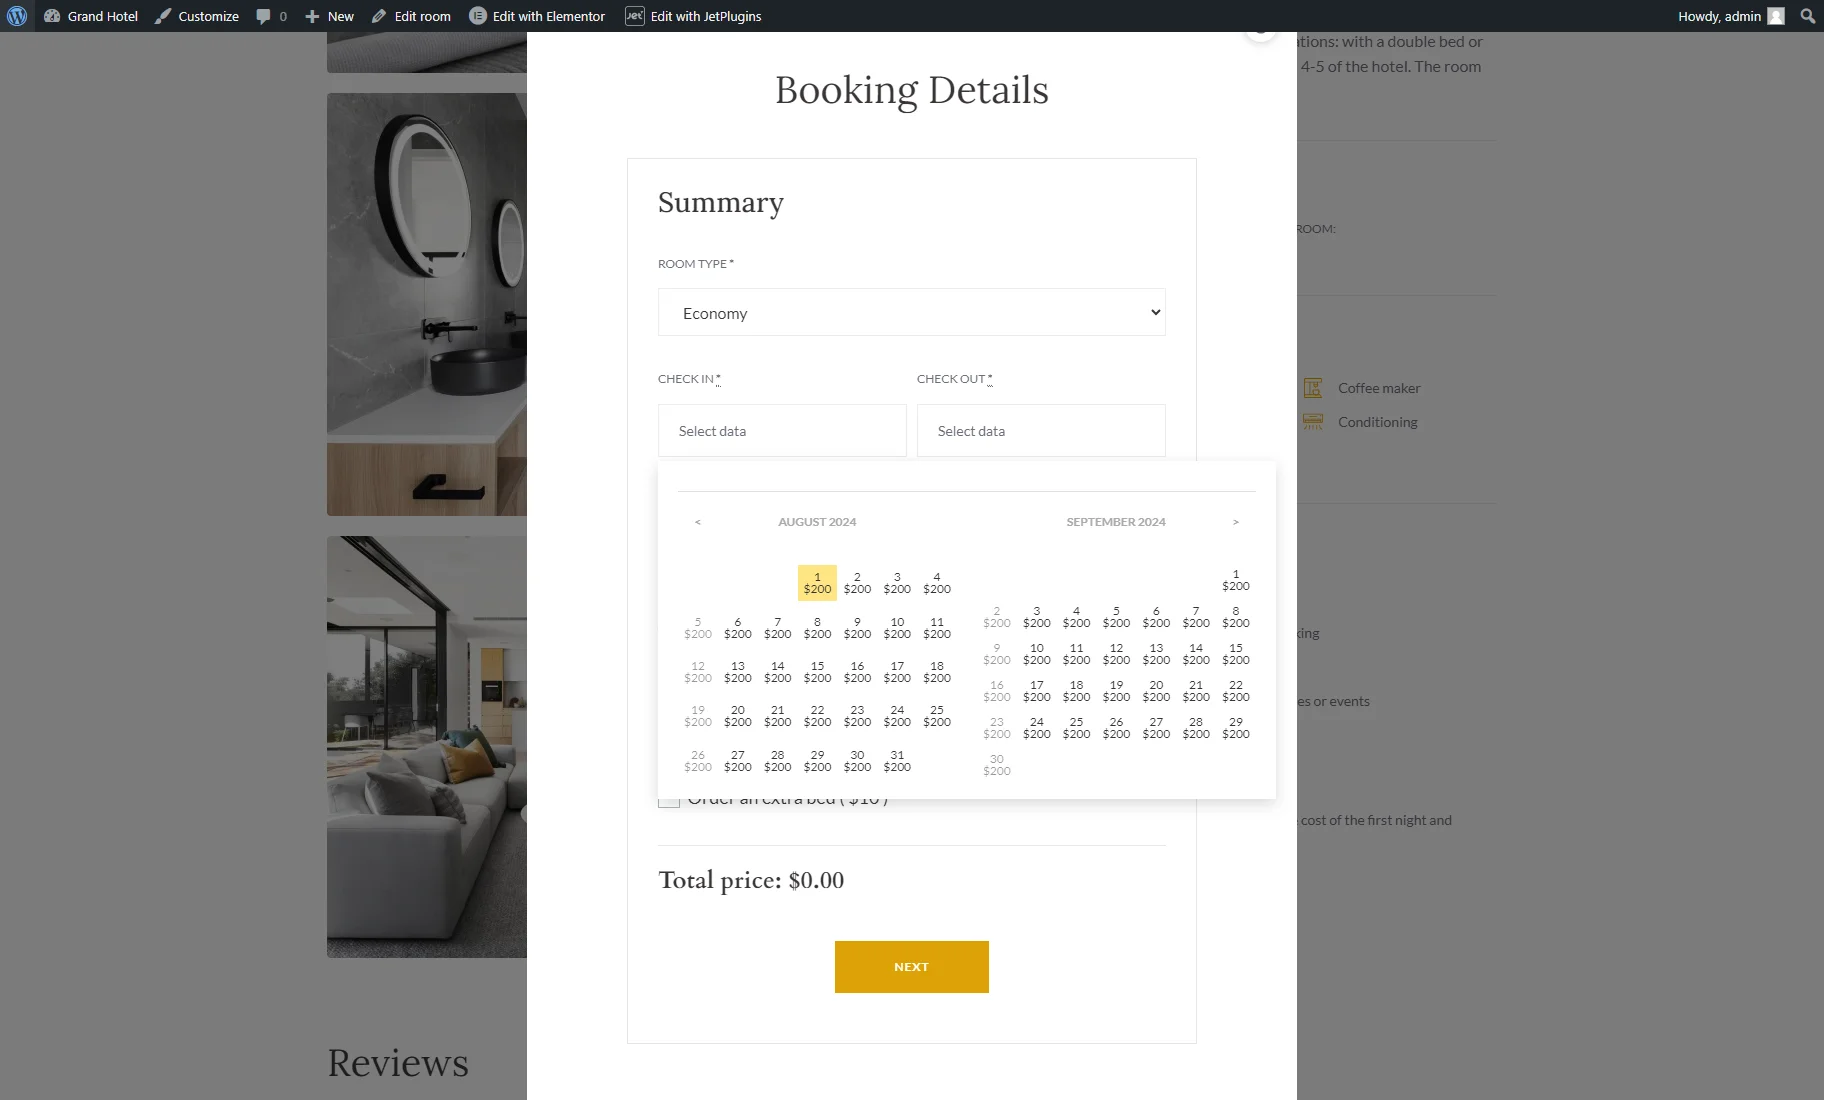
- Show price in calendar — if turned on, each date in the Check-in/Check-out dates field of the bookings form will display the corresponding price for the booking item (apartment). This option allows users to see different prices for different days, such as weekends or seasonal rates, during the booking process. More information is provided in the How to Set Up the Seasonal Prices and How to Configure the Weekend Pricing tutorials.
Schedule
The Schedule tab has three settings.

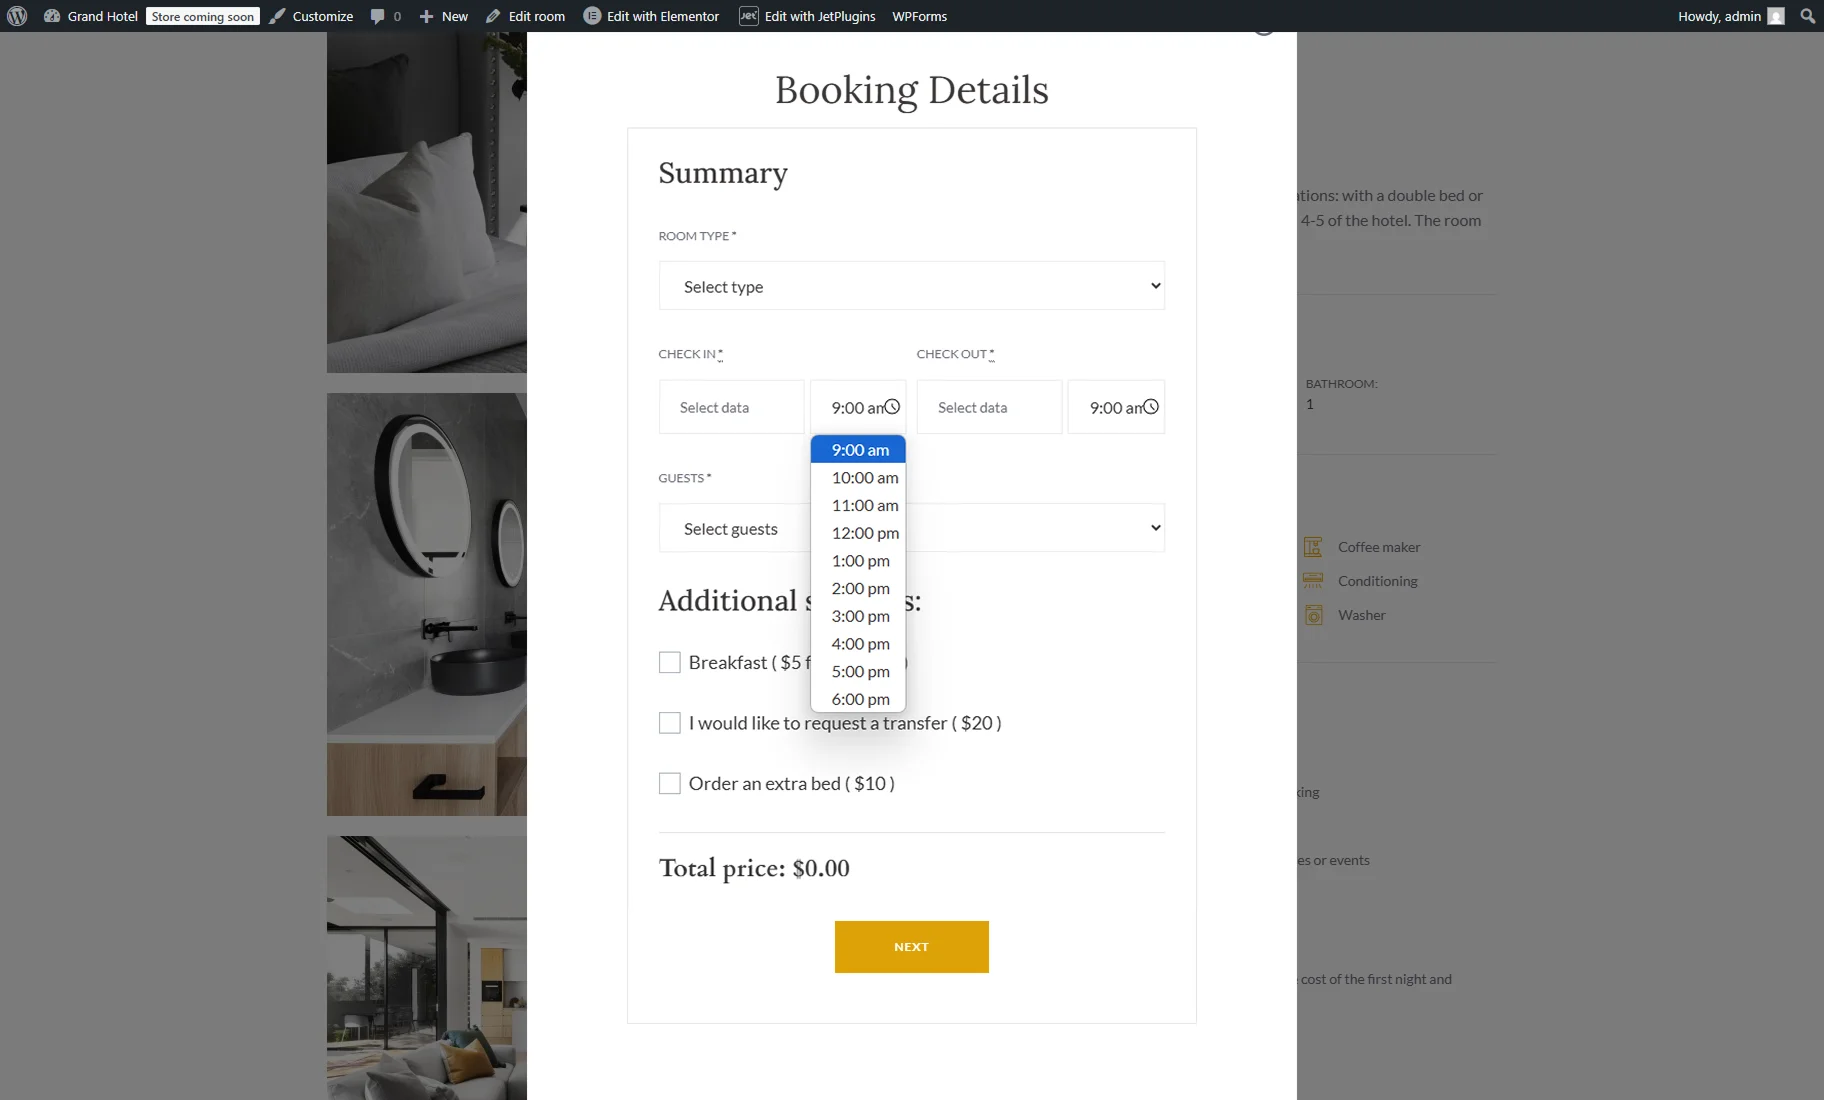
Timepicker — a toggle, if enabled, allows users to choose a time when making a booking.
It activates such settings:
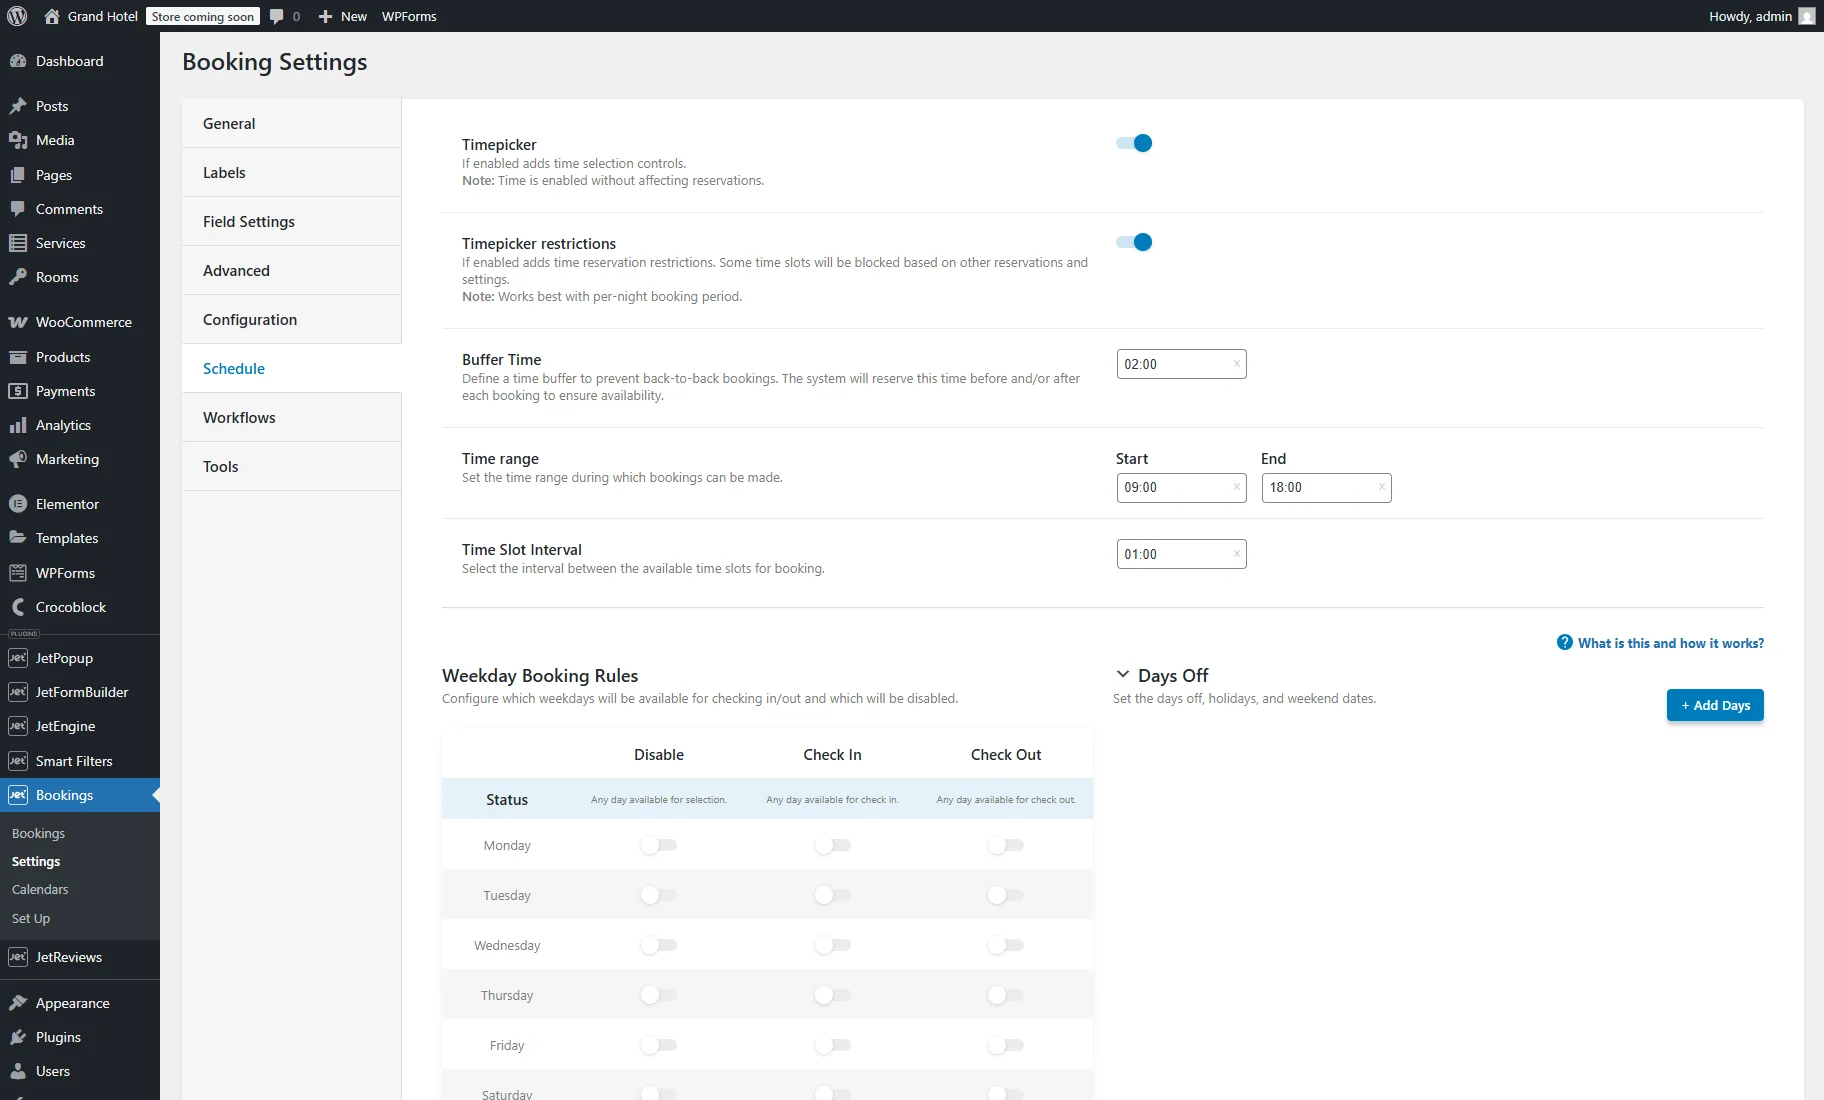
- Timepicker restrictions — if enabled, this feature applies time-based reservation restrictions, automatically blocking certain time slots based on existing bookings and configured settings. It works best with a per-night booking period to ensure accurate availability management. It activates the Buffer Time option;
- Buffer Time — sets a time gap between bookings to prevent back-to-back reservations, specified in hours and minutes (e.g., “2:00” means a two-hour gap). The system will automatically block the specified time before and/or after each booking to ensure proper availability;
- Time range — time slots that define the available time frame for making bookings (e.g., between 9 a.m. and 6 p.m.);
- Time Slot Interval — sets the spacing between available booking time slots, specified in hours and minutes (e.g., “1:00” means a one-hour interval).
More details can be found in the How to Manage Timepicker for Check-In/Check-Out in JetBooking and How to Manage Timepicker for Check-In/Check-Out in WooCommerce-Based Mode tutorials.
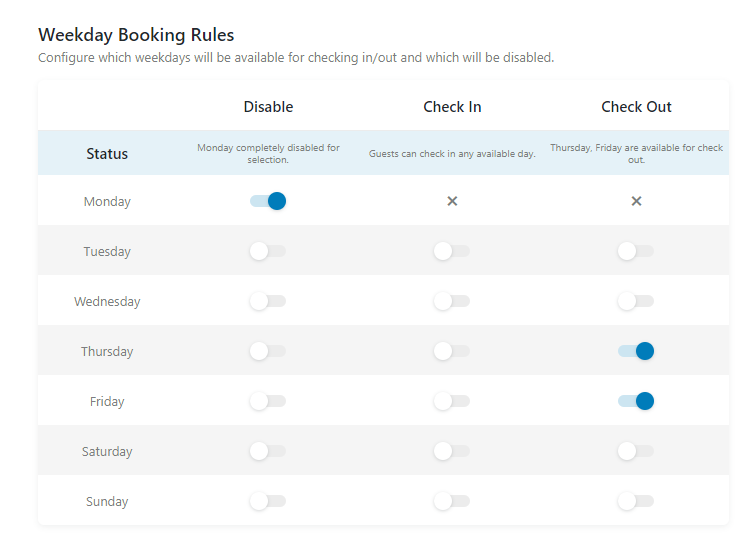
Weekday Booking Rules — allows for the choice of weekdays that will be unavailable for booking. Also, the weekdays available for check-in and check-out can be specified by enabling the toggles in the Check In and Check Out columns. Consequently, the specific days can be enabled for check-outs while making other days unavailable. If all toggles are turned on, or all options are disabled, the results will be the same: all days will be opened for booking, check-in, and check-out.
Days Off — allows adding days (e.g., national holidays) that will be out of reach for customers. Hit the “+ Add Days” button to trigger a pop-up with such settings:

- Range Label — sets the name of the holiday day or period (e.g., “New Year 2024);
- Start Day — sets the first day of the holiday period. If a holiday includes only one day, only this field should be set;
- End Day — sets the last day of the holiday period.
More information is provided in the How to Manage Days and Weekends in Booking tutorial.
Workflows
This tab allows configuring the notification system for clients. It can be used for sending confirmations, reminders, feedback requests, etc. The use case is described in the How to Create an Automatic Notification System with JetBooking tutorial.
Here, the Enable Workflows toggle should be activated.
Clicking the “+ New Workflow Item” button unrolls such settings:
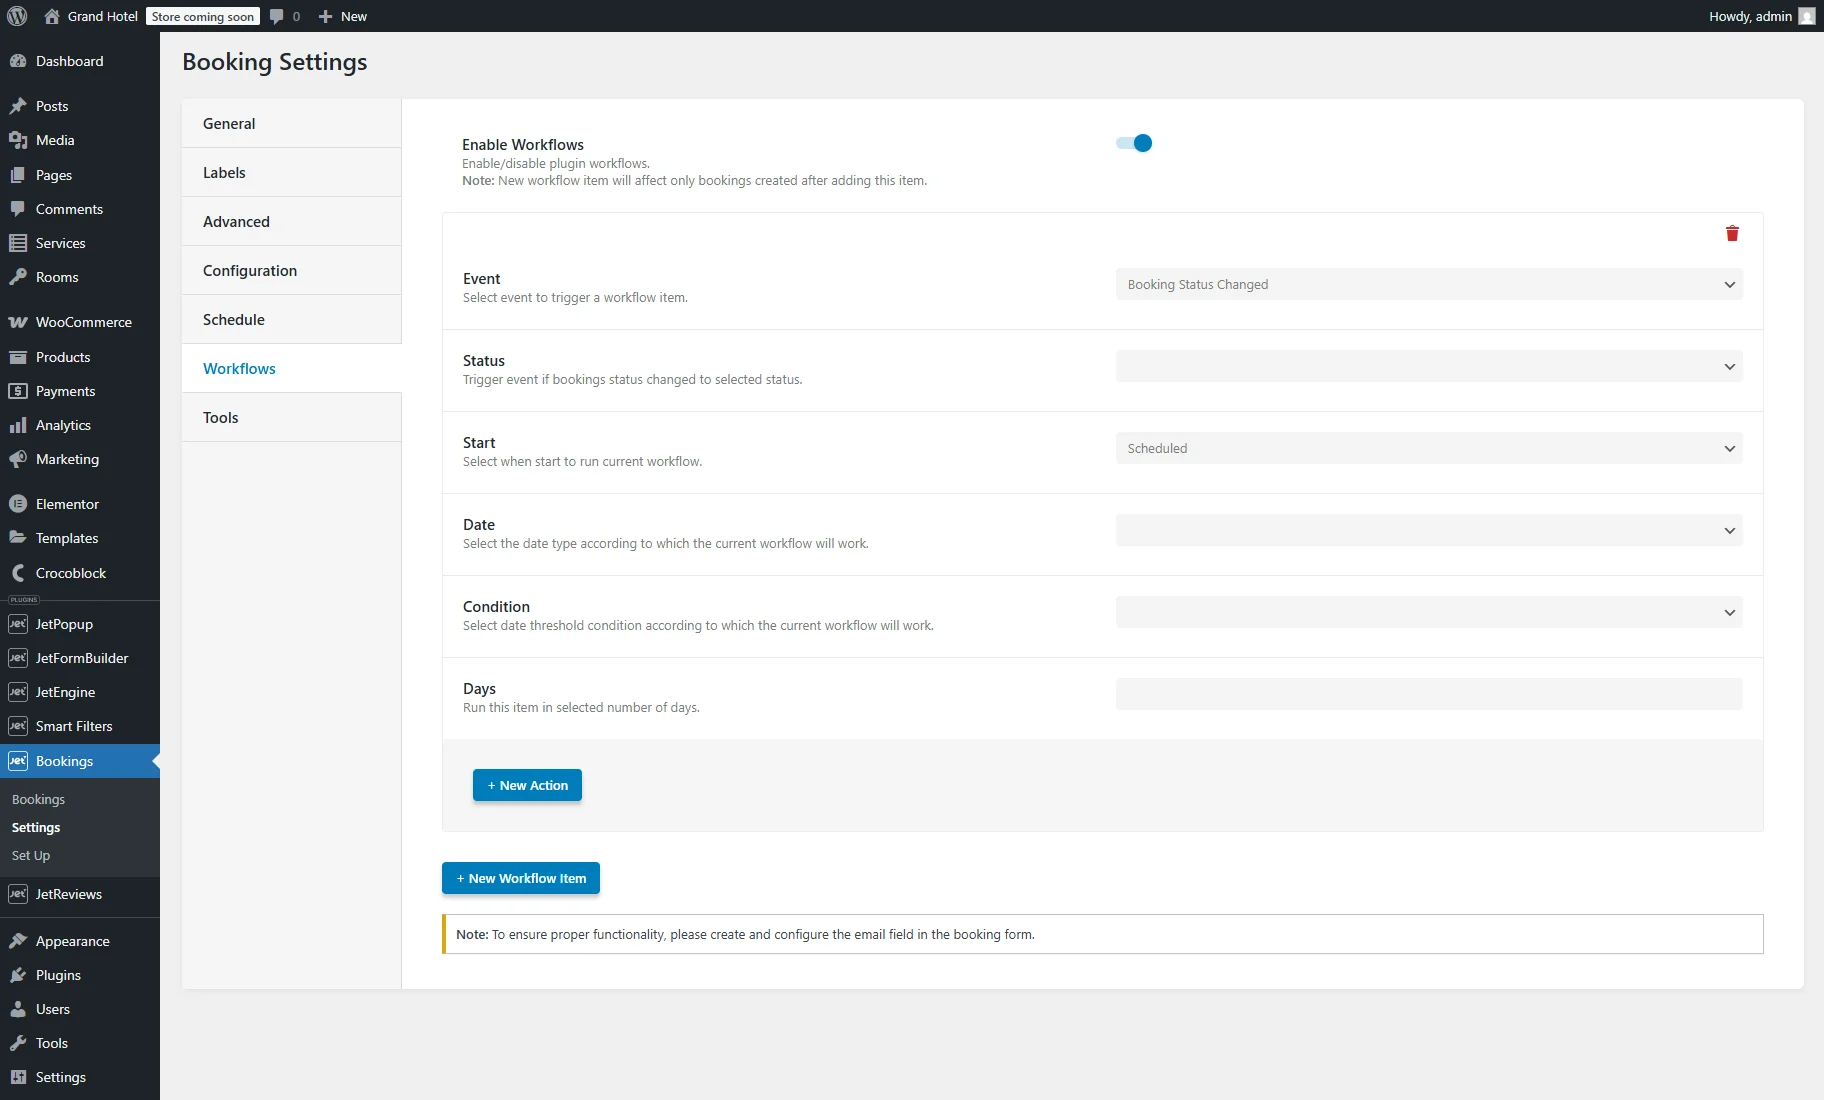
- Event — a dropdown menu where an event can be chosen to initiate a workflow action:
- Booking Created — an email will be sent after the booking creation;
- Booking Status Changed — an email will be sent after the booking status is changed. This option activates the Status dropdown menu;
- Start — a dropdown menu to select the trigger time for running the current workflow:
- Immediately — a workflow will be initiated immediately;
- Scheduled — allows setting the schedule details:
- Date — a dropdown menu with “Check in” and “Check out” options. It allows the selection of the date type according to which the current workflow will work;
- Condition — a dropdown menu that contains “Before” and “After” options. It allows the selection of date threshold conditions;
- Days — a field to enter the selected number of days (e.g., email should be sent one day before check-in).
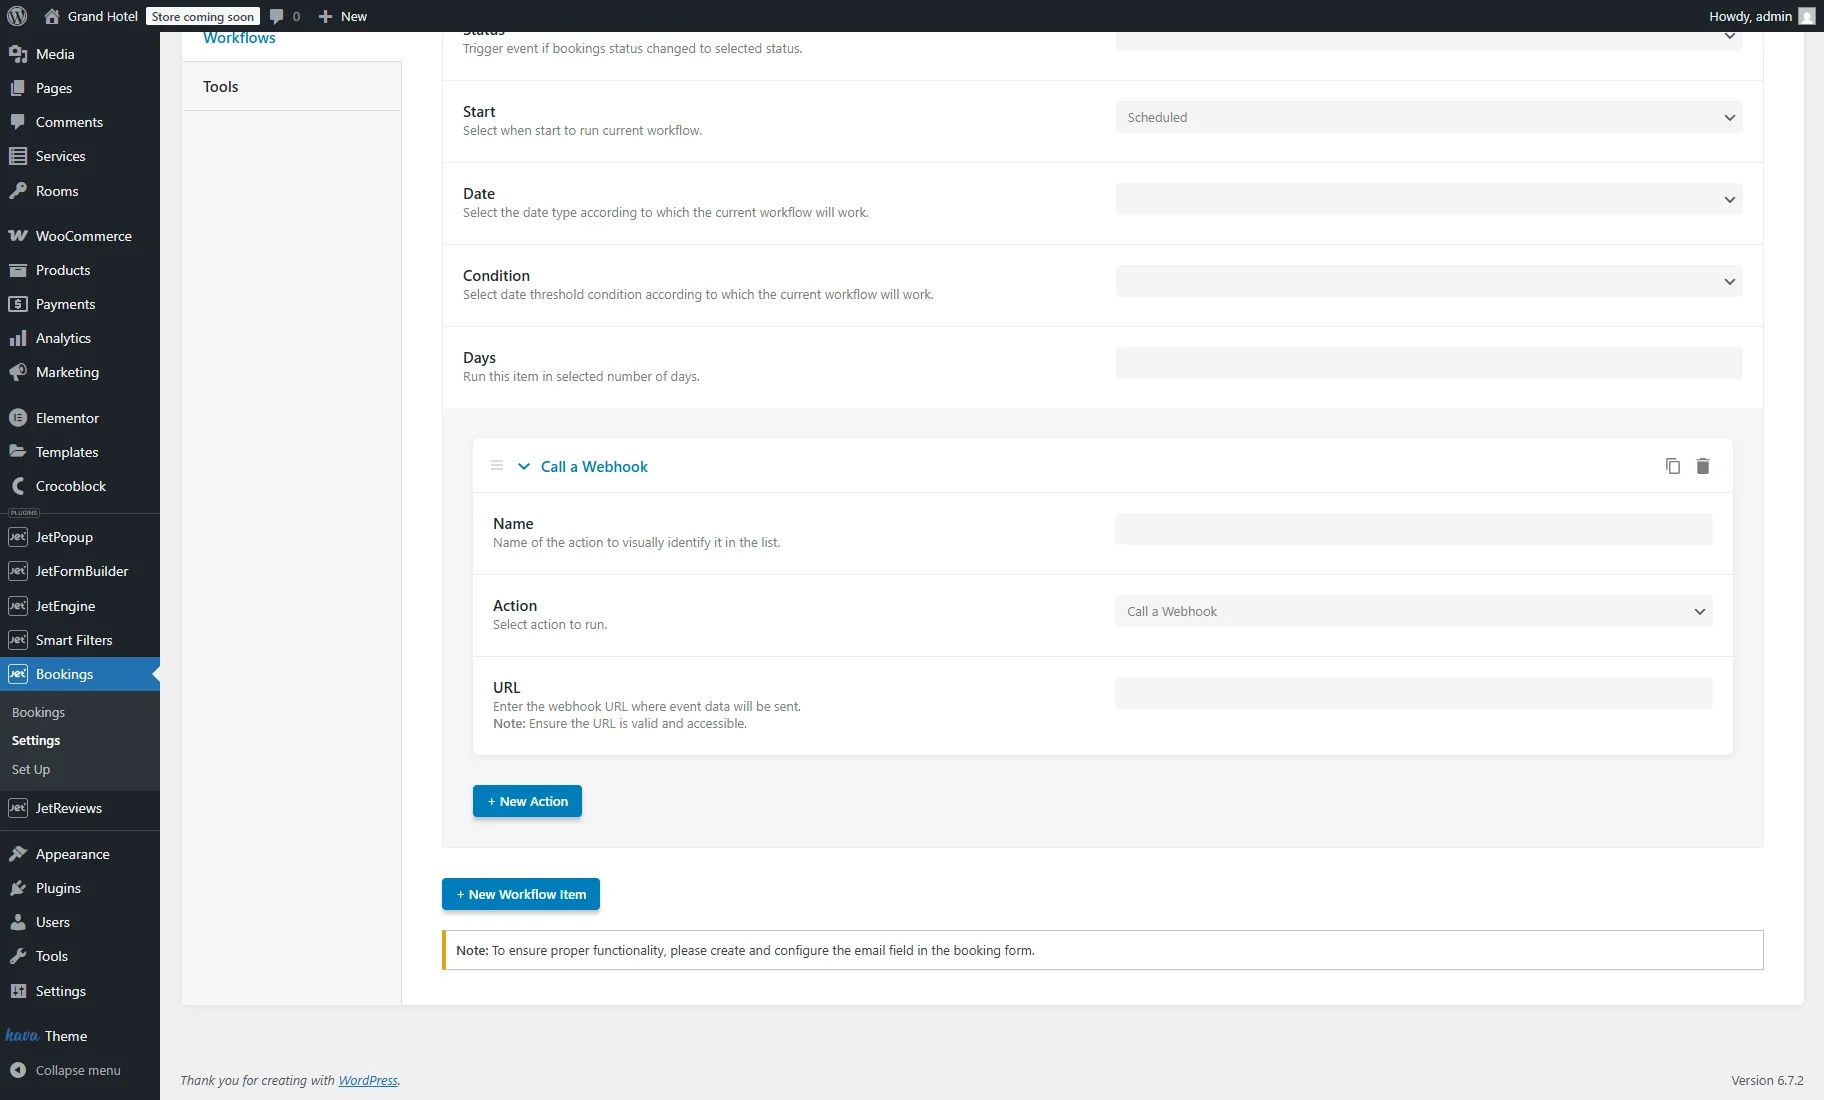
Clicking the “+ New Action” button unrolls such settings:
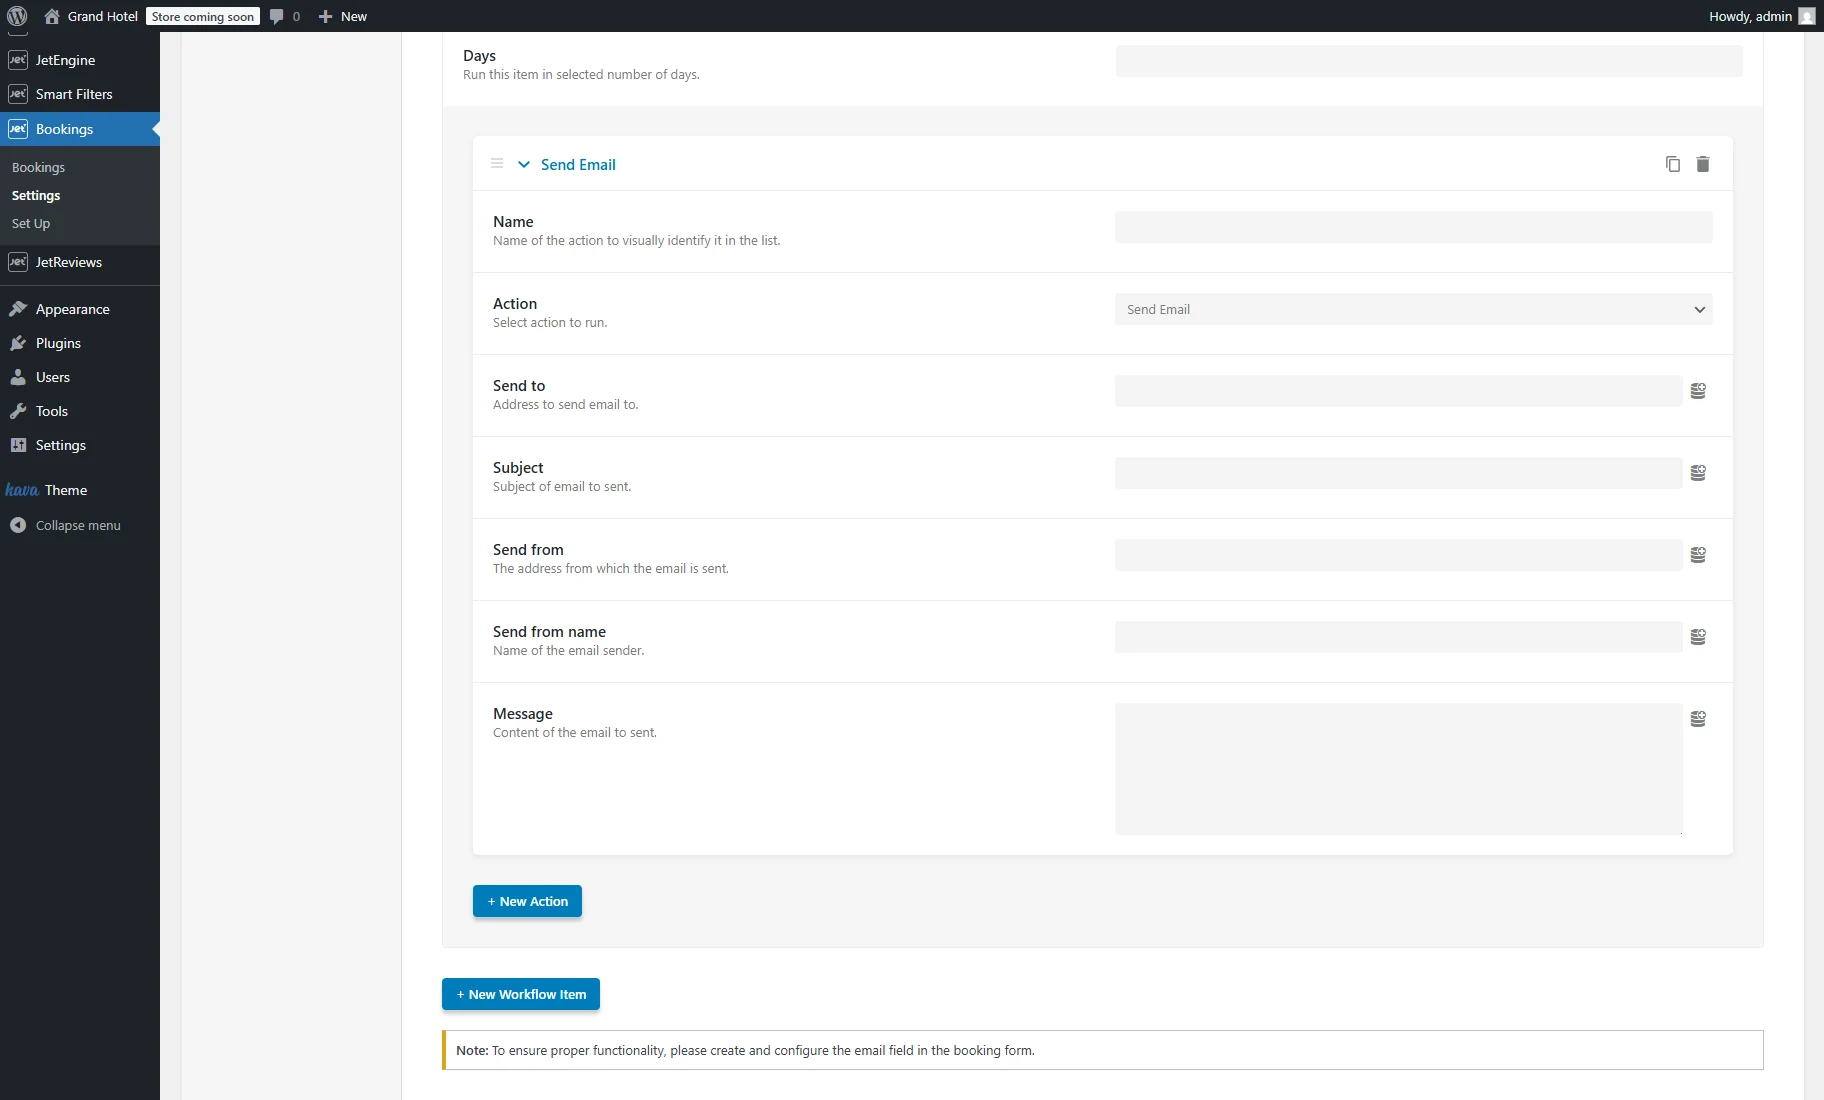
- Name — an action name to visually identify it in the list;
- Action — such actions are available to run:
- Send Email — this option activates such additional fields that support the JetBooking macros:
- Send to — an address to send the email to;
- Subject — the subject of the email to be sent;
- Send from — an address from which the email is sent;
- Send from name — the name of the email sender;
- Message — the content of the email to be sent.
- Send Email — this option activates such additional fields that support the JetBooking macros:
- Call a Webhook — activates the URL text field to specify the webhook URL for sending event data. The URL should be valid and accessible.
One can add as many workflow items and actions as needed.
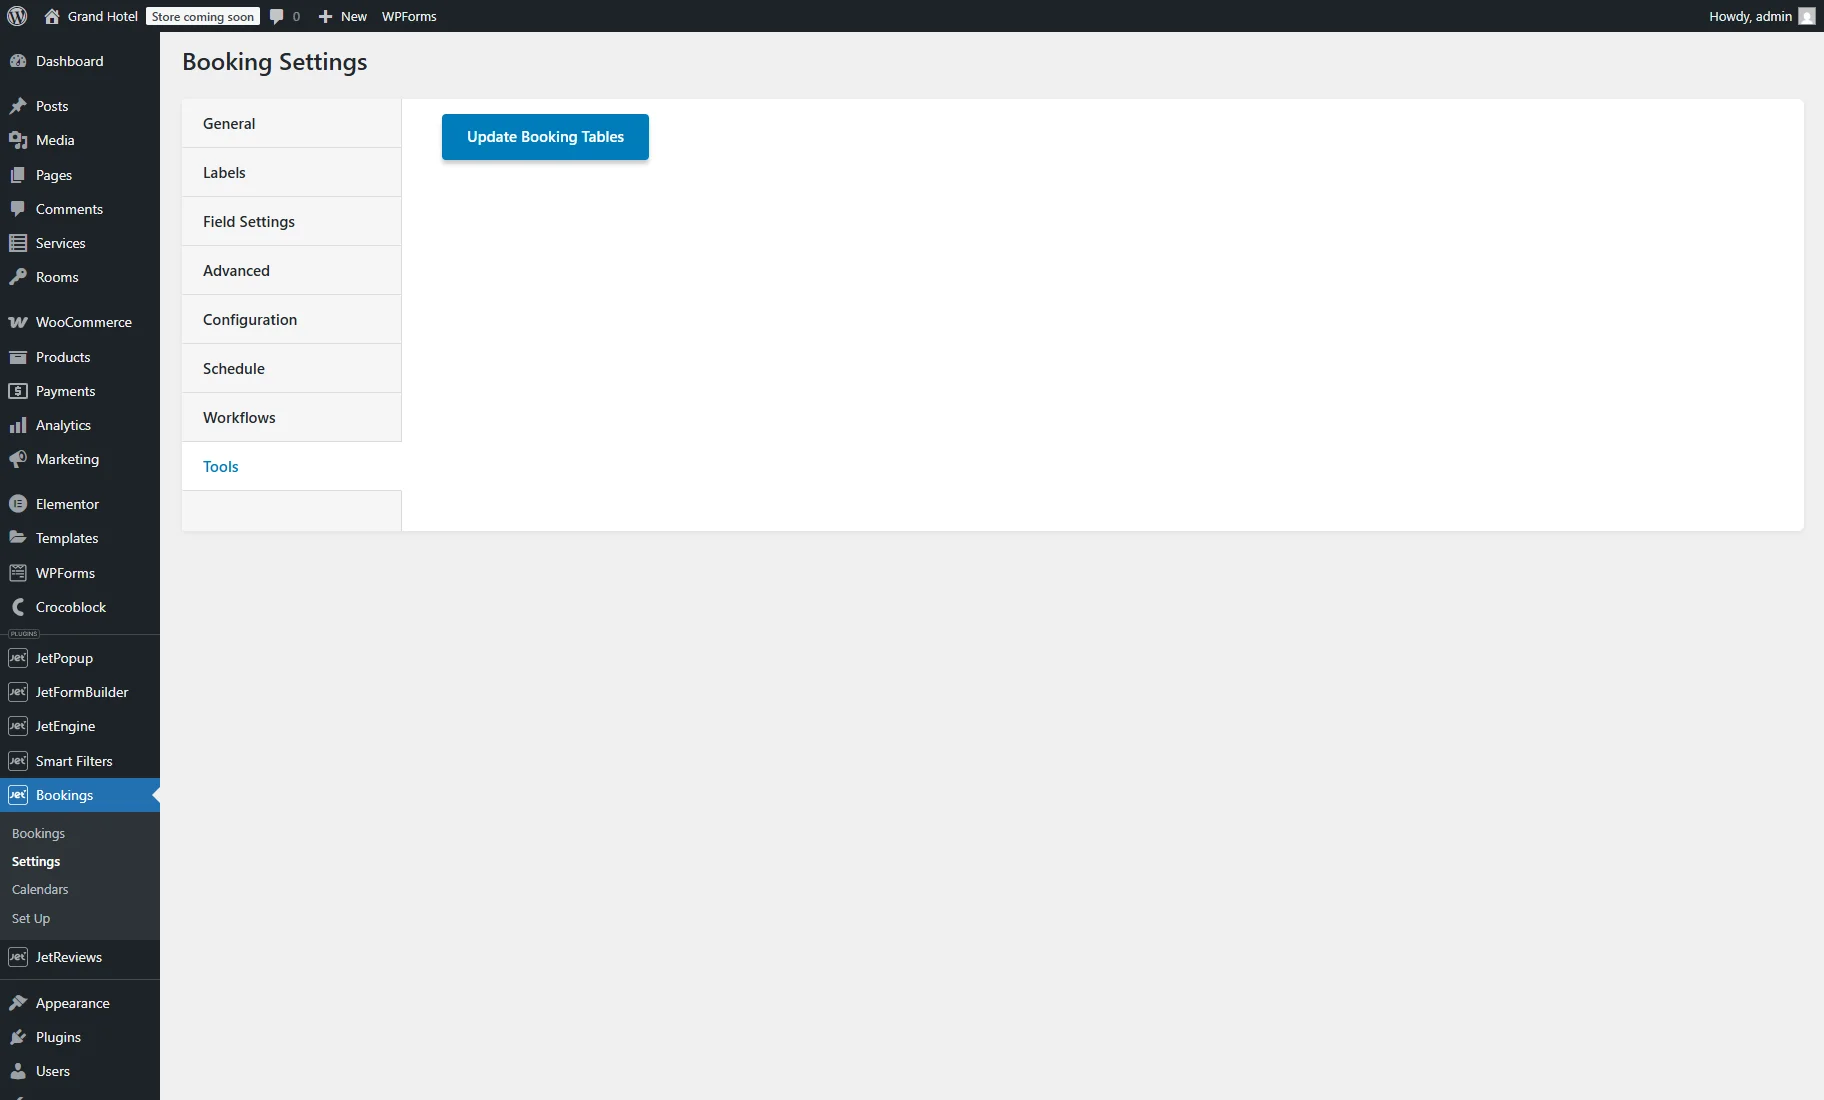
Tools
With the enabled Hide DB columns manager option in the Advanced settings tab, only the “Update Booking Tables” button is available. This button refreshes, modifies, and optimizes the booking data in the database tables.
If the Hide DB columns manager option is disabled, the Tools tab shows the list of the DB table columns created in this tab or during the booking setup.
Such columns are booking-specific and indicate additional services, details, etc.
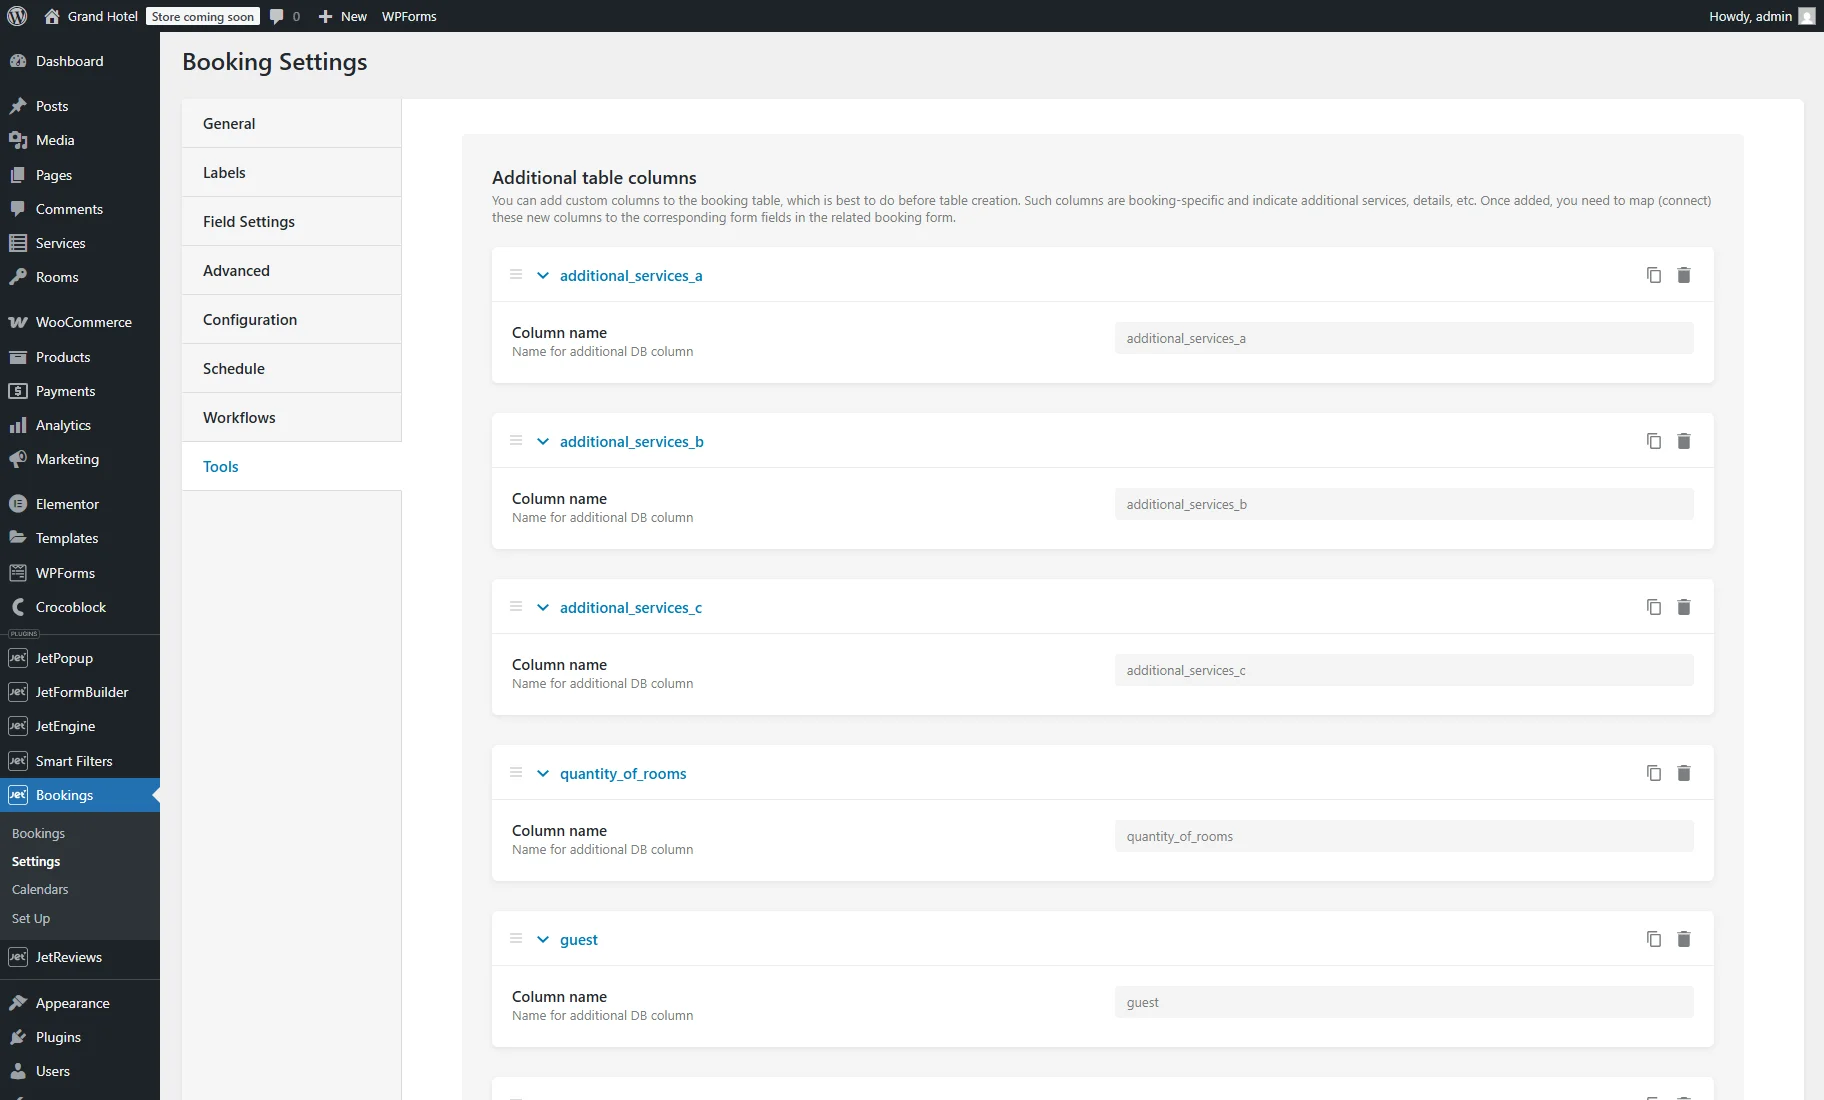
In this tab, one can add, change, and delete columns. To add custom columns to the booking table, one should press the “New DB Column” and type their name in the Column name field.
If some changes are made, the “Update Booking Tables” button should be pressed.
Calendars
This tab is available if the Enable iCal synchronization option is activated in the Advanced settings tab.
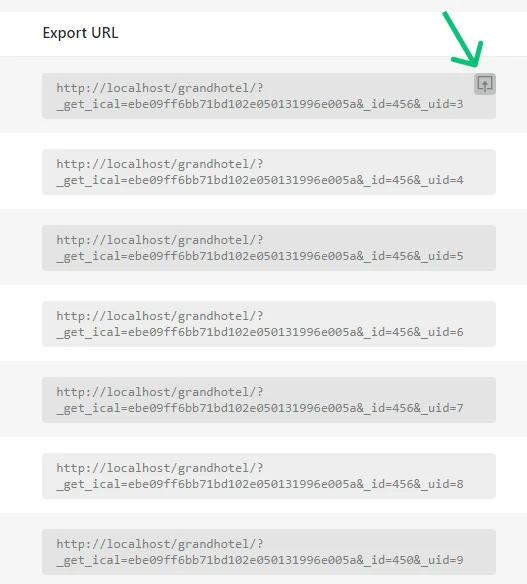
The tab allows editing the calendar associated with every post (the “Edit Calendar” button) and applying an iCalendar Template.
More information is provided in the How to Transfer Bookings from Google Calendar via ICal Synchronization tutorial.
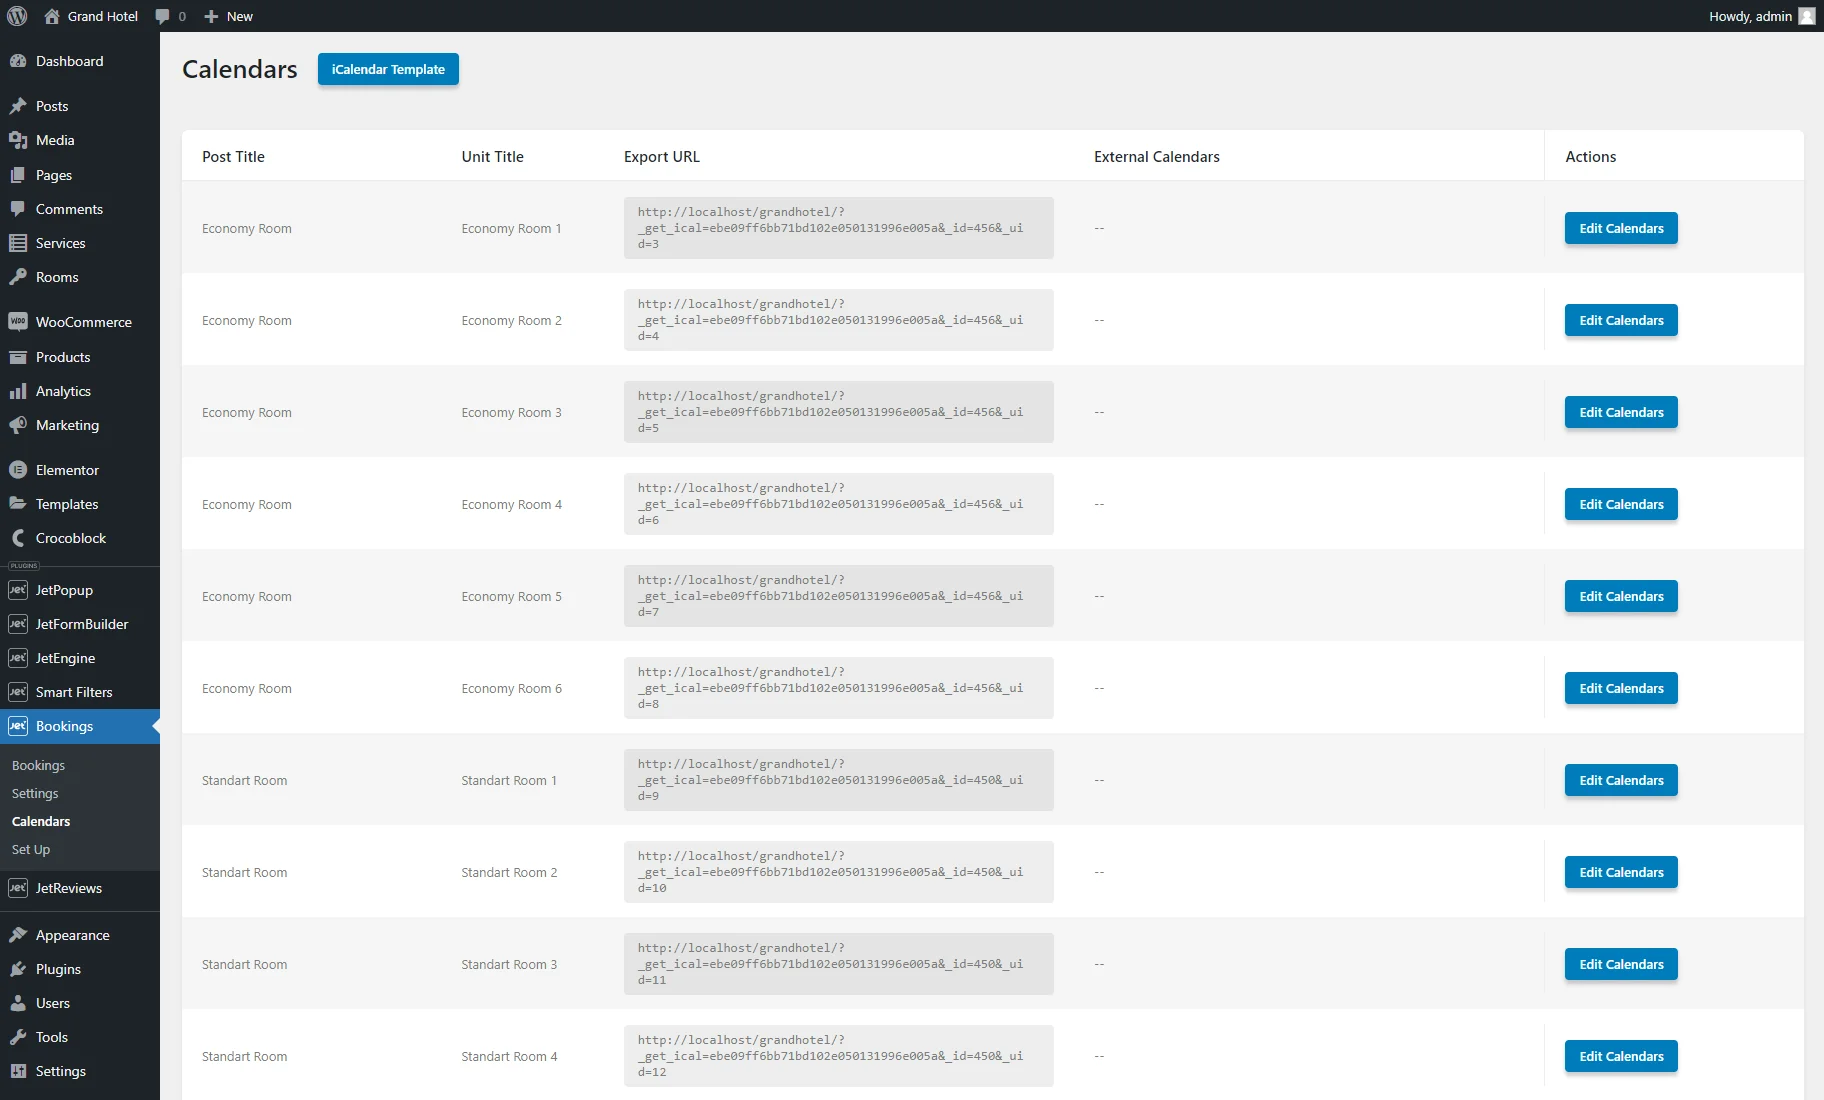
If the cursor hovers over any Export URL, the “Export” icon will appear, clicking on which the ICS file with the calendar will be downloaded.
Set Up
In this tab, the booking setup can be completed.

After the booking configuration, the Set Up tab allows resetting the JetBooking plugin by pressing the “Reset data” button. The “Go to settings” button redirects to the booking settings tab.
This tab will be hidden if the Hide Setup Wizard toggle of the Advanced tab is enabled.

Vendors
The Vendors feature in JetBooking allows assigning the “JetBooking Vendor” role to users so they can manage their own booking instances, orders, and related content from the WordPress dashboard, with all actions controlled and approved by the administrator. More details are provided in the How to Implement Multivendor Functionality in JetBooking tutorial.
In the Vendors tab of the JetBooking Dashboard, one can create new vendors and observe the list of created ones, including the information such as ID, Username, Name, Email, links to the created Posts and related Bookings, and a link to the Profile.
The “JetBooking Vendor” role can also be assigned to existing users by editing their profile.

That’s all about the JetBooking Dashboard settings for your WordPress website.