While Bricks Builder offers you clean code, good performance, and a developer-friendly approach, Crocoblock plugins that have Bricks integration are providing you with a powerful toolkit for building the most complex dynamic websites.
Here are these plugins:
- JetEngine;
- JetSearch;
- JetSmartFilters;
- JetBooking;
- JetAppointment;
- and JetFormBuilder.
They are available in a dedicated package for Bricks for a special price.
In this article, I will break down the process of building a booking system using JetBooking and other Crocoblock plugins combined with Bricks Builder.
JetBooking Setup on Bricks
‼️ Before I start, I want to draw your attention to the fact that all the documentation in the JetBooking section, even if it mentions Elementor or Block Editor, is equally valid for Bricks as well, even if Bricks is not mentioned there.
So you can fully rely on this documentation – you can find a lot of different guides that cover all the details about the JetBooking plugin’s settings, as well as videos on the Crocoblock YouTube channel – even other builders used there for demonstration, it’s valid for Bricks as well.
One main difference is that the documentation may reference the JetThemeCore plugin for creating custom templates, while Bricks has its own built-in Theme Builder. Since both work in a very similar way, you can simply follow the same instructions, applying them to the Bricks Theme Builder.
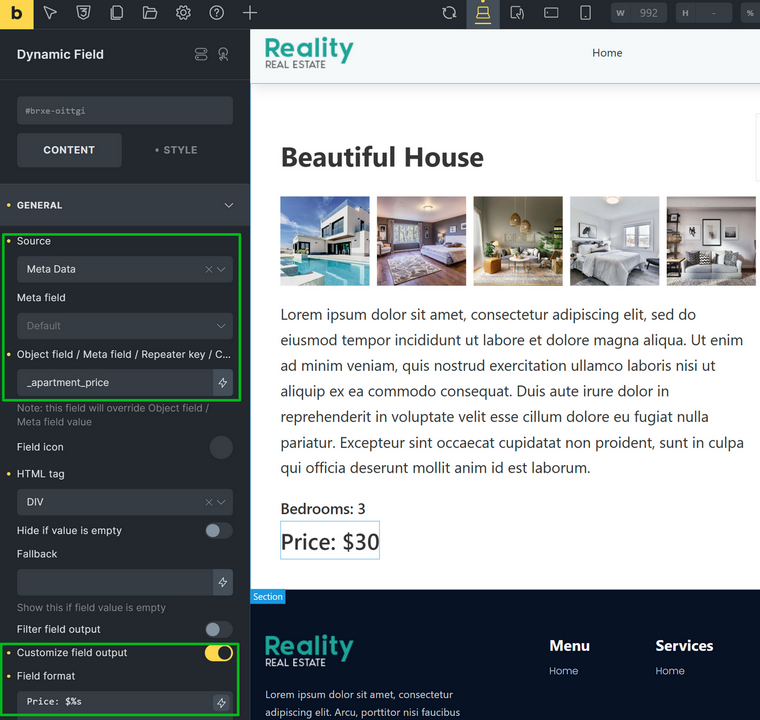
Another one is that Elementor and Gutenberg have some JetBooking meta fields more integrated in the builders’ dynamic feature. The main example here is that to display the item price on Bricks’ template, you should manually type the _apartment_price meta value.
JetBooking modes
Before you start configuring JetBooking, decide which mode you want to use. JetBooking offers three modes. Let’s see how they work.
Plain Mode
No WooCommerce is involved in this case, and you’ll need at least one custom post type for the bookable item. For convenience, let’s use a Hotel Room as an example, since booking systems are often built for real estate. To set this up, go to JetEngine > Post Types > Add New and create a CPT with all the custom fields required to display the information.
Once the custom post type is created, build a template for it in Bricks Theme Builder to display all its data on the front end, including custom fields. You can follow this detailed guide (originally made for JetThemeCore, but the logic is the same).
In Plain Mode, payments and orders are managed by the JetFormBuilder plugin.
Also, you can create a custom post type for displaying the orders beautifully, with custom fields for customers’ and booking details. Most likely, you don’t need a custom template for it, as it’s not meant to be displayed on the front end. However, you can use it to be a part of a custom user dashboard.
Anyway, all information about bookings is stored in JetBooking > Bookings, so this CPT is quite optional.
Plain Mode with WooCommerce basic integration (WooCommerce checkout)
I just want to make it clear that it’s the same Plain Mode when it comes to templates and forms, but payments are managed by WooCommerce instead of JetFormBuilder. Also, you can find orders in WooCommerce’s Orders.
You should still create a custom post type for your Hotel Room to display items on the front end, and still use JetFormBuilder for creating a booking (filling out the customer’s information, selecting dates, etc.), but then it redirects the order to WooCommerce for payment.
Also, the information about these orders and payments can be found in WooCommerce > Orders.
This mode can be useful if you want to connect some payment gateways that are not available in JetFormBuilder.
💡 Read this detailed guide on setting up WooCommerce checkout for the Plain mode.
WooCommerce-Based Mode
Finally, the JetBooking plugin has a WooCommerce-Based Mode, when it acts as a booking plugin for WooCommerce and creates a specific product type – Bookable Product.
In this mode, most of the operations are managed by WooCommerce. Your bookable items are actually WooCommerce products, but they have a date picker and, if the Timepicker functionality is on in JetBooking, a time picker.
Other than that, it’s a typical WooCommerce product, which you can add to the Cart (instead of filling out a booking form), and the customer’s details are added at the checkout stage. In this configuration, JetFormBuilder is not needed.
JetEngine can be useful, though, not for creating a CPT for a booking item but for adding custom fields to the WooCommerce product.
💡 Read this detailed guide on how to add custom fields to a WooCommerce product.
Which mode is better?
In my personal opinion, the most feature-rich modes are Plain Mode and Plain Mode with WooCommerce Checkout. The reason is that you have all the advantages of custom post types and their templates, where you have full control over, and can easily add as many custom fields as you want and display them the way you see them, without any restrictions WooCommerce has.
Also, you have a classic way to book items – using a booking form.
In addition, JetFormBuilder is a very feature-rich plugin that allows you to use so many after-submit actions: to call webhooks and hooks, insert posts, register users, not to mention sending emails and setting up redirects. You can apply conditions not only to form fields but also to post-submit actions – for example, send certain emails depending on the payment success.
If native JetFormBuilder payment methods (PayPal and Stripe checkouts) are not enough for you, a WooCommerce Checkout that you can connect in one click is a great option – you should only slightly configure the post-submit action to enjoy all the varieties of payments WooCommerce supports.
However, if you prefer the fully WooCommerce-based mode – where bookable items are added as products (without a form), using the cart instead of JetFormBuilder or JetEngine – that option is available as well. Keep in mind, though, that if you want to customize how your product (bookable item) appears on the front end, it may require some extra effort. However, adding booking cancellation functionality might be a bit easier in this setup.
Adding a bookable item in JetBooking and Bricks
Depending on the mode you’ve chosen, the process of adding items to be booked by customers will be slightly different.
If you prefer WooCommerce-Based Mode – choose it in the initial Booking Settings (or Wizard) and start adding items like usual products. However, revise general settings in JetBooking > Settings – such as bookable days of the week, timepicker, pricing, the number of days that can be booked, and so on. These settings will be the default, but you can change them for every particular item on its page.
But if you choose Plain Mode (with or without WooCommerce checkout), these are the steps:
- Install JetBooking, JetEngine, and JetFormBuilder plugins.
- Go to JetEngine > Post Types and create a post type for bookable items. Let’s call it Properties for easier reference. You can then add the necessary fields (such as description, price, and any other custom fields) that will define each property and display its details on the front end.
- Go to JetBooking > Set Up and follow the Wizard steps. Choose Plain Mode first, then choose the Property CPT that you’ve just created, and on the next step, you will be able to add WooCommerce checkout if needed.
- On the final step, a booking form will be created automatically with the post-submit action that connects this form with the JetBooking plugin. You can add more fields and more post-submit actions, if needed. In case you want to use the Multiple Units Booking feature, follow this guide. Also, if you have chosen the WooCommerce checkout, you will need a number of additional settings in the form – read this guide.
Don’t style the form at this step! You will do it using a visual element when creating a template. - You can change settings at any time in Bookings > Settings. If some items have their own schedule and booking conditions, you can change them directly on this item’s page in the dashboard.
- Add content to at least one bookable item (Property) in the dashboard – you will need it to preview the template. Go to Property > Add Post and fill out the fields. Don’t forget the item price and number of units (if more than one unit of the same kind is there – e.g., if you rent a room in a house. Thus, if you have, let’s say, two units under one Property, it can be booked twice for the same dates, as there are two different rooms.
- Create a template for your bookable item (Property) using Bricks Theme Builder. The process is the same as with any other CPT or single template. Use Bricks elements and Dynamic Data > JetEngine (Properties) fields or Dynamic Field, Dynamic Image, Dynamic Link elements by JetEngine. The advantage of the latter elements is that you can apply a custom callback to modify the date: e.g., display an image by ID, tweak date format, etc.
To display the price, use the Dynamic Field element, Source: Meta Data, and manually type the _apartment_price meta value after selecting the “Dynamic value.”
Don’t forget to select the Property you’ve just added content to as a preview to see what you’re doing.
- Using the JetForm element, add a booking form by selecting the Single Booking Form from the list. Using the Styling tab, style all the elements.
Congrats! That’s it, and now, you can test your booking website.
The next step would be adding payment gateways for JetFormBuilder.
Booking Notifications and Emails
JetFormBuilder has many post-submit actions to trigger different events, and Send Email is one of them.
In the email, you can dynamically display all the field values that your Single Booking Form has. But if you want to add more, for example, fetch the Property Name (as the form is placed in the template, so there will be different properties but the same form) – add a Hidden Field and choose Post Title from the list.
If you want to fetch any of the meta fields your Property has, choose Meta Value, then copy and paste the name of the meta field you want to fetch, e.g., check-in time.
Then, open the JetForm tab and add the “Send Email” post-submit action. Click the pencil icon and add the email content and fields. You can dynamically map all the fields there.
Also, you can add conditions for the emails. For example, send one only if the payment is successful, and send another one if it fails. To do it, click on the crossing icons (they appear when you hover over the action), go to the Event Match tab, and select GATEWAY.SUCCESS event (or GATEWAY.FAILED for failed transaction).
But that’s not all – check out the Bookings > Settings > Workflows tab. There, you can not only send emails or connect webhooks immediately in the event of booking, but also create scheduled actions, which is perfect for booking reminders.
Filters and Search
To display all the properties on one page, you can either use a custom CPT archive – you can create it using the default Bricks tools, or use JetEngine Listing Template – it offers much more flexibility.
Building a Listing Grid Template in Bricks is quite straightforward:
- Create a template for a single item in the future loop (Listing Grid) – follow this guide.
- Add the Listing Grid element to the page you want to display your bookable items and choose the template you’ve just created.
- You can level it up and display your bookings on the map. First, activate the Map Listing module in JetEngine > JetEngine, and then use these instructions.
Of course, you can use the Bricks’ Query Loop instead, but map and other perks of JetEngine will not be available.
There’s also the Dynamic Calendar Module available in JetEngine, in case you have booking items that would look great in a calendar.
But if you have more than a dozen bookable elements, it’s hard to imagine a good archive page without filters, right? The JetSmartFilters plugin has seamless integration with Bricks. So, install it, add the filters you want to see, and integrate it into your archive template – JetEngine’s Listing Grid or Bricks Query Loop.
You can use Select, Range, Radio, or Search filters, and it’s worth mentioning that their settings have a user-friendly UI.
Talking about search functionality – while the Search filter is used more for narrowing down the other filters’ results, a proper site-wide search needs a dedicated plugin, such as JetSearch. Here are some of its advantages:
- JetSearch provides AJAX-based search, so results appear instantly without refreshing the page.
- It displays live previews as users type, allowing them to find relevant content faster.
- The plugin searches through posts, pages, custom post types, WooCommerce products, taxonomies, and custom fields, so it’s perfect for JetBooking items, and you can also specify which custom fields will be searched.
- Results are ranked by relevance, ensuring that the most meaningful matches appear first.
- Custom search suggestions – either created manually to guide your customers, or formed automatically based on the most frequent search queries of previous users.
- Search terms are highlighted within the results, making it clear why a particular item matched the query.
- Performance is optimized with indexing, so searches remain fast even on large websites.
- Full design control is available since JetSearch integrates natively with Bricks for styling and customization.
As a result, you can create a powerful and beautifully designed booking system using the Bricks and Crocoblock combo.
FAQ
Yes, JetBooking works with Bricks. Even if the documentation mentions Elementor or Gutenberg, the logic is the same, and you can apply it to Bricks with only minor adjustments.
No, WooCommerce is optional. You can use JetBooking in Plain Mode with JetFormBuilder handling forms and payments, or connect WooCommerce if you need extra payment gateways. There’s also a fully WooCommerce-based mode.
Plain Mode gives you full control over custom post types and templates, while WooCommerce-Based Mode treats bookable items as WooCommerce products. The choice depends on whether you prefer forms or the cart checkout flow.
Yes, JetFormBuilder creates flexible booking forms that can be extended with extra fields, conditional logic, and advanced post-submit actions like sending emails or webhooks.
You create a template in the Bricks Theme Builder and add dynamic fields such as title, content, price, and custom fields.
For time-based bookings, such as doctor’s appointments, there’s a dedicated JetAppointment plugin, which also has Bricks integration. Read here about their differences.
Takeaway
Building a booking system in Bricks doesn’t have to be complicated. JetBooking, together with other Crocoblock plugins, gives you the freedom to choose how you want bookings to work, whether it’s a clean form-based setup (with or without WooCommerce checkout) or a fully WooCommerce-based one.
You can create custom post types, design templates exactly the way you want, and integrate flexible forms that handle everything from payments to notifications.
With Bricks’ performance and Crocoblock’s flexibility combined, you can build a system that fits your workflow and your clients’ needs perfectly.