In today’s digital markets, various businesses need innovative strategies to package and deliver their services. A membership platform might be a great option, since it offers predictable revenue streams while providing clients with flexible, scalable access to the company’s services.
This article examines the creation of a WordPress membership platform for a hypothetical performance marketing agency, PERFORMANCE MINDS, utilizing the powerful combination of Bricks Builder and Crocoblock plugins.
Crocoblock Features for Your Membership Website
The foundation of a successful membership platform lies in its structure. For a performance marketing agency, this structure should reflect how clients engage with the services and the value they receive at different subscription levels.
The Crocoblock toolkit simplifies the creation of a membership site using Bricks Builder. These six key features work together seamlessly to provide a professional membership experience, containing everything from user registration and payment processing to personalized content delivery and appointment booking.
- Registration & payment form:
- JetFormBuilder form registers new users with proper role assignment (Register User form action + Members plugin);
- processes subscription payments with PayPal (PayPal Recurring Payments add-on);
- User data management (JetFormBuilder + JetEngine Meta Box):
- the form captures and stores membership information and saves custom user data to WordPress user meta;
- User profile (JetEngine Profile Builder):
- after registration and payment, users are redirected to their account;
- Custom content (JetEngine Custom Post Types):
- specialized content for different membership levels (news section);
- website team and services sections;
- Dynamic content display (Dynamic Fields and conditional display):
- displays membership status and information via a set of Dynamic Fields;
- displays news (published as Custom Post Types) specific to their membership level in user accounts;
- Booking system (JetFormBuilder + JetAppointment):
- the user can schedule a 1-2-1 (one-on-one) meeting with team members.
Registration & payment form
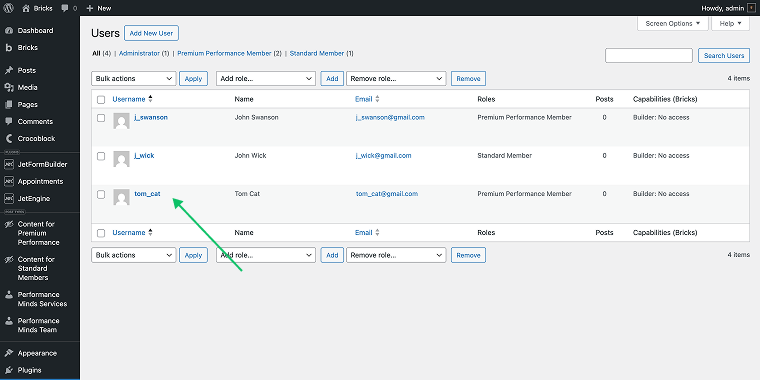
First, create new user roles for members using any user management plugin you like (in my case, it’s the Members plugin by Blair Williams). This is a necessary step since we will need these roles to build various functionalities.
A registration form built with JetFormBuilder and enhanced by the PayPal Recurring Payments add-on creates a seamless, professional registration/payment process.
The registration form will guide potential clients from initial interest to paid membership with minimal friction. The form may include the following groups of fields.
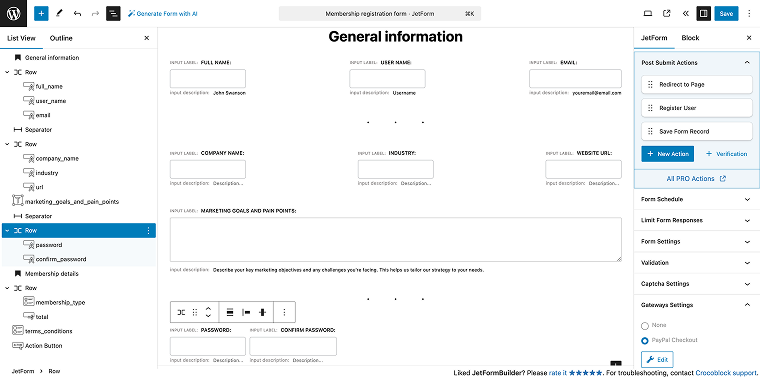
- General information section:
- Text Field blocks — to collect users’ Full name, Username, Email (with FIELD TYPE value set to “Email”), Company Name, Industry, and Website URL;
- Textarea Field block — to learn users’ Marketing goals and pain points;
- A pair of Text Field blocks for password creation and confirmation (with FIELD TYPE value set to “Password”).
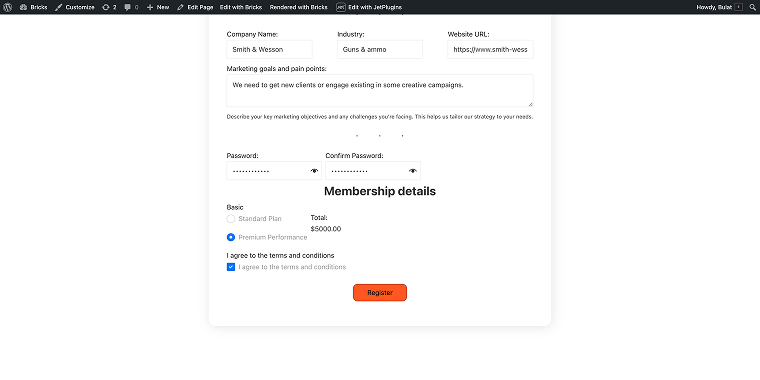
Through the form, we can collect personal and essential business information. On the front end, the form may have the following look.
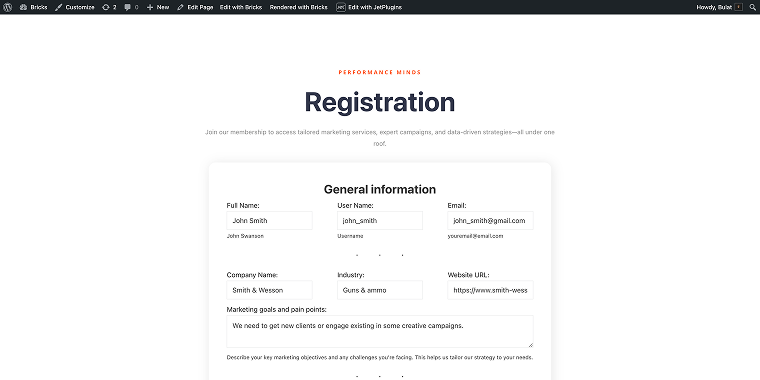
The information we collect through the form serves two purposes: it offers the marketing team valuable context about the new client and enables your platform to personalize the experience from day one.
User data management
To manage and display user data on other areas of the site, such as the user account page, we can utilize JetEngine Meta Boxes.
To create a Meta Box, navigate to the WordPress Dashboard, then go to JetEngine > Meta Boxes, click on “Add New,” and select Meta Box for “User.” Regarding the meta fields, you can create as many as your platform or marketing purposes may require.
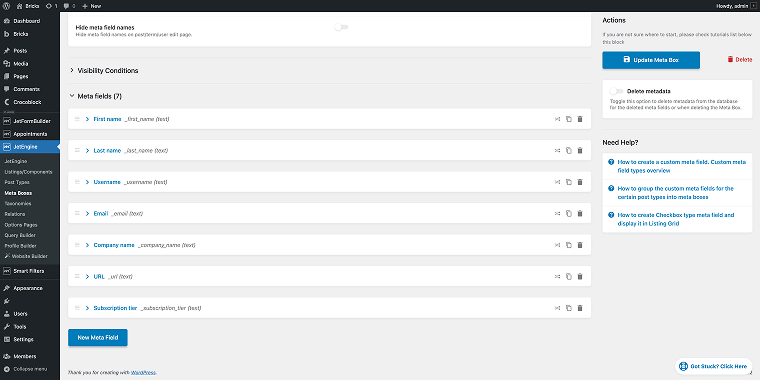
My set of Meta Fields includes First name, Last name, Username, Email, Company name, URL, and Subscription tier, all implemented as the Field type – “text”.
When you’re finished, click “Publish the Meta Box.” Now we need to ensure that the meta key for each field (e.g., _first_name, _last_name) corresponds to the ones used in the registration form.
Finally, don’t forget to create new roles for your members. To do that, we need to install the Members plugin. In my case, I’ll add two roles: Premium Performance Member and Standard Member. After installing and activating the plugin, create a new role by going to the WordPress Dashboard > Members > Add New Role. There, you can either deny or grant capabilities to the newly created role.
Matching the Meta Box with JetFormBuilder
In the JetFormBuilder form, we need to add the Register User form action, ensuring that we match the form fields in the FIELDS MAP section. Then, in the USER META fields section, enter the exact meta keys (such as _company_name, _url) to ensure the data syncs correctly with the Meta Box meta fields.
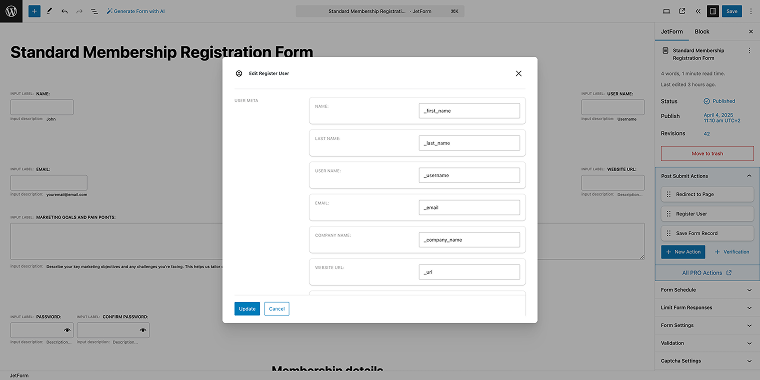
Once you are finished, click “Update.” After this step is completed, we can proceed to creating a user account area (front-end user dashboard) where user information is displayed dynamically.
User profile
JetEngine’s Profile Builder allows you to create a fully customized user experience beyond the standard WordPress admin area.
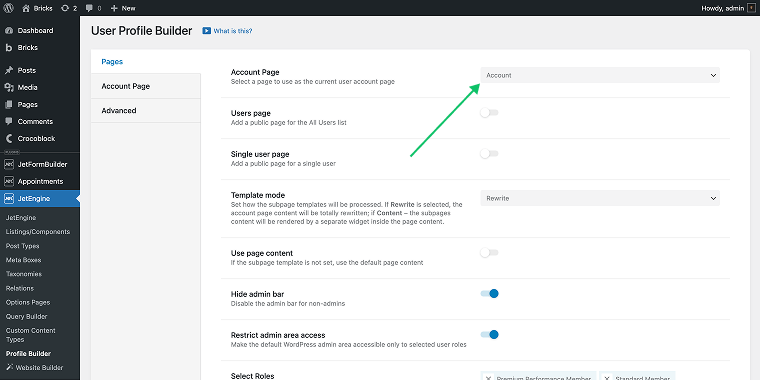
To access the Profile Builder tool, go to WordPress Dashboard > JetEngine > Profile Builder.
In the Profile Builder section, you can fine-tune various aspects of the account area. Don’t forget to create a new page to use as the account page, which is specified in the Account Page field.
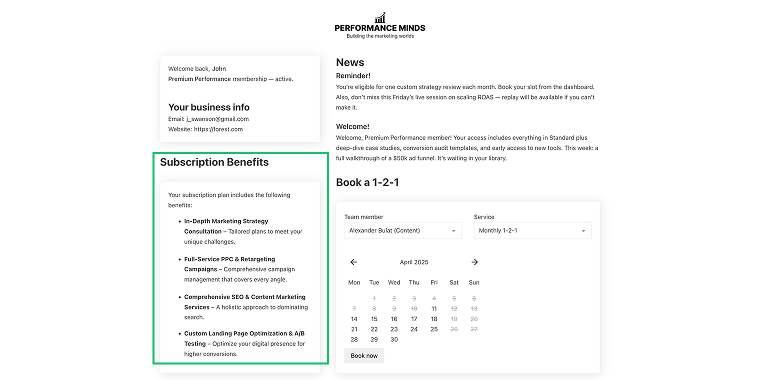
The account page (user dashboard) should be designed to highlight essential information, featuring a user-friendly interface that enables clients to manage their membership and interact with the agency team.
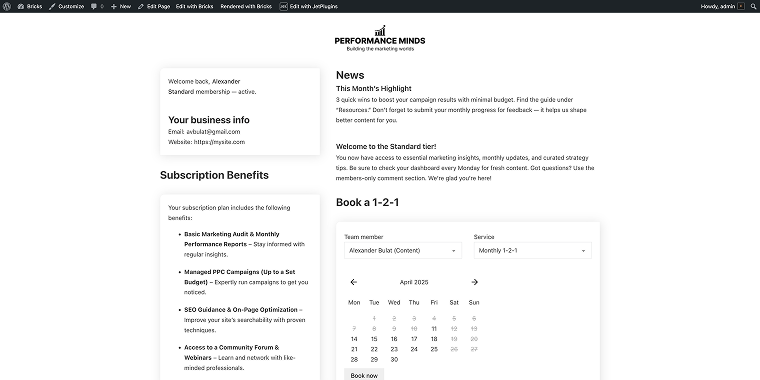
The user Account page will have the following sections:
- user details section that displays current plan and user information (name, type of membership, email, and website URL);
- a dynamic section that displays subscription benefits;
- a dynamic news section that displays content based on the user’s subscription level;
- a section with a JetFormBuilder form where users can book a 1-2-1 with the agency team member.
Custom content
Now I’m going to create a set of CPTs that will be used to:
- display news in the user account (Content for the Premium Performance CPT and Content for Standard CPT);
- two items that will be used for the Provider post type (Performance Minds Team CPT) and Services post type (Performance Minds Services CPT) pages for the JetAppointment plugin.

News (CPT)
For the news section, I plan to create two Custom Post Types (CPTs), each catering to a different membership level. This approach will reduce confusion for the admins by providing distinct sections for each membership type.
To create a CPT, go to WordPress Dashboard > JetEngine > Post Types, and use the following settings:
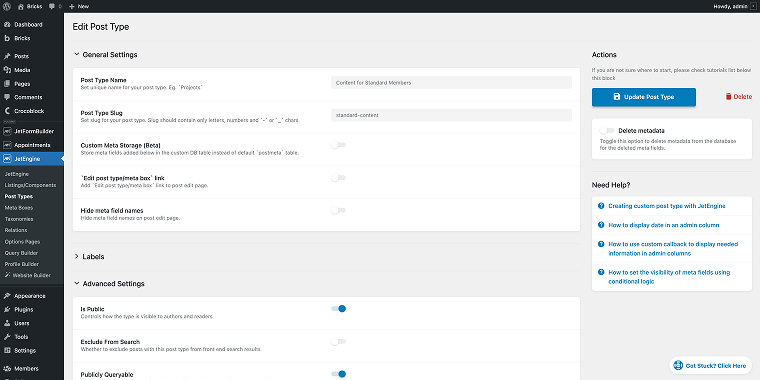
- General Settings — in the Post Type Name field, I’ll add the name of the CPT, which is “Content for Standard Members.” For the Post Type Slug field, I’ll add the slug of the CPT, which is “standard-content”;
- Advanced Settings — I’ll leave most of the settings unchanged, but will add several options in the Supports field (“Title,” “Editor,” “Thumbnail”).
In the same way, I’ll add a CPT for the Premium Performance Members. When done, click the “Add Post Type” button to save the CPT.
Team (CPT)
Now, let’s create a CPT for the team members. I’ll need this for the appointment booking form located in the user account.
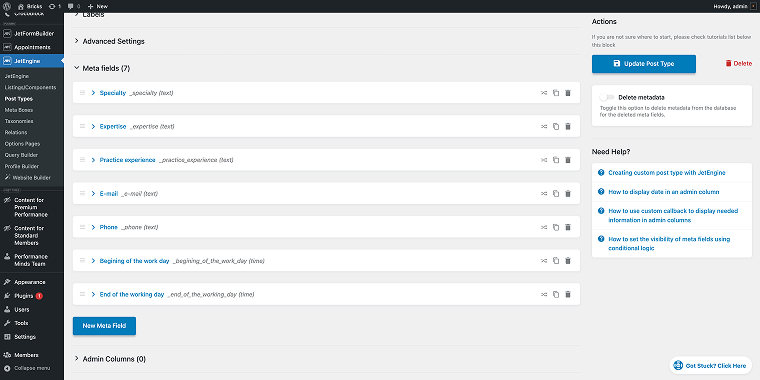
- General Settings — in the Post Type Name field, I’ll add the name of the CPT, which is “Performance Minds Team.” For the Post Type Slug field, I’ll add the slug of the CPT, which is “pm-team”;
- Advanced Settings — I’ll leave most of the settings unchanged, but will add several options in the Supports field (“Title,” “Editor,” “Thumbnail”);
- Meta fields — here, I’ll add a set of meta fields that will store team members’ info, including Specialty, Expertise, Practice experience, E-mail, Phone, Beginning of the work day, and End of the working day, with the first five using “text” field types and the last two using “time” field types.
When done, click the “Add Post Type” button to save the CPT.
Services (CPT)
The final CPT is Services. Similar to the previous one, I will need it for the appointment booking form in the user account. The settings are as follows:
- General Settings — in the Post Type Name field, I’ll add the name of the CPT, which is “Performance Minds Services.” For the Post Type Slug field, I’ll add the slug of the CPT, which is “pm-services.”
If you plan to display the services elsewhere on your website, feel free to add the meta fields to store any information you need, such as the title, description, image, price, and more.
When done, click the “Add Post Type” button to save the CPT.
Dynamic content display
User information section
Previously, we collected all the necessary user information through the registration form and saved it in the Meta Box. At this step, we need to add a set of Dynamic fields to the account page (provided by JetEngine) that can retrieve relevant information from the Meta Box meta fields.
Go to WordPress Dashboard > Pages and click on the “Edit with Bricks” to open your account page in the Bricks Builder.
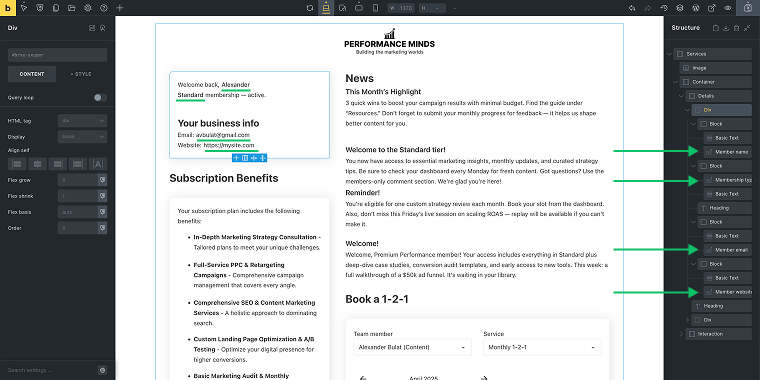
The user info section has the following structure:
- Basic text element — to display welcome message (“Welcome back, …”);
- Dynamic Field element — to display the name of the user, in the settings:
- Set Source to “Meta Data”;
- For Meta Field, choose the corresponding field (in this case, “First name”);
- Dynamic Field element — to display the subscription type:
- Set Source to “Meta Data”;
For Meta Field, choose the corresponding field (“Subscription tier”).
NOTE
Optionally, you can add other fields that will display the expiration date of the subscription, but for that, you will need to add the Registration and Expiration date meta fields to the Meta Box.
Other fields follow the same logic.
When a logged-in user visits their account page, they will see the data they entered during registration pulled directly from the Meta Box.
Subscription benefits section
Bricks provides convenient options for conditionally displaying elements. In the Subscription Benefits section, I will use the dynamic visibility of the Rich Text elements. First, I will add both lists of features to the Account page. Then, I will click on the “switch” icon to activate the conditional options panel.
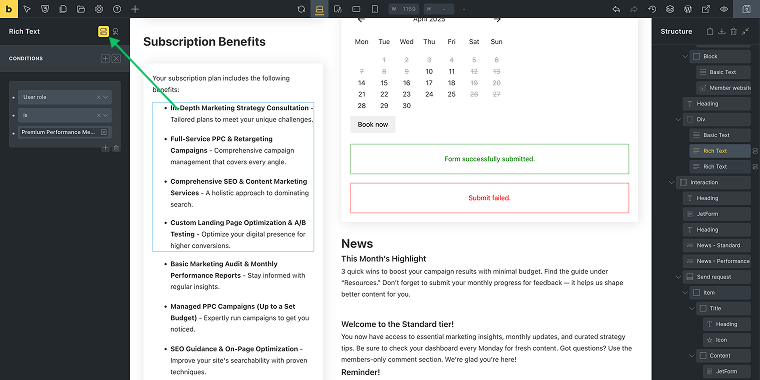
For the first list (which should be displayed on the Premium Performance Member account), I will use the following settings. In the first dropdown, I will select the “User role” option; in the second, “is”; and in the third, “Premium Performance Member.”
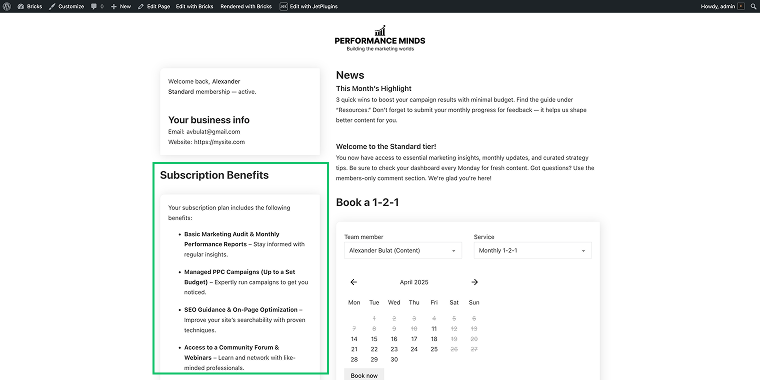
For the second list (which should be displayed on the Standard Member account), in the first dropdown, I will select the option “User role”; in the second, “is not”; and “Premium Performance Member” in the third.
Now, when Premium Performance users log into their accounts, they will see the following block:
Also, the Standard Member users will receive a slightly different view.
News for members
To display news items on the account page, I will create two Listing Items with a conditional display based on the user role. Let’s start with the news section for a Standard membership plan.
In the WordPress Dashboard, navigate to JetEngine > Listings/Components and click the “Add New Item” button. In the Setup Listing Item pop-up, select the following settings:
- Listing source field — since the source for the listing is a CPT, select “Posts”;
- From post type field — in this field, we need to choose a corresponding CPT, which is “Content for Standard Members”;
- Listing item name field — add a corresponding name for the listing so you can distinguish it from the other one;
- Listing view field — here you can choose the builder that you want to create a listing with, either “Bricks” or “Blocks”;
- Click on the “Create Listing Item” to be redirected to the editor.
In the editor, you need to add two Dynamic Fields that will display the title and content of the CPT. To do this, click on the “+” button, type “dynamic” in the search field, and add it twice.
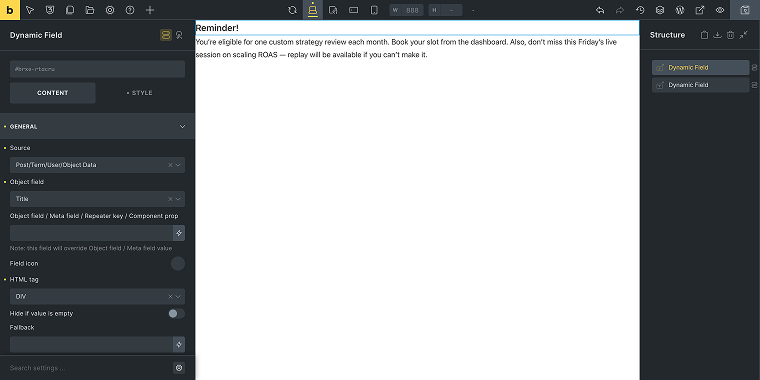
Click on the first Dynamic Field, navigate to the GENERAL tab in the settings, and select “Post/Term/User/Object Data” in the Source field and “Title” in the Object field. For the second Dynamic Field, you need to select “Content” in the Object field.
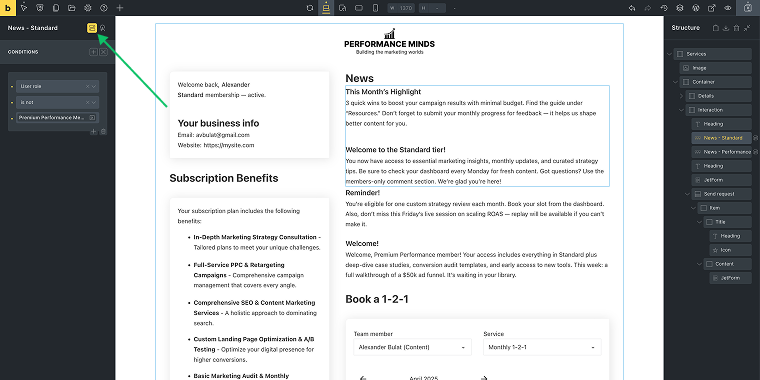
When both listings are ready, we can add them to the account page. Go to the account page, open it in the Bricks editor, select the section or DIV where you want to add the listing, click on the “+” button, and type “listing” into the search field. Add a Listing Grid element to the page, then click on it to open the settings menu.
In the CONTENT > GENERAL section, select the listing you previously created from the Listing dropdown. In the Columns field, you can set the number of columns to display posts; I’ll set it to “1.”Now we need to establish the conditions for displaying both listings. Click on the “Conditions” button and set the same type of conditions we used for the Subscription Benefits section.
Repeat the flow with the second Listing Grid element.
Booking system
The final section on the Account page is the 1-2-1 booking form, which is for a one-on-one session with the specialist. To create it, we’ll need the JetAppointment plugin. First of all, after installing the plugin, we need to tweak it a little bit.
Go to WordPress Dashboard > Crocoblock > JetPlugins Settings > JetAppointment. Here, you need to select the corresponding entities in the Services post type and Provider post type fields.
The JetAppointment plugin can simplify your appointment workflow by automatically generating Zoom meeting links and managing email communications. When a meeting is booked, the system sends notification emails to service providers, including both booking confirmations and approval requests, and delivers meeting details, including Zoom call information, directly to users.
Feel free to check this video for instructions on setting up the integration between JetAppointment and Zoom.
Now let’s create a 1-2-1 booking form. Go to WordPress Dashboard > JetFormBuilder > Form and click on the “Add New Form” button. For this form, I’ll need the next set of fields:
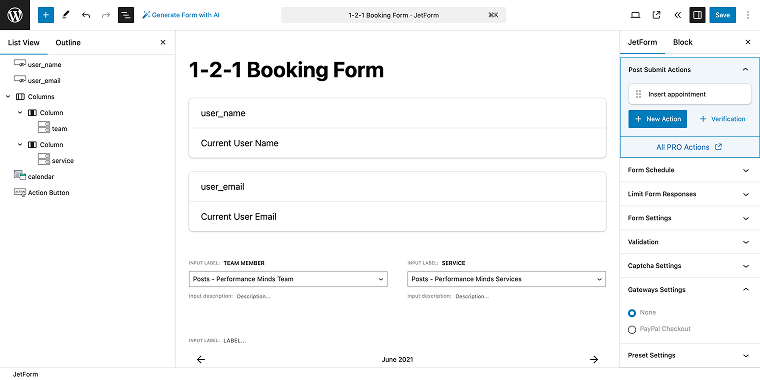
- Hidden field block — for the user’s name, in the FIELD VALUE select “Current User Name”;
- Hidden field block — for the user’s email, in the FIELD VALUE select “Current User Email”;
- Select Field block — to display a list of providers, in the FILL OPTIONS FROM select the “Post”, and in the POST TYPE select the CPT that contains team profiles;
- Select Field block — to display a list of providers, in the FILL OPTIONS FROM select “Post”, and in the POST TYPE select the CPT that contains services;
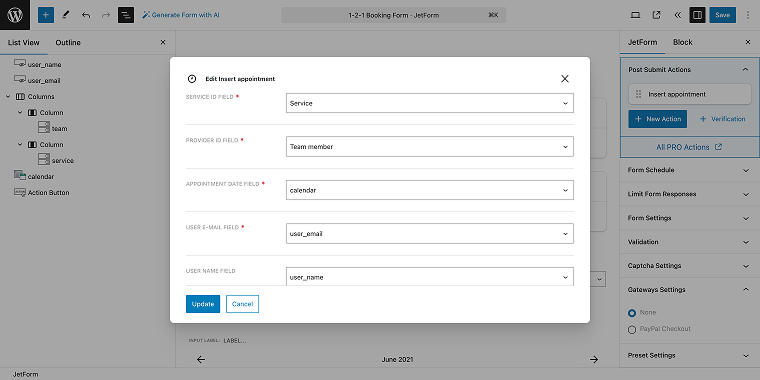
- Appointment Date block — where the user can select the date and time of the booked event, in the block’s settings, go to the Field Settings tab, and in the fields GET SERVICE ID FROM and GET PROVIDER ID FROM, select options “Form Field” and then select corresponding fields from the form.
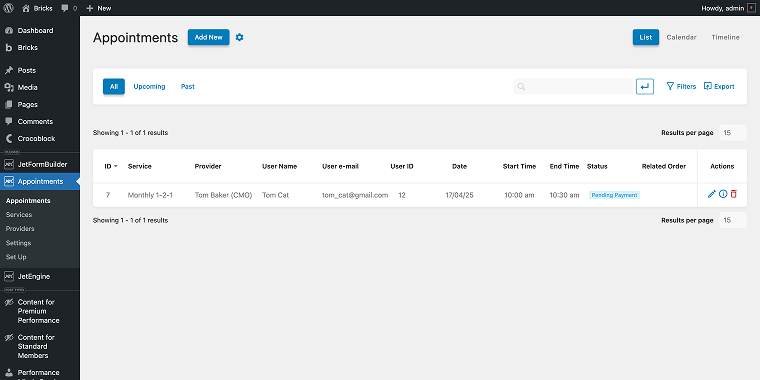
Finally, we need to add a form action that will create an appointment record in the WordPress Dashboard > Appointments > Appointments section.
When finished, save your progress by clicking the “Update” button, and then click the “Save” button to save the form. Now we add to the Account page and try it out.
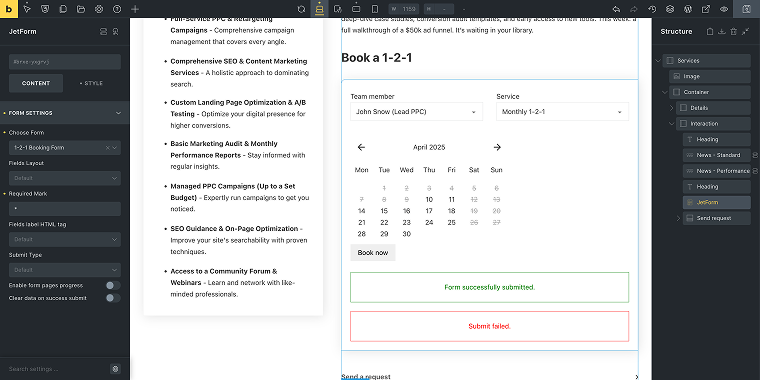
Navigate to the Account page, choose the section or DIV where you wish to place the form, and click the “+” button to add a JetForm element in that location. In the element’s settings, go to the CONTENT > Form Settings tab, and select your form in the Choose Form dropdown.
Optionally, you can also add another form here, so users can send general inquiries to the website administrator.
Now let’s test the flow. I’ll turn off the PayPal Recurring Payments add-on to shorten the demo video. Let’s go.
The registration and appointment booking are functioning correctly, and the dynamic fields are displaying accurate information.
The appointment was also successfully booked, and the user received a confirmation with a link to cancel or modify the appointment — all of this is handled by the JetAppointment plugin.
FAQ
To create a comprehensive membership site with Bricks Builder, you’ll need several Crocoblock plugins, primarily JetFormBuilder for registration and payment processing, JetEngine for managing user data and creating dynamic content, and JetAppointment for appointment booking functionality. These plugins work together seamlessly to manage everything from user registration and payment collection to personalized content delivery and appointment scheduling.
You can create membership-specific content by developing separate Custom Post Types (CPTs) for each membership tier and utilizing Bricks’ dynamic visibility feature. Establish conditional display rules based on user roles to determine which content is visible to different membership levels.
Yes, JetFormBuilder combined with the PayPal Recurring Payments add-on provides a complete solution for processing recurring subscription payments. The system allows you to create registration forms that collect user information and process payments simultaneously, while automatically assigning the appropriate user roles based on the chosen membership tier.
Conclusion
Creating a membership platform with Bricks Builder and Crocoblock plugins offers various online businesses a powerful way to package and deliver their services while generating predictable revenue. The seamless integration between JetFormBuilder, JetEngine, and JetAppointment creates a professional user experience that spans from registration to service delivery, featuring personalized dashboards that display membership-specific content and features.
By implementing the six essential features outlined in this article – registration and payment processing, user data management, customized user profiles, specialized content creation, dynamic content display, and appointment booking – businesses can establish a scalable membership platform that adapts to their needs. This approach not only simplifies client management but also enhances the perceived value of services by providing an organized and professional interface for client interactions.

