This article provides a detailed, step-by-step guide to building a dynamic chat application on WordPress, using the powerful features of JetEngine, JetSmartFilters, and JetFormBuilder. Think of it as creating your own mini Messenger – a real-time interface where users can talk to each other, without needing to refresh the page.
If you follow along to the end, you’ll learn how to create a secure chat interface where messages are private between users, how to style the interface dynamically, and how to build a logic-based chat query that only displays relevant conversations.
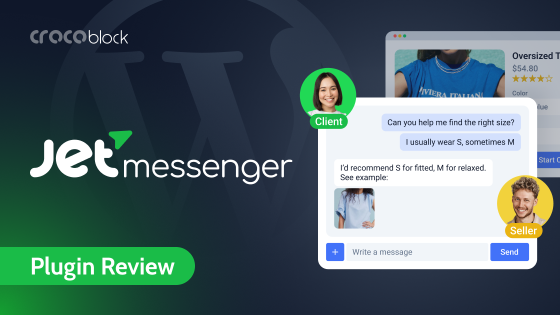
Instead of implementing this custom solution, use the new JetMessenger plugin. It provides private on-site messaging for registered users and covers everything this custom setup is designed to achieve.
However, if your project requires a highly specific implementation and workflow, this guide walks you through the process of building it from scratch.
Why Use a Dynamic Chat Application on WordPress?
Most WordPress sites focus on publishing content or selling products, but what if you want to add actual interaction? A dynamic chat application brings your site to life by letting users talk to each other in real time. It’s not just a “nice-to-have” feature. Instead of forcing users to rely on external tools like email or third-party messengers, you give them the ability to stay inside your site. They can connect, ask questions, negotiate, or simply stay engaged.
Understanding the Chat Interface
In the final result, a logged-in user opens the chat page and sees a list of other users (excluding themselves). When they click on one, the page doesn’t fully reload; instead, the chat area updates automatically using AJAX. If there was a previous conversation, it loads instantly. If there weren’t, the area would be empty. The user can type a message and hit “Enter,” and the new message immediately appears in the chat. Only the two users involved in a conversation can see their shared messages.
Let’s build this step-by-step.
Phase 1: Setting Up the User List with JetSmartFilters
First, you need a way for users to select who they want to chat with. For that, we’ll use JetSmartFilters.
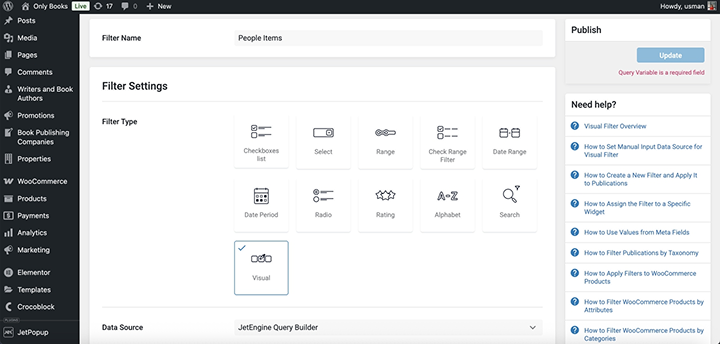
Start by creating a new filter. You can call it “People Items.” In the filter settings, set the data source to JetEngine Query Builder. Now you’ll need a custom SQL query that pulls in user information.
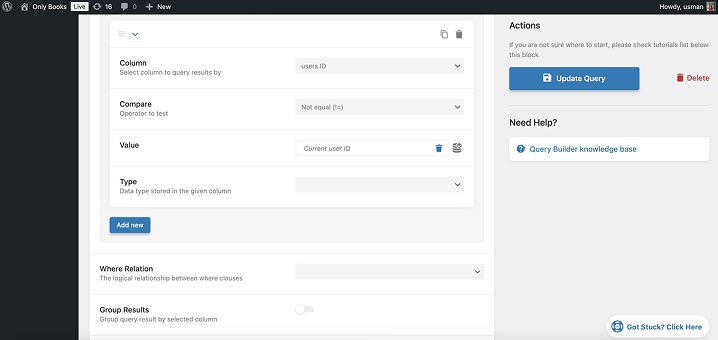
Inside JetEngine’s Query Builder, create a new SQL query. This query should pull in the user ID and display name from the users table, and join it with the usermeta table to grab the profile picture.
Also, be sure to exclude the currently logged-in user. This is important – we don’t want people chatting with themselves, unless you want to allow that (some apps do).
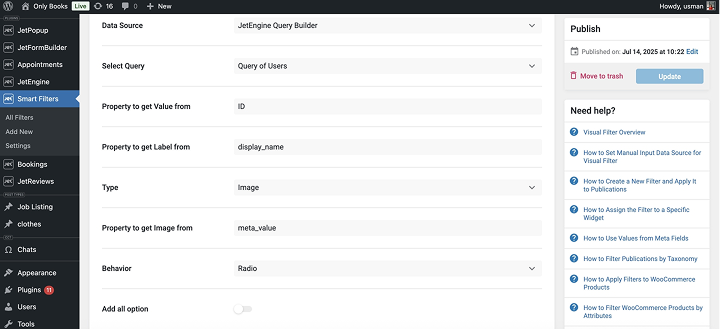
Back in the filter settings, configure it to use the ID for its value, and display_name as the label. Choose “Image” as the filter type and set the image source to the profile picture meta key. Enable “Radio” behavior so the user can only select one person at a time.
Finally, set a plain query variable name like get_messages. This variable will capture the ID of the selected user and pass it to the main chat query.
Phase 2: Showing the Chat Messages
Now you need to display the conversation between two users. This is done using a listing grid powered by a custom query.
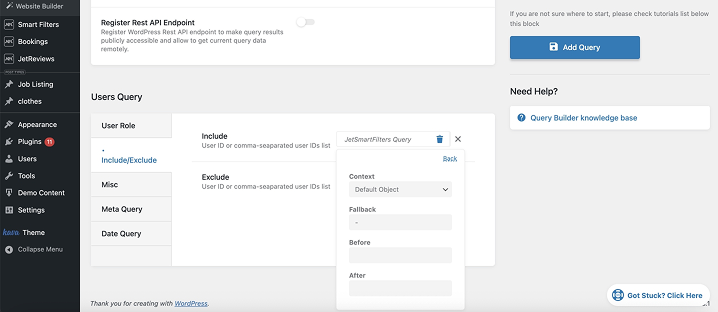
Create a new User Query in JetEngine’s Query Builder. Let’s call it “Get Current Chatting User.”
In the Include field, use the dynamic tag that reads from the get_messages query variable. This will load only the user that the currently logged-in user has selected.
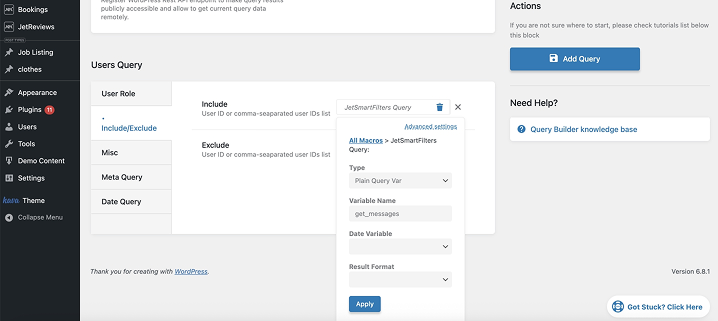
To make sure the chat area doesn’t show anything by default, add a fallback value (like “-”) so it appears empty unless a user is selected. This avoids confusion.
Next, go to the JetEngine plugin and create a Custom Content Type (CCT) called “Chats.” This is where each message will be stored. The CCT should have three fields: message (textarea), sender_id (text), and receiver_id (text).
Now, create a Custom Content Query called “Get Messages.” In this query, set two filtering conditions:
- The sender must be either the current user or the selected user.
- The receiver must also be either the current user or the selected user.
This ensures that only the messages shared between those two users will show, and no one else can see them.
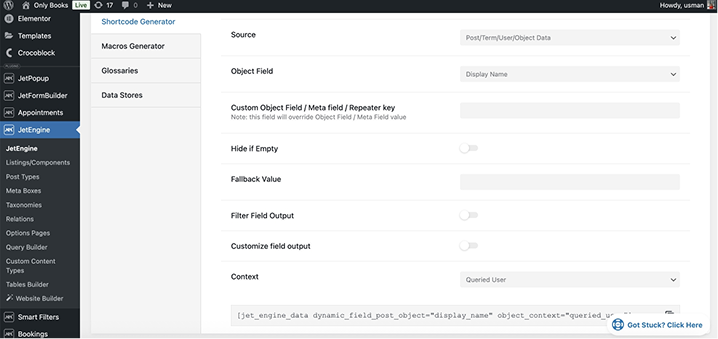
To configure this option, generate a JetEngine shortcode for both the current user and the second user involved in the chat.
Phase 3: Styling the Messages Dynamically
Once the right messages are being pulled, it’s time to make them look like a real chat.
In your listing (or query loop if you’re using Bricks), display the messages using a nested listing. Each message should render inside a chat bubble. First, generate a shortcode for the current user to show the name in the chat.
Create a New Listing with JetEngine, naming it “Chat Message Item” or another suitable name. Add your shortcode and dynamic fields like Message, Sender ID, and Receiver ID to the Listing.
Next, create the Elementor page and add your listing to the designated area.
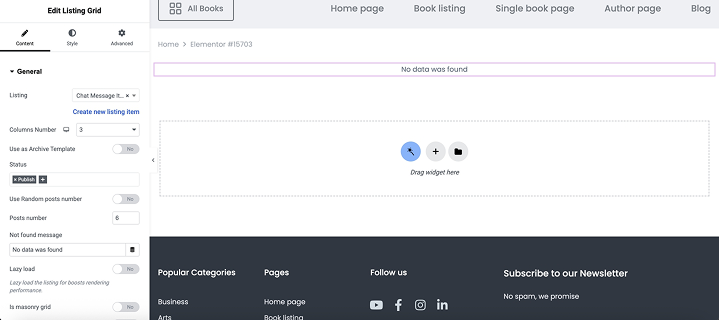
Also, set Custom Query to “Get Messages.”
To style messages differently depending on who sent them, add a data-sender-id attribute to each message item. Set it to the sender’s ID and use CSS to style messages.
Phase 4: Sending Messages with JetFormBuilder
Now that users can see their chat history, it’s time to let them send new messages.
Create a new form using JetFormBuilder. This form should have three fields:
- Message (text input);
- Sender ID (hidden field with current user ID);
- Receiver ID (hidden field with queried user ID).
NOTE
When using dynamic shortcodes to fill hidden fields, make sure to replace all double quotes with single quotes. For example, instead of [jet_engine_data dynamic_field_post_object=”ID” object_context=”queried_user”], write [jet_engine_data dynamic_field_post_object=’ID’ object_context=’queried_user’]. Otherwise, the shortcode won’t render properly in the form.
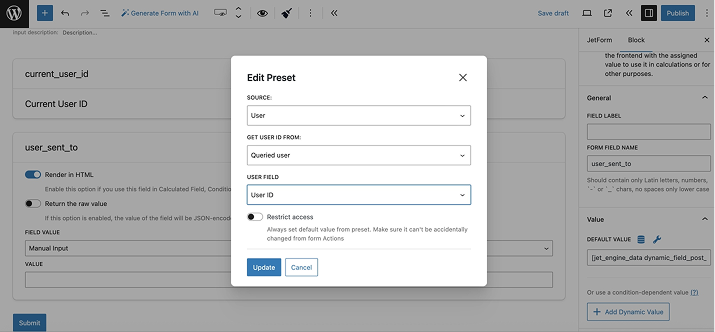
Alternatively, you can use the Preset feature and select “Current User” or “Queried User” as needed.
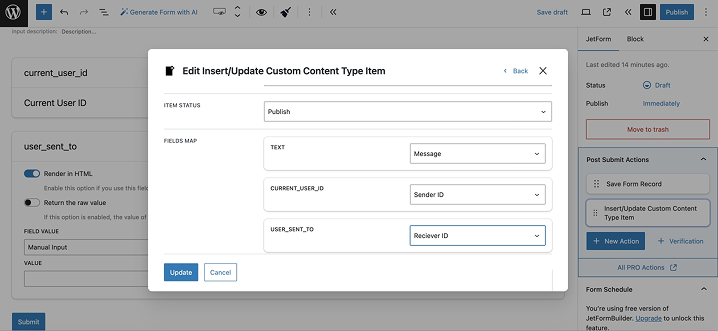
Set the first post-submit action to insert a new item into the “Chats” CCT. Map the message content, sender ID, and receiver ID accordingly. Set the post status to “Publish.”
Add a second post-submit action: “Redirect to Current Page.” This is essential because it triggers a refresh of the chat area, but with a twist. The page reloads and appends a query argument, like ?user_sent_to=2.
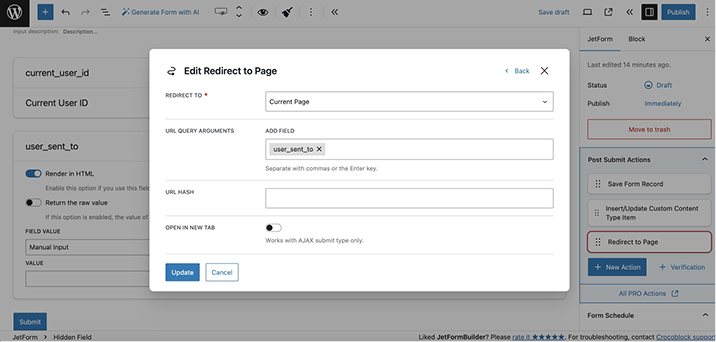
Now, update the filter you built with JetSmartFilters to have a default filter value that dynamically reads from this user_sent_to URL query. This way, when the page reloads, it remembers who the user was chatting with and loads the correct conversation automatically.
For a more detailed walkthrough, check out the video tutorial:
DIY Chat vs JetMessenger: When to Use Which?
The short answer is: use JetMessenger for all kinds of websites, including WooCommerce shops.
It stores conversations in its own dedicated database tables (not the posts table), signs and encrypts every chat/message/user reference (HMAC-SHA256), re-checks permissions on every write, protects uploaded media behind authorized routes, rate-limits abuse, and plugs into WordPress’s native GDPR export/erase tools. You also get email notifications, a context system that ties each thread to a post/product/order/user, builder widgets for Elementor, Bricks, and Gutenberg, and a JetFormBuilder action to start chats from forms.
So, it has the full package.
We were offering this custom DIY chat solution when this plugin wasn’t released yet. However, this guide is not useless, and if you look closer, you can see that the messages are stored in CCT tables – and that’s why they are available for displaying on the front end or to be used in the dashboard. So, it’s better to treat this solution as a two-way website form communication where the content is available for publishing.
Another use of this solution is that you can see another use case of the JetEngine + JetFormBuilder + JetSmartFilters combo, so you can build your own similar custom solutions.
FAQ
Use the JetMessenger plugin by Croboclock, which offers a private on-site messaging system with context attached, which is extremely important for WooCommerce, booking, and membership sites.
No. Each message stores both the sender and receiver IDs, and the query logic only pulls conversations where those two users match – so no one outside the conversation can see it.
Use JetMessenger when the conversation itself is the goal; it handles security, notifications, and context-bound threads out of the box. Build your own when you need the messages to be open data you can query, filter, and reuse across your site, since each one is stored as a CCT.
Yes. The same combination of custom queries, CCTs, and form submissions works for customer support, internal team messaging, or buyer-seller conversations in a marketplace – the chat is just one application of it.
Conclusion
You can add a full-fledged website messenger using the JetMessenger plugin that offers an advanced on-site private context-aware functionality out of the box.
However, if you want a more custom solution, where messages are closer to comments by their role, and the content should be queried and displayed, then you can consider this solution.
Also, you can take it as a blueprint for similar solutions, and the real beauty here is the flexibility. By combining JetEngine’s custom queries and content types with JetSmartFilters and JetFormBuilder, you can build far more than just a chat app.