This is one of the most anticipated and cool things to announce: JetMessenger is there for all Crocoblock users! It’s a private messaging system built natively into your WordPress to create private chats between users, with automatic email notifications (if enabled), and full integration with WooCommerce, JetEngine, JetFormBuilder, and your favorite page builder – Elementor, Bricks, or Block Editor. Every conversation stays on your site, in your database, tied to the order, product, post, or listing it’s actually about.
So, be it marketplaces, directory websites, LMS sites, booking platforms, or other sites where two users need to talk privately about something specific, JetMessenger gives them a thread for it.
Why the Market Needs JetMessenger
Let me make a fast clarification: so when someone says “WordPress chat plugin,” it means at least two completely different categories of tools.
The first category is the live chat widget – a little bubble in the corner of your site that anonymous visitors click to talk to a sales rep. For example, Tidio, Tawk.to, Crisp, Intercom.
The second is the community DM system – private messaging between members of a social network. For example, BuddyBoss, BuddyPress add-ons, or Better Messages. They are built around the assumption that your site is a social platform, and conversations are general-purpose.
The thing is, there’s a third category that neither of those handles well, and it’s the one a lot of modern WordPress projects actually need: user-to-user messaging, bound to a specific transactional context. For example, a customer messaging a vendor about a particular order, a student asking their instructor about the lesson, or a guest asking a host about a booking before they commit.
The issue is that this category is not really natively covered, but most multi-vendor tools use TalkJS (a SaaS solution). So, JetMessenger, the newest plugin by Crocoblock, is built for that third category, and it’s the first credible attempt I’ve seen at solving it natively, inside WordPress, on your own database, without a third-party SaaS in the middle.
So, let’s dive in.
What JetMessenger Actually Is
JetMessenger is a private messaging system for WordPress where every conversation is tied to something. That something is a context, and contexts are the central idea of the product.
In simple terms, when someone sends a message, it doesn’t have to start from scratch. It can include additional information – for example, the recipient can see which page the message was sent from or receive extra metadata about the sender if it’s configured.
A context can be:
- a WooCommerce order;
- a WooCommerce product (a pre-purchase question to the product’s vendor);
- information about the post the message was sent from;
- a direct message (user-to-user without an attached object).
There’s also a dynamic resolver to detect a user, and it has options:
- Current post author;
- Current Woo product author;
- JetEngine objects:
- queried user ID,
- queried object ID,
- current object author.
- A particular user ID or email address.
📌 Other important facts about JetMessenger:
- You place chats using a builder – there are widgets for Elementor, blocks for Gutenberg, and elements for Bricks.
- Chats have a dedicated page or endpoint within the WooCommerce account page.
- Users can have their messages inside their User Profile (by JetEngine’s Profile Builder).
- Users get notifications about new messages via email (if it’s not switched off).
- The backend communicates using REST API.
- The front end is a React application that mounts inside the page.
- Conversations are stored in dedicated database tables (the plugin creates four of them on activation) rather than abusing the WordPress posts table the way some plugins do.
- IDs are stored encrypted (HMAC-SHA256).
Who is JetMessenger for?
Of course, it’s for anyone who wants to have a context-oriented and GDPR-compliant messenger on their website. But here are the top cases for this messenger:
- Marketplace operators running WooCommerce with multiple vendors.
- Directory and listing sites.
- LMS platforms where students and instructors need to talk privately about coursework.
- Booking and appointment sites where pre-booking questions decide whether the booking happens.
- Membership and SaaS-style portals where users need a private channel to staff or to each other.
And JetMessenger is for registered users only – guests can’t send messages.
Setting Up JetMessenger
This is a step-by-step guide on setting up the JetMessenger plugin.
After installation, you can find the settings in Crocoblock > Messenger. On the first run, you will see the “Setup Wizard” button.
🔌 Step 1 – Select usage contexts.
You will see checkboxes for each available context type:
- Direct messaging;
- Post messaging;
- WooCommerce order messaging;
- WooCommerce product messaging.
Enable the ones your project needs.
🔌 Step 2 – Assign chat pages where your chats will be located.
For each enabled context, you choose how its chats will be exposed on the front end. For the non-WooCommerce contexts (direct (no-context), or one with a post context), this is straightforward – pick an existing page or let the wizard create one. You can use the same page for both, if you want.
The wizard literally creates the pages for you, with sensible default titles (My Chats, Post Chats, Order Chats, Product Chats), so you don’t have to leave the wizard, create pages, come back, and assign them.
💡 You can definitely place chats in your Profile Page using JetEngine’s Profile Builder. Choose the My Account page and place the My Chats where you want to see your chats. Thus, you can, for instance, place post-related messages on a separate page and direct messages to your profile page – it all depends on your workflow.
For WooCommerce contexts, the routing dropdown offers two paths:
| Routing option | What it does | When to use it |
| Static Page | Creates (or uses) a regular WordPress page that hosts the chat UI | When you want chats on a dedicated page, you control it with a builder |
| WooCommerce My Account Endpoint | Injects the chat surface as a native tab inside the WooCommerce account area (e.g., /my-account/order-messages/) | When you want chats to live inside the existing WooCommerce customer experience |
And what is really cool, the two WooCommerce contexts can be routed independently. Orders can use the My Account endpoint while Products use a static page, or any other combination. The wizard treats them as separate decisions because they really are.
The My Account endpoint option is the one I’d recommend for most WooCommerce builds. It means customers don’t have to learn a new place to find their conversations, as order messages live right next to their order history, with a tab labeled however you want.
🔌 Step 3 – Notifications, Rate Limits, Security settings.
After clicking the “Finish” button of the wizard, you have a general settings section – there, you can reset Context settings, but also find the Rate Limits section – it’s for your website performance and avoiding spikes. There, you can control how many messages users can send each other within a given timeframe, message limits, and so on.

There’s also a big section for setting up Notifications. There, you can set up email notifications and the mail body using dynamic tokens like {{sender_name}}. There, you can also edit the initial message for a WooCommerce order chat, so the user can see their order summary.
Finally, the Privacy section has many settings to ensure that the messenger is compliant with GDPR and can receive all their data, as well as get this data erased.
🔌 Step 4 – Page Builder setup.
You pick which builder you’re using (Block Editor, Elementor, Bricks) and then choose between Add components for me (the wizard inserts the suitable widgets/blocks automatically) or I will do it manually later (you’ll handle widget placement yourself).
If you pick Add components for me, the next screen offers a further refinement: for each context, you can choose between two insertion modes:
- Insert directly into the page content – the chat UI is placed inside the actual page content of the page created in Step 2.
- Insert into a template – the chat UI is placed inside the template used by that page, which is typically an Elementor Theme Builder template, a Bricks template, or a JetEngine Profile Builder template.
Even if you chose the latter option, you can later edit it manually.
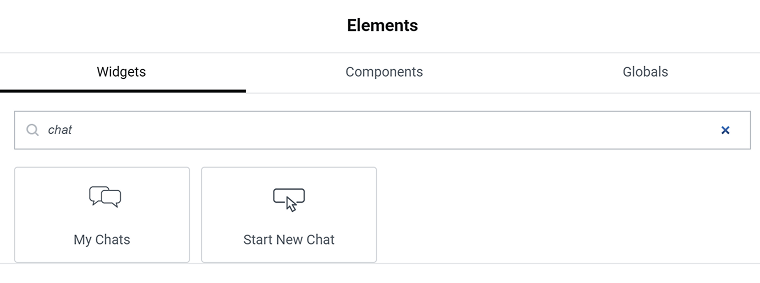
There are two dedicated widgets/blocks/elements for chats:
- My Chats – for your chats;
- Start New Chat – a button to start a new chat.
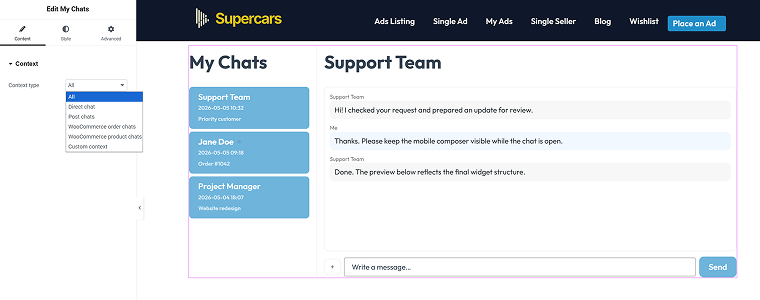
Settings for My Chats are very simple: you can choose a context, whether you want to see all chats there or only certain ones. It makes sense if you create separate pages for different contexts. But if you create just one page for all of your chats, select “All” from the dropdown.
The Start New Chat widget settings have a bit more to choose from, but it’s also mostly about the context:
JetMessenger in Action: Practical Example
After you set up the plugin, you should definitely add some users, because messaging yourself is not possible. Also, I really recommend a plugin to switch between users, for example, WP User Switch, for faster testing.
For now, I will test non-WooCommerce cases: direct chat and post chat.
My site is a multi-vendor directory, where different users can post their listings. I’ve already created a loop (Listing) template with JetEngine for those items and added the Start New Chat widget with the resolver set to the Current post author. So, when I send a message, it will go to the author of the post that is in my listing template.
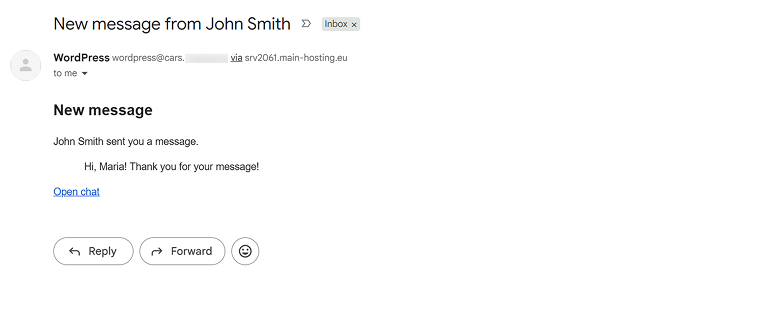
There’s an email notification for the messages as well (if not switched off). By clicking the “Open chat” button, the user is redirected to the chats page.
Definitely, you can make the template fancier using HTML and CSS according to your branding.
Now, I want to test direct messaging, and for that, I will choose the simplest scenario – messaging to Admin. In the Start New Chat settings, I will choose the admin’s ID instead of the dynamic resolver, so messages will always be directed to the Admin.
It’s logical to add this button to the user’s profile – so I will create a new subpage in JetEngine > User Profile, and place both My Chats (with “All Chats” settings, so I will be able to see all the chats there, not only direct) and the Start New Chat widget.
As you can see, as soon as I clicked the “Start New Chat” button, I got redirected to the page that I’ve selected for chats in the JetMessenger settings. However, then, I’m able to continue chatting right from my profile page.
If you want to keep messages only in the user profile, without going back and forth, choose the Account option in the wizard instead of the static My-Chats page.
💡 If you want to separate direct and post-related messages, just create separate sections/tabs, add the My Chats widget, and in the settings, select only Direct/Post chats for each section/tab. The same for WooCommerce chats.
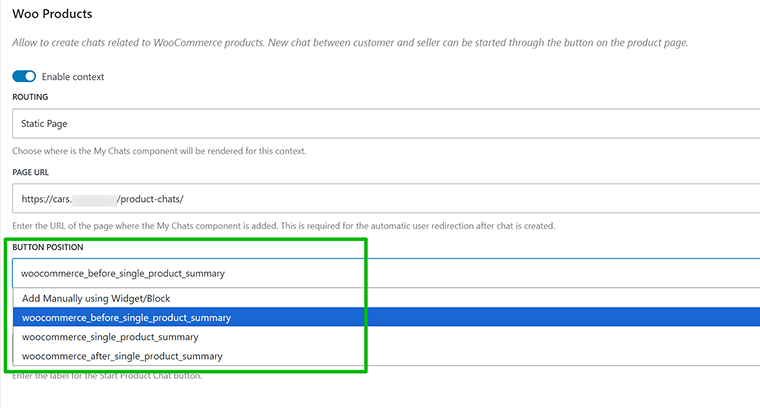
JetMessenger for Multi-Vendor WooCommerce Marketplaces
JetMessenger has dedicated compatibility with WooCommerce, and you can definitely use it with normal WooCommerce sites, so that the admin and editors will get all the messages, or with multi-vendor WooCommerce platforms.
You definitely can add it manually to a product template, using a widget and JetWooBuilder, Elementor Pro, Bricks, or Block Editor to edit your WooCommerce template, or just select where it should be according to WooCommerce hook locations. Then, you don’t have to edit your Woo template.
The same situation with the chat button for Order and Checkout steps:
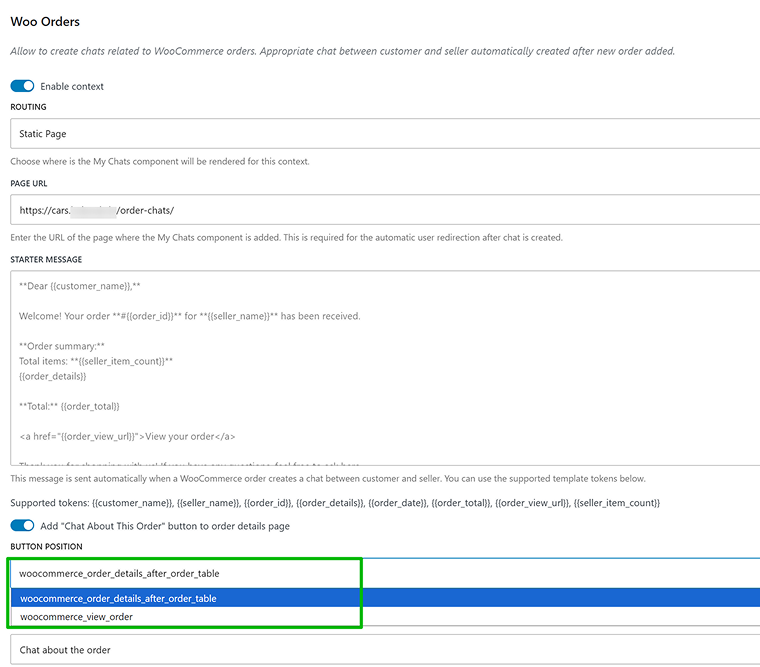
Chats can be placed on a dedicated page or using the endpoint, right in the user’s WooCommerce profile. Here’s one more reminder that all users should be registered to use this messenger.
JetMessenger and JetFormBuilder Integration for WordPress Forms
This is a very cool integration, using which you can start a chat or continue the existing one, and, sure, you can add context. To do it, use Hidden fields – for example, to add a context about the current post, add a Hidden field with a Current Post ID value.
For the current post author, choose Current Post Author ID. This is a must-have for sending post-related messages. And, of course, add a field for the initial message.
Then, add the new JetMessenger: Create or Reuse Chat post-submit action and include all the required fields in the appropriate fields using macros wrapper – %.
For example, the field called your_message will look like this – %your_message%, etc.
Now, add this form to a page. In my example, it’s for a chat with a post context, so I should place it on a post created by other users to be able to chat with them.
This action doesn’t redirect you to a chat page! It just leaves a message that can then be found and continues in a user profile dashboard. The user, though, gets an email notification (doesn’t need an extra JetFormBuilder action).
However, if you want to connect more actions – connect automation services or CRM using a webhook, etc., you can do it just like with any other JetFormBuilder form.
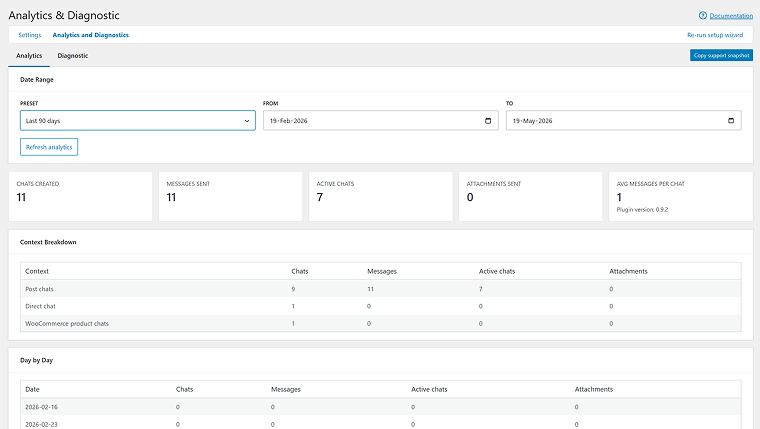
Analytics and Diagnostics
The final dashboard is Analytics and Diagnostics – they are what the names suggest.
In the Analytics tab, you can see all the chat numbers and the breakdown per day, and choose a range up to the last 90 days.
The next tab is Diagnostics, and it not only gives very detailed data but also offers centralized access to all your Start Chat locations:
Security in JetMessenger
As it’s a messenger, it means data and files can be submitted, which potentially brings security risks. So this is how JetMessenger handles them.
Public IDs are opaque, not sequential
Every chat, message, and user is referenced on the client as a payload.signature token signed with HMAC-SHA256. Changing a single character in either half makes the server reject the request. Tokens are also bound to the blog_id, so a valid token from one site in a multisite network won’t unlock anything on another. This kills the most common WordPress IDOR pattern.
Authorization checks
A lot of plugins verify access when you load a chat and then trust you forever after. JetMessenger re-checks context permissions on every write – when sending a message, marking something as read, attaching a file. If you lose vendor status on a WooCommerce order, you immediately lose the ability to post in that order’s chat, not just to view it. This matters more than it sounds: write-side bypasses are how most real-world WordPress breaches happen.
Media files security
Media files don’t create attachments, so they are not in the Media Library. Instead, uploaded images go into a hashed folder with .htaccess and robots.txt protection, and they are served through an authorized route rather than a direct URL. So, if you copy the URL and open it in incognito, you get a 403. A user who isn’t part of the chat gets the same 403.
Layered XSS protection
XSS protection in JetMessenger comes down to one principle applied everywhere: nothing the user types is ever trusted as code. It can be a chat message or a value pulled in by a third-party developer. The server strips out anything dangerous like scripts, hidden event handlers, or sketchy links before it ever reaches the browser. Safe formatting like bold or italics gets through; anything that could run code doesn’t. That means even if someone deliberately tries to sneak malicious code into a message, the browser only ever sees plain, harmless text.
Rate limiting with proper 429 responses (“too many requests”)
Once someone crosses a sensible threshold set up in rate limits, it politely refuses further attempts. This stops someone from hammering the system, be it a bot spamming messages, a script trying to brute-force tokens, or just a client stuck in a loop.
GDPR is taken seriously
The plugin’s data is included in the native Personal Data Exporter and Eraser tools in Dashboard > Tools.
Also, according to Retention Policies, it runs a retention cron that cleans up orphaned attachment files (not just database rows), and logs deletion events without leaking message contents into the audit log.
What’s on the Near-Term Roadmap?
The plugin is shipping in stages, and here are a few things that are on the way:
A Policy Engine for global “who can message whom” rules. Think site-wide policies like “subscribers can message instructors but not other subscribers.” It’s important for platforms where the messaging rules are a meaningful part of the product (LMS systems, gated communities, professional marketplaces).
A third-party SDK for registering custom contexts. Right now, the built-in contexts cover most cases, but developers will eventually be able to register their own, e.g., lms_course, event_ticket, appointment_slot, whatever the project needs. But surely, the core permission checks always run before the custom adapter’s logic, so a sloppy third-party adapter can’t accidentally open a security hole.
Search, archive, mute, and close states. Per-user states (you can archive or mute a chat without affecting how the other participant sees it), and per-chat states (an admin closing a support thread closes it for everyone).
Adaptive polling, which is the more sophisticated version of the current fixed-interval approach. When a conversation is active, the polling speeds up so messages feel near-instant. When the chat is idle, the polling backs off progressively to save server load. Either way, security re-checks happen on every poll, so transport changes don’t open new vulnerabilities.
FAQ
Portal messaging is private, on-site communication between registered users of a platform, as opposed to live chat with anonymous visitors or messaging through external apps. It keeps conversations inside your WordPress site, where you control the data, the interface, and the rules.
Anyone running a platform where two registered users need a private channel to discuss something specific: multi-vendor marketplaces, LMS sites, directories, booking platforms, membership communities, and B2B portals. If your users currently leave your site to talk over email or WhatsApp, you’re losing context, control, and a meaningful piece of the user experience.
Every conversation in JetMessenger is bound to an object: a WooCommerce order, a product, a post, or a custom entity. When a user starts a chat from that object’s page, the system attaches the object as the chat’s context, so both participants already know what the conversation is about and can find it later by filtering on that context.
You can add a “Start Chat” button to a listing template and set up a post that is shown in a loop as a context. But a listing template is literally a template, a wrap for posts. So you can’t add it as a context, and you don’t need it.
If you mean listing as a listing of a directory website (post, entry) – not a listing (loop) template, then yes, of course, you can use it as a context.
Because the messaging is the workflow. When a chat is tied to an order, a vendor doesn’t have to ask “Which order are you talking about?” – they already know. When it’s tied to a listing (post), the listing owner has all the context they need to respond. Pulling messaging into your WordPress data model means conversations carry information instead of demanding it.
The most common ones: customer-to-vendor chat on multi-vendor WooCommerce stores, student-to-instructor channels in LMS platforms, listing inquiries on directory sites, host-guest pre-booking conversations on rental platforms, and member-to-staff support on membership portals. Anywhere two registered users have something specific to discuss, contextual messaging gives them a structured place to do it.
To Wrap It Up
JetMessenger is a plugin that takes context seriously, and that’s rarer than it should be in the WordPress ecosystem. Most messaging plugins treat messages as a flat namespace and leave the context-binding work to you. JetMessenger inverts that, and context is the foundation, and messages exist within contexts. Once you get used to that model, generic messaging plugins start to feel like they’re missing the point.
Once you work with a context-first system, traditional messaging plugins can start to feel disconnected from the workflows they’re supposed to support. And that’s really where JetMessenger stands out and doesn’t just add chat functionality to WordPress, but makes conversations part of the website logic itself.
If you want to build a more connected and interaction-driven WordPress website, this is a plugin worth exploring. Try JetMessenger in a real project, experiment with its contextual approach, and you’ll quickly see how much smoother user communication can become.