Imagine walking into a supermarket and tossing items into your cart as you go. Without a clear view of what’s already inside, it’s easy to forget something important or accidentally add too much. That same experience can happen in an online store, especially if customers can’t quickly check what’s in their cart while they browse.
In a physical store, your cart is always with you. But online, if users feel uncertain or overwhelmed, they might simply close the tab, and that’s how abandoned carts happen.
A mini cart helps prevent this by giving shoppers instant access to their selected items, directly from any page. It lets them quickly review what they’ve added, make changes, and head to checkout without interrupting their shopping flow.
In this article, we’ll show you how to implement an easy, powerful mini cart in WooCommerce.
Ready to improve the customer experience and boost conversions? Let’s dive in.
What Are Mini Cart and Fast Cart in WooCommerce?
Before we jump into implementation, let’s clarify the difference between a WooCommerce mini cart and a fast cart in WooCommerce, and why they’re crucial for user experience and conversions.
Mini Cart
A mini cart is a small, easily accessible shopping cart summary, typically displayed in the header, sidebar, or as a dropdown. It lets customers quickly review their selected products, quantities, and totals – all without leaving the page. This improves the shopping flow by reducing friction and keeping users engaged.
Fast Cart
A fast cart (also called a drawer cart or cart pop-up) is an advanced version of the mini cart that slides in or pops up as an overlay. It includes AJAX functionality, allowing shoppers to edit cart items or apply discount codes on the fly and proceed directly to checkout.
Why are they important?
Both mini carts and fast carts improve the customer experience by:
- making it easier to review and update Woo cart contents;
- encouraging impulse purchases and upsells;
- reducing the number of clicks to checkout, which boosts conversion rates.
In this article, we’ll show you how to add these powerful features to your eCommerce website with minimal effort.
How to Implement a Mini Cart with JetPlugins
One of the easiest and most flexible ways to add a mini cart to your WooCommerce store is by using JetBlocks in combination with JetThemeCore. This method allows you to insert a fully functional cart icon into your site’s header or footer and customize how the cart appears – as a dropdown, slide-out panel, with or without labels.
JetBlocks offers a dedicated WooCommerce Shopping Cart widget that works perfectly inside JetThemeCore headers and footers.
Let’s walk through the steps:
1. Install the plugins
To use this method, make sure the following plugins are installed and activated:
- JetBlocks;
- JetThemeCore;
- WooCommerce.
Once they’re active, go to WordPress Dashboard > Crocoblock > Theme Builder and open or create a Header template.
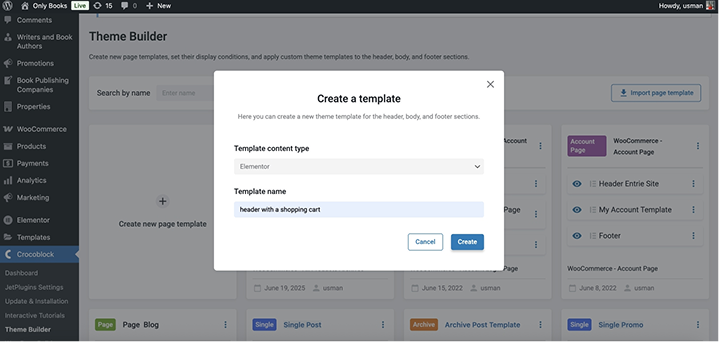
2. Add the WooCommerce Shopping Cart widget
Inside Elementor, open your header template. From the widgets panel, drag the WooCommerce Shopping Cart widget into the header section. It’s usually placed next to the site’s navigation or logo.
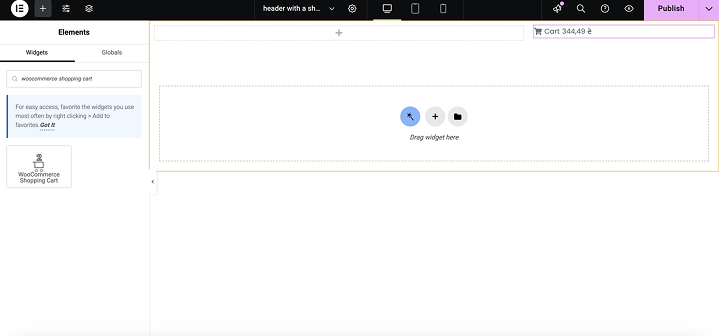
You will immediately see the cart icon with a product count and subtotal if items are in the cart. This widget automatically connects to WooCommerce and updates dynamically.
3. Configure the mini cart display and behavior
Once you’ve added the Shopping Cart widget to your header using Elementor, it’s time to customize how it looks and works.
First, look at the Label field. This is the text that appears next to your cart icon. For example, you could write something like “Your Cart” or “Bag” to help users understand what the icon is for.
Next, you can choose a cart icon — just click the icon picker and select the one you like, or even upload your own SVG.
Then, scroll down and turn on the Show Products Count option. When this is enabled, users will see how many items are currently in their cart. You can also customize how this number looks by adding your own sentence, like “You have %s items” — the %s will be replaced with the number.
If you want to show the total cost of all items, turn on Show Cart Subtotal. Again, you can personalize the display format using the %s shortcode for the price.
To give users a better shopping experience, enable the Show Cart Dropdown setting. This will display all the products inside the cart when someone clicks or hovers over the cart icon.
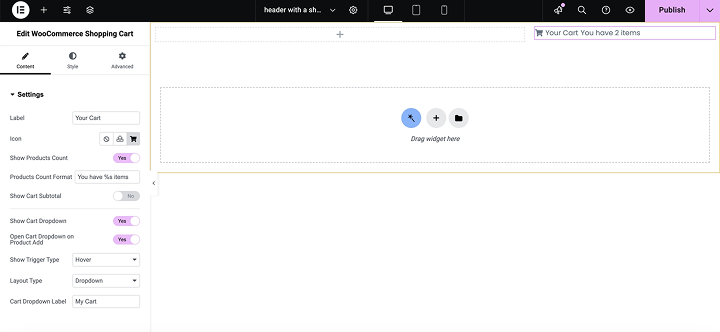
If you also enable the Open Cart Dropdown on Product Add, the mini cart will automatically appear each time a new product is added. It is one of the ways to confirm that the item was successfully added.
Finally, choose how the cart opens. You can let it appear on hover or only when the customer clicks the icon.

You can also choose the layout style – either a simple dropdown or a stylish slide-out panel from the side of the screen.
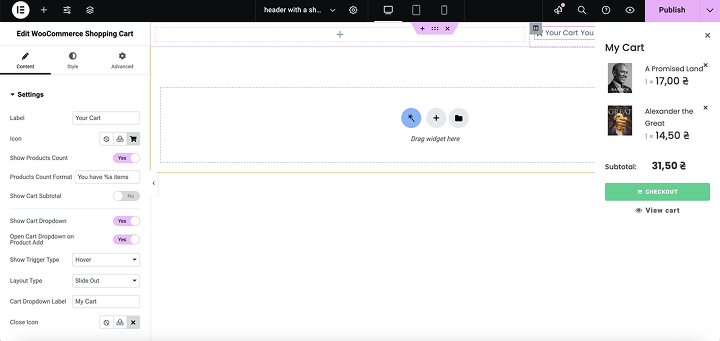
You can also type in a Cart Dropdown Label – for example, “Your Cart Summary” – which will show up inside the mini cart panel above the product list.
Once you’ve made your choices, your cart will update in real-time and match the look and feel of your website.
Other Ways to Add a WooCommerce Mini Cart
Besides Crocoblock plugins, there are several other tools that allow you to implement a mini cart in WooCommerce. Each offers different levels of flexibility, customization, and user experience.
If you’re working with Elementor Pro, one of the simplest and most elegant solutions is already at your fingertips. The Menu Cart widget includes a built-in mini cart feature that can be displayed either as a simple cart icon or as an interactive dropdown or side cart. This widget allows for full design customization directly from Elementor, including icon style, typography, cart behavior on click, and responsive display settings for mobile and desktop.
CartFlows is another tool that includes mini cart and fast cart capabilities. Originally built for sales funnels, CartFlows integrates with WooCommerce and supports dynamic cart elements like slide-in panels, quick checkout links, and real-time product updates. It’s ideal if you want to combine cart functionality with upselling, order bumps, and checkout optimization.
If you’re working with a limited budget or just starting out, there are several free plugins that offer a surprisingly good mini cart experience.
One of the most popular options is WP Menu Cart, which lets you add a cart icon to your menu that updates automatically as users shop. While simple, it works well with most themes and doesn’t require coding. Another reliable option is Side Cart WooCommerce, which adds a floating cart that slides into view when a product is added. It uses AJAX to update the cart contents in real time, allowing users to change quantities or remove items instantly, all without reloading the page.
For those looking for more visual appeal, the XT Floating Cart for WooCommerce plugin provides a modern floating panel with smooth animation effects. Its free version includes core functionality like live cart updates and a direct link to checkout.
Many of these plugins support key UX features like automatic cart opening when a product is added, live updates for quantity changes, the ability to remove items directly from the cart panel, and clearly visible floating cart icons available across all pages of the site. Some even allow you to insert a coupon field or show dynamic totals, helping shoppers feel in control of their purchase as they go.
Choose the method that best fits your tech skills, design goals, and site performance needs.
Best Practices for Using Mini Cart and Fast Cart in WooCommerce
Here are some of the best practices to follow when setting up a WooCommerce mini cart or fast cart:
- Make the cart accessible on every page. Your customers shouldn’t have to hunt for their cart. The cart icon should always be visible – either on the header or, if it’s a floating cart, ideally in a fixed position, such as the bottom right or top right of the screen. This ensures users can quickly view, edit, or proceed to checkout from any page.
Choose a recognizable icon (usually a shopping bag or cart) and test its visibility on both desktop and mobile.
- Enable auto-open on product add. When a customer adds a product to the cart, opening the side cart automatically gives instant feedback that the action was successful. It also encourages them to review the cart and proceed to checkout.
- Allow in-cart product editing. Let users increase or decrease product quantities or remove items without leaving the cart panel. This reduces the friction of going to a separate cart page just to make adjustments.
- Display key cart information clearly: price, product name, estimated total, etc.
- Show urgency or promotions. But don’t overdo it – the cart should remain clean and focused on completing the purchase.
- Track cart interactions. Use tools like Google Analytics or Meta Pixel to track how customers interact with your mini cart. These insights can help you optimize further. Maybe you need a bigger button, better color contrast, or faster load speed.
FAQ
A mini cart is usually a small dropdown or pop-up that shows your cart summary while you browse the shop. A fast cart is typically a slide-in or drawer-style cart that appears instantly and often includes advanced features like one-click checkout, upsells, or coupon boxes. Both help shoppers review their cart without leaving the current page.
Yes. Most cart plugins offer the option to automatically open the cart drawer or pop-up after an item is added. This improves the user experience and can increase conversions.
Usually not, if you’re using a well-coded plugin. But still, it’s always a good idea to test your website performance after adding new features.
Conclusions
Adding a mini cart or fast cart to your WooCommerce store is a game-changer for boosting conversions, improving the shopping experience, and simplifying the buyer’s journey. In this article, we explored why this feature is important and how to implement it using JetPlugins.
A well-designed mini cart (or fast cart) improves the user experience, reduces cart abandonment, and increases your sales potential. So use this article and implement a mini cart on your next eCommerce website.