Creating the top menu level is quite straightforward, while submenus are where all the fun begins. Although this may seem quite simple and obvious, it actually contains some pitfalls, especially when it comes to mega menus and multi-level menus and displaying all of this on mobile devices while providing not only intuitive navigation but also proper load speed.
This is the topic of this article. Let’s go through the best practices for creating submenus on WordPress sites, particularly using Elementor, Bricks, FSE, custom header builders that some themes provide, and, of course, dedicated menu plugins.
Table of Contents
- What Are Submenus in WordPress?
- Adding Custom Submenus in Elementor
- Adding Multilevel and Mega Menus in Bricks
- Creating Menus in FSE
- FAQ
- Wrapping Up
What Are Submenus in WordPress?
Submenus in WordPress are the same concept as in other industries and fields: they refer to subordinate items that fall under primary menu items. Submenus are often used to create a hierarchical structure in your site navigation, making it easier for users to find specific content within broader categories.
The menu items you see on the top are called primary navigation/menu. The items that appear when you hover or click on one of these items (that have subordinate elements) are called secondary or submenus. The items that appear when clicking or hovering over the secondary items are called third-level navigation.
The third level is considered to be the deepest possible nesting level for an appropriate user experience. However, even this level can become too complex and confusing for easy navigation. If feasible, it’s better to avoid using such deep nesting.
The majority of submenus appear in dropdowns, which is a really convenient way to display them on desktops and mobile devices.
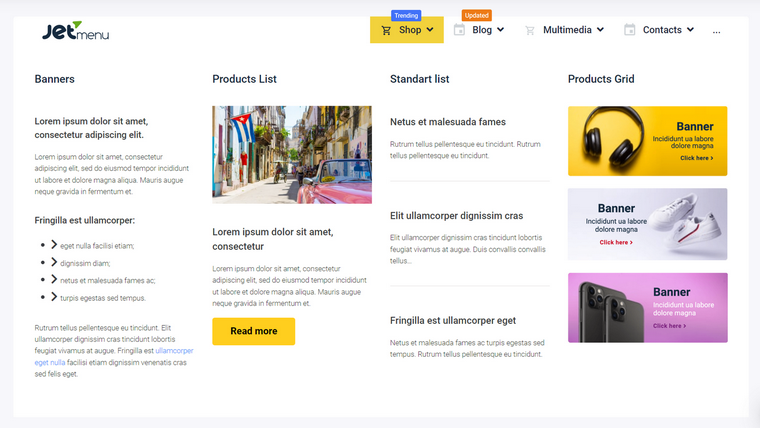
If you have a lot of information and elements to be placed in a menu, consider using a mega menu. A mega menu is a large, customizable drop-down menu that can display multiple levels of navigation at once. It is typically used to showcase a wide variety of options, categories, or subcategories in a visually organized and easy-to-navigate format. Mega menus often include additional elements like images, icons, descriptions, and even interactive features.
It is considered a submenu type, but it is more advanced and offers a richer, more detailed navigation experience than traditional submenus.
How to create WordPress submenus?
To create a submenu on WordPress, go to the website’s dashboard, Appearance > Menus, and create or select the existing menu that will have a submenus. All you need to do is drag the element under the parent one and move it slightly to the right so it will form a hierarchical structure. In my example below, Asia, Europe, and Africa are on the primary level. Spain and France are submenus of the second-level item called Europe, and Paris is a submenu of France (third-level item).
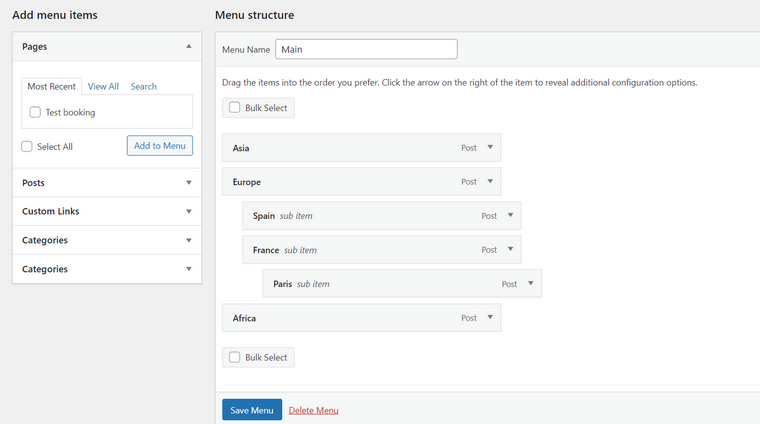
By default, it will be displayed as a nested dropdown by most of the theme’s default menus or menu widgets/blocks:

If you want to adjust the way menu items look, use styling options provided by your builder, menu plugin, or theme widgets or blocks. Usually, you can change the background and text colors, typography, and paddings even if you use the simplest menu tools. However, if you need more, in particular, to change the behavior, layout, animations, width, etc, you will have to either apply some custom CSS, create a custom Walker, or use a dedicated menu plugin that provides advanced settings.
Mega menu in WordPress and how to create it
Mega menu is sort of a sophisticated version of a submenu, and it’s absolutely essential for many website types, e.g., eCommerce or any content-rich ones, as there’s basically no other way to display really complex structures and a lot of elements without using it.
While the simple nested submenus I discussed in the previous section is a default WordPress functionality, mega menus should be either custom-coded or implemented using mega menu plugins. And frankly, custom coding such menus is not always a great idea, as it’s very time-consuming and seems like reinventing the wheel, while there are quite many good solutions on the market.
Depending on the WordPress website builder or editor you use, there are different tools for creating both simple and complex menus, so let’s get down to these options.
Adding Custom Submenus in Elementor
I start with Elementor as it’s the most popular WordPress builder. With the latest updates, there are considerably more tools for using your creativity and building various menu layouts than there were before.
There are two scenarios for creating menus and submenus with Elementor, depending on whether you use the free or Pro version of the builder.
In the case of a free version, and if the active theme is Hello Elementor, you can activate the Hello Theme Header & Footer feature in Elementor > Settings > Features. It’s a very simple header and footer builder that allows you to display the logo and menu and change the menu font and color. If the menu is uncomplicated, it may be enough for you. But if you want to achieve something more complex, you will have to get an add-on with the functionality to edit the header and add a menu.
A good option here is to combine JetThemeCore and JetMenu. The first plugin allows you to add custom headers and footers, create or modify any template, assign display conditions, set them for various devices, etc. JetMenu, in turn, is a powerful menu plugin for creating menus of any complexity. By the way, it works not only with Elementor but also with Block Editor. As an alternative only for Elementor, check out the JetBlocks plugin – it’s very affordable. JetBlocks has versatile Nav Menu and Hamburger Panel widgets, a Sticky functionality, and other useful ones for any custom header.
In the case of using Elementor Pro, you will be able to edit headers and footers just like any other Elementor template by adding widgets there. Elementor Pro has a Nav Menu widget for adding and styling menus and submenus, but it has its limits. For example, you can’t create mega menus or style every little detail of the menu, and there are not so many options for the mobile version either. However, for traditional submenus, this functionality is fairly enough.
Another idea for adding menus in Elementor is using their Nested Elements functionality (which is still in Beta) in combination with the Tabs widget. Activate it in Elementor’s settings (also available in a free version), and you will see that tabs have become containers where you can add other widgets, including menus, images, buttons, or just simple links. It can be used to create simple mega menus on the header, but it’s probably more useful for sidebar navigation.
Finally, making the top menu sticky is the right solution. Check this comprehensive article about ways to do it and some design examples.
Adding Multilevel and Mega Menus in Bricks
Bricks theme offers simple and mega menu-building functionality out of the box, and if you want more, there are various add-ons to make it look even better.
So, there are a few widgets for building menus and submenus of any complexity in Bricks:
- Nav Nestable;
- Dropdown (with Mega Menu and Multilevel options available);
- Offcanvas and Toggle for mobile menus.
As usual, the Bricks team does a good job by stuffing their widgets with a lot of styling settings and dynamic functionality. For example, you can customize menus at the level of the Nav Nestable widget, go to each submenu nav link, and stylize them separately.
In case you want your Bricks submenus to be even more dynamic and flexible, you can add JetEngine dynamic listings and widgets there, as this plugin is fully compatible with Bricks.
Check this video to learn more about adding any kind of menus in Bricks.
Creating Menus in FSE
In case you prefer using one of the FSE themes for your project, the menu-building logic will be similar to the one described for Bricks. However, if you want to create something more sophisticated than the default Gutenberg blocks offer, you should either choose a theme with this toolkit already added or one of the add-ons with a set of additional blocks. This article, with a list of more than 40 tools for any purpose, will definitely help you make a choice.
If you are not a big fan of FSE but are still on the Block Builder team, the good old combination of JetThemeCore and other Crocoblock plugins for Gutenberg will give you the freedom to edit any part of your website, including headers and footers, and add menus of any complexity.
FAQ
In a nutshell, “submenu” stands for “subordinate menu” items. They are nested elements of the second or third level of navigation and are normally displayed in a dropdown.
To add simple submenus, go to Dashboard > Appearance > Menus, add the elements you want to be on the second level under the primary items and drag it slightly to the right. You will see that the “sub-item” label appears after this. On the front end, such elements will be displayed in a dropdown. If you want to create more complex structures, use a plugin like JetMenu.
Wrapping Up
There are no websites without menus, and there are fewer sites without submenus. They are essential for creating logical and intuitive navigation structures that help users find what they are looking for without testing their patience with long searches and serial clicking.
On the desktop version, submenus are normally displayed as dropdowns; on mobile devices, flyout behavior is also quite popular, along with other layouts, depending on the content.
For content-rich websites, especially eCommerce ones, a mega menu of submenus is a must, and dedicated plugins like JetMenu can create such structures.
If you are a Bricks user, the theme’s default features will probably be enough for you. But if you prefer Elementor or Block Editor, you will most likely need an extra plugin or two to make something more sophisticated than a classic menu. I’ve given some ideas of what can be done in this article, so it’s time to create your awesome site navigations.