Making the website highly dynamic is essential for many projects. That means that the content on the site would change depending on the user’s data (time of the day, whether they registered or not, location, etc.), interactions (e.g., using filters, previous sessions), and so on. Also, the content is fetched dynamically, meaning you don’t create each block for each page manually but add it once and then just display it whenever you need. Powerful tools that give developers instruments to build such sites make WordPress a powerful full-fledged CMS.
In this article, we will talk about the main components of dynamic sites and what JetEngine offers as a true powerhouse in this field and discuss how CPT, CCT, Listings, Relations, and other tools work.
Table of Contents
- CPT, and When Do You Need Them?
- Custom Taxonomies and Terms
- JetEngine Meta Boxes vs. WordPress Custom Fields
- What Is CCT, and When to Use Them?
- Listings vs. Listing Grid
- Query Builder and Why It Is So Cool
- Glossaries Explained
- Data Stores to Make Clients Happy
- Options Pages in Simple English
- Related Items as Your New Favorite Feature
- Takeaway
CPT, and When Do You Need Them?
CPT (Custom Post Types) is a great way to organize your content not only on highly dynamic sites but even for those on a static side. WordPress has seven default post types, including posts, pages, navigation menus, etc. Each post type has a dedicated template and set of meta fields which is one reason for having different post types.
The most frequently used default post types are posts and pages. Pages can have a hierarchical structure (there can be parent and child pages), while posts can be grouped in categories and by tags and then displayed chronologically.
But when we make good use of CPT functionality, this default setup can be changed the way we need for the particular website and become really flexible. This is where WordPress stopped to be a blogging platform and started to be a real full-fledged CMS.
CPT is a custom post type created by the website developer to organize and display content more efficiently, add custom meta fields and taxonomies, and display it all using custom templates.
WooCommerce Products is the most frequently used CPT, it has a lot of custom meta fields, such as Price, Short Description, etc., and it’s created by the WooCommerce plugin. But you can create your own custom post types with all the fields needed and then display it the way you want on the custom layout. Also, there will be a dedicated menu item in the dashboard:
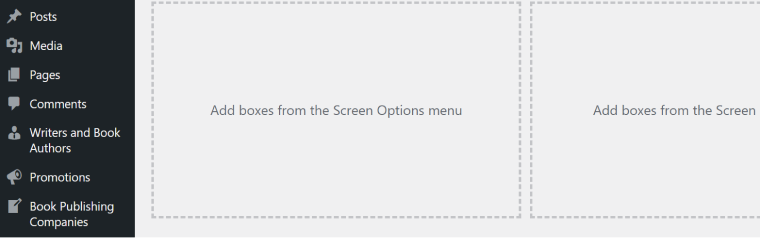
For example, this dynamic bookstore demo site has such CPTs:
- books (WooCommerce products);
- book authors;
- publishing companies;
- promotions.
They all have different custom fields to fill in the information needed for that particular post. For example, for “book authors,” it’s “date of birth,” “date of death,” and “full name.” The photo and main content are taken from the “thumbnail” and “content” default WordPress fields, and then we have the result in the custom template for this CPT, which looks like this.
⛏️ To create a CPT, go to JetEngine > Post Types > Add New. Right there, you can add all the custom meta fields, set the CPT type (hierarchical or not), and add all the advanced settings, admin columns, and filters, so it will be handy to work with them on the back end.
Custom Taxonomies and Terms
If we have custom post types, it’s logical that they should also be grouped and tagged (just like default WordPress Posts and Pages), right? That’s why such a thing as Custom Taxonomies is essential (but they can be applied to the default post types, too).
By default, WordPress has two taxonomies – categories and tags:
- Categories are a hierarchical way to group posts because there can be multiple nested categories.
- Tags are a non-hierarchical way of grouping posts.
Let’s say you are a lifestyle blogger, and you have the Fashion, Food, and Interior categories in your blog. They will be called taxonomy terms.
❗ People often mix up taxonomy and term. But Taxonomy is the “parent” of the term. Taxonomies are the way of grouping posts, while the term is one of the groups within that taxonomy.
Imagine you have a website about Geography and a CPT called “Countries,” which you want to group in different ways: by continent, access to the sea, and climate. To do so, create three taxonomies: Continent, Sea Access, and Climate.
Then add the terms within each taxonomy. For example:
- in Continent, add “Europe,” “Asia,” etc.;
- in Sea Access, add “Has access,” “Doesn’t have access”;
- in Climate, add “Hot,” “Cold,” and “Moderate.”
⛏️ To create Custom Taxonomy, go to JetEngine > Taxonomies > Add New. There, you will select post types that the taxonomy will work with. Custom meta fields can also be added there, so when you display the taxonomy in the archive template or the listing, these meta fields can be displayed.
JetEngine Meta Boxes vs. WordPress Meta Fields (Custom Fields)
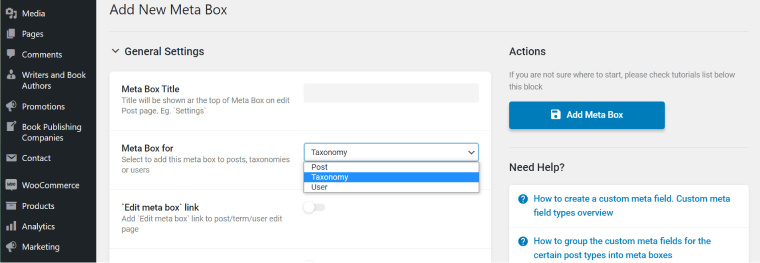
You’ve probably seen the Meta Box in the JetEngine dashboard menu. Apparently, this tool is for creating custom meta fields, right? But wait, why do we need it if you can create custom fields when adding a new CPT? It’s the right question, and Metabox is an additional tool but extremely useful.
What if you want to add custom fields to default post types or Users? Or what if you have a similar set of custom fields for different CPT? That’s when the Meta Box tool comes into play. It’s literally a “box” with a group of custom fields that you can attach to as many default and custom post types, taxonomies, or users, as you need.
⛏️ To create a Meta Box, go to JetEngine > Meta Box > Add New. Select whether you will add this Meta Box to Posts, Taxonomies, or Users. And then, choose the particular post types, taxonomies, and users you want Meta Box to be added to.
After that, create custom fields as usual.
What Is CCT, and When to Use Them?
JetEngine offers a unique feature called CCT (Custom Content Types) which has been created to boost the performance of websites with many posts.
CCT creates a separate database table for each CCT, and each CCT item occupies just one row there.
In contrast, default post types or CPT occupy one row (plus one row for each revision) in the wp_posts database table, and as many rows in wp_postmeta as many meta fields this post has. So, if you have 100 posts with 5 meta fields each, it will occupy 600 rows distributed in two tables. Also, to find the requested information, the system must go through the whole wp_posts and wp_postmeta rows – there will be thousands of them (because there will be other post types with their meta fields), so it will take some time to complete the request.
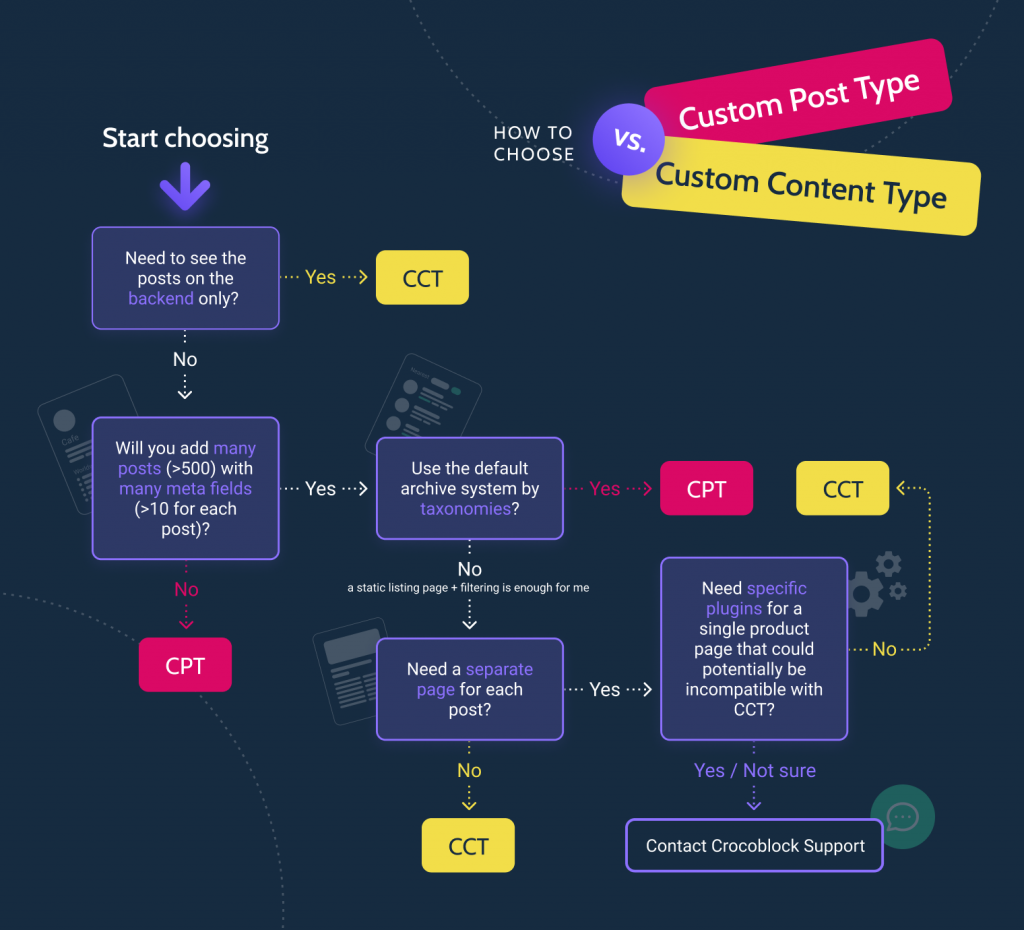
At the same time, if you use CCT, 100 posts will take only 100 database rows, and the search will be performed in the dedicated database, not in the common one, which is great for performance. This is a handy guide in which cases CCT is the right choice:
By default, it doesn’t have a dedicated page, but you can connect CCT to a dedicated CPT, and then it will work as a regular post but still will be more optimized thanks to its database table structure. Also, it’s very convenient to create a JetFormBuilder form that will be automatically connected to that CCT, with all the fields added and mapped so that you can populate the meta fields from the front end. Learn more about CCT here.
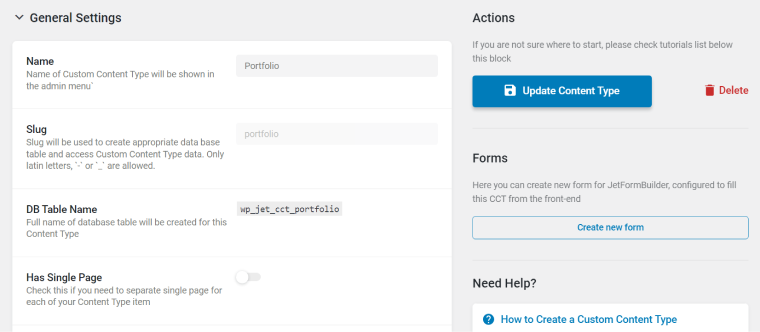
⛏️ To create CCT, you must first activate the Custom Content Type module in JetEngine > JetEngine. Then go to JetEngine > Custom Content Types > Add New.
Listings vs. Listing Grid
Listing
Sometimes, beginners mix up JetEngine Listing and Listing Grid. So, let’s clear this up.
Listing is a template for one constituent element of the future Listing Grid that will be displayed on the front end. Listing defines how data from post meta fields will be fetched, look, and all the design elements.
The course of action is as follows: first, you create a CPT/CCT or use default post types, then add content on the backend, then create Listing, and only then add it to pages or templates with the help of the Listing Grid widget. A Listing is a building brick for a Listing Grid.
In the example below, you can see how the listing template looks in the Elementor editor:
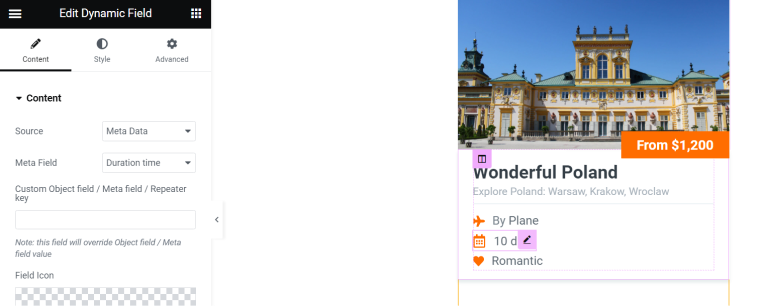
⛏️ To create a Listing, go to JetEngine > Listing > Add New. Name it and choose a source for the listing: it can be a Post (particular post type the data will be retrieved from), Terms, CCT, Users, Custom Query, or Repeater Field. Also, you can choose between Elementor and Gutenberg editors for building a listing template. Use Dynamic Field and other dynamic widgets/blocks by JetEngine to build the listing – they have a lot of settings to retrieve and filter the content exactly the way you want.
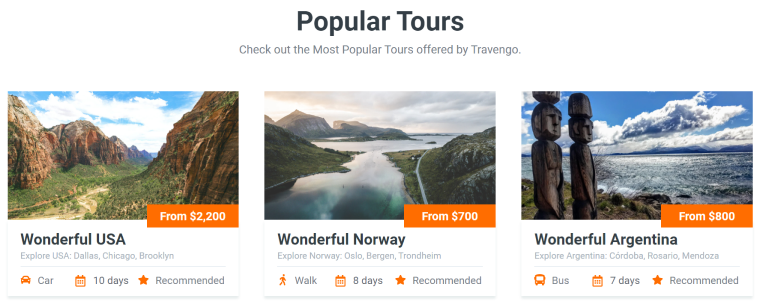
Listing Grid
As the name suggests, Listing Grid is a widget/block for showing a grid of listing templates, just like this:
However, it has many additional features.
Layouts
First of all, Listings can be displayed not only in a grid layout but also as follows:
- Slider – simply activate the toggle on the Listing Grid settings panel;
- Carousel – in the Slider tab, choose the number of slides to display and other settings;
- Calendar – note, the Calendar module must be activated, and there’s a dedicated Calendar widget/block;
- Map – the Map module must be activated, and there’s a dedicated Map Listing widget/block;
- Injection – to “inject” another listing template to the Listing Grid loop; the Injection module must be activated.
Custom Queries
Listing Grid always has a Source – the Listing you’ve already created. So, it displays things within a design you set for the Listing item. But you can tweak the data displayed in listings by adding the additional “layer” of the Custom Query. To do it, activate the Use Custom Query toggle and select the query previously created in Query Builder. It will filter, add, or modify the content but display it within the frame of the listing template you’ve chosen as a Source.
Post/Terms/Users/CCT Queries
Just like with Custom Query built with a Query Builder, you can add additional layers of querying right in the editor. There are dynamic tags and macros to choose from to modify the query. This is how the Post Query feature works:
It does the same job as the Custom Query feature but has fewer settings and a bit on the legacy side. That’s why we recommend using Query Builder and Custom Query.
Query Builder and Why It Is So Cool
Query Builder might look a bit intimidating at first glance, but it’s actually not. We’ve already talked about Listings, Listing Grids, and how they display the content fetched from the database. There are a lot of settings to get the content you want, but what if you need even more options and flexibility?
It was the question Crocoblock developers asked themselves, and the Query Builder came as an answer. The thing is, you can’t place all of the settings and tabs for such super-flexible settings on the widget/block settings panel – it will be too much. That’s why Query Builder is a non-visual back-end builder for custom queries. Such queries can be built once and then reused by different widgets as many times as needed.
In general, a process of displaying any content on the front end looks like this: there’s content in the database, and you want a certain content to appear on the front end – let’s say, a post grid of portfolio items. So first, it should be requested from the database or, in other words, queried. And only after that it can be displayed.
Every dynamic content Elementor widget or Gutenberg block is, first of all, a tool for creating a query and retrieving some content from the database. When you change the settings (not styling) of the widget/block, you actually modify the query.
But what if you build a query first on the backend and then simply fetch it on the front end? And this is how Query Builder works.
You have hundreds of settings, macros, and conditional options there for any post types, terms, users, comments, REST APIs, and even build SQL queries.
Glossaries Explained
What if you don’t want to manually add options for the Select field of the forms or filters? Or what if you want to save your time and just select the right word/value/sentence when adding new content to the meta fields instead of typing it?
This is where Glossaries come in handy. JetEngine Glossaries are sets of options to be used in multiple locations by different tools, such as forms, filters, and as a source of Select meta fields. Create as many Glossaries as you need, and use them whenever you want.
Data Stores to Make Clients Happy
Your website users definitely deserve to have their own private storage of favorite posts and products. That’s why the Data Store feature was created, and both logged-in or not registered users can create wishlists, see recently viewed items, and “likes” counters.
Options Pages in Simple English
All meta fields belong to certain post types, users, etc. But what if you need a set of fields available literally everywhere on your website? And if you change the value of such fields, will it be changed everywhere at once? We’ve got you covered, and you can enjoy the power of Option Pages – the set of options with a dedicated section on the WordPress dashboard, so you have easy access there and don’t need to dig into code or complicated settings.
It’s a really useful thing for many cases. The simplest example is the company address or phone number, which can be found on many pages, and then, once changed, you have to edit all those pages if you don’t use Option Pages.
There are more advanced use cases, e.g., changing colors and displaying certain blocks and panels. Check out this detailed article about the Option Pages feature.
Related Items as Your New Favorite Feature
You can build a much more advanced and branchy content structure on the website than just posts organized by categories and tags. This is what relations are created for, and this feature is really powerful to interconnect objects and display things without creating additional categories, unnecessary grouping, and so on.
To learn more, read this comprehensive article about Relations and how to create them.
Takeaway
In this article, we went through many different features the JetEngine plugin offers for building an advanced dynamic structure for your website. But this is by no means a complete list of perks JetEngine can offer, not to mention other Crocoblock plugins created to put WordPress dynamic sites to a whole new level. And I hope you enjoy these powerful plugins. 💚