
7 Things to Know About JetBooking & Woo After Basic Setup
Discover 7 practical JetBooking and WooCommerce tips for managing booking statuses, multiple booking forms, payments, subscriptions, availability workflows, and checkout customization.
Before you start, check the tutorial requirements:
- JetBooking plugin installed and activated
This article shares practical tips for using WooCommerce with JetBooking. These recommendations are most useful after JetBooking is set up and you start working with real bookings, payments, carts, and product catalog workflows rather than initial testing.
Some of the described workflows apply to Elementor, Gutenberg, and Bricks. Some of the workflows additionally involve JetFormBuilder, JetWooBuilder, and JetSmartFilters plugins.
Who Is This Guide For?
This guide is aimed at WordPress site owners, agencies, and advanced implementers who want to go beyond basic JetBooking setup and build more reliable WooCommerce-based booking flows within the WordPress ecosystem, while avoiding common edge cases.
Understanding Your Core Architecture: JetBooking Modes
As a quick reminder, JetBooking supports three distinct booking workflows, and your site is already running on one of them:
- The “Plain” mode that handles bookings entirely within JetBooking. It uses post types as properties and orders and booking forms that can be created with JetFormBuilder.
- The “Plain” mode with Woocommerce integration enabled, which allows you to use custom booking forms and WooCommerce checkout.
- The “WooCommerce-based” mode relies on WooCommerce as the core booking transaction layer. It uses WooCommerce products as bookable items.
Some of the advanced tips work with two or more JetBooking modes, while others may be compatible with only one. Your site’s booking mode will determine which of the following recommendations are relevant to your setup.
The Booking Mode is set during the JetBooking wizard setup and can be changed in the WordPress Dashboard > Bookings > Settings > General tab.
Booking Status when a WooCommerce Payment is Canceled
Skill level: Intermediate
Booking Mode: “WooCommerce-based” or “Plain” with Woocommerce integration
When JetBooking is integrated with WooCommerce, the booking status is usually determined by the connected WooCommerce order status.
The JetBooking and WooCommerce order statuses are aligned:
- Completed — the booking has been successfully fulfilled;
- Processing — the booking is confirmed and being prepared or handled;
- On hold — the booking is temporarily reserved, awaiting confirmation or further action;
- Pending/Pending payment — the booking was created, but payment has not been received yet and requires customer action;
- Refunded — the booking has been canceled, and a refund has been issued;
- Cancelled — the booking has been canceled by the customer or admin, and service will not be provided;
- Failed — the customer’s payment failed or was declined, so the booking attempt was unsuccessful;
- Created/Draft — the booking entry has been created but may require further review or confirmation.
Booking is considered confirmed when it and the related WooCommerce order have the “Processing” or “Completed” status.
How to test the “Cancelled” or “Failed” order scenario on staging:
- Create a Test Booking: Submit a booking form on the front end or manually add a new booking via WordPress Dashboard > Bookings > Bookings > Add New.
- Place the Order: Go through the WooCommerce checkout page and complete the order. Initially, both the WooCommerce order and the related JetBooking entry will hold a “Processing” status, indicating that the payment was successful and the booking is confirmed.
- Simulate a Cancelled or Failed Payment: Navigate to WordPress Dashboard > WooCommerce > Orders and manually change the order status to either “Cancelled” or “Failed”.
As a result, the connected JetBooking entry will automatically update its status to match the order (changing to “Cancelled” or “Failed” respectively). Once this happens, the system releases the inventory, and the previously blocked calendar slots instantly become available for new bookings on the website, effectively preventing locked inventory or overbooking issues.
Multiple Booking Forms for Different CPTs with a Single Checkout
Skill level: Intermediate
Booking Mode: “Plain” with Woocommerce integration
You can support multiple post types (including WooCommerce products) with different booking forms while using a single WooCommerce cart and checkout.
This approach can be used only with the “Plain” mode combined with WooCommerce integration, as the “WooCommerce-based” mode supports bookings for WooCommerce products only.
First, create separate CPTs (Custom Post Types), for example, “Properties”, “Tours”, “Extras”, using JetEngine or another plugin.
In WordPress Dashboard > Bookings > Settings, adjust the required post types in the Booking instance post type field.
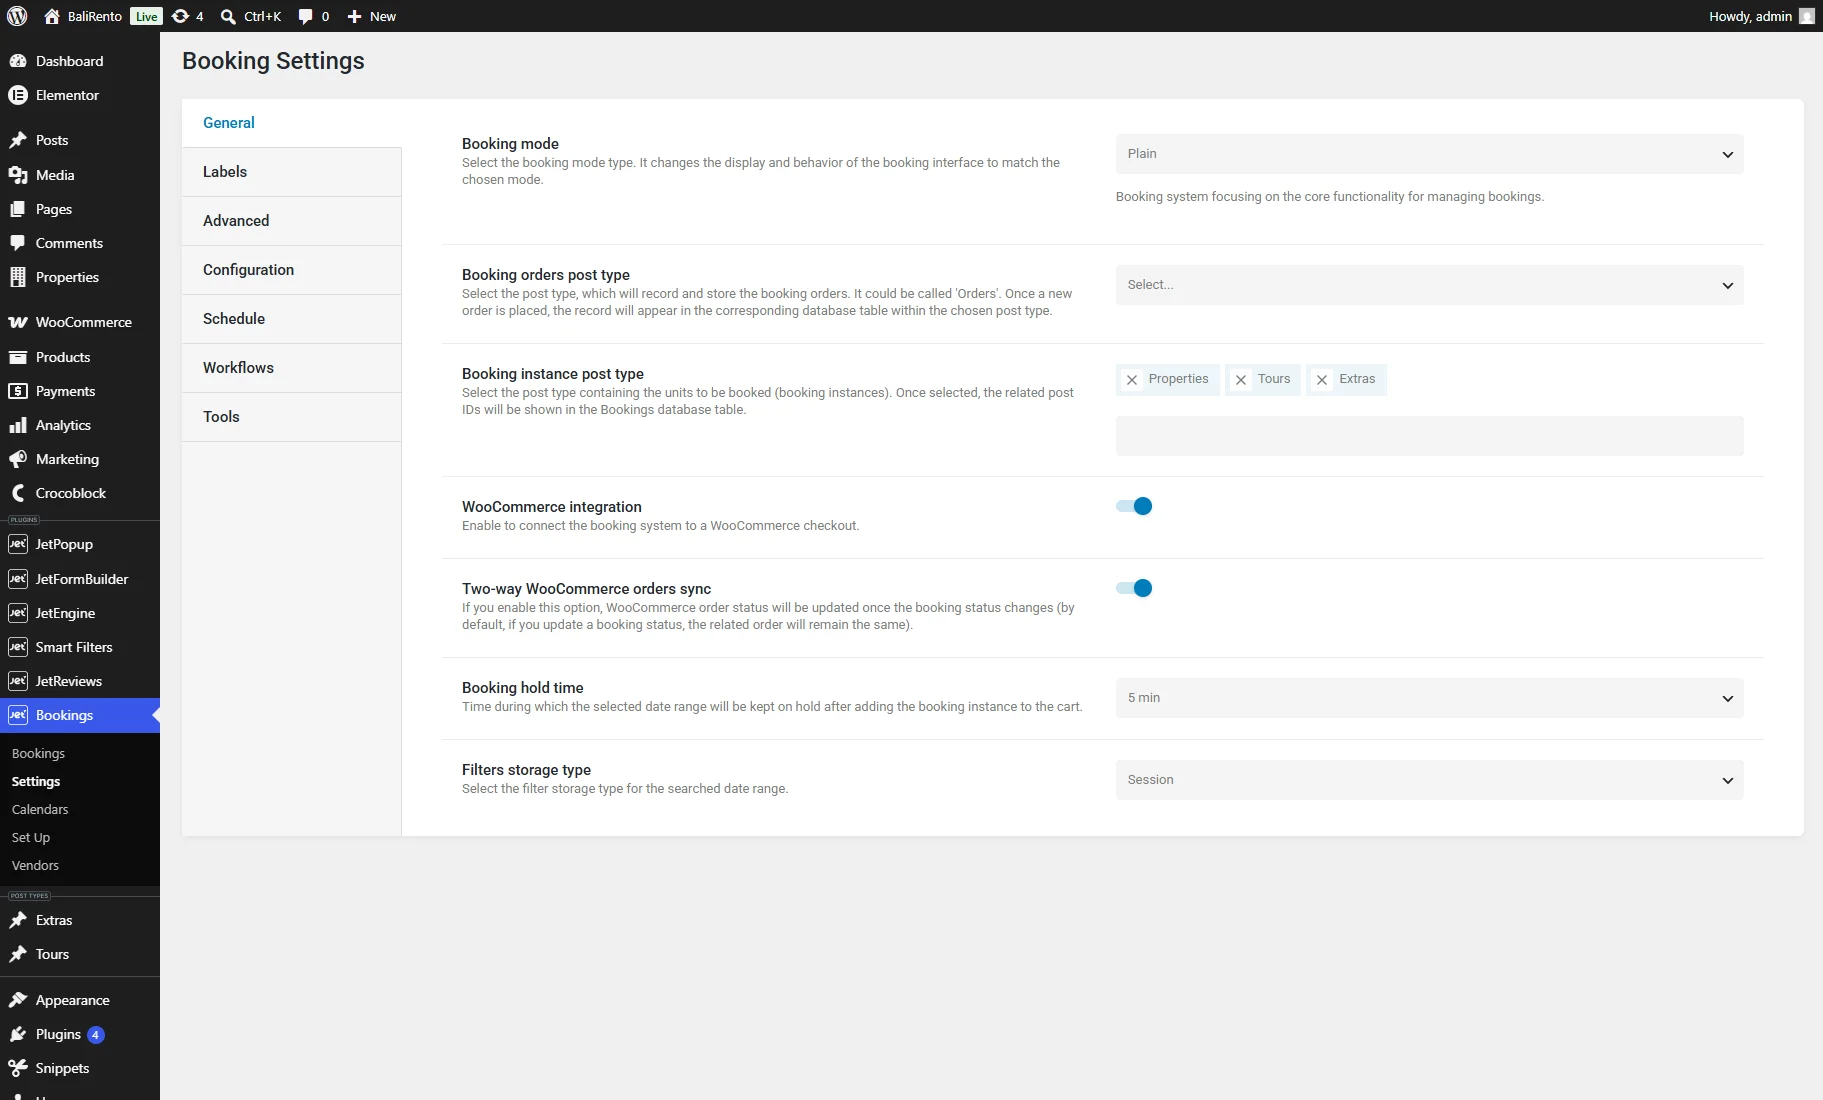
You can use a single booking form with WooCommerce integration across multiple CPTs, as it automatically pulls the current post ID from the Single Post Page. If a specific CPT requires different fields or logic, duplicate the original form and customize it as needed.
Then, place the form on the corresponding Single Post Page templates so visitors can submit bookings directly from each item page.
The exact same logic applies if you are using a WooCommerce product as an additional post type for bookings.
Thanks to the WooCommerce integration feature within JetFormBuilder, all distinct booking forms will automatically route users to the same Checkout page.
To ensure the multi-booking workflow operates correctly on your staging site:
- Navigate to the front end, visit the single pages of different CPTs, and submit different forms for different post types (for example, a property and tour posts). Ensure to complete the checkout for each booking.
- Proceed to WordPress Dashboard > WooCommerce > Orders to verify that each submission generates a separate order.
- Ensure that individual booking records for each post type are stored as independent entries in the WordPress Dashboard > Bookings > Bookings tab.
Filtering WooCommerce Bookable Products by Booking Dates
Skill level: Intermediate
Booking Mode: “WooCommerce-based”, “Plain”, or “Plain” with Woocommerce integration
Many booking websites need users to search for products based on actual availability within selected dates, not just by categories, locations, or prices.
It can be achieved with the JetSmartFilters plugin.
If you use the “Plain” mode with WooCommerce integration, refer to the How to Apply JetSmartFilters to Your Booking Website tutorial.
For the “WooCommerce-based” mode, you may consider some adjustments.
Instead of displaying bookable items with Listing Grid on the Archive page template, you can use the Products Grid, Products List, or Products Loop on the Shop page or other template created for WooCommerce (with JetWooBuilder, for example).
For more details, refer to the How to Display Booking Instances Grid in WooCommerce-Based Mode tutorial.
Booking Forms with Render States and Multi-Steps
Skill level: Advanced
Booking Mode: “Plain” or “Plain” with WooCommerce integration
To improve your booking forms, you can use such features:
1. WordPress Multi-Step Form with Step Indicator and Conditional Blocks — multi-step forms split a complex booking process into smaller steps like service selection, user details, and payment. Conditional blocks show or hide parts of a form based on user choices. In booking forms, they are used to display relevant options like extras or payment fields only when needed.
2. Calculation Formulas — allows you to calculate a total price for bookings, additional services, WooCommerce orders, price per hour, seasonal and weekend prices, and taxes.
3. Change Render State — allows users to toggle between different states of the same form. For example, the first render state can represent a form for registration, while the second render state can represent a login form. Another example is to set the first state to rent a certain number of rooms and the second to rent the whole house.
JetBooking with Memberships and Recurring Payments
Skill level: Advanced
Booking Mode: “WooCommerce-based”, “Plain”, and “Plain” with WooCommerce integration
JetBooking is mainly intended for managing one-time bookings by handling availability, dates, and time slots, rather than subscription-based services.
1. To widen JetBooking functionality, you can use WooCommerce Subscriptions for recurring payments and WooCommerce Memberships for access control and user-based booking restrictions.
What to choose depends on your model:
- If you sell one-time stays/rentals/bookings — JetBooking alone + WooCommerce checkout is enough;
- If you want recurring access (e.g., monthly studio access, repeated bookings) — add WooCommerce Subscriptions;
- If you want tiered access (VIP users, limited booking rights, exclusive calendars) — add WooCommerce Memberships.
2. You can consider the JetAppointment plugin as an alternative when you need scheduled repeat bookings. But note that JetBooking handles day-based availability (daily or multi-day reservations), while JetAppointment manages time-slot-based scheduling (hourly/minute slots within a day).
3. If you use the JetFormBuilder booking form with the “Plain” Booking Mode, you can set the recurring payments using the Stripe Payments or PayPal Recurring Payments add-on.
More details are described in the How to Set Recurring Stripe Payments in a WordPress Form or How to Set Recurring PayPal Payments in WordPress Form tutorial.
Stripe vs WooCommerce: What JetBooking Really Needs
Skill level: Intermediate
Booking Mode: “WooCommerce-based”, “Plain”, and “Plain” with WooCommerce integration
One of the most common confusions is deciding whether JetBooking requires WooCommerce, Stripe, or both. The answer depends on the booking mode you use:
1. For the “WooCommerce-based” mode, you can combine WooCommerce checkout and WooCommerce Stripe Payment Gateway for bookings.
2. For the “Plain” mode, you can accept payments directly in the booking form using the Stripe Payments add-on for JetFormBuilder, as described in the Stripe Payment Form with JetFormBuilder PRO Addon and How to Configure Payment Gateways tutorials.
3. If you use the “Plain” mode with the WooCommerce integration, there are two ways, select one suitable for you:
- Use WooCommerce checkout together with a WooCommerce Stripe Payment Gateway, similarly to the “WooCommerce-based” mode;
- Use the Stripe Payments add-on, similarly to the “Plain” mode.
Customizing Cart Button Labels for JetBooking Products
Skill level: Intermediate
Booking Mode: “WooCommerce-based” and “Plain” with WooCommerce integration
Customizing cart texts, checkout labels, and button captions for products is usually handled through WooCommerce settings, theme templates, translation tools, or builders such as JetWooBuilder. In most cases, these labels are not controlled by the JetBooking core itself.
1. With JetWooBuilder, you can customize all WooCommerce page templates, like the Single Product, Shop, Catalog, Account, Checkout, etc.
To customize the Cart button labels, refer to the How to Create a Cart Page Template tutorial.
2. The other way to change the labels is to use a translation plugin (e.g., Loco Translate) or custom code.
Related JetPlugins Features
- JetBooking — booking cancellation, seasonal and weekend prices, and booking units;
- JetFormBuilder — multi-step layouts, conditional logic, calculations, and payment integration;
- JetSmartFilters — filtering the bookable products catalog;
- JetWooBuilder — custom WooCommerce templates for product, cart, checkout, and account pages, including button and layout customization.
FAQ
Yes. In the “Plain” mode with WooCommerce integration, you can use one or several forms for different CPTs or products while routing all bookings through the same WooCommerce cart and checkout page.
Yes. When the WooCommerce order status changes to “Cancelled” or “Failed,” the connected booking status is updated accordingly, and the reserved inventory is released.
JetBooking focuses on availability and booking management rather than subscriptions. For recurring payments or membership-based access, you can combine it with WooCommerce Subscriptions, WooCommerce Memberships, or recurring payment solutions available in JetFormBuilder.
Yes. Depending on the booking mode and page setup, you can use JetSmartFilters together with JetBooking to help users find bookable items for selected dates. The exact implementation varies between the “Plain” and “WooCommerce-based” modes and may require additional configuration of listings, products, or queries.
Not always. In the “Plain” mode, you can accept Stripe payments directly through JetFormBuilder. WooCommerce becomes necessary when your booking workflow relies on WooCommerce checkout.
Yes. JetFormBuilder supports multi-step forms, conditional blocks, calculations, and render states, allowing you to build booking flows with separate steps for booking details, customer information, payments, and confirmations.
Yes. These labels are usually controlled by WooCommerce, your theme, translation plugins, or builders such as JetWooBuilder rather than by the JetBooking plugin itself.
That’s all. These tips help you avoid common edge cases and architect stronger WooCommerce‑based booking flows within the WordPress ecosystem, instead of stopping at the basic JetBooking integration step.