In this article, I’m going to show you many features of Crocoblock JetEngine Query Builder that you probably did not know about or didn’t pay enough attention to, but they can really help you in developing your project.
Table of Contents
- Query Caching
- Nested Queries
- Merged Query
- A Query for Any Archive Page
- Filters That Depend on Query
- Queries That Depend on Filters
- Showing or Hiding Content Based on Queries
- Fetching Anything From the Database With SQL
- Using Shortcodes to Get Any Data Into the Query
- Comma-Separating Anything, Including Shortcodes
- Using Fallbacks for No-Data Situation
- Creating Pop-Ups Based on Queries
- Manipulating Repeaters
- Replacing JetEngine Glossaries With Option Pages
- Showing Listing Without Creating JetEngine Listing
- Exposing Data via REST API
- Fetching Data Using REST API
- Fetching WooCommerce Variable Products
- Getting Items in WooCommerce Cart
- Fetching Relationships
- Matching Queries With Listings and Filters Using IDs
- Building Filterable Tables
- Building Listings Based on Queries
- JetEngine Map Listings Based on Queries
- Building Charts Based on Queries
FAQ
Takeaway
1. Query Caching
You can use query caching for even faster website performance. Whenever you create a new JetEngine Query Builder query, you will see an option to cache it in the settings. So, once a person visits your site with the query you have created and the query has already run, the subsequent visits to the site will all have the posts or whatever is queried here fetched from the cache, which means it will not send requests to the database every single time. To ensure that caching is activated on your website, go to Tools > Site Health > Info tab and check whether the WP_CACHE option is enabled.
2. Nesting Queries
You can nest queries, and let me show you this using the example of two queries: User query and Post query. First, create a User query and set certain parameters. Just to make things simple, I will include user IDs there. Save it.
Now, let’s create a Post query. Let’s say I want to fetch posts that have users from the previous query as authors. Go to the Author tab, and in the “Author In” section, click on the database icon. There, select the “Query Results” macro from the list. Then, select the previously created query for authors. In the Return field, select “List of IDs.”
Now, you have a nested query where you can fine-tune every element using their own query. You can use it not only with users and posts but also with any other elements, such as taxonomies or comments – your imagination is the limit here.
3. Merged Query
You can not only nest queries but also merge several queries into one. There can be a lot of use cases for this feature, for example, when different queries are used for various interconnected content blocks on the website.
Creating merged queries has quite straightforward logic: you should have previously created queries. After that, create a new query, and in the Query Type section, select “Merged Query.” In the settings below, choose the queries you want to merge; you can also exclude duplicating items by switching the corresponding toggle and limiting items per page.
4. A Query for Any Archive Page
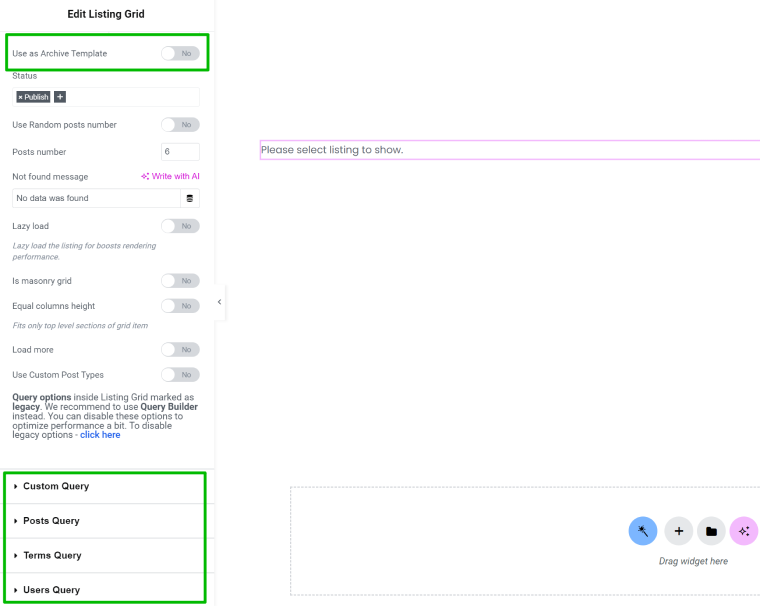
When using the Listing Grid widget, you’ve probably seen the control “Use as Archive Template,” which is for taxonomy or search result pages. Also, there’s a list of settings for setting up queries. However, with the introduction of Query Builder and, thus, custom queries, these controls are kept for backward compatibility for those users who set up queries there before the Query Builder introduction.

But let’s get back to the replacement of the “Use as Archive Template” control by the custom query. Go to JetEngine > Query Builder, add a new query, and in the “Query Type,” select “Current WP Query.” There, you can also set the pagination rules.
Then, in the Listing Grid settings, select this query – and it will fetch the current WP Query for the particular taxonomy or other pages that use the loop. Don’t forget to select the appropriate Listing template in the General Settings section.
5. Filters That Depend on Query
If you create a query, let’s say, for taxonomy terms, with all the settings you need, you can use it as a data source for JetSmartFilters’ filter. After creating a query, create a filter and choose it in the Data Source section. In the Query Variable field, click on the database icon and choose “Taxonomy.”
That’s it; now you can display this filter on the front end.
6. Queries That Depend on Filters
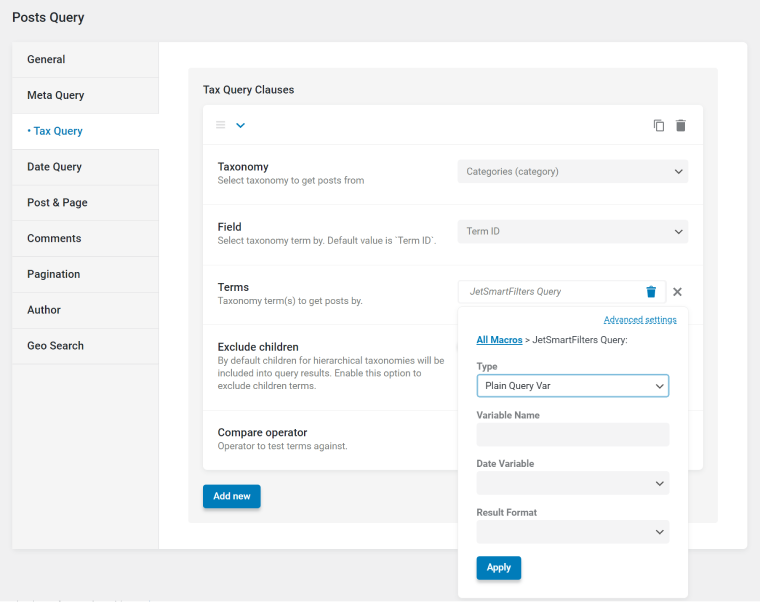
In some cases, you want exact data selected from a filter to be the basis of a query. Let’s say we will query posts using the taxonomy terms selected in filters. Create a query, and in the Tax Query tab, select the taxonomy term. In my case, I will use “ID” in the Field input – because in the filter I will refer to, the “Property to get Value from” field was also “Term ID.”
Now, in the Terms field, click on the database icon and select the “JetSmartFilters Query,” the type is “Plain Query Var.”

7. Showing or Hiding Content Based on Queries
You can show or hide content based on whether the query has items or not. For example, it’s very handy if you want to hide a heading if there are no items to display in the listing grid below it; there are many other use cases for it as well.
But first, make sure the JetEngine’s Dynamic Visibility module is activated. Now, let’s create a container that will be hidden if the query doesn’t exist (or vice versa). After adding it to the page, open the Advanced Settings tab in Elementor, click on an eye icon in Block Editor, click on the Dynamic Visibility section, choose “Show element if the condition is met,” and you will see the list of conditions. One of them is “Query has items.” Choose it, and choose the corresponding query.
Now, the container will only be displayed if the query has items.
8. Fetching Anything From the Database With SQL
There are a lot of query types to choose from, one of them being SQL query. This is the query type that will be useful when other types are not suitable, for example, displaying users that have birthdays this month or posts published this week.
You can use either the default (visual) mode or the Advanced one, where you can write SQL commands directly or generate them using AI (but you should review the results).
For example, I want to fetch the “menu item” post type from the database and display it somewhere. To do so, I will use a visual mode and select the database table “posts” first. Then, click “Add New” in the “Where (query classes)” section, select “post_type” from the list, “Equals” operator, and type “nav_menu_item,” which is the name of the menu post type.
Now, I can check the result by clicking the Preview results toggle.
This is the simplest example of using the “SQL/AI query” query type; you can use JOIN and other clauses. For more information, check this article on SQL query use cases.

9. Using Shortcodes to Get Any Data Into the Query
Sometimes, the place where you get the comma-separated IDs may not be part of JetEngine and created by other plugins, so how do you get that data? JetEngine’s Shortcode Generator will help you. Let’s say we have a list of IDs stored inside a checkbox somewhere, and there’s a “list_of_ids” meta field for it.
Go to JetEngine > JetEngine and open the Shortcode Generator tab. There, select “Meta Data” as a source, and type the “list_of_ids” in the “Custom Object field/Meta field/Repeater key” input.
But we need these IDs to be comma-separated. To achieve this, click the Filter Field Output toggle and choose the “Multiple select values” option from the dropdown. By default, it’s comma-separated (in the next field, but you can type something else for other cases), and this is what we needed.
Now, copy this code from the field below and paste it into the query. Let’s create a “Post query” query, and in the Post & Page section, you will see the Post In input. Click on the database icon, choose the Shortcode result option, and paste the shortcode.
As a result, we will get something a bit similar to a nested query – the query will fetch not particular IDs but whatever the result is in the given field.
10. Comma-Separating Anything, Including Shortcodes
Talking about shortcodes, do you know that you can comma-separate not only IDs in the list of IDs in the Post In field but shortcodes as well? This is how you can add not only one shortcode but as many as you need.
11. Using Fallbacks for No-Data Situation
With JetEngine Query Builder, you can use fallbacks, and this is how to do it. After clicking the database icon in any of the inputs for querying data, click on the “Advanced Settings” link, and you will see the “Fallback” input. Fill it with the content you want users to see in case the query is empty. If there should be post IDs, paste the post IDs, and so on.

12. Creating Pop-Ups Based on Queries
Of course, we will need the JetPopup plugin here. After the installation, create a pop-up and name it. Let’s put aside the content of this pop-up; you can add it any time, but what is important now are the Conditions for it. There, you can select particular pages where to display it, but you can also add another condition: whether the particular query has or doesn’t have items.

13. Manipulating Repeaters
To do that, we first need to create an Options Page, and let’s add a repeater field there with a few repeaters called Name and Value.
Now, we can go to the JetEngine > Query Builder > New Query and, in the Query Type, select “Repeater Query,” and in the section below, select the “JetEngine Option Field,” and then the particular option field.
It’s a dropdown, so it’s quite easy to fetch. Don’t forget to check the results using the Preview results toggle, and then you can fetch it on the front end using the Listing Templates.
14. Replacing JetEngine Glossaries With Option Pages
Glossaries are JetEngine-specific feature that makes your life easier by using glossaries for multi-select fields (Select, Radio, or Checkbox) that you can reuse as many times as you want, and it will work both for JetEngine and JetFormBuilder.
But what if you want to make these glossary choices and lists available only for certain users and restrict them to others?
Let’s use Option Pages for this. Create a new page and add some fields. Let’s add two fields: label and value, and also the switcher field, which is disabled by default.
15. Showing Listing Without Creating JetEngine Listing
What if you want to add a FAQ section using JetEngine’s repeater fields? To do it, add custom fields where the repeater will have two fields: a question and an answer. When they appear on the back end, add some content there.
Now, we need to display them on the front end. Of course, you can use the JetEngine Listing template, but there are other ways to fetch repeater fields. I want to display these FAQ elements in an accordion.
But first, let’s create a query. Go to JetEngine > Query Builder > New Query and, in the Query Type, select “Repeater Query,” the source will be “JetEngine Metafield,” and then select the field containing FAQs.
Now, let’s go back to the page; I will add a Classic Accordion widget by JetTabs, delete all the accordion elements except one, and activate the Use JetEngine Query toggle. Then, choose the query that we’ve just created, and you will see that new accordion items appeared equal to the number of repeater items.
However, the accordion is empty and doesn’t display questions and answers. To fix it and fetch the question, go to the Label section, click on a database icon, select “Current object” ({je_current_object_field} dynamic token for Bricks), then select the corresponding query and the field. To fetch the answer, go to the Content type section, change it to “Editor,” and repeat the same steps as for the Label.
16. Exposing Data via REST API
What if you want another site to fetch data from your site? You can expose that data using REST API and Query Builder.
Let’s say we want to query all the posts on our site and expose them to REST API. Create a new query (Post type), select all the posts, and activate the Register REST API endpoint toggle. There, you can edit the endpoint path to your liking and then either restrict access or leave it public.
If you insert the URL into the browser address bar, you will see a raw JSON text. So now, let’s discuss how to fetch this data using REST API and JetEngine and display it properly.
17. Fetching Data Using REST API
You can fetch REST API data on another website using JetEngine. But to do that, first, make sure that the REST API Listings module is activated in JetEngine > JetEngine. Reload the page, and you will see that the REST API Endpoints section appears in the inner menu. Click “+New Endpoint,” give it a name, and insert the URL (the endpoint generated in the previous example). If the endpoint is public, no authorization settings are required.
Click “Connect” to check whether the endpoint works, and if everything is fine, it’s time to create a query based on the endpoint. Create a query, select the “REST API query” query type, and then, in the section below, select the endpoint.
To ensure it works, click “Preview Results.” If everything is fine, you can create a Listing Template based on this query and fetch data on the front end. You can even display array items using a free add-on.
18. Fetching WooCommerce Variable Products
What if I want to show WooCommerce variable products as individual products? Or display all the variations of the particular product in a listing grid?
So, there’s a specific WooCommerce query type in Query Builder, which has a dedicated query type for WooCommerce. But let’s not forget that Variations is one of the custom post types, so we can fetch it using the “Post Query” query type and then select “Variations” as the custom post type to work with.
After doing that, we can preview the query results and see that all the variations of all of the products will be displayed in one list. For example, you have Product A, which has two variations, and Product B, which also has two variations – as a result of this query, we will get four products, which are all variations.
But what if we just want to show only the variations of the current product? Well, let’s have a look at the results preview again. It has this value as “Parent ID,” which returns us a product ID of the product to which the variation belongs. So, to make the query return only the variations of the current product, let’s open the Post & Page tab, and you will see there the “Post Parent ID,” where, after clicking on the database icon, I choose the “Current ID” macro. This is exactly what we need.
19. Getting Items in WooCommerce Cart
What if we change the query type from the “Post Query” to “WC Product Query”? After doing that, in the General tab, you can see the Include field. You can insert IDs there but also use macros by clicking on the database icon, and there, we can select “WC Products in Cart.” Based on that, you can fetch all the products that are currently in the cart.
20. Fetching Relationships
To start with, you should create JetEngine relations to deal with. Now, I want to query all the items related to this particular post type. Let’s see how to do it using Query Builder.
Create a new query, and the query type should be the parent query type. For example, if the parent is Page, it should be the “Page” as post type in the “Post” query type.
There, go to the Post & Page tab and, in the Post In section, click on the database icon and select the “Related Items” macro. There, choose the relation you want to use and the items you want to show.
After that, you can go to the particular page or page template and use this query to display all the related items.
21. Matching Queries With Listings and Filters Using IDs
Your filters by JetSmartFilters might not work because they are not connected properly using IDs. If you create a listing based on a query and then want it to be filtered, you should do three things:
- add the unique ID while editing the query in the Query ID field;
- use the same ID for the Listing Grid, and add it as CSS ID;
- and use it while setting up filters in the Query ID field (on the front end if you use Elementor and on the right panel if you prefer Block Editor).
22. Building Filterable Tables
JetEngine has a module called Dynamic Tables Builder, and you should activate it before using it. What it does is create a table based on a query. You can set the number of columns and which data will be displayed there based on the query and also style it. There’s a dynamic preview, so you can see it right in the editor. You can use any queries, including REST API or SQL queries, and then display tables using the Dynamic Table widget. Cool, isn’t it?
And the best part is that you can filter them as well using JetSmartFilters. This is the full documentation on how to do it, but it’s intuitive, and the table can be filtered just like any other listing.
23. Building Listings Based on Queries
Well, it’s time to get back to the basics and the most universal Listing Template type, which is based on Query Builder queries. When creating a Listing Template, select the Source as “Post/Term/User/Object Field,” and in the Object Field input, select the query you want to use.
24. JetEngine Map Listings Based on Queries
First of all, to create a Map Listing Template, you need to activate the Map module for JetEngine. Also, when adding meta fields to your default or custom post types, you should add a “Map” field type so the address can be displayed properly – and the items can be selected on a map.
Now, let’s create a query, and it should be a “Post type” query type, as we will fetch posts. But look, now we have the “Geo Search” tab among the sections for setting up a query. This is exactly what we need: you can select a particular location around which you want to search.
In this tab, you can select the maximum search radius, the units, and, of course, the particular address, which you can copy and paste from the map. Thus, it’s just being intuitive and doesn’t require any extra effort. You can also display it using the dedicated widget.
25. Building Charts Based on Queries
Have you heard that JetEngine also has a Dynamic Charts module? As always, you should first activate the Dynamic Charts Builder module. After that, you will see the “Charts Builder” menu item under the JetEngine menu in your dashboard. Click on it, and, just like with dynamic tables, you should choose a query to build your chart on.
There, you can choose one of many chart types, then columns to fetch data from, style it, and enjoy the result on the front end using the Dynamic Chart widget.
FAQ
Install JetEngine and the Query Builder tools will be among the many instruments that the plugin offers for building highly dynamic websites.
No, and this is the unique advantage of the Query Builder, as it provides a visual interface for creating even the most complex queries for fetching any content on WordPress websites.
Takeaway
The Query Builder tool by JetEngine is truly something that delights many WordPress developers, even if they have seen it all. In this article, I shared my experience and some of the features that have impressed me and helped me in my work.

