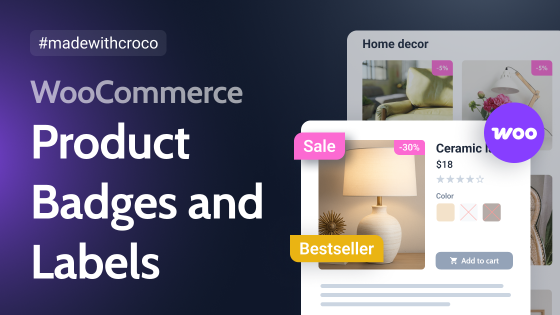
When shoppers land on your online store, they’re typically scanning rather than reading. They’re looking for visual cues to identify what matters most: deals, new arrivals, bestsellers, or products running low. This is exactly where WooCommerce product badges and labels come into play.
Product badges are small visual elements that appear on product images or listings to highlight key information, like:
- “Sale!”;
- “Bestseller”;
- “Low Stock”;
- “Only X items left!”
- custom messages like “Holiday Special.”
These badges serve as instant attention-grabbers that guide customer behavior and influence purchasing decisions.
Which Stores Benefit Most from WooCommerce Product Badges?
While virtually any WooCommerce store can benefit from badges, certain types of businesses find them particularly valuable:
- Fashion and apparel stores should use badges extensively to highlight new collections, seasonal sales, and trending items. The fast-paced nature of fashion retail makes “New Arrival” and “Limited Edition” badges particularly effective.
- Electronics and tech stores may use badges to highlight “Latest Model,” “Refurbished,” or “Open Box” products, helping customers make informed decisions about product conditions and availability.
- Stores with frequent promotions, such as grocery or general merchandise shops, need badges to communicate changing deals and offers. “Weekly Special” or percentage-based discount badges guide customers toward current promotions.
- Stores with large inventories will benefit from badges that help customers navigate extensive catalogs. When you have hundreds or thousands of products, badges such as “Staff Pick” or “Most Popular” create curated pathways through your inventory.
- Seasonal businesses can use badges strategically throughout the year. A holiday decoration store might rotate among “Pre-Season Sale,” “In Stock Now,” and “Last Chance” badges as the season progresses.
Minimalist stores or luxury brands might use badges more sparingly to maintain a clean, sophisticated aesthetic. The key is finding the right balance for your brand audience.
Types of Product Badges Any Store Can Use
The most common WooCommerce product badges include:
- Sale badges that highlight discounted products, often showing the percentage or amount saved;
- New product badges to showcase recent additions to your catalog;
- Best seller badges that serve as social proof;
- Stock status badges like “Low Stock,” “Out of Stock,” or “Back in Stock”;
- Custom promotional badges for seasonal campaigns, special events, or brand-specific messaging;
- Feature badges like “Free Shipping,” “Eco-Friendly,” or “Handmade”;
- Time-sensitive badges with countdown timers for flash sales or limited offers.
The most effective badge strategies typically combine dynamic badges (such as sale or stock status) with manual badges that you assign to specific products for promotional purposes.
Recommended Method of Adding Product Badges
When implementing product badges in WooCommerce, to my mind, JetEngine and JetWooBuilder offer one of the most flexible and powerful approaches. These Crocoblock plugins (especially JetEngine) give you complete control over badge design, placement, and logic without requiring any coding.
Why JetEngine and JetWooBuilder stand out
JetEngine lets you create truly dynamic badges that respond to real-time product data. With JetWooBuilder, you can add static labels and create an intelligent badge system that automatically adapts to your inventory.
The combination works beautifully because JetWooBuilder provides a laser-focused solution (Single Sale Badge widget and templates for your WooCommerce pages). In contrast, JetEngine provides the data logic and conditional display rules.
Together, they can form a comprehensive solution that handles everything from basic sale badges to complex, multi-conditional promotional labels.
To implement this method, you’ll need:
- JetEngine provides dynamic content capabilities and conditional logic;
- JetWooBuilder offers WooCommerce-specific widgets and templates;
- Elementor (free or Pro) page builder that integrates with these plugins.
Both JetEngine and JetWooBuilder are available as part of the Crocoblock subscription, starting at $199 per year, which includes access to 21 plugins, 1-year updates, and support. Alternatively, both plugins can be purchased as standalone solutions for $43 per item.
Creating a simple sale badge with JetWooBuilder
Let’s start with the most straightforward implementation of a sale badge for discounted products.
Step 1: Edit the single product template
Navigate to WordPress Dashboard > Crocoblock > Woo Page Builder > Single Template (or your archive/listing template, depending on where you want badges to appear). Open the template in Elementor.
Step 2: Add the sale badge widget
JetWooBuilder includes a dedicated Single Sale Badge widget specifically for product pages. Drag this widget into your product template (or any other placement) where you want the badge to appear (typically at the top corner of the product image, or somewhere near the product title).
You can customize the appearance through the widget’s Style tab, adjusting colors, typography, positioning, and spacing to match your brand.
Creating conditional badges with JetEngine
For more advanced badges, like “Best Seller,” “Low Stock,” or custom promotional labels, we can use JetEngine’s Dynamic Visibility feature alongside regular Elementor widgets.
Step 1: Edit the single product template
This step is similar to Step 1 in the JetWooBuilder section.
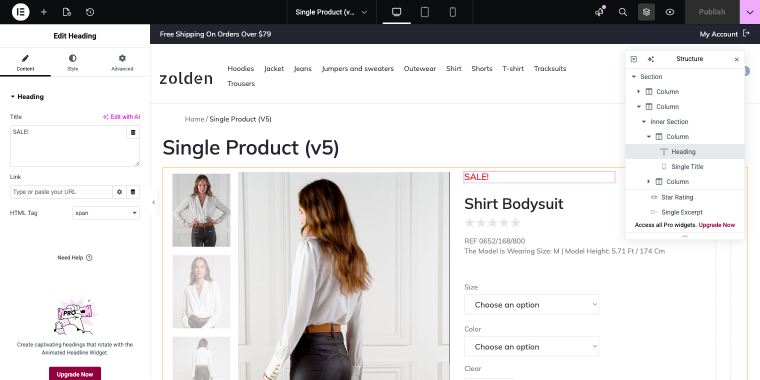
Step 2: Add a badge element
Insert a Heading widget (or any text widget) where you want your badge to appear. If you need to position it at the top of the product, add an Inner Section Elementor widget first for better layout control.
Step 3: Configure the badge content
In the Heading widget:
- add your badge text (e.g., “SALE!”, “Best Seller,” or “Limited Stock”);
- choose an appropriate HTML tag – span will do the job;
- style the badge using background colors, padding, borders, and typography.
Step 4: Set up dynamic visibility
Here’s where JetEngine’s power comes in. Proceed to the Advanced tab of your widget and enable the Dynamic Visibility toggle:
- Visibility condition type – set to “Show element if condition met”;
- Conditions – set to “Product is on Sale.”
NOTE
In case the Dynamic Visibility tab is absent in the Advanced tab, you need to enable the corresponding module in the JetEngine’s settings. Go to WordPress Dashboard > JetEngine > Default Modules and enable the toggle next to the Dynamic Visibility module.
This set of features lets you show the badge when the Sale price field value is specified in the product settings (products without a specified sale price won’t display a badge).
Adding a Bestseller badge
For a Bestseller badge, you might set it to appear when product sales exceed a certain number:
- Condition – set to “Greater than”;
- Field – select a dynamic tag “WooCommerce Product Field”;
- Field – “Total sales”;
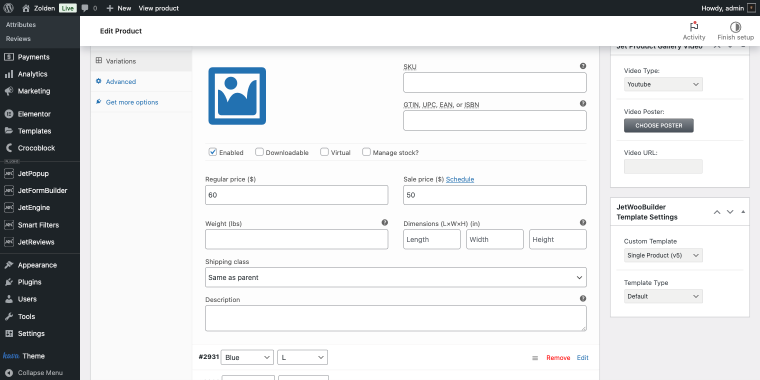
- Value – set to “50” (or whatever threshold you consider a bestseller).
Adding a Low Stock badge
For a Low Stock badge, feel free to use the following set of settings:
- Condition – set to “Less than”;
- Field – select a dynamic tag “WooCommerce Product Field” and then select “Stock Quantity”;
- Value – set to “5,” or any other value you consider appropriate.
Adding a stock quantity badge
Now let’s create a badge that will display real-time stock status. For that, we’ll need a Dynamic Field widget, which we’ll fine-tune to access WooCommerce’s stock metadata.
Step 1: Add a Dynamic Field widget
In your product template, drag a Dynamic Field widget from the Elementor widgets panel.
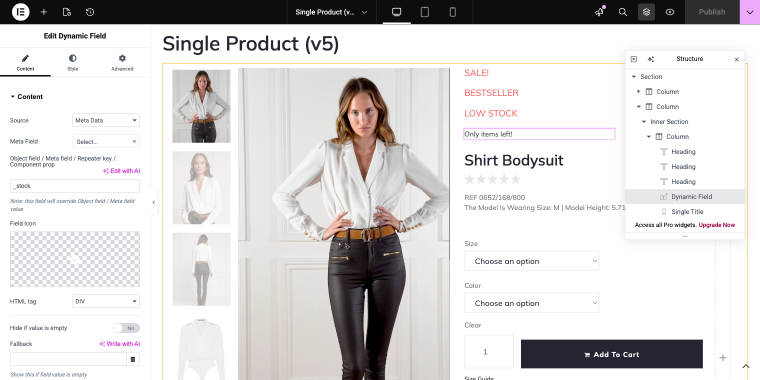
Step 2: Configure the widget
In the widget settings, feel free to apply the following set:
- Source – set to “Meta Data”;
- Object Field – set to _stock;
- Customize field output – enable the toggle, so that you can change the field format:
- Field Format – customize how you want to display the information: “Only %s items left!”
Step 3: Add conditional visibility
Use Dynamic Visibility to control when the stock badge appears. Since this field is an addition to the low stock warning badge, we can use the same visibility conditions.
📚 Read also: Dynamic Visibility for Elementor: Top 3 Use Cases
How will this look on the front end?
Let’s say we have a best-selling product, as the badge indicates.
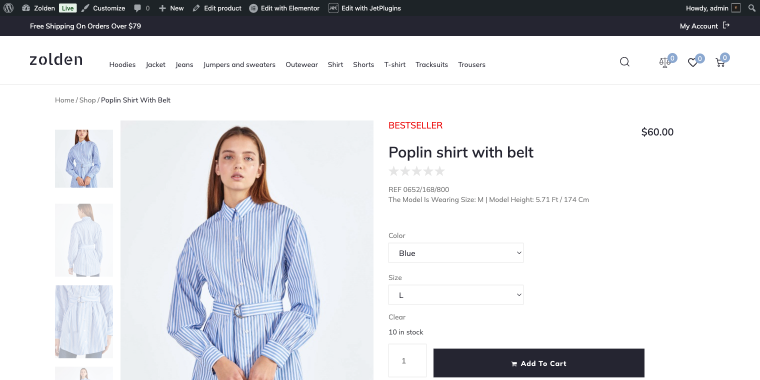
Currently, only ten items are available. So, if we set the Quantity value to “1,” two badges will appear on the front end: one will display a low-stock warning, and the other will show the exact number. Let’s see how this works:
Nice and easy. Following the same logic, you can add other badges to your single product template to notify customers about different states of your products.
Advantages of using JetPlugins
The JetEngine and JetWooBuilder approach offers several distinct advantages. You can:
- have complete design freedom, thus you can style badges exactly how you want them;
- create dynamic badges that update automatically based on real product data;
- build this with Elementor, which requires no coding at all;
- create as many badge variations as you need;
- show badges based on complex combinations of criteria and display rules;
- combine with JetSmartFilters, JetReviews, and other Crocoblock plugins for enhanced functionality.
For store owners seeking maximum flexibility and willing to invest time in setup, JetPlugins offer professional results comparable to custom development at a fraction of the cost.
Additional Methods: WooCommerce Badge Plugins
While I prefer the flexibility of JetEngine and JetWooBuilder, dedicated badge plugins can be excellent choices, especially if you want a quick setup or don’t use Elementor. Here are three solid alternatives.
Advanced Woo Labels (Freemium)
🏆 Best for Woo stores that need unlimited custom labels based on conditional logic.
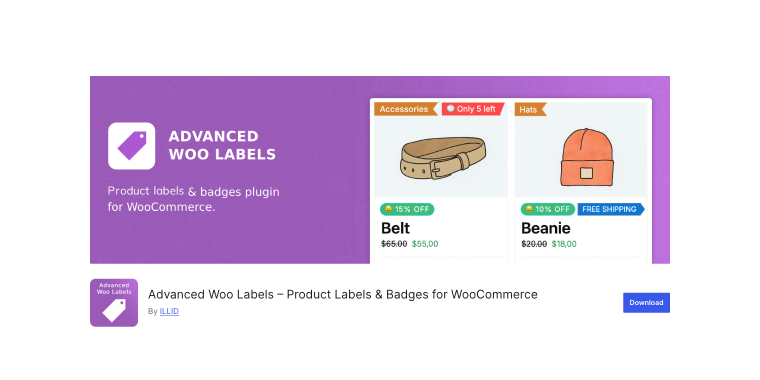
The plugin allows you to create text labels, image labels, and even emoji labels that display on product images or before product titles. You can set up conditions based on products, user roles, or specific pages, making it a great solution for targeted marketing campaigns. The plugin includes several pre-designed label shapes and extensive styling options.
Pricing: a free version is available, and the Personal plan starts at $59/year for one site, with higher tiers available for multiple sites.
Key features:
- unlimited labels per product;
- conditional display based on product, user, or page criteria;
- special text variables for discount value, rating, stock status, and quantity;
- five different text label shapes with custom styling;
- positioning options on product images or before titles.
Pros:
- highly flexible conditional logic system;
- extensive customization options for label appearance;
- can display dynamic product information within labels;
- regular updates and active development;
- works with most WooCommerce themes.
Cons:
- interface can feel overwhelming for beginners;
- some advanced features require a learning curve;
- customer support response times vary.
YITH WooCommerce Badge Management (Freemium)
🏆 Best for stores that need a freemium option with an extensive library of pre-made badges.

This plugin offers both automatic badge rules for your entire shop and manual badge assignment for individual products. The free version includes basic badge functionality, while the premium version unlocks advanced features like custom badge uploads, scheduling, and more sophisticated conditional display rules. YITH‘s interface is particularly user-friendly, making it accessible for beginners.
Pricing: a free version is available, and the Premium version starts at approximately €80/year for a single-site license.
Key features:
- large library of professionally designed badge graphics;
- visual badge builder with drag-and-drop interface;
- automatic badge assignment based on product attributes;
- scheduling system for time-limited badges;
- integration with other YITH plugins.
Pros:
- extensive collection of ready-to-use badge designs;
- intuitive interface suitable for non-technical users;
- strong free version for basic badge needs;
- works seamlessly with YITH’s other WooCommerce extensions.
Cons:
- advanced features locked behind a premium paywall;
- customization options are more limited than some competitors;
- badge positioning options somewhat restricted;
- occasional performance issues with very large product catalogs.
Product Labels for WooCommerce (Freemium)
🏆 Best for stores that need an easy-to-use interface for creating and managing product labels.

The plugin is great for creating multiple badges for different product groups and includes countdown timers for promotional campaigns. It offers over 700 pre-designed badges and allows you to upload custom images. The live preview feature makes it easy to position and style badges exactly as you want them.
Pricing: a free version is available, and the Premium version starts at $43/year for one site.
Key features:
- over 700 predefined badge designs;
- countdown timers for time-sensitive promotions;
- ability to upload custom images as badges;
- live preview for easy positioning and styling;
- multiple badges per product are supported.
Pros:
- affordable pricing compared to alternatives;
- massive selection of pre-made badge designs;
- intuitive scheduling system for badge campaigns;
- works well with most WooCommerce themes.
Cons:
- interface can feel cluttered with so many options;
- some compatibility issues with discount plugins;
- documentation could be more comprehensive.
FAQ
Properly implemented product badges have minimal impact on site performance. Modern plugins like JetEngine/JetWooBuilder are optimized for WooCommerce. To prevent issues, use caching, avoid too many conditional queries, and limit the number of active badges per product.
Most advanced badge solutions support scheduling, with JetEngine’s Dynamic Visibility allowing date-based conditions. Plugins like YITH Badge Management and Product Labels for WooCommerce also have built-in scheduling for start and end dates, ideal for seasonal campaigns like “Black Friday,” “Summer Sale,” or “Holiday Special” periods.
Less is more with product badges. Limit to 1-2 to avoid clutter. Prioritize key information, such as sales or low stock. Use conditional logic to show the most relevant badge as prominently as possible.
Conclusion
WooCommerce product badges and labels are more than just decorative elements; they’re powerful tools for guiding customer behavior, highlighting important product information, and ultimately driving sales. Using psychological principles such as urgency, social proof, and visual hierarchy, badges help shoppers navigate your store more efficiently and make confident purchasing decisions.
Whether you choose the advanced customization of JetEngine and JetWooBuilder or opt for a dedicated badge plugin, the key is to implement badges strategically. Focus on clarity over quantity, maintain consistent styling across your store, and always test how badges appear across devices and screen sizes.
Remember, the most effective badge strategy aligns with your brand, meets your customers’ needs, and supports your business goals. Take the time to set up your badge system properly, and you’ll have a marketing tool that works automatically, highlighting your best products and promotions 24/7.
