How to Display Booking Instances in a Grid
Discover how to display booking instances in a grid with different builders for the WordPress JetBooking plugin.
Before you start, check the tutorial requirements:
- Elementor (Free version), Block editor (Gutenberg), Bricks, or Timber/Twig
- JetBooking plugin installed and activated
- JetEngine plugin installed and activated
- JetPopup plugin installed and activated
This tutorial focuses on setting up the grid for displaying the booking instances from the JetBooking WordPress plugin using different builders: Elementor, Gutenberg, Bricks, or Timber/Twig.
Setting Up the Grid with the Elementor Builder
Let’s start by setting up a Listing Template in Elementor.
Creating the listing
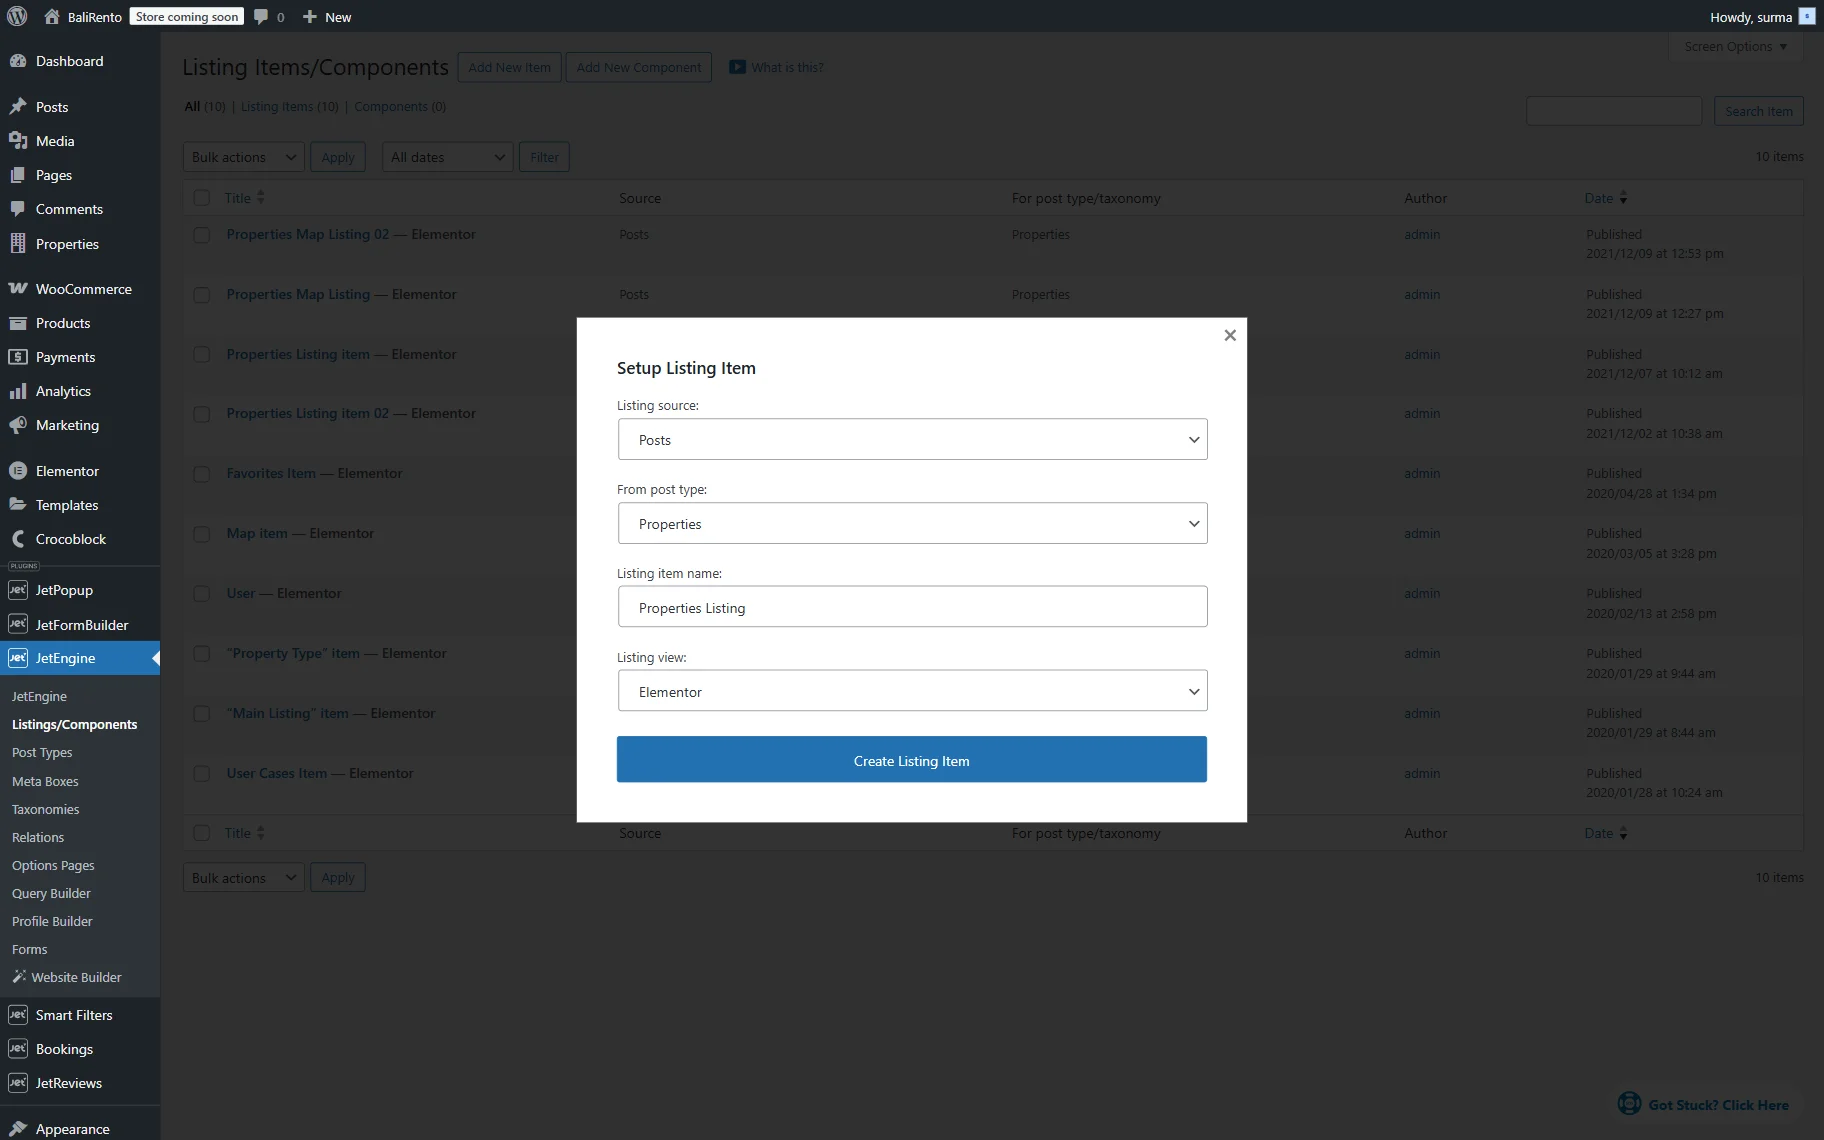
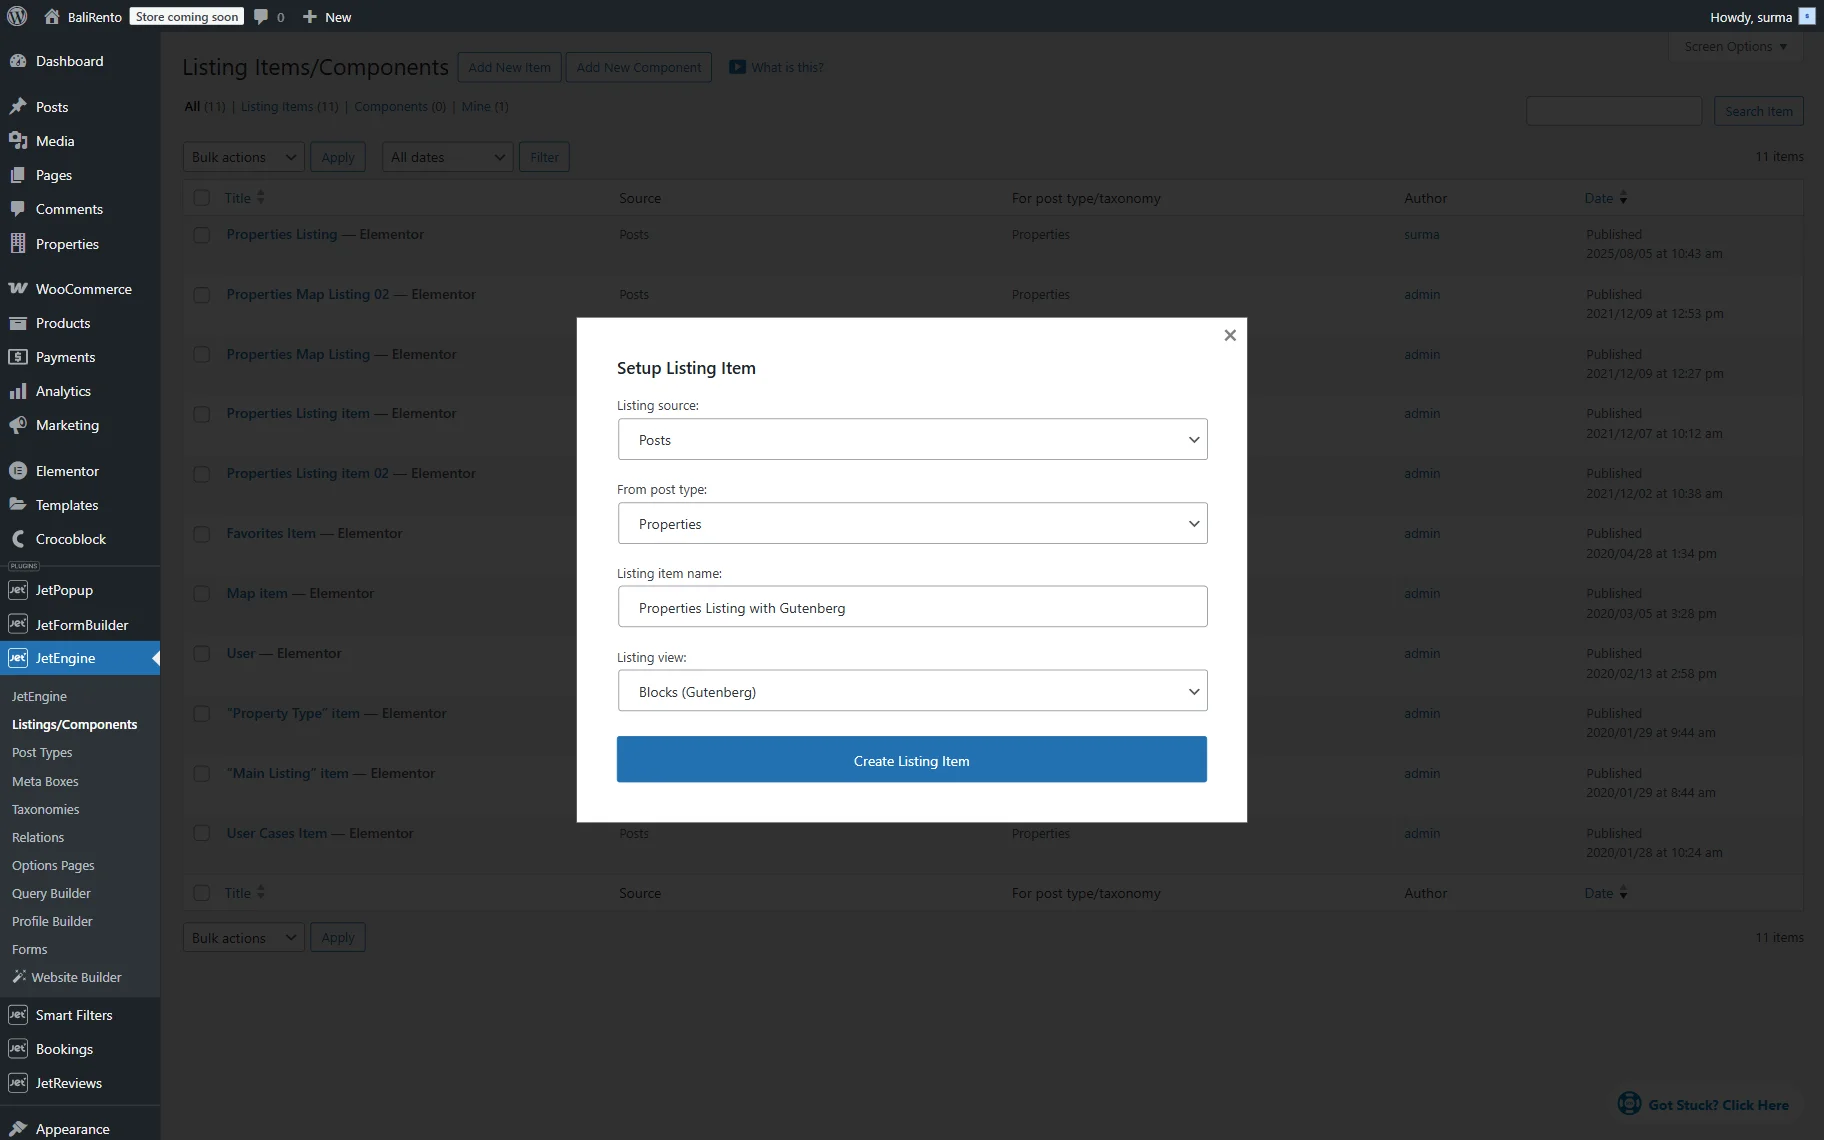
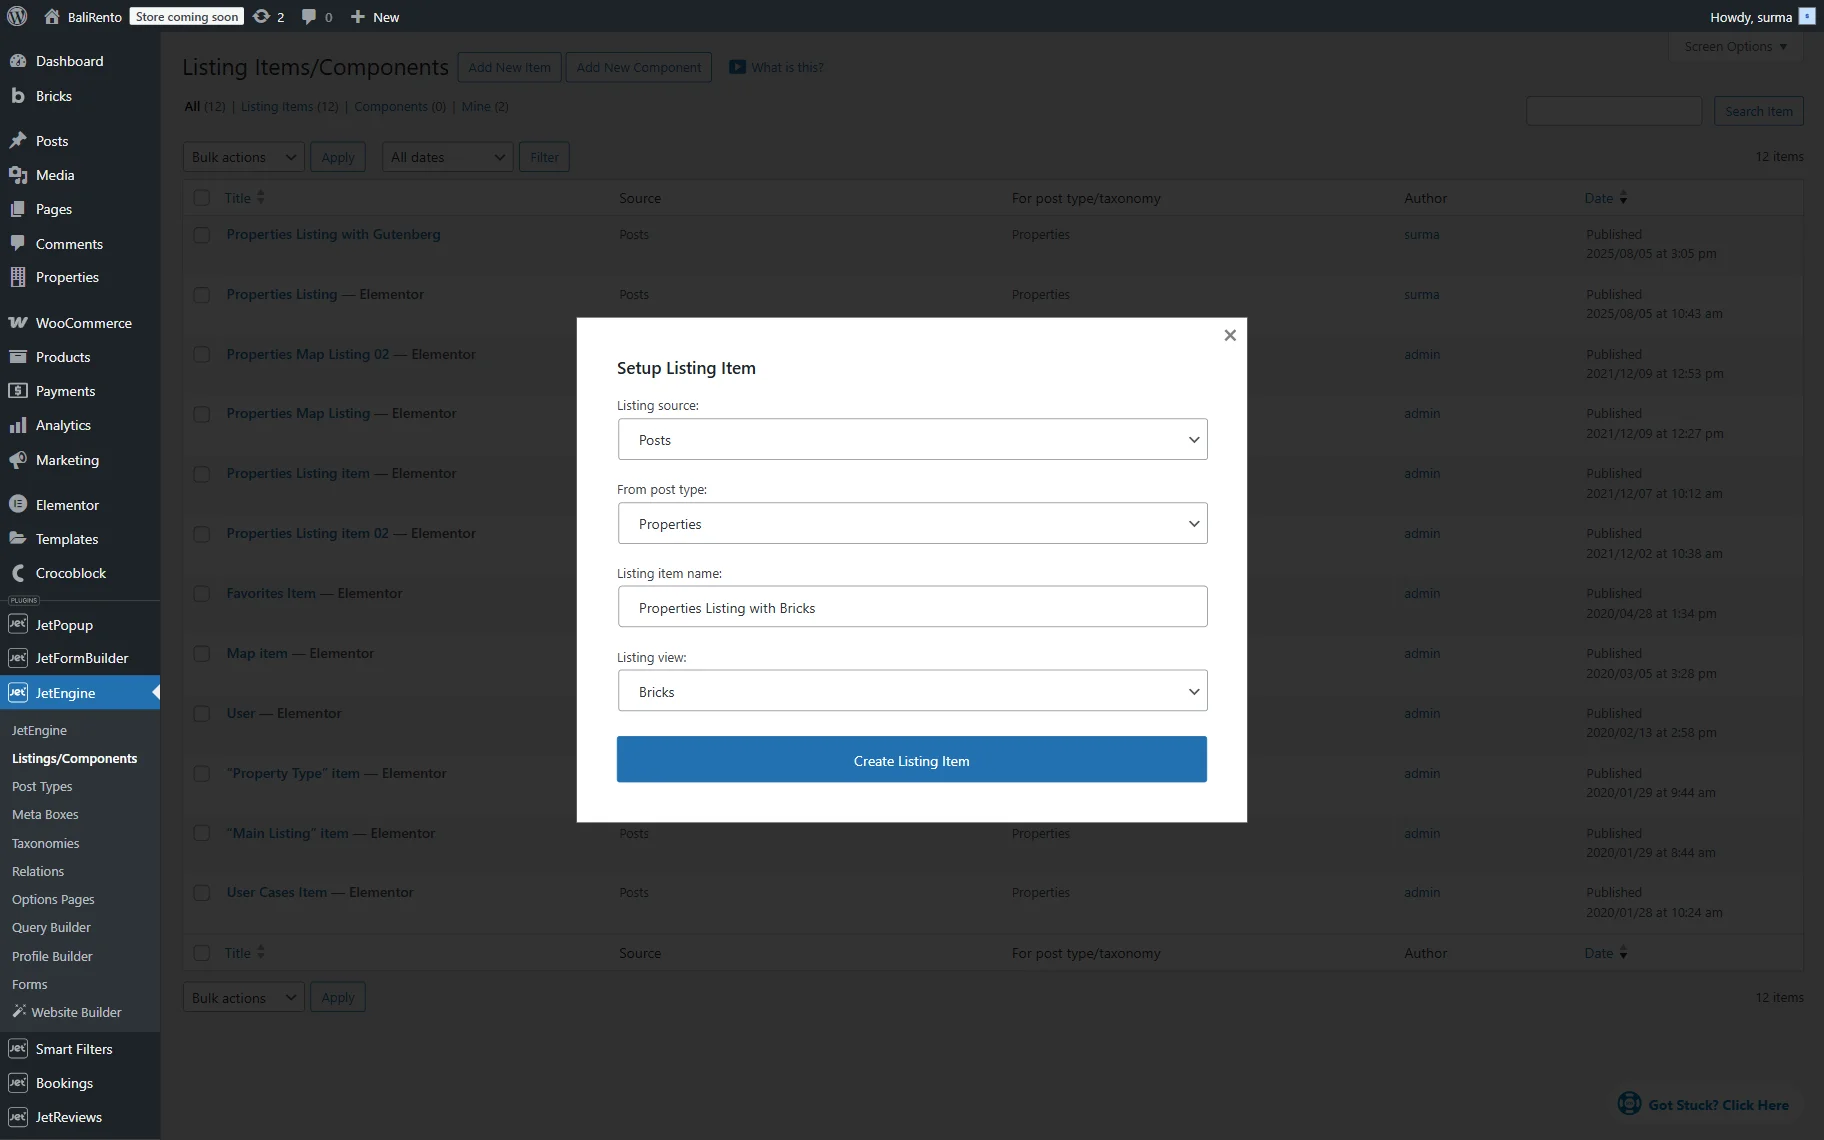
Proceed to WordPress Dashboard > JetEngine > Listings/Components and click the “Add New Item” button.
In the newly appeared Setup Listing Item pop-up, fill in the fields. Keep the “Posts” option as the Listing Source. Select the Instance Booking Custom Post Type (CPT) in the From post type dropdown (“Properties” in this case). Enter the Listing item name and set the “Elementor” Listing View.
Then, click the “Create Listing Item” button.
Once the Elementor editing page is opened, you can add the Dynamic Widgets to display the content of the CPT.
Let’s have a closer look at displaying the info about the service.
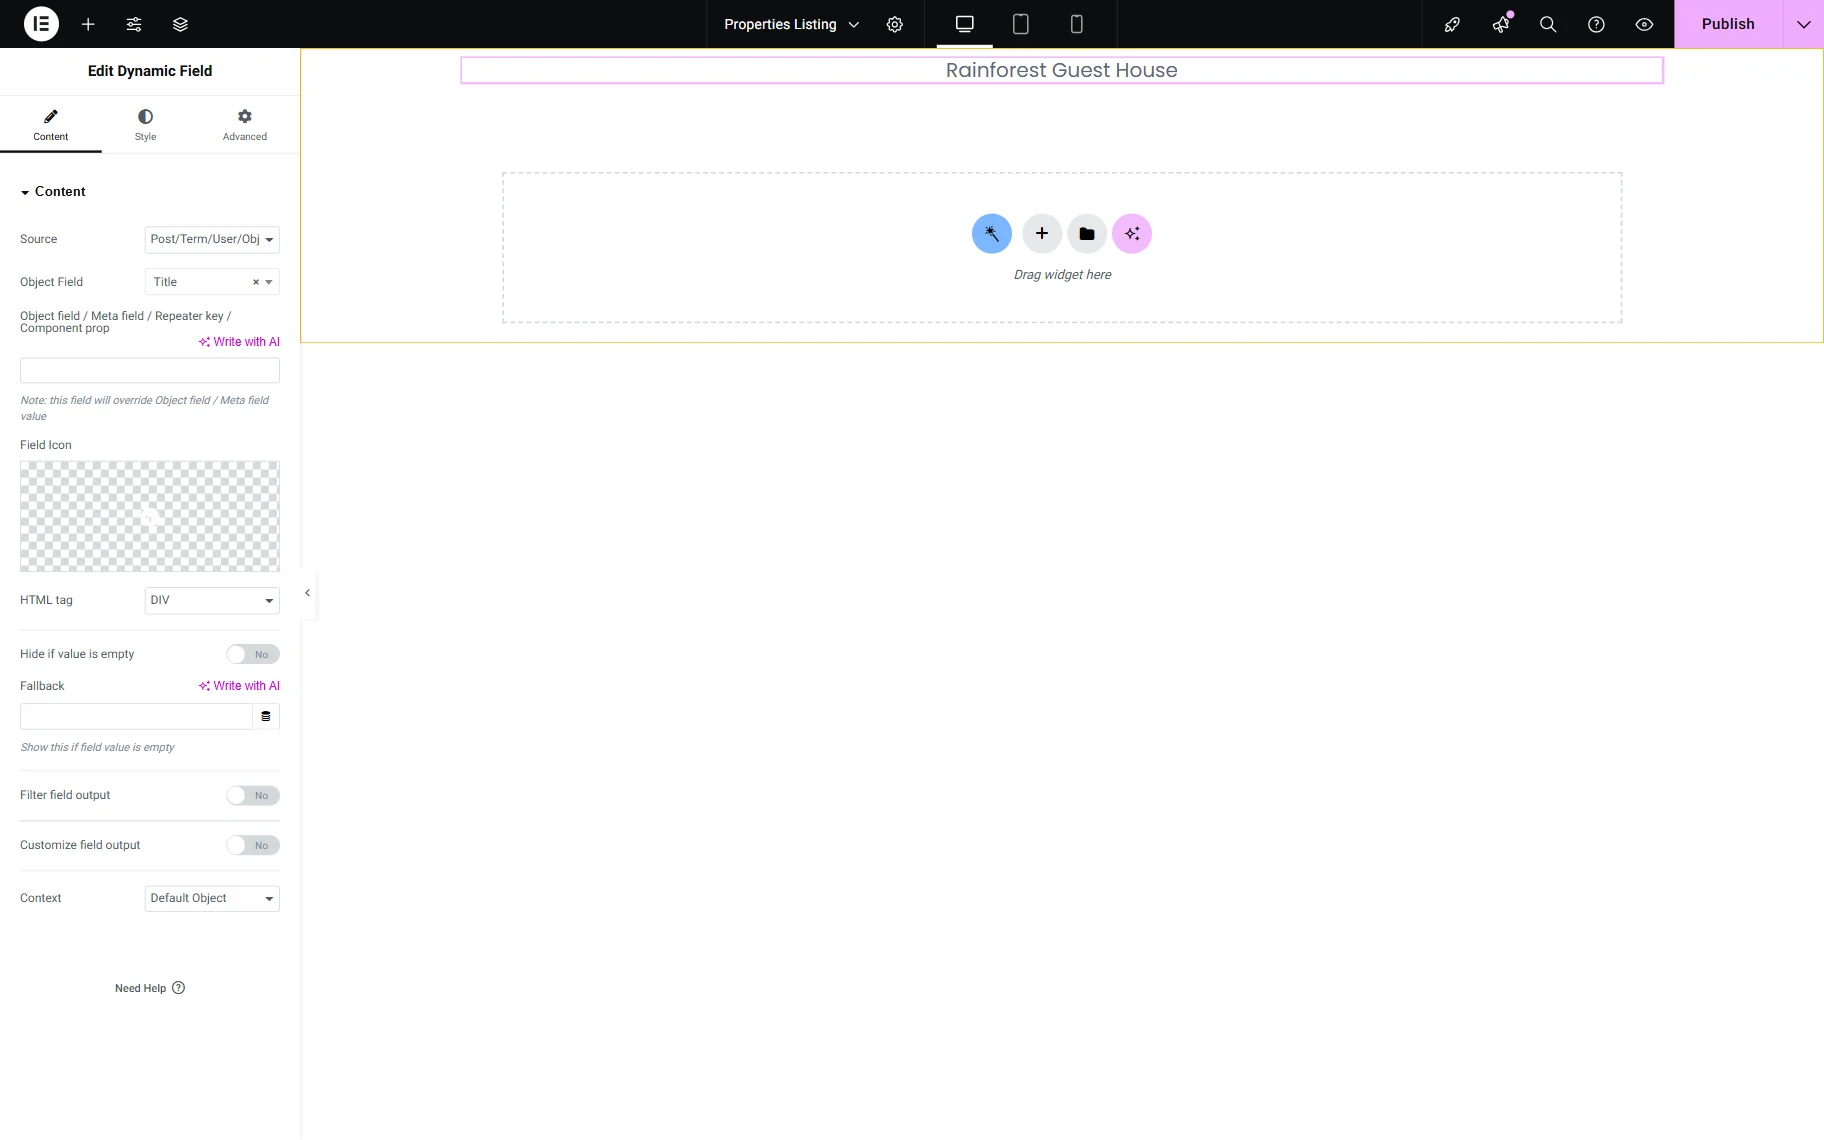
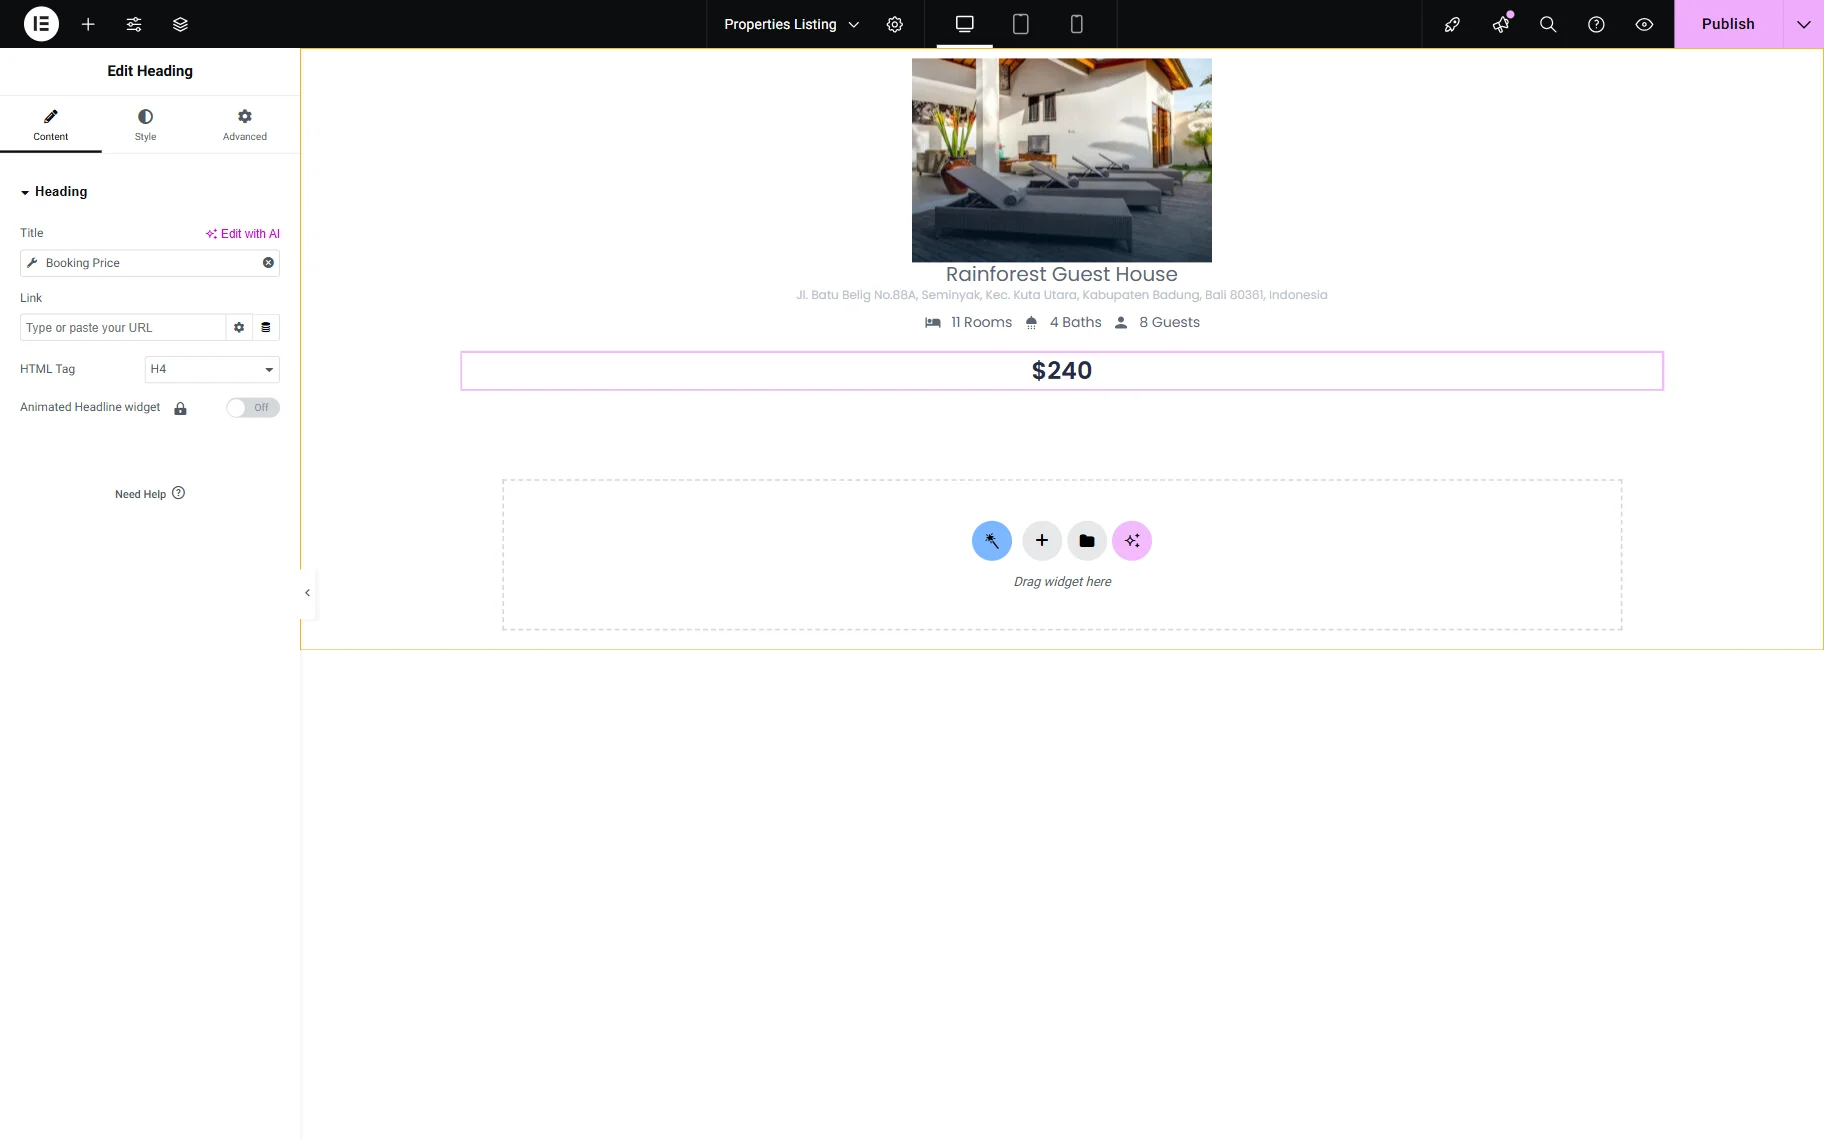
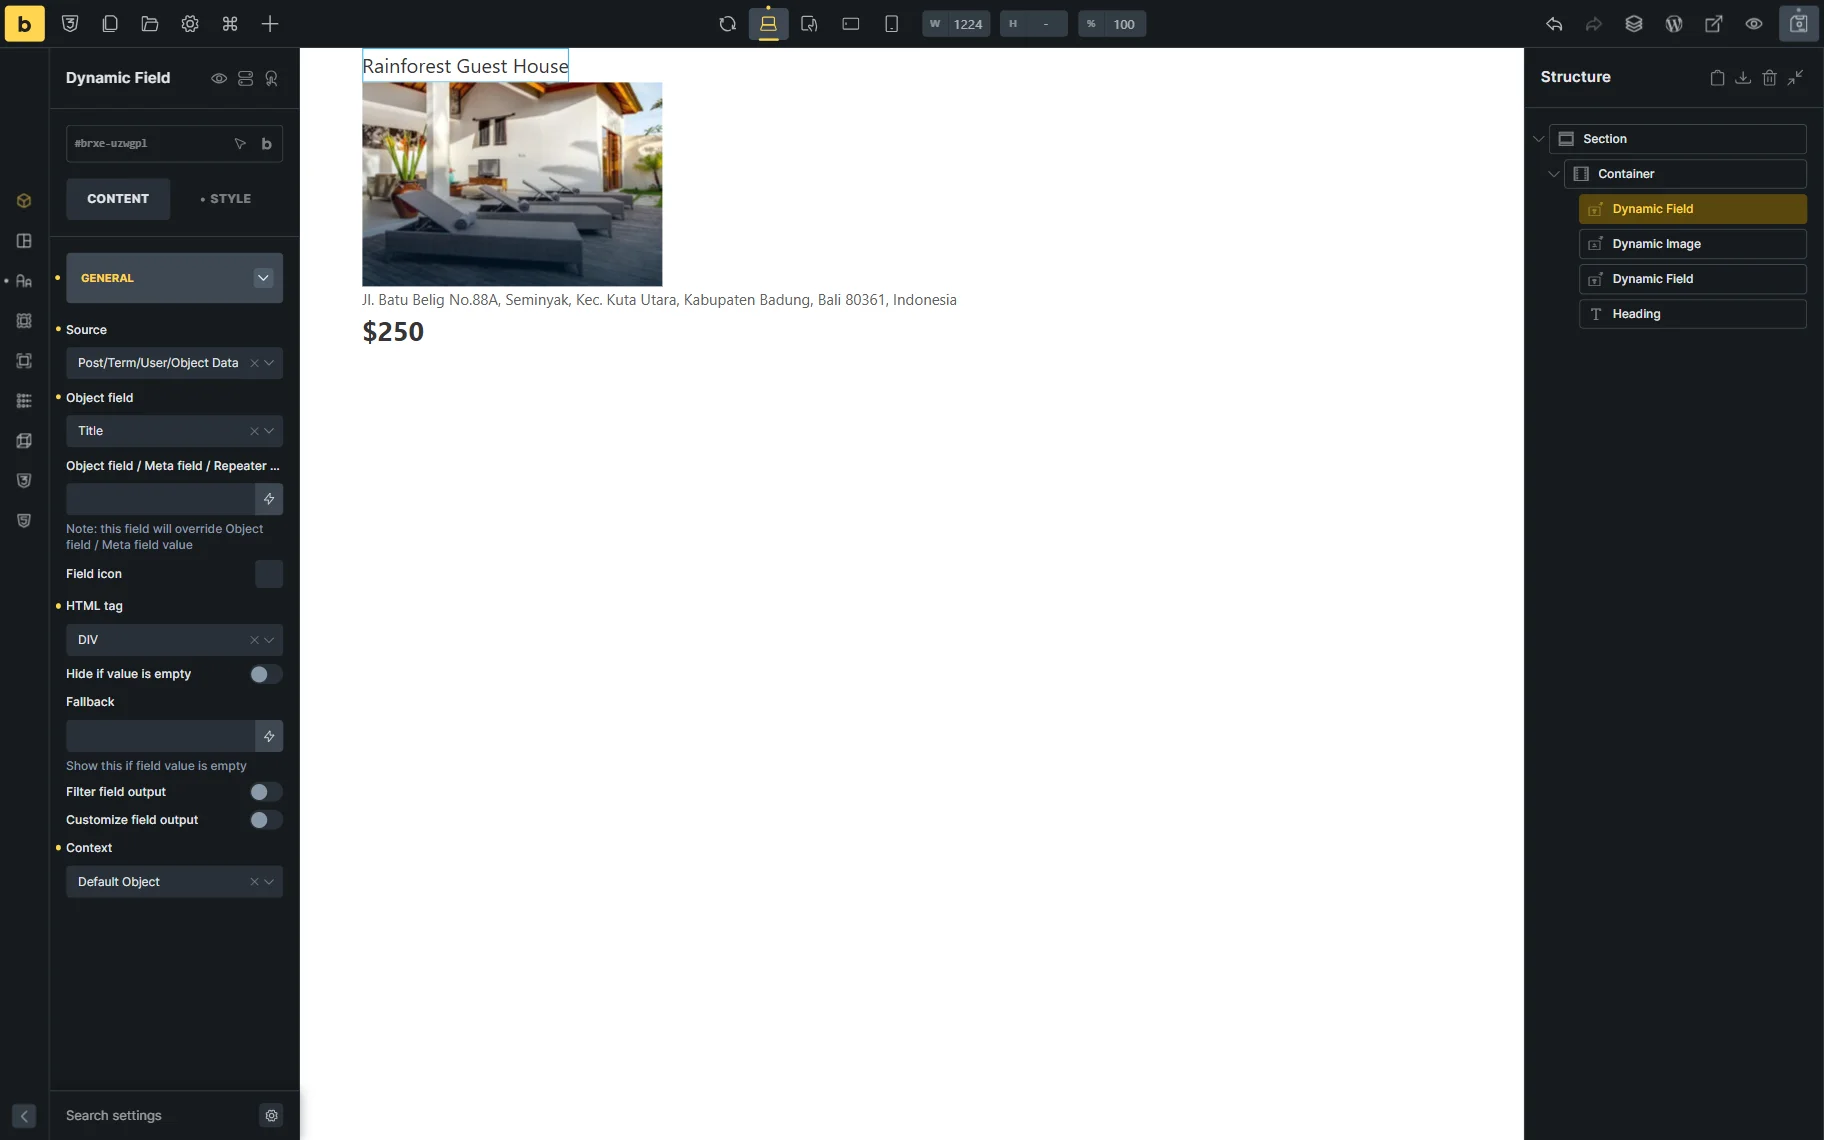
First of all, let’s display the title of the post. For that, add the Dynamic Field widget. Keep the “Post/Term/User/Object” option as the Source. Then select the “Title” from the Object Field dropdown.
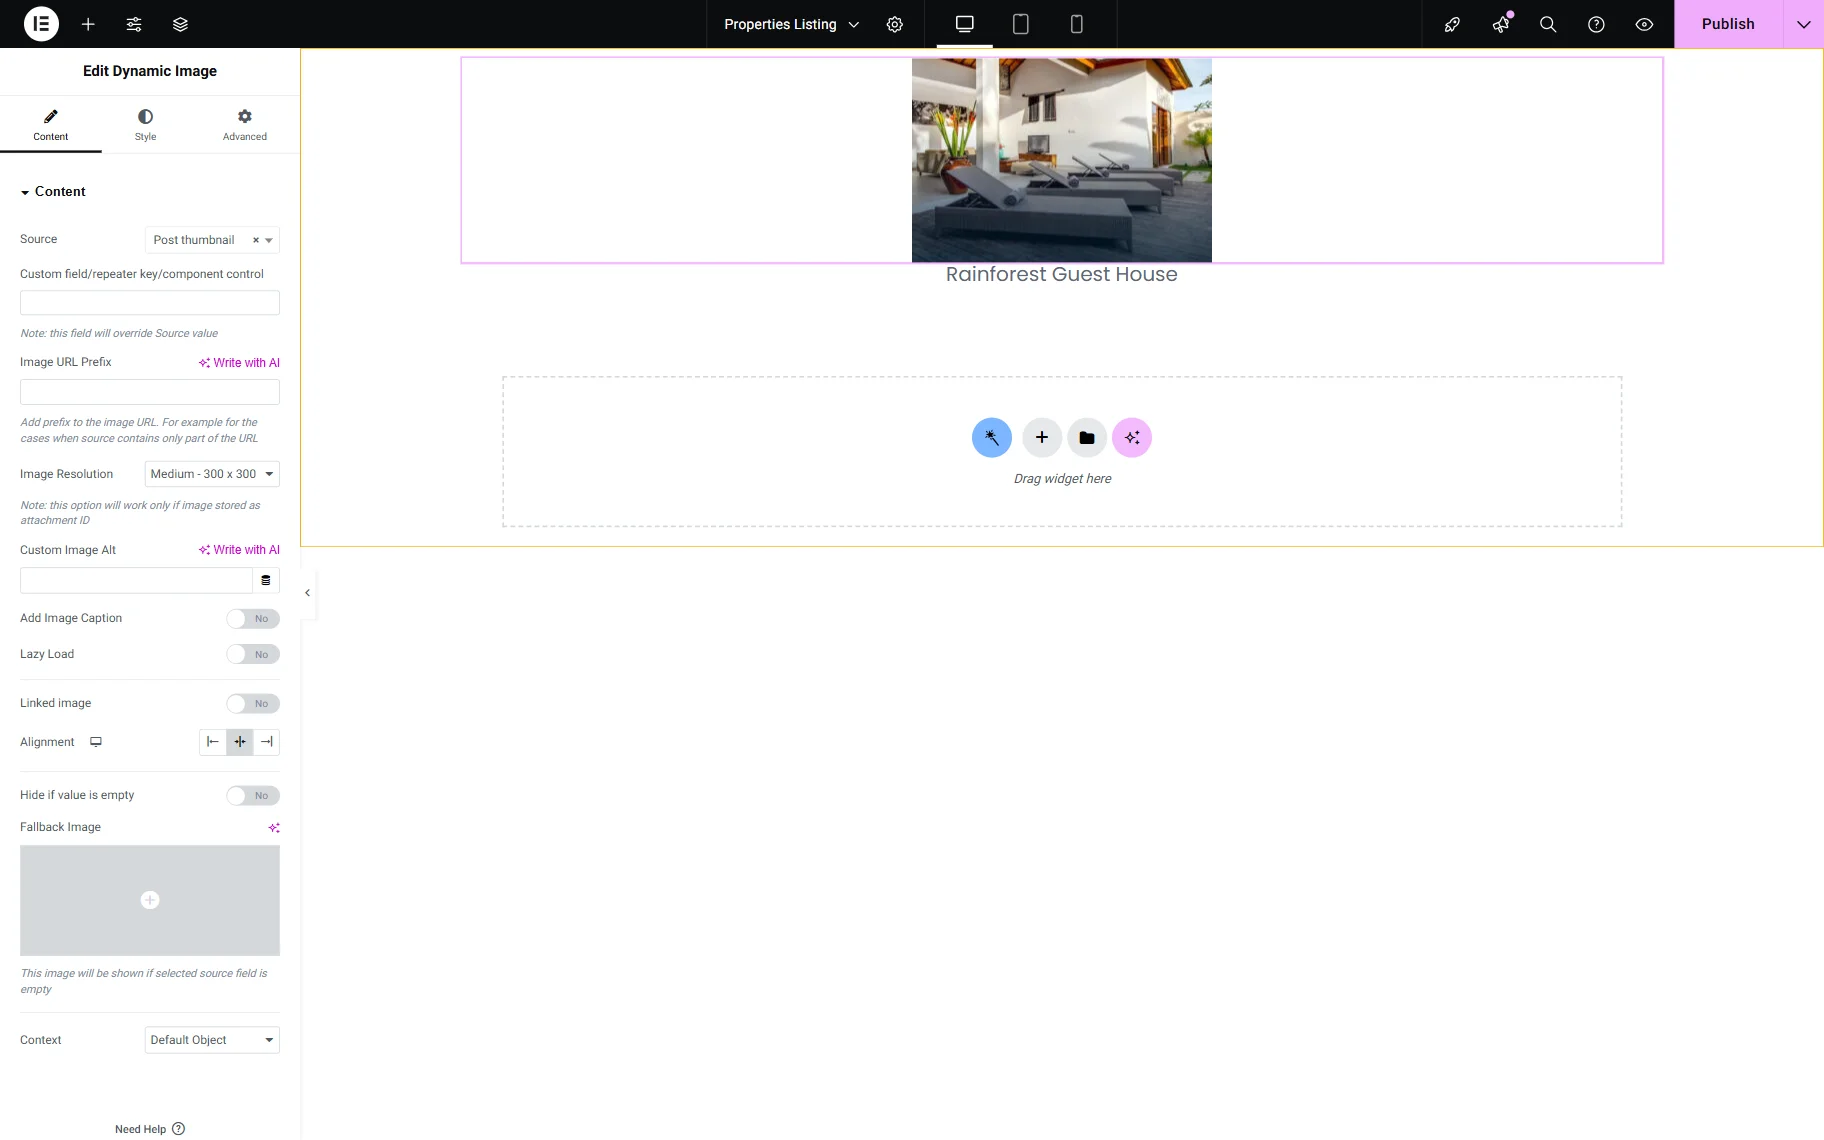
To display the thumbnail, the Dynamic Image widget should be added. By default, the “Post thumbnail” is chosen as a Source. So if you need to display the thumbnail, keep the settings as they are. If you need to display an image from the custom meta field, click on the dropdown and select the field name you need.
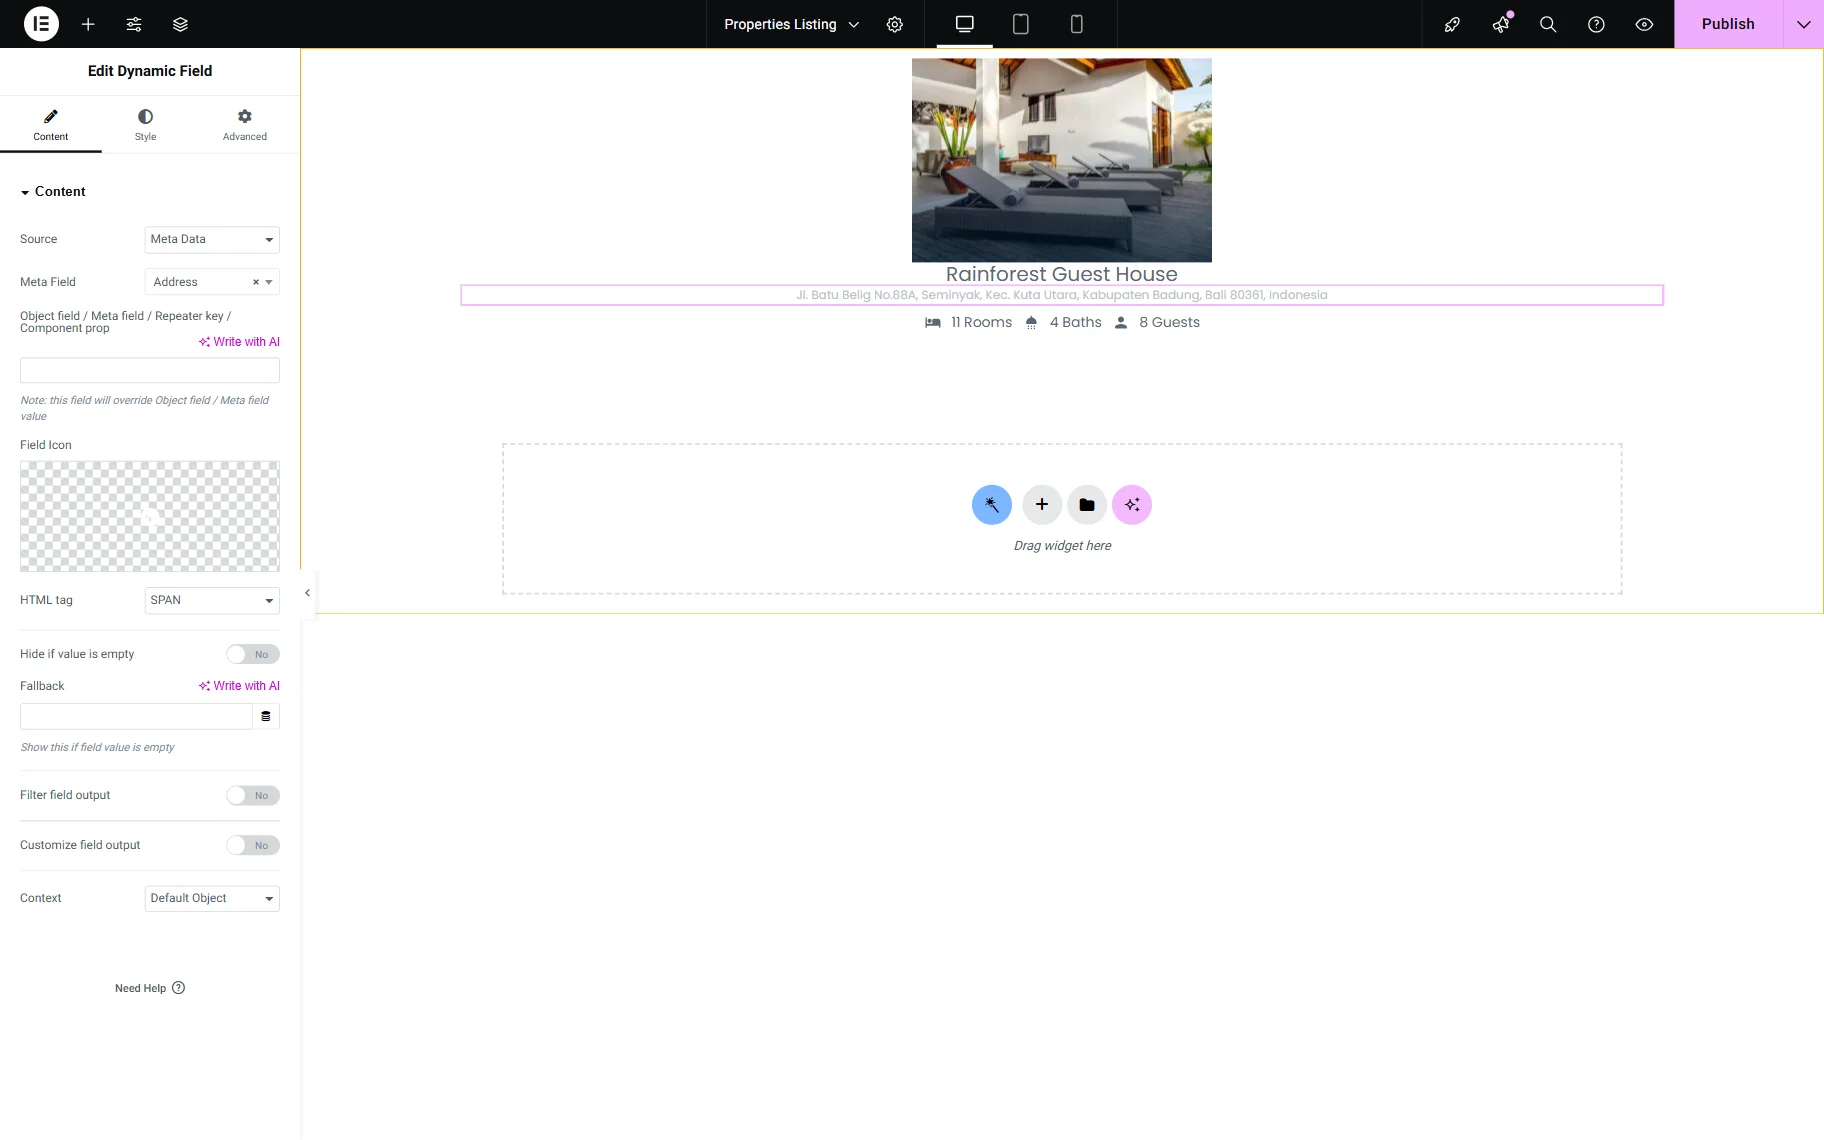
When you need to display meta fields from the post, add another Dynamic Field widget. Choose the “Meta Data” for the Source and select the needed Meta Field from the dropdown.
If you need some extra text, you can enable the Customize field output toggle and add the required text to the newly appeared field. Ensure that the “%s” value is kept as it replaces the value of the field.
You can also use a Headline, Heading, or Text Editor widget with the Dynamic Tag to display the meta fields’ values. We used the Headline widget to enter the description for the First part and get the Second part from the meta field using the Dynamic Tag icon and choosing the field from the dropdown.
The information about the instance post, such as the property price, can also be displayed using Dynamic Tags.
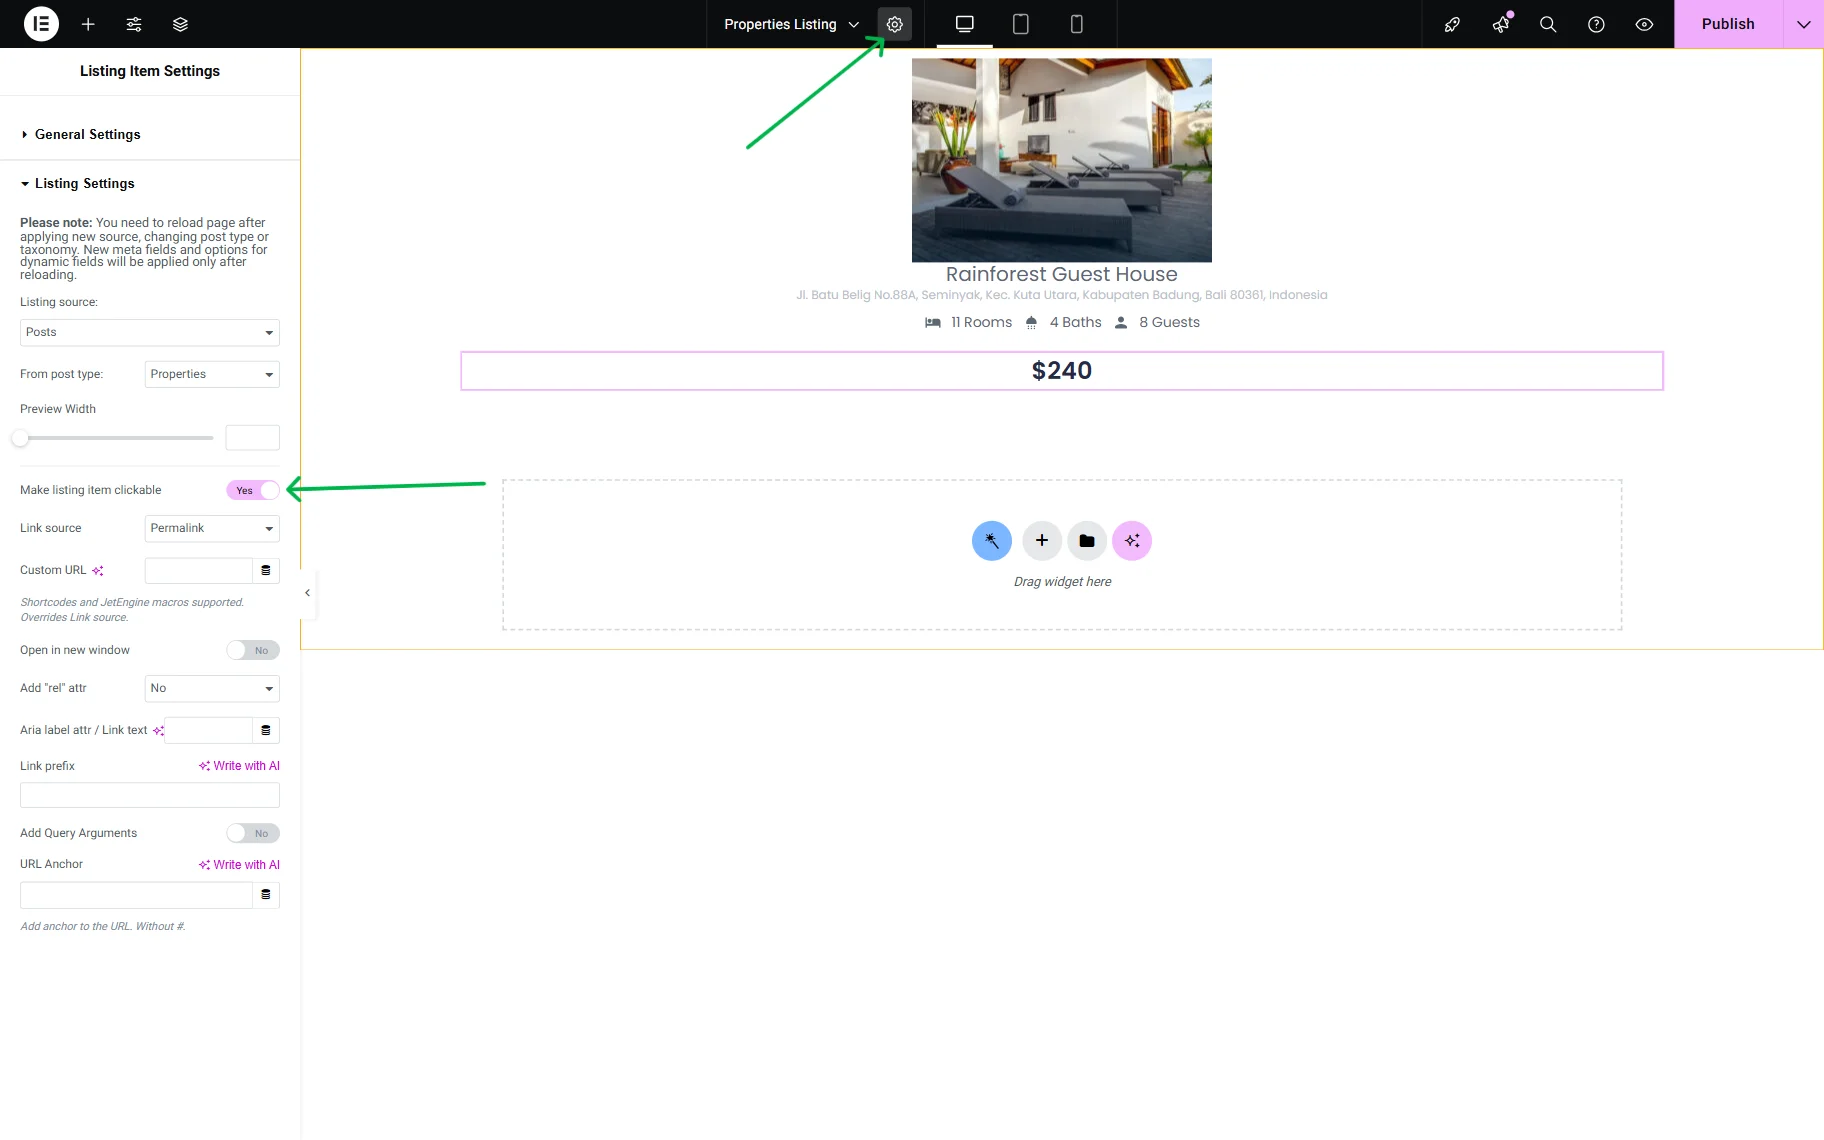
If you need the listing item to be clickable, so users can proceed to another page with the post details after clicking, click the “gear” icon at the top bar and enable the Make listing item clickable toggle.
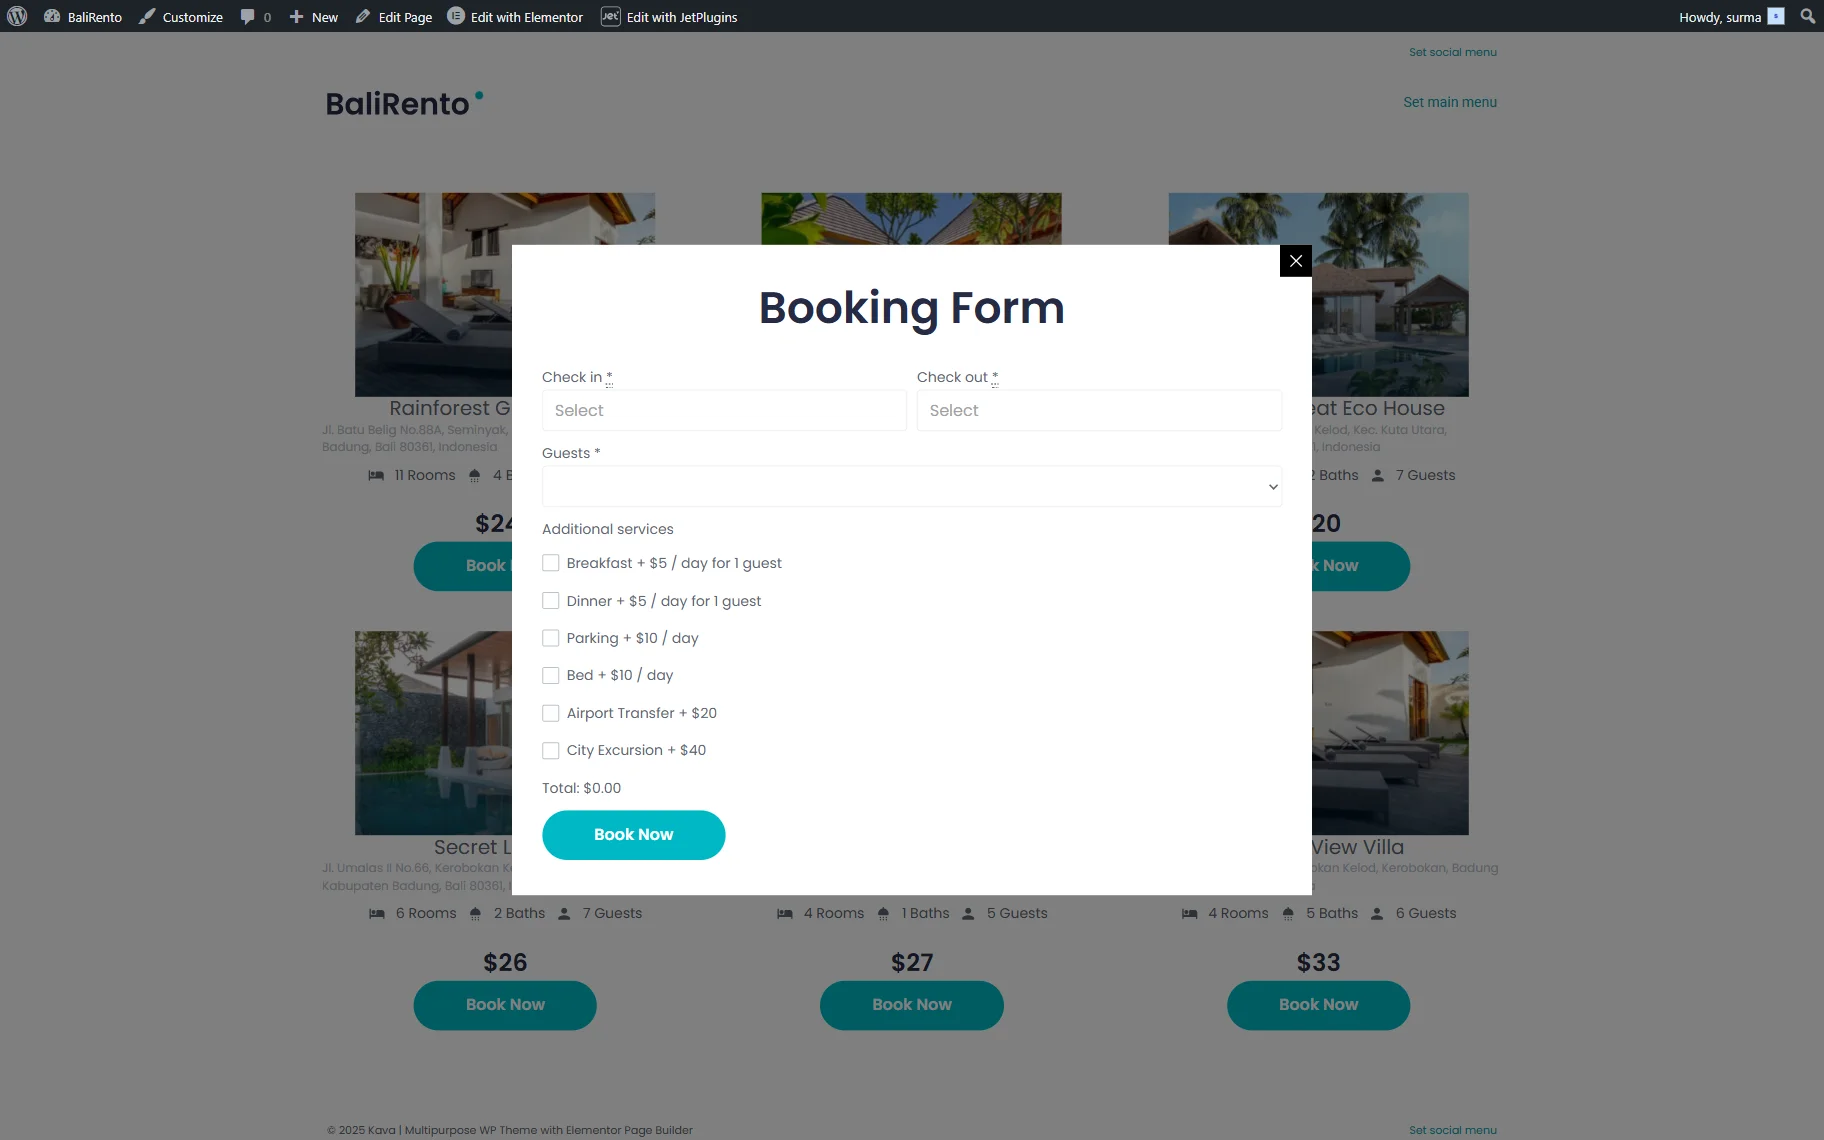
Adjusting a dynamic pop-up with the booking form
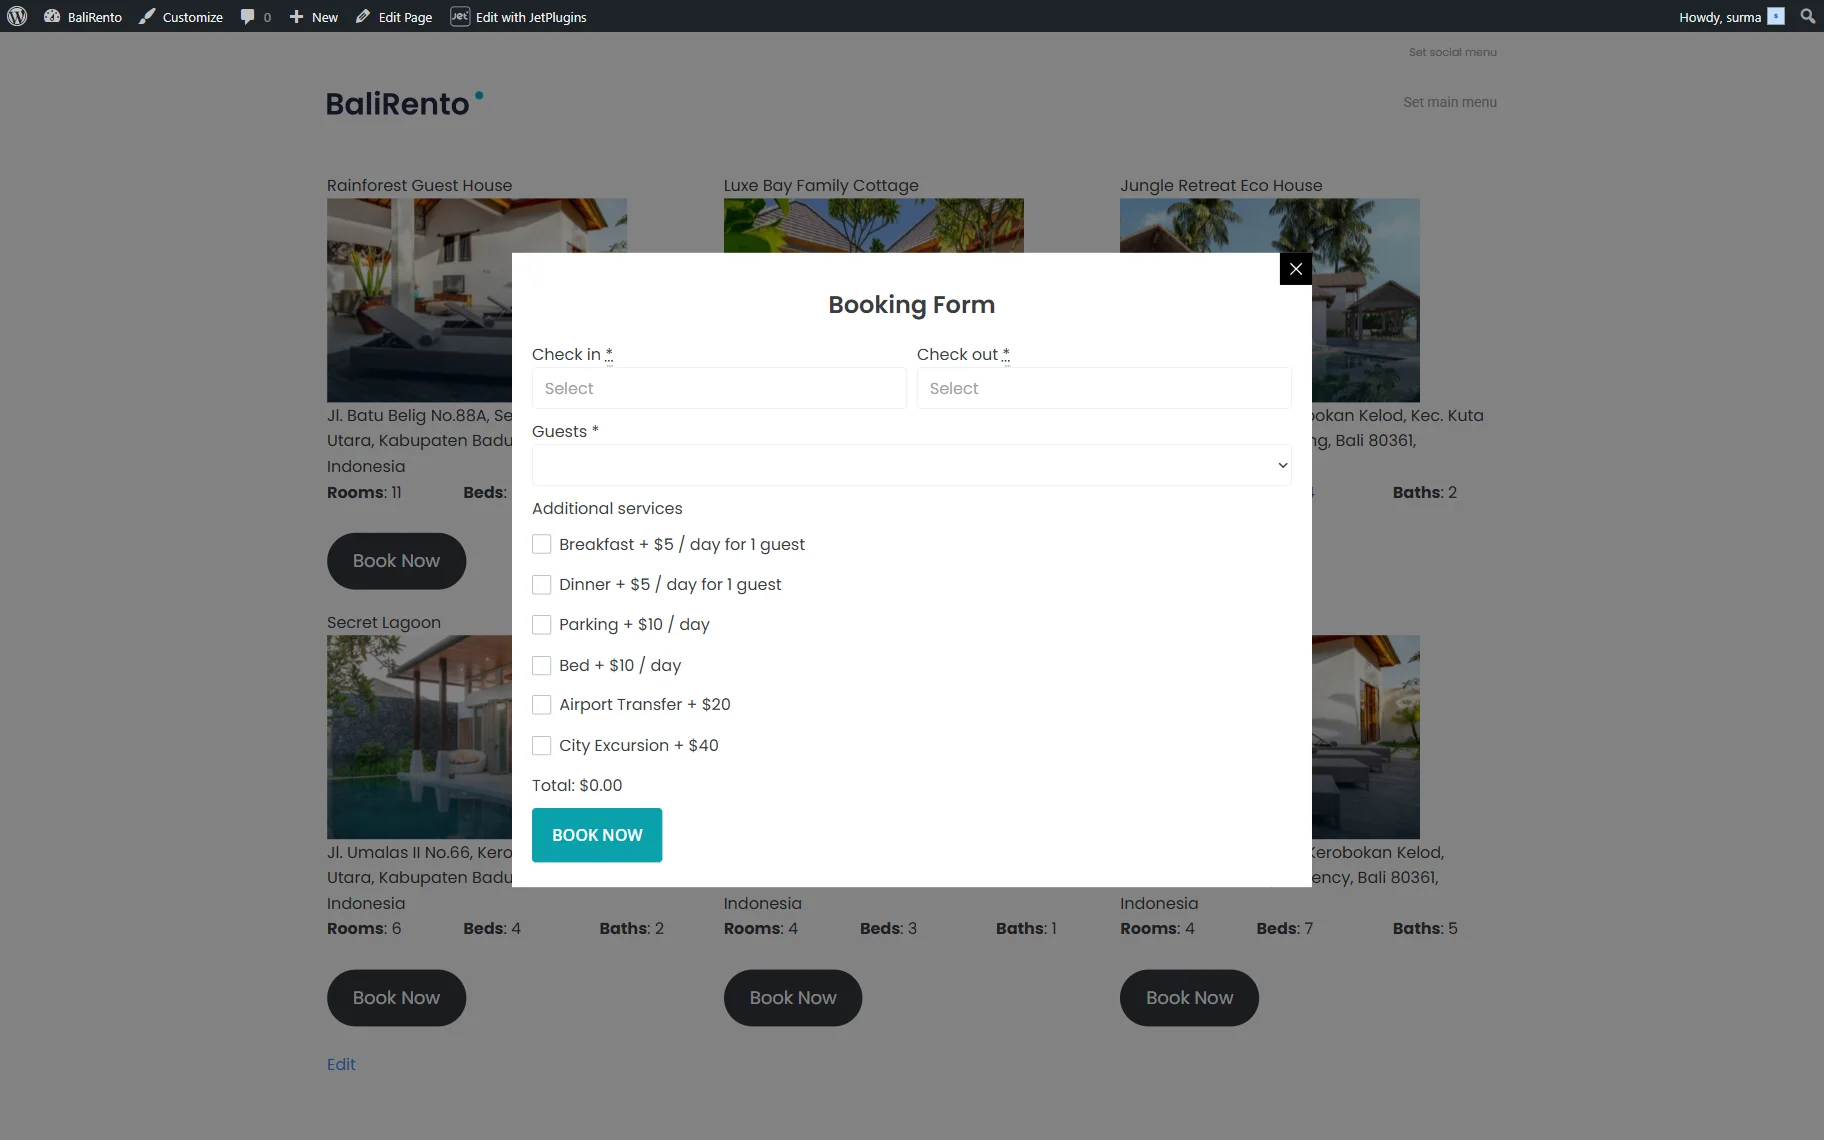
If you would like to include a pop-up with the booking form within the listing item, let’s take a closer look at the setup.
If you are setting up JetBooking with the booking wizard, the form will be created automatically. In the How to Set Up Booking with Wizard Setup tutorial, you can find the details on the setup.
In case you would like to create a form by yourself, refer to the How to Create a Booking Form tutorial.
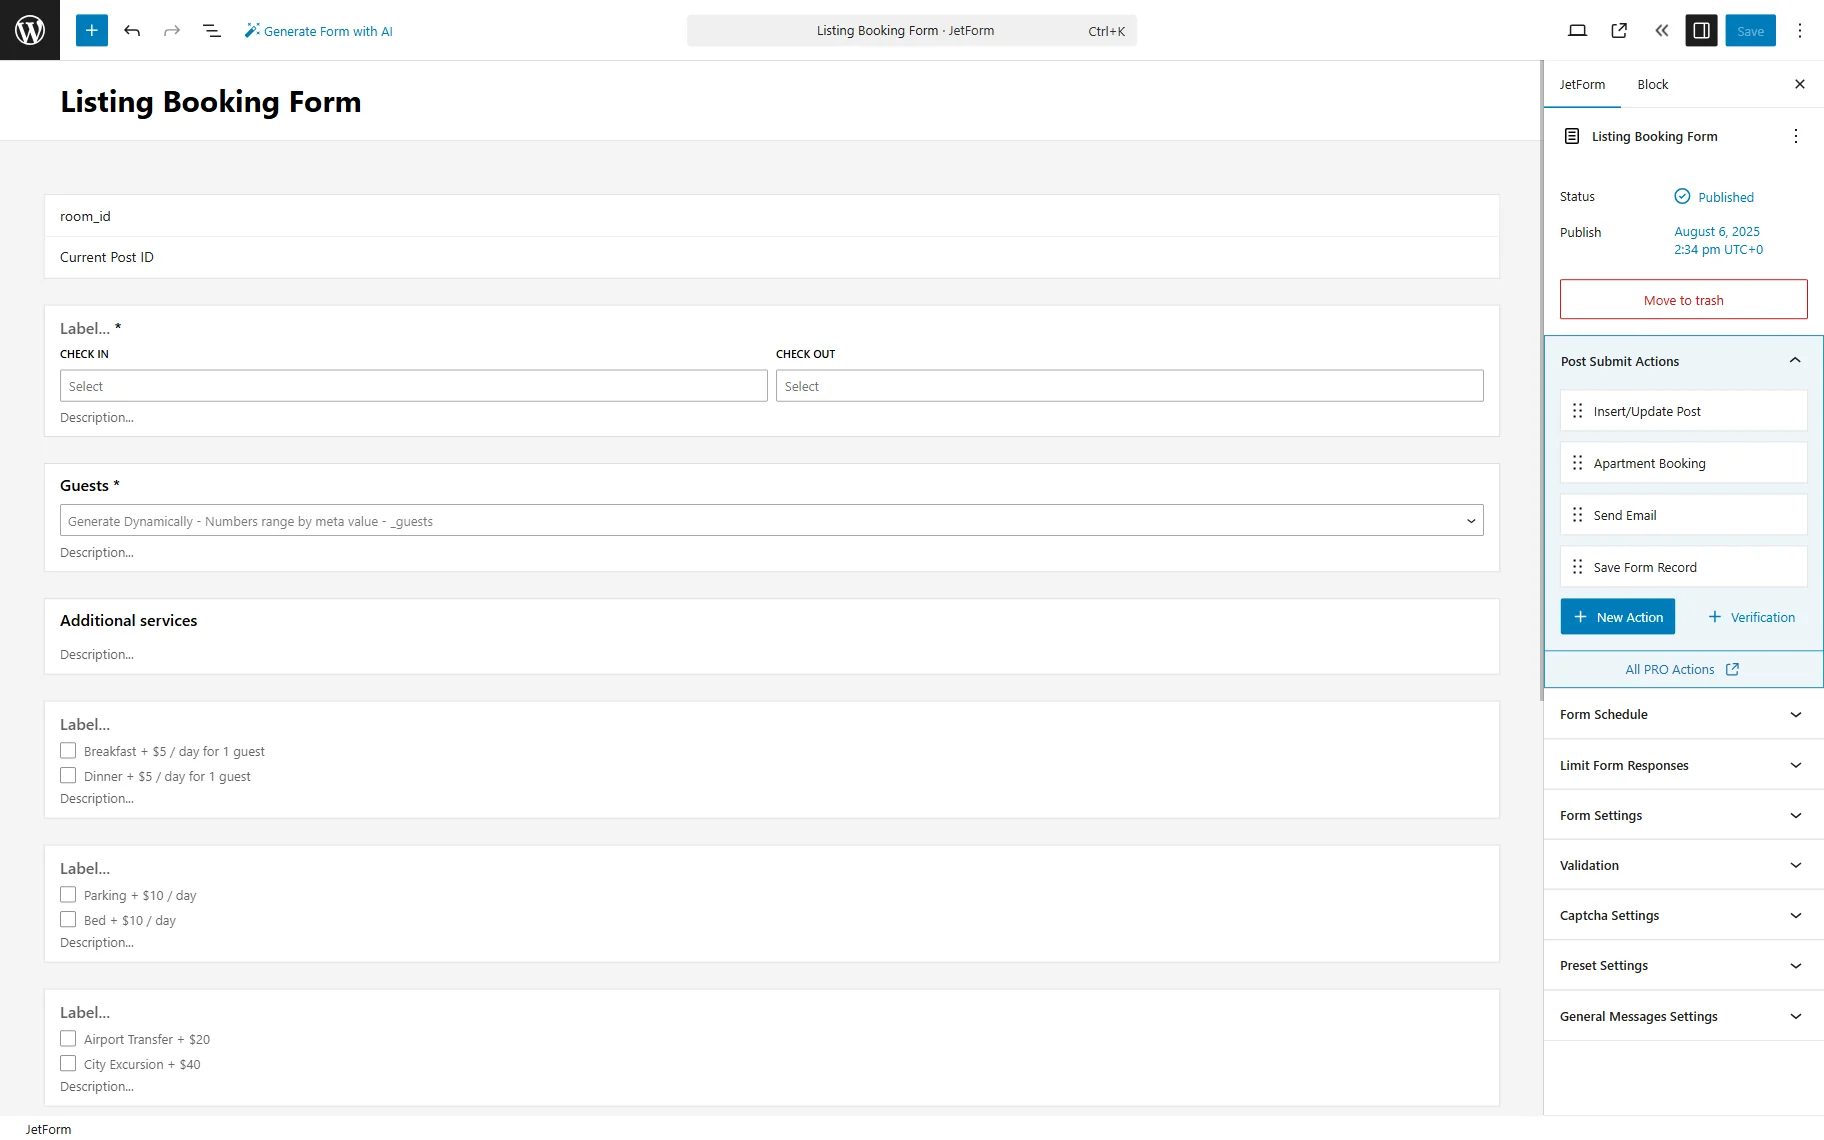
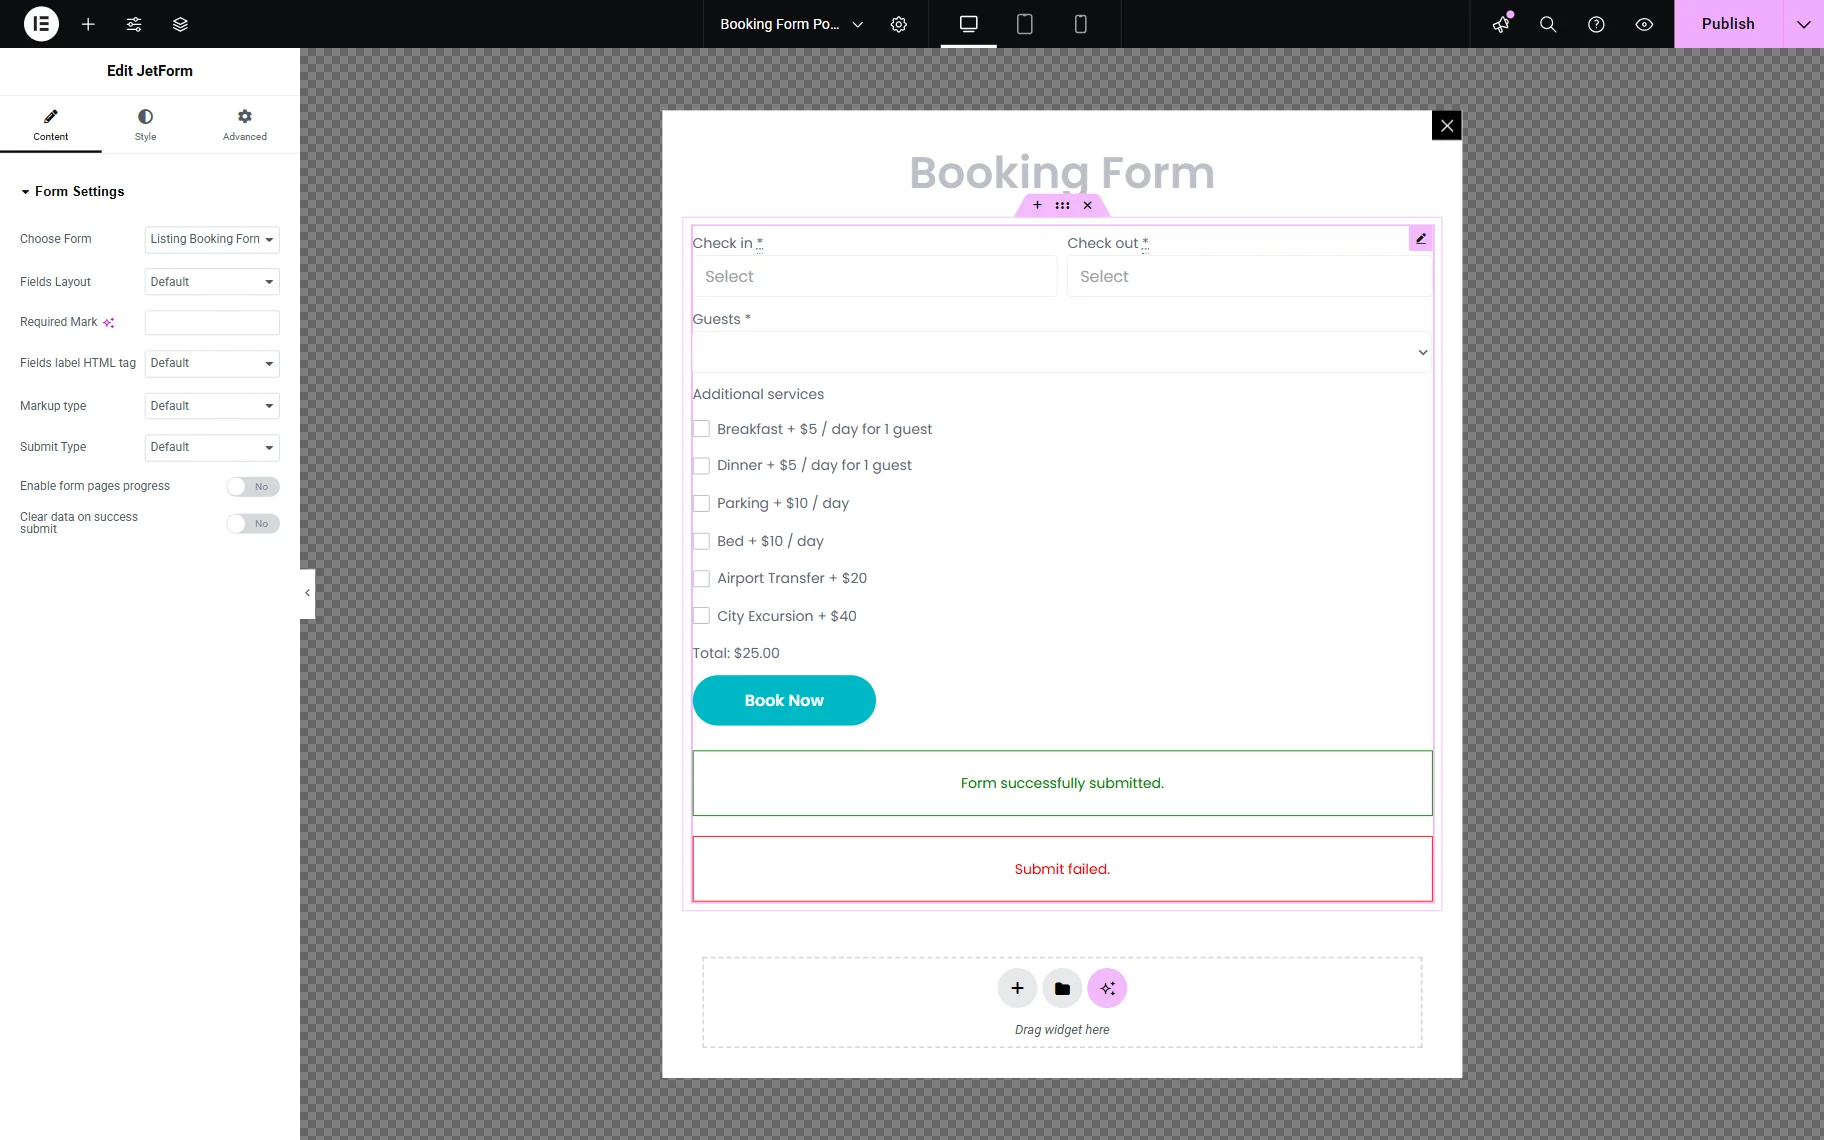
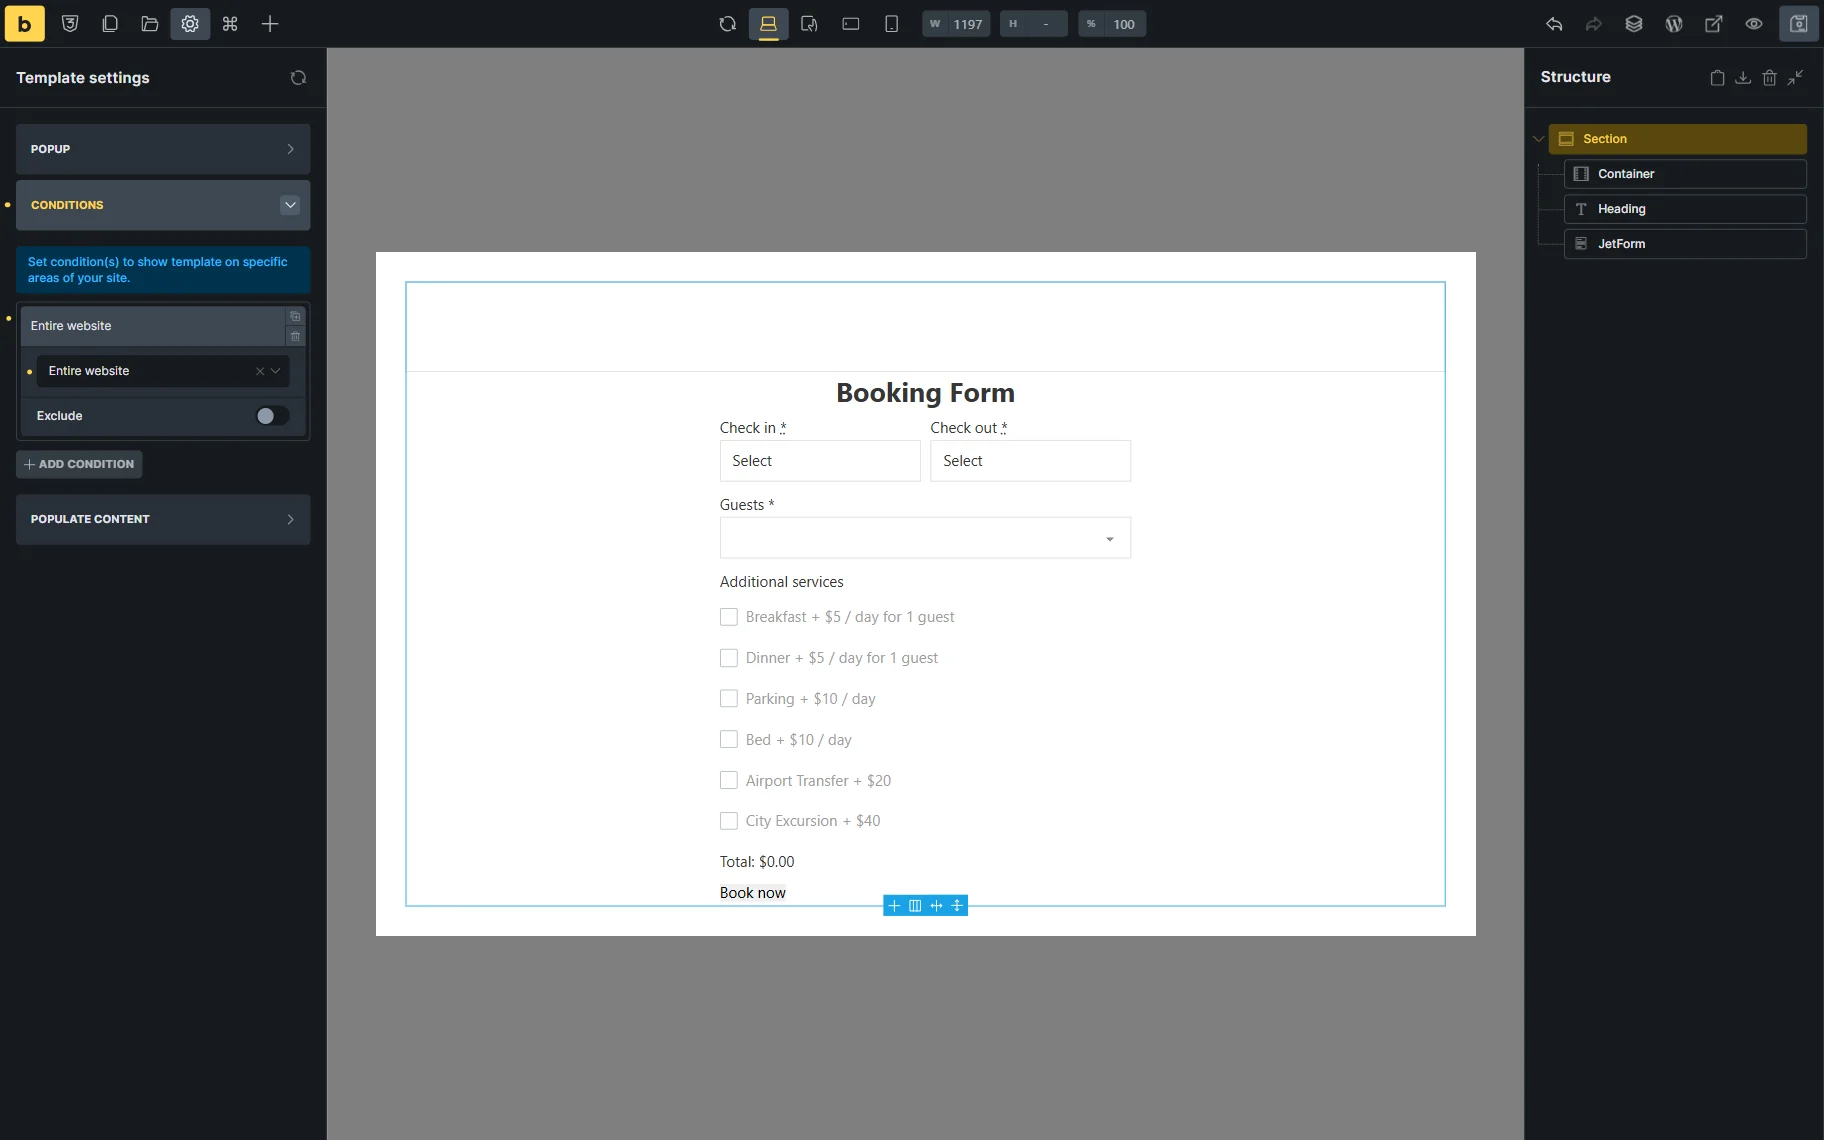
We created a booking form using a Pattern that allows users to select dates and other options for the service.
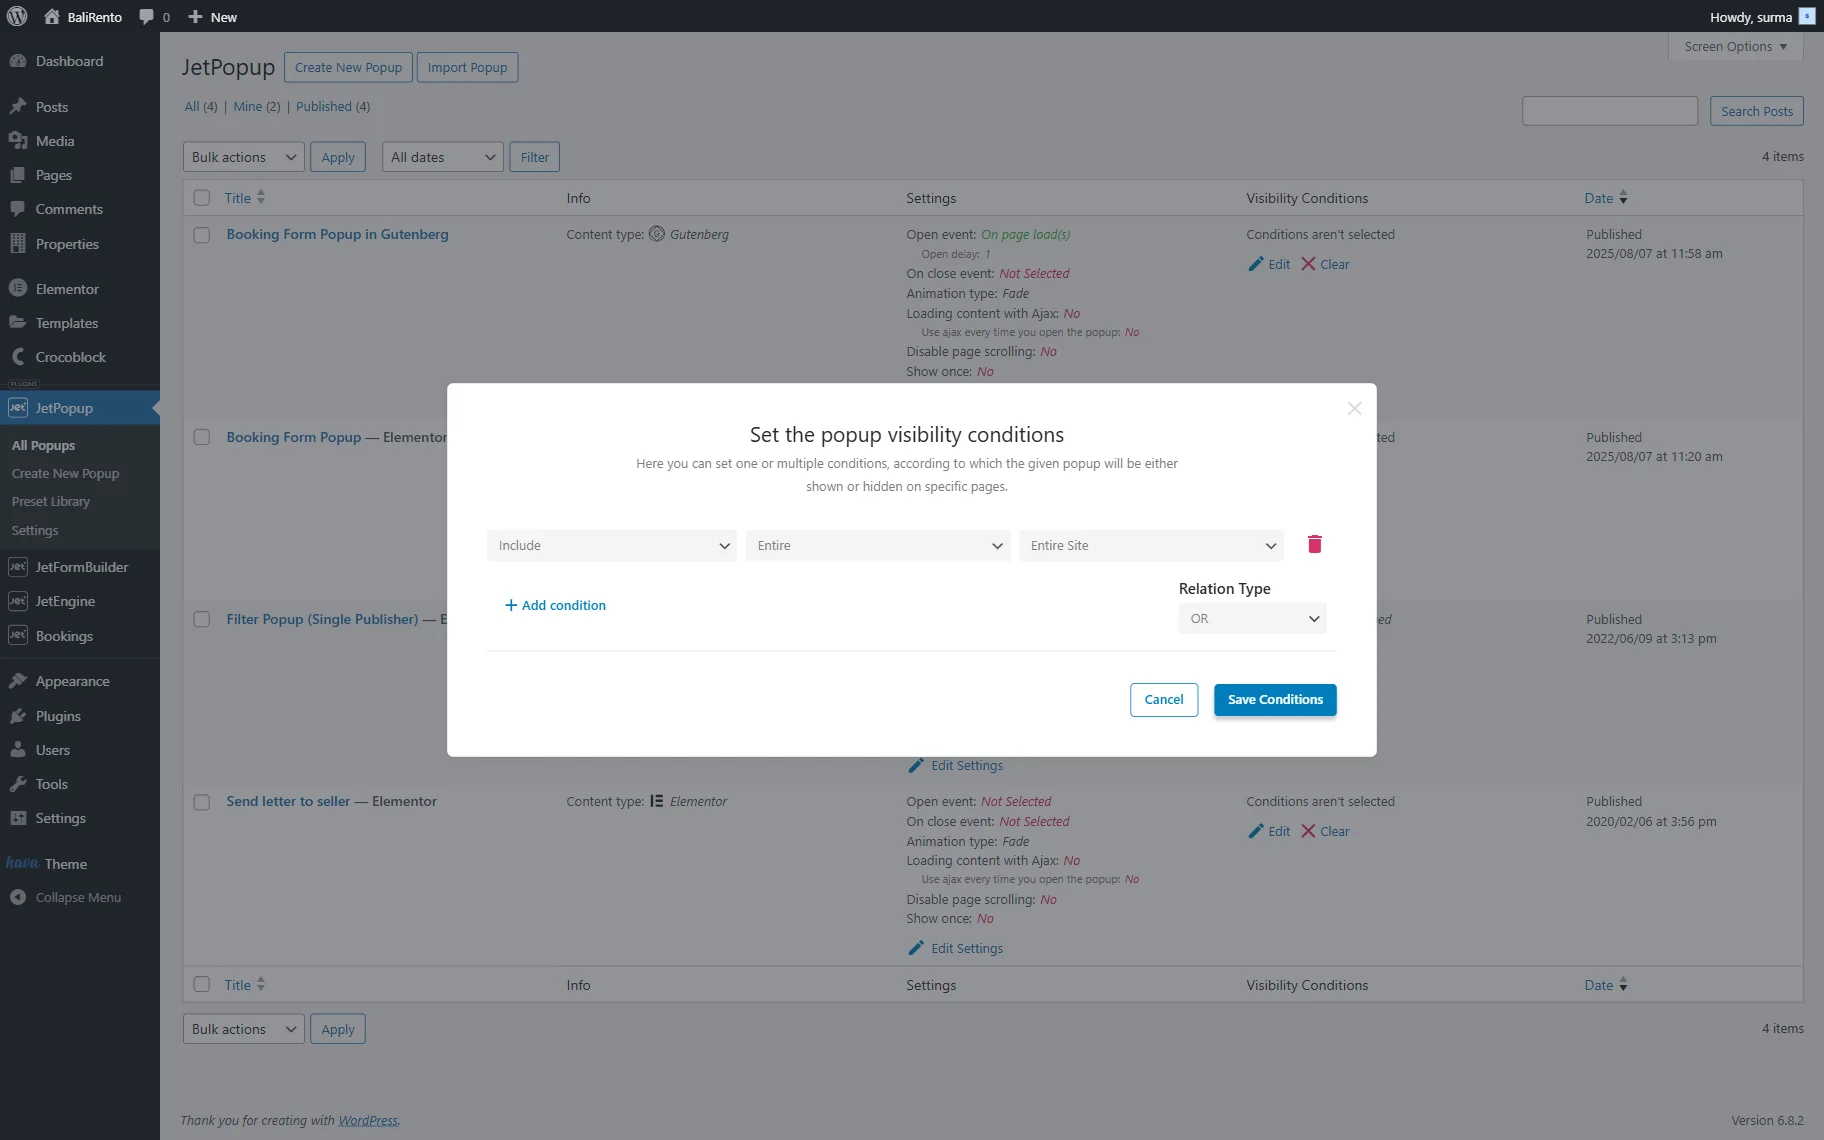
Then, let’s create a Dynamic Popup with the booking form.
Click the “Publish” button once you are ready.
Now, proceed back to the Listing Item’s settings. Add a Button widget and change the Label if needed (we entered the text “Book Now”).
Proceed to the Advanced tab and in the JetPopup section, select the Attached Popup you created. Activate the JetEngine Listing popup option. Next, define the Trigger Type as “Click On Widget,” and your pop-up will open once the button is clicked.
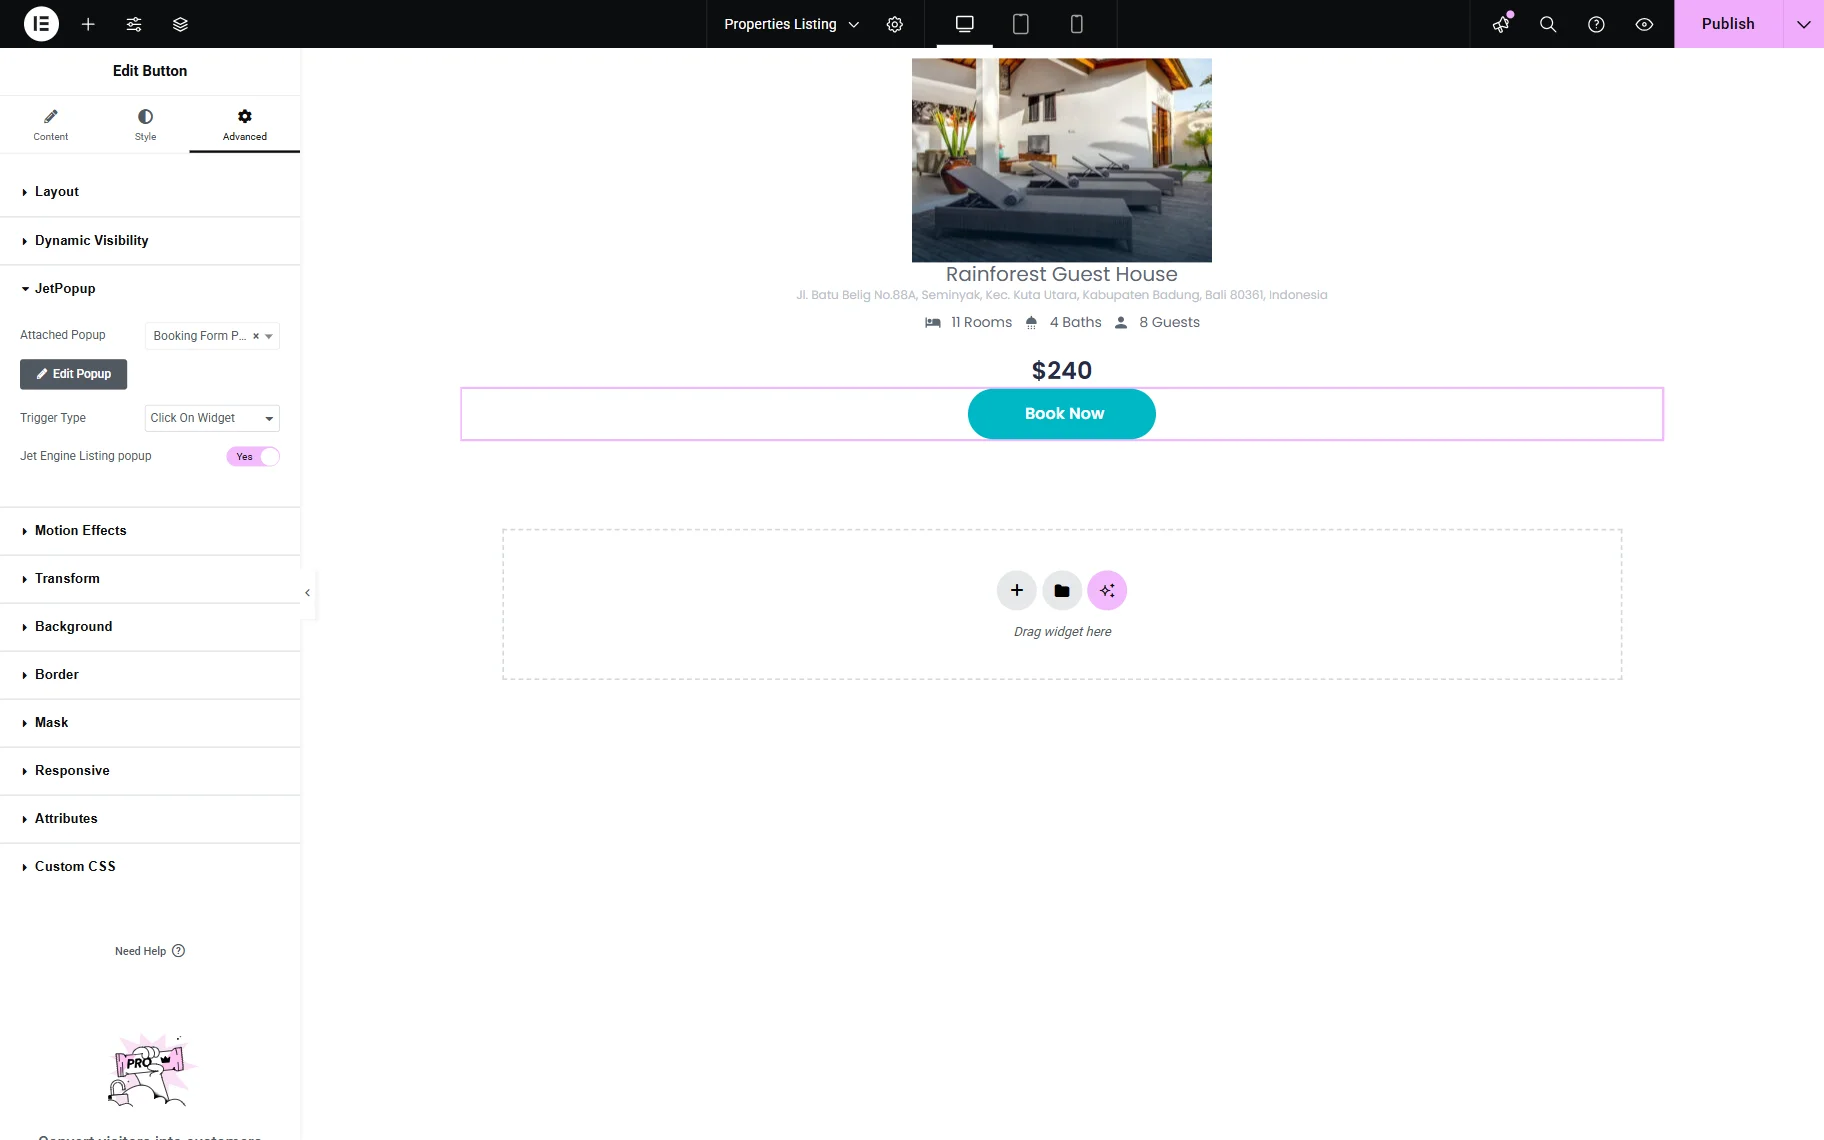
Ensure that the Conditions for the pop-up are set up, as without them, the pop-up will not function properly.
Once you have added all the needed widgets and applied the required styles, click the “Publish” button.
Displaying the listing on the front end
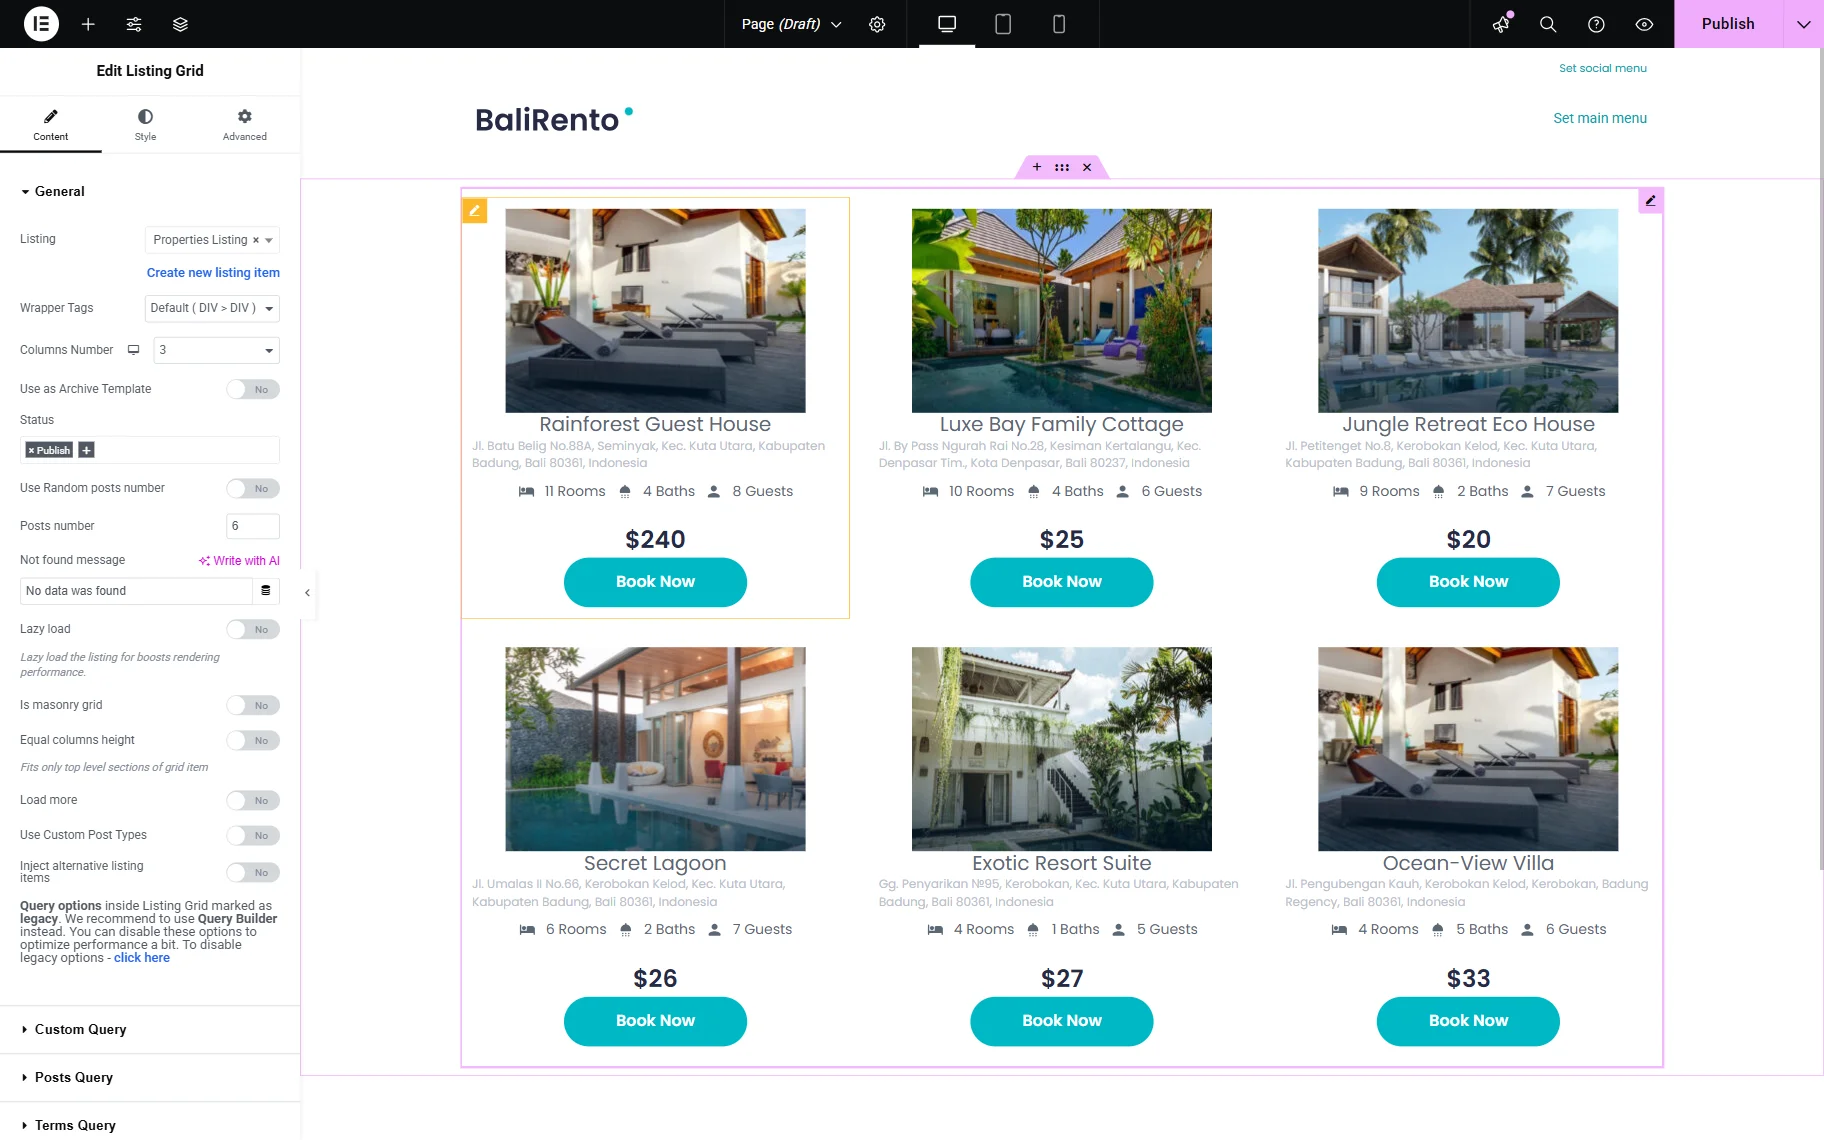
Now, proceed to the page where you need to display the listing and open it in the Elementor editing page. Add the Listing Grid widget to the desired space. Choose the recently created Listing.
Click the “Publish” button when you are ready and proceed to the frontend.
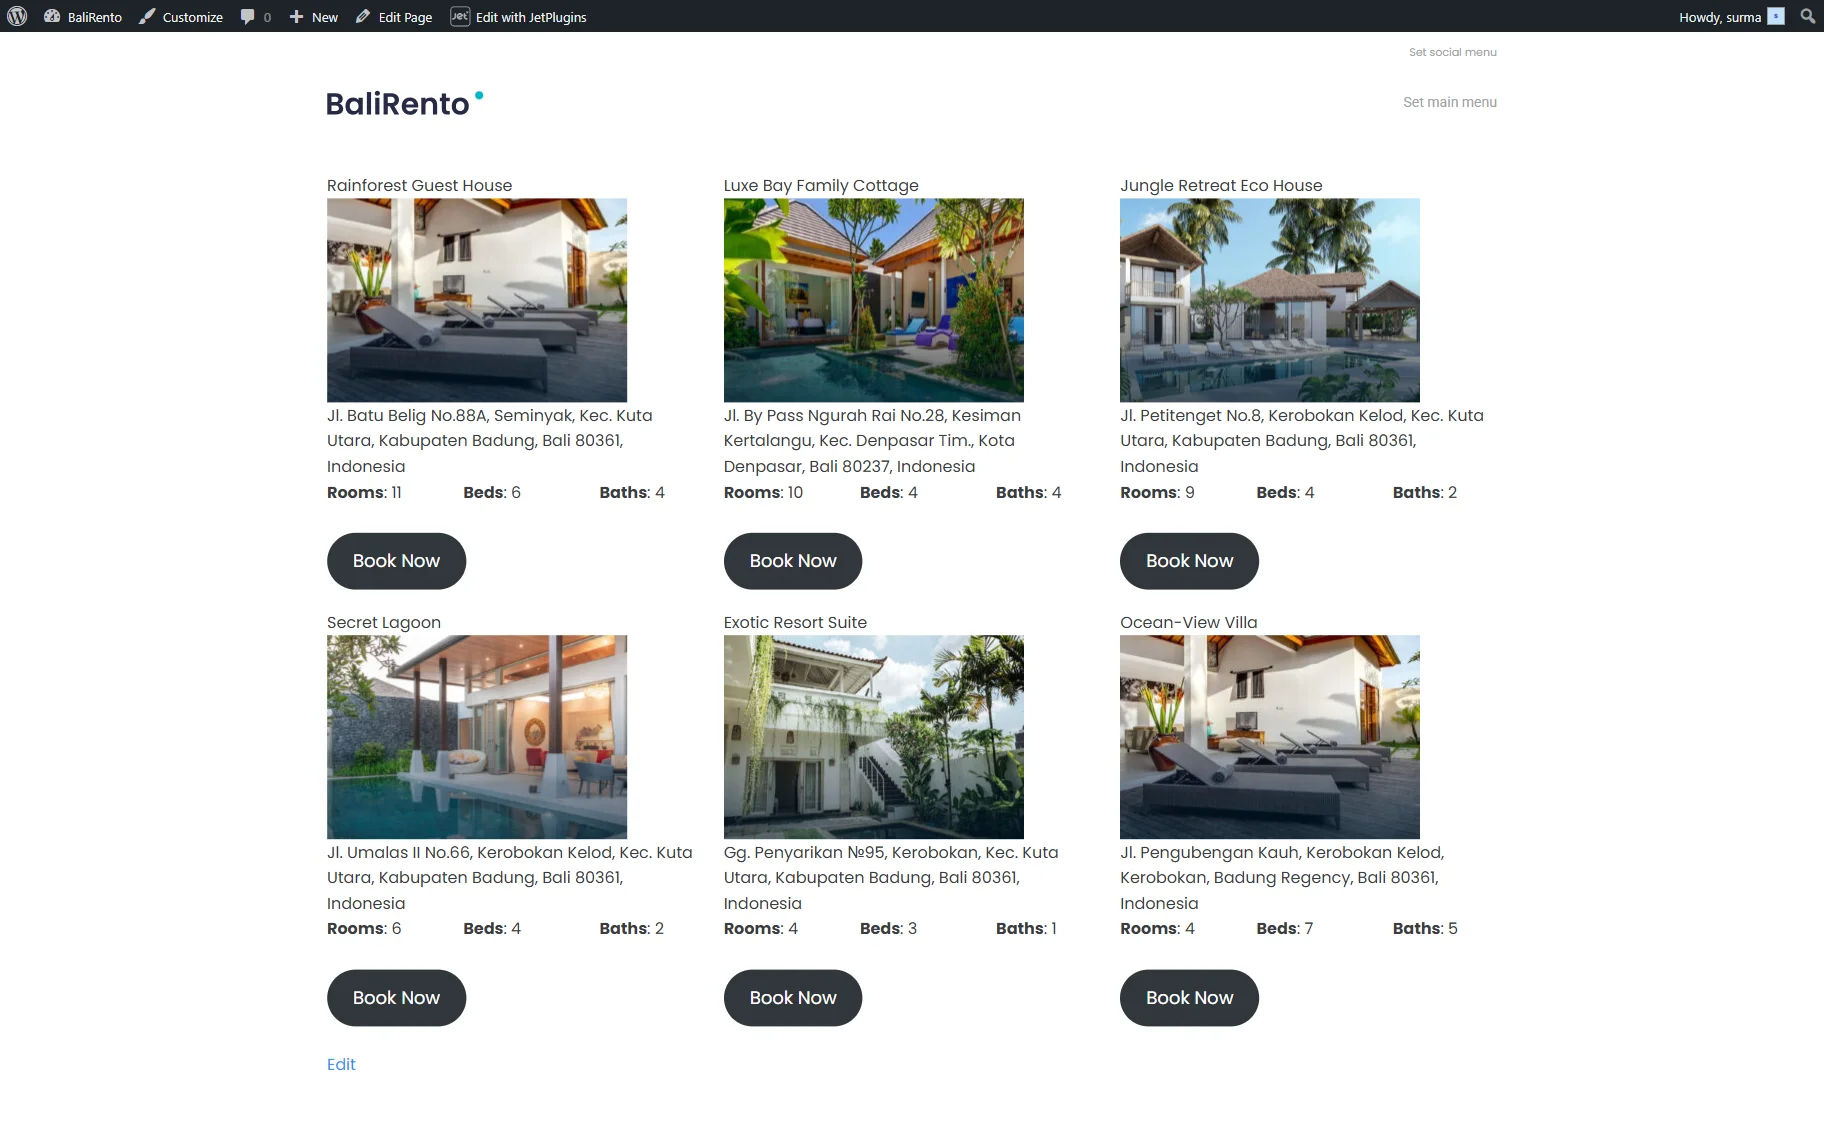
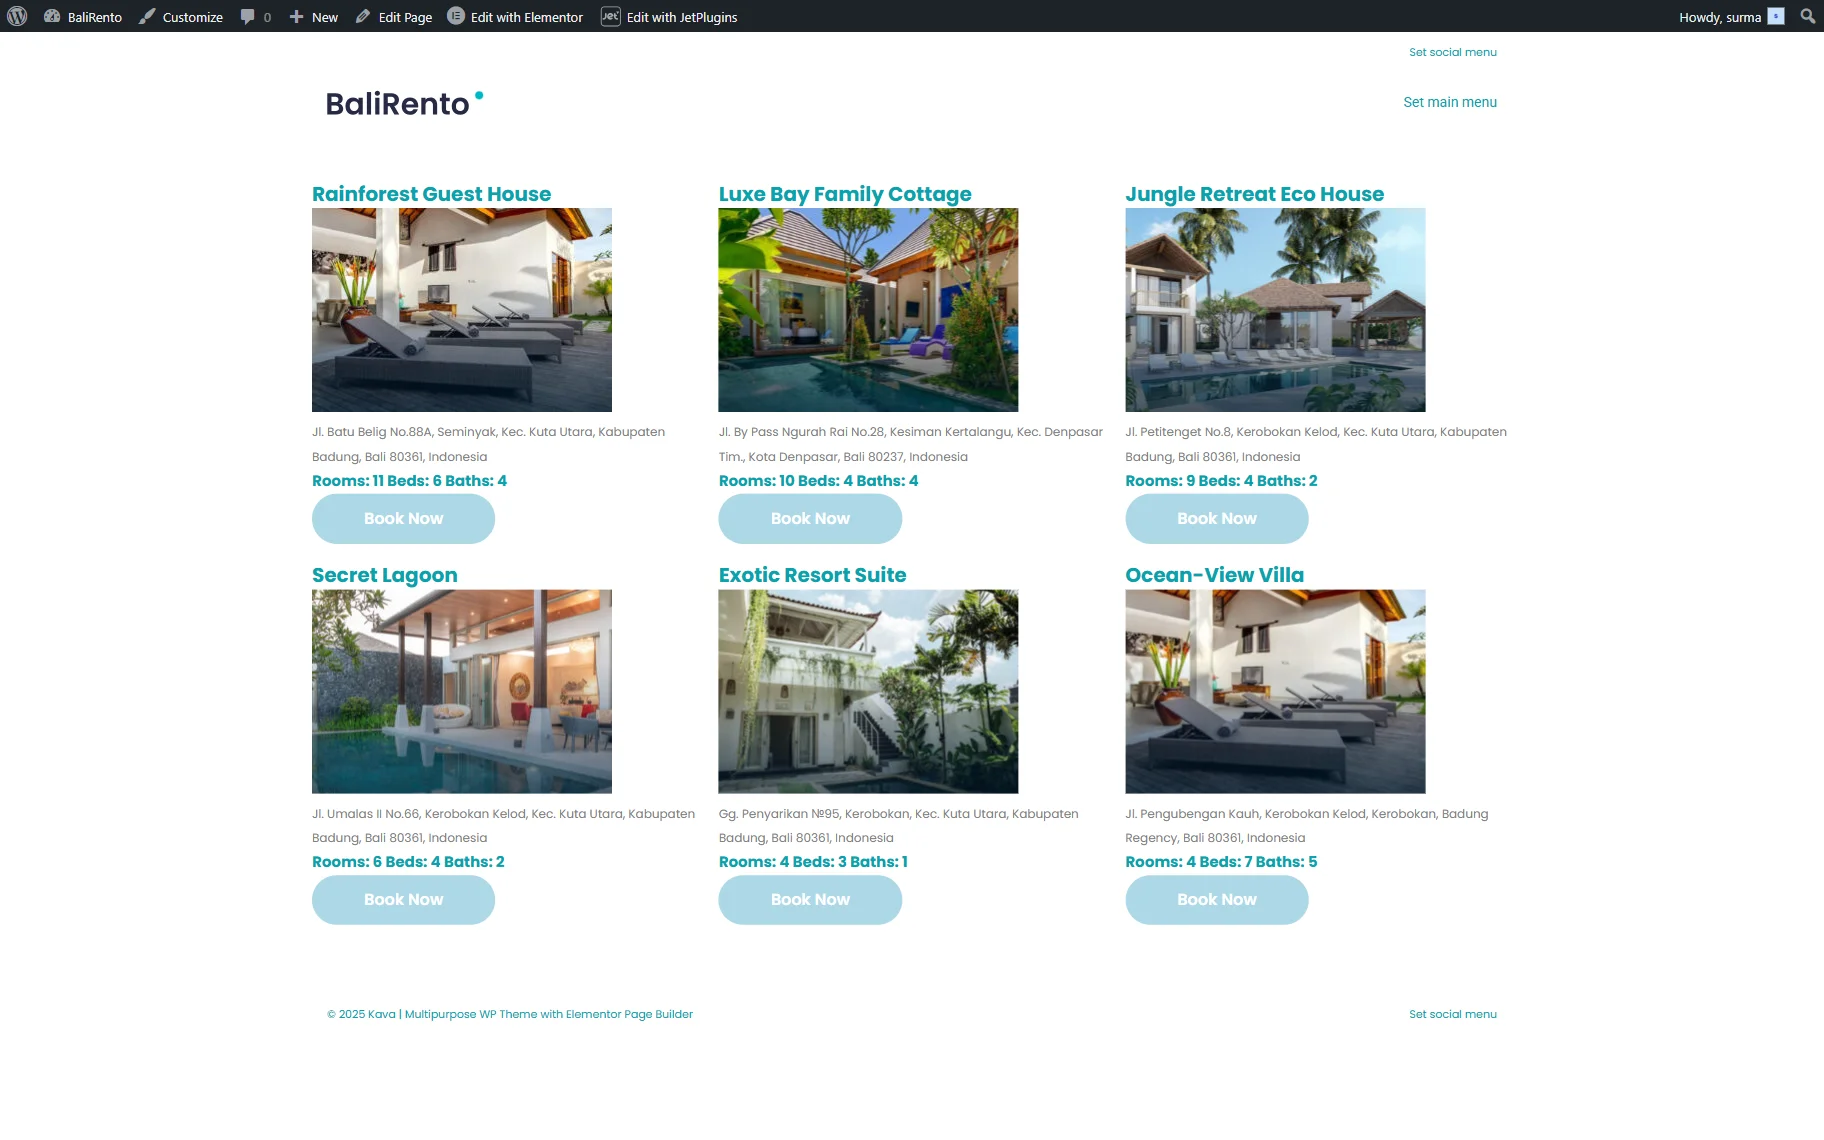
The Listing Grid widget is displayed correctly on the front-end page.
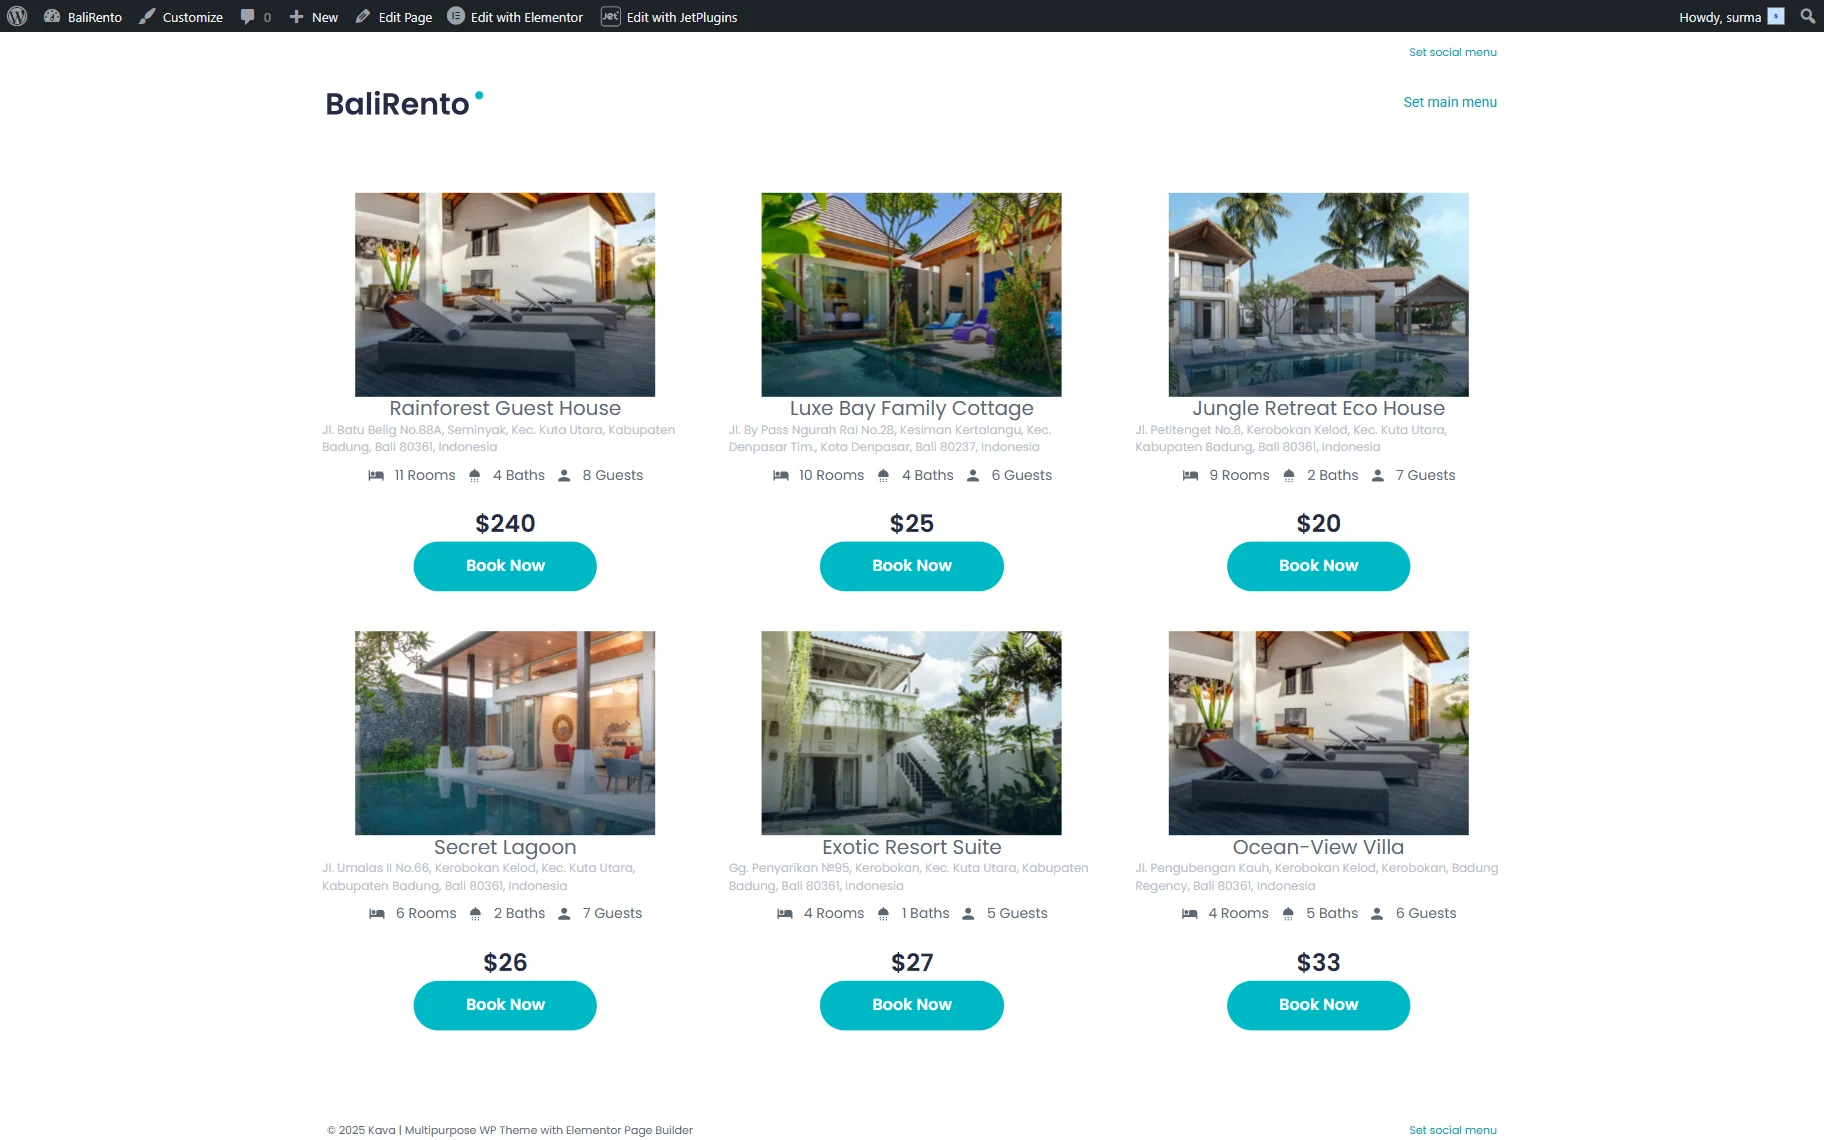
The dynamic pop-up with the form is also displayed on the front page.
Setting Up the Grid with Gutenberg
Let’s focus on setting up the Listing Template with the Gutenberg builder.
Creating the listing
Proceed to WordPress Dashboard > JetEngine > Listings/Components and click the “Add New Item” button.
In the newly appeared Setup Listing Item pop-up, fill in the fields. Keep the “Posts” option for the Listing Source. Select the Instance Booking CPT in the From post type dropdown (“Properties” in this tutorial). Enter the Listing item name and set the “Blocks (Gutenberg)” Listing View.
Then, click the “Create Listing Item” button.
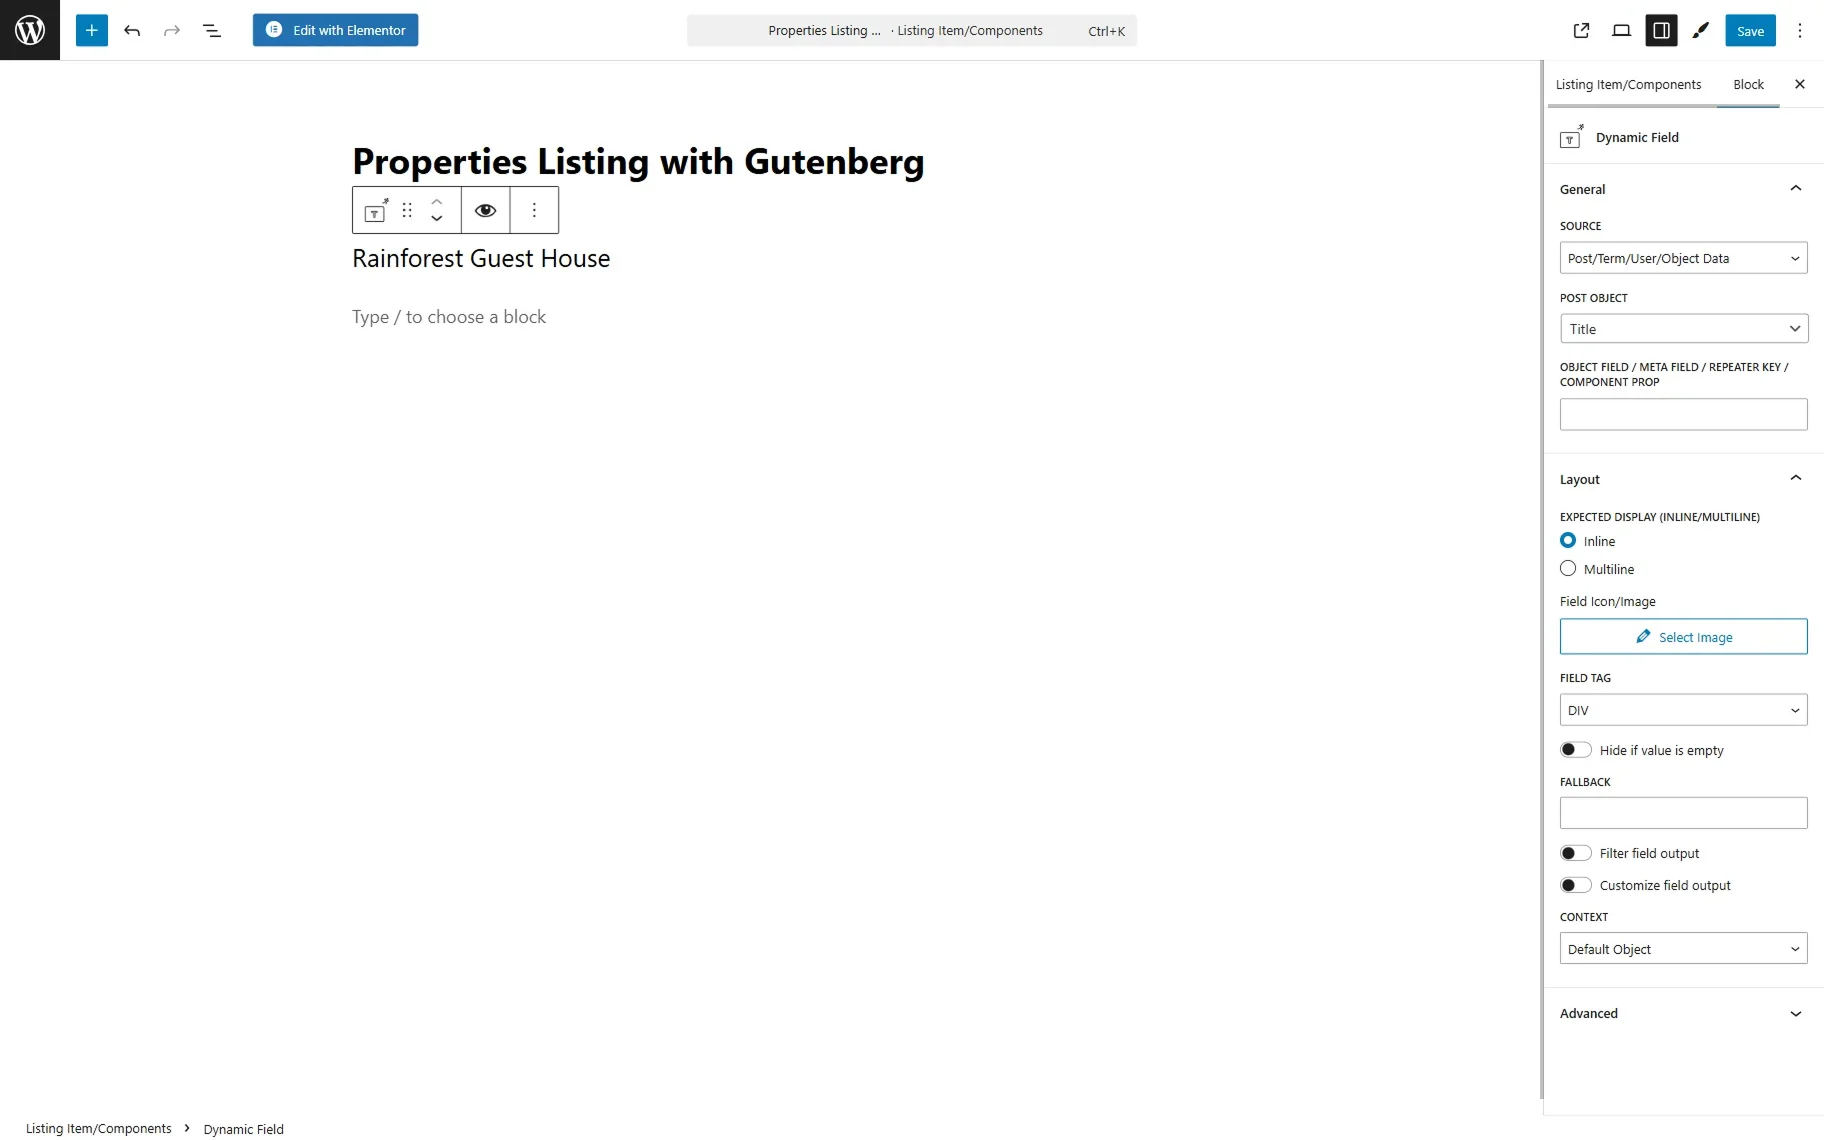
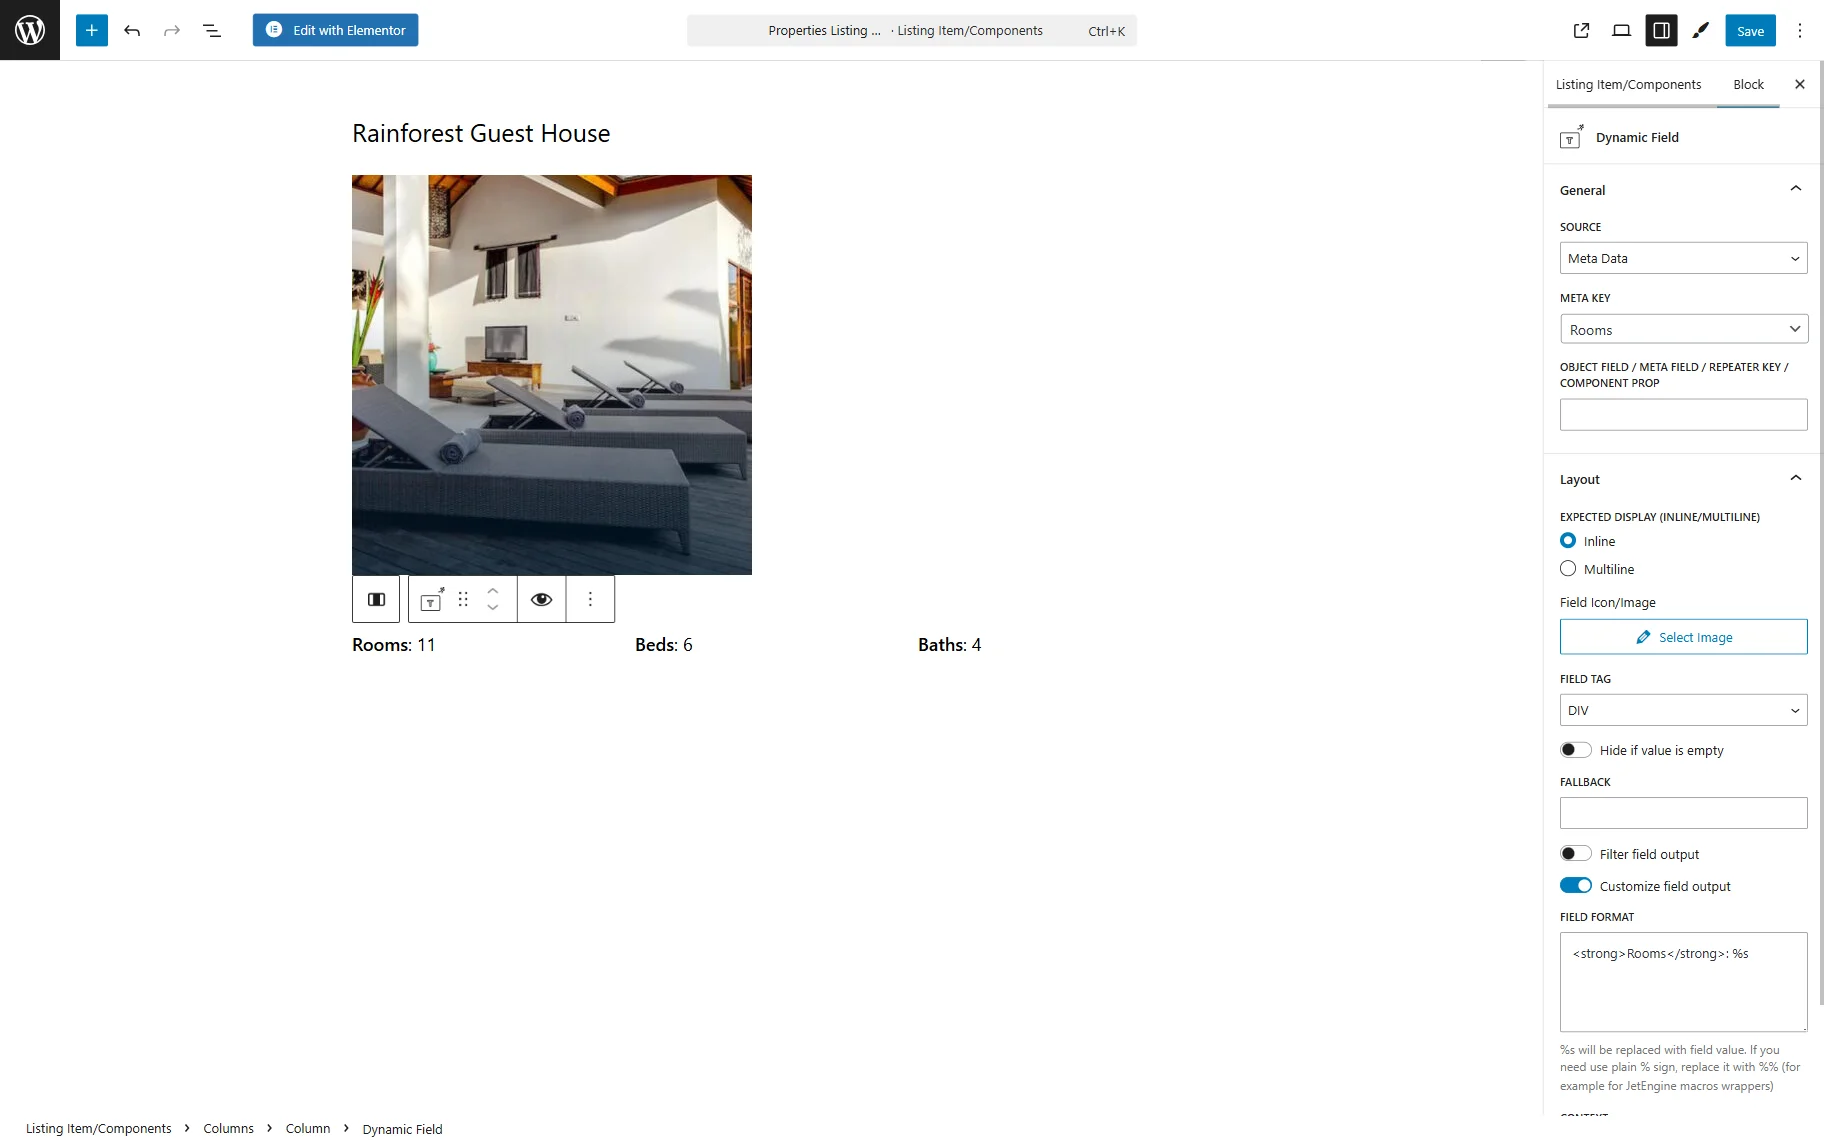
When the editing page is opened, let’s add the Dynamic Field block to display the posts’ titles. Keep the “Post/Term/User/Object” option for the SOURCE and the “Title” from the POST OBJECT dropdown.
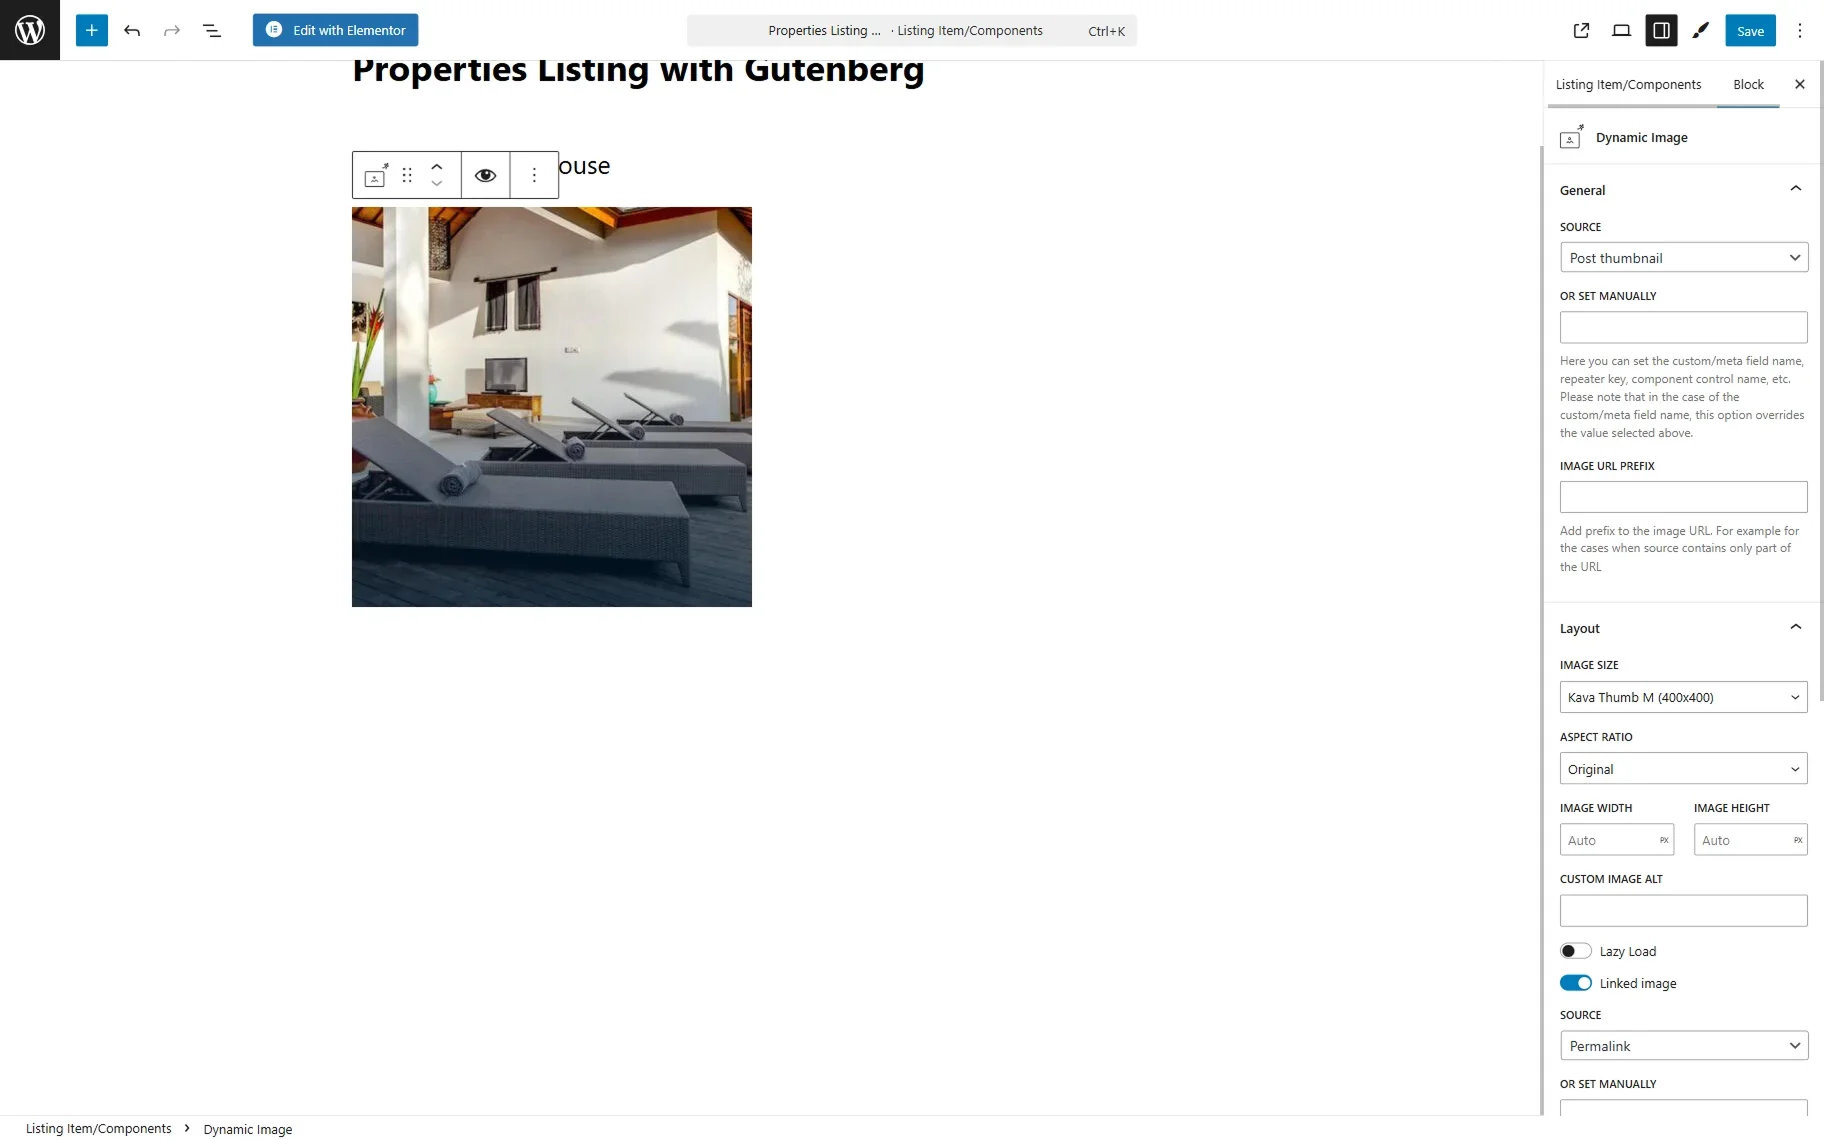
To display the posts’ thumbnail, add the Dynamic Image block. According to the default settings, the block displays a thumbnail so that you can retain the settings. If you need to display the images from the image meta field, you can change it in the SOURCE field.
The Dynamic Field block can be used to display other meta fields. Choose the “Meta Data” for the Source and select the needed Meta Field from the dropdown.
If you need some extra text, you can enable the Customize field output toggle and add the required text to the newly appeared field. Ensure that the “%s” value is kept as it replaces the value of the field.
Adjusting a dynamic pop-up with the booking form
If you would like to add the pop-up with the booking form, ensure that the booking form is created.

Then, create a pop-up using the JetPopup plugin.
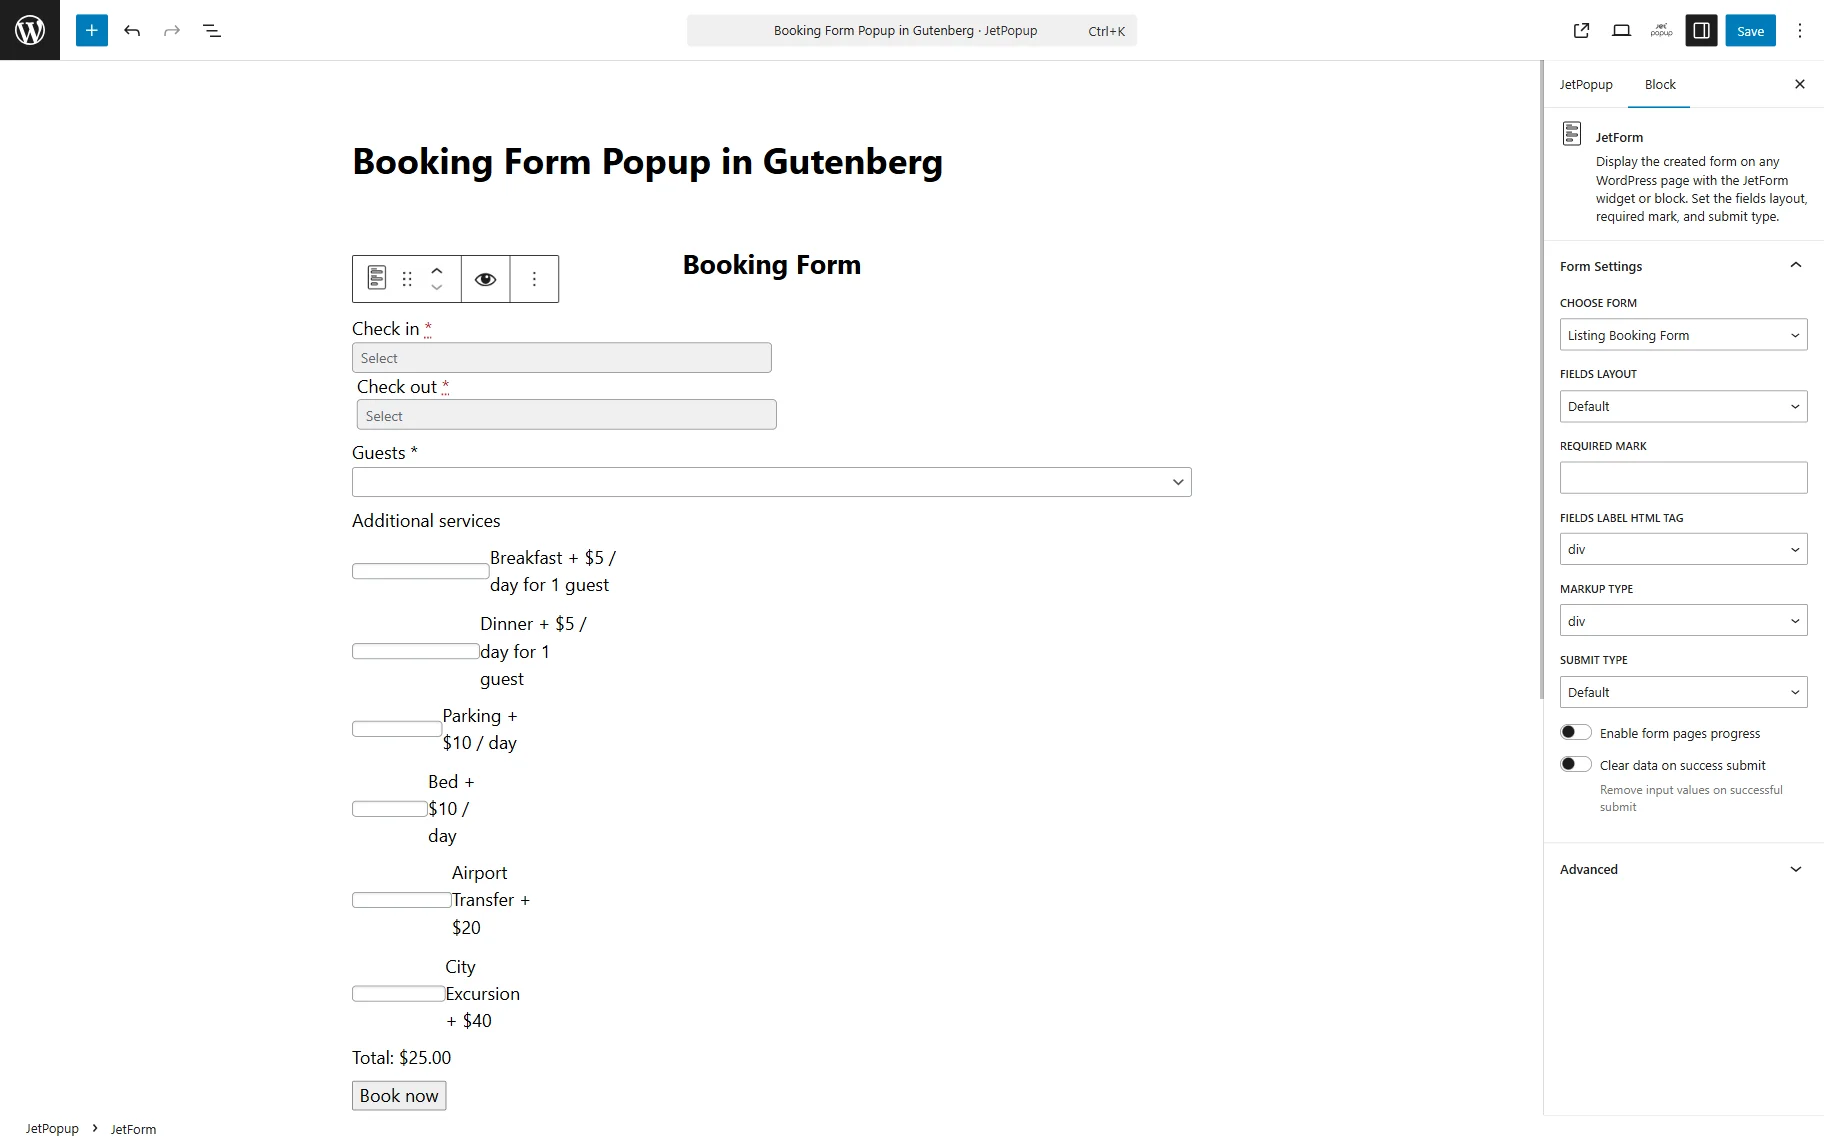
Once you are ready, click the “Save” button. Then, set up the pop-up’s Conditions, as without it, the pop-up will not be displayed on the front.

Open the Listing Item template editing page. Add the Button block and proceed to the Advanced tab. Select the ATTACHED POPUP you created earlier and define the “Click” as a TRIGGER TYPE. Enable the JetEngine Listing Popup toggle.
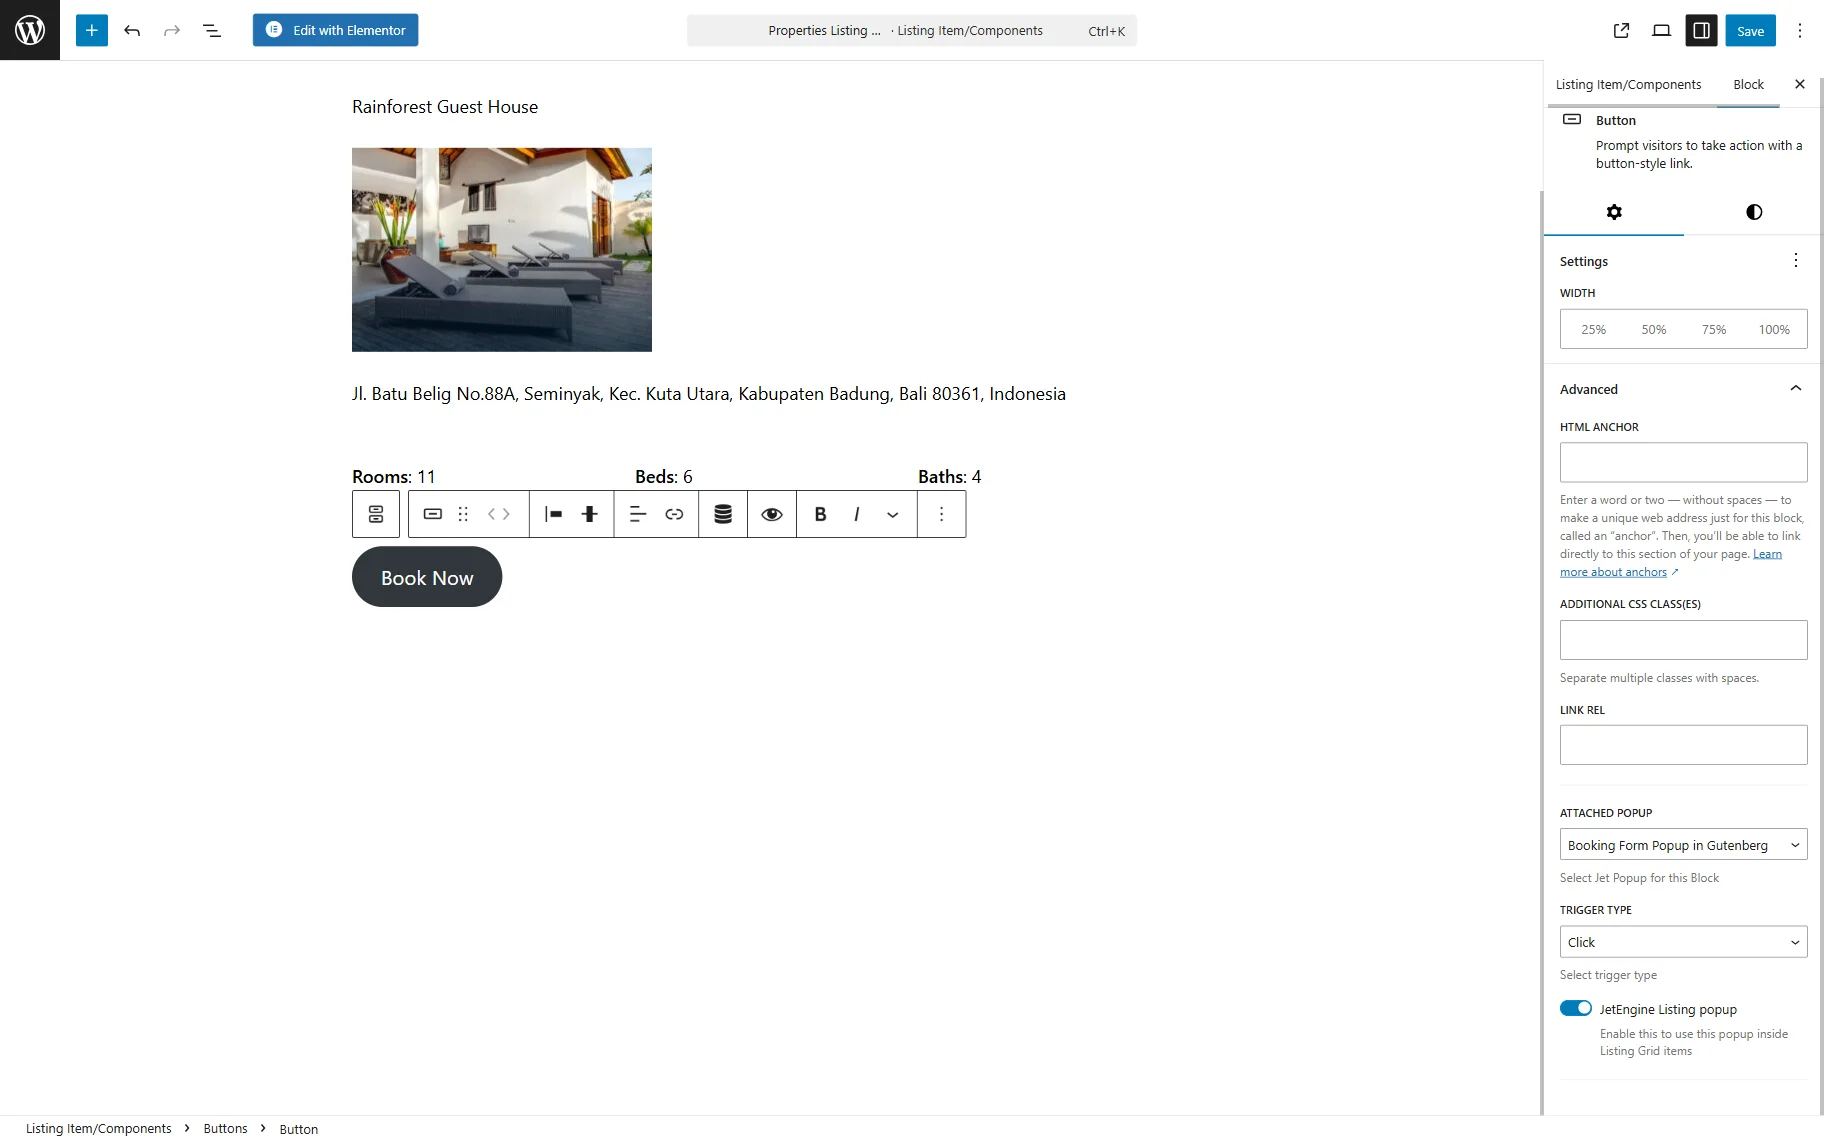
Click the “Save” button once you are ready.
Displaying the listing on the front end
Now, proceed to the page where the grid should be displayed and open it in the builder. Add the Listing Grid block.
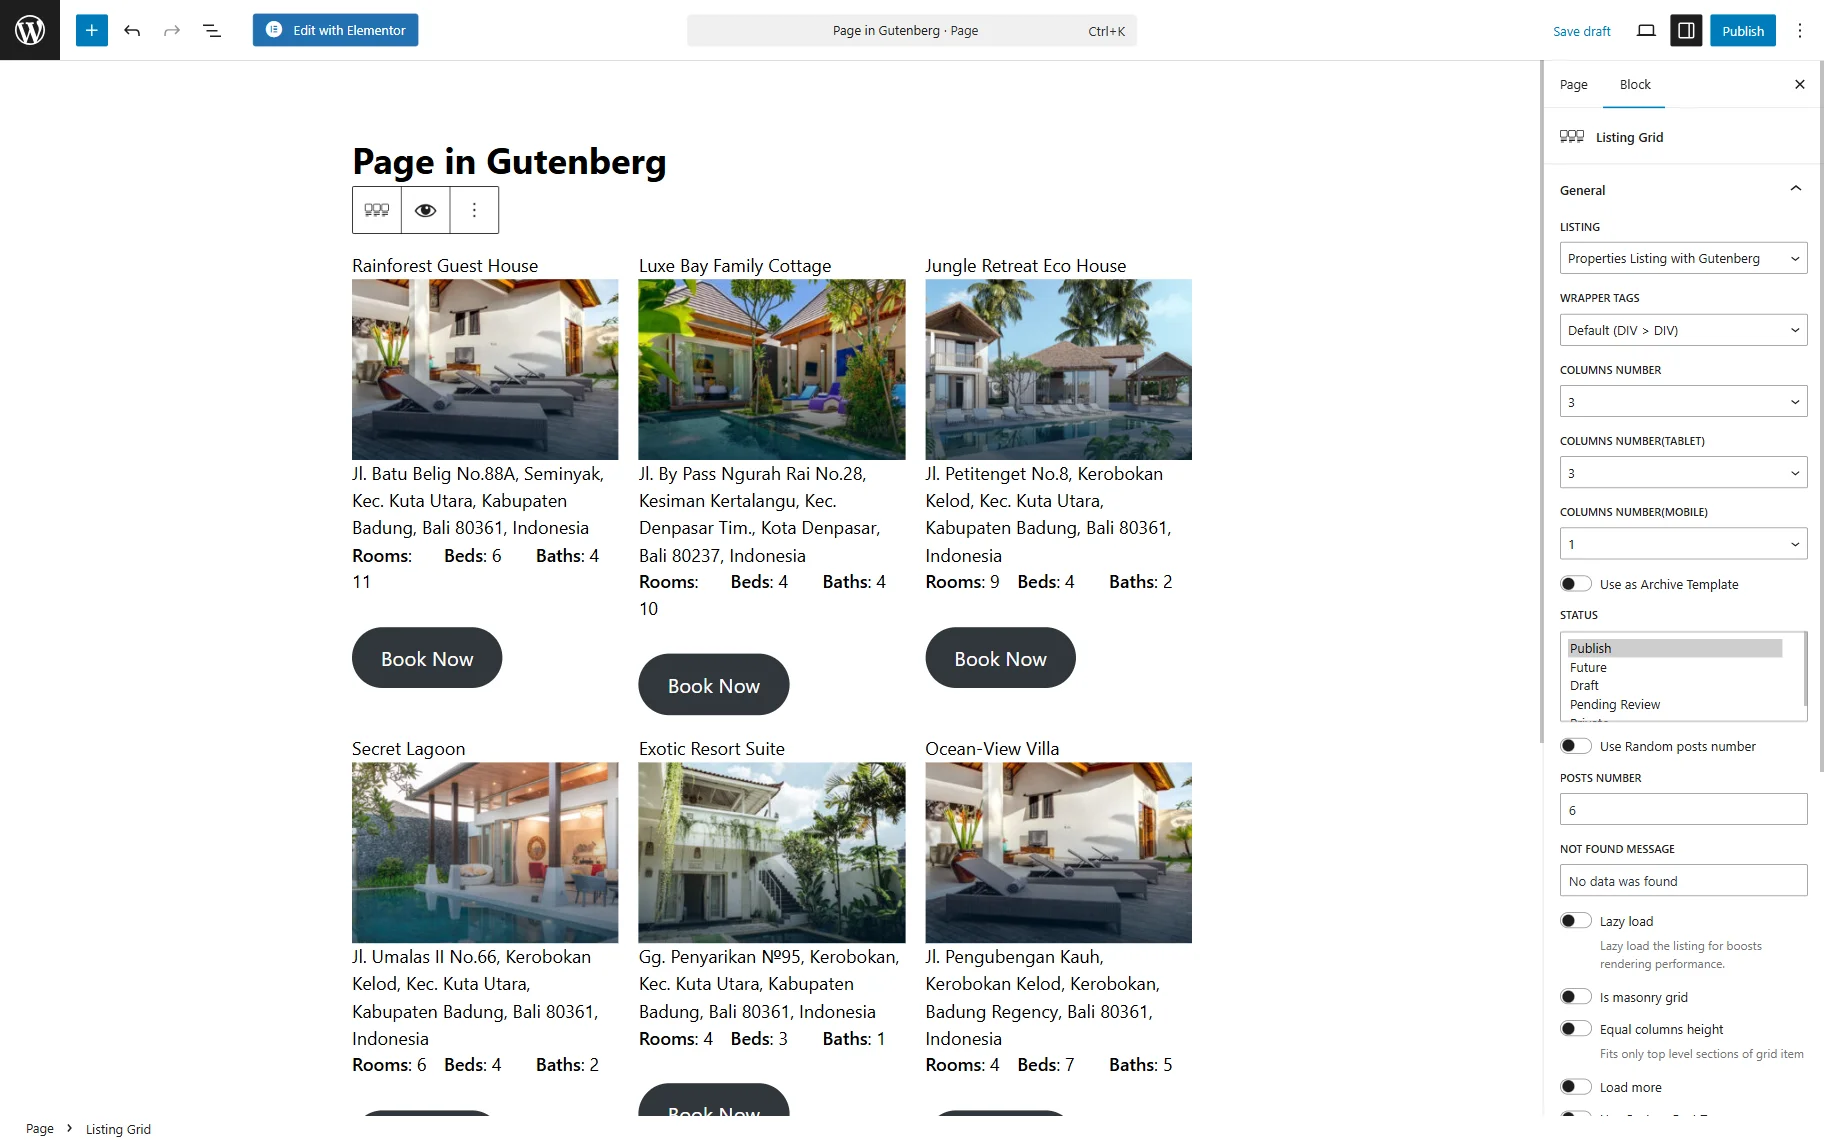
After all the settings are applied, click the “Publish” button.
On the front-end page, the Listing Grid is displayed.
The dynamic pop-up works as well when we click on the “Book Now” buttons.
Setting Up the Grid with the Bricks Builder
In case you use the Bricks builder, you can check our How to Create Listing Items with Bricks guide.
Creating the listing
Proceed to WordPress Dashboard > JetEngine > Listings/Components and click the “Add New Item” button.
In the Setup Listing Item pop-up, keep the “Posts” option for the Listing Source. Select the Instance Booking CPT in the From post type dropdown (“Properties” here). Enter the Listing item name and set the “Bricks” Listing View.
Then, click the “Create Listing Item” button.
When the editing page is opened, we can add information about the CPT with the help of either JetEngine’s widgets, such as Dynamic Field, Dynamic Image, and Dynamic Link, or by using Bricks’ elements with the Dynamic Data.
In this tutorial, we focus on displaying the booking instances’ info using the JetEngine’s Dynamic Widgets.
So, click the “+” shaped icon and add the Dynamic Field to display the posts’ titles. The default settings allow you to display the title, so you can keep it.
In case you would like to make the title clickable, you can use the Dynamic Link element. Keep the “Permalink” Source if you need to redirect users to the single post page. Then, click the Dynamic Data icon and select the “Post Title” option.
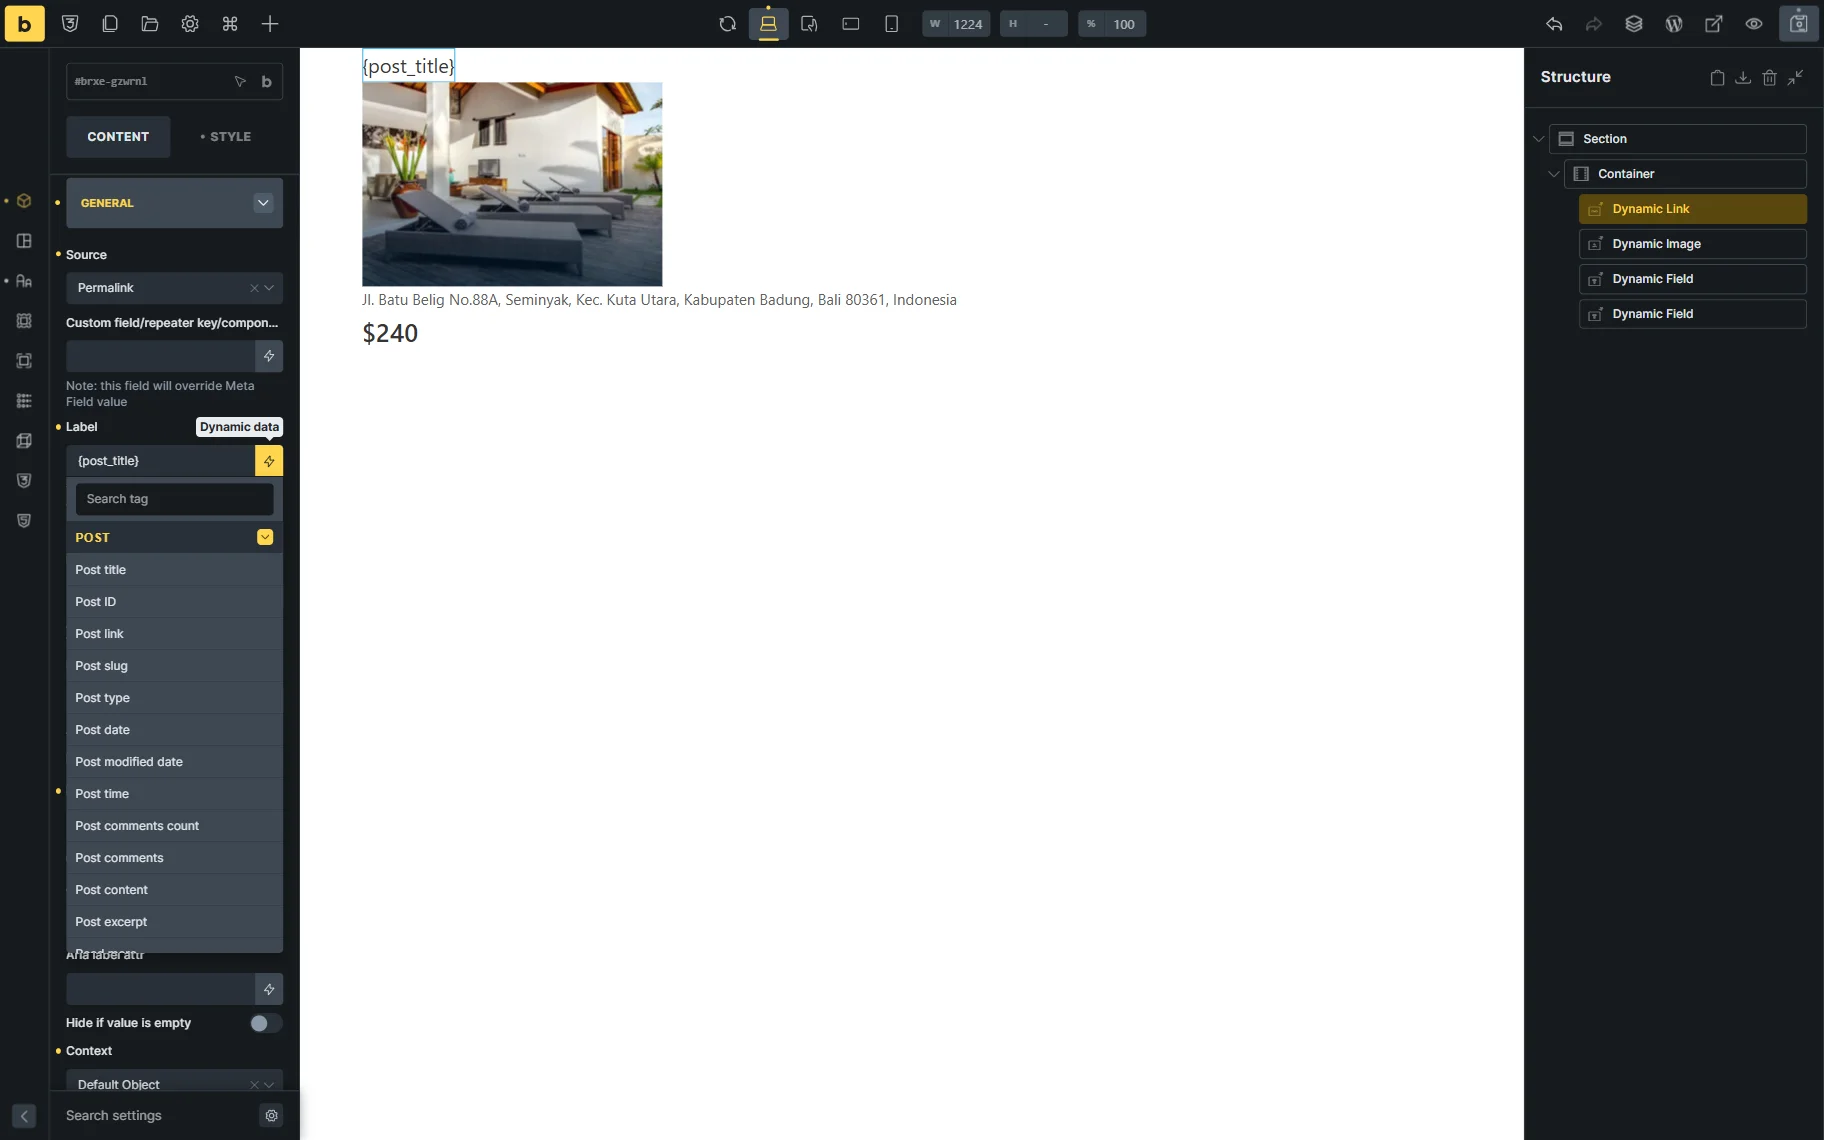
To display the thumbnail of the posts, add the Dynamic Image element. The default settings allow you to display the thumbnail, which enables you to retain the settings. If you need to display the images from the image meta field, you can change it in the Source field.

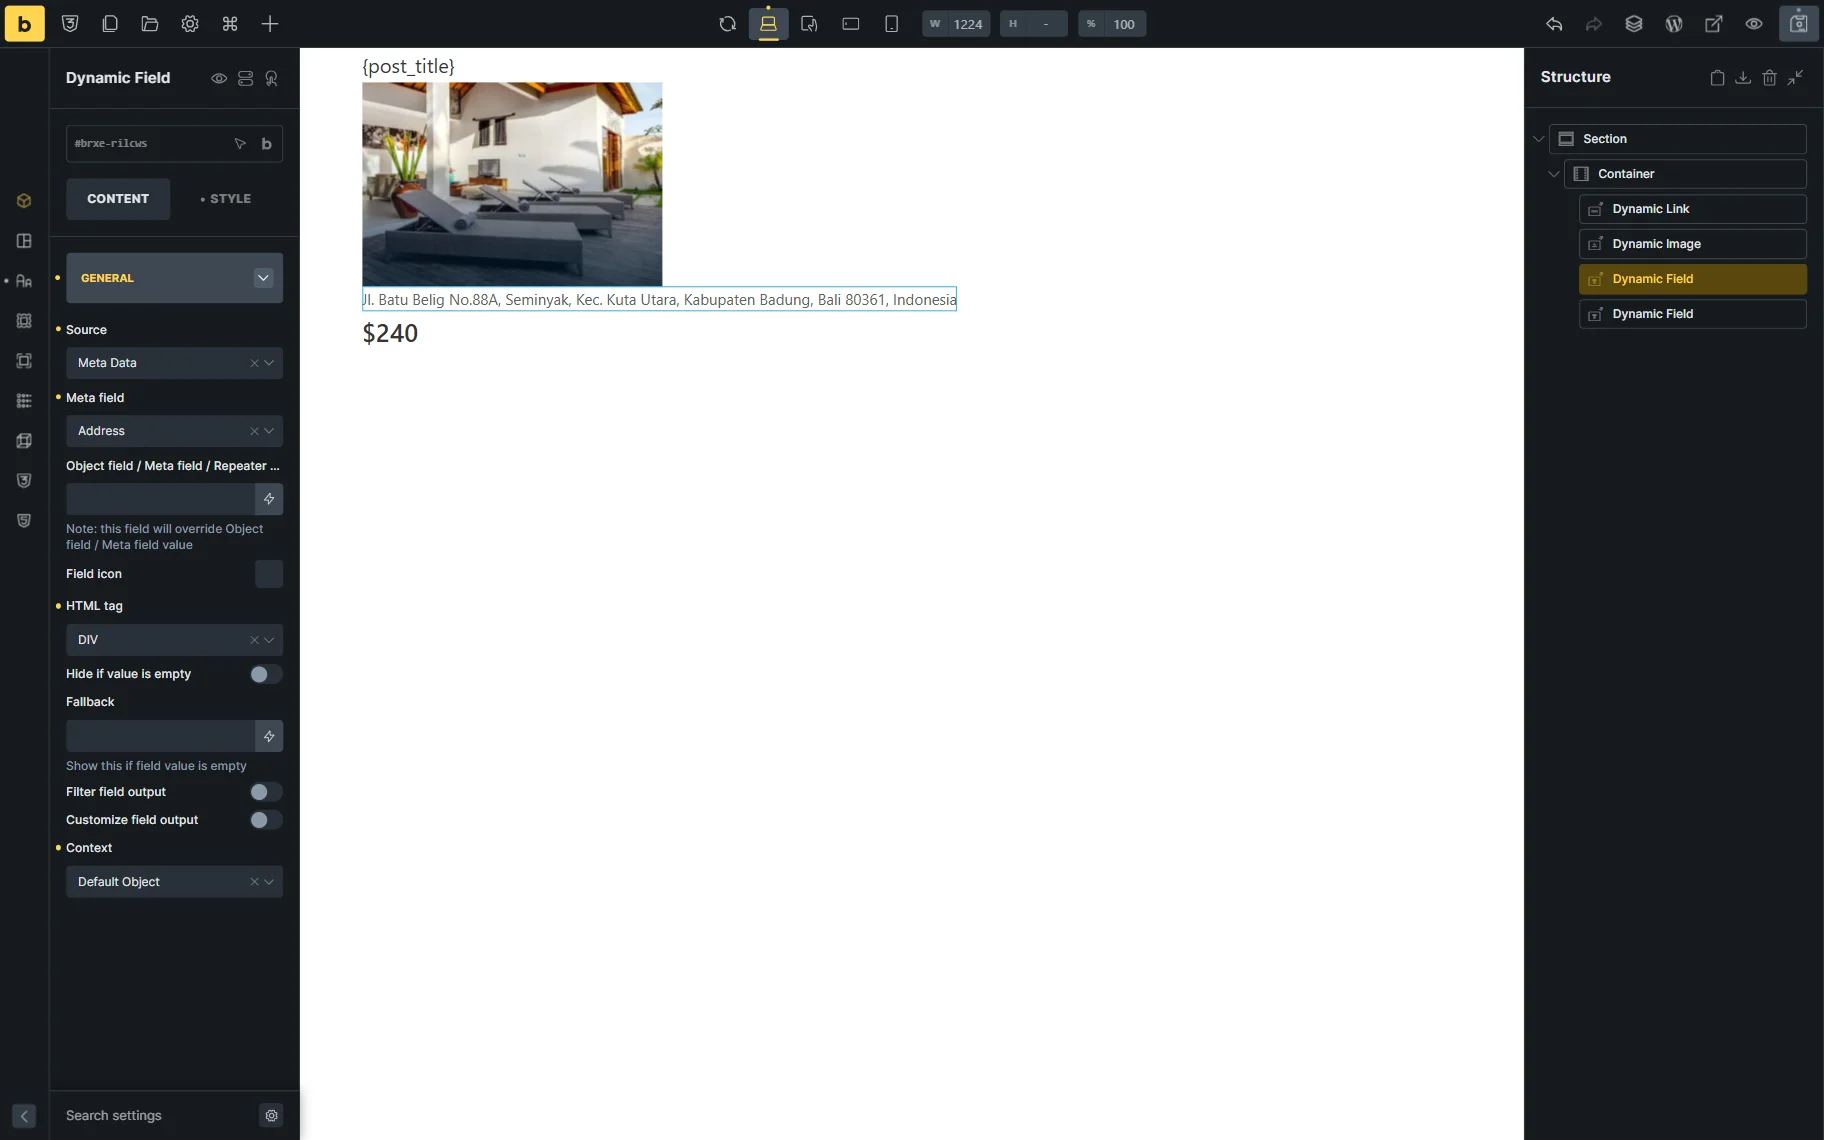
To display meta fields, use the Dynamic Field. Choose the “Meta Data” for the Source and select the needed Meta Field from the dropdown.
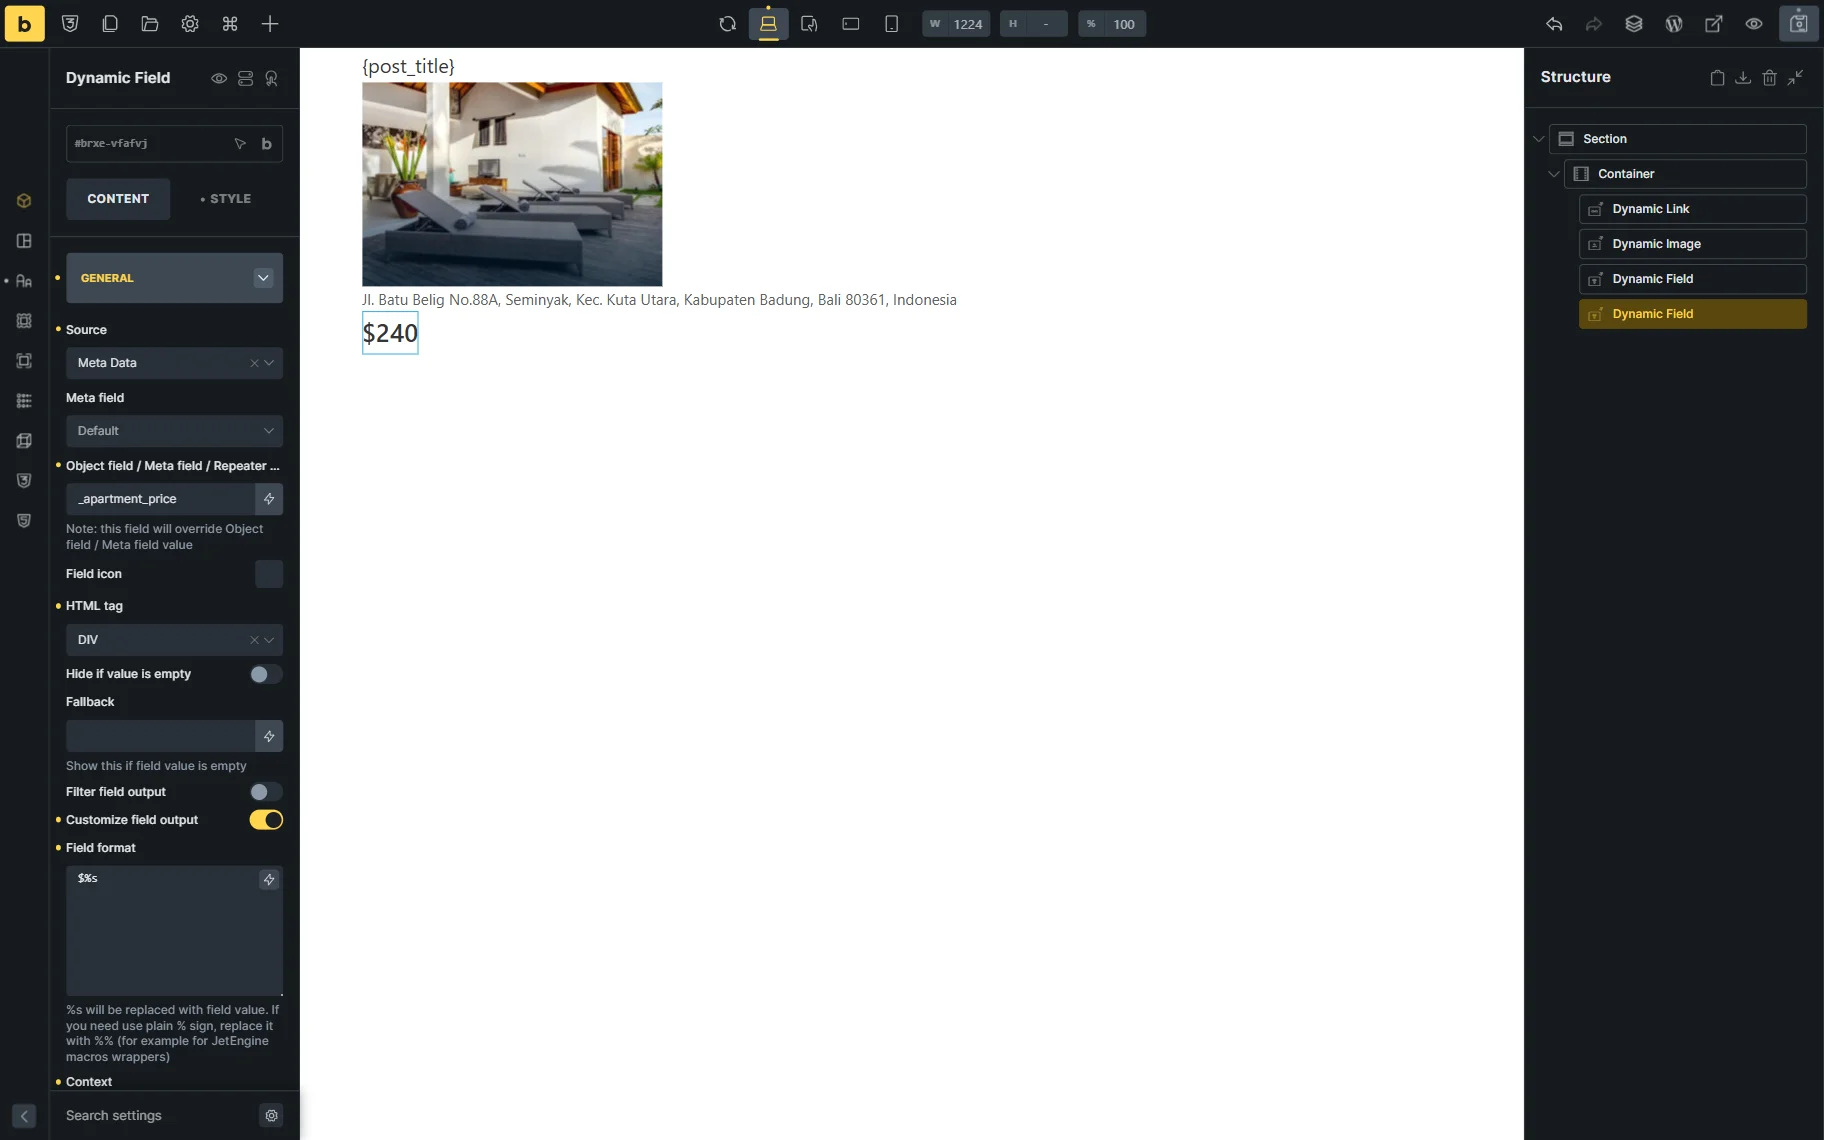
To display the booking price, you need to add the Dynamic Field element, select the “Meta Data” for the Source, and add the “_apartment_price” in the Object field / Meta field / Repeater key / Component prop field.
Adjusting a dynamic pop-up with the booking form
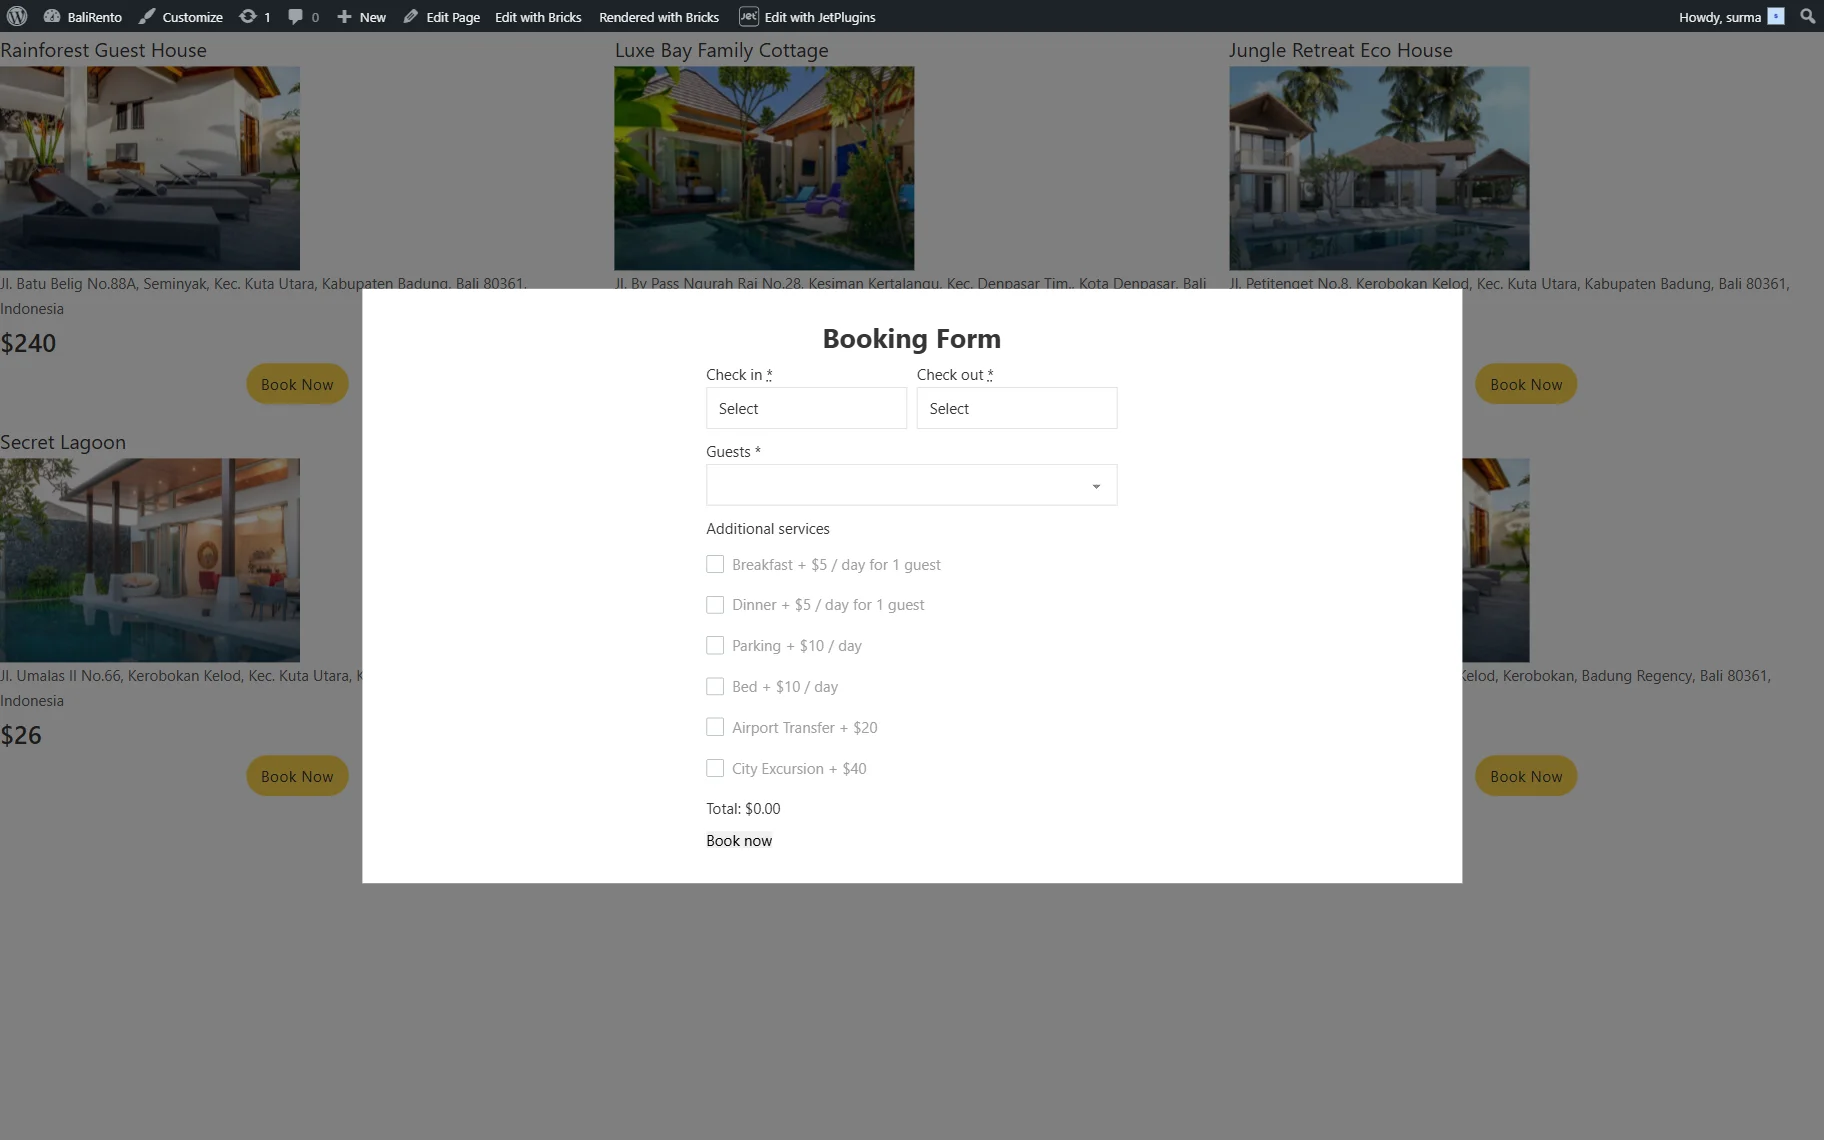
Unfortunately, the dynamic pop-up from JetPopup does not work in the Bricks builder. Alternatively, you can create a pop-up using the Bricks builder.
Ensure that the booking form is created.

Set up the pop-up in the Bricks builder. Once the pop-up is created, click the “gear” icon in the top tab, and in the Conditions tab, select the condition according to which the pop-up will be displayed.
Then, open the listing template and add a Button element. Click the “Interaction” button. Select the “Click” Trigger and choose the “Show Element” Action. Select the “Popup” as a Target, and in the newly appeared field, select the pop-up you created earlier.
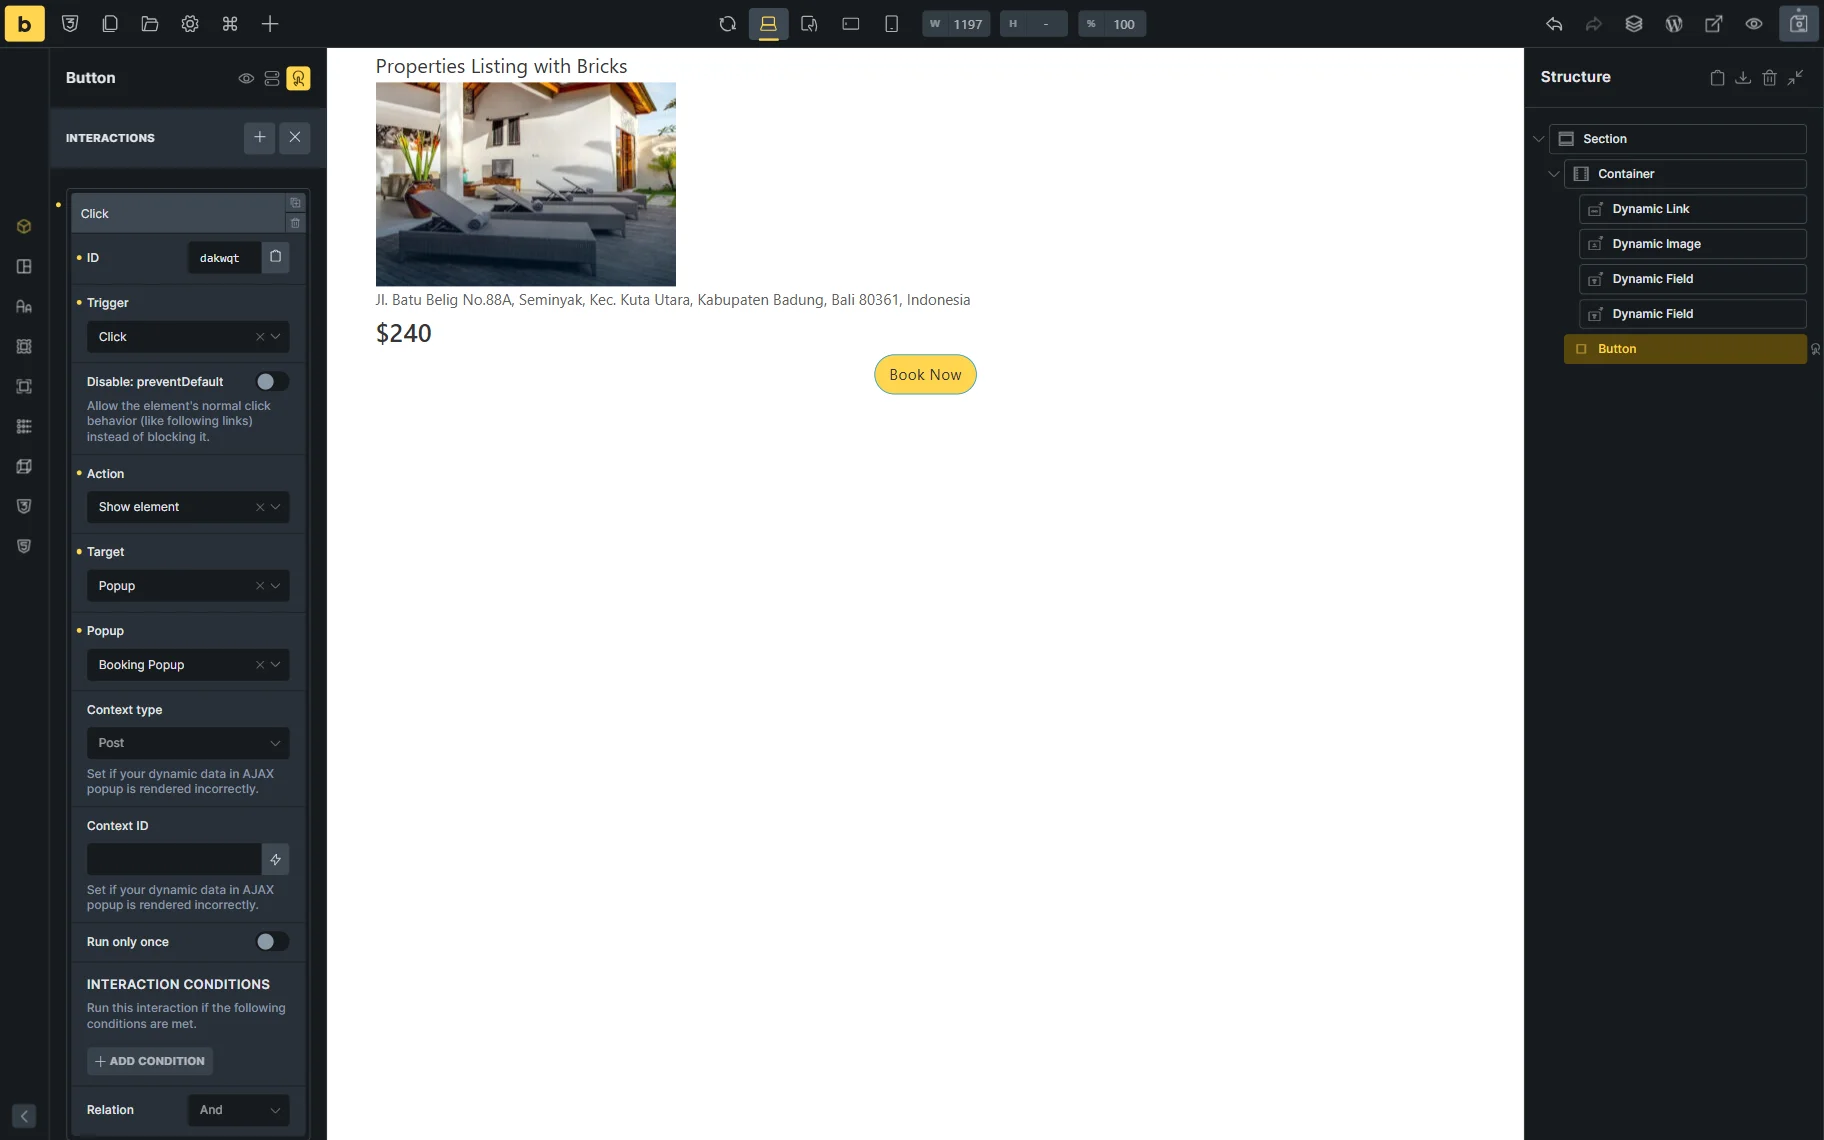
Click the “Save” button once you are ready with the settings.
Displaying the listing on the front end
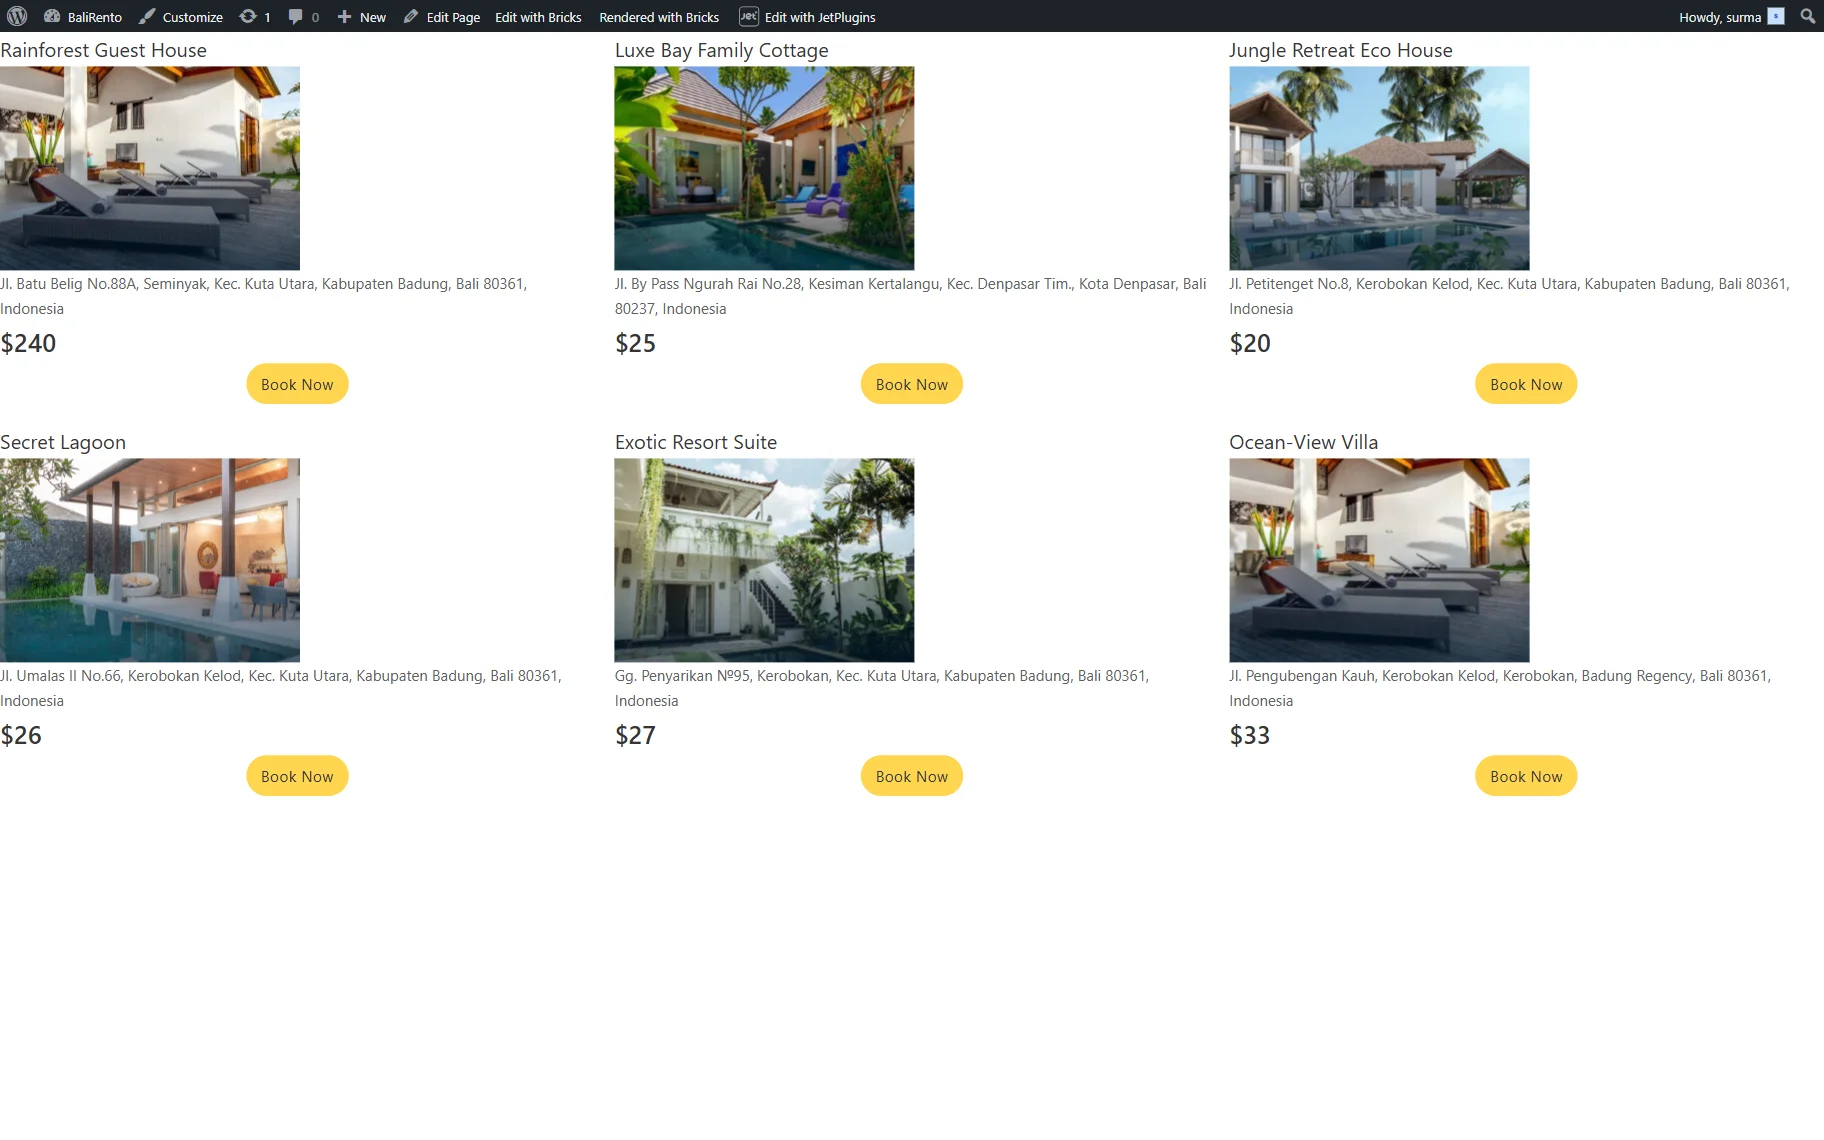
Open the page where you need to display the grid in the Bricks builder. Add the Listing Grid element and select the listing you have created in the Listing input.
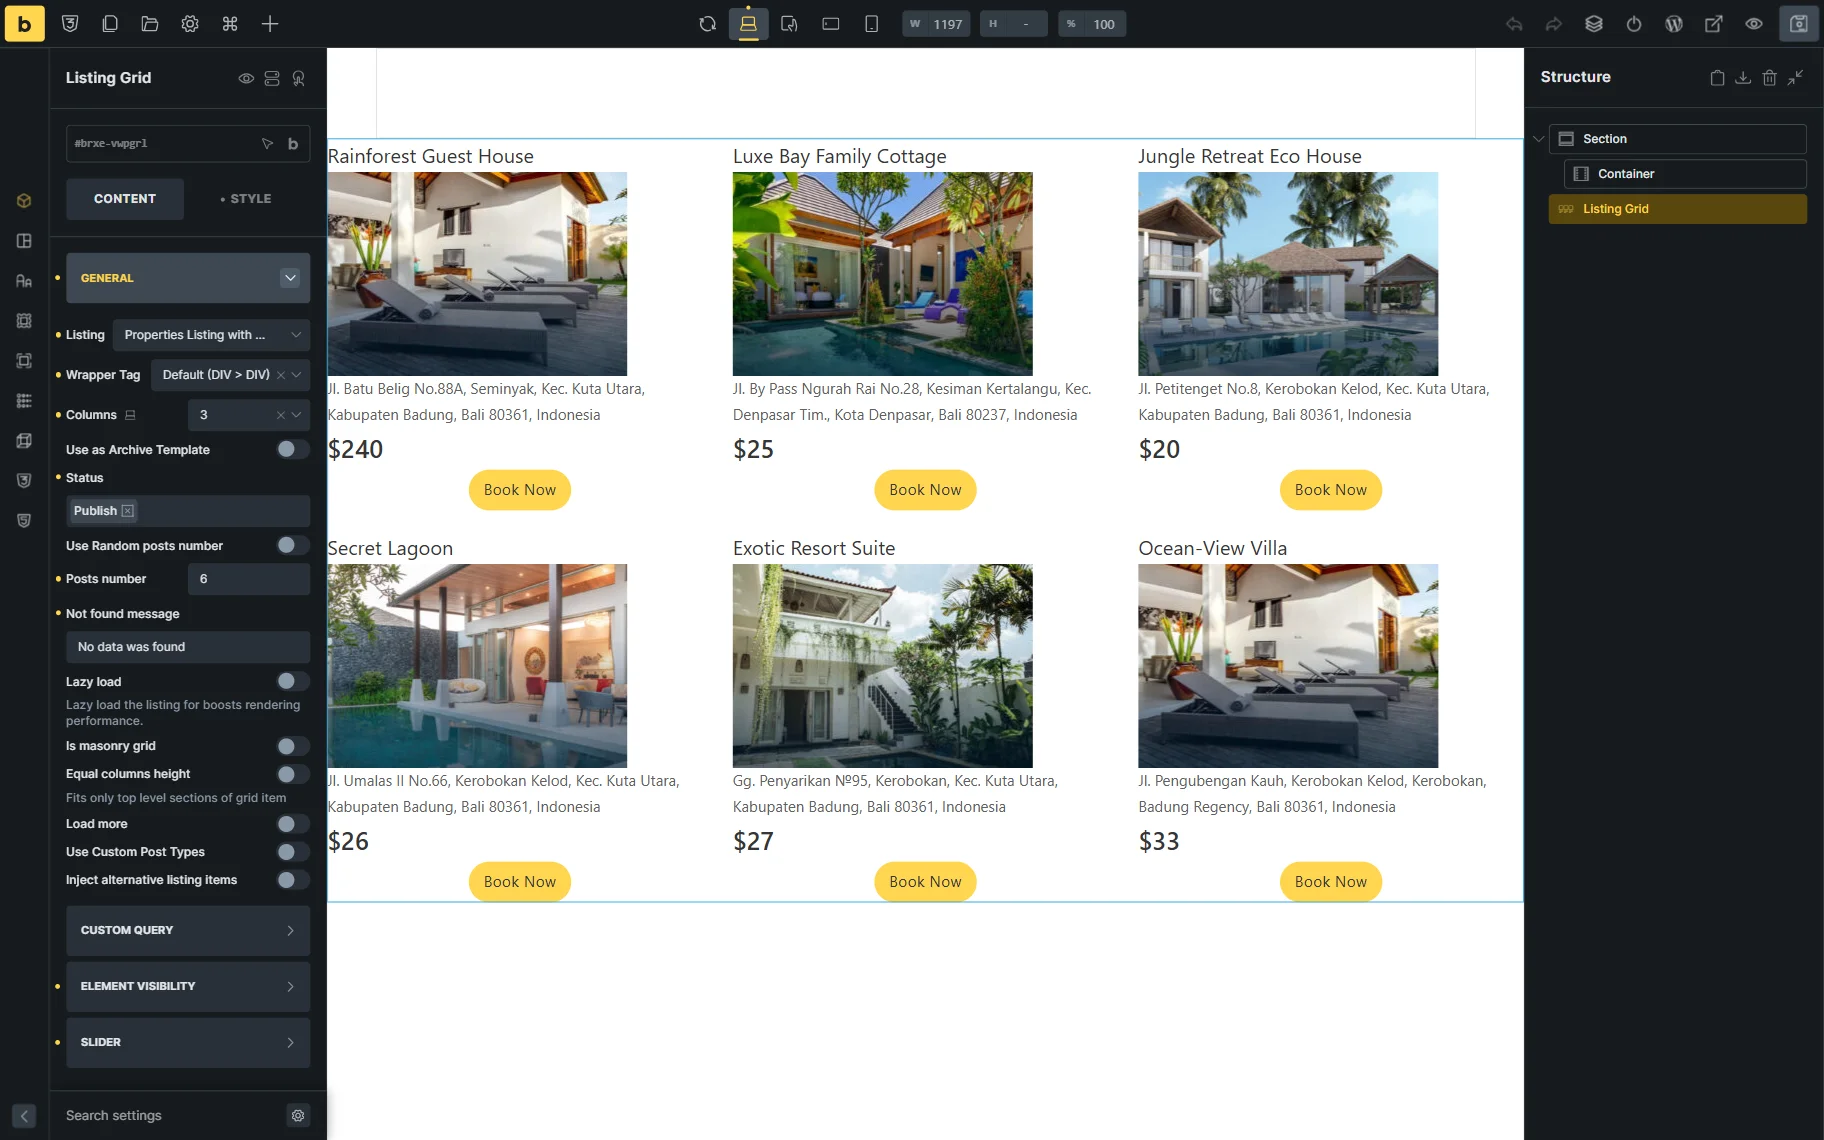
When you are ready with the settings, click the “Save” button and open the front-end page.
The Bricks’ pop-up is also displayed on the front end.
Setting Up the Grid with the Timber/Twig
This part of the tutorial focuses on setting up a grid using Timber/Twig. Refer to our How to Create a Listing Template Using Timber/Twig View guide to review the settings’ details.
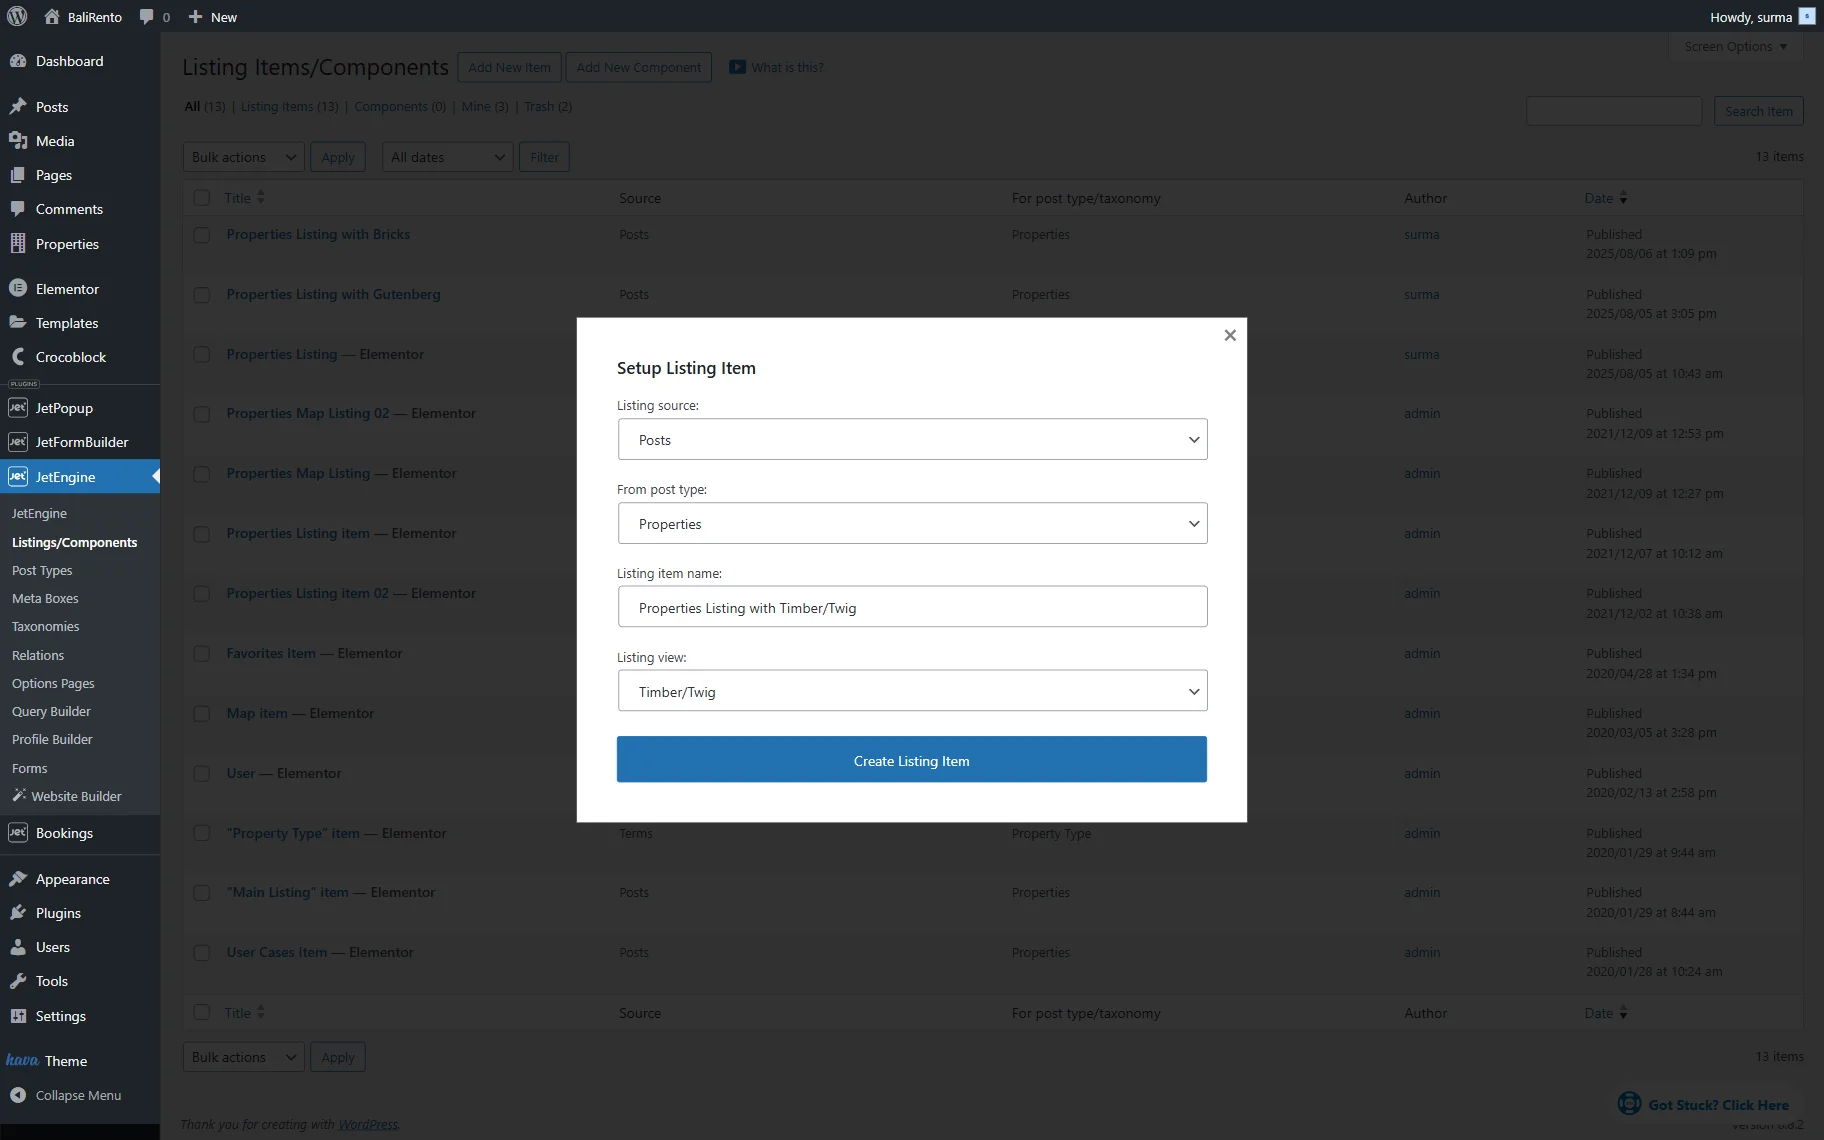
Creating the listing
Proceed to WordPress Dashboard > JetEngine > Listings/Components and click the “Add New Item” button.
In the Setup Listing Item pop-up, keep the “Posts” option for the Listing Source. Select the Instance Booking CPT in the From post type dropdown (“Properties” in this case). Enter the Listing item name and set the “Timber/Twig” Listing View.
Then, click the “Create Listing Item” button.
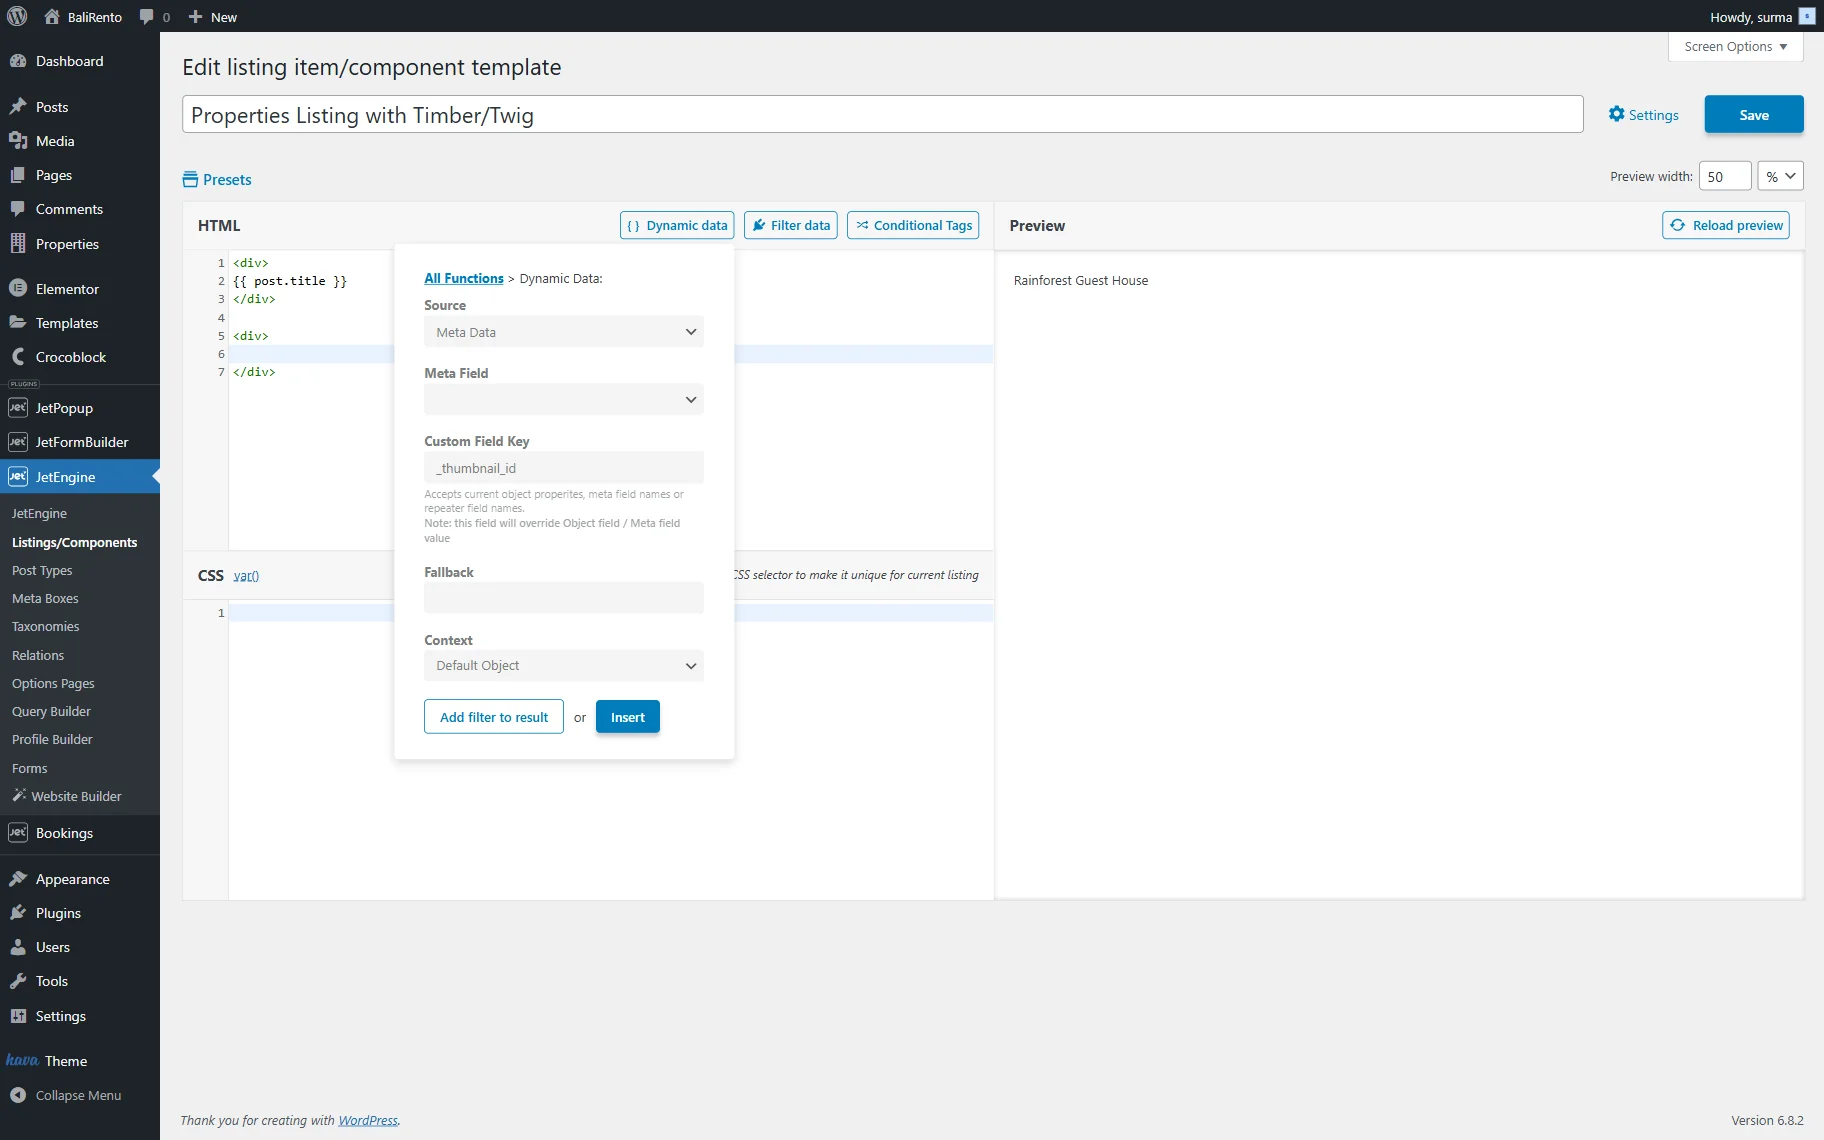
When the editing page is opened, firstly, we will display the post title. For that, we hit the “Dynamic Data” button and pick the “Post” option. From the Select data to show dropdown, choose the “Post Title” and click the “Insert” button.

The {{ post.title }} placeholder will be inserted into the sheet. It can also be typed manually, without using the “Dynamic Data” functionality.
To display the post’s thumbnail, click the “Dynamic Data” button again and pick the “Dynamic Data” option. In the pop-up, we selected the “Meta Data” Source and entered the “_thumbnail_id” Custom Field Key. Then, we hit the “Add filter to result” button.
We picked the “JetEngine Callback.” Then, we selected the “Get image by ID” from the Callback function dropdown menu. This option also allows us to pick the Image size.
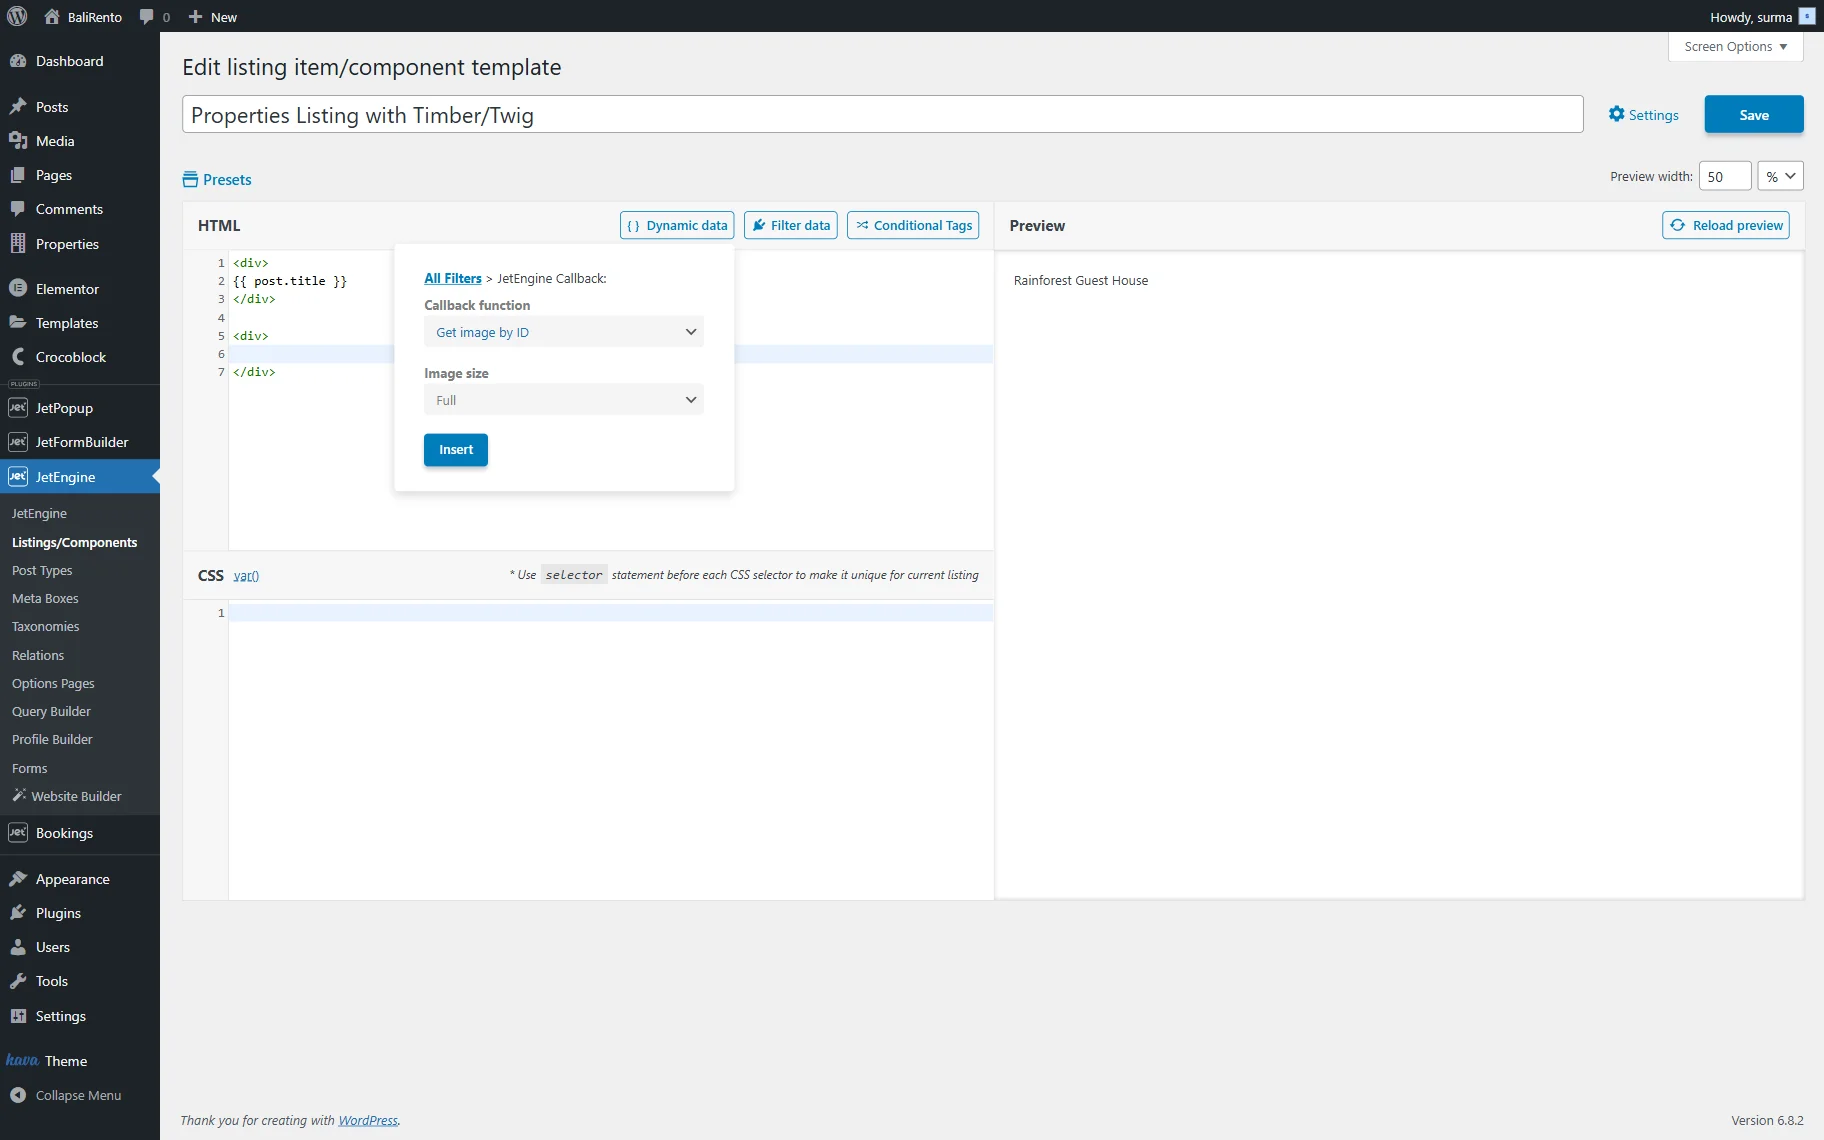
Then, click the “Insert” button.
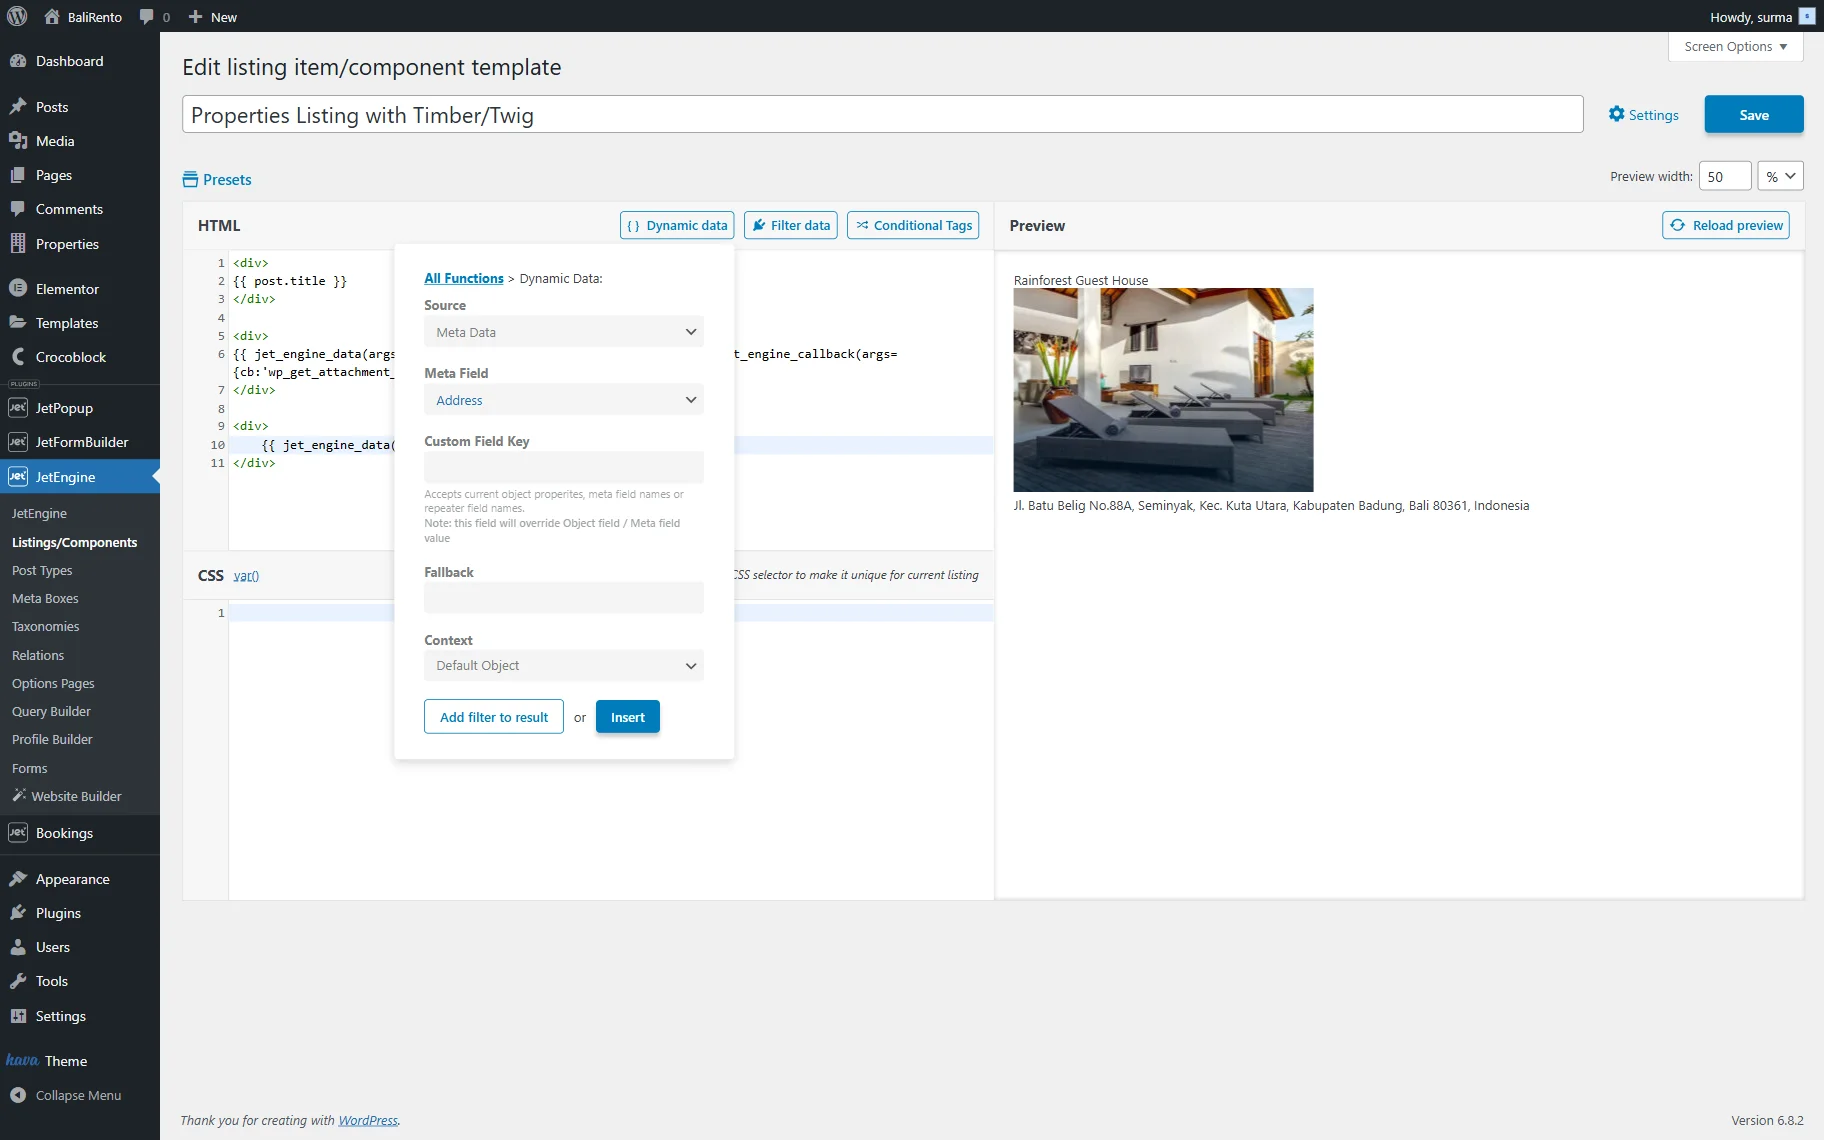
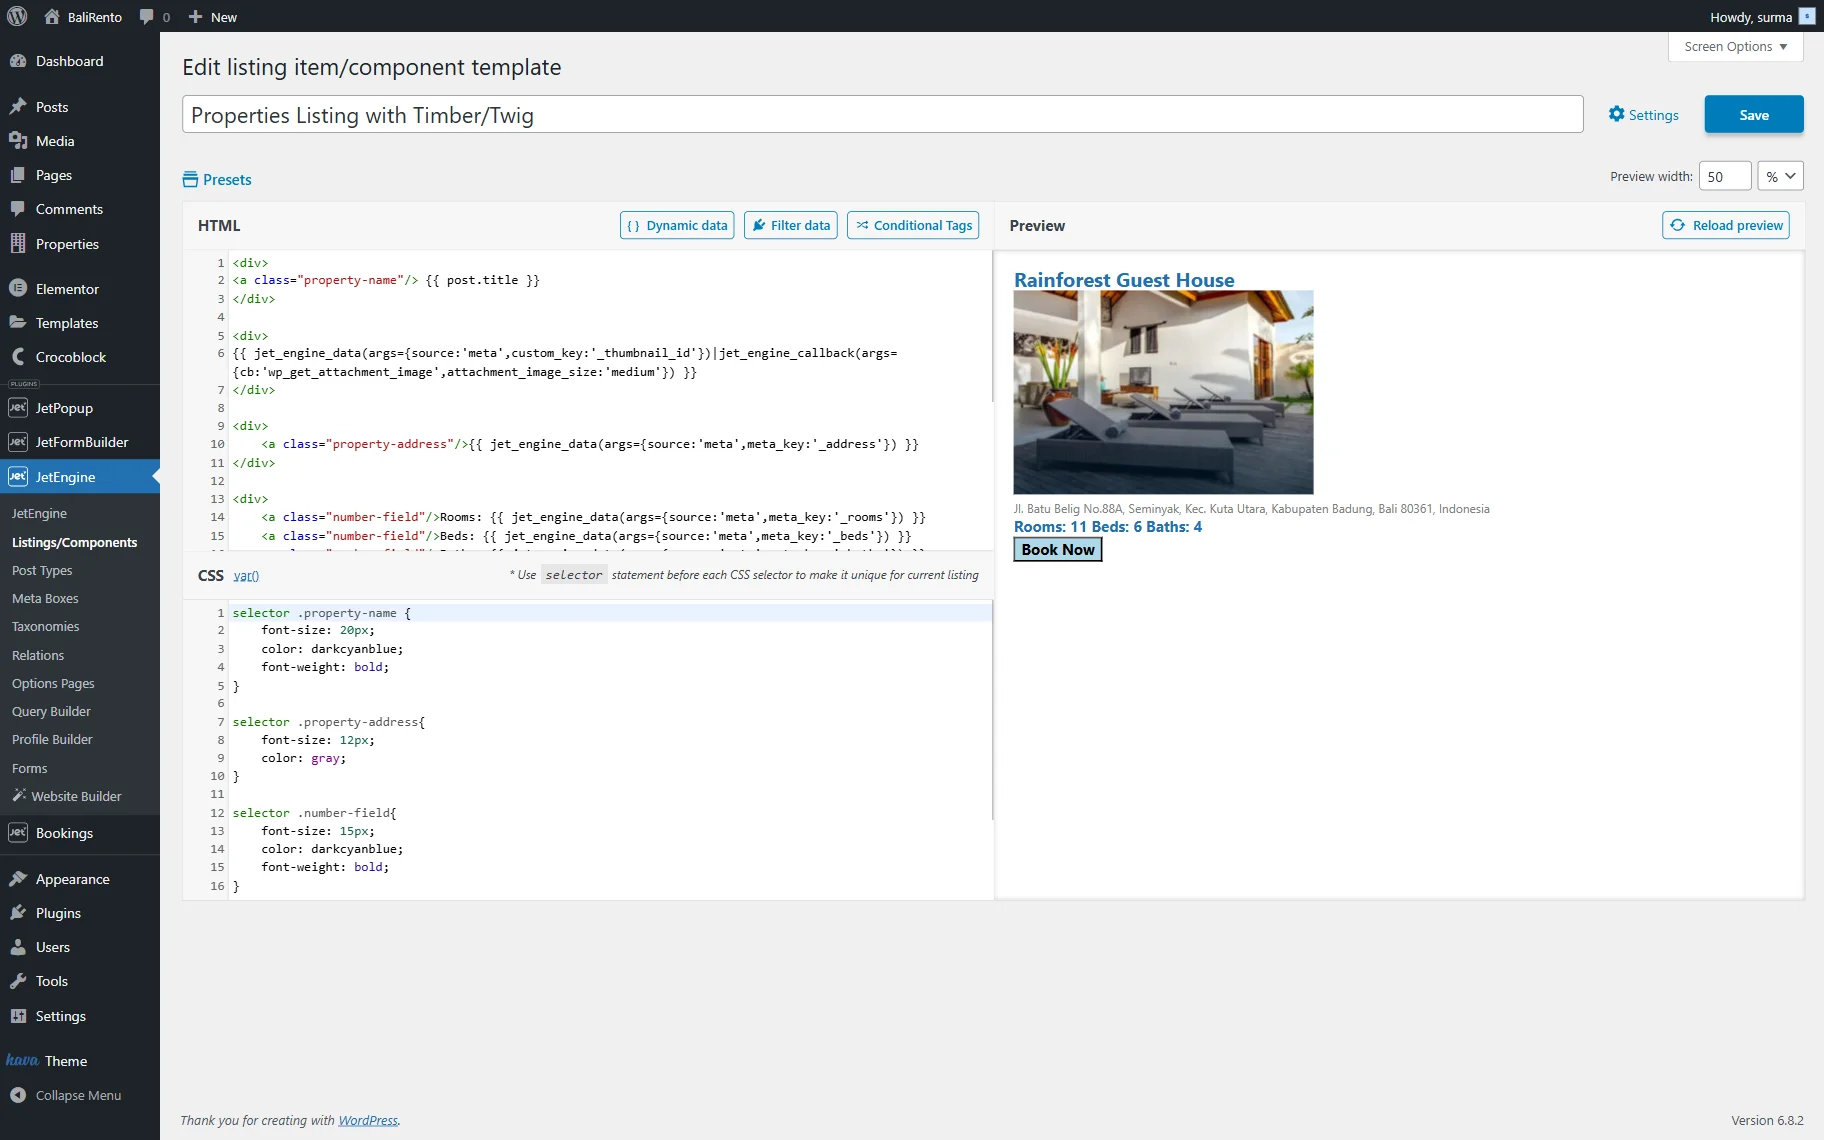
We applied the <div> element to segment placeholders, ensuring that each of them appears on a distinct line within the listing item.
To display the custom meta field value. We hit the “Dynamic data” button and chose the “Dynamic Data” option. We selected the “Meta Data” Source and picked the necessary Meta Field (“Address” Textarea meta field). Then, we hit the “Insert” button.
Additionally, we inserted the “Rooms” number meta field. We added the “Rooms:” custom text before the placeholder:
Rooms:{{ jet_engine_data(args={source:'meta',meta_key:'_rooms'}) }}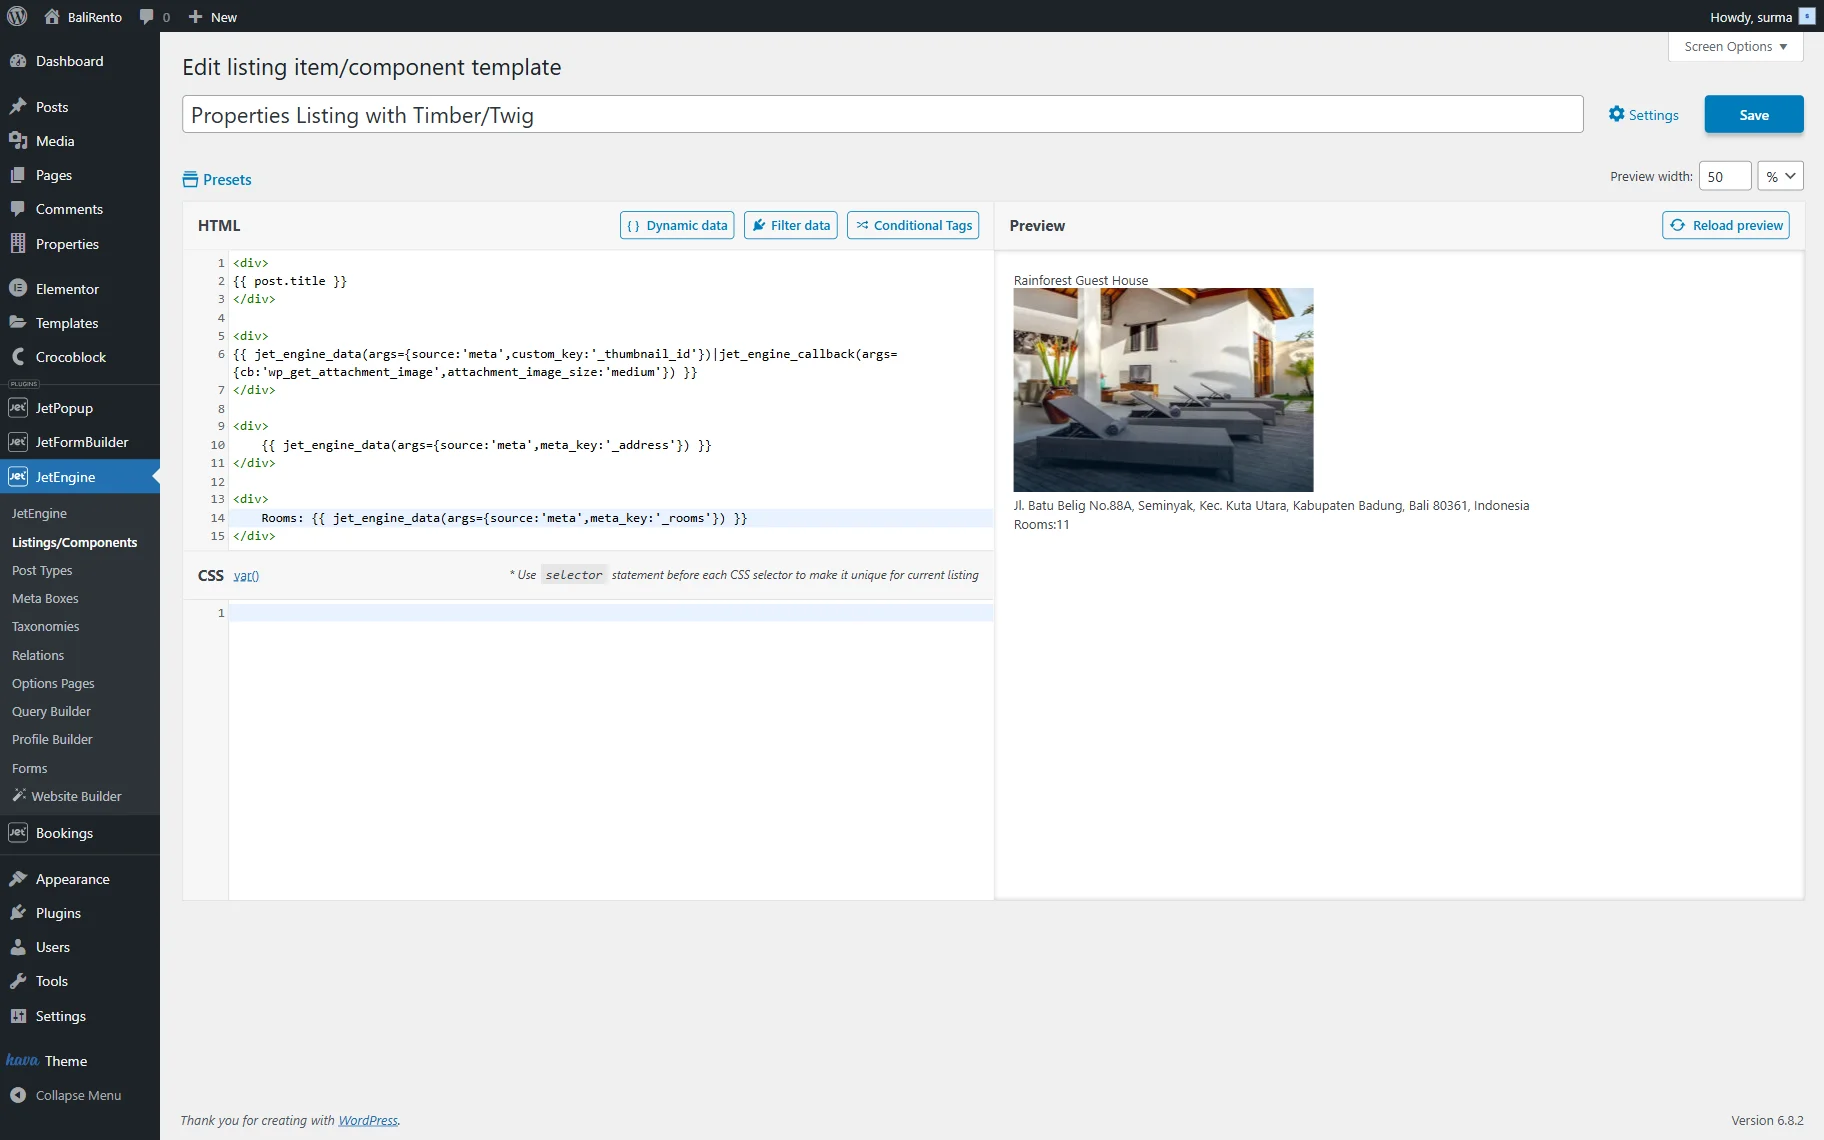
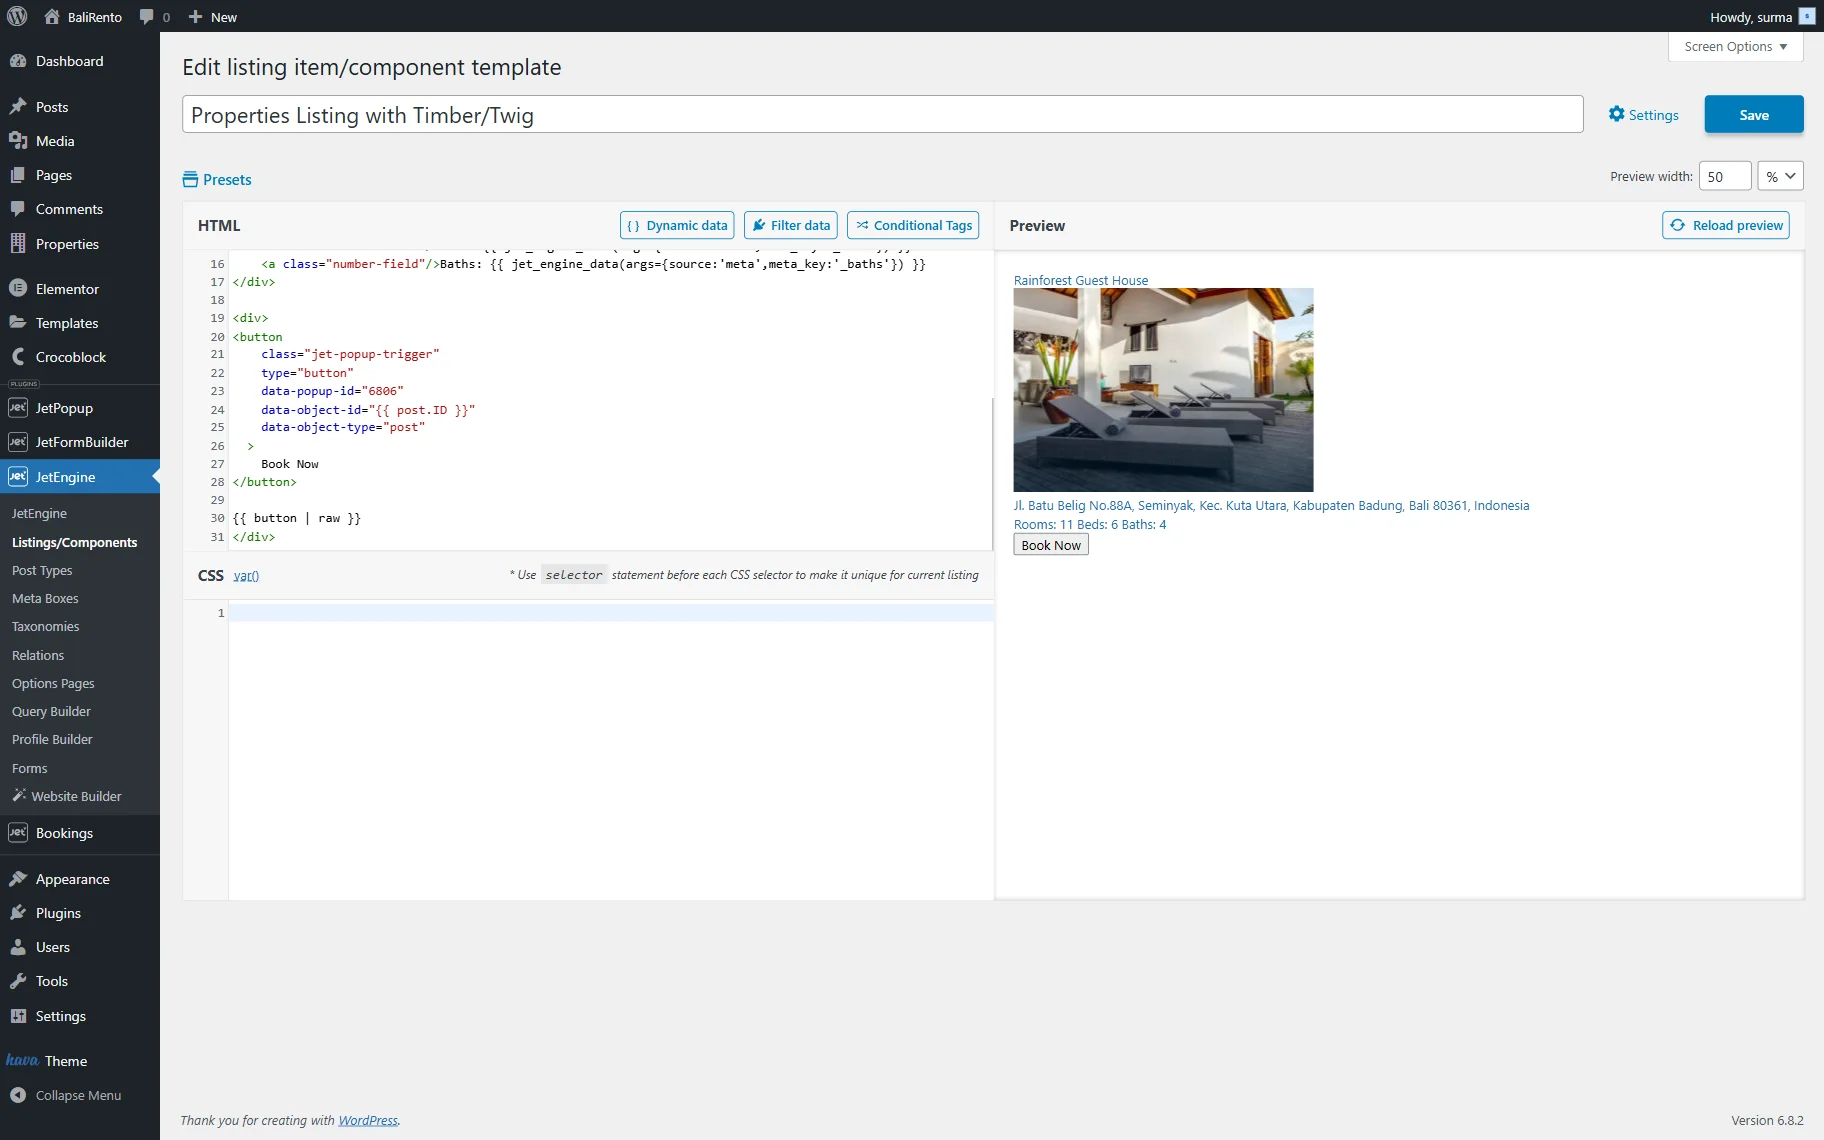
Adjusting a dynamic pop-up with the booking form
If you need to add a dynamic pop-up with the booking form, ensure that the form is set up and the pop-up is created.

Then, add the following HTML code:
<button
    class="jet-popup-trigger"
    type="button"
    data-popup-id="6806"
    data-object-id="{{ post.ID }}"
    data-object-type="post"
  >
	Book Now
</button>

{{ button | raw }}
Here, the “6806” is the ID of the pop-up, so ensure you use the ID of the correct pop-up. The “Book Now” text will be displayed on the button.
Following our How to Create a Listing Template Using Timber/Twig View guide, we set up the CSS styles.
Once you are ready, click the “Save” button.
Displaying the listing on the front end
To display the listing template in the Listing Grid, you can create a page in the Gutenberg builder, Elementor, or Bricks editor. We used the Elementor editor.
So, proceed to the page where you need to display the grid and add the Listing Grid widget/block/element. Select the listing you created earlier.
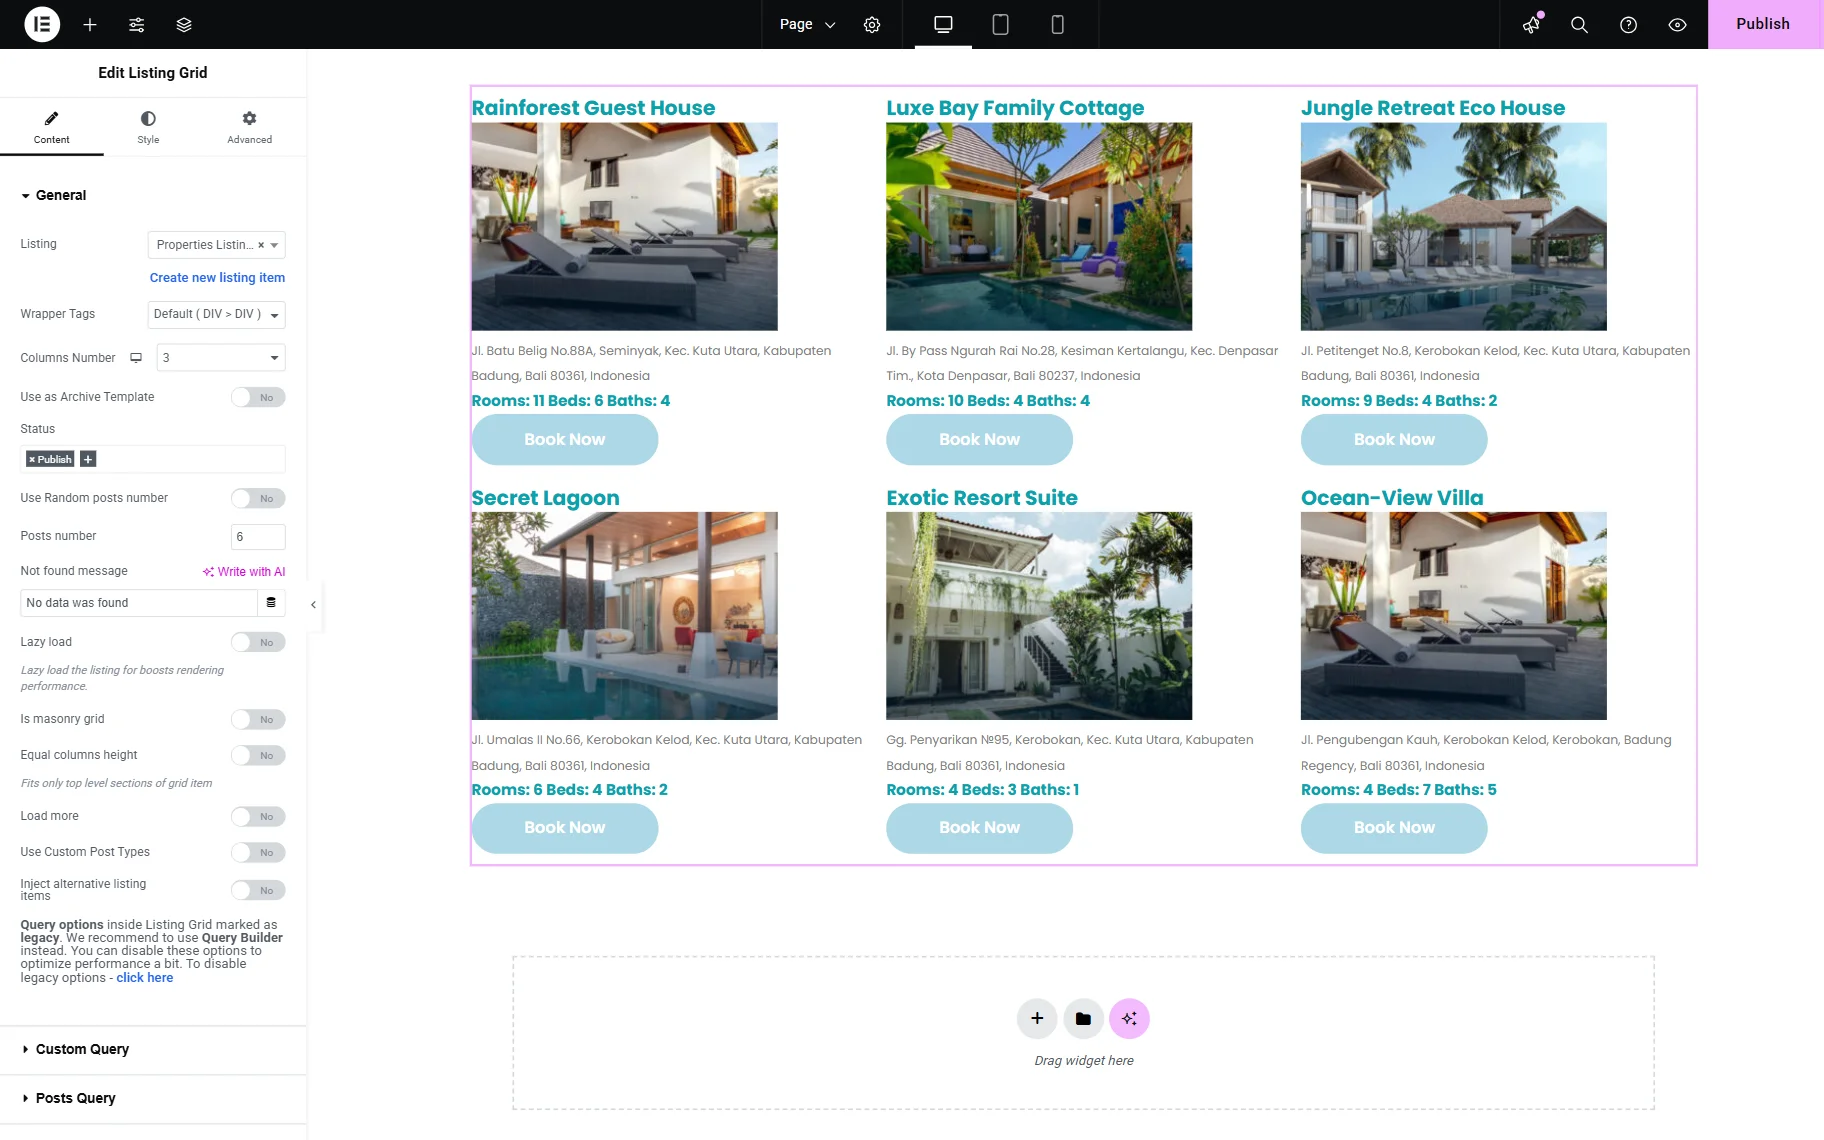
Click the “Publish” button once you are ready. Open the page on the front end.
That’s it. Now, you know how to set up the grid and display booking instances from the JetBooking WordPress plugin using different builders, including Elementor, Gutenberg, Bricks, and Timber/Twig.